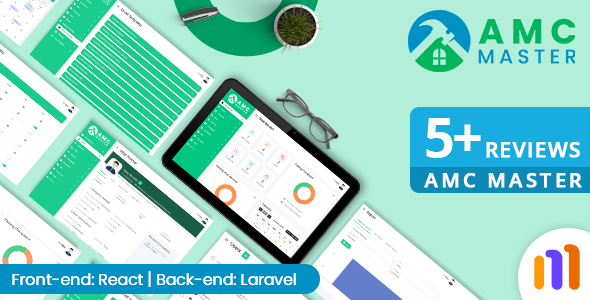
AMC Management System
Documented by Youjoomla -
AMC - Annual Maintenance Contract
Documented by Mojoomla - at November 24, 2025
A) Introduction
Annual Maintenance Contract System is ideal way to manage complete Annual Maintenance. It has different user roles like Employee, Customer and admin user.
This user guide covers all options that this react js provides. Please read the documentation carefully as it probably contains answers to most of questions that may arise. If your feel some aspect is not covered or have some questions, contact us via e-mail sales@mojoomla.com. We will do our best to answer your in shortest time.
B) Installation
1) Backend Server Requirements
Please make sure the following server environment is available:
- PHP Version: 7.3 or higher
- Laravel Version: 8.x
- Database: MySQL
- cPanel: Recommended
- Composer: Must be installed
Required PHP Extensions:
- BCMath
- Ctype
- Fileinfo
- JSON
- Mbstring
- OpenSSL
- PDO
- Tokenizer
- XML
2) Create Database
Login to your hosting panel → open the MySQL Databases section → create a new database and user → assign all privileges.
3) Upload Files via FTP
- Unzip the amc_package.zip file.
- Inside it, you will find:
- amc_api.zip → Laravel Backend
- amc_react.zip → React Frontend
- Upload the amc_api folder to your server using FTP (example: FileZilla).
- Upload the amc_react folder to your server using FTP.
4) Update Backend .env File
Inside the amc_api folder, open the .env file and update the following details.
Database Configuration (Example)
DB_CONNECTION=mysql
DB_HOST=127.0.0.1
DB_PORT=3306
DB_DATABASE=amc
DB_USERNAME=root
DB_PASSWORD=
Replace these values based on your hosting provider's database credentials.
SMTP Configuration (Example)
MAIL_MAILER=smtp
MAIL_HOST=sandbox.smtp.mailtrap.io
MAIL_PORT=2525
MAIL_USERNAME=
MAIL_PASSWORD=
MAIL_ENCRYPTION=null
MAIL_FROM_ADDRESS=no-reply@yaraa.com
MAIL_FROM_NAME="${APP_NAME}"
Enter your actual SMTP username and password (Mailtrap or any mail provider).
After updating .env, run the following commands:
composer install
php artisan key:generate
php artisan migrate
Commands can be executed via SSH or Hosting Panel Terminal.
II) Frontend Setup
5) Update Frontend Environment Configuration
If using Build Package:
Go to env.js and update:
REACT_APP_BASE_URL = "https://yourdomain.com/amc_api/public/api"
If using Source Package:
Node version: 16.x required
Install dependencies:
npm install
Then open .env and update:
REACT_APP_BASE_URL = "https://yourdomain.com/amc_api/public/api"
6) Run the Application
Once everything is configured, access your React application at:
https://your-domain.com
The AMC frontend will now load and communicate with your Laravel API backend.
(*). Local Installation Setup
1).Using Xampp - Annual Maintenance Contract setup
Please follow these steps to install garage master in your local system using Xampp
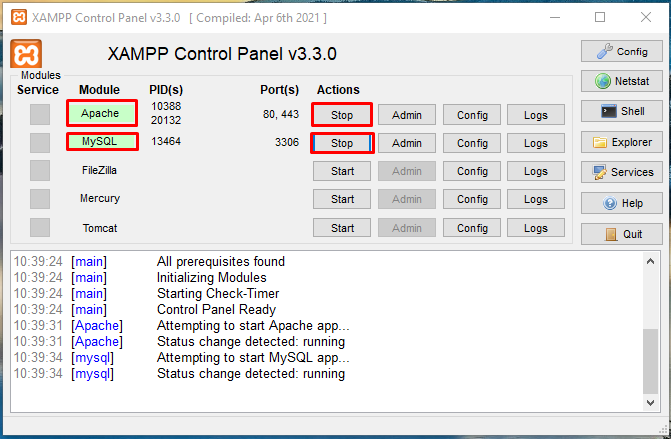
- Step1 : Start xampp server. if not exists xampp please install xampp.
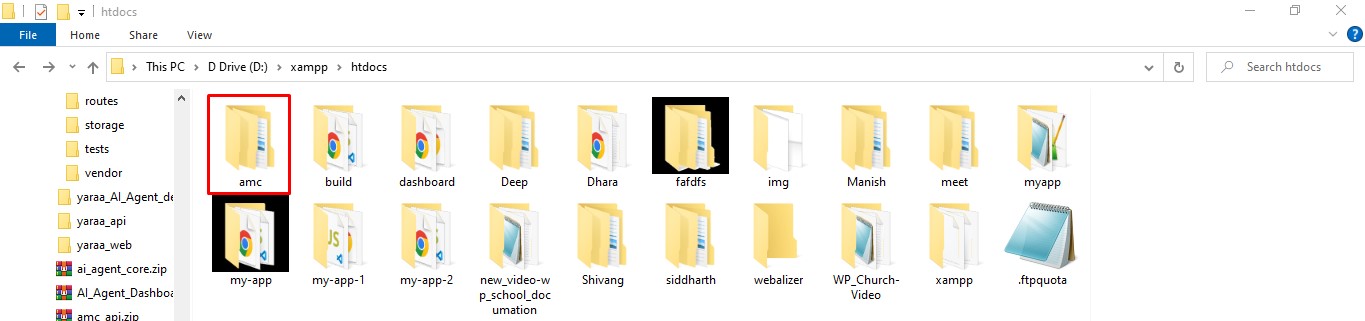
- Step2 : Add amc folder(extracted "amc.zip") in your xampp htdocs folder(Example. E:\xampp\htdocs\amc)
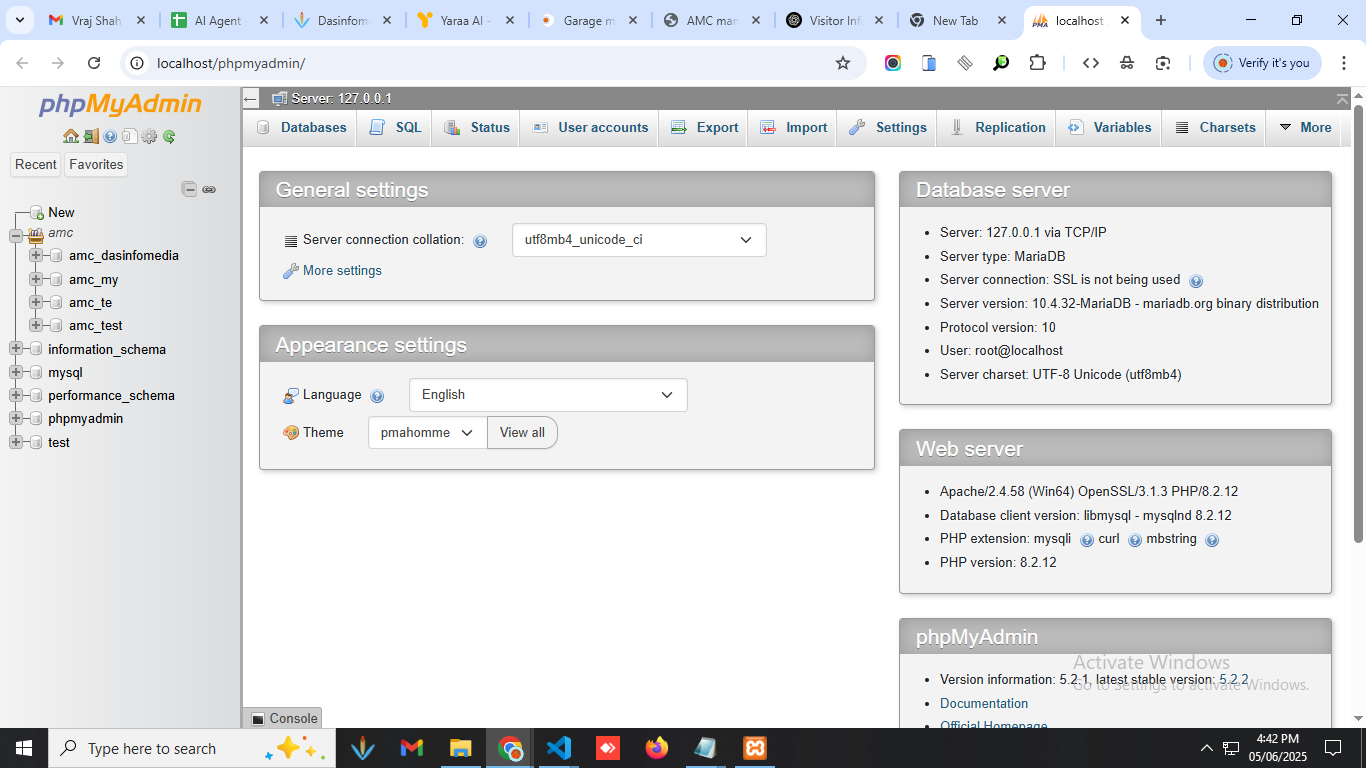
- Step3 : Open your browser and type http://localhost/phpmyadmin To Open Phpmyadmin Then Create New Database
- Step4 : Open your browser and type http://localhost/amc/build. you will seeing Installation wizard
- Step5 : In local you can add database details in installation wizard(Database user:root , Pass : "",(password is empty), Database Host:localhost)
Step 1:
Step 2:
Step 3:
Step 4:
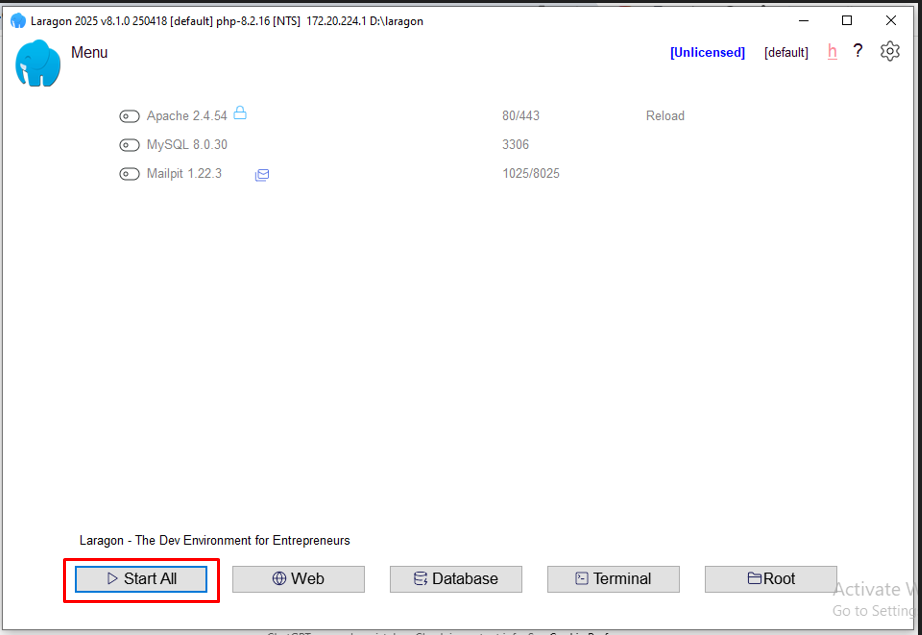
2).Using Laragon - Annual Maintenance Contract setup
- Download Laragon from Click here
- Please refere this laragon documentation for installation : click here
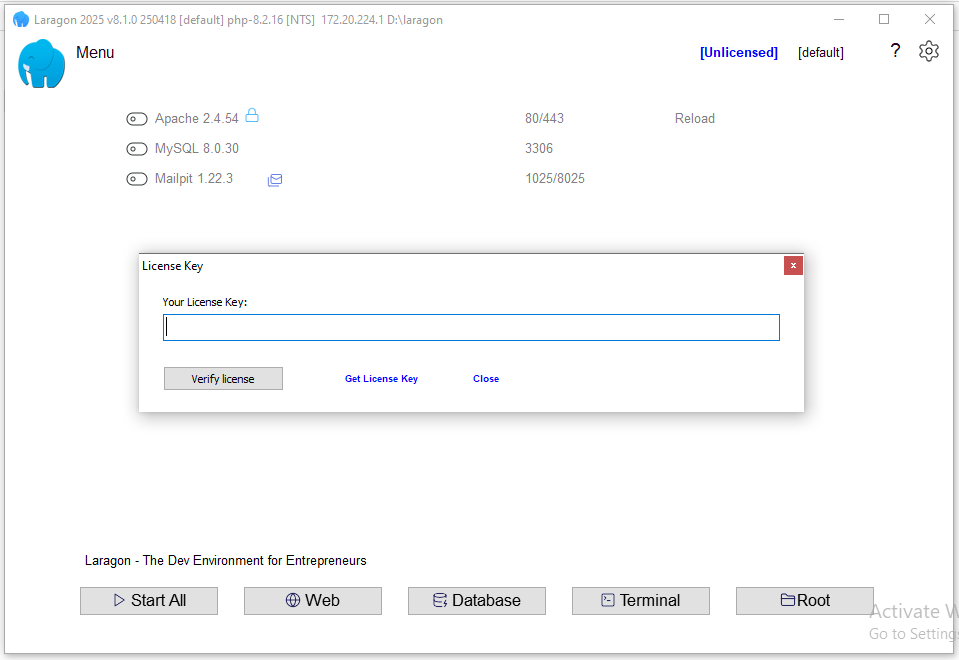
- After Complete The Installation Step Open Your Laragon App
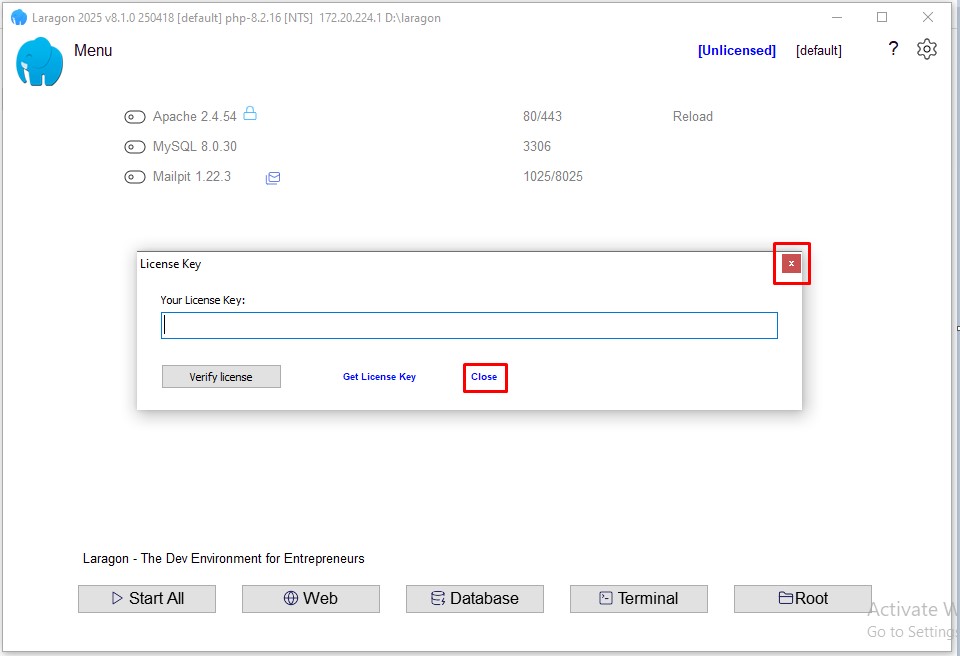
- After Opening Laragon App You Can See License Key Pop-up Box.Kindly Click on Close or Cancel Button
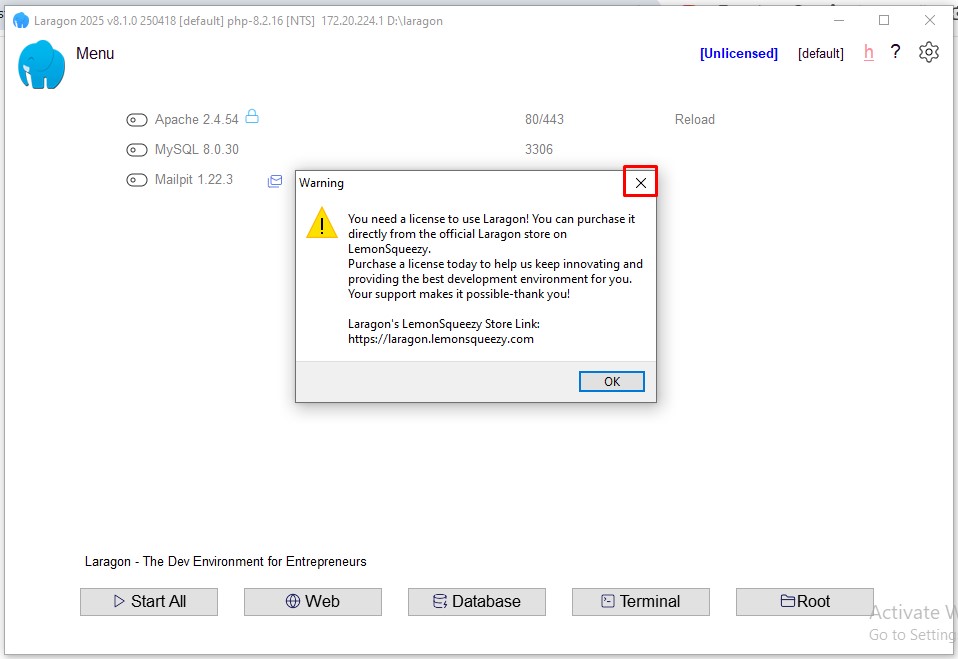
- After Clicking on Cancel or Close Button if you See a Below Types Of Pop-up Box, Click on Close Button
- Click on Start All Button
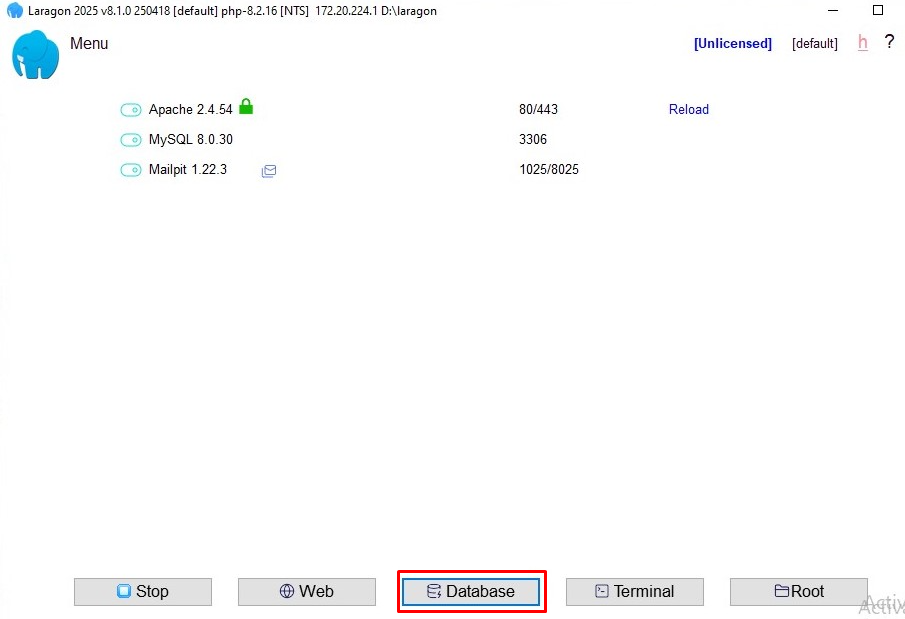
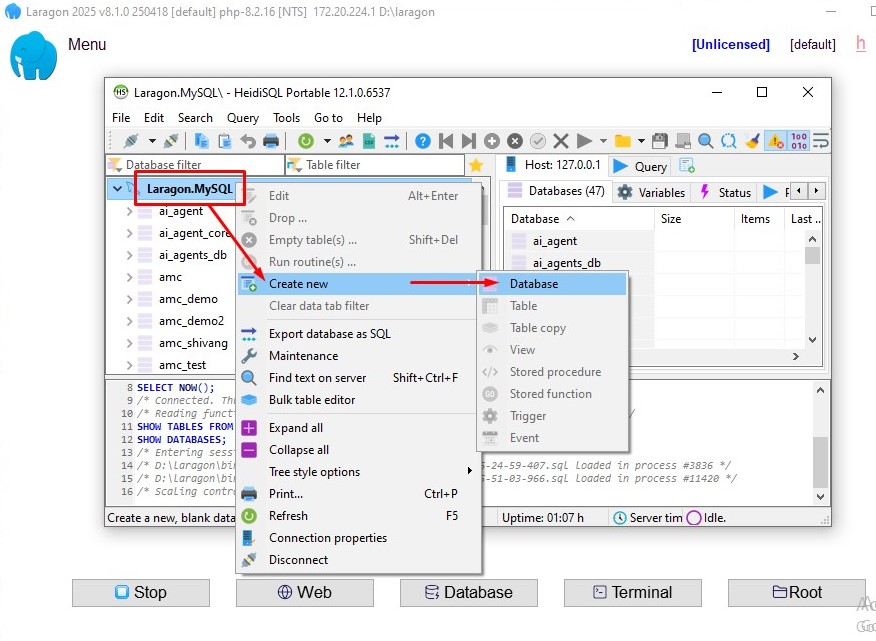
- Create New Database By Clicking on Database Button
- give name of your database by Rightclick on LaragonMysql->createNew->database
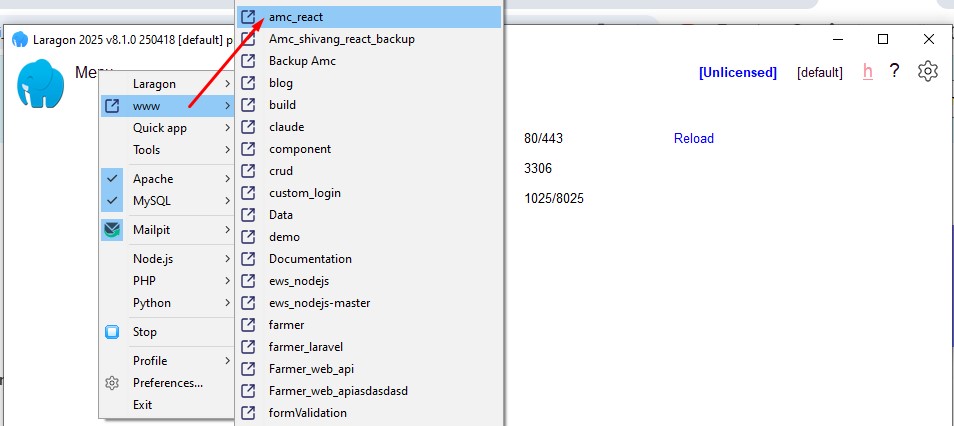
- Now Open Your Laravel App Click on Menu->www->amc_react
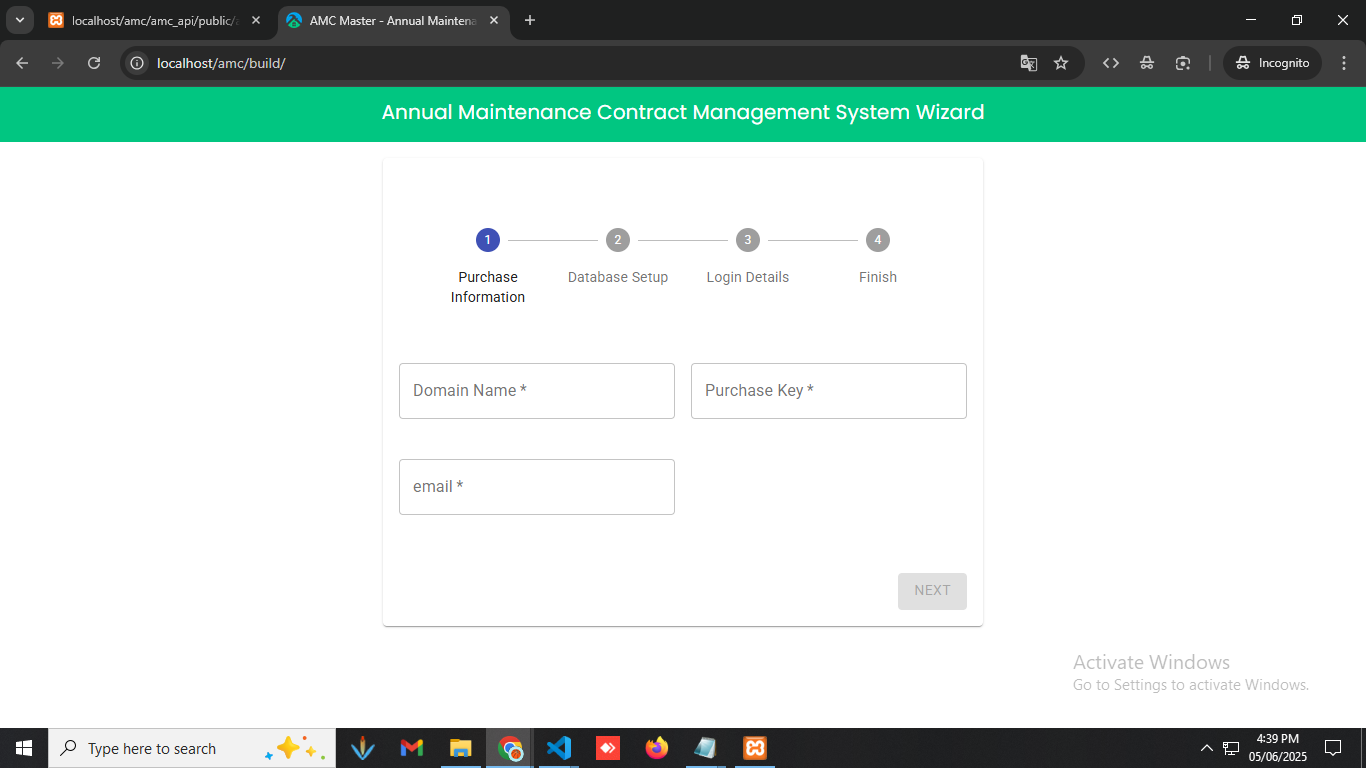
C)Installation Setup Wizard
1).Purchase Information
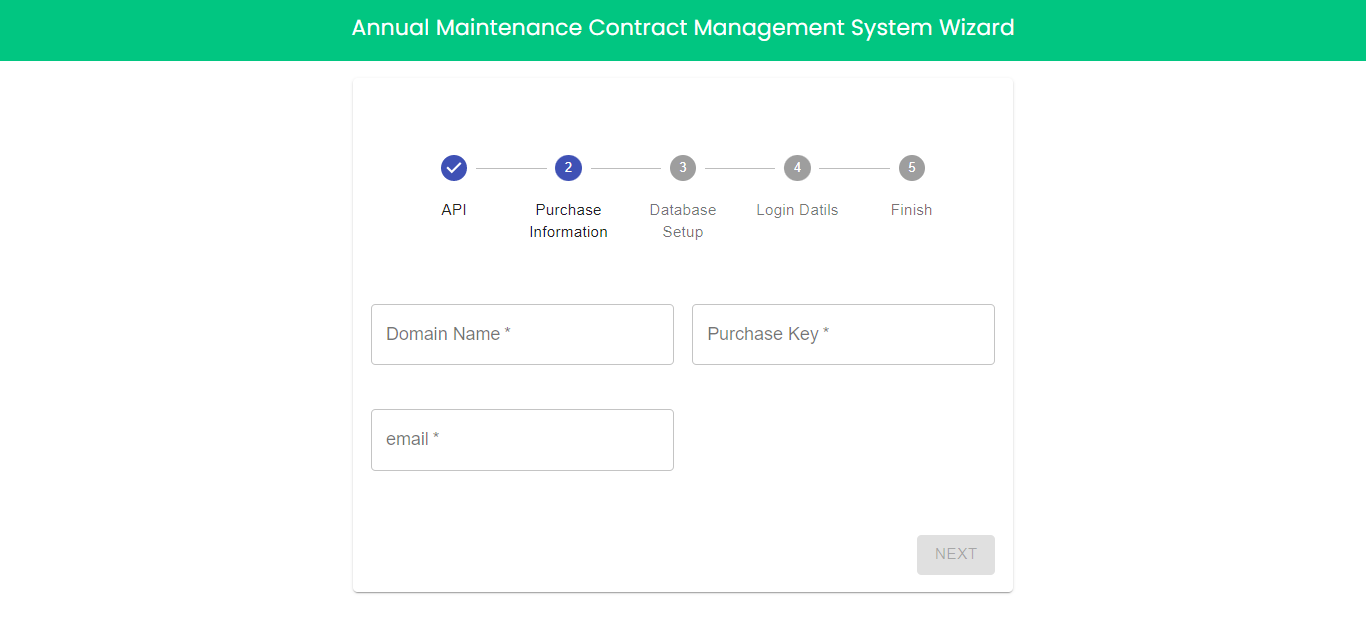
- Domain Name : Enter your domain name.
- Purchase Key : Enter your purchase key.
- Email: Enter your email address
2).Database Setup
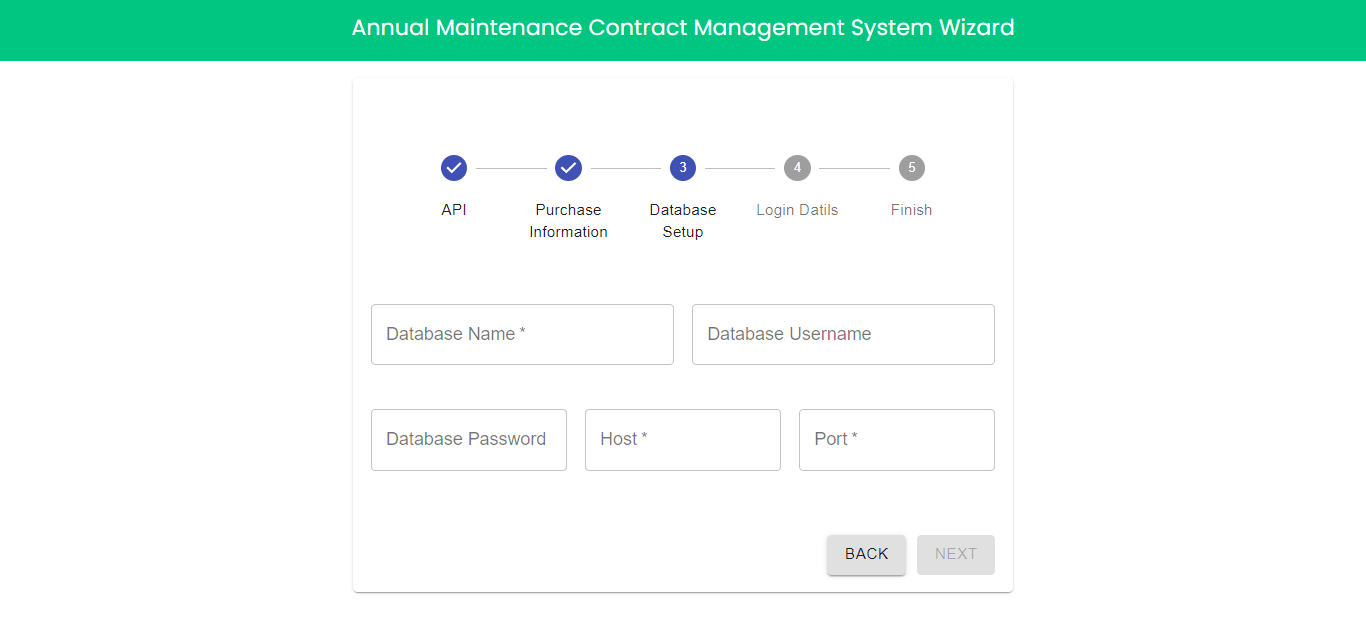
- Database Name : Enter database name.
- Database Usename : Enter database user name.
- Database Password : Enter database password.
- Host : Enter host.
- Port : Enter port.
3).Login Details
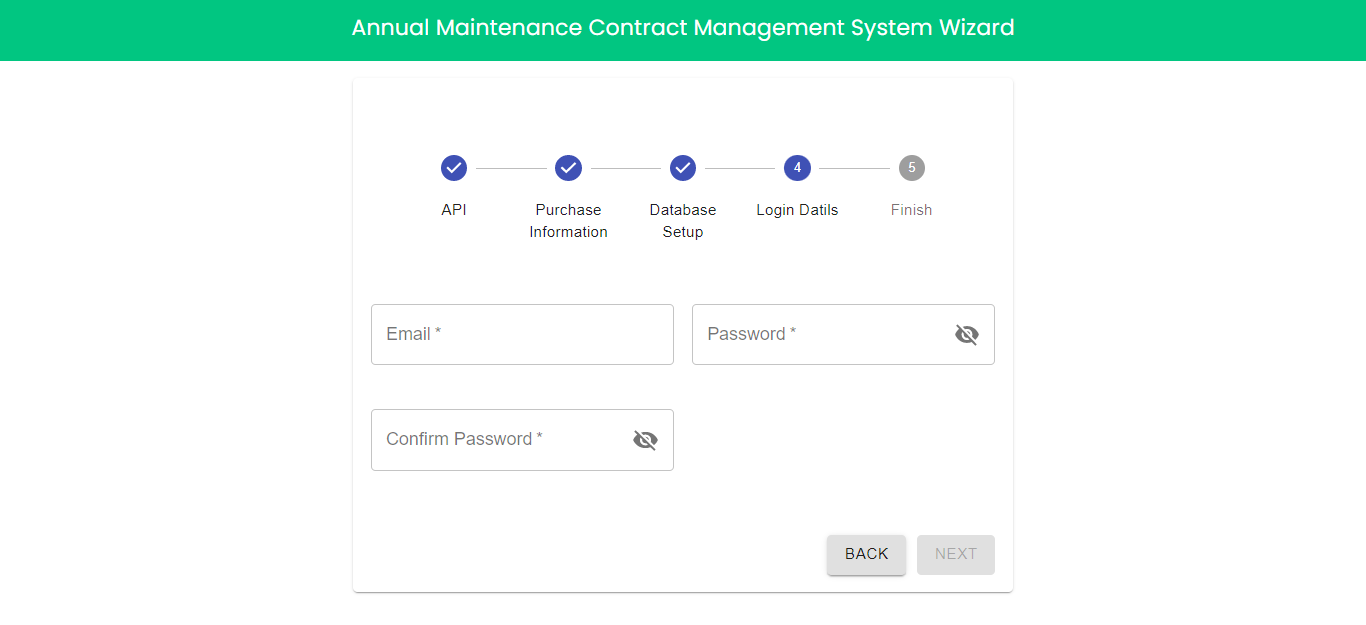
- Email : Enter email address.
- Password : Enter passsword.
- Confirm Password : Enter confirm password.
4).Finish
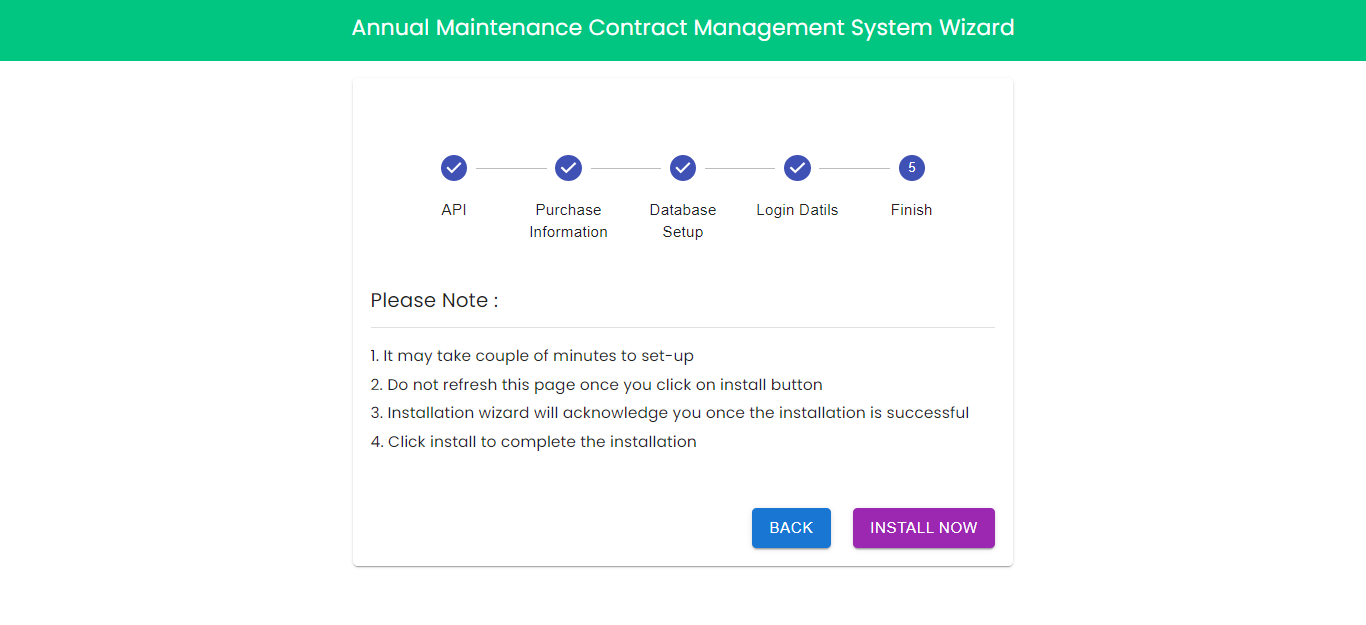
- Read the notes and click on install now.

Once System installed successfully.You can login into the system with entered email and password.
You can reset your password by going to profile page.Click on top right corner menu and click on profile.
D) Frontend Login Page
You can now login with admin email and password.
Login Page
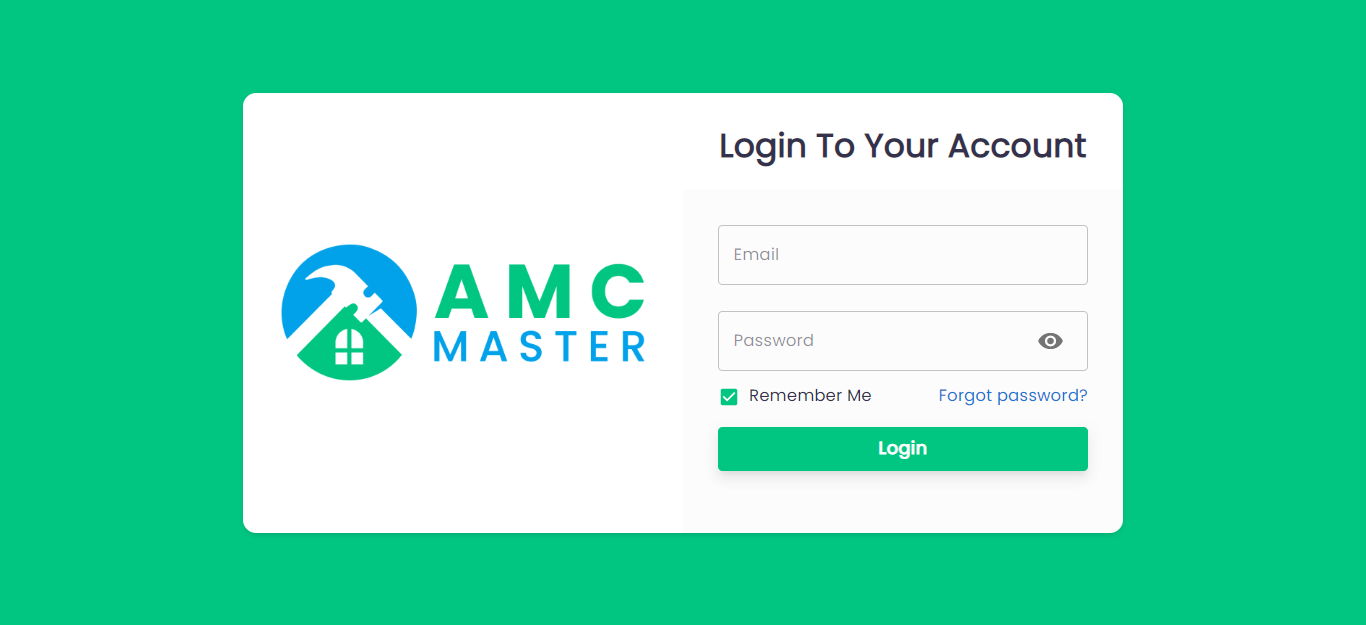
Now all user can login from this login page.
D) Admin View:
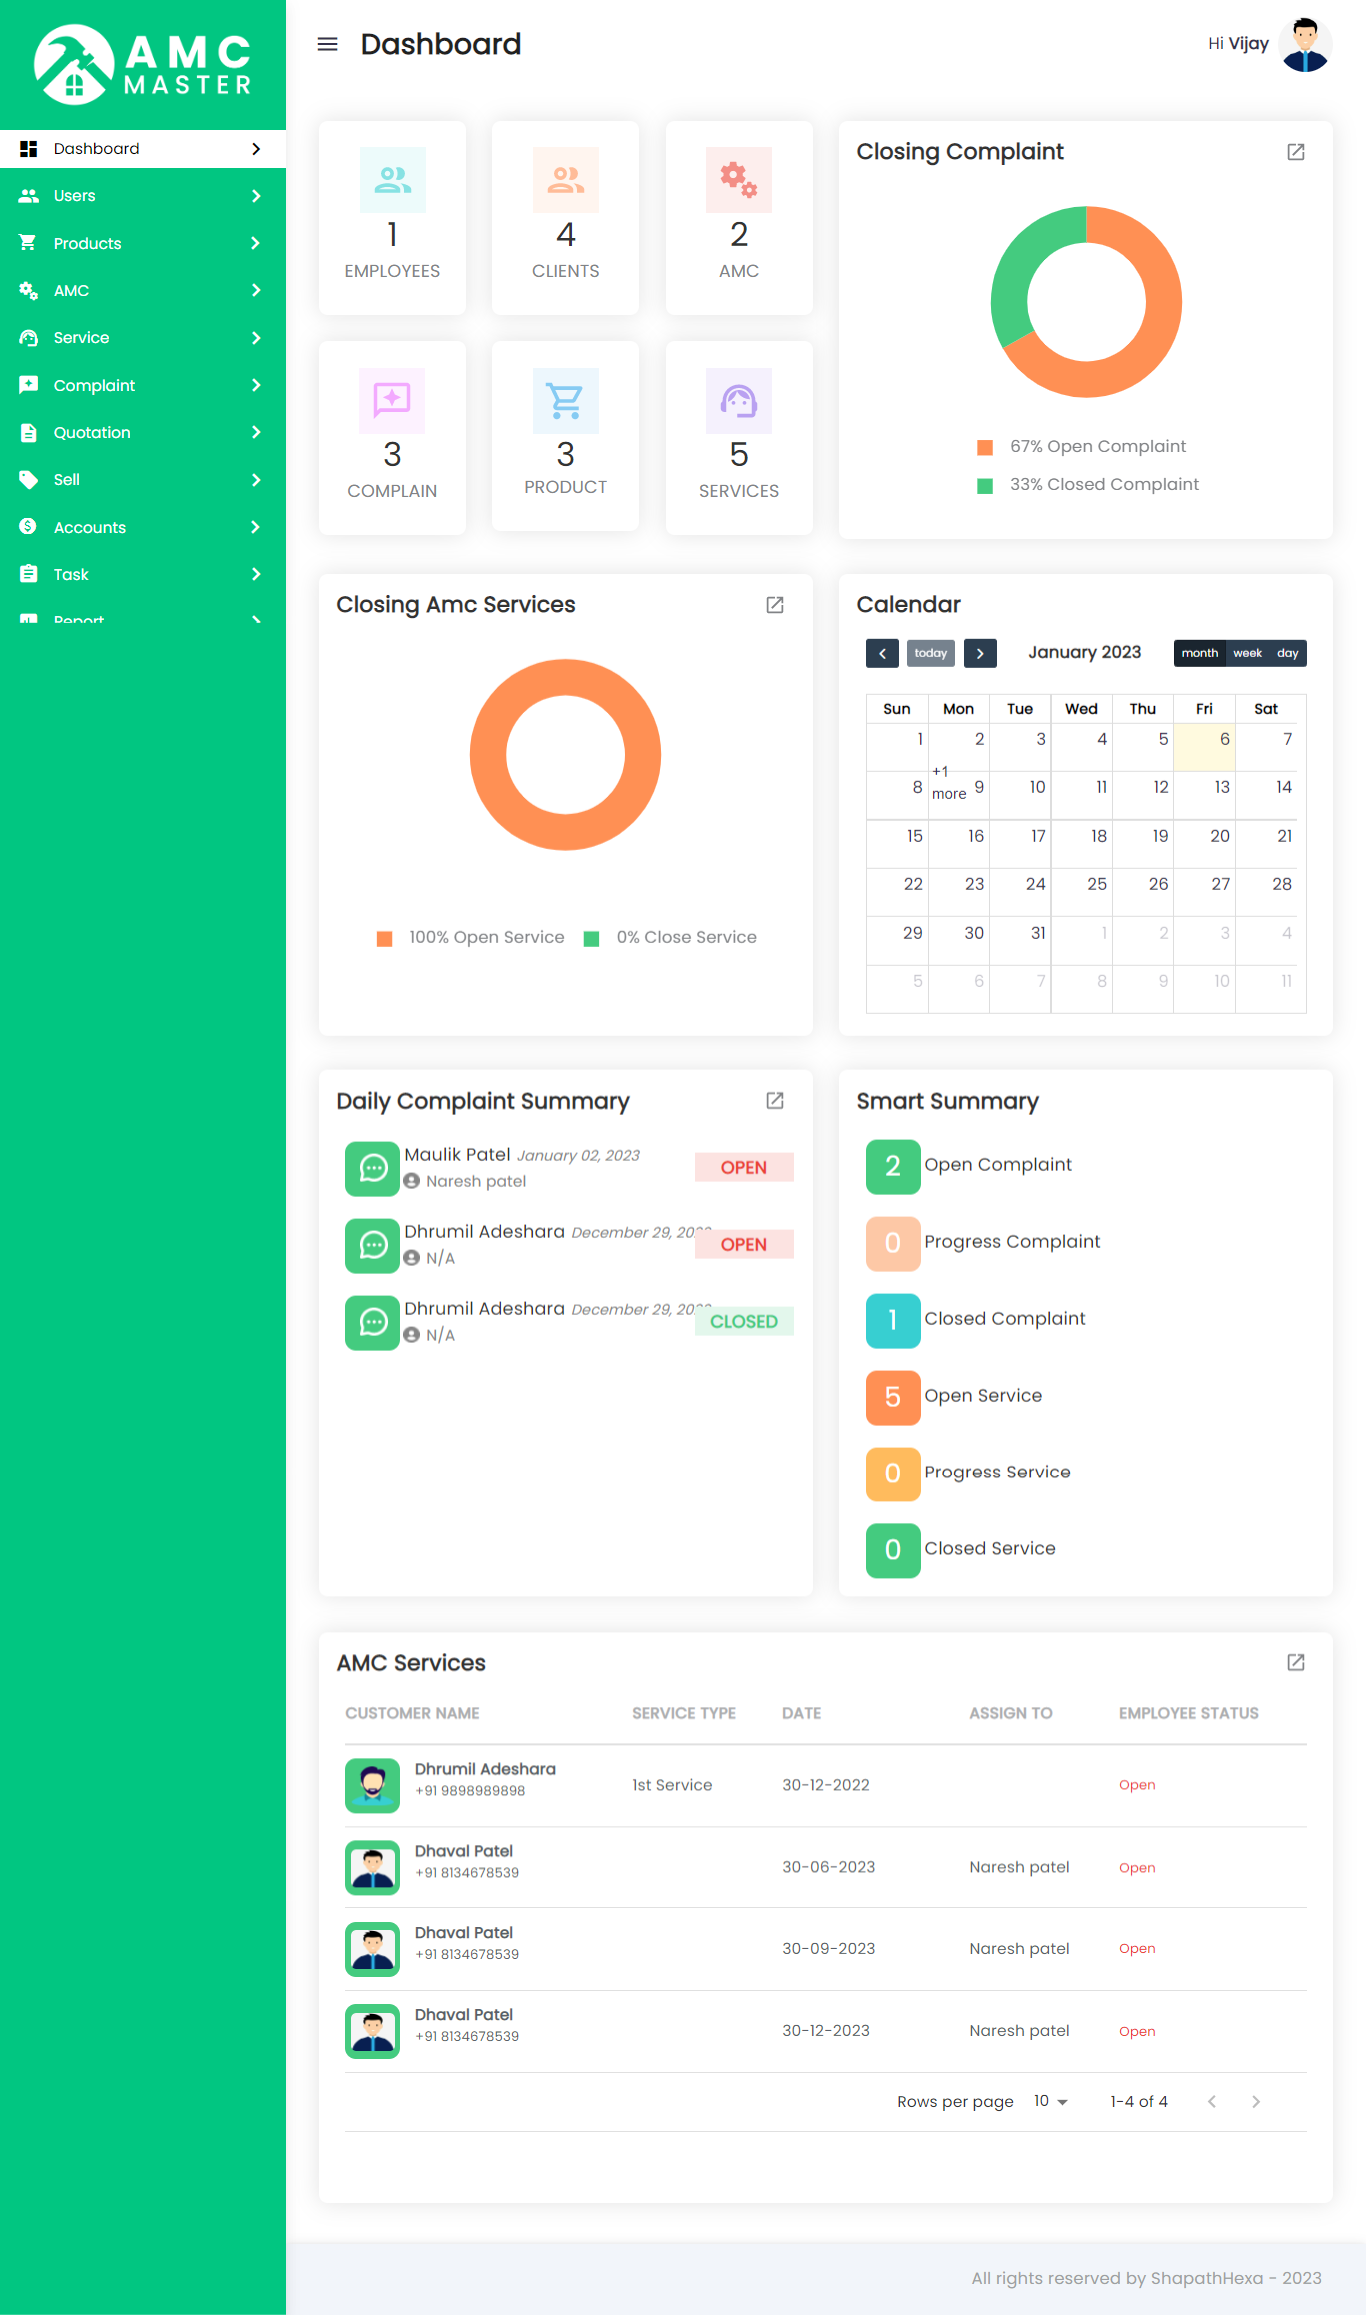
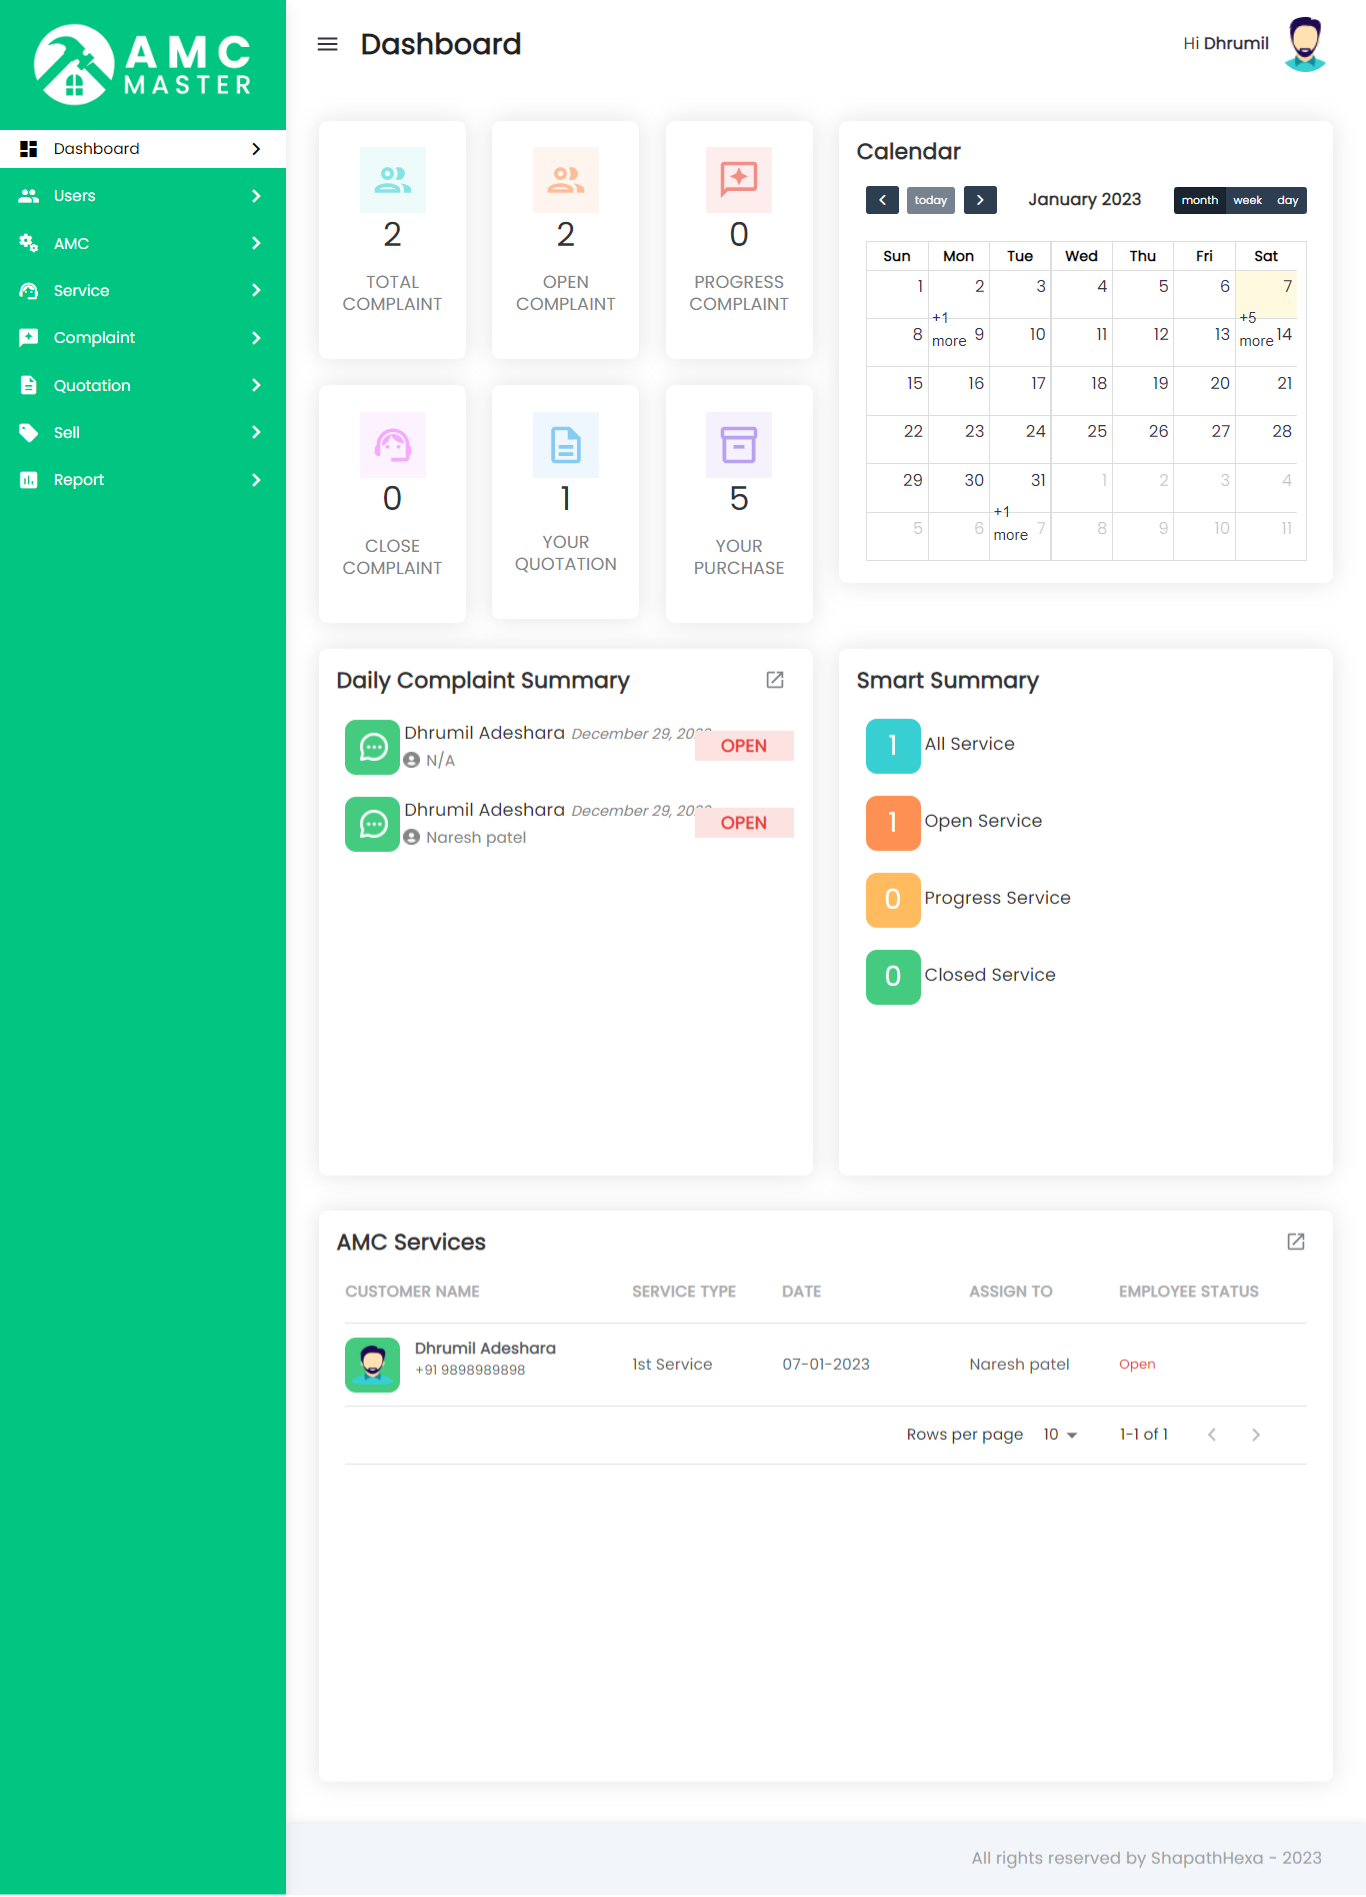
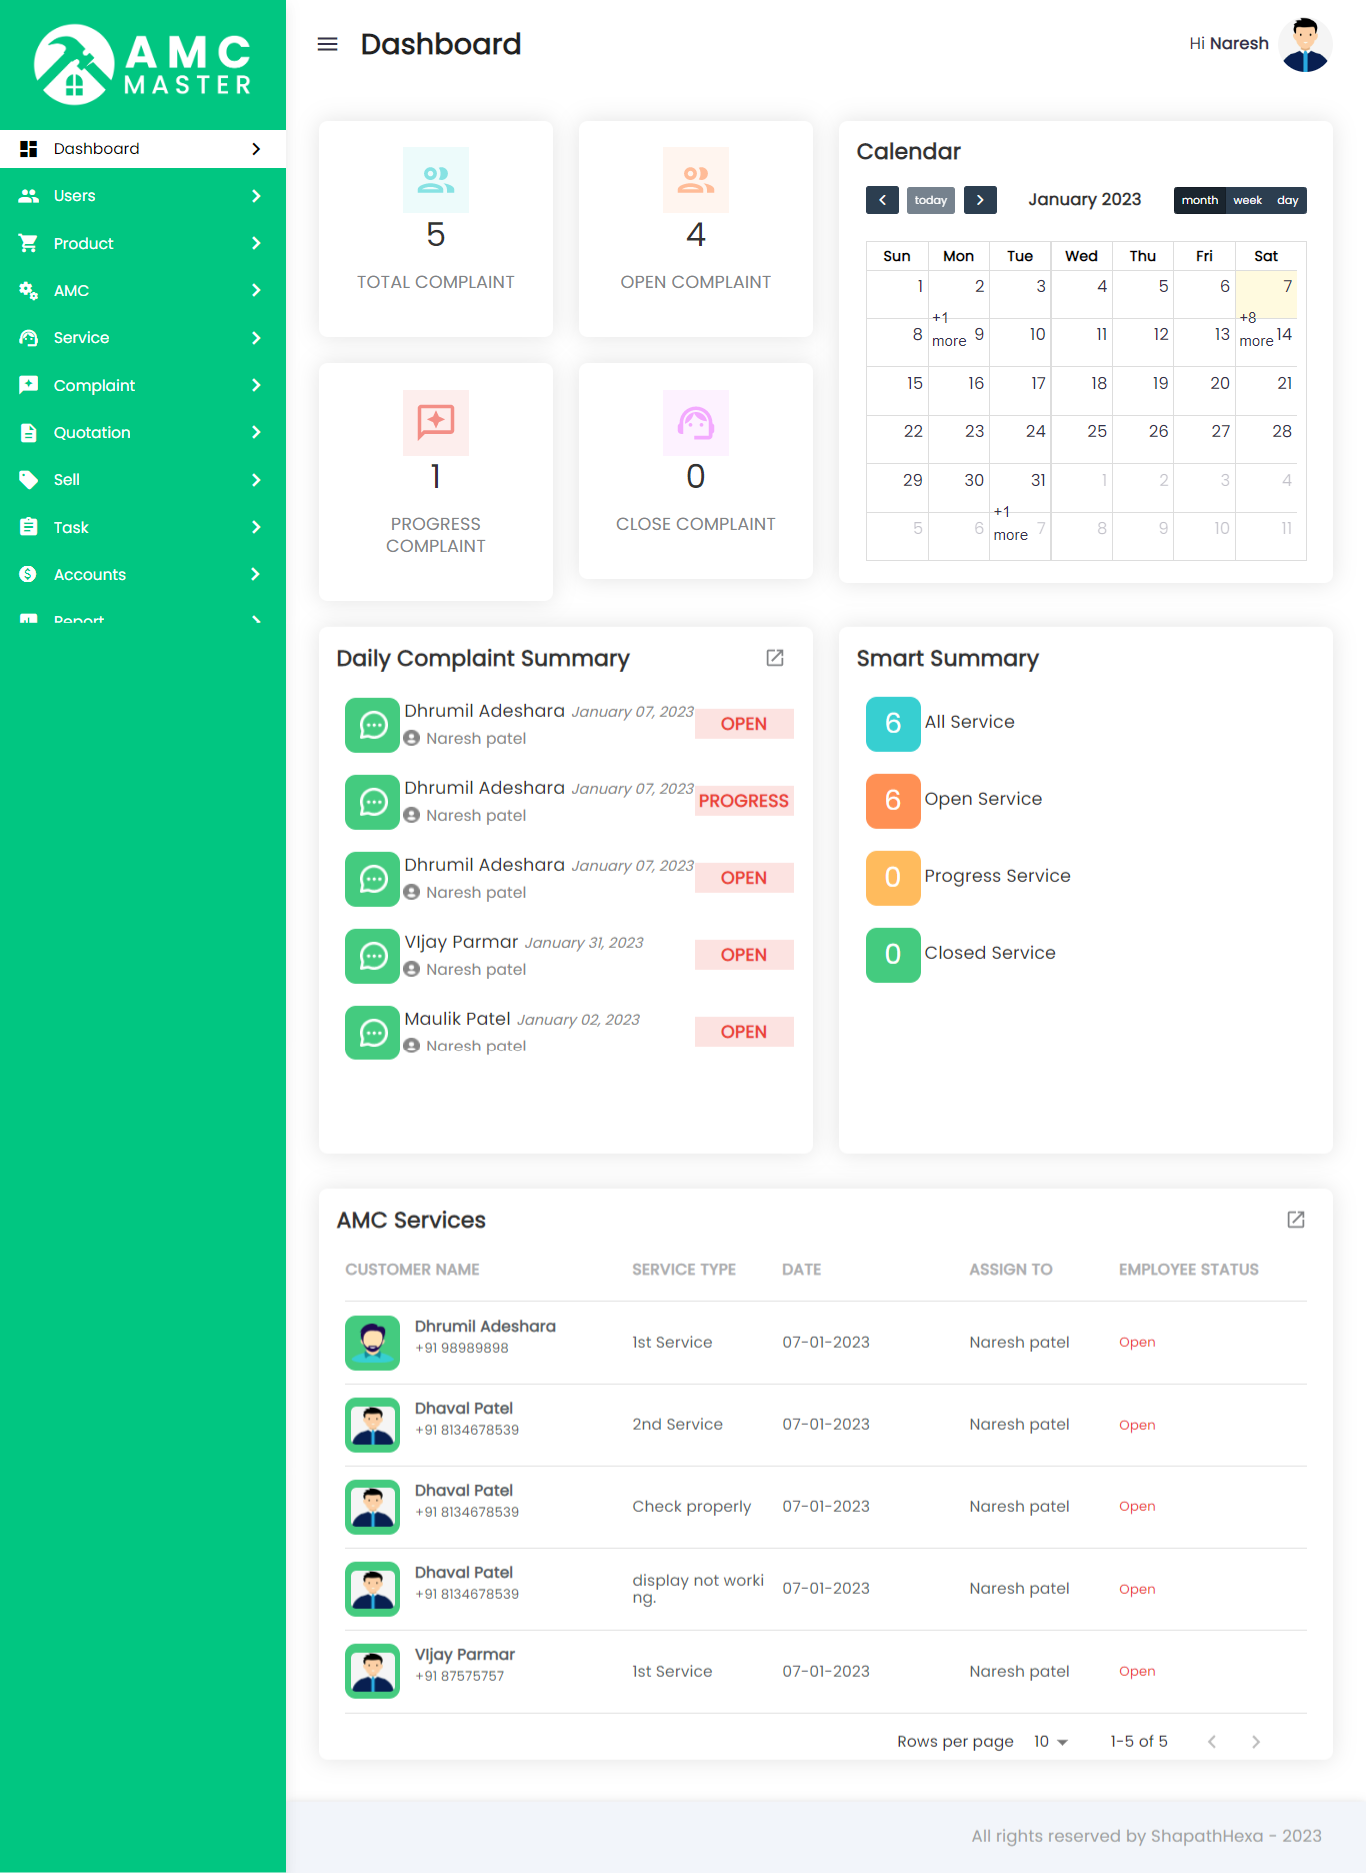
1) Dashboard:
Admin side dashboard view.
2) Settings
A) General Settings
Click on Setting inside Click on General Setting to start setting up the system . You are advised to fill all fields of General settings as these details are used in different section of whole system .You can change these settings as per your requirement.
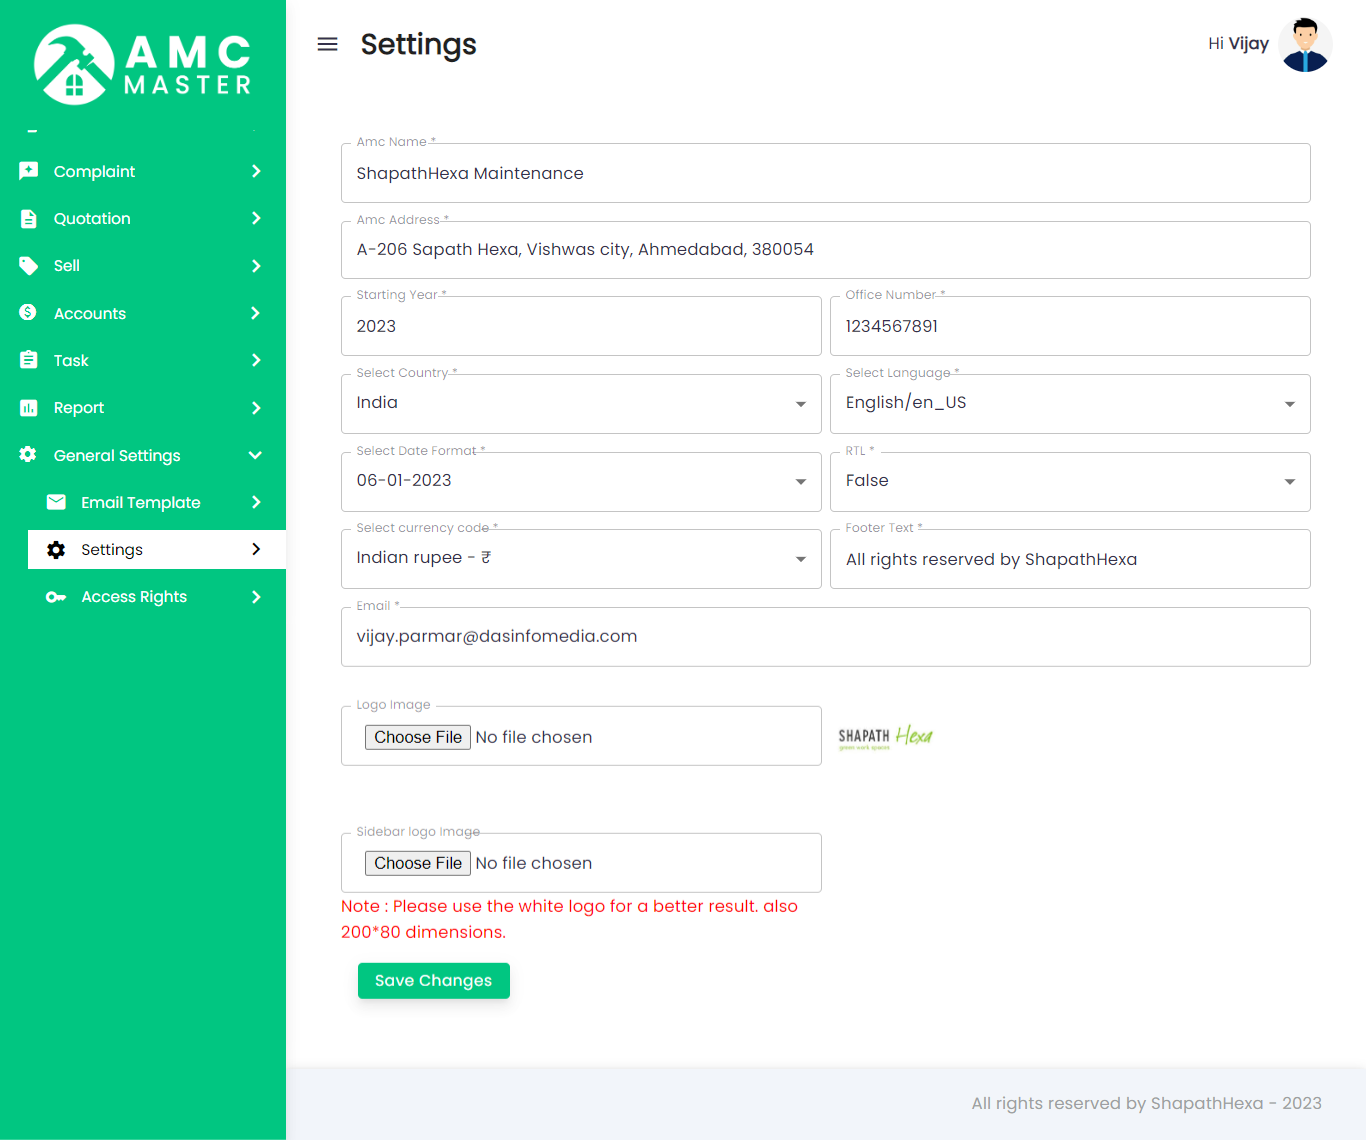
- AMC Name : Enter name of AMC.
- Upload Icon : Upload AMC Icon
- AMC Address : Enter address of the AMC.
- Starting Year : Enter starting year of the AMC.
- E-mail : Enter official e-mail address of the AMC.
- Logo Image : Upload Logo Image.
- Select Country : Select Country.
- Select Language : Select Language of the AMC.
- Send E-mail Notification : select checkbox if you want to send email.
- Date Format : Select Date Formate.
System Settings
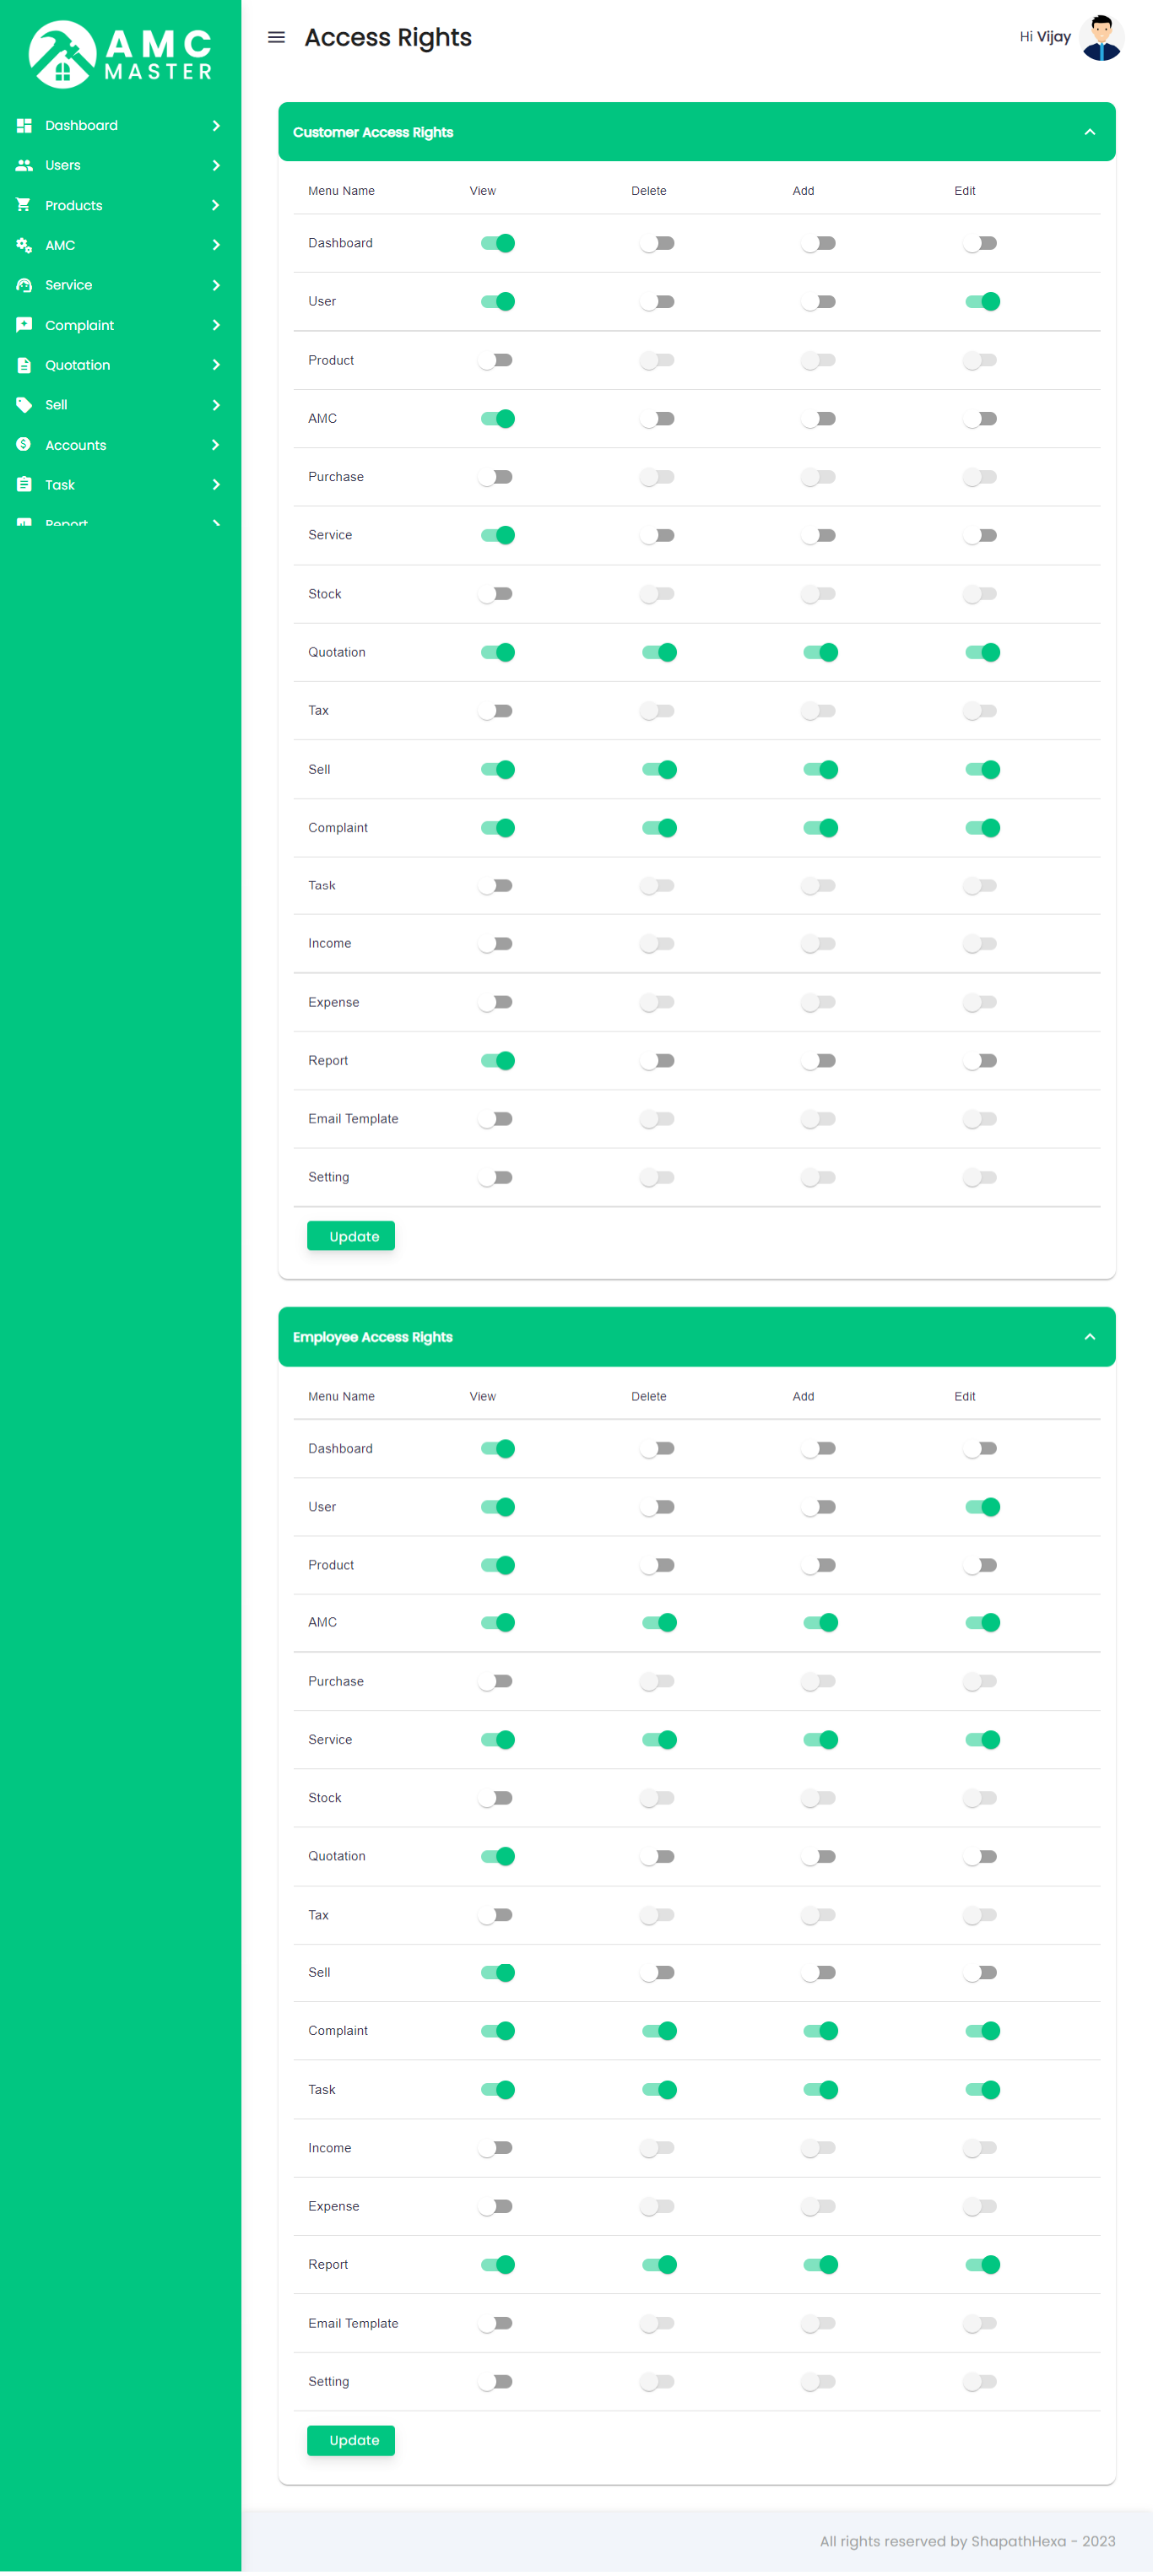
B) Access Right Settings
Click on General Setting inside Click on Access Right to start setting up the system . Access rights is used to give access of functionality to Employee and Client, Based on selected option access will be given to Employee and Client.
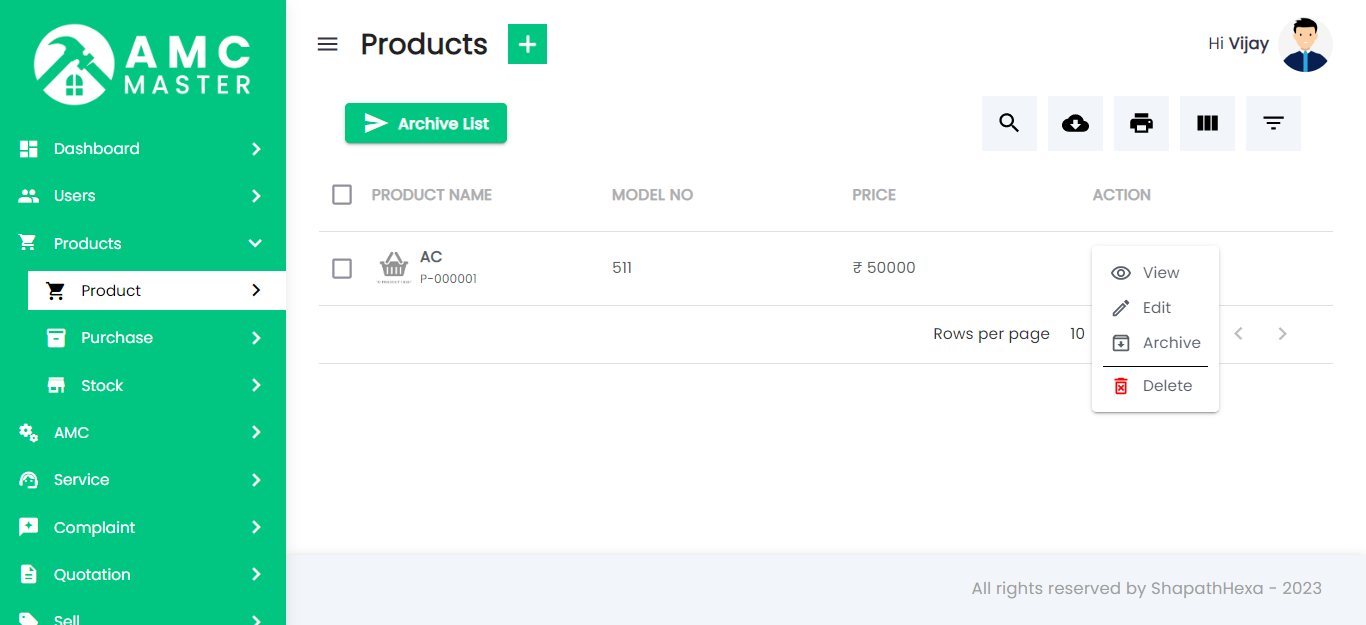
3) Products
I) Product:
Product List: Admin can add new Product type and manage all types of Product as well as view complete list of all ProductType.
Add Product Type: Admin can add product details
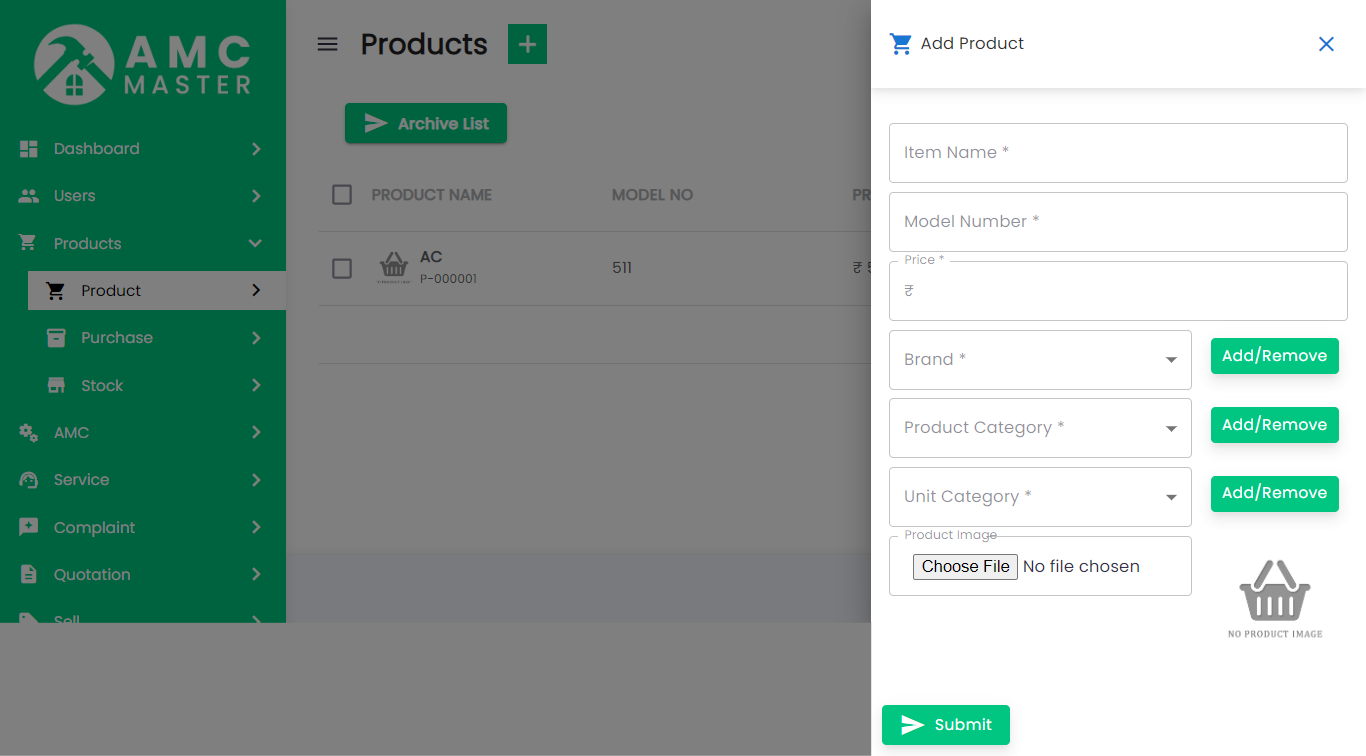
- Item Code: Item Code Auto Generated.
- Item Name: Enter new Item name.
- Model Number: Enter new Model Number.
- Brand: Select Brand from the list.
- Add Or Remove: If desired Brand is not available in list then click on Add Or Remove button. You can add new Brand from here.
- Product Category: Select Product category from the list.
- Add Or Remove: If desired Product category is not available in list then click on Add Or Remove button. You can add new category from here.
- Price: Enter Price.
- Unit: Select Unit from the list.
- Add Or Remove: If desired Unit is not available in list then click on Add Or Remove button. You can add new Unit from here.
- Product Image: Upload image for this Product.
- Product Specification: Enter Product Specification for this Product.


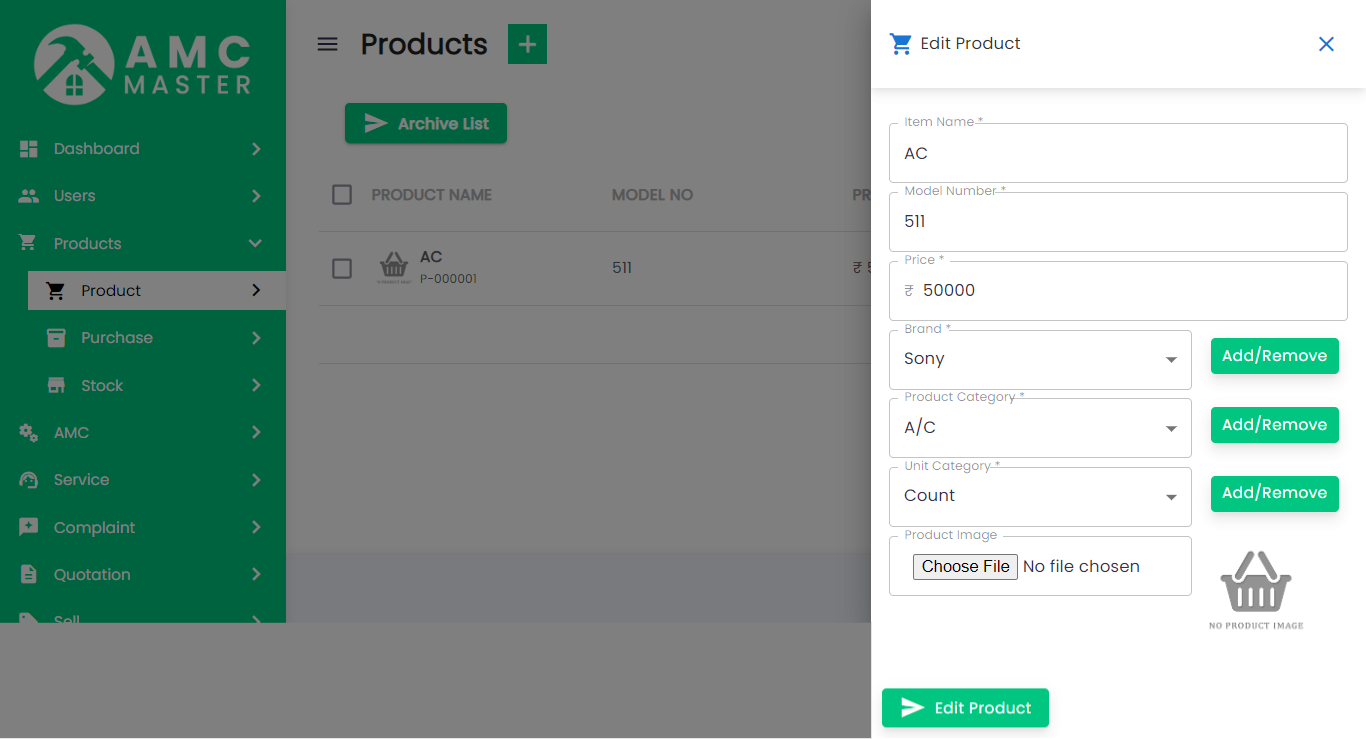
Edit Product: Admin can Edit detail of particular Product by clicking on Edit detail button. This will open up details. From here admin can Change Product Details.
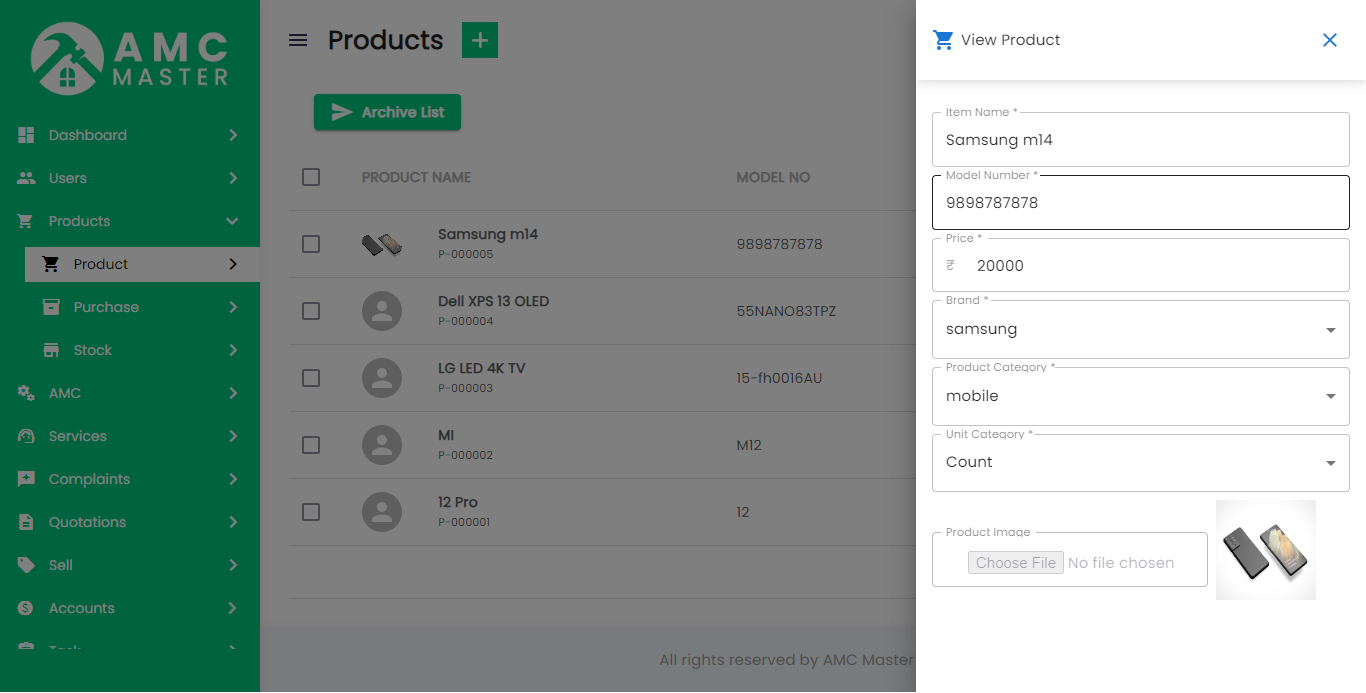
View Product: Admin can View detail of particular Product by clicking on View detail button. This will open up details. From here admin can View Product Details.
Archive Product: Admin can Archive detail of particular Product by clicking on Archive detail button. This will Move details in Archive List.

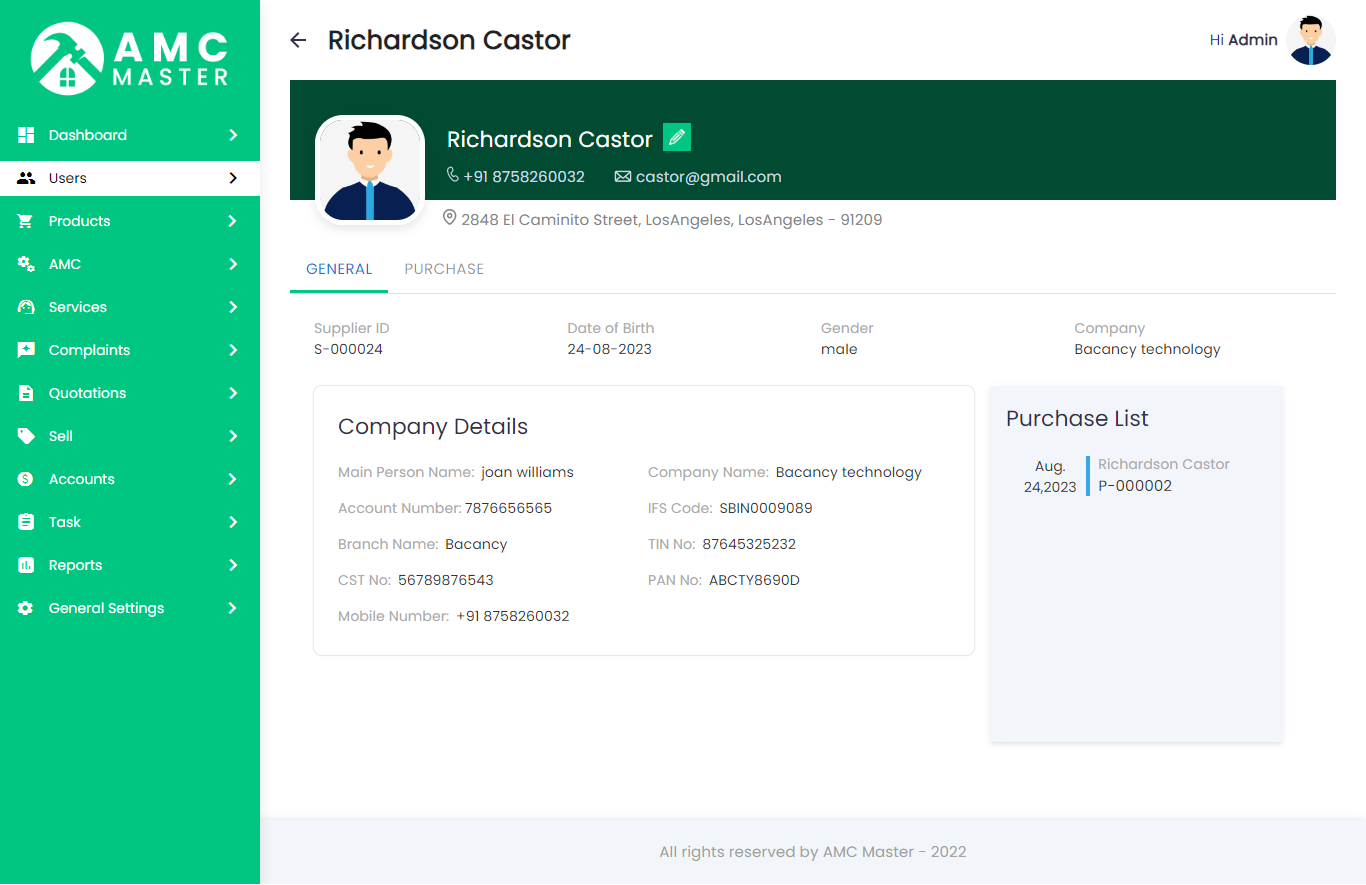
II) Supplier:
Supplier List: Admin can add new Supplier, manage all Supplier and view complete list of all Supplier.
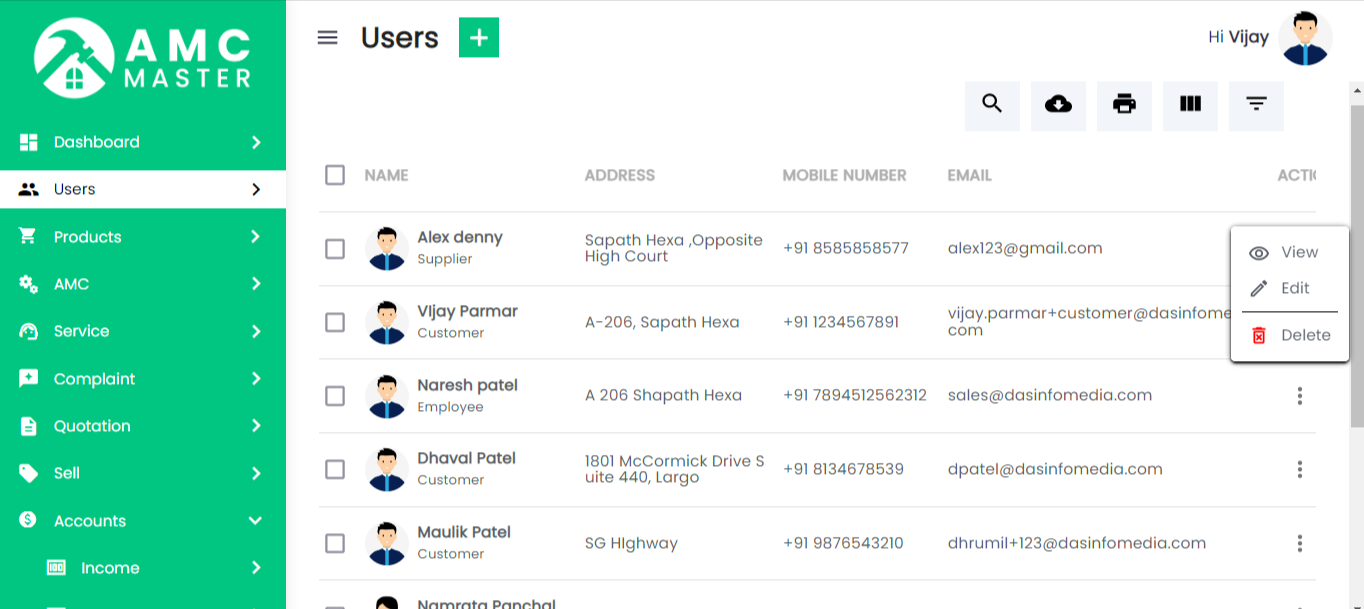
Add Supplier: Admin can add supplier details.
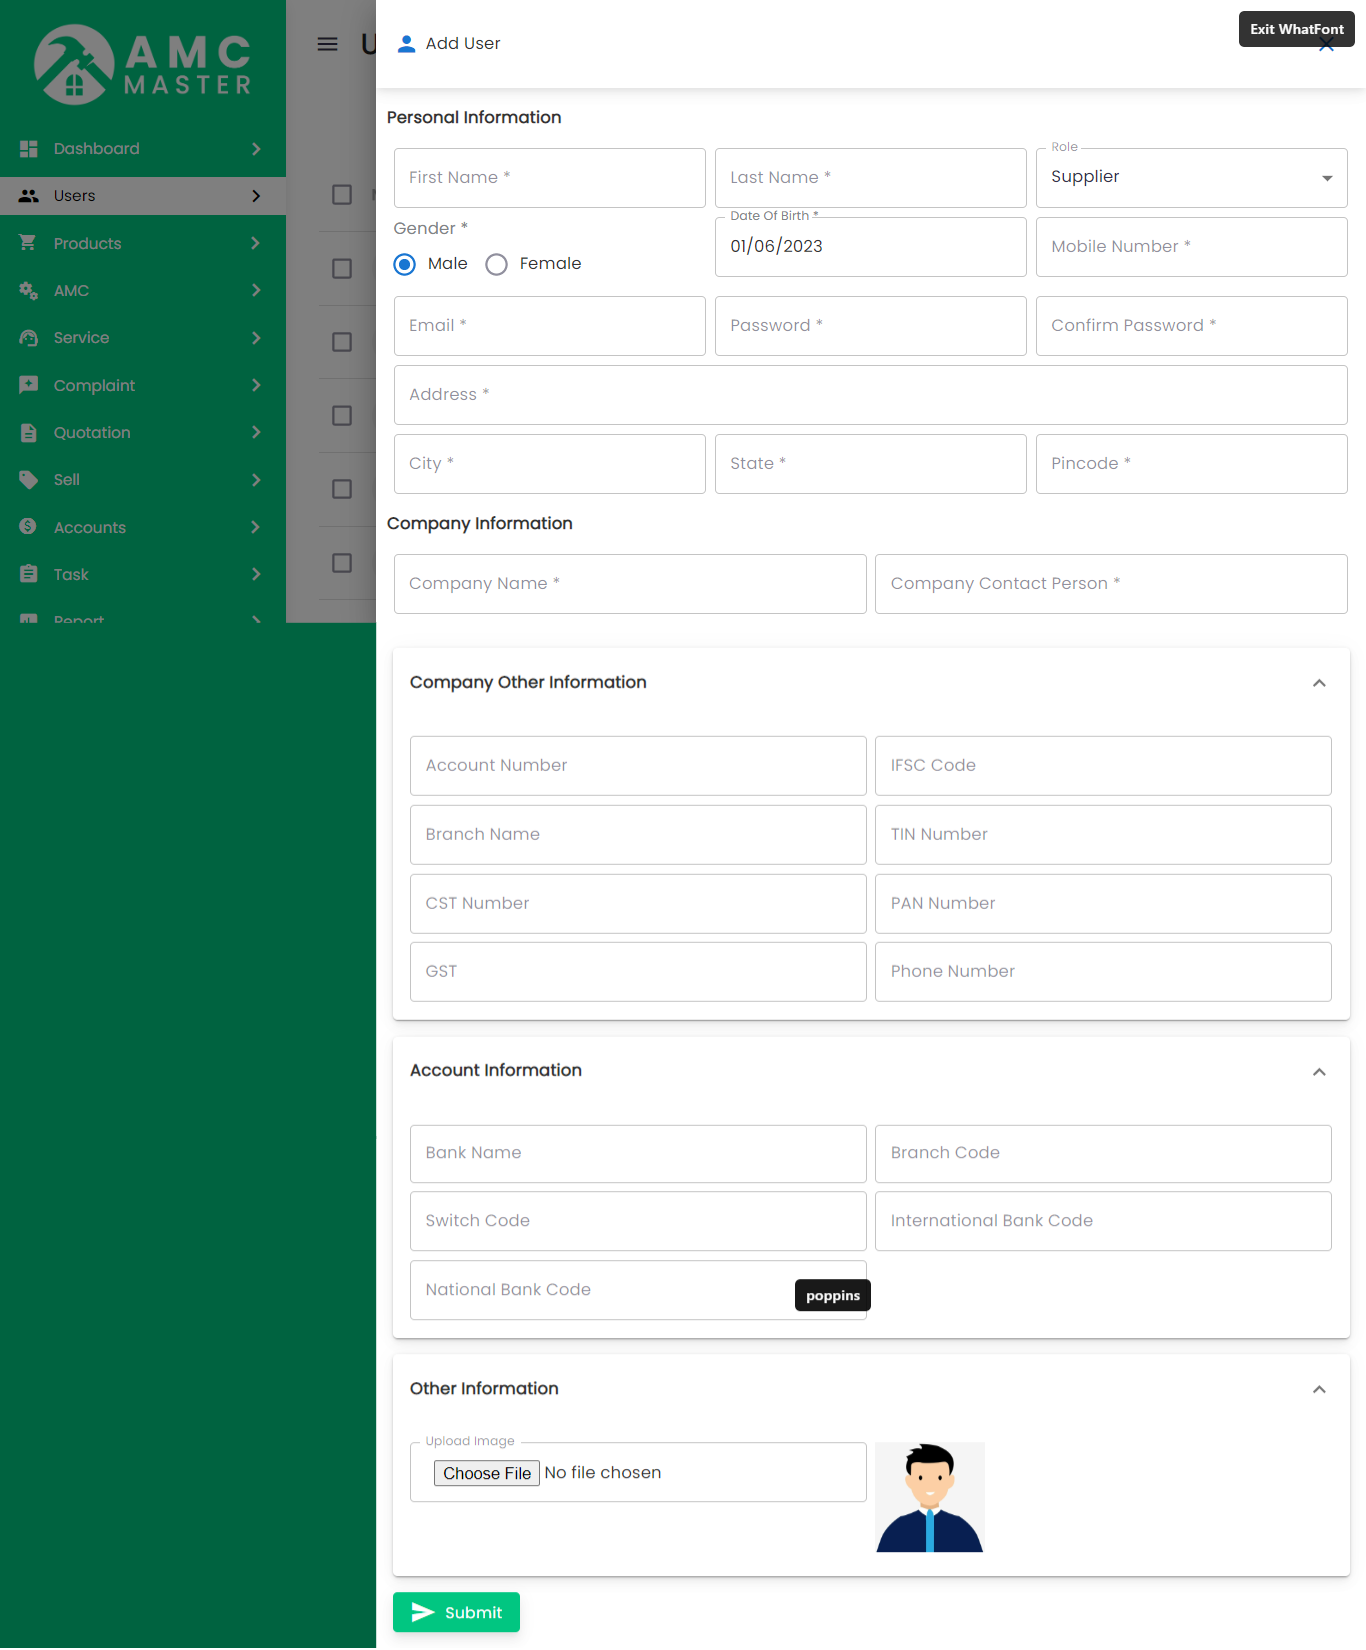
- Supplier No: Supplier No Auto Generated.
- First Name: Enter new First name for this Supplier.
- Last Name: Enter new Last name for this Supplier.
- Middle Name: Enter new Middle name for this Supplier.
- Email: Enter new Email for this Supplier.
- Address: Enter new Address for this Supplier.
- Photo: Upload image for this Supplier.
- Company Name: Upload image for this Supplier.
- City: Enter city name for this Supplier.
- State: Enter state name for this Supplier.
- Country: Enter company name for this Supplier.
- Zip Code: Enter zip code name for this Supplier.
- Mobile No: Enter new Mobile Number for this Supplier.
- Account No:Enter new Account Number for this Supplier..
- Bank Name:Enter Bank Name Number for this Supplier..
- Branch Name: Enter new Branch Name for this Supplier.
- Swift Code:Enter new Swift Code for this Supplier..
- Branch code: Enter Banch code of the Bank for this Supplier.
- International Bank Code: Enter International Bank Code for this Supplier.
- National Bank Code: Enter National Bank Code for this Supplier.
Account Details
Edit Supplier: Admin can Edit detail of particular Supplier by clicking on Edit detail button. This will open up details. From here admin can Change Supplier Details.

View Supplier: Admin can View detail of particular Supplier by clicking on View detail button. This will open up details. From here admin can View Supplier Details.
III) Purchase:
Purchase List: You can add new Purchase, manage all Purchase and view complete list of all Purchase.
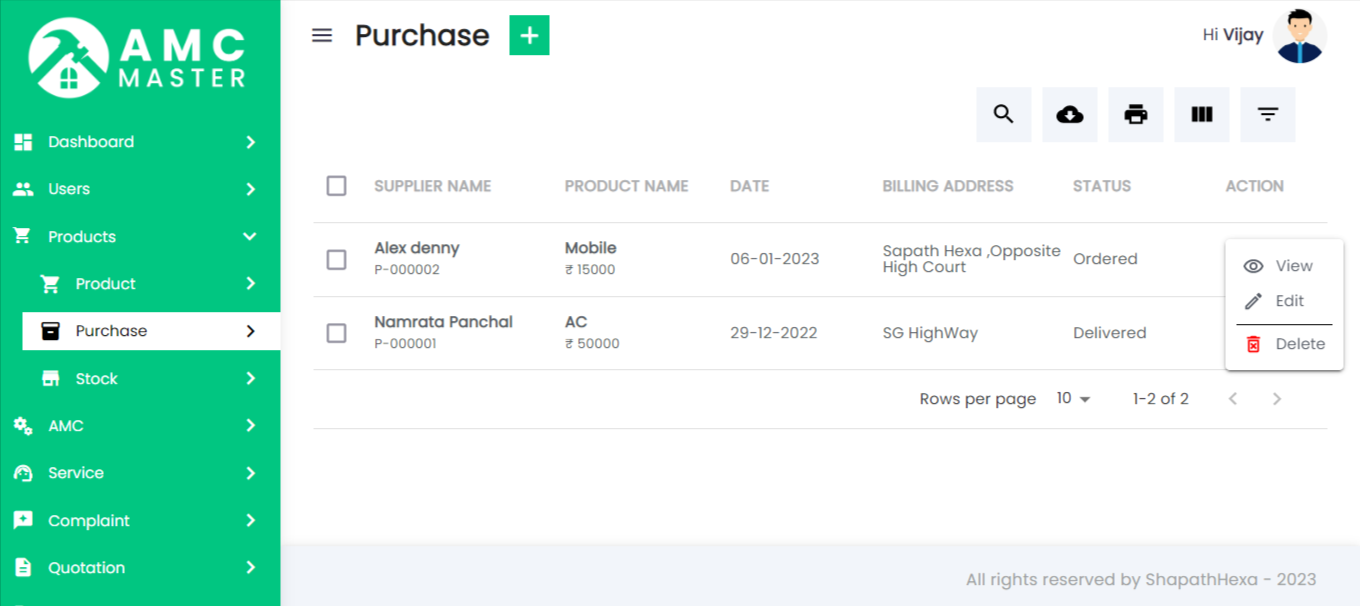
Add Purchase: You can add purchase details.
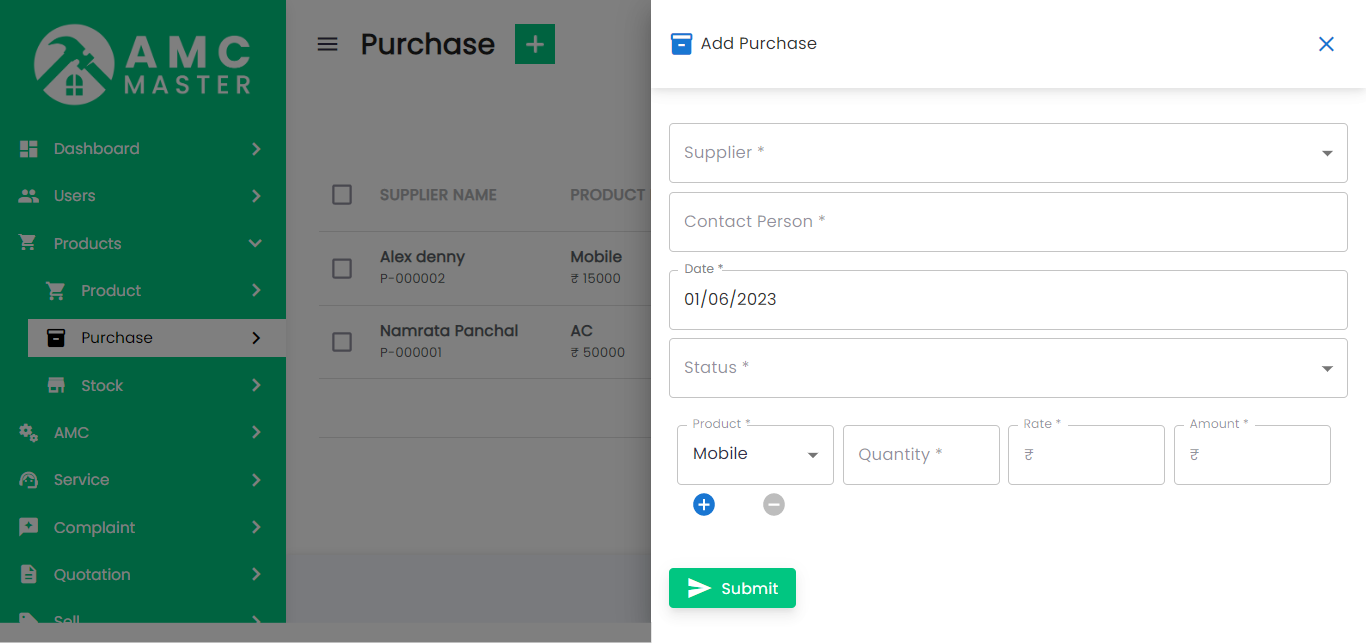
- Purchase No: Purchase No Auto Generated.
- Status: Select Status of Purchase.
- Purchase Date: Select Purchase date for this Purchase.
- Contact Person:: Enter new Contact Person name for this Purchase.
- Supplier Name: Select Supplier name for this Purchase.
- Email: Enter new Email for this Purchase.
- Billing Address: Enter new Address for this Purchase.
- Add New: Add New Product for the Purchase.
- Product: Select Product for this Supplier.
- Quantity:Enter Quantity for this Supplier.
- Price:Select Product and Auto Generated Price
- Amount:Select Product and Quantity and Auto Generated Amount.
- Action:Delete Product for Purchase
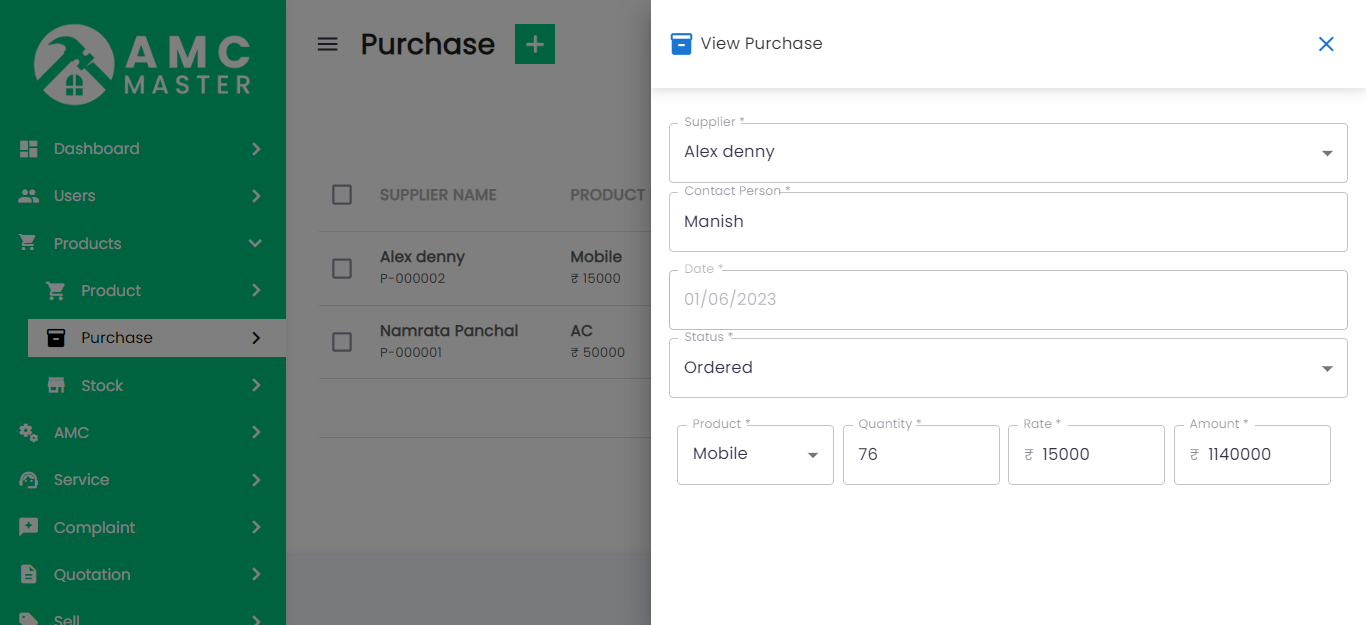
Purchase Details
View Purchase: Admin can view detail of particular Purchase by clicking on view detail button. This will open up details. From here admin can also Print Out view Purchase.
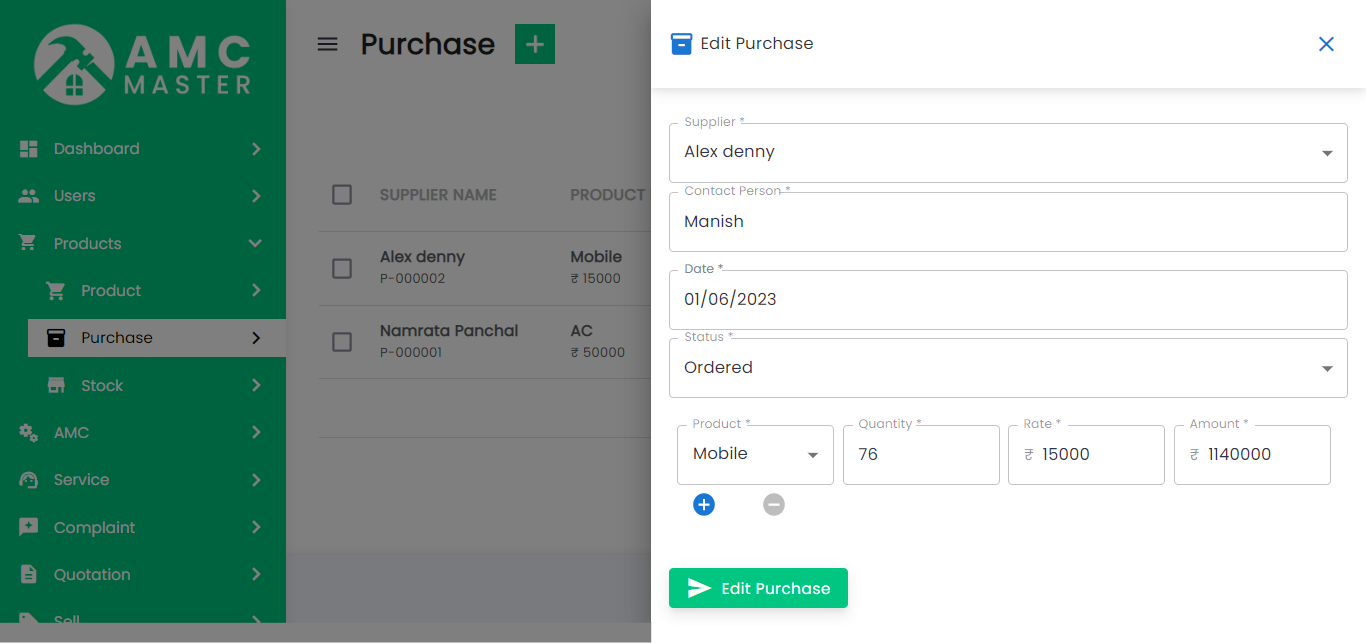
Edit Purchase: Admin can Edit detail of particular Purchase by clicking on Edit detail button. This will open up details. From here admin can Change Purchase Details.
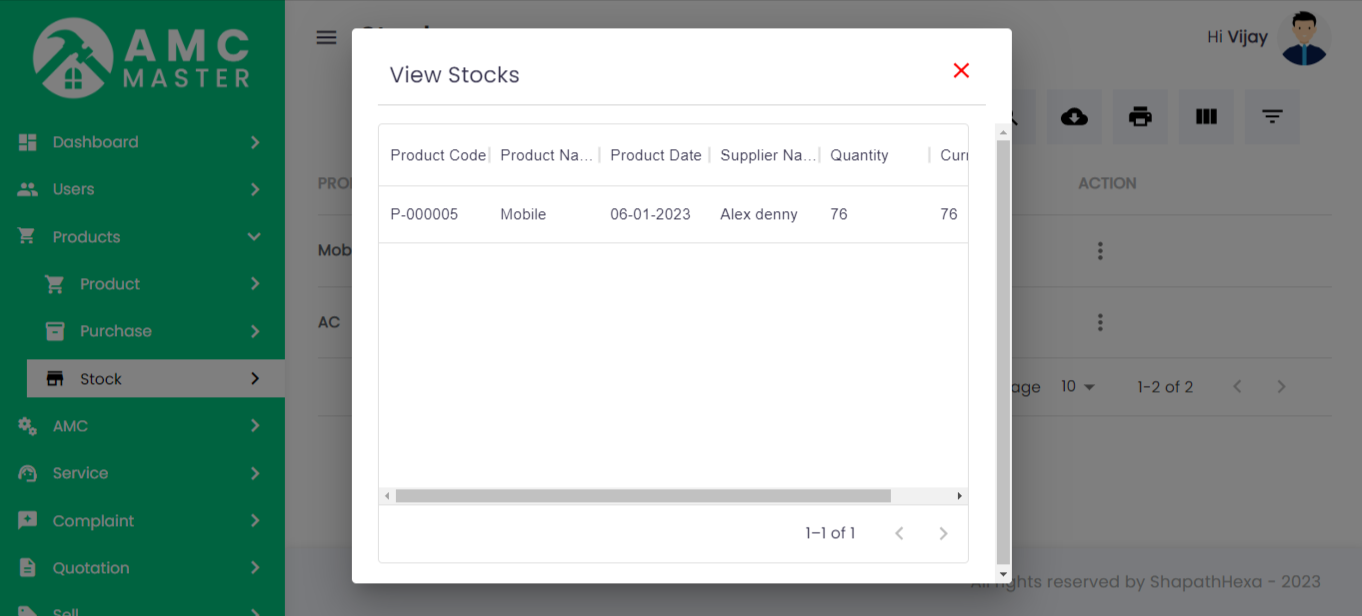
IV) Stock:
Stock List: Admin can view complete list of all Stock and view detail of particular Stock by clicking on view detail button. This will open up details. From here admin can also Print Out view Stock.
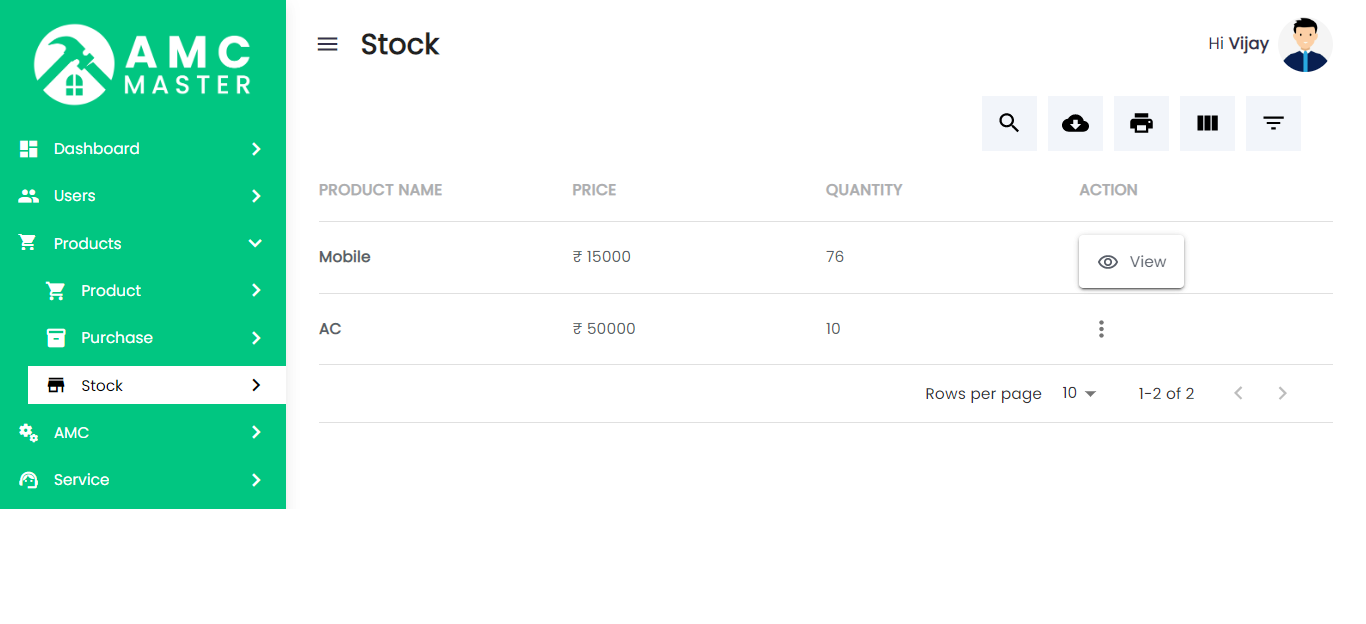
View Stock: Admin can view the particular stock details.
V)Tax
Tax List: Admin can add new Tax, manage all Tax and view complete list of all Tax.
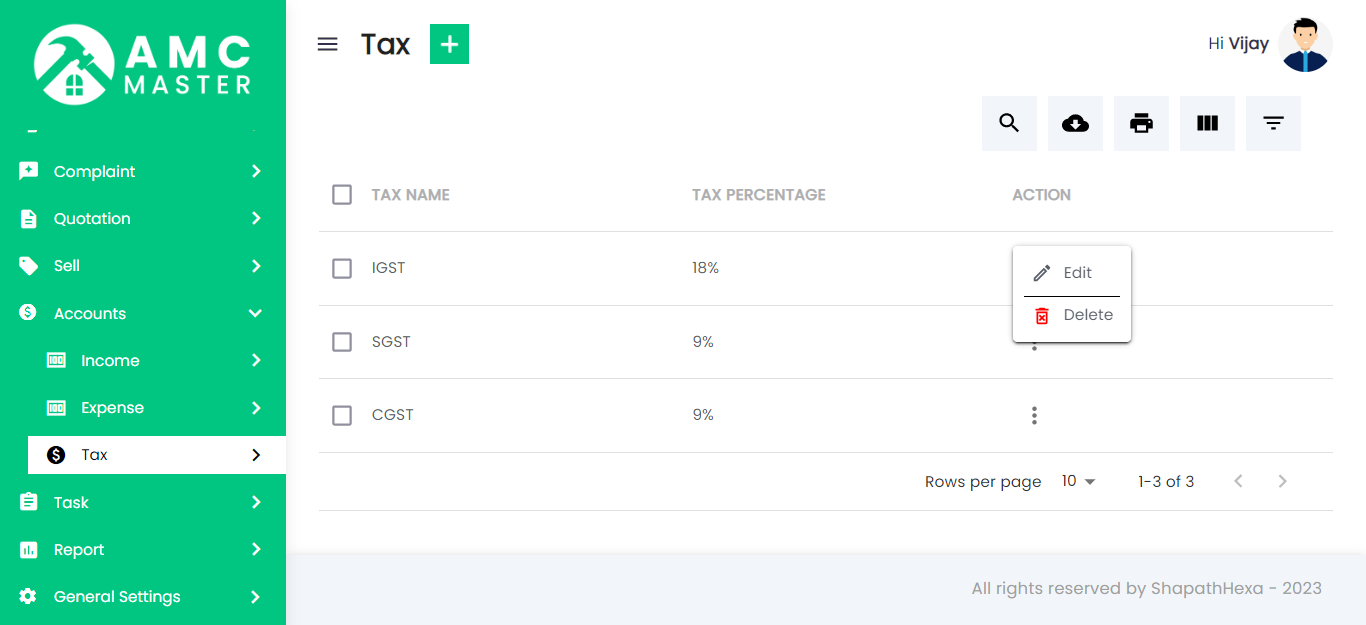
Add Tax: Admin can add tax details.

- Account Tax Name: Enter Account Name for this Tax.
- Tax: Enter Tax for this Task.
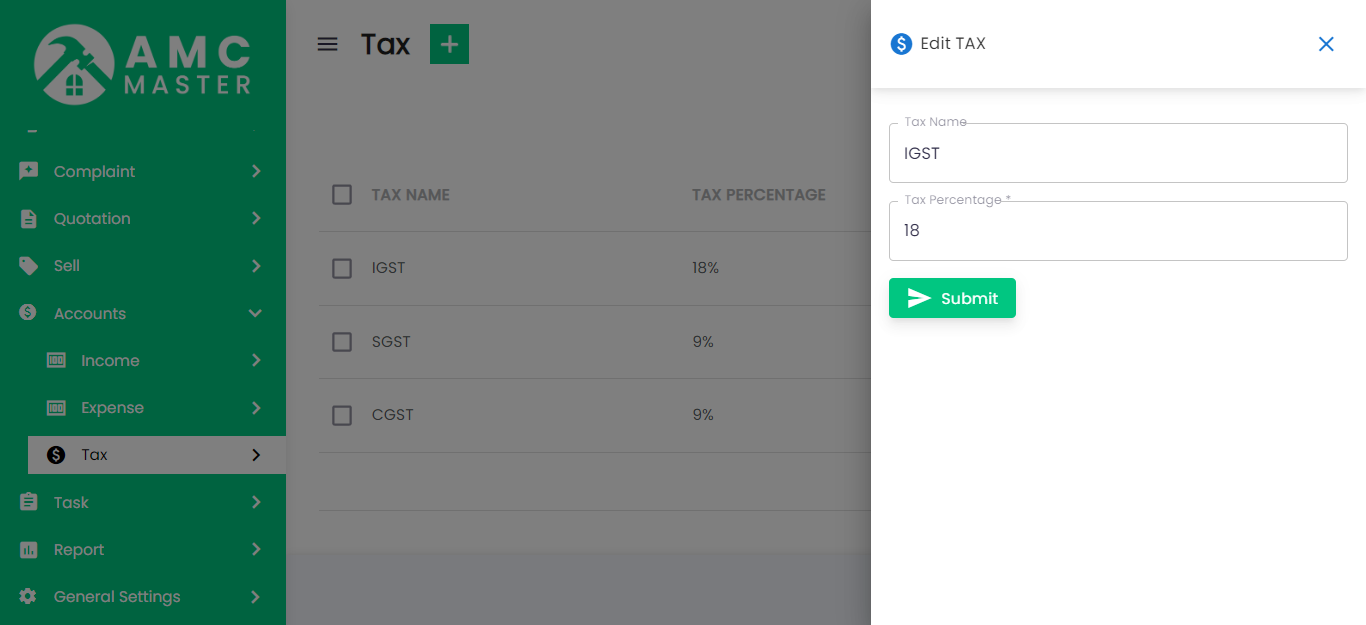
Tax Edit: Admin can Edit detail of particular Tax by clicking on Edit detail button. This will open up details.
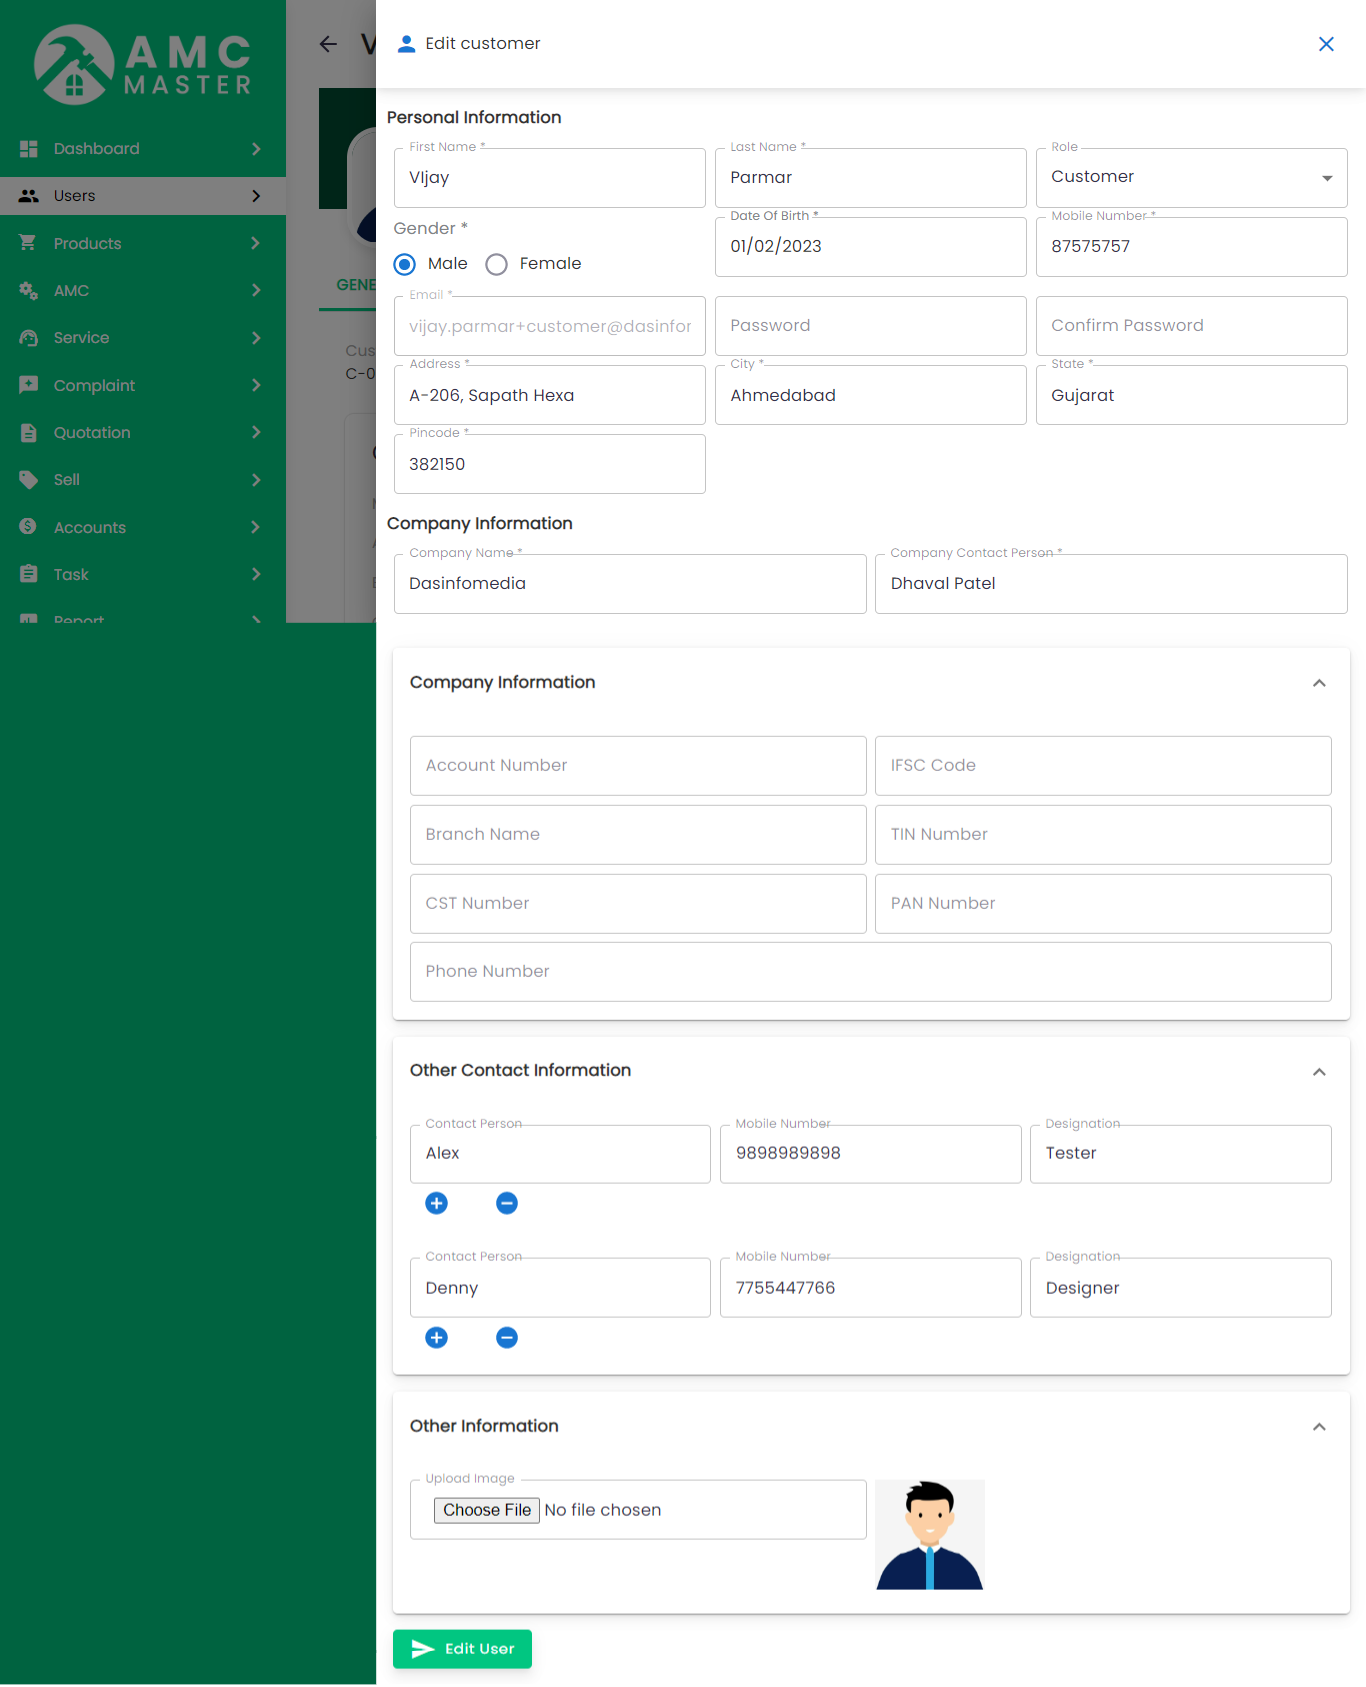
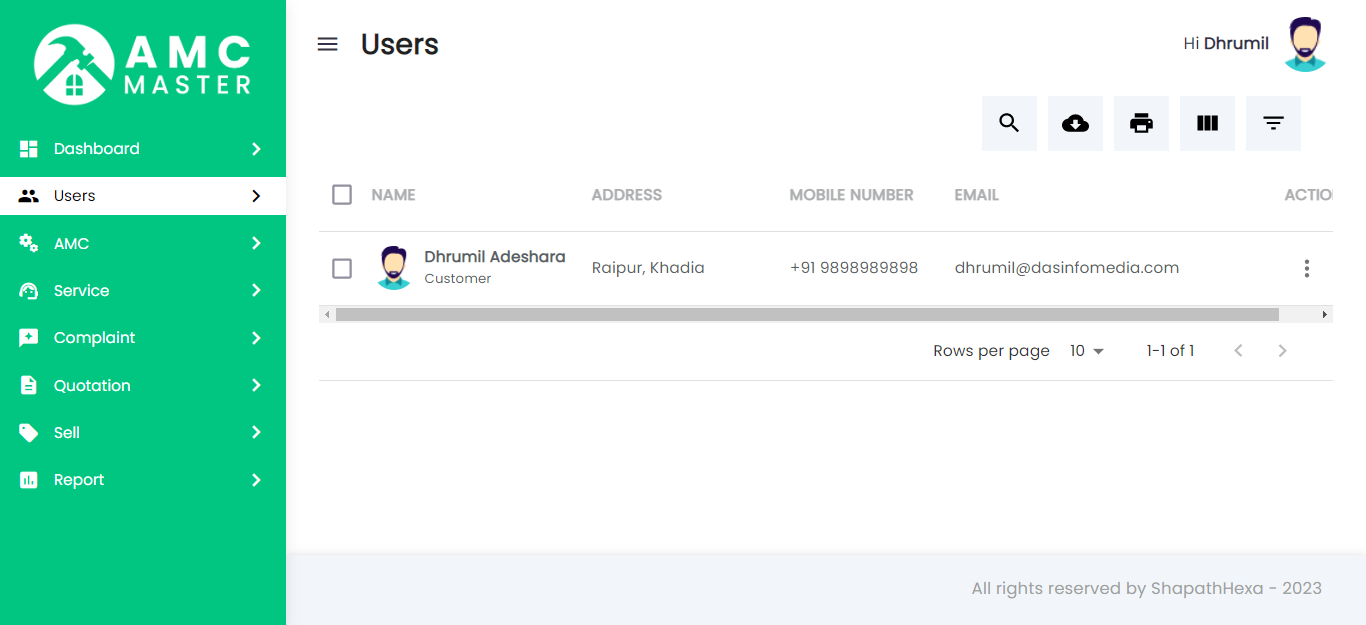
4) Client
Client List: Admin can add new Client, manage all Client and view complete list of all Client.
Add Client: Admin can add client details.
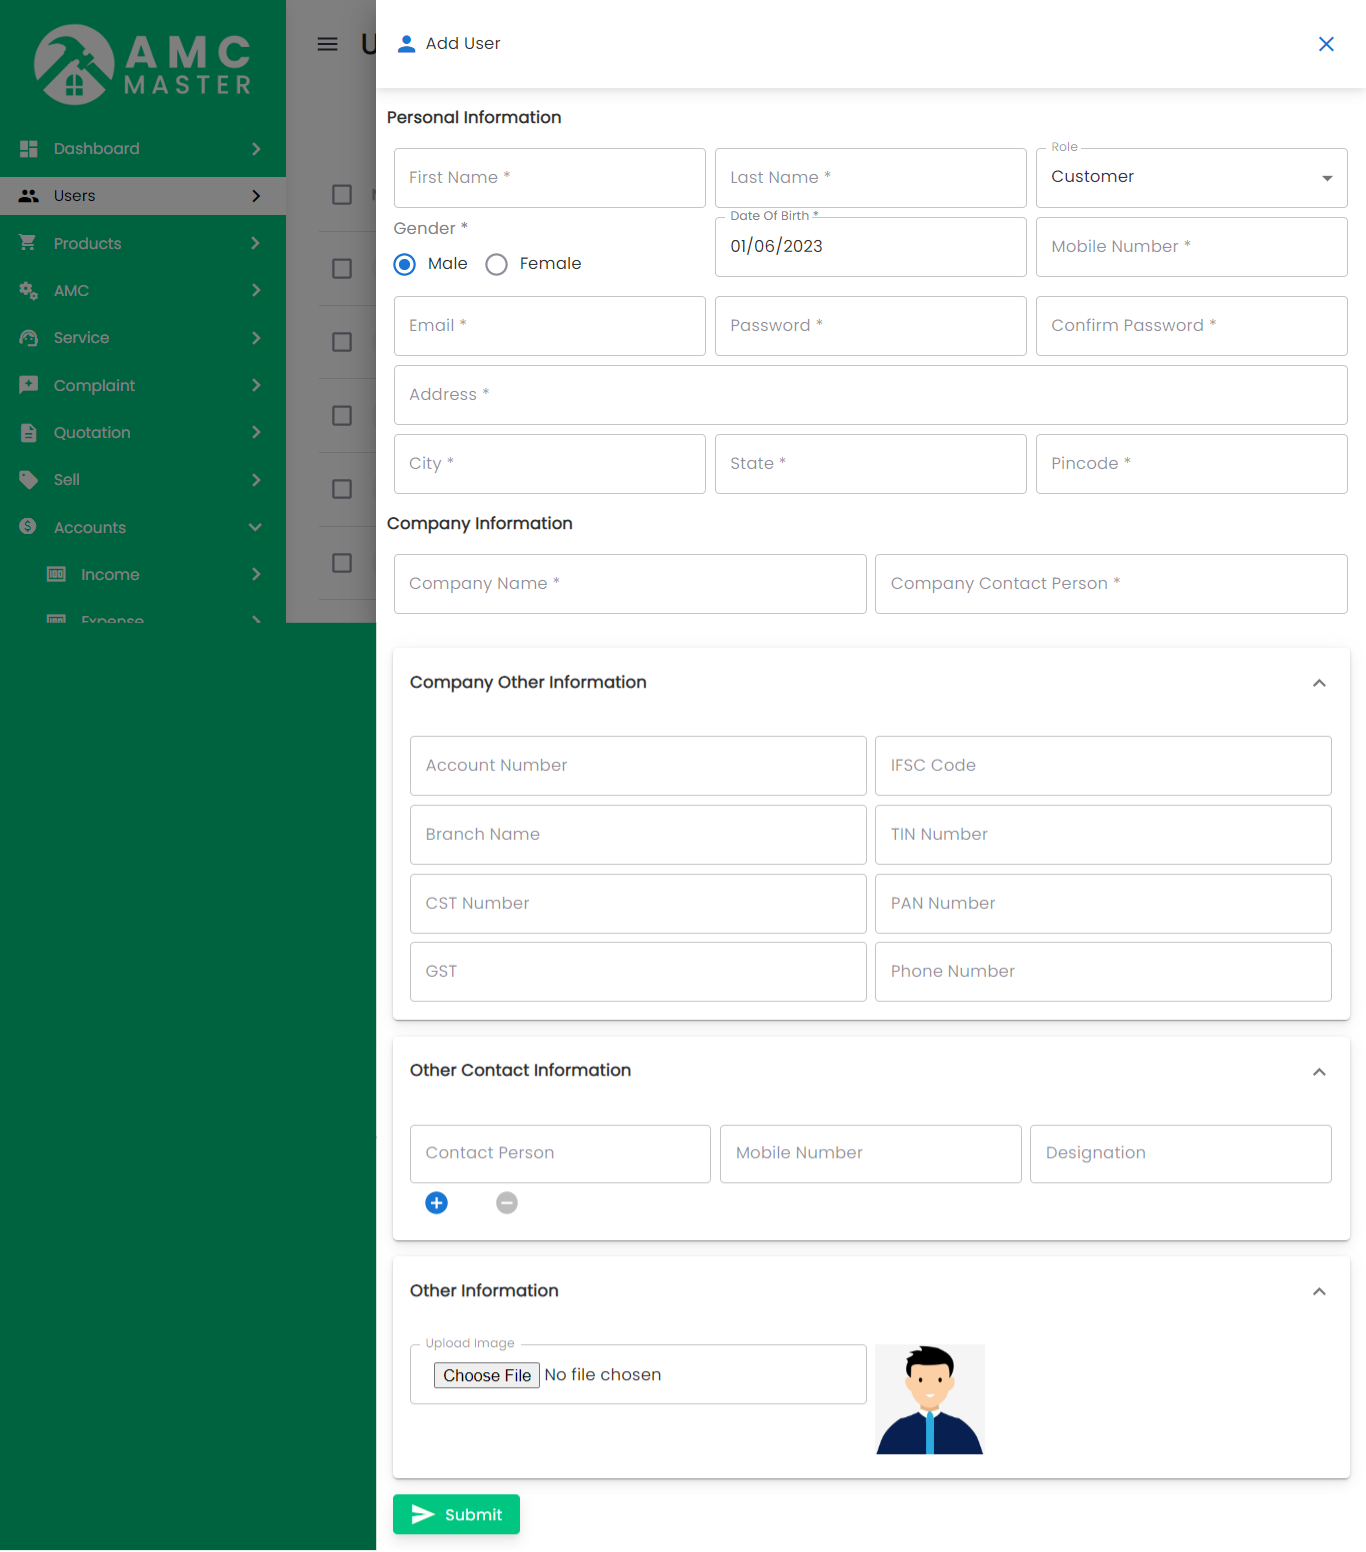
- Client Id: Client Id Auto Generated.
- First Name: Enter new First name for this Client.
- Last Name: Enter new Last name for this Client.
- Middle Name: Enter new Middle name for this Client.
- Gender: Select Gender for this Client.
- Date Of Birth: Enter new Date Of Birth for this Client.
- Marital Status: Select Marital Status for this Client.
- Main Person Name: Enter new Main Person Name for this Client.
- Mobile Number: Enter new Mobile Number for this Client.
- Account Number: Enter new Account Number for this Client.
- IFSC Code:Enter new IFSC Code for this Client..
- Branch Name: Enter new Branch Name for this Client.
- TIN No: Enter TIN No for this Client.
- CST No: Enter CST No for this Client.
- PAN No: Enter PAN No for this Client.
- Address: Enter new Address for this Client.
- City: Enter new City for this Client.
- State: Enter new State for this Client.
- PIN Code: Enter new PIN Code for this Client.
- Alternate Mobile Number: Enter new Alternate Mobile Number for this Client.
- Email: Enter new Email for this Client.
- Password: Enter new Password for this Client.
- Upload Image: Upload image for this Client.
- Add New: Add new Contact Person Name for this Client.
- Contact Person Name: Enter new Contact Person Name for this Client.
- Mobile Number:Enter new Mobile Number for this Client.
- Designation:Enter new Designation for this Client.
- Action:Delete Contact Person Name.
Company Details
Address
Contact
Other Info
Other Contact Details
Client View: Admin can view detail of particular Client by clicking on view detail button. This will open up details.
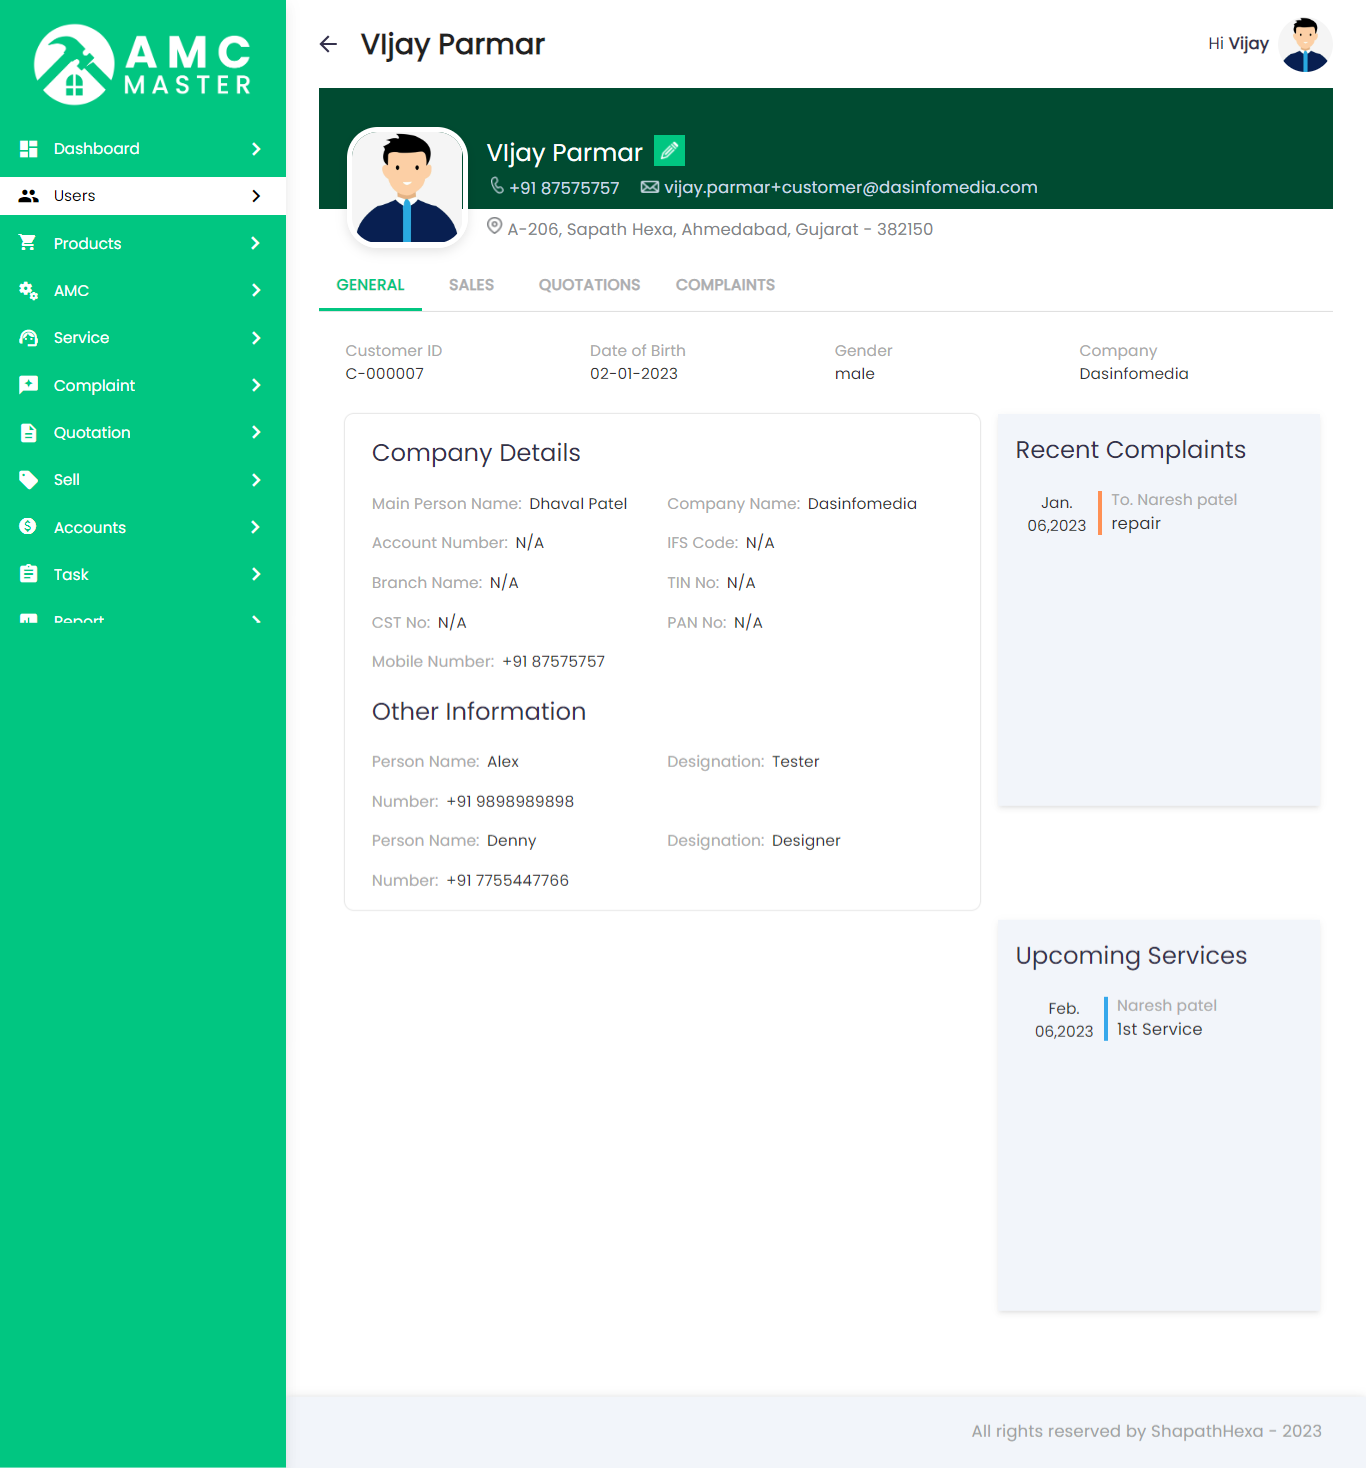
Client Edit: Admin can Edit detail of particular Client by clicking on Edit detail button. This will open up details.
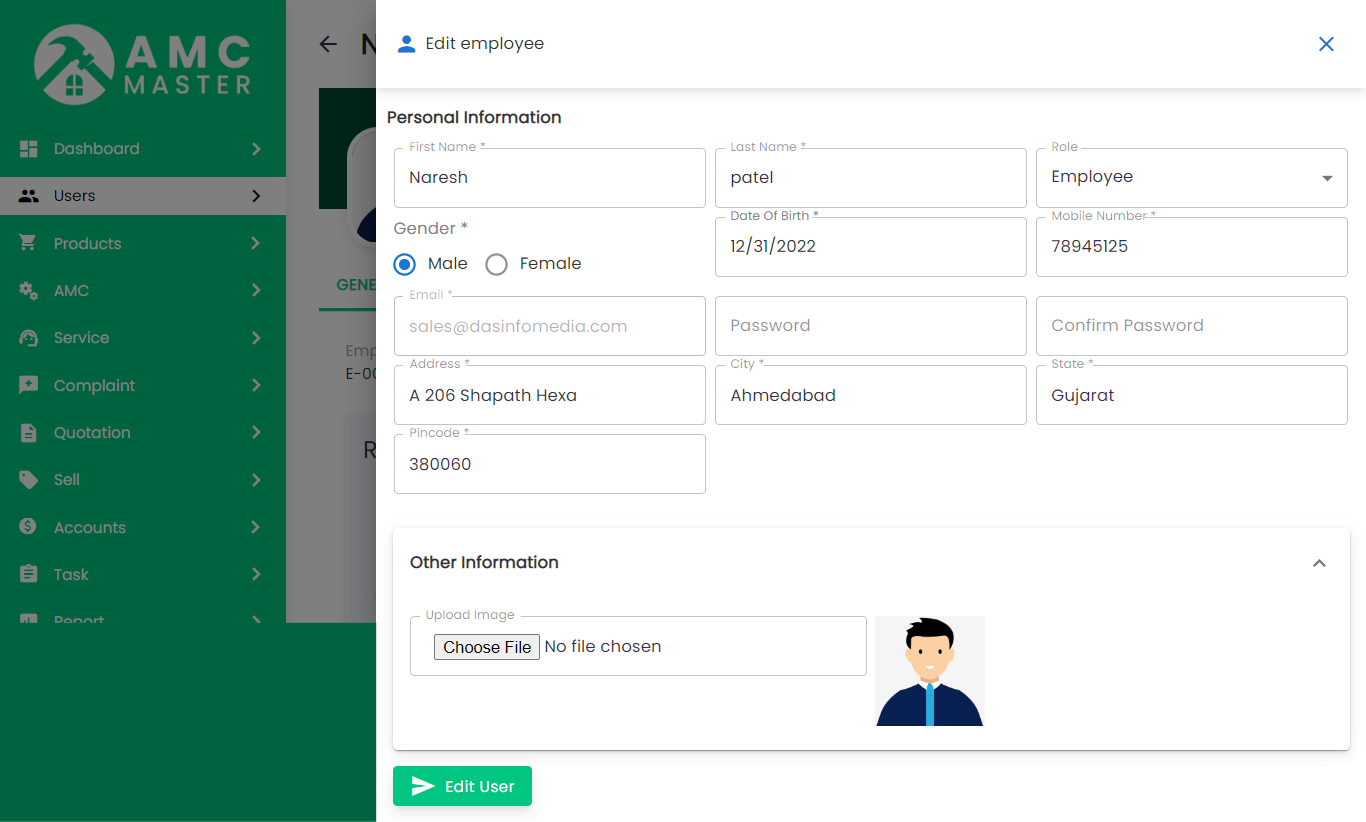
5) Employee
Employee List: Admin can add new Employee, manage all Employee and view complete list of all Employee.
Add Employee: Admin can add employee details.
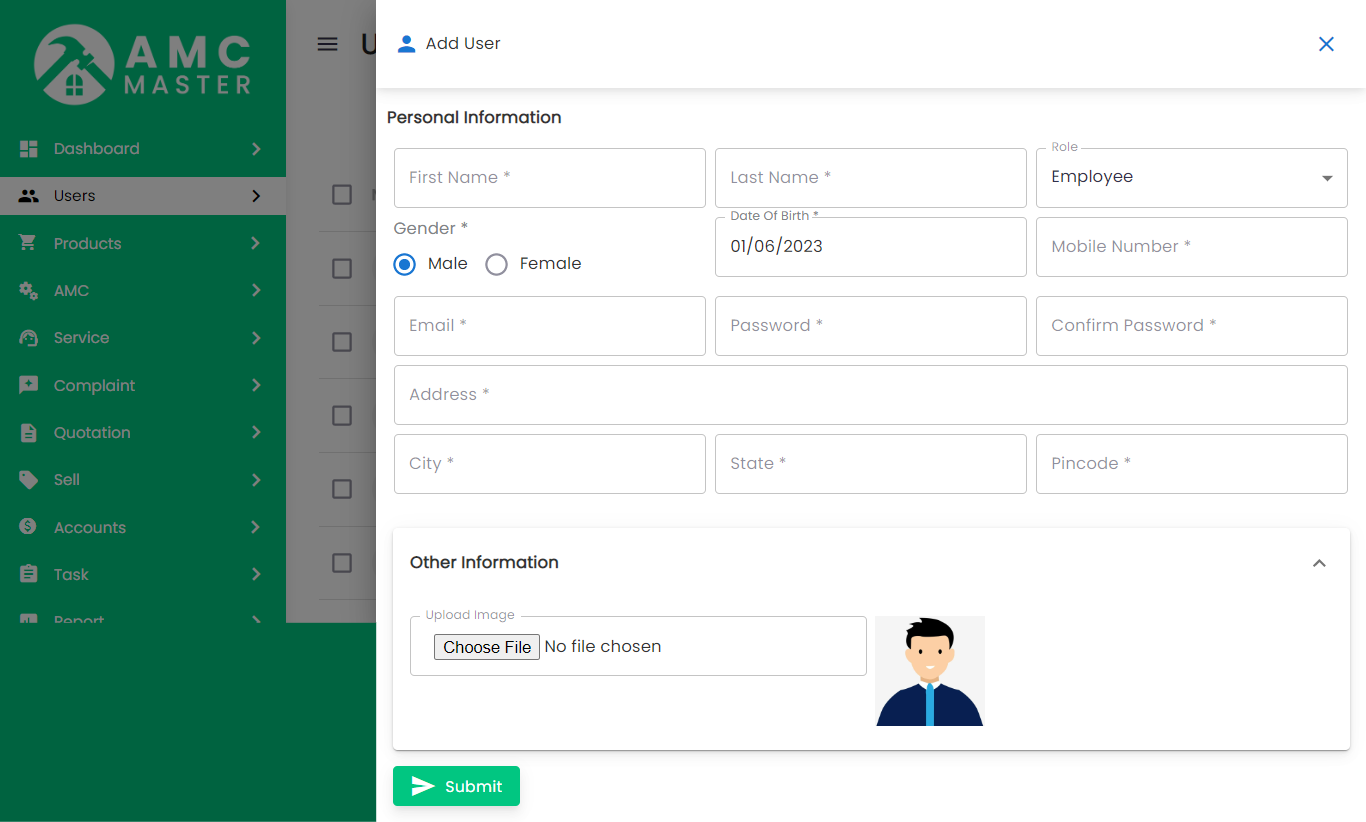
- Employeeid: Employeeid Auto Generated.
- First Name: Enter new First name for this Employee.
- Last Name: Enter new Last name for this Employee.
- Middle Name: Enter new Middle name for this Employee.
- Gender: Select Gender for this Employee.
- Date Of Birth: Enter new Date Of Birth for this Employee.
- Marital Status: Select Marital Status for this Employee.
- Address: Enter new Address for this Employee.
- City: Enter new City for this Employee.
- State: Enter new State for this Employee.
- PIN Code: Enter new PIN Code for this Employee.
- Mobile Number: Enter new Mobile Number for this Employee.
- Alternate Mobile Number: Enter new Alternate Mobile Number for this Employee.
- Phone Number: Enter new Mobile Number for this Employee.
- Email: Enter new Email for this Employee.
- Send Mail: Youjoomla Checkbox Send Mail for this Employee.
- Password: Enter new Password for this Employee.
- Upload Image: Upload image for this Employee.
Address
Contact
Other Info
Employee View: Admin can view detail of particular Employee by clicking on view detail button. This will open up details.

Employee Edit: Admin can Edit detail of particular Employee by clicking on Edit detail button. This will open up details.
``````````
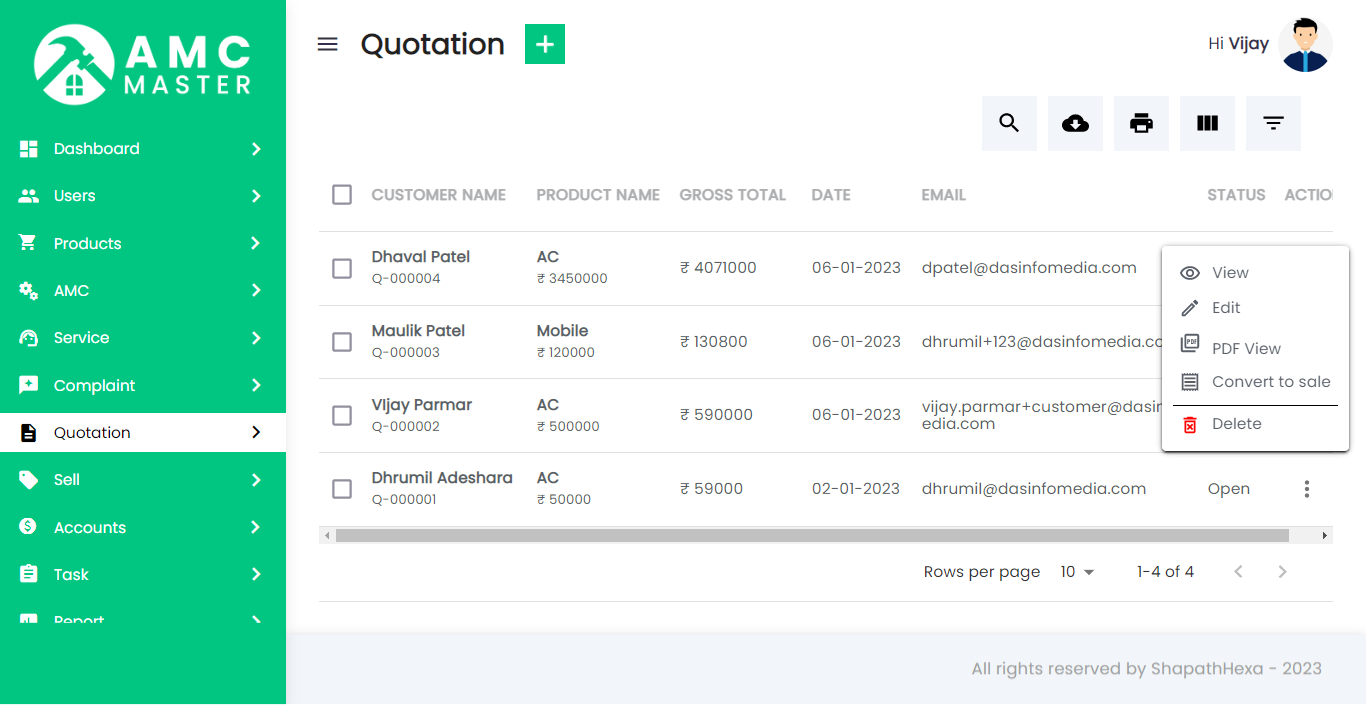
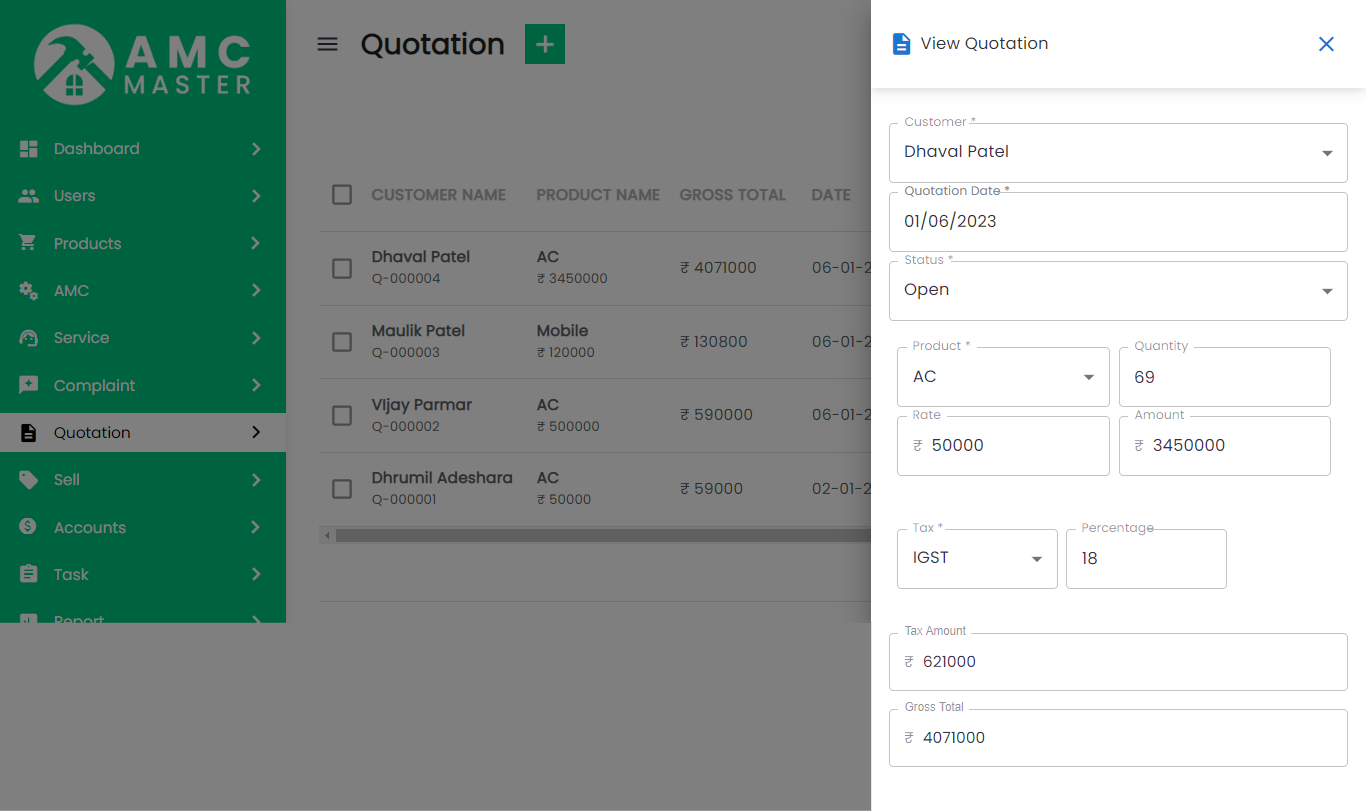
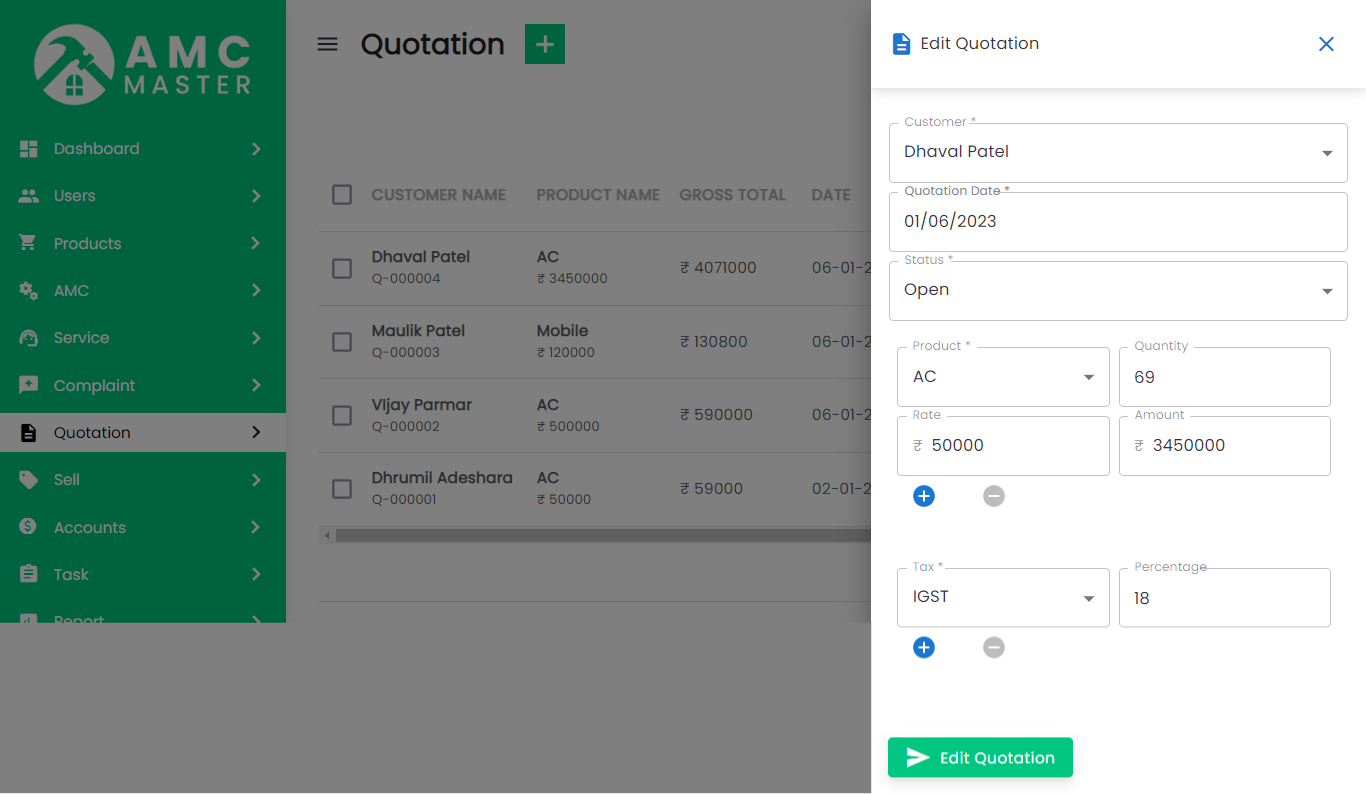
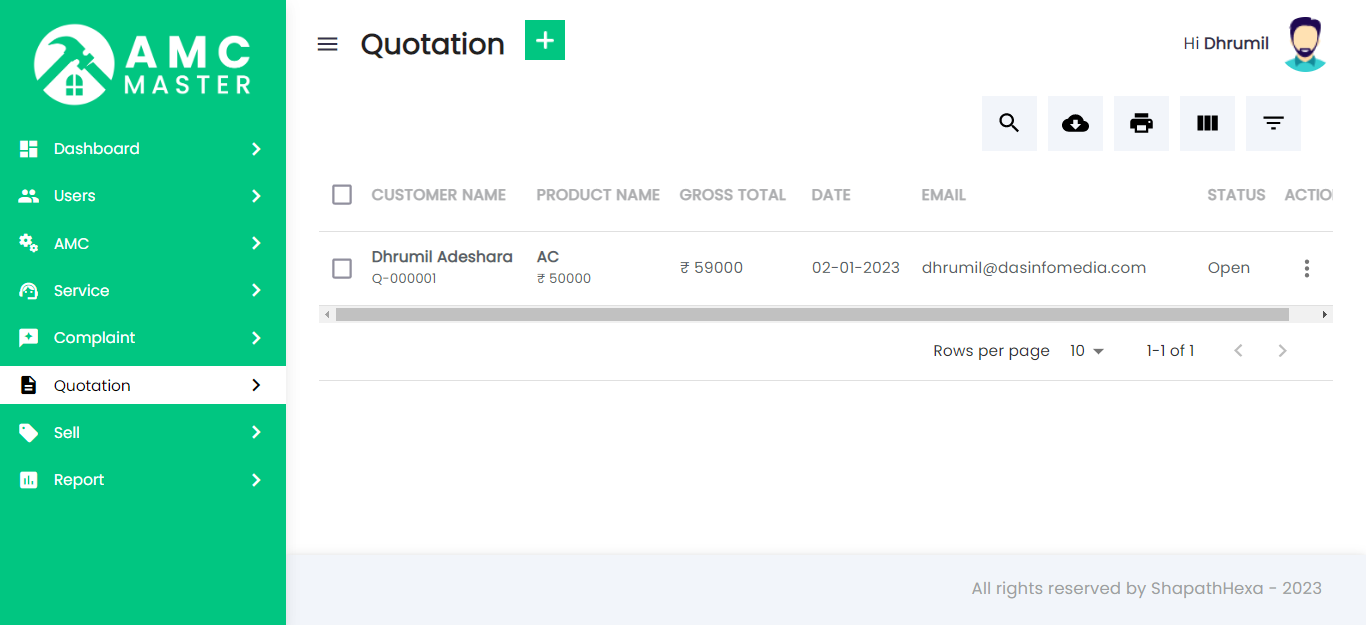
6) Quotation
Quotation List: Admin can add new Quotation, manage all Quotation and view complete list of all Quotation.
Add Quotation: Admin can add Quotation details.
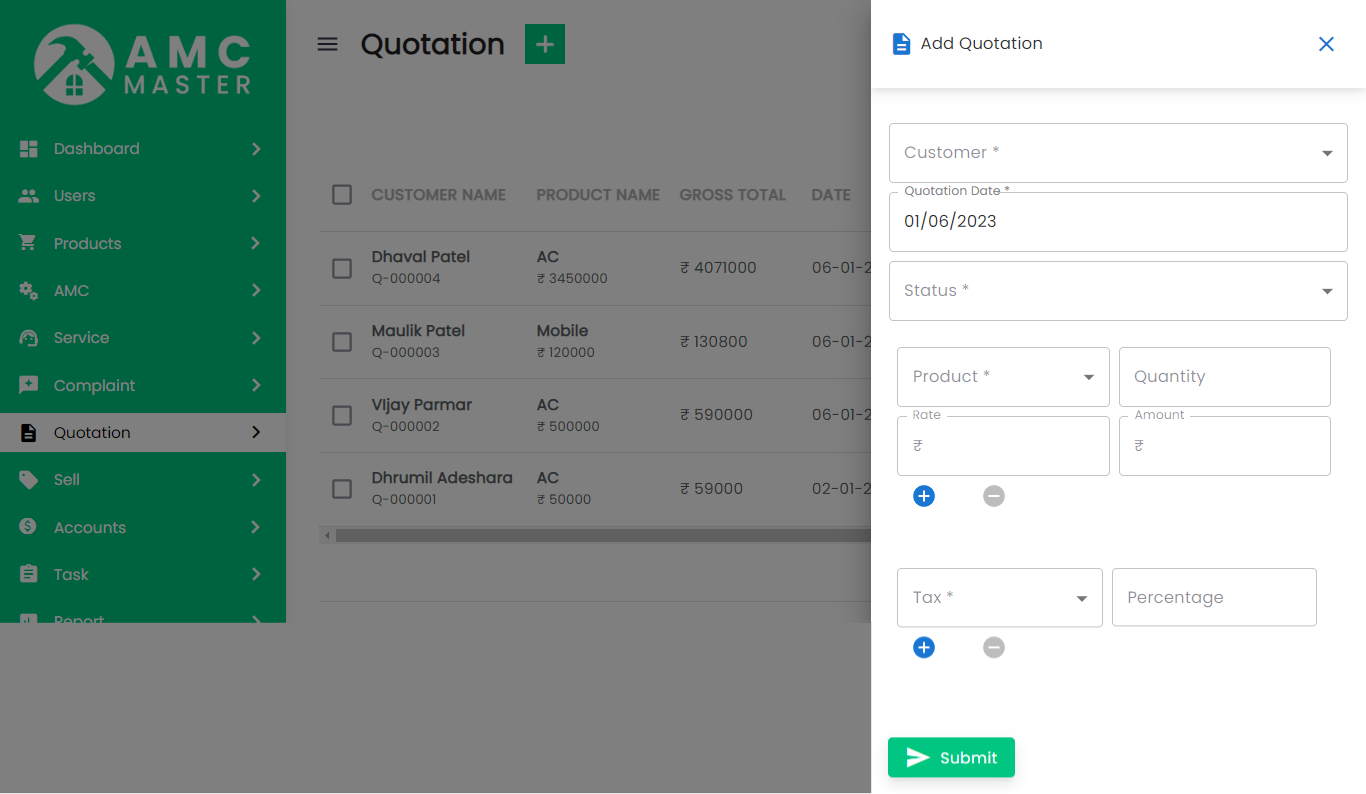
- Quotation No: Quotation No Auto Generated.
- Quotation date: Enter new Quotation date for this Quotation.
- Customer Name: Select Customer Name for this Quotation.
- Mobile Number: Enter new Mobile Number for this Quotation.
- Email:Enter new Email for this Quotation.
- Status: Select Status for this Quotation.
- Billing Address: Enter new Billing Address for this Quotation.
- Message: Enter new Message for this Quotation.
- Add new: Add new Product for this Quotation.
- Product Name: Select Product for this Quotation.
- Quantity: Enter new Quantity in Product for this Quotation.
- Price: Select Product in Display Price for this Quotation.
- Amount: Select Product and Enter Quantity in Display Amount for this Quotation.
- Add new: Add new Product for this Quotation.
- Select Tax Name: Select Tax for this Quotation.
- Tax: Enter new Quantity in Tax for this Quotation.
Personal Information
Other Info
Quotation Details
Account Tax
Quotation View: Admin can view detail of particular Quotation by clicking on view detail button. This will open up details.
Quotation Edit: Admin can Edit detail of particular Quotation by clicking on Edit detail button. This will open up details.
Quotation Convert to Sell: Admin can Add Sell detail of particular Quotation by clicking on Convert to Sell detail button. This will open add Sell details.

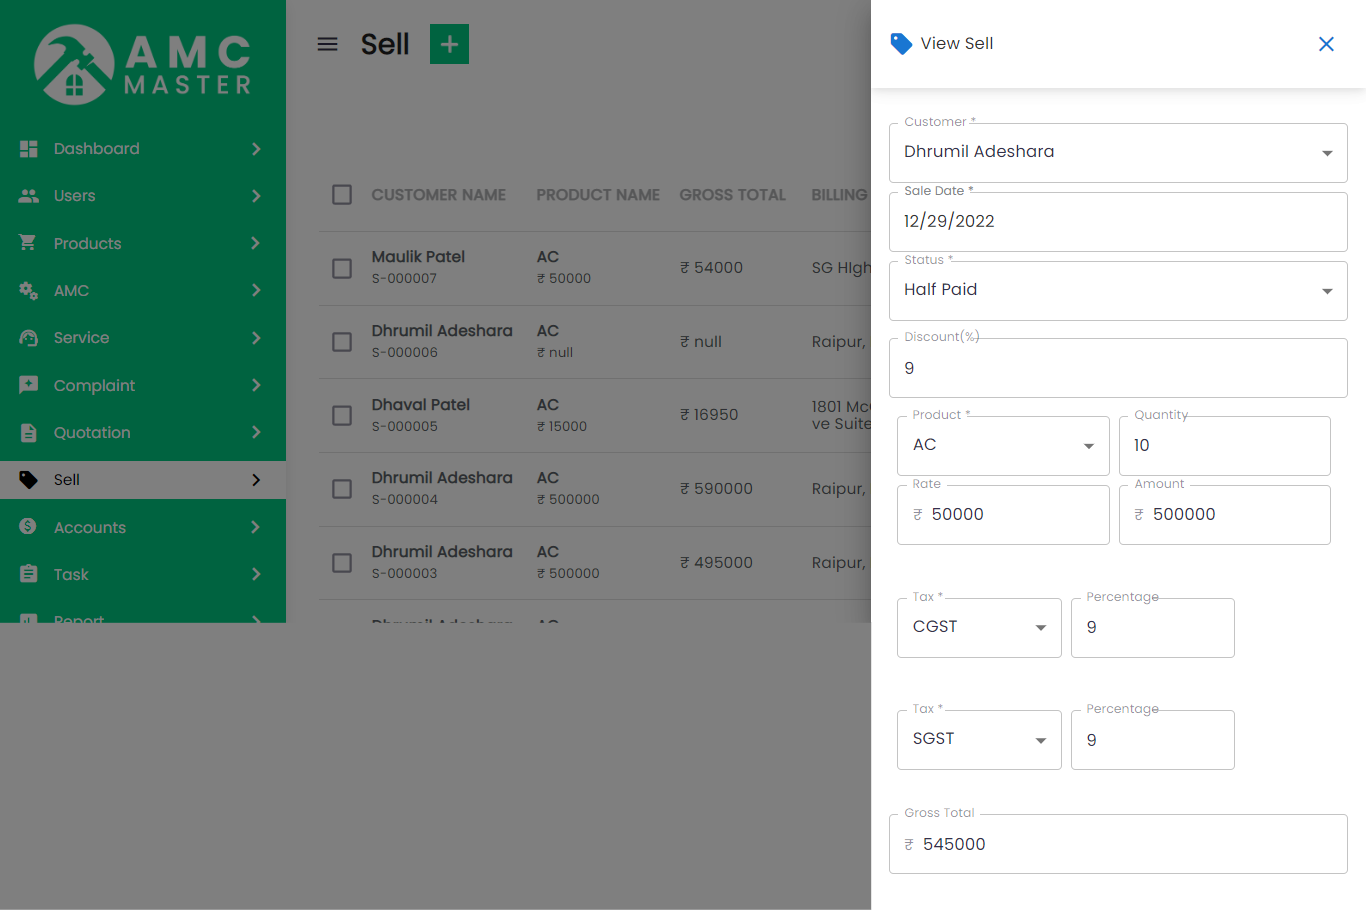
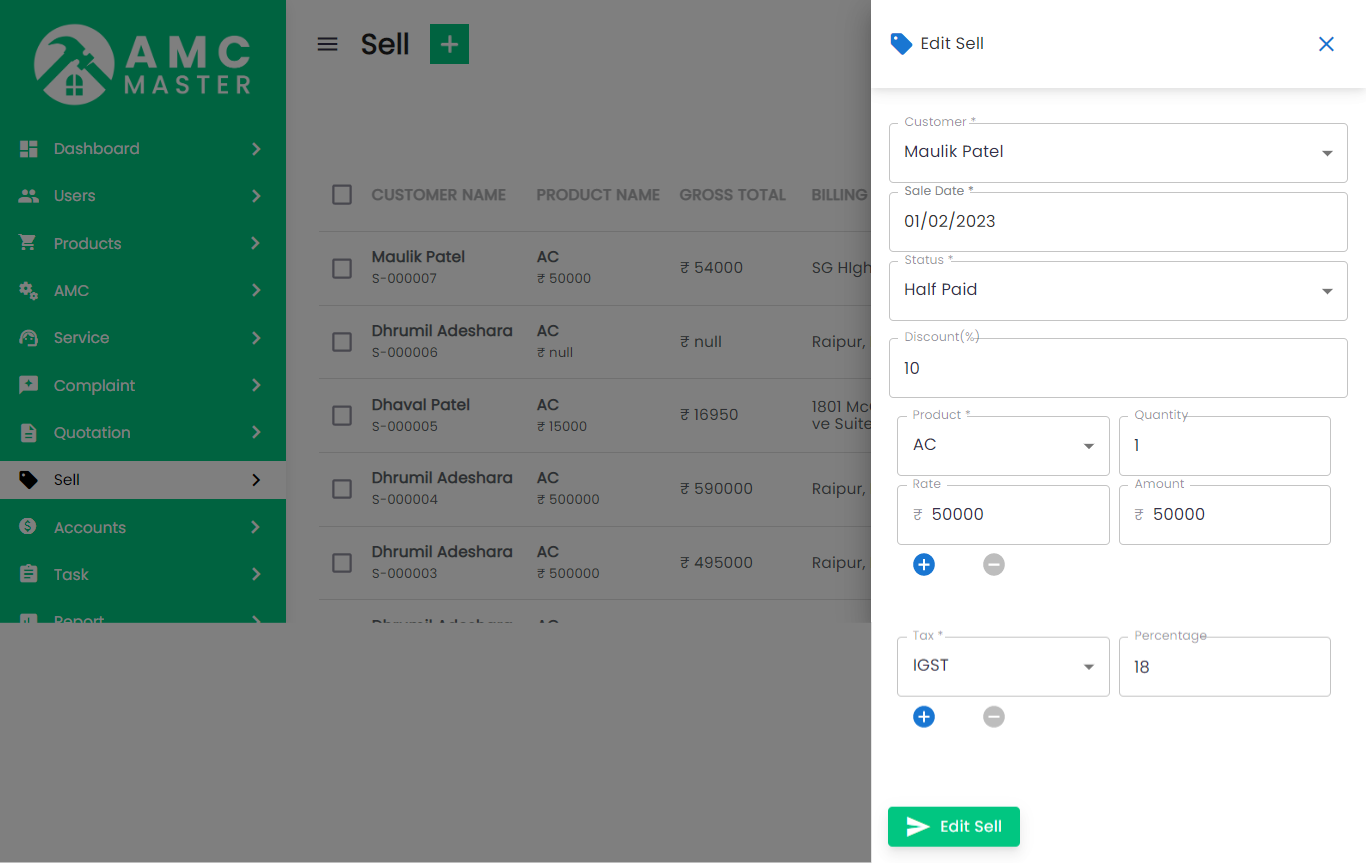
7) Sales
Sales List: Admin can add new Sales, manage all Sales and view complete list of all Sales.
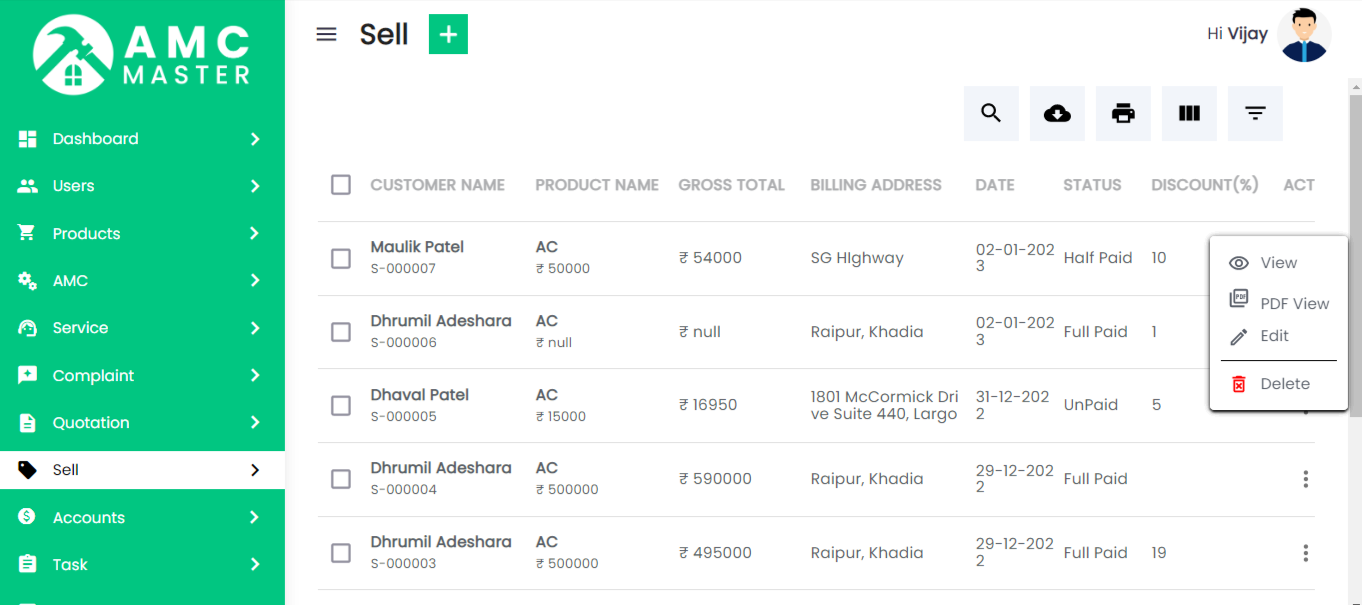
Add Sales: Admin can add sales details.

- Quotation No:Enter New Quotation No for this Sales.
- Bill No: Bill No Auto Generated for this Sales.
- Status: Select Status for this Sales.
- Sales Date: Enter New Sales Date for this Sales.
- Customer Name: Select Customer name for this Sales.
- Mobile Number: Enter new Mobile Number for this Sales.
- AMC Type: Select AMC Type for this Sales.
- Email: Enter new Email for this Sales.
- Billing Address: Enter New Billing Address for this Sales.
- Add New: Add New Product for this Sales.
- Product Name: Select Product for this Sales.
- Quantity: Enter new Quantity in Product for this Sales.
- Price: Select Product in Display Price for this Sales.
- Amount: Select Product and Enter Quantity in Display Amount for this Sales.
- Action: Delete Product for this Sales.
- Add New: Add New Tax for this Sales.
- Tax Name: Select Tax for this Sales.
- Tax: Select Tax Name in Display Tax for this Sales.
- Action: Delete Account Tax for this Sales.
Sales Details
Account Tax
Sales View: Admin can view detail of particular Sales by clicking on view detail button. This will open up details.
Sales Edit: Admin can Edit detail of particular Sales by clicking on Edit detail button. This will open up details.
8) AMC
AMC List:Admin can add new AMC, manage all AMC and view complete list of all AMC.
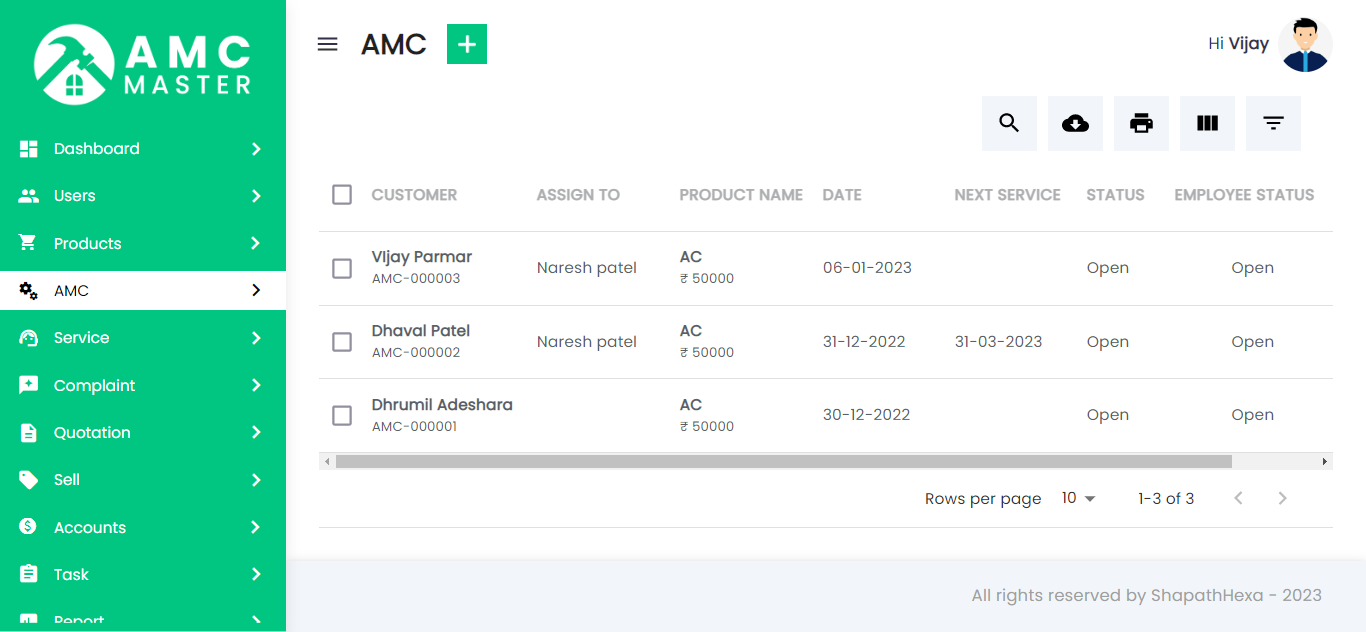
Add AMC: Admin can Add AMC details.
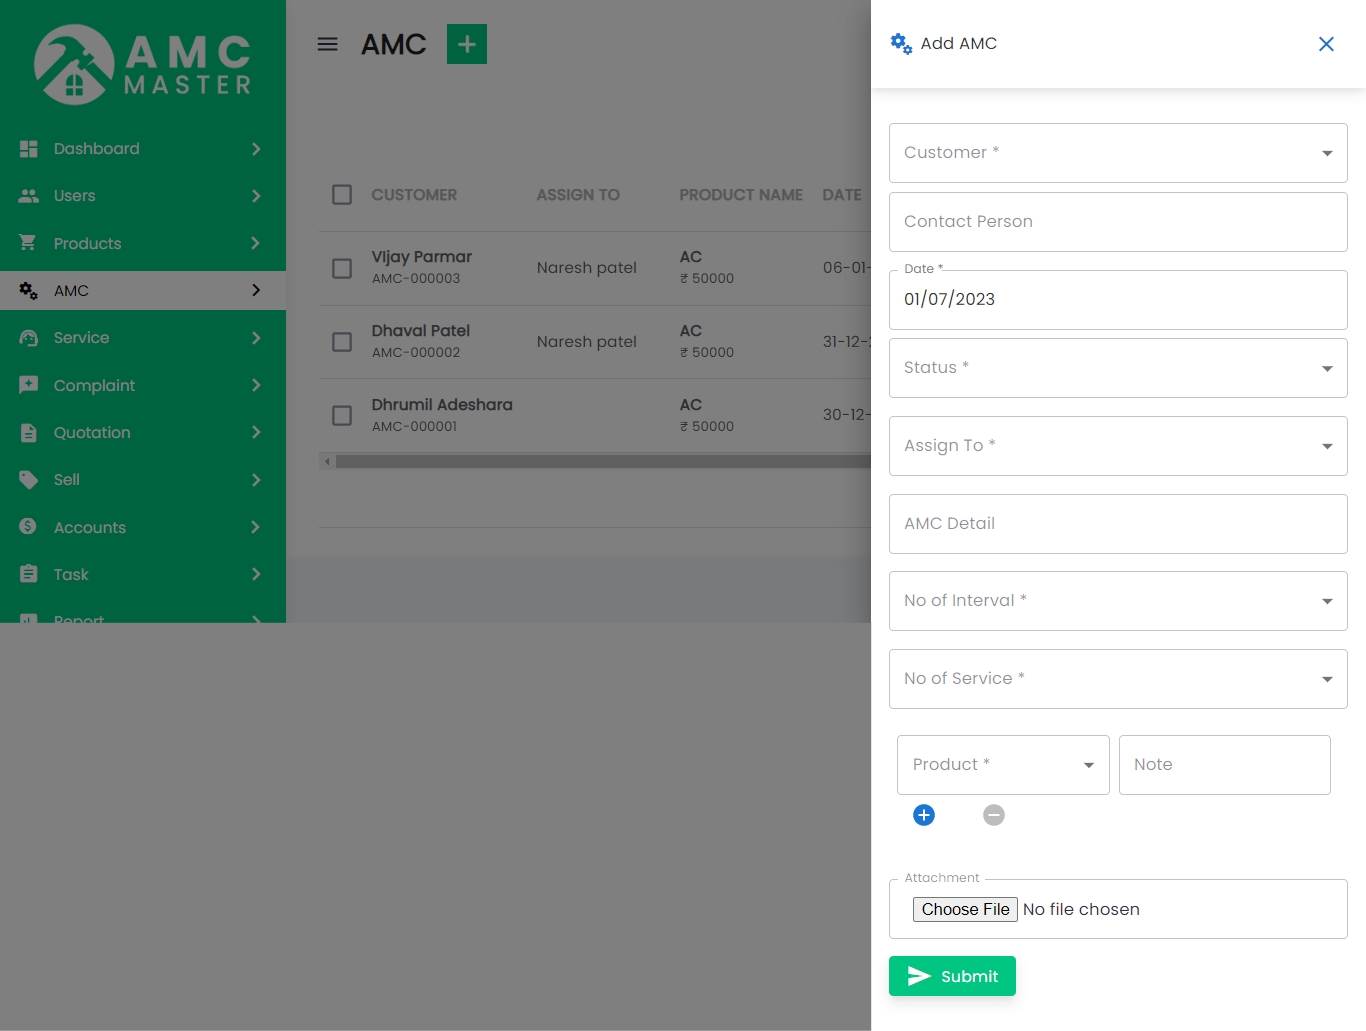
- AMC No: AMC No Auto Generated for this AMC.
- Date: Enter New Date for this AMC.
- Contact Person: Enter Contact Person for this AMC.
- Customer Name: Select Customer name for this AMC.
- Mobile Number: Enter new Mobile Number for this AMC.
- Assign To: Select Assign To for this AMC.
- Email: Enter new Email for this AMC.
- Status: Select Status for this AMC.
- Billing Address: Enter New Billing Address for this AMC.
- Add AMC Details: Enter New AMC Details for this AMC.
- Attachment: Attachment Upload File for this AMC.
- Add New: Add New Product for this AMC.
- Product Name: Select Product for this AMC.
- Note: Enter new Note in Product for this AMC.
- Action: Delete Product for this AMC.
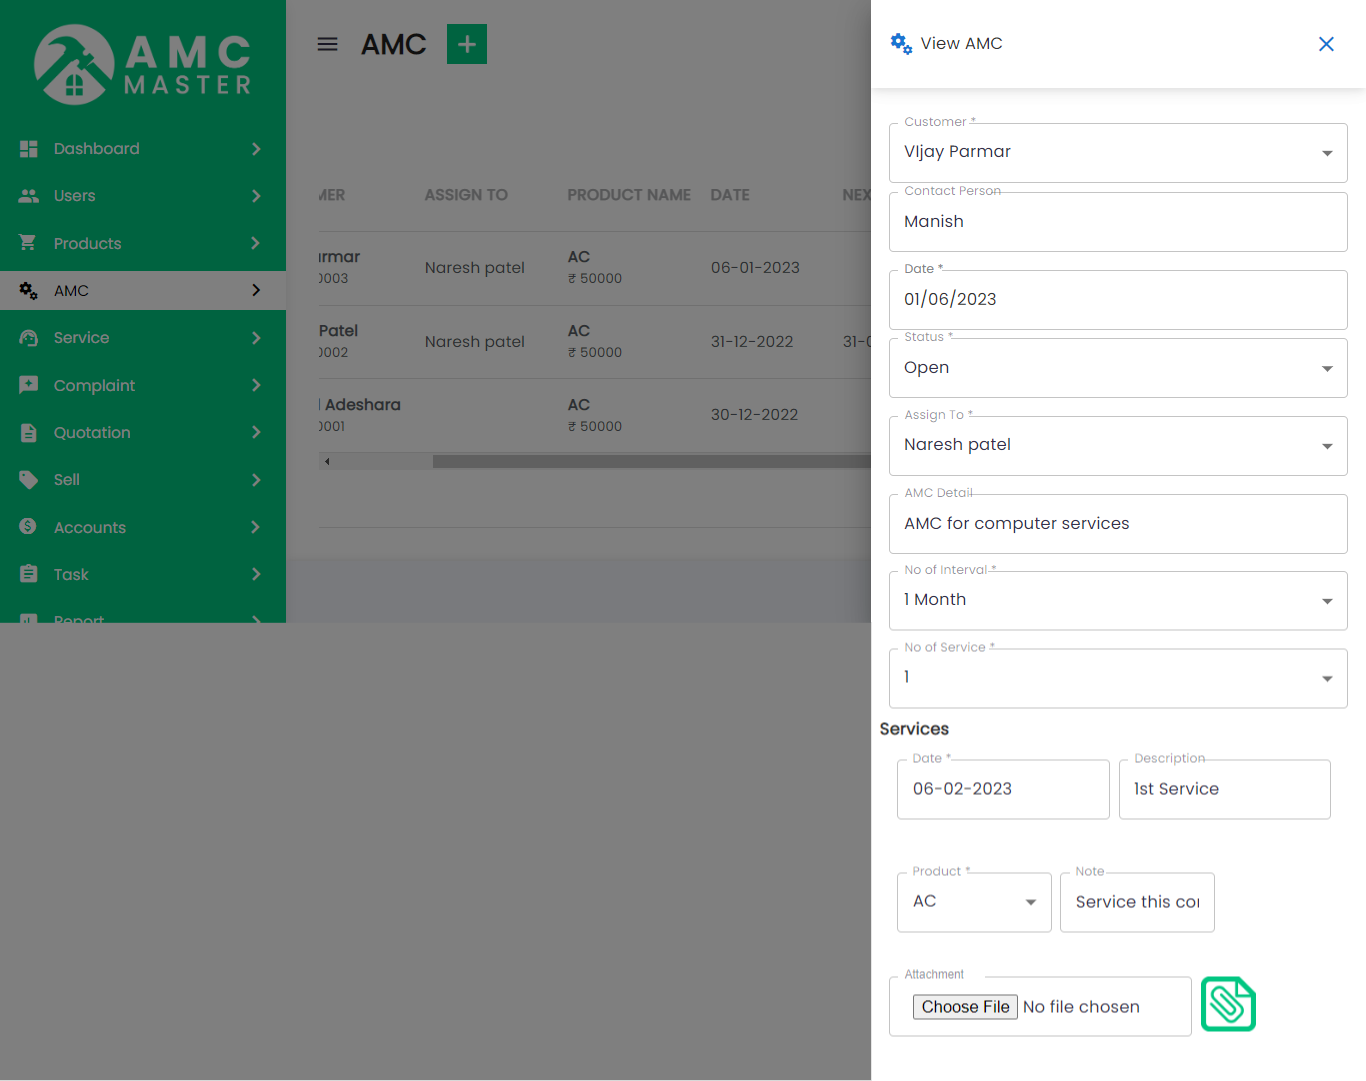
AMC Details
AMC View: Admin can view detail of particular AMC by clicking on view detail button. This will open up details.
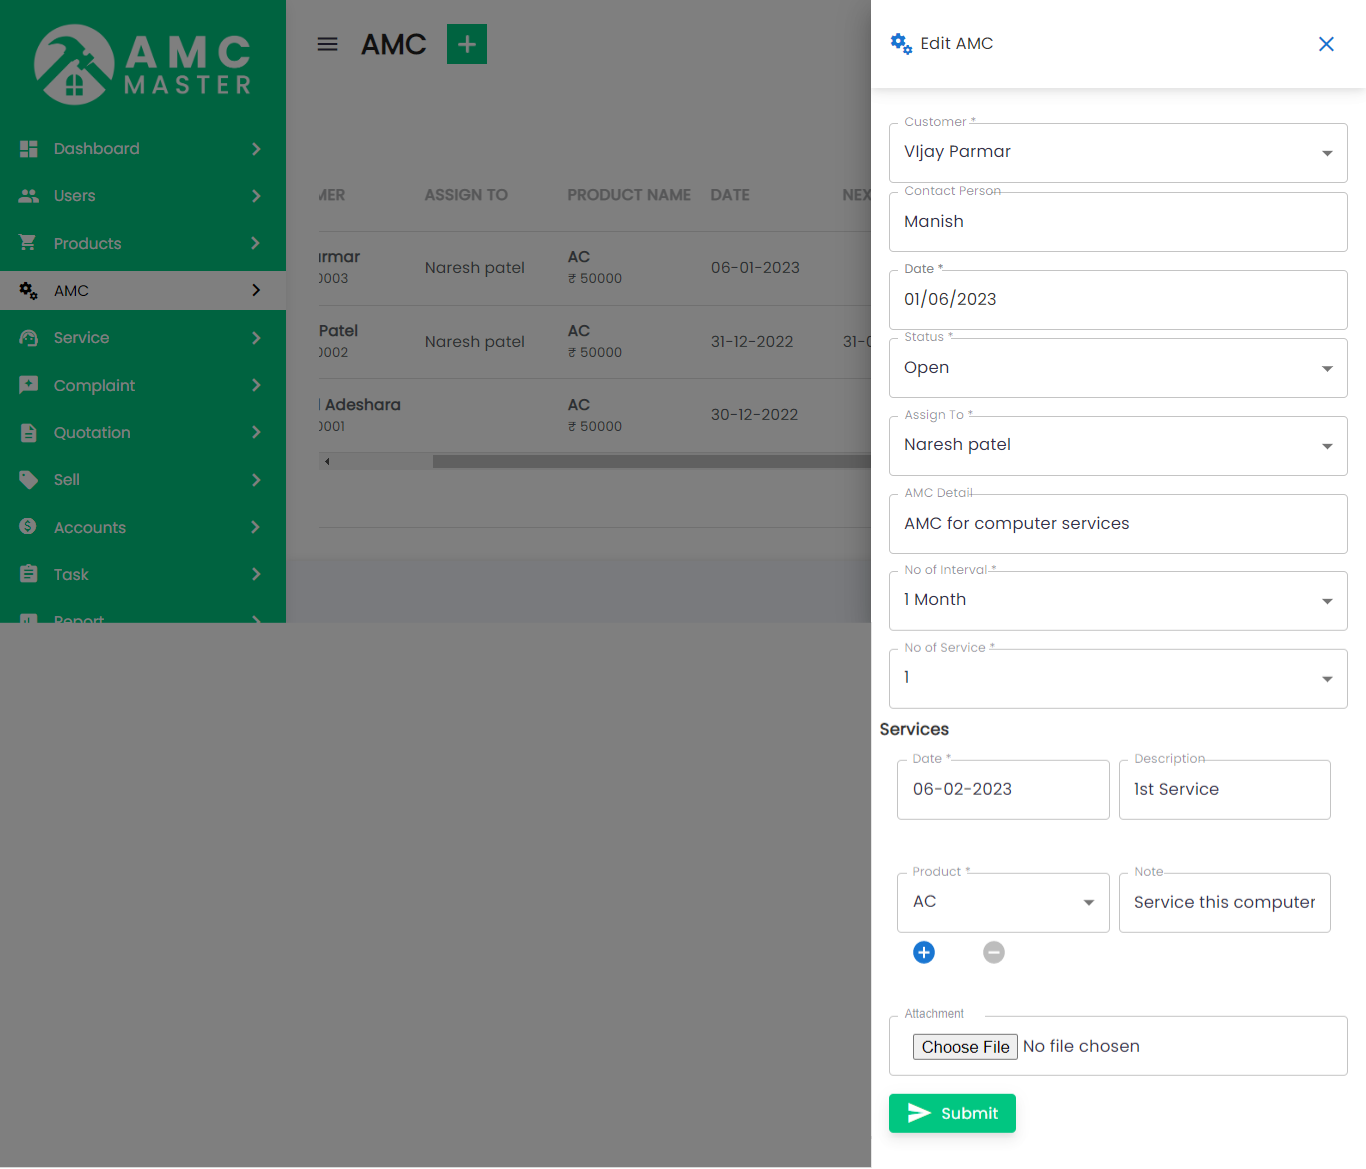
AMC Edit: Admin can Edit detail of particular AMC by clicking on Edit detail button. This will open up details.
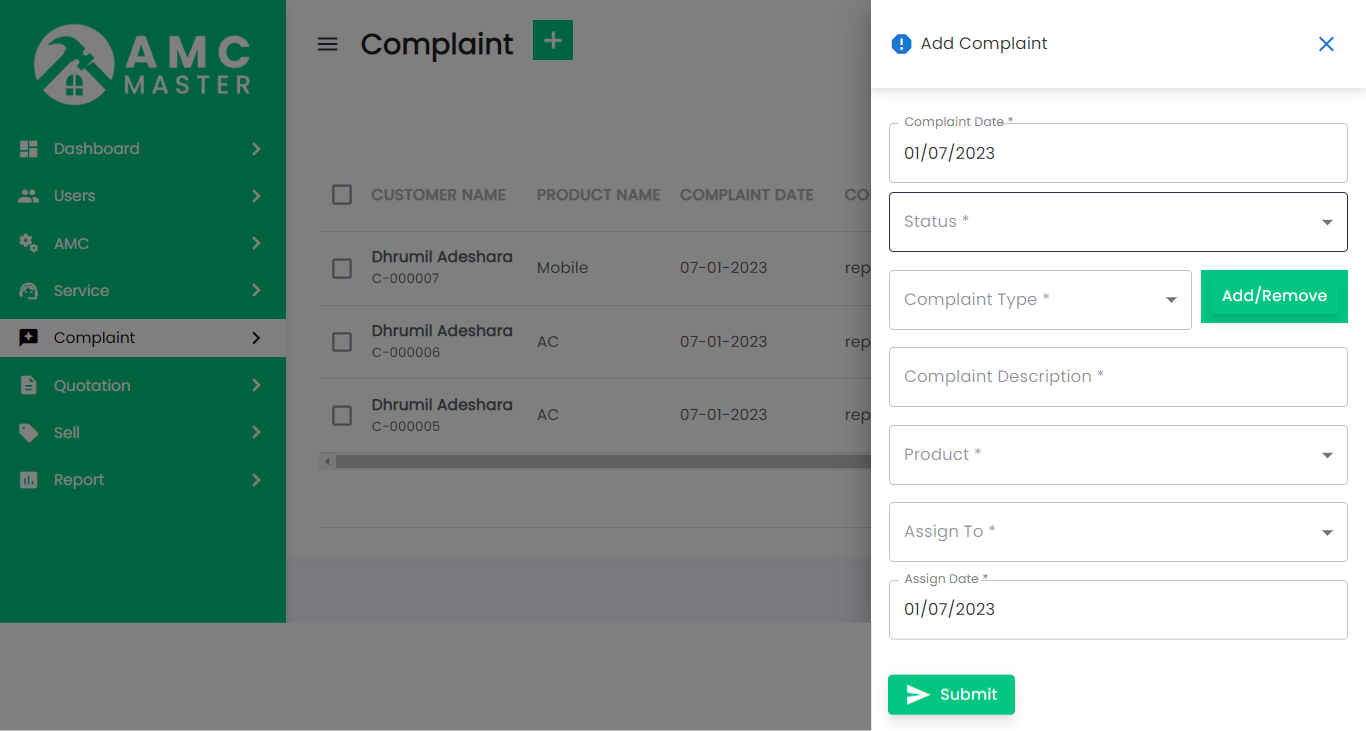
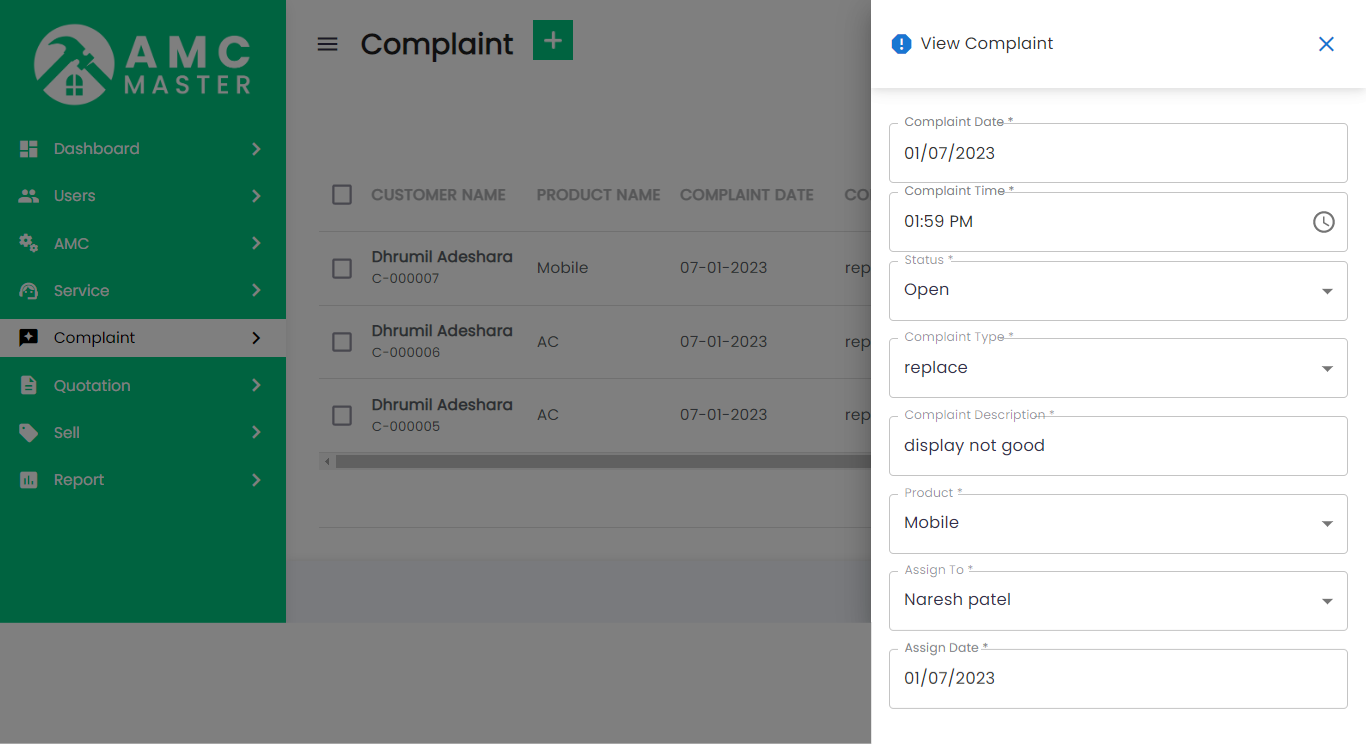
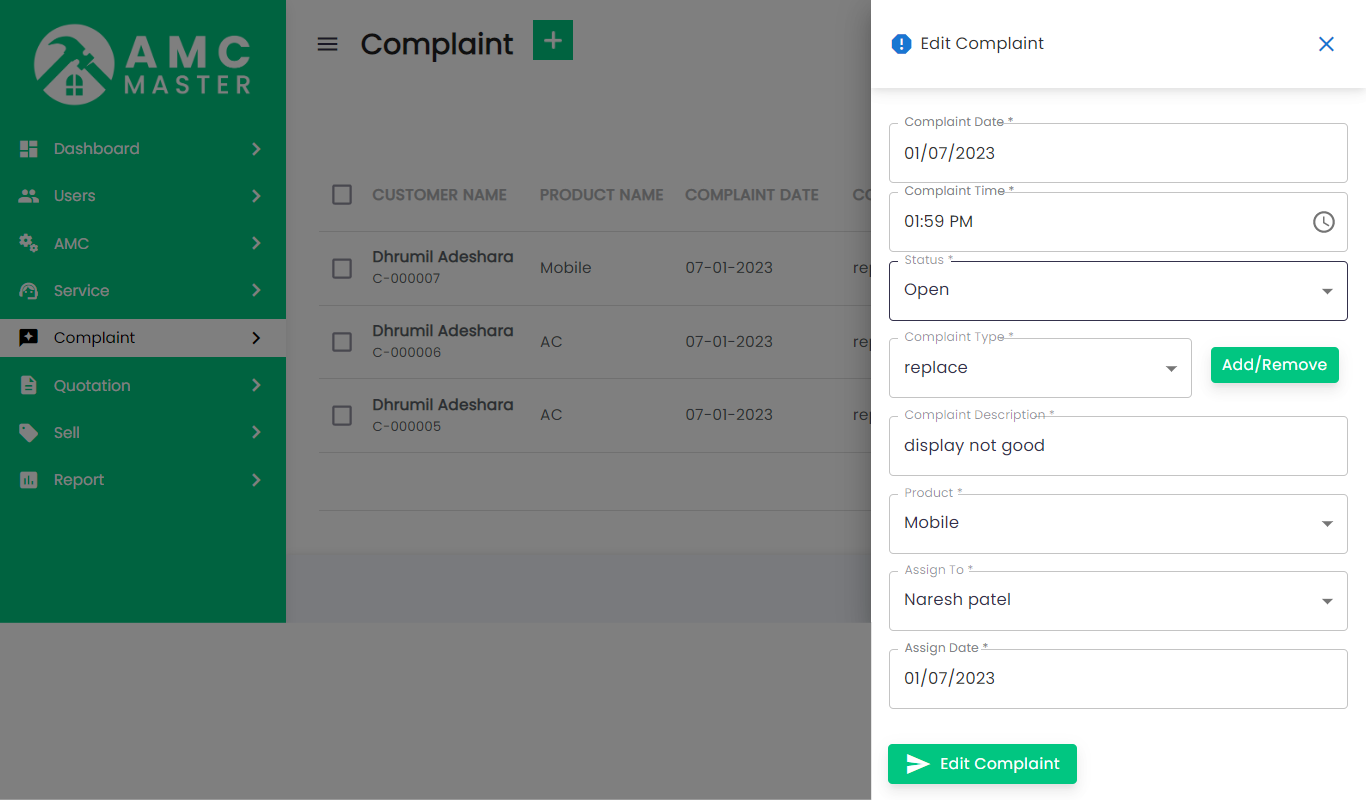
9) Complaint
Complaint List: Admin can add new Complaint, manage all Complaint and view complete list of all Complaint.
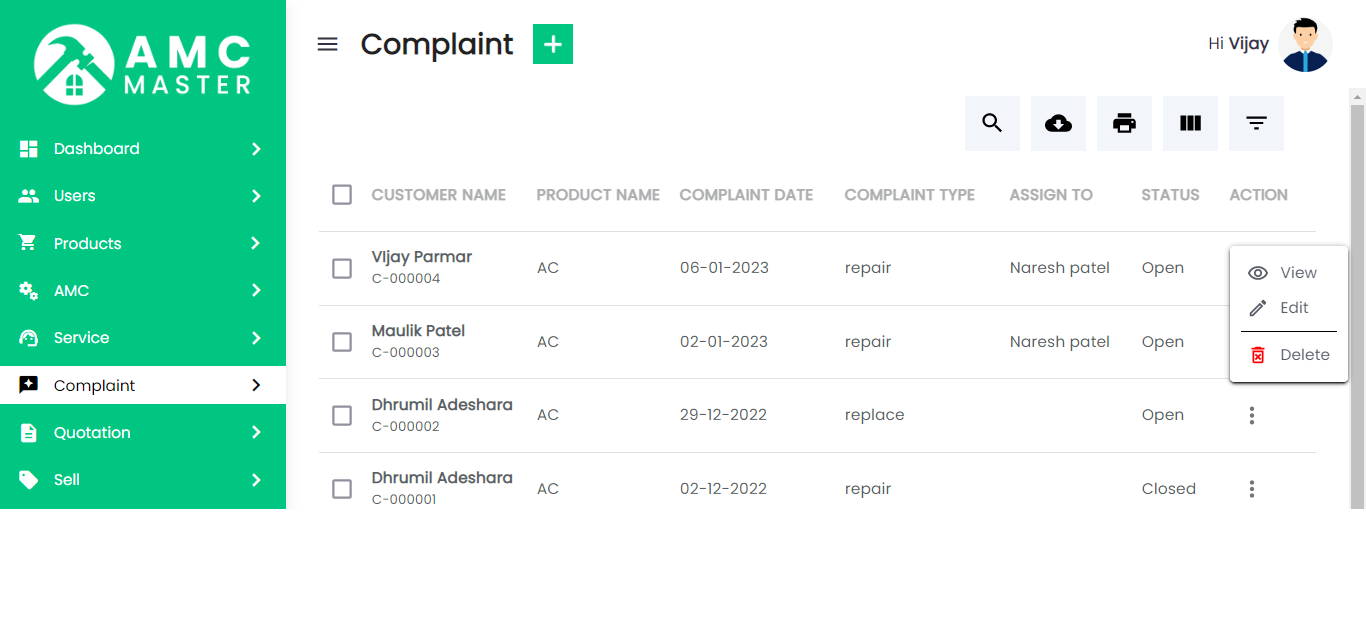
Add Complaint: Admin can add complaint details.
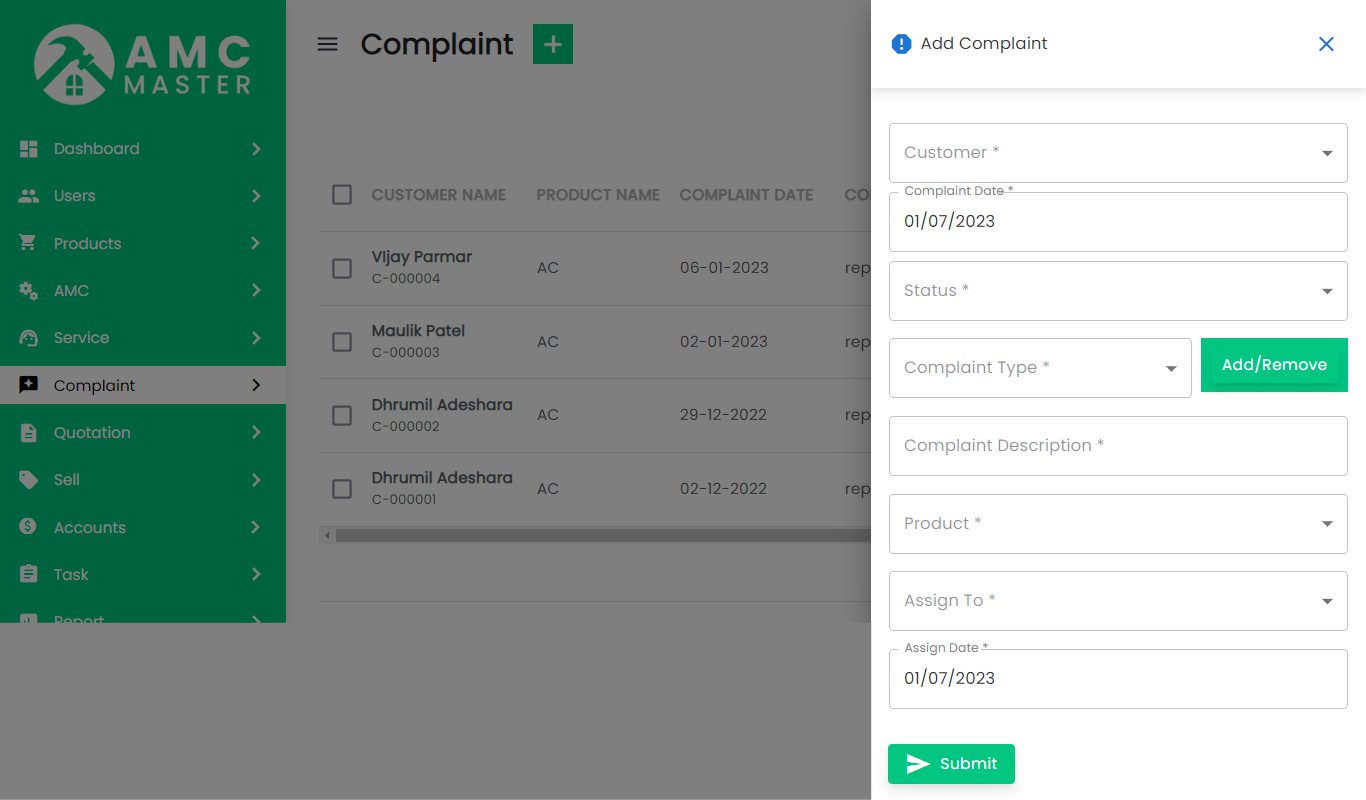
- Complaint Number: Complaint No Auto Generated for this Complaint.
- Status: Select Status for this Complaint.
- Complaint Date: Enter New Complaint Date for this Complaint.
- Mobile Number: Enter new Mobile Number for this Complaint.
- Contact Person: Enter Contact Person for this Complaint.
- Customer Name: Select Customer name for this Complaint.
- Email: Enter new Email for this Complaint.
- Close Date: Enter New Close Date for this Complaint.
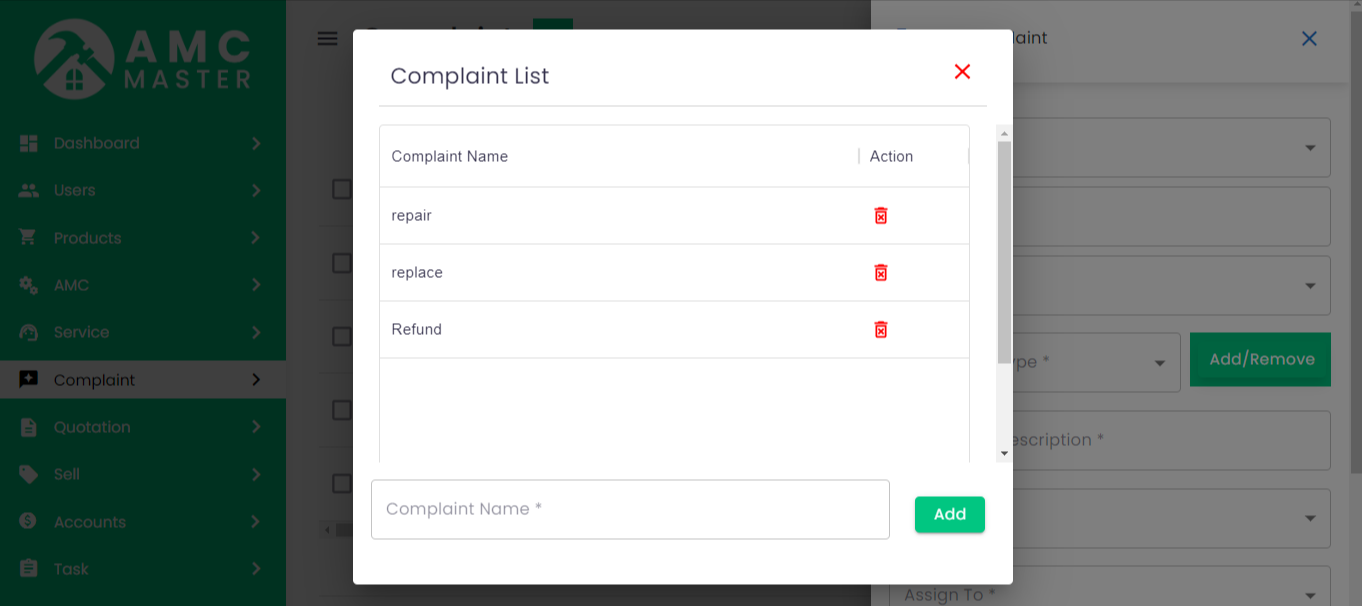
- Complaint Type: Select Complaint Type for this Complaint.
- Add Or Remove: If desired Complaint is not there in the list and your want to add new Complaint then click on Add Or Remove button. your can add new Complaint from here.
- Complaint Description: Enter New Complaint Description for this Complaint.
- Address: Enter New Address for this Complaint.
- Complaint Chargeable: Select Complaint Chargeable for this Complaint.
- Product Name: Select Product for this Complaint.
- Assign To: Select Assign To for this Complaint.
- Attachment: Attachment Upload File for this Complaint.
- Assign Date: Enter New Assign date for this Complaint.
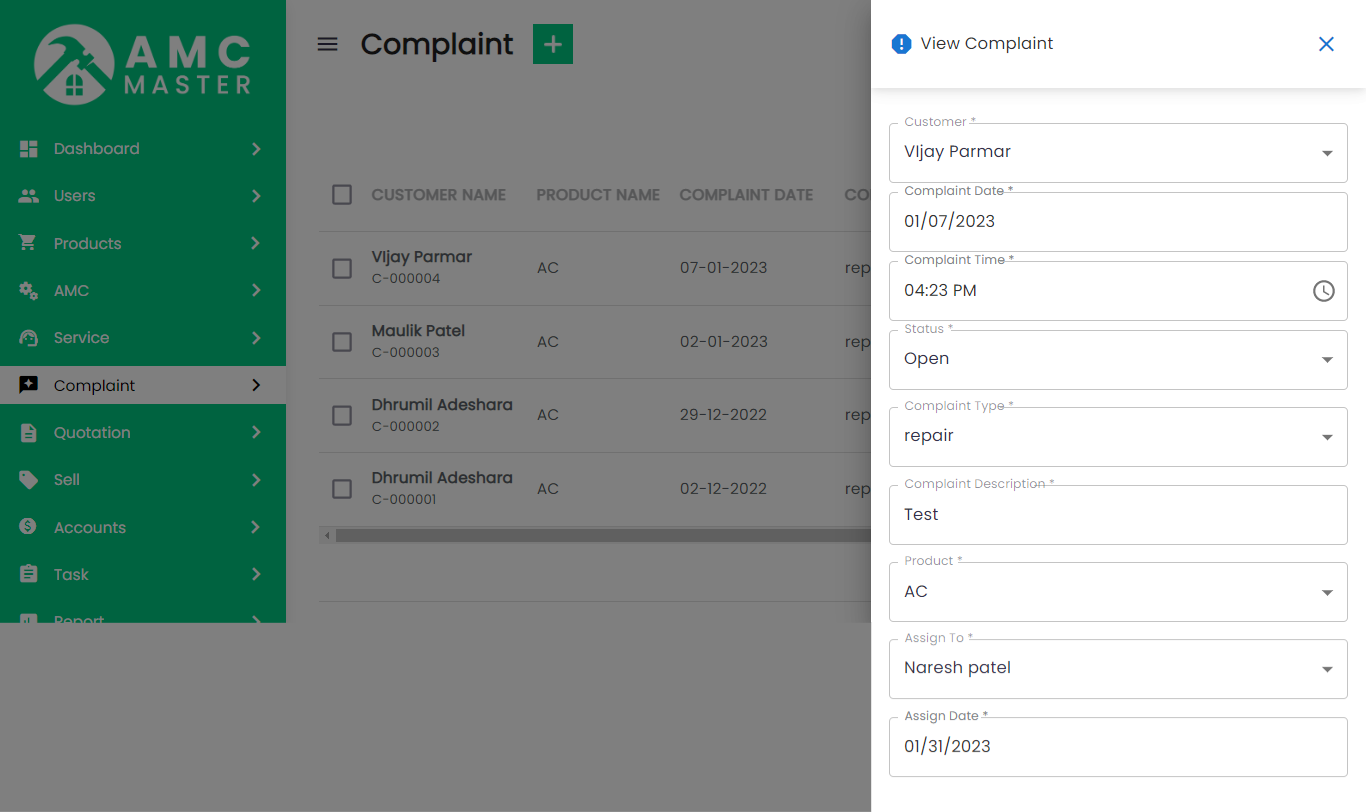
Complaint View: Admin can view detail of particular Complaint by clicking on view detail button. This will open up details.
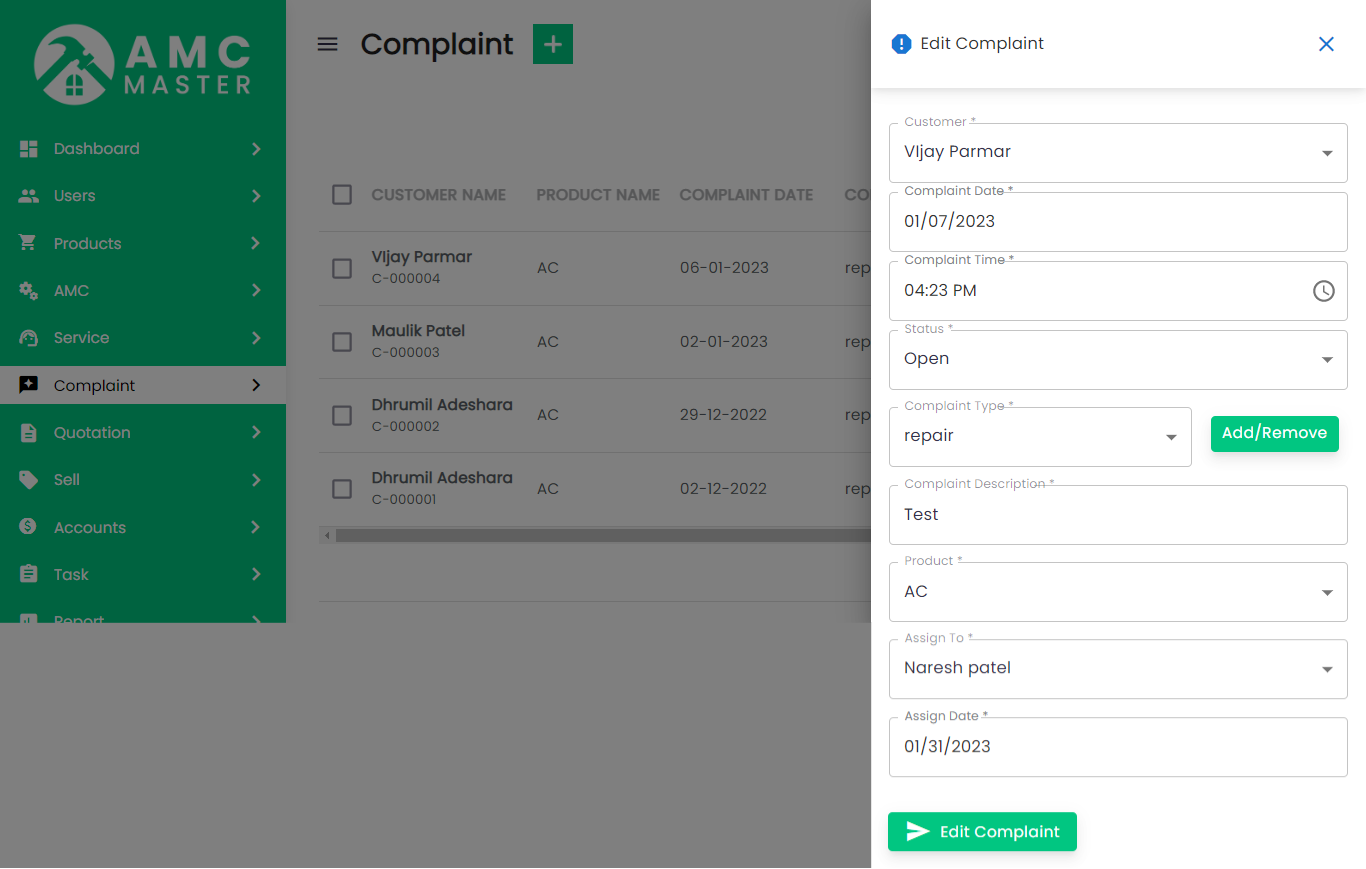
Complaint Edit: Admin can Edit detail of particular Complaint by clicking on Edit detail button. This will open up details.
10) Service
Service List: Admin can add new Service, manage all Service and view complete list of all Service.
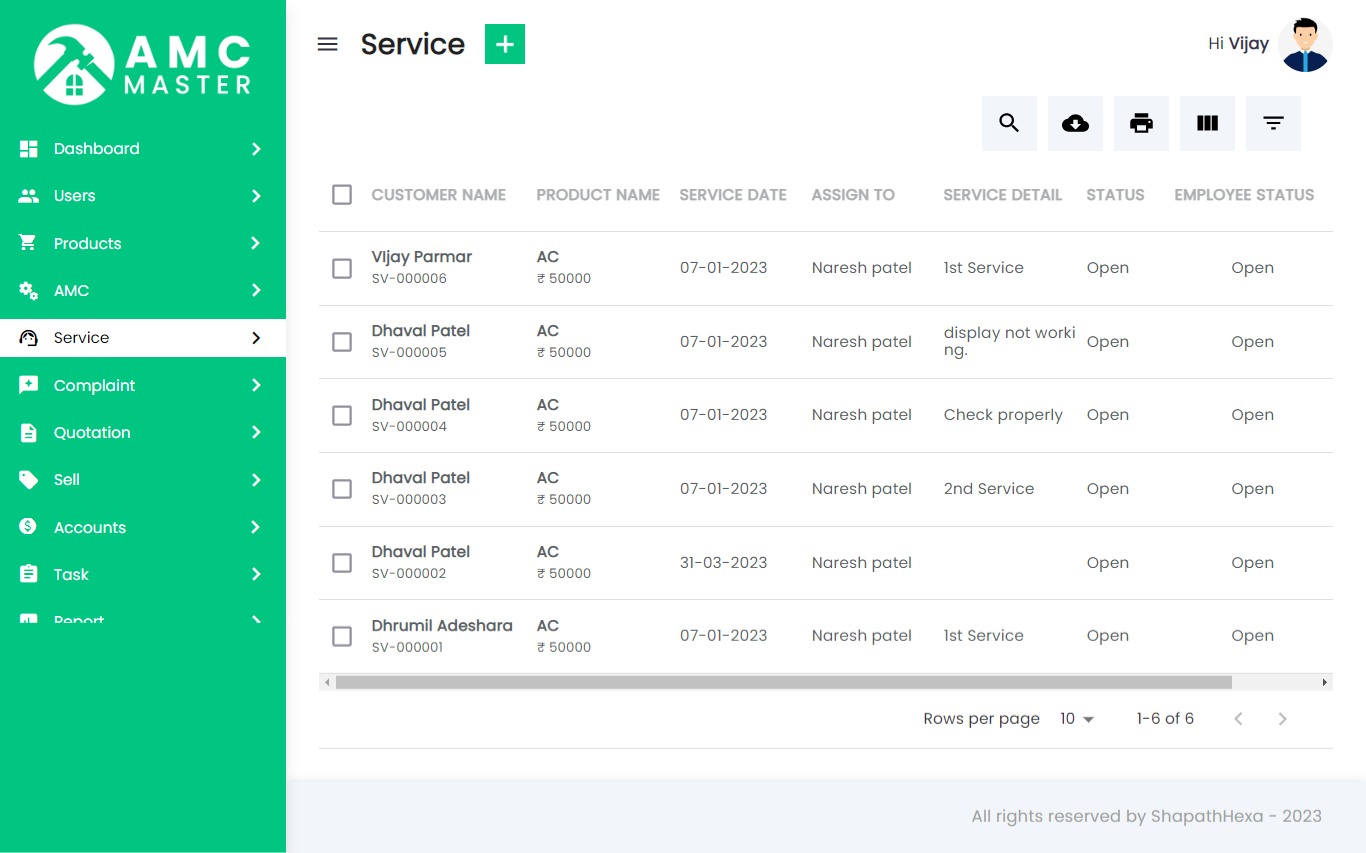
Add Service: Admin can add service details.
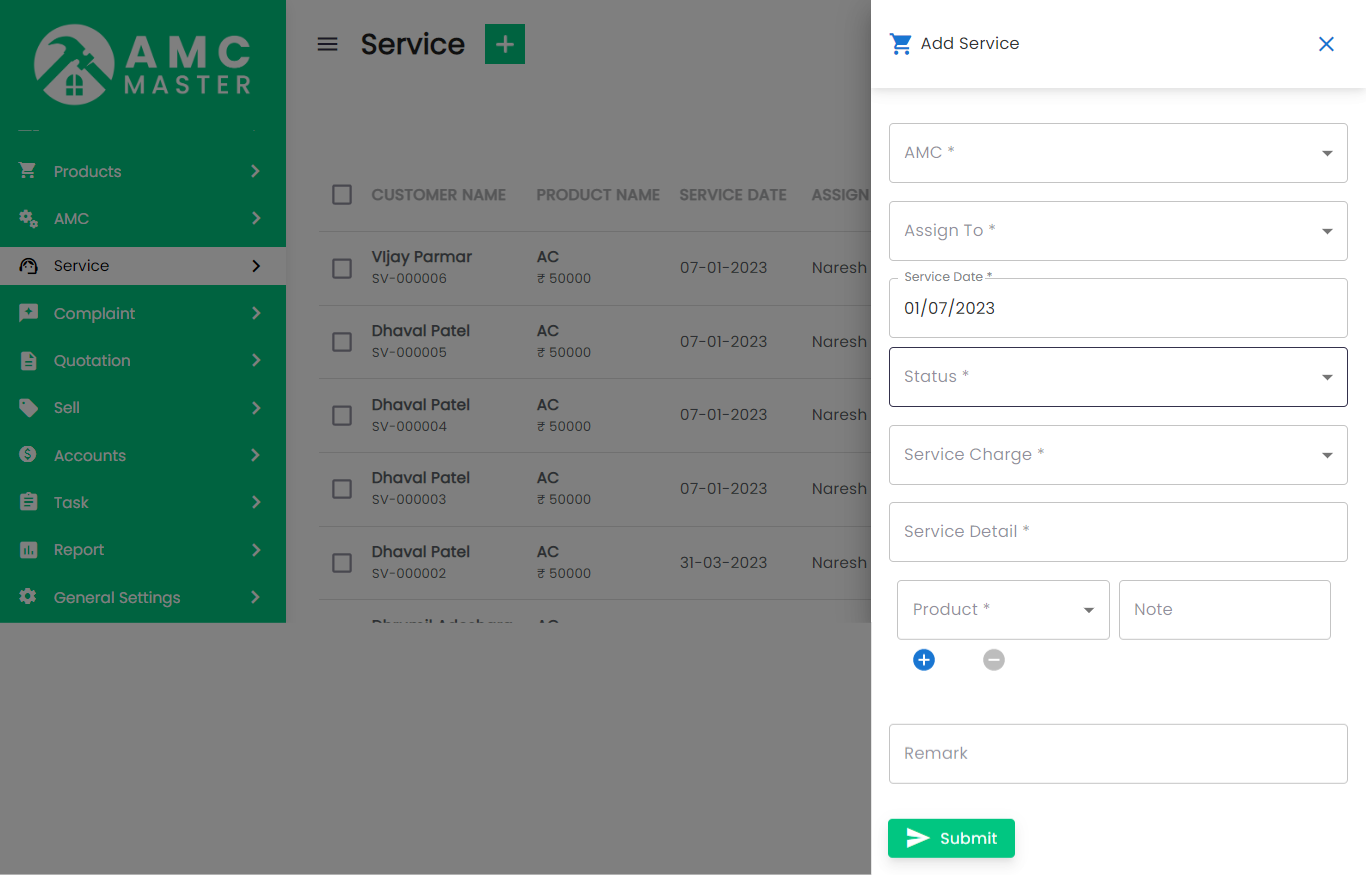
- Service Code: Service Code Auto Generated for this Service.
- Assign To: Select Assign To for this Service.
- Service Date: Enter New Service Date for this Service.
- Status: Select Status for this Service.
- Customer Name: Select Customer name for this Service.
- Service Charge: Select Service Charge for this Service.
- Remark: Enter new Remark for this Service.
- Service Details: Enter Service Details for this Service.
- Add New: Add New Product for this AMC.
- Product Name: Select Product for this AMC.
- Note: Enter new Note in Product for this AMC.
- Action: Delete Product for this AMC.
AMC Details
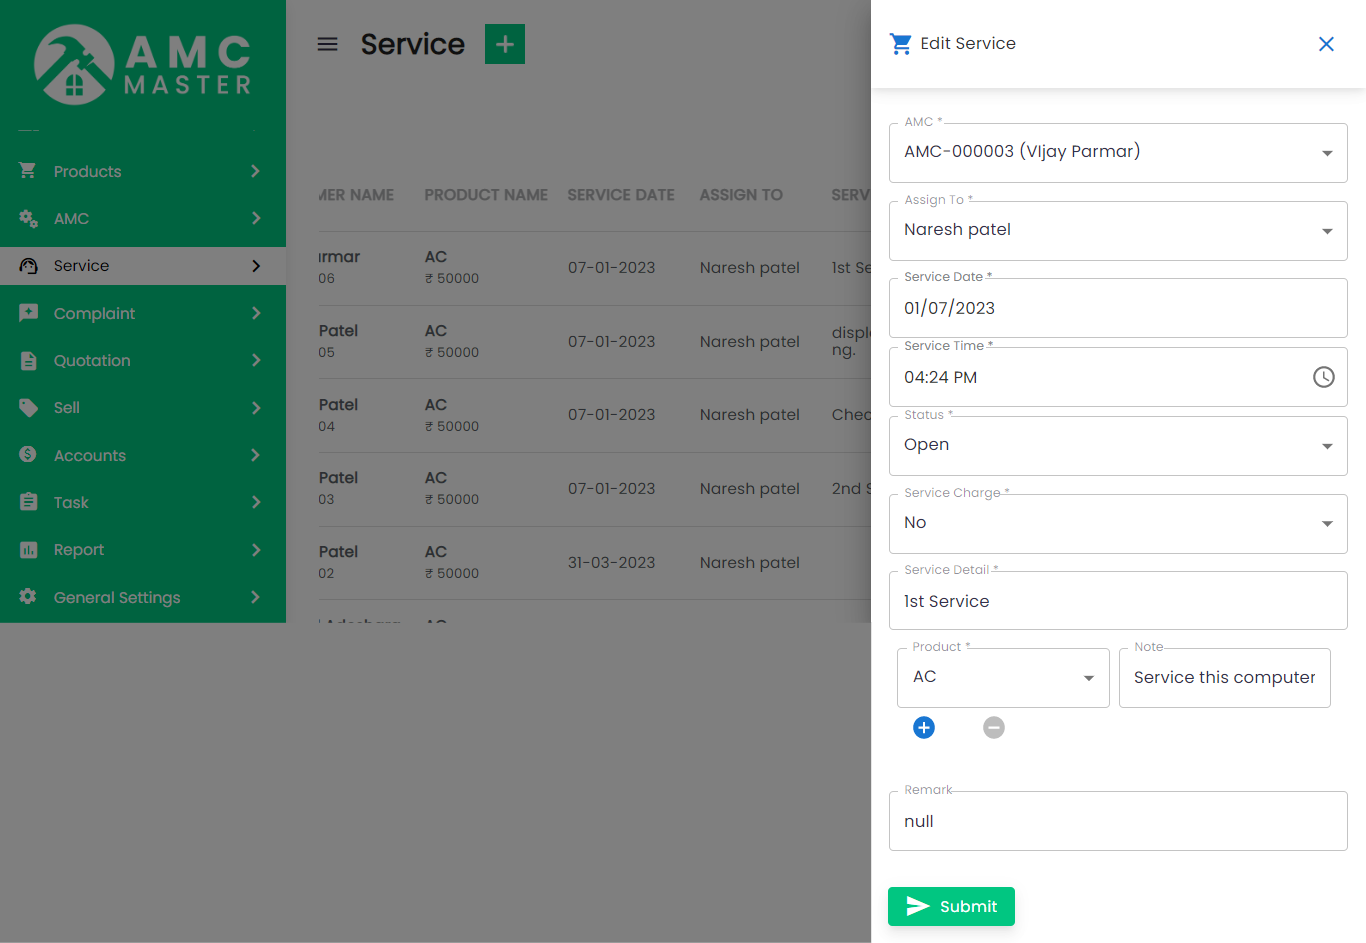
Service Edit: Admin can Edit detail of particular Service by clicking on Edit detail button. This will open up details.
11) Task
Task List: Admin can add new Task, manage all Task and view complete list of all Task.
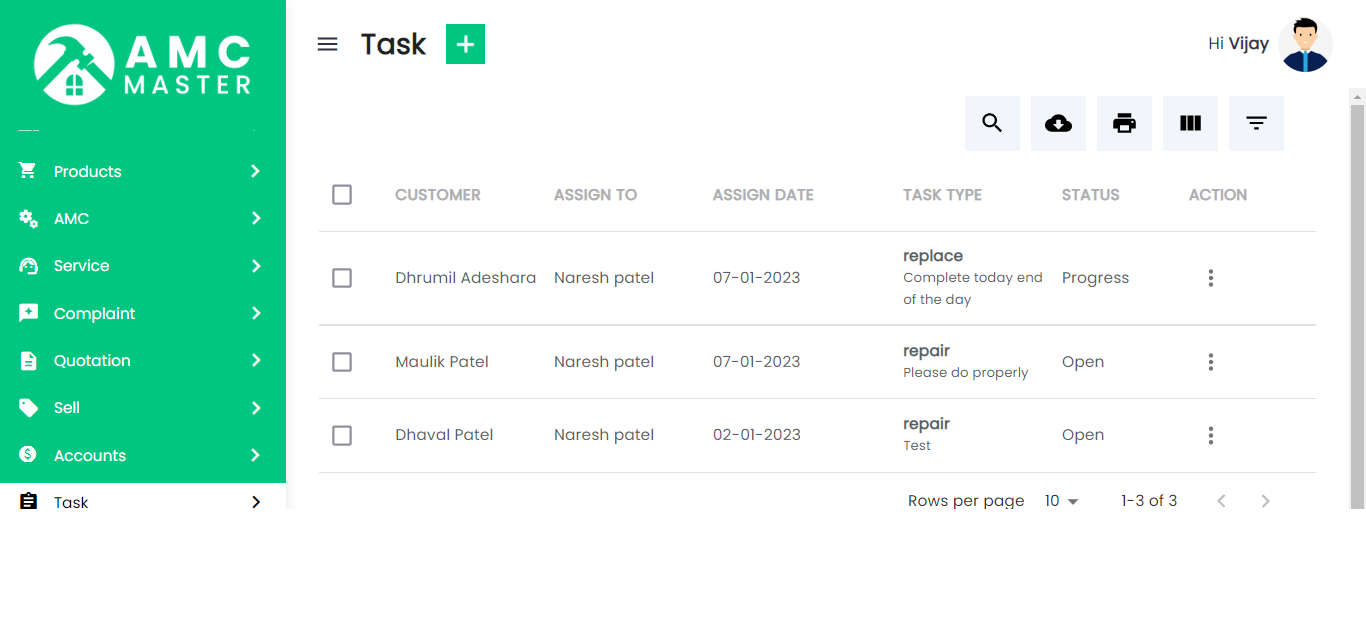
Add Task: Admin can add task details.
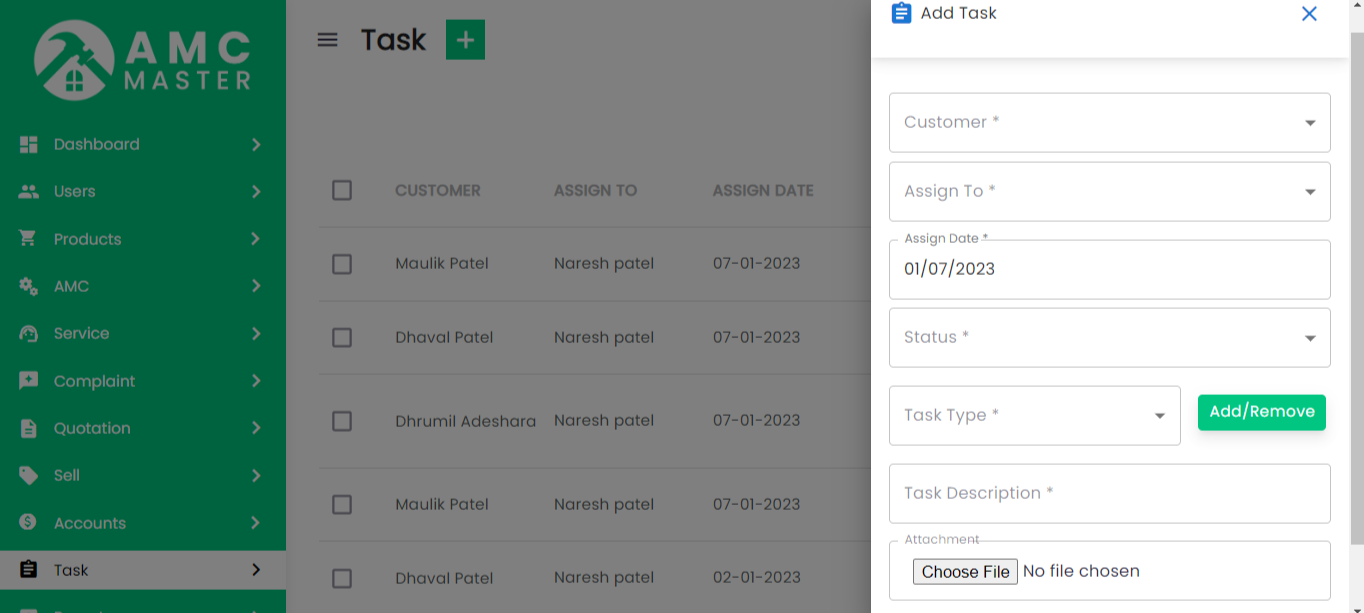
- Client: Select Client for this Task.
- Assign To: Select Assign To for this Task.
- Subject: Enter Subject for this Task.
- Assign Date: Enter New Assign Date for this Task.
- Task Type: Select Task Type for this Task.
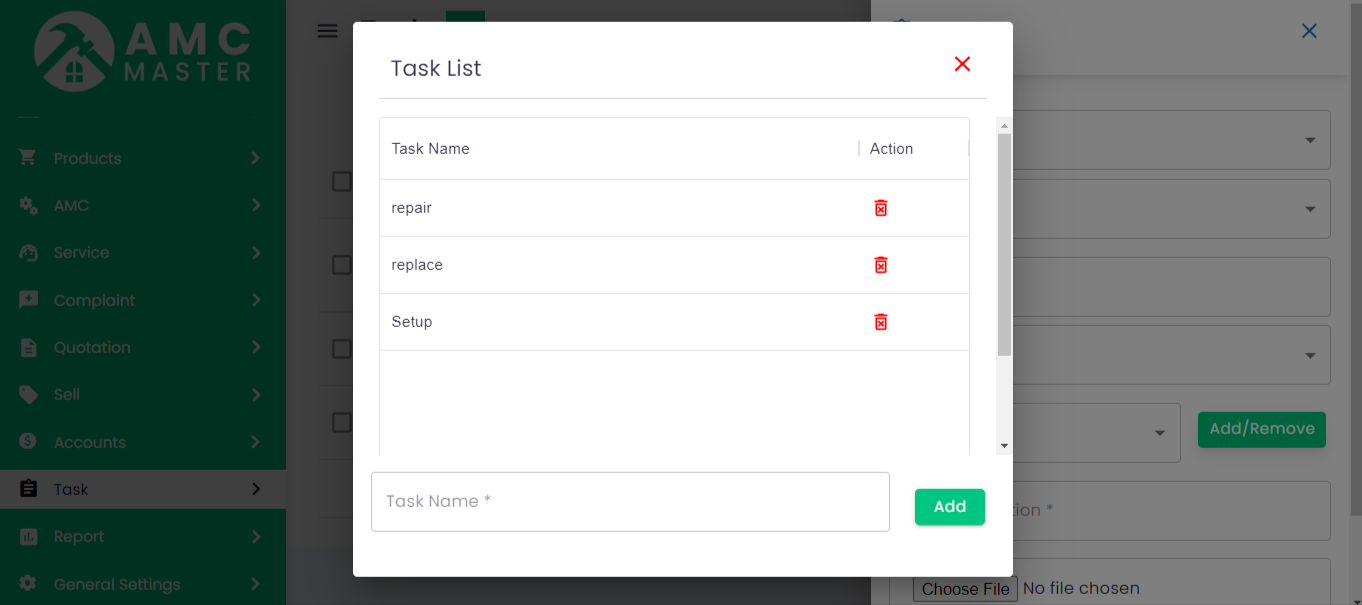
- Add Or Remove: If desired Task is not there in the list and your want to add new Task then click on Add Or Remove button. your can add new Task from here.
- Remarks: Enter new Remark for this Task.
- Description: Enter Description for this Task.
- Close Date: Enter Close Date for this Task.
- Attachment: Attachment Upload File for this Task.
- Status: Select Status for this Task.
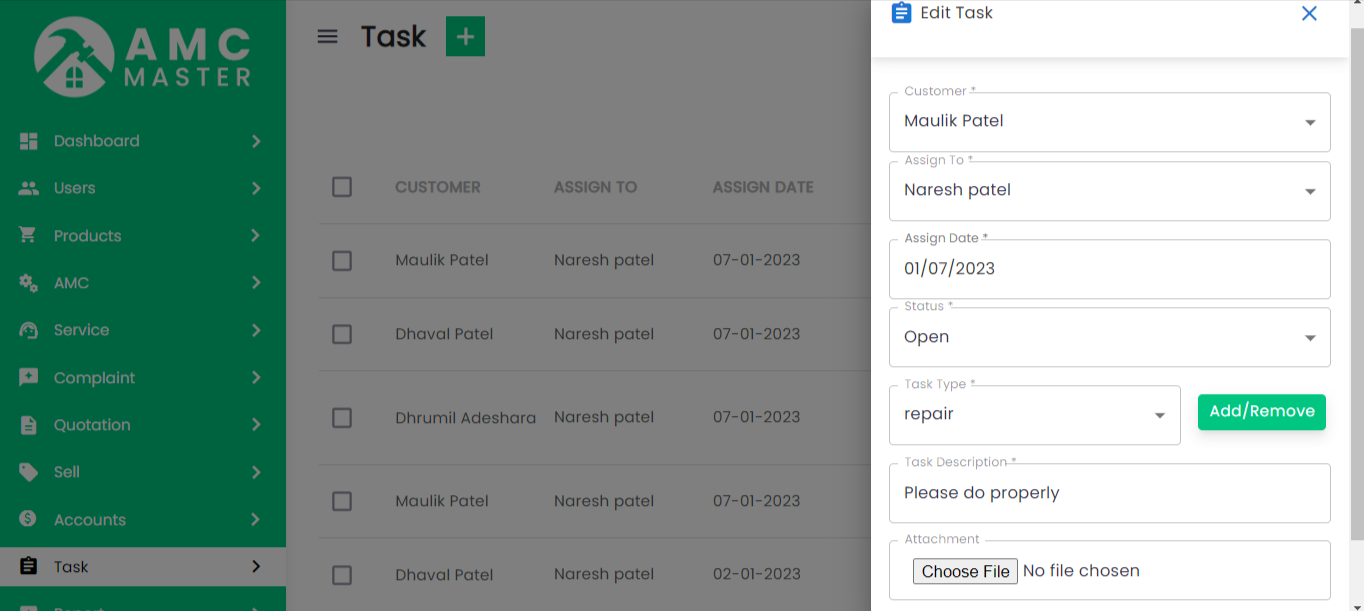
Task Edit: Admin can Edit detail of particular Task by clicking on Edit detail button. This will open up details.
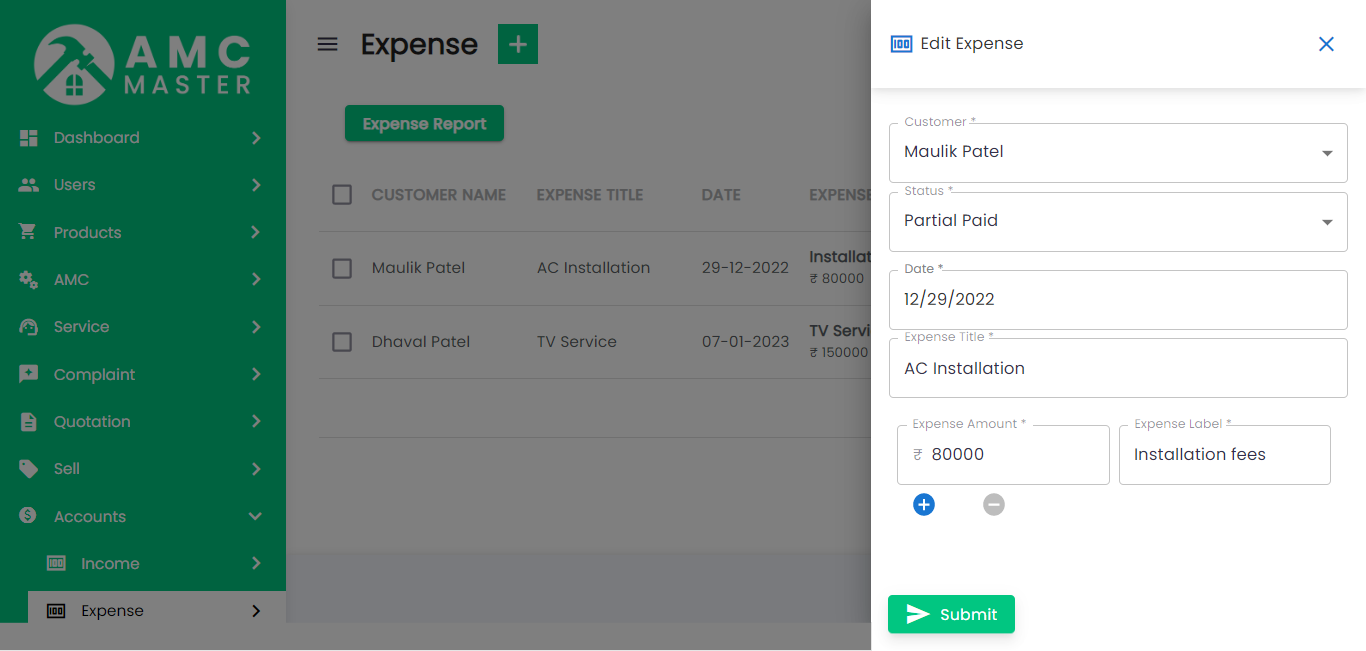
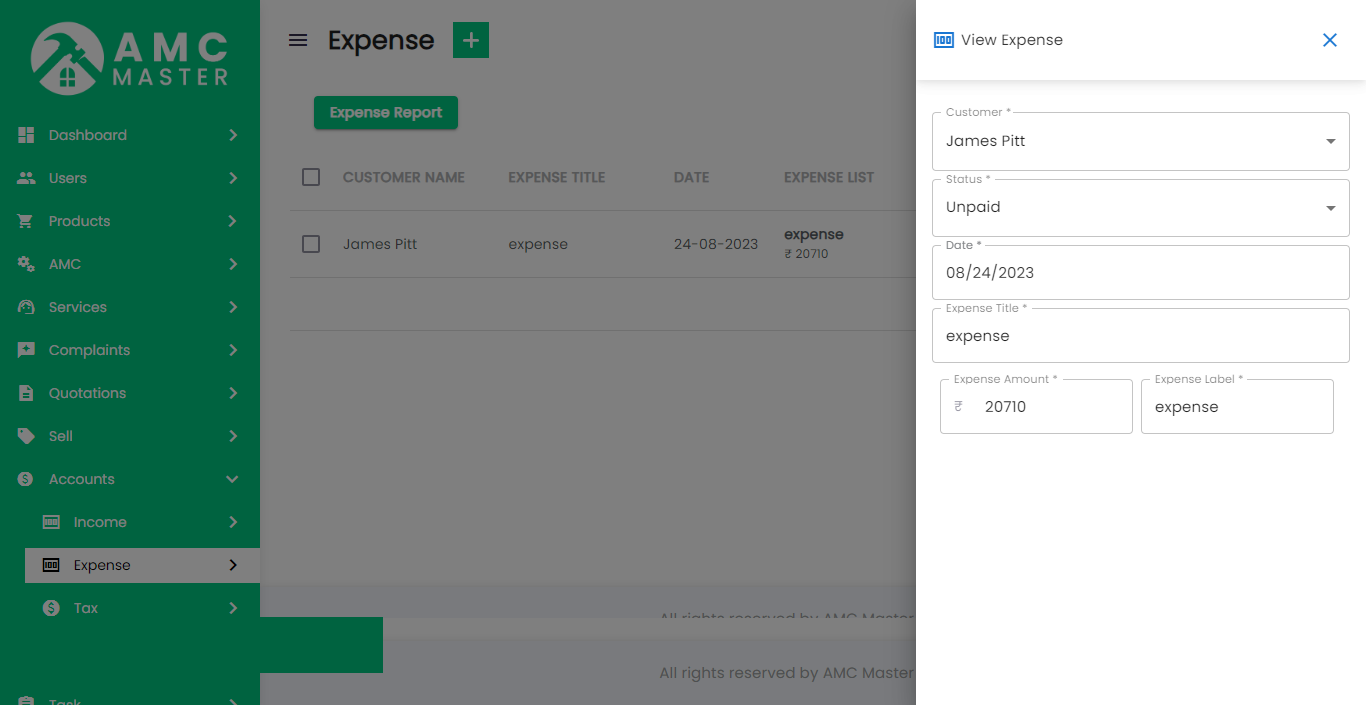
12) Expenses
Expenses List: Admin can add new Expenses, manage all Expenses and view complete list of all Expenses.
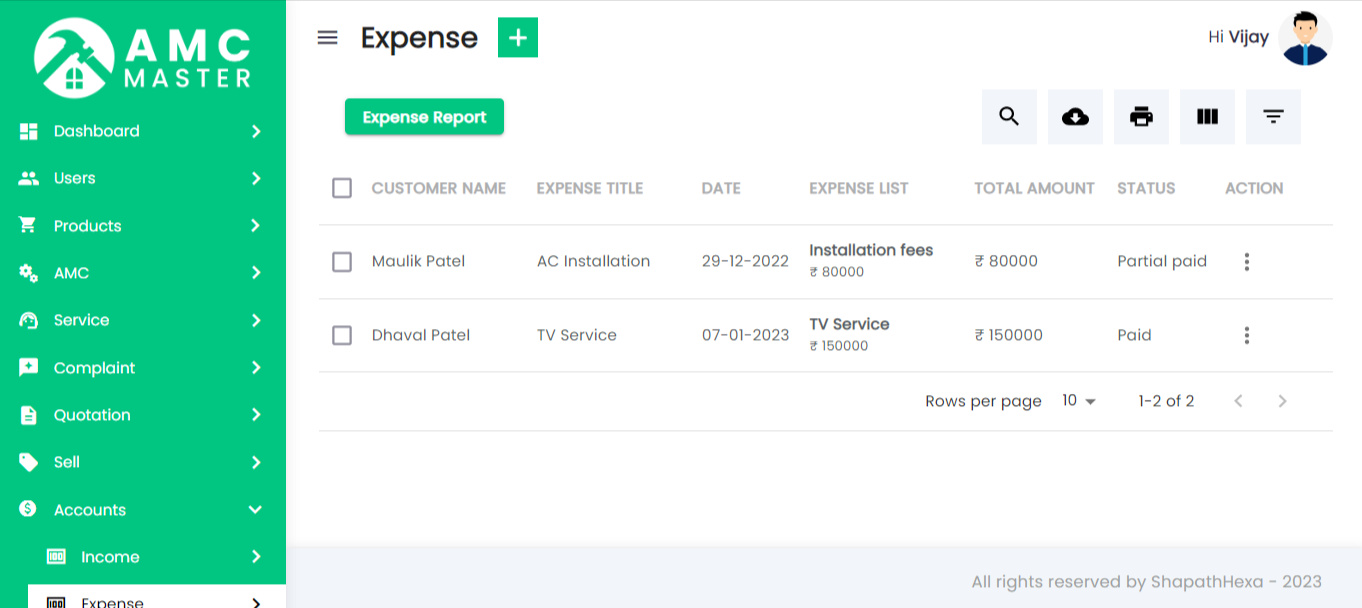
Add Expenses: Admin can add expenses details.
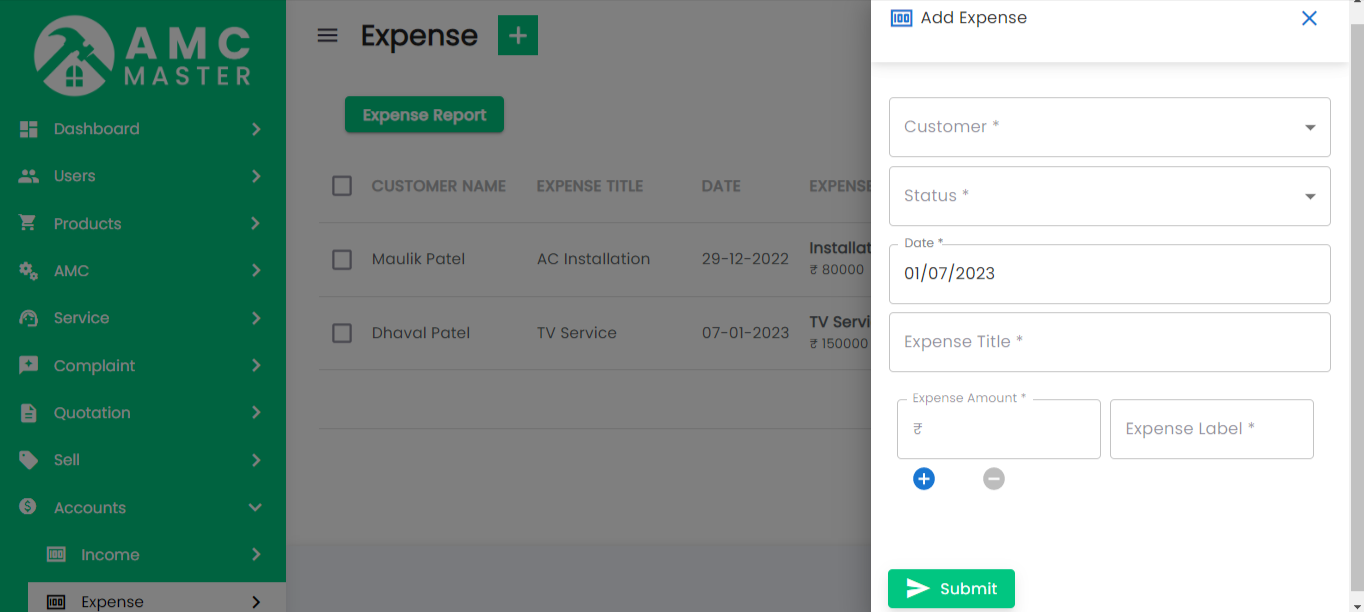
- Main Label: Enter Main Label for this Expenses.
- Date: Enter Date for this Expenses.
- Status: Select Status for this Expenses.
- Expense Entry: Enter Expense Amount for this
Expenses.
Expense Entry Label - Add More Field: Add new Expense Entry field for this Expenses.
Expenses Edit: Admin can Edit detail of particular Expenses by clicking on Edit detail button. This will open up details.
Monthly Expenses: You can View Monthly expenses details.
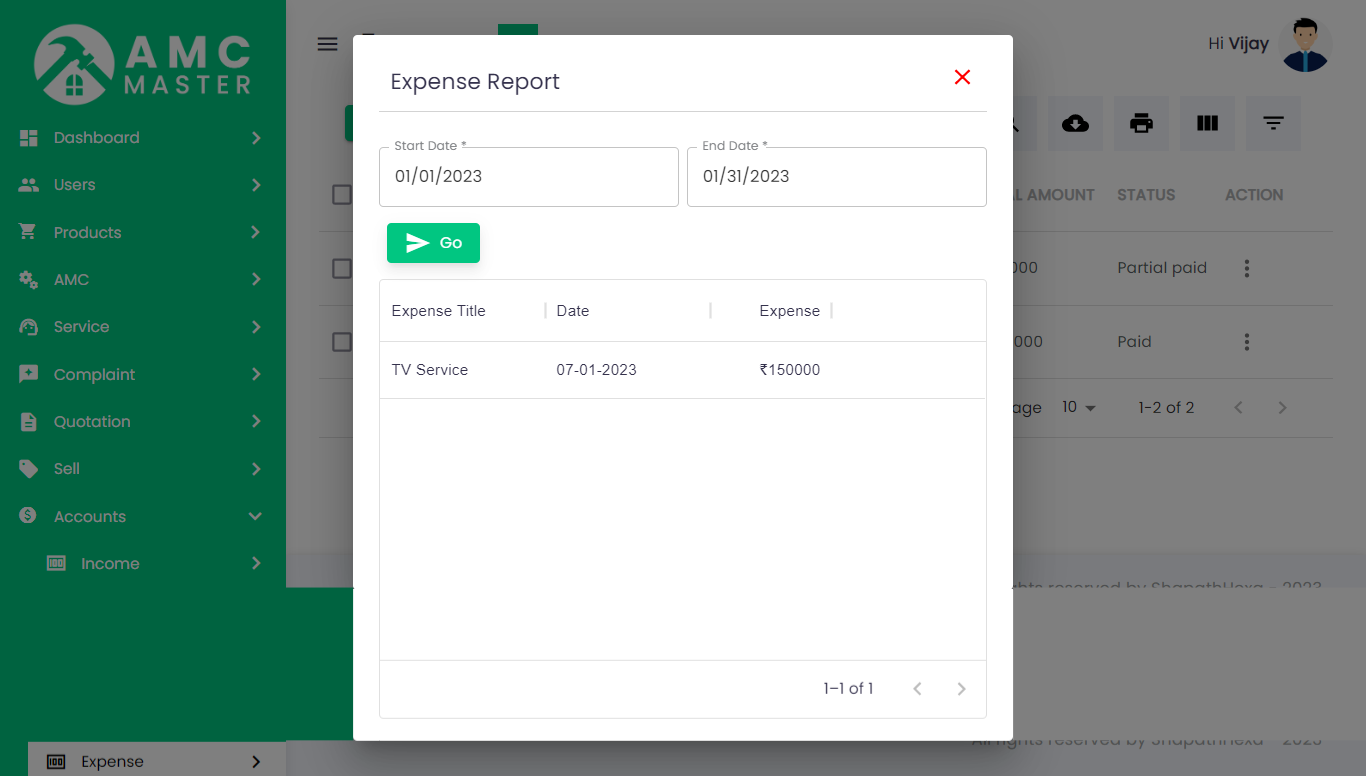
- Start Date: Enter Start Date for this Monthly Expenses.
- End Date: Enter End Date for this Monthly Expenses.
- Go: Click GO Button in view Monthly Expense.
Expenses View: Admin can View detail of particular Expenses by clicking on View detail button. This will open up details.
13) Income
Income List: Admin can add new Income, manage all Income and view complete list of all Income.
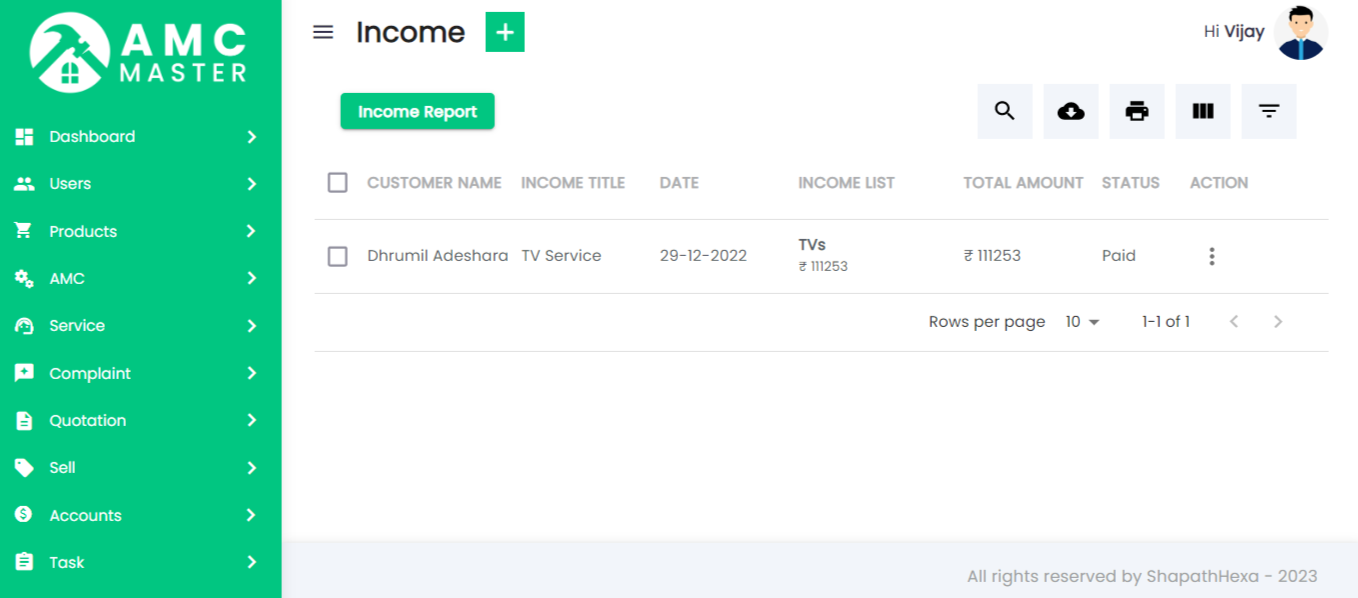
Add Income: Admin can add income details.
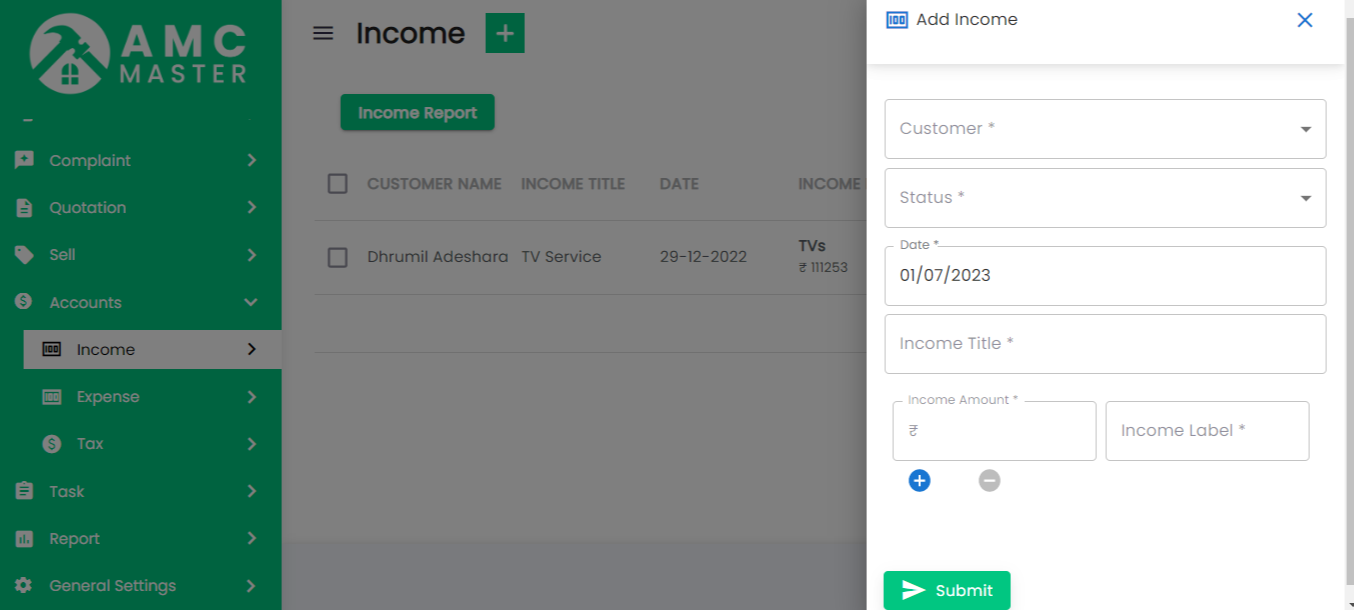
- Customer Name: select Customer Name for this Income.
- Status: Select Status for this Income.
- Date: Enter Date for this Income.
- Main Label: Enter Main Label for this Income.
- Income Entry: Enter Income Amount for this
Income.
Income Entry Label for this Income - Add More Field: Add new Income Entry field for this Income.
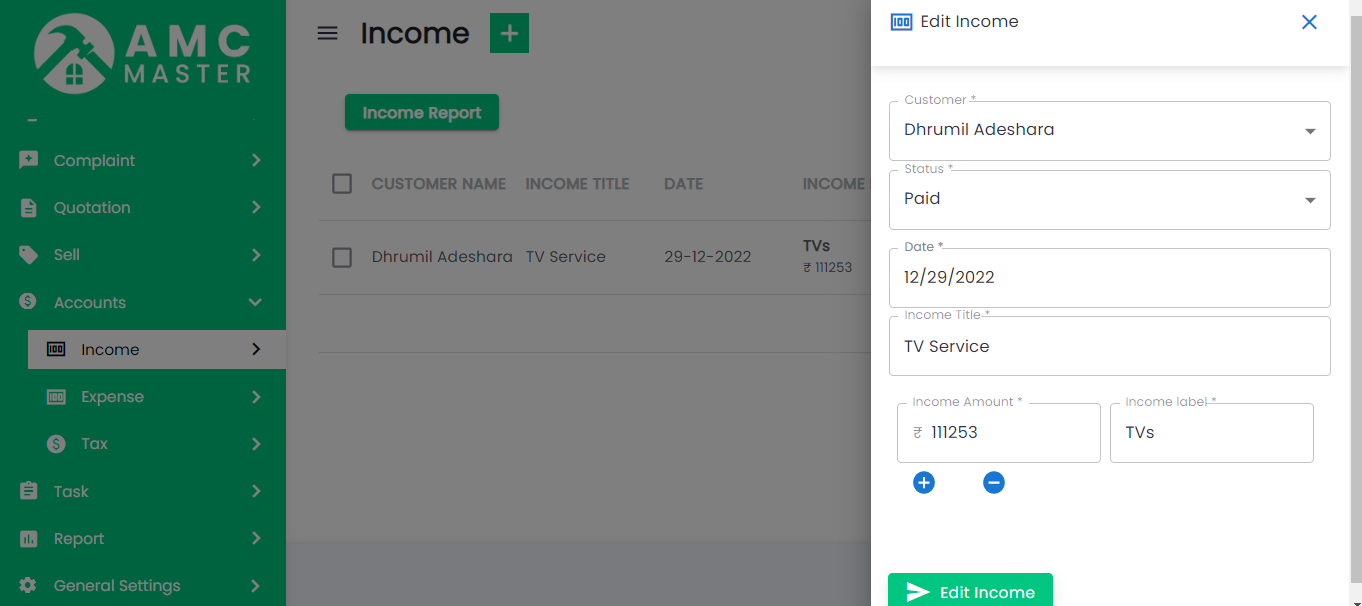
Income Edit: Admin can Edit detail of particular Income by clicking on Edit detail button. This will open up details.
Monthly Income: Admin can View Monthly Income details.

- Start Date: Enter Start Date for this Monthly Income.
- End Date: Enter End Date for this Monthly Income.
- Go: Click GO Button in view Monthly Income.
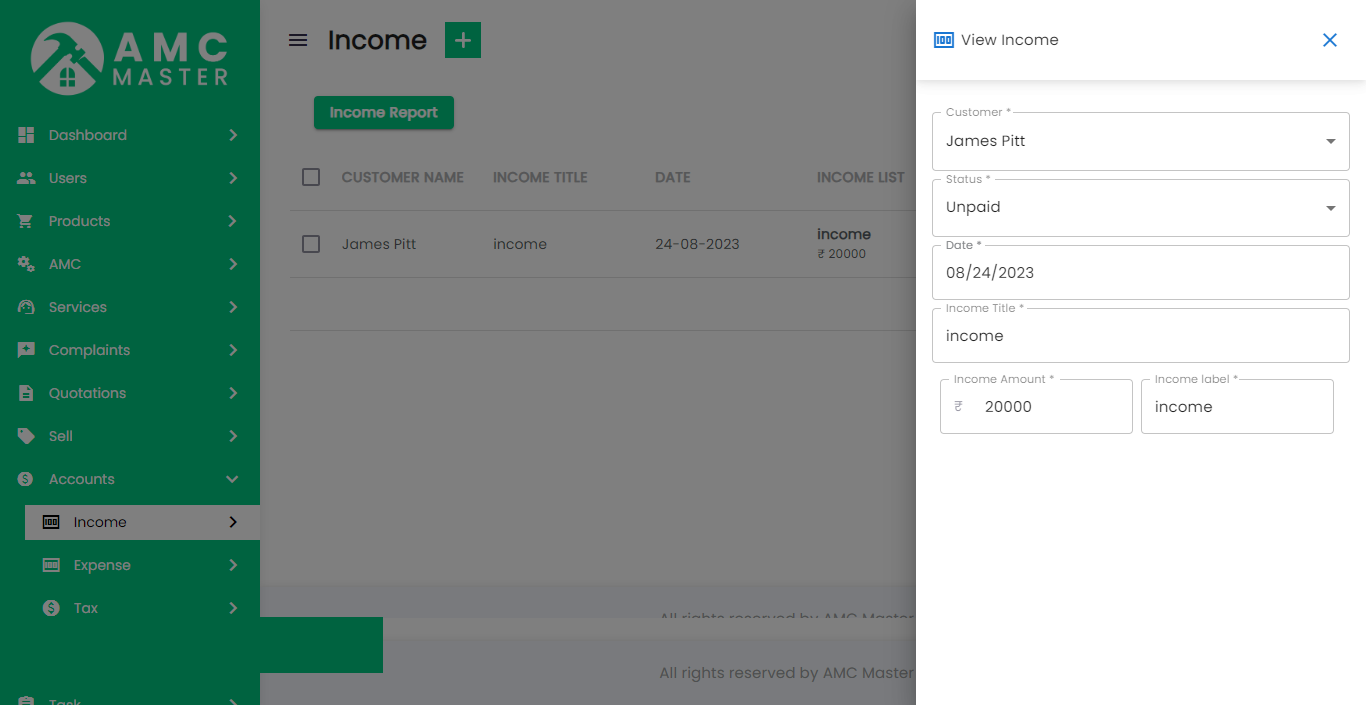
Income View: Admin can View detail of particular Income by clicking on View detail button. This will open up details.
14) Reports
I)Complaint Reports:
You can start date and end date between view complaint report.
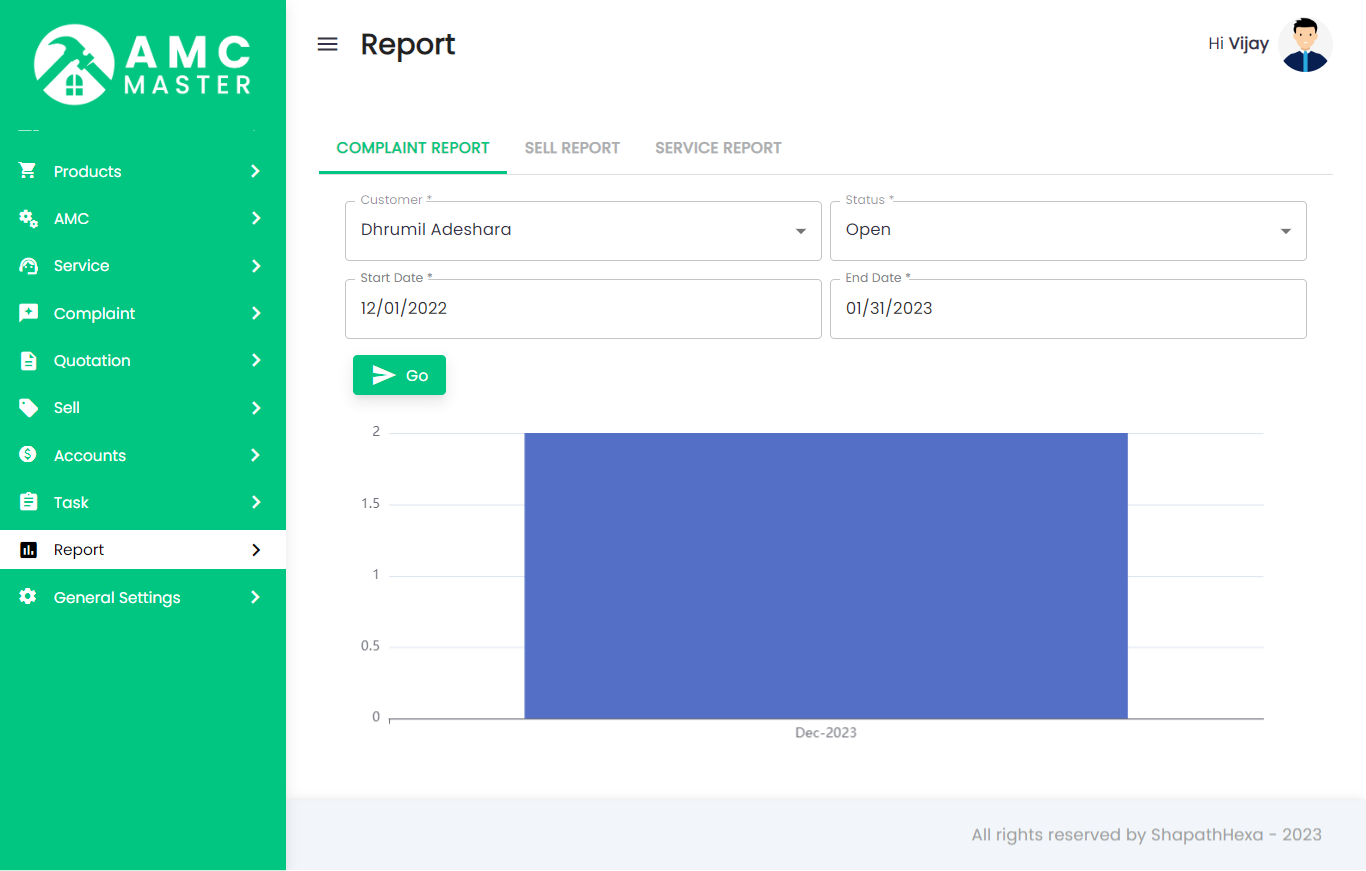
- Start Date: Enter Start Date for this Complaint Report.
- End Date: Enter End Date for this Complaint Report.
- Select Option: Select Option Complaint for this Complaint Report.
- Select Client: Select Client Name for this Complaint Report.
When clicking on GO button. This will open Start Date and End date Between In Complaint Report.
II)Sales Reports:
You can start date and end date between view Sales report.
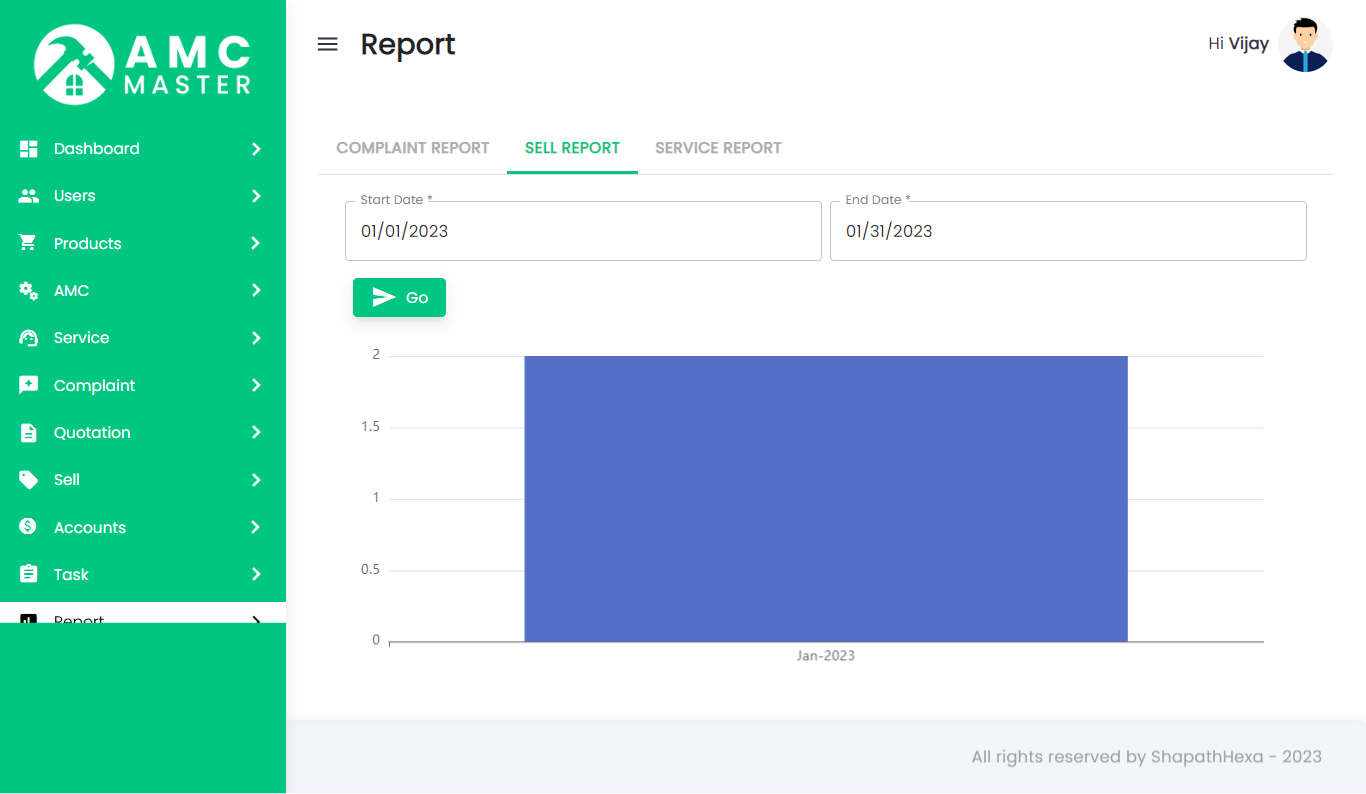
- Start Date: Enter Start Date for this Sales Report.
- End Date: Enter End Date for this Sales Report.
- Select Client: Select Client Name for this Sales Report.
When clicking on GO button. This will open Start Date and End date Between In Sales Report.
III)Services Reports:
You can start date and end date between view Services report.

- Start Date: Enter Start Date for this Service Report.
- End Date: Enter End Date for this Service Report.
- Select Client: Select Client Name for this Service Report.
When clicking on GO button. This will open Start Date and End date Between In Service Report.
15) Mail Format
Admin can set mail format using this details.

F) Client View :
1)Dashboard
client side dashboard view.
2)Client
Client List: Client can see his own details.
Client View:Client view with much more details.

3) Quotation
Quotation List: Client will see all the quotation given to him by the company.
Quotation View:Client can view Quotation details.
Quotation Add: Client will Add the quotation.

- Quotation No: Quotation No Auto Generated.
- Quotation date: Enter new Quotation date for this Quotation.
- Customer Name: Customer Name for this Quotation.
- Mobile Number: Enter new Mobile Number for this Quotation.
- Email:Enter new Email for this Quotation.
- Status: Select Status for this Quotation.
- Billing Address: Enter new Billing Address for this Quotation.
- Message: Enter new Message for this Quotation.
- Add new: Add new Product for this Quotation.
- Product Name: Select Product for this Quotation.
- Quantity: Enter new Quantity in Product for this Quotation.
- Price: Select Product in Display Price for this Quotation.
- Amount: Select Product and Enter Quantity in Display Amount for this Quotation.
- Add new: Add new Product for this Quotation.
- Select Tax Name: Select Tax for this Quotation.
- Tax: Enter new Quantity in Tax for this Quotation.
Personal Information
Other Info
Quotation Details
Account Tax
4) AMC
AMC List:Client will see all current active AMC with your company.

AMC View:Client can view detail of particular AMC by clicking on view detail button. This will open up details.
5)Complaint
Complaint List:Client will see all the complains he has raised.

Complaint Add:Client can register new complain or service call using this form this complaint.
Complaint View: Client can view complaint.
Complaint Edit:Client can edit complaint.
6) Service
Service List: Client can view complete list of all Service.

E) Employee View
1)Dashboard
Employee side dashboard view.
Here employee have all module access. He can do all action like add, edit, delete, view in all module. Only setting, accessright and email template this three module can't access employee.
G) FAQ
1) I Dont see Installer Page properly.No background image,no Next button nothing.
Make Sure you have .htaccess file on main directory[in AMC folder].Where src,webroot,config directory[].
If you already have .htaccess Make sure your host has mod_rewrite module on.Basically on apache server.
If you want to have any paid customization as per your requirements, you can contact us on sales@mojoomla.com.
2)Backend Update
1.Navigate to the Backup Folder:
Go to the directory: public_html/amc_api/public/storage/public
Take a Backup of the public folder by copying it to a safe location on your local machine or server.
2.Update the Package:
3.Replace the public Folder:
After the package has been updated, replace the existing public folder in amc_api_laravel/storage/app/ with the backup you made earlier.