Garage Management System
Documented by Mojoomla -

A) Introduction
Garage Management System for Laravel the ideal way to manage complete Garage Management System. It has different user roles like Admin, Customer, Employee, Support Staff and Accountant.
This user guide covers all options that this laravel provides. Please read the documentation carefully as it probably contains answers to most of the questions that may arise. If you feel some aspect is not covered or have some questions, contact us via e-mail sales@mojoomla.com. We will do our best to answer your in the shortest time.
1).Server Requirements
However, if you are not using Homestead, you will need to make sure your server meets the following requirements:
- PHP version >= 8.2
- Downlod Composer.
- Make sure you have Composer installed on your machine.
- Go to Package Directory in update composer.[Example->(D:\wamp64\www\garage)].
2).File Manager Upload
- Login to your cPanel.
- Go to File Manager.
- Navigate to your domain folder (usually public_html/).
- Click Upload and upload the file:garage.zip
- After the upload is complete, extract the zip file.
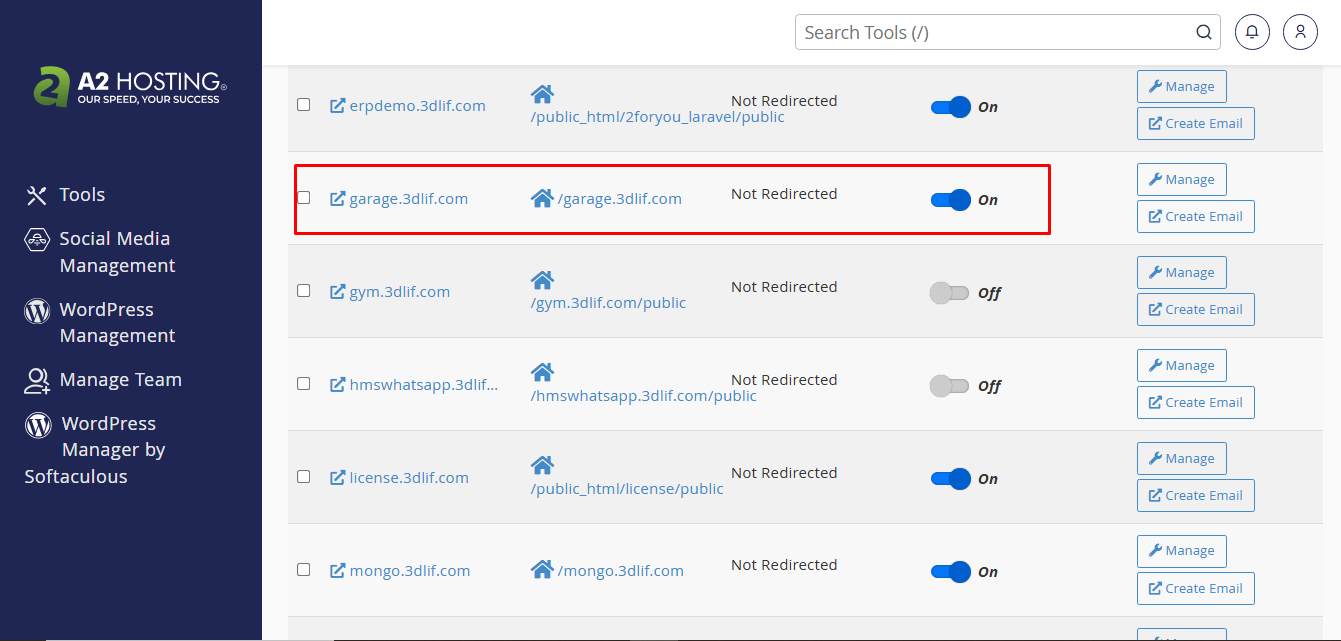
- Pointout Garage root folder in your domain (Ex. public_html/garage)
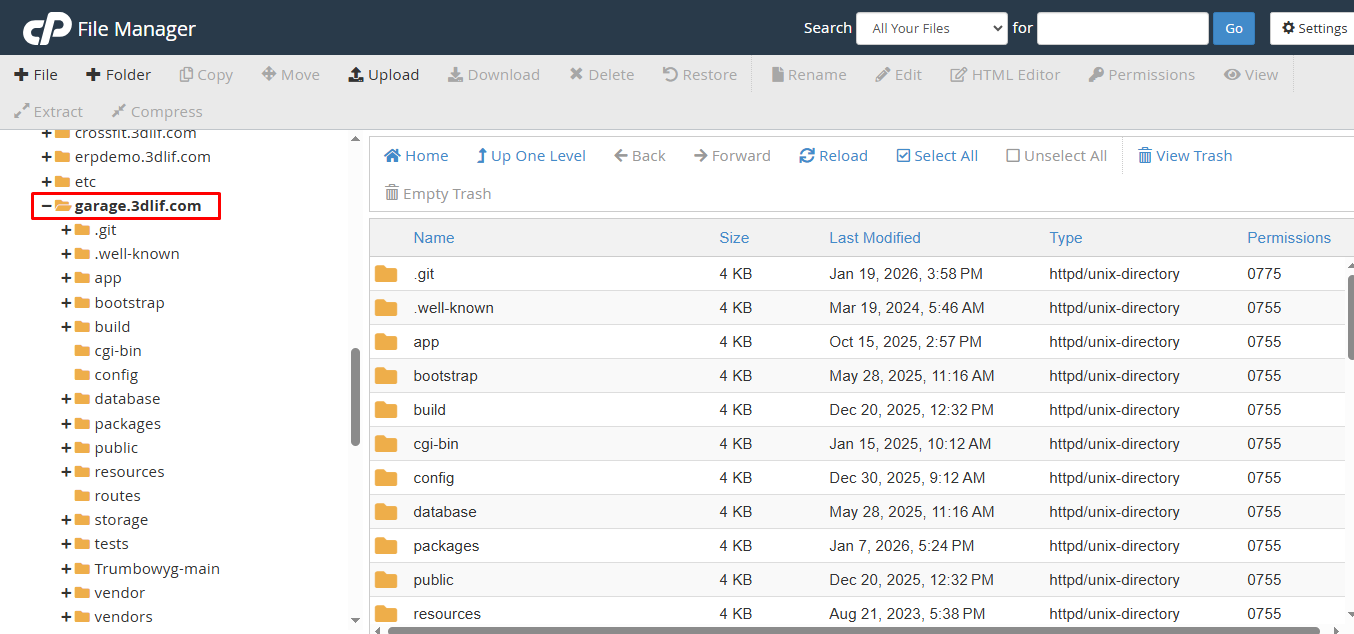
- You will now have a folder named Garage inside public_html: public_html/garage
Please review the screenshots below for proper setup guidance:
Extract the provided garage.zip file into your domain directory and ensure that the root folder is correctly selected in the domain list.
Confirm that the document root is pointing to the correct project directory.
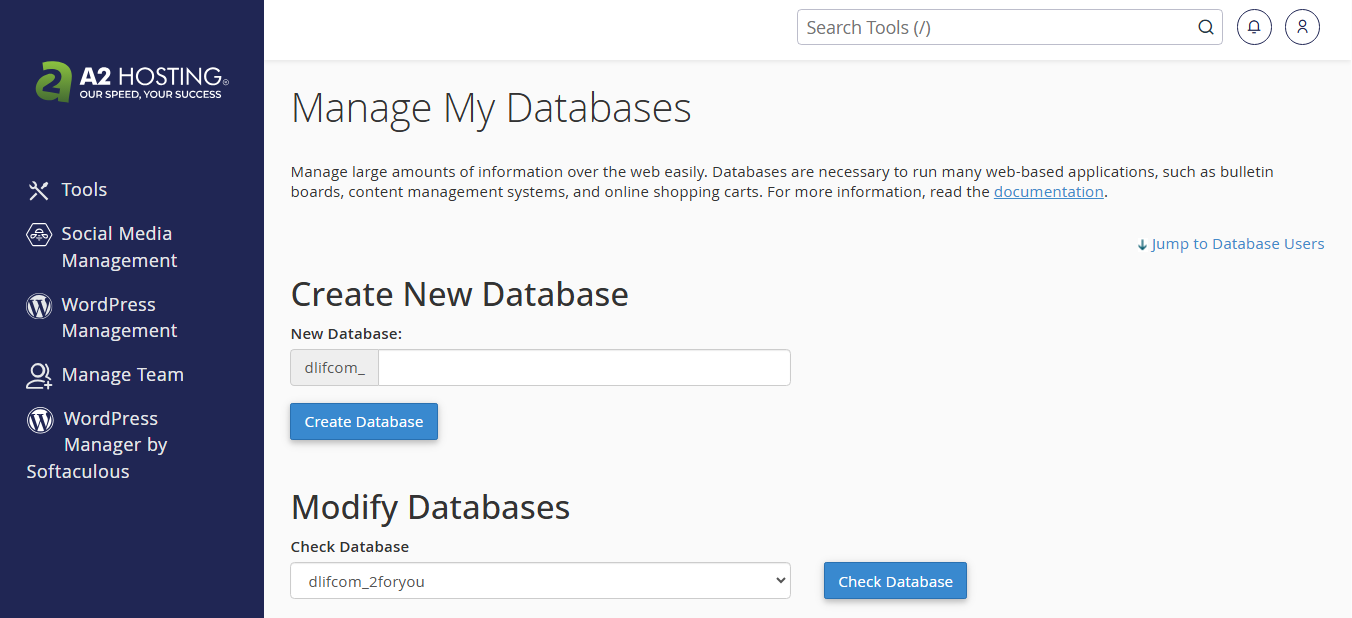
After the files are set up correctly, create a new database and database user, then assign the user to the database with all required privileges.
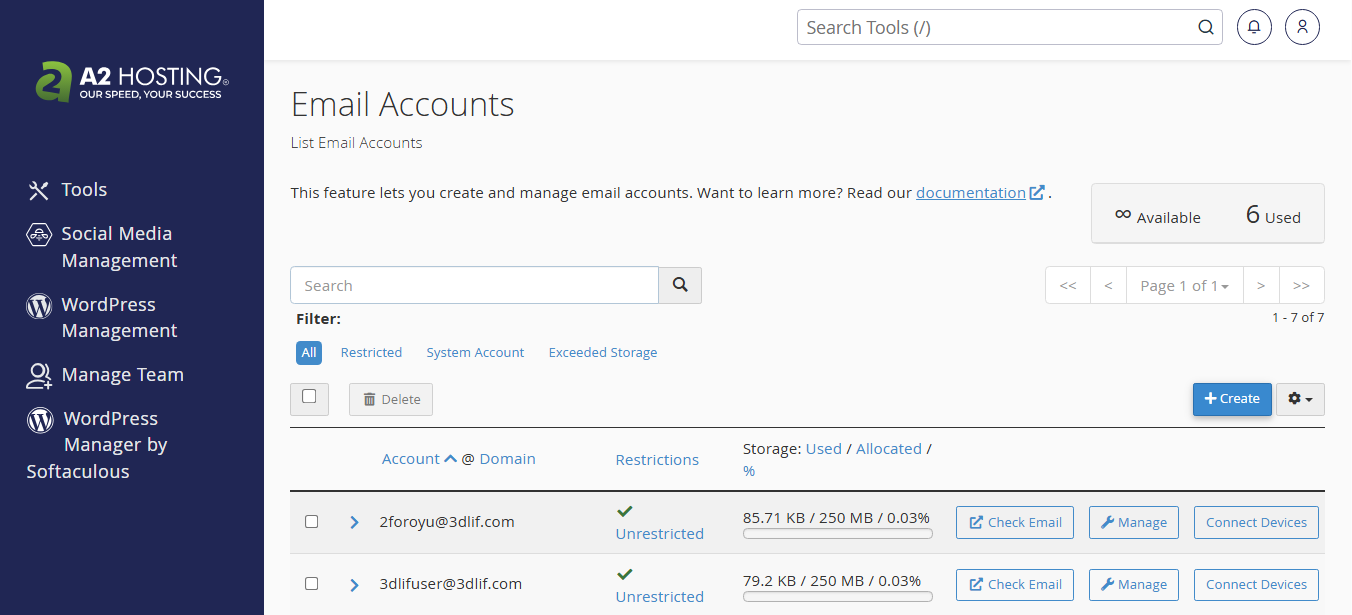
Once the installation is completed successfully, add your server email account details in the Garage Master application’s Email Settings to ensure email features work properly.
3). Create a MySQL Database and User
- In cPanel, scroll down to the Databases section.
- Click on MySQL® Database Wizard.
- Step 1: Create Database.Enter a name, e.g., garage_db and click Next Step.
- Step 2: Create Database User. Enter a username and password, e.g.,
- Username: garage_user
- Password: (use a strong password or click "Password Generator")
- Step 3: Assign User to Database
- Step 4 :Check the box: All Privileges and Click Next Step.
- Click Create User.
Note: if you are getting any issue please check:FAQ
4). Run the Installation Wizard
- Open your browser and go to your domain:https://yourdomain.com
- The Garage System Installation Wizard will appear.
(*). Local Installation Setup
1).Using Xampp - Garage master setup
Please follow these steps to install garage master in your local system using Xampp
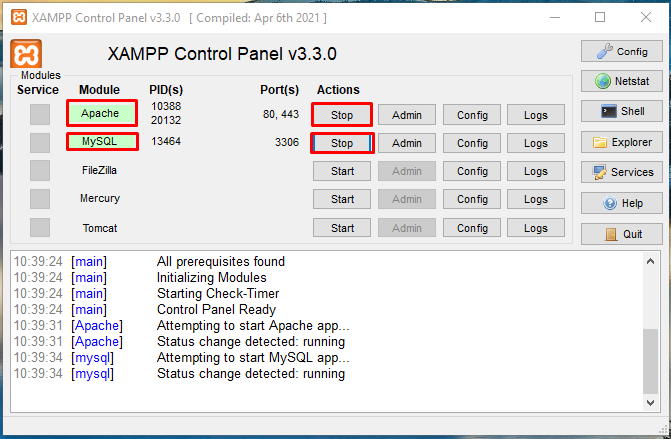
- Step1 : Start xampp server. if not exists xampp please install xampp.
- Step2 : Add garage folder(extracted "garage.zip") in your xampp htdocs folder(Example. E:\xampp\htdocs\garage)
- Step3 : Open your browser and type http://localhost/garage. you will seeing Installation wizard
- Step4 : Then open Phpmyadmin in your server and create new database
- Step5 : Then open your link in web browser and you will seeing Installation wizard.(localhost/garage/installation_form)
- Step6 : In local you can add database details in installation wizard(Database user:root , Pass : "",(password is empty), Database Host:localhost)
Step 1:
Step 2:
Step 3:
Step 4: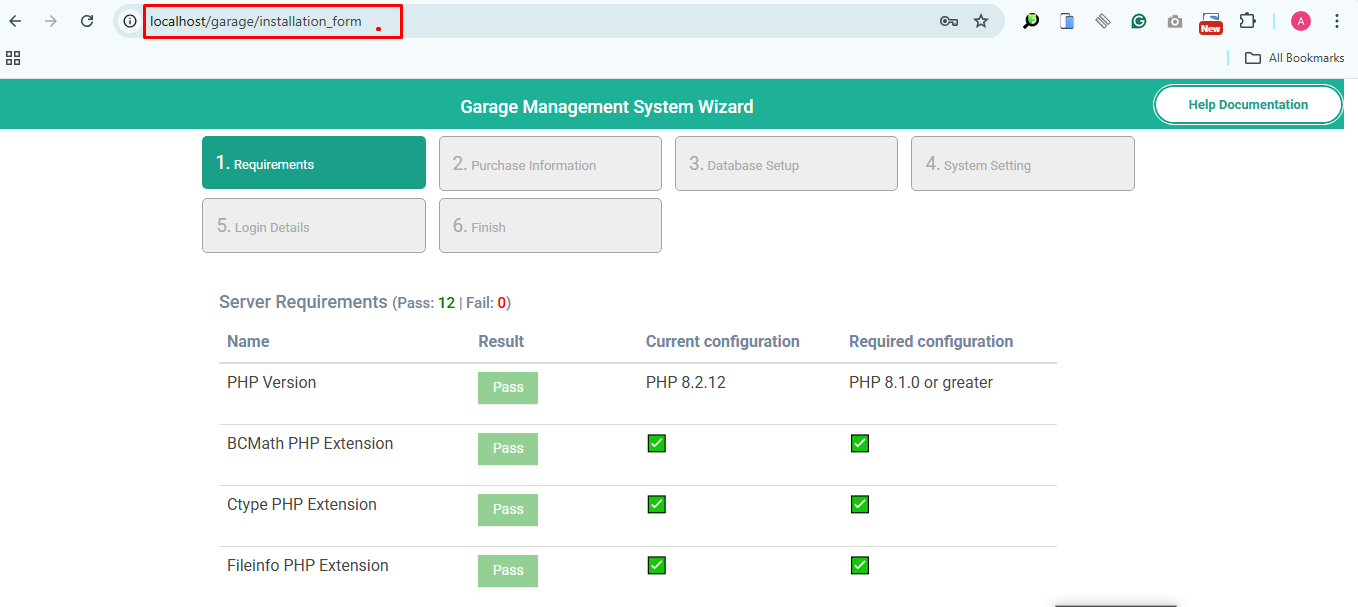
2).Using Laragon - Garage master setup
- Download Laragon from Click here
- Please refere this laragon documentation for installation : click here
- After Complete The Installation Step Open Your Laragon App
- After Opening Laragon App You Can See License Key Pop-up Box.Kindly Click on Close or Cancel Button
- After Clicking on Cancel or Close Button if you See a Below Types Of Pop-up Box, Click on ok button.
- Click on Start All Button
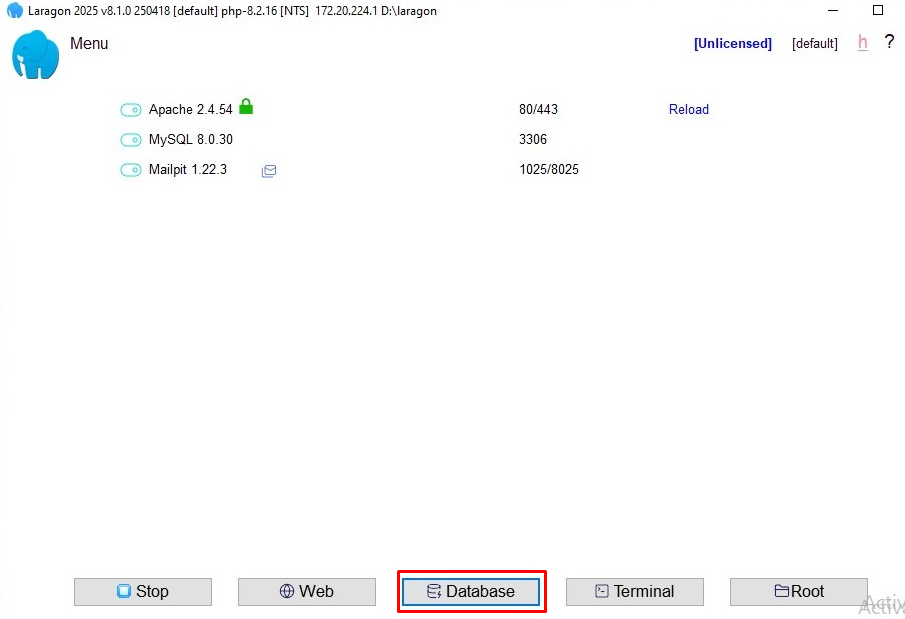
- Create New Database By Clicking on Database Button
- give name of your database by Rightclick on LaragonMysql->createNew->database
- After creating database Right Click->Apache->sites-enabled->garage.test.conf
- After Clicking on garage.test.conf You will Show a Below Screen.Remove this /public and save file then restart or reload laragon
- Now Open Your Laravel App Click on Menu->www->garage




B) Installation:
1)Requirements
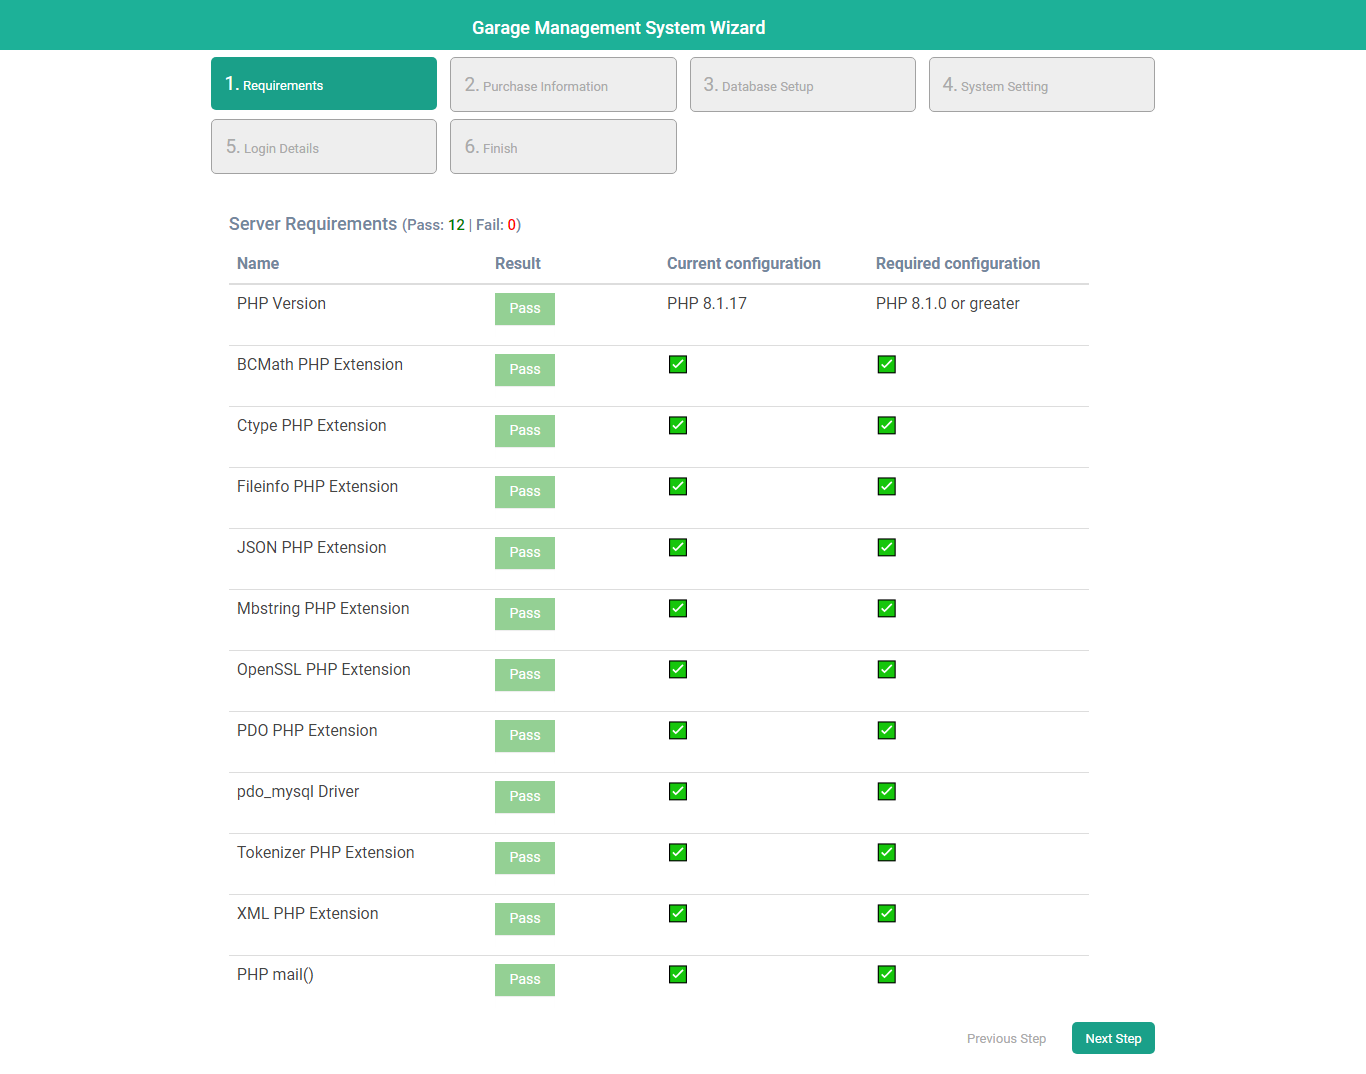
Note : If any result is fail then you are not able to install this package. check all requirements and click on Next Step.
2)Purchase Information
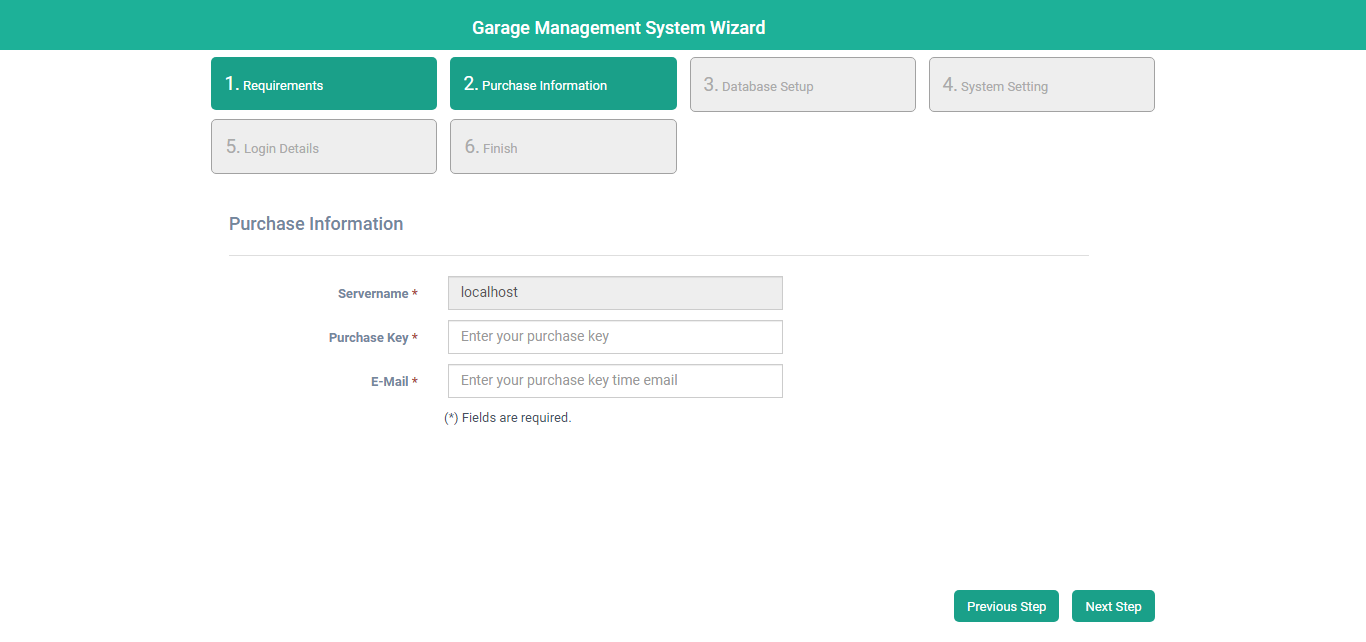
- Servername : Enter your servername name.
- Purchase Key : Enter your purchase key.
- E-mail : Enter your purchasekey time email.
3)Database setup
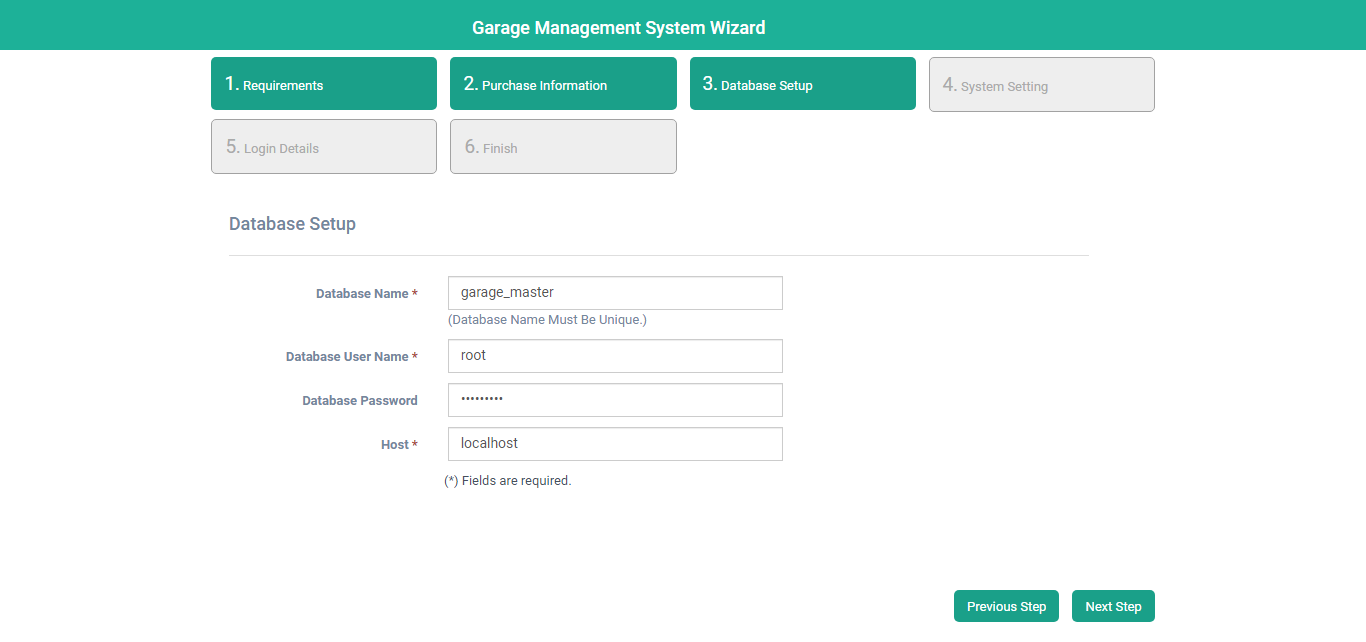
- Database Name : Enter your database name same as in the control panel
- Database User name : Enter a database user name used in control panel.
- Database Password : Enter a database password same used in control panel.
- Host : Enter a host name used in control panel.
All privileges to give the database user can access the database use in control panel.
4)System Setting
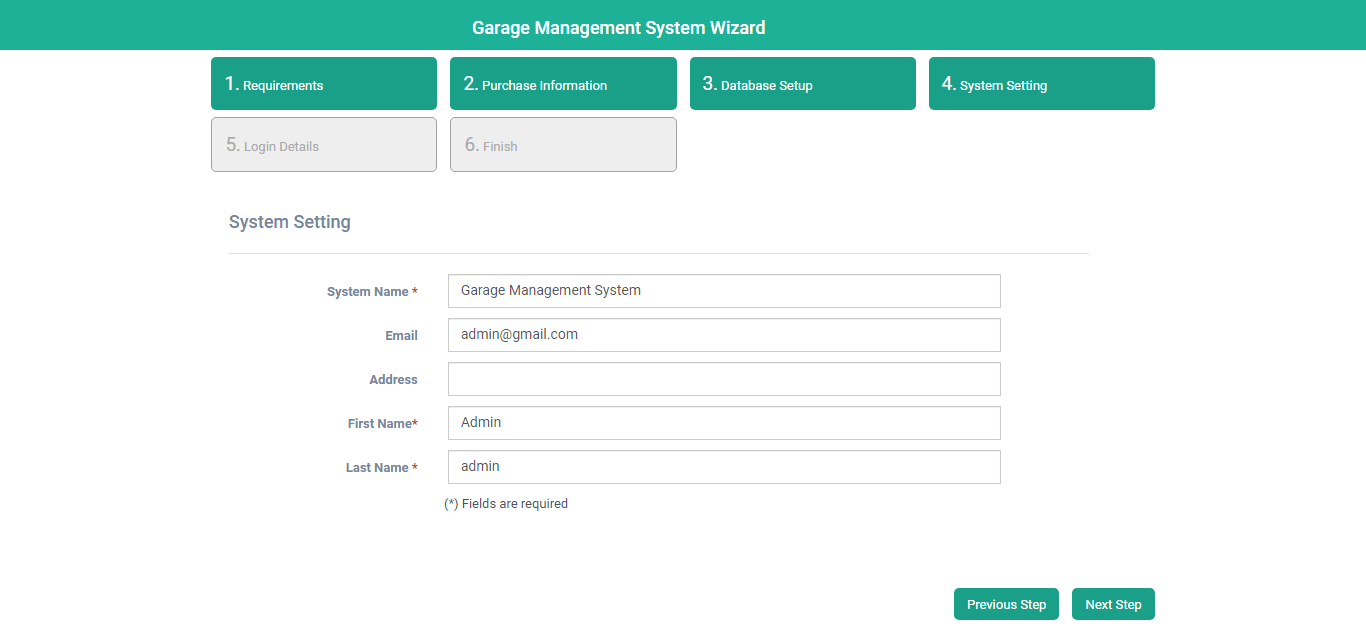
- System Name :Enter a new system name.
- Email :Enter a new email.
- Address :Enter a new address.
- First Name :Enter a new first name.
- Last Name :Enter a new last name.
5)Login Details
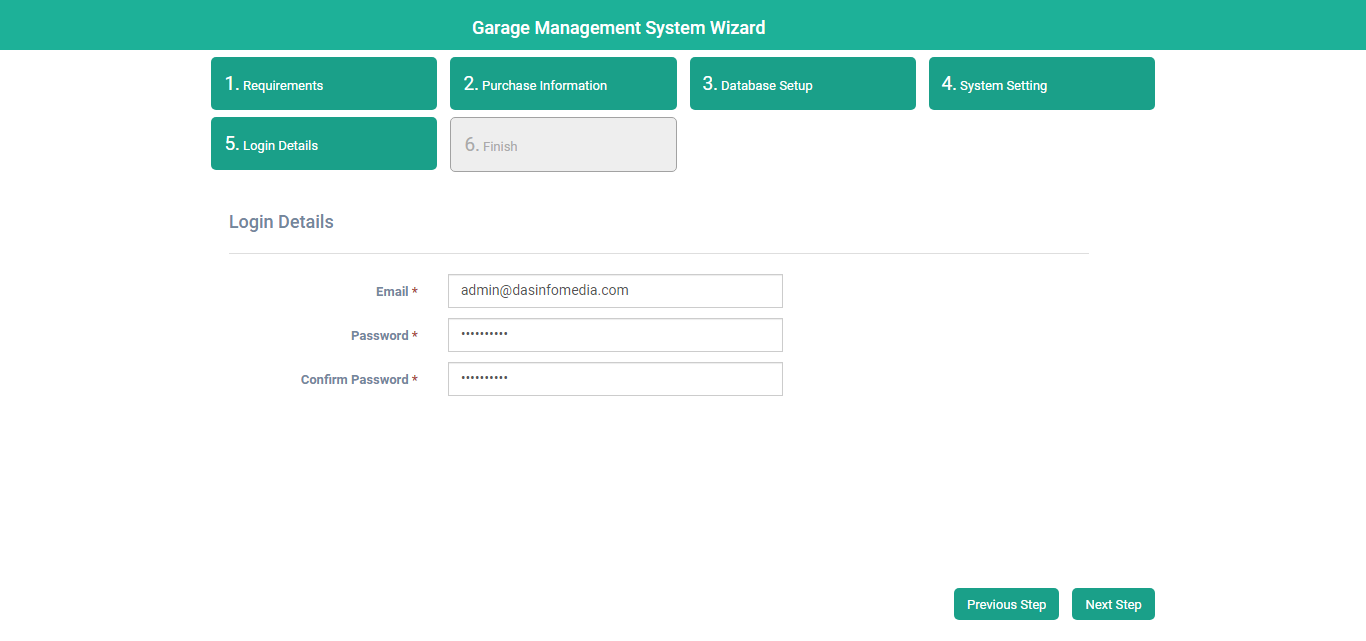
- Username :Enter a new admin username.
- Password :Enter a new admin password.
- Confirm Password :Enter a new admin confirm password.
6)Finish
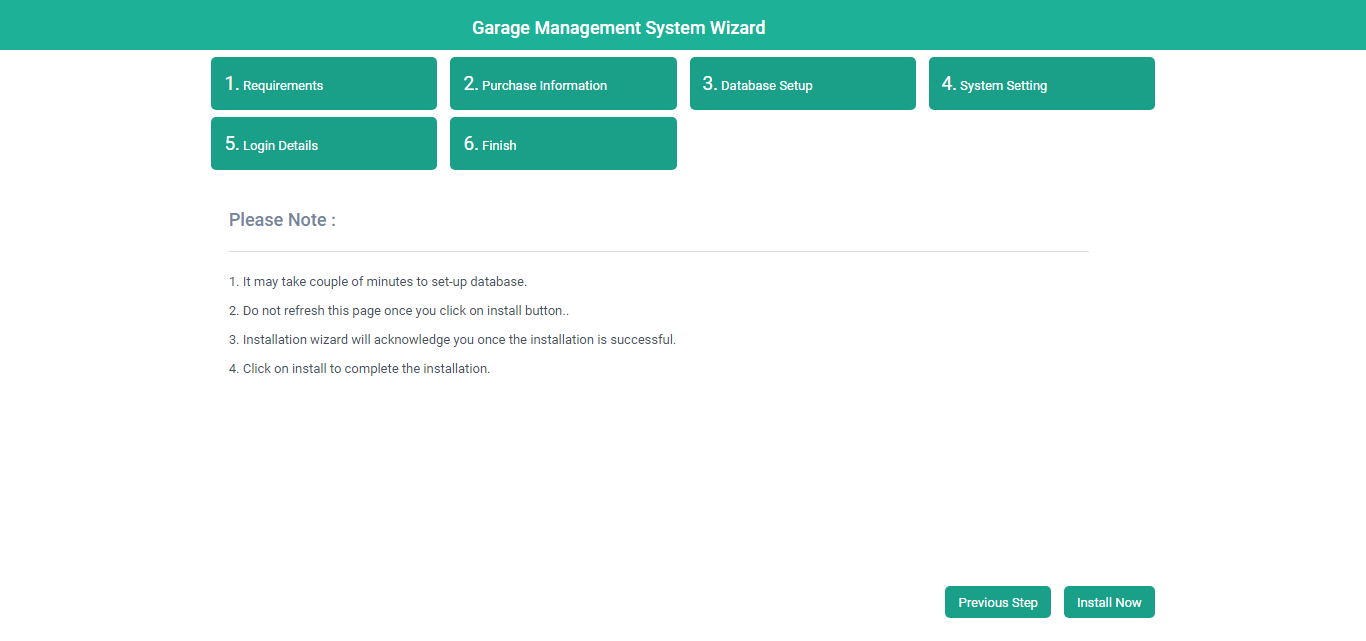
- Read the notes and click on install now.

Once System installed successfully.You can login into the system with entered username and password.
C) CronJobs
Create this cronjob in your cPanel to activate reminder notification.
You need to set below command as cronjob
php artisan schedule:run (runs from the root folder of garage app)
Example of cronjob command set in cPanel:
* * * * * php /path/to/garage/artisan schedule:run >> /dev/null 2>&1
* * * * * /usr/local/bin/php /home/public_html/garage.com/artisan schedule:run >> /dev/null 2>&1
D) Front-end Login Page:
You can now log in with admin username and password.
Login Page :

Now all user can log in from this login page.
E) Front-end Service Booking:
Admin can enable frontend service booking from the other settings tab.
Front-end Booking Page :
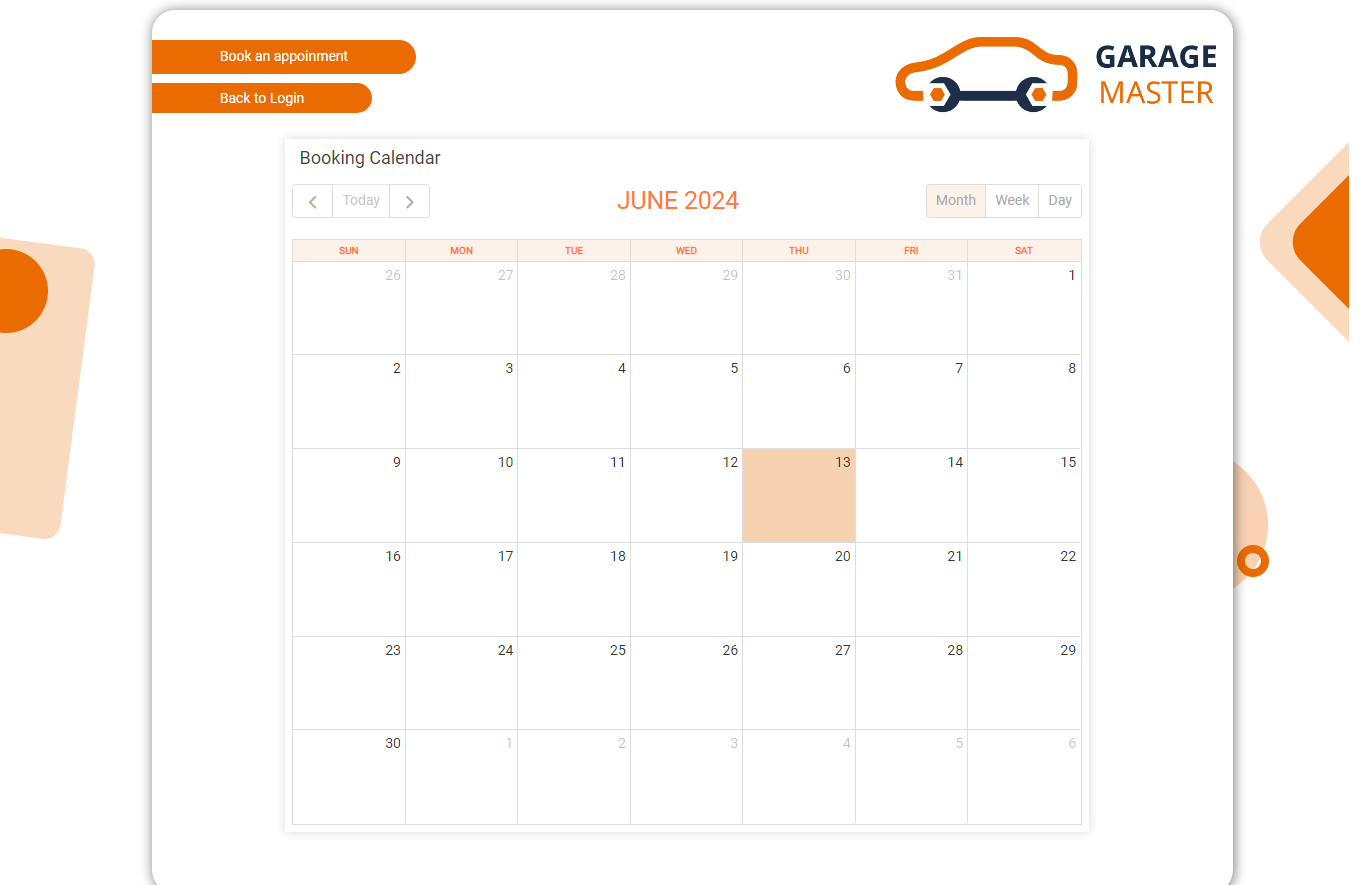
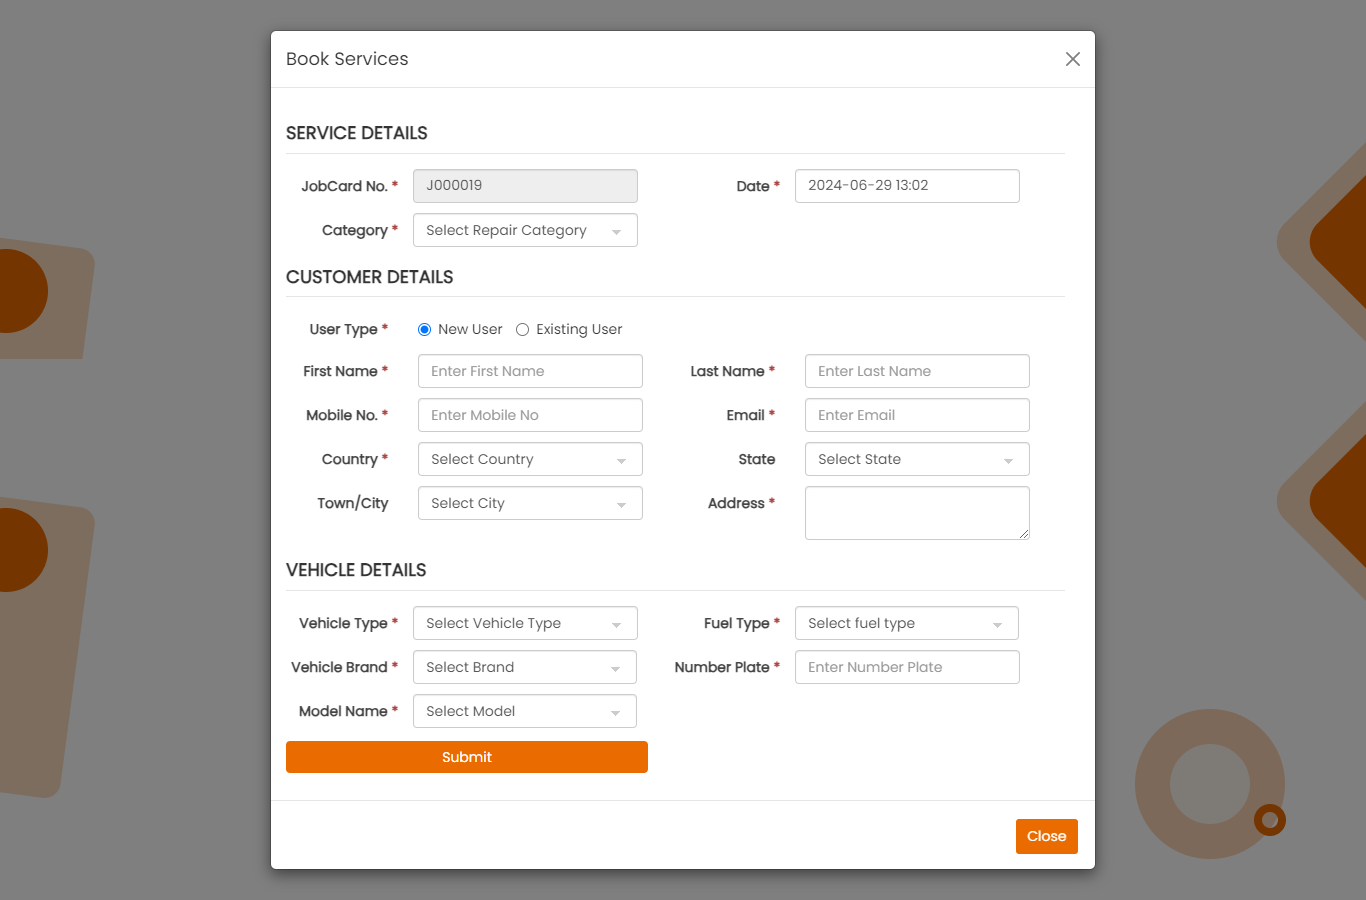
Book an Appointment :
Users can book vehicle service from here Book an Appointment. Also when selecting any date then it will display by default the selected date
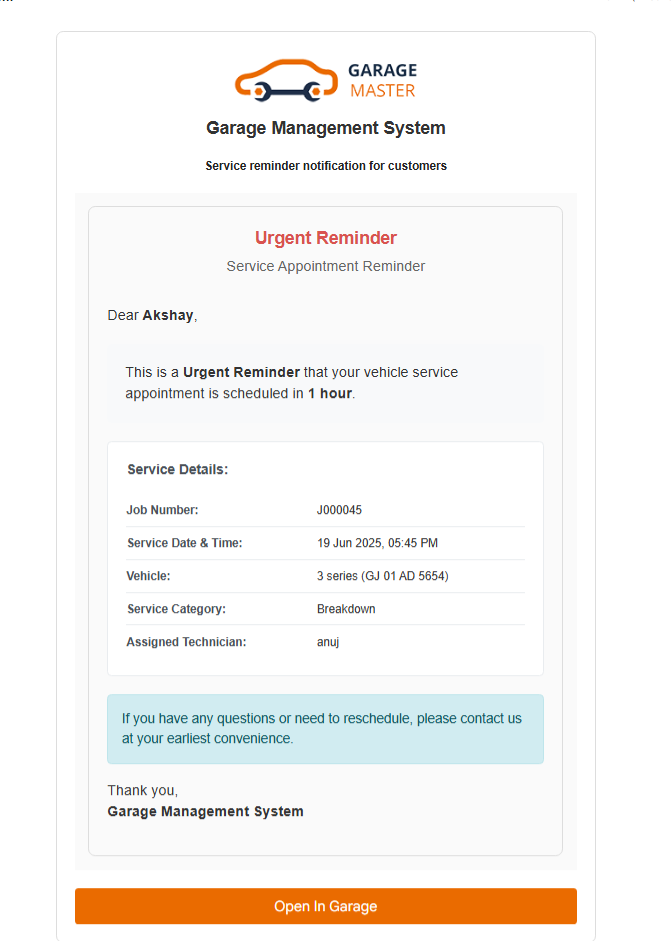
After setting up email configuration it will send an email to the customer.if you have set CronJobs then it will send an reminder email to the customer.
Here are template for reminder mail to customer
F) Admin View:
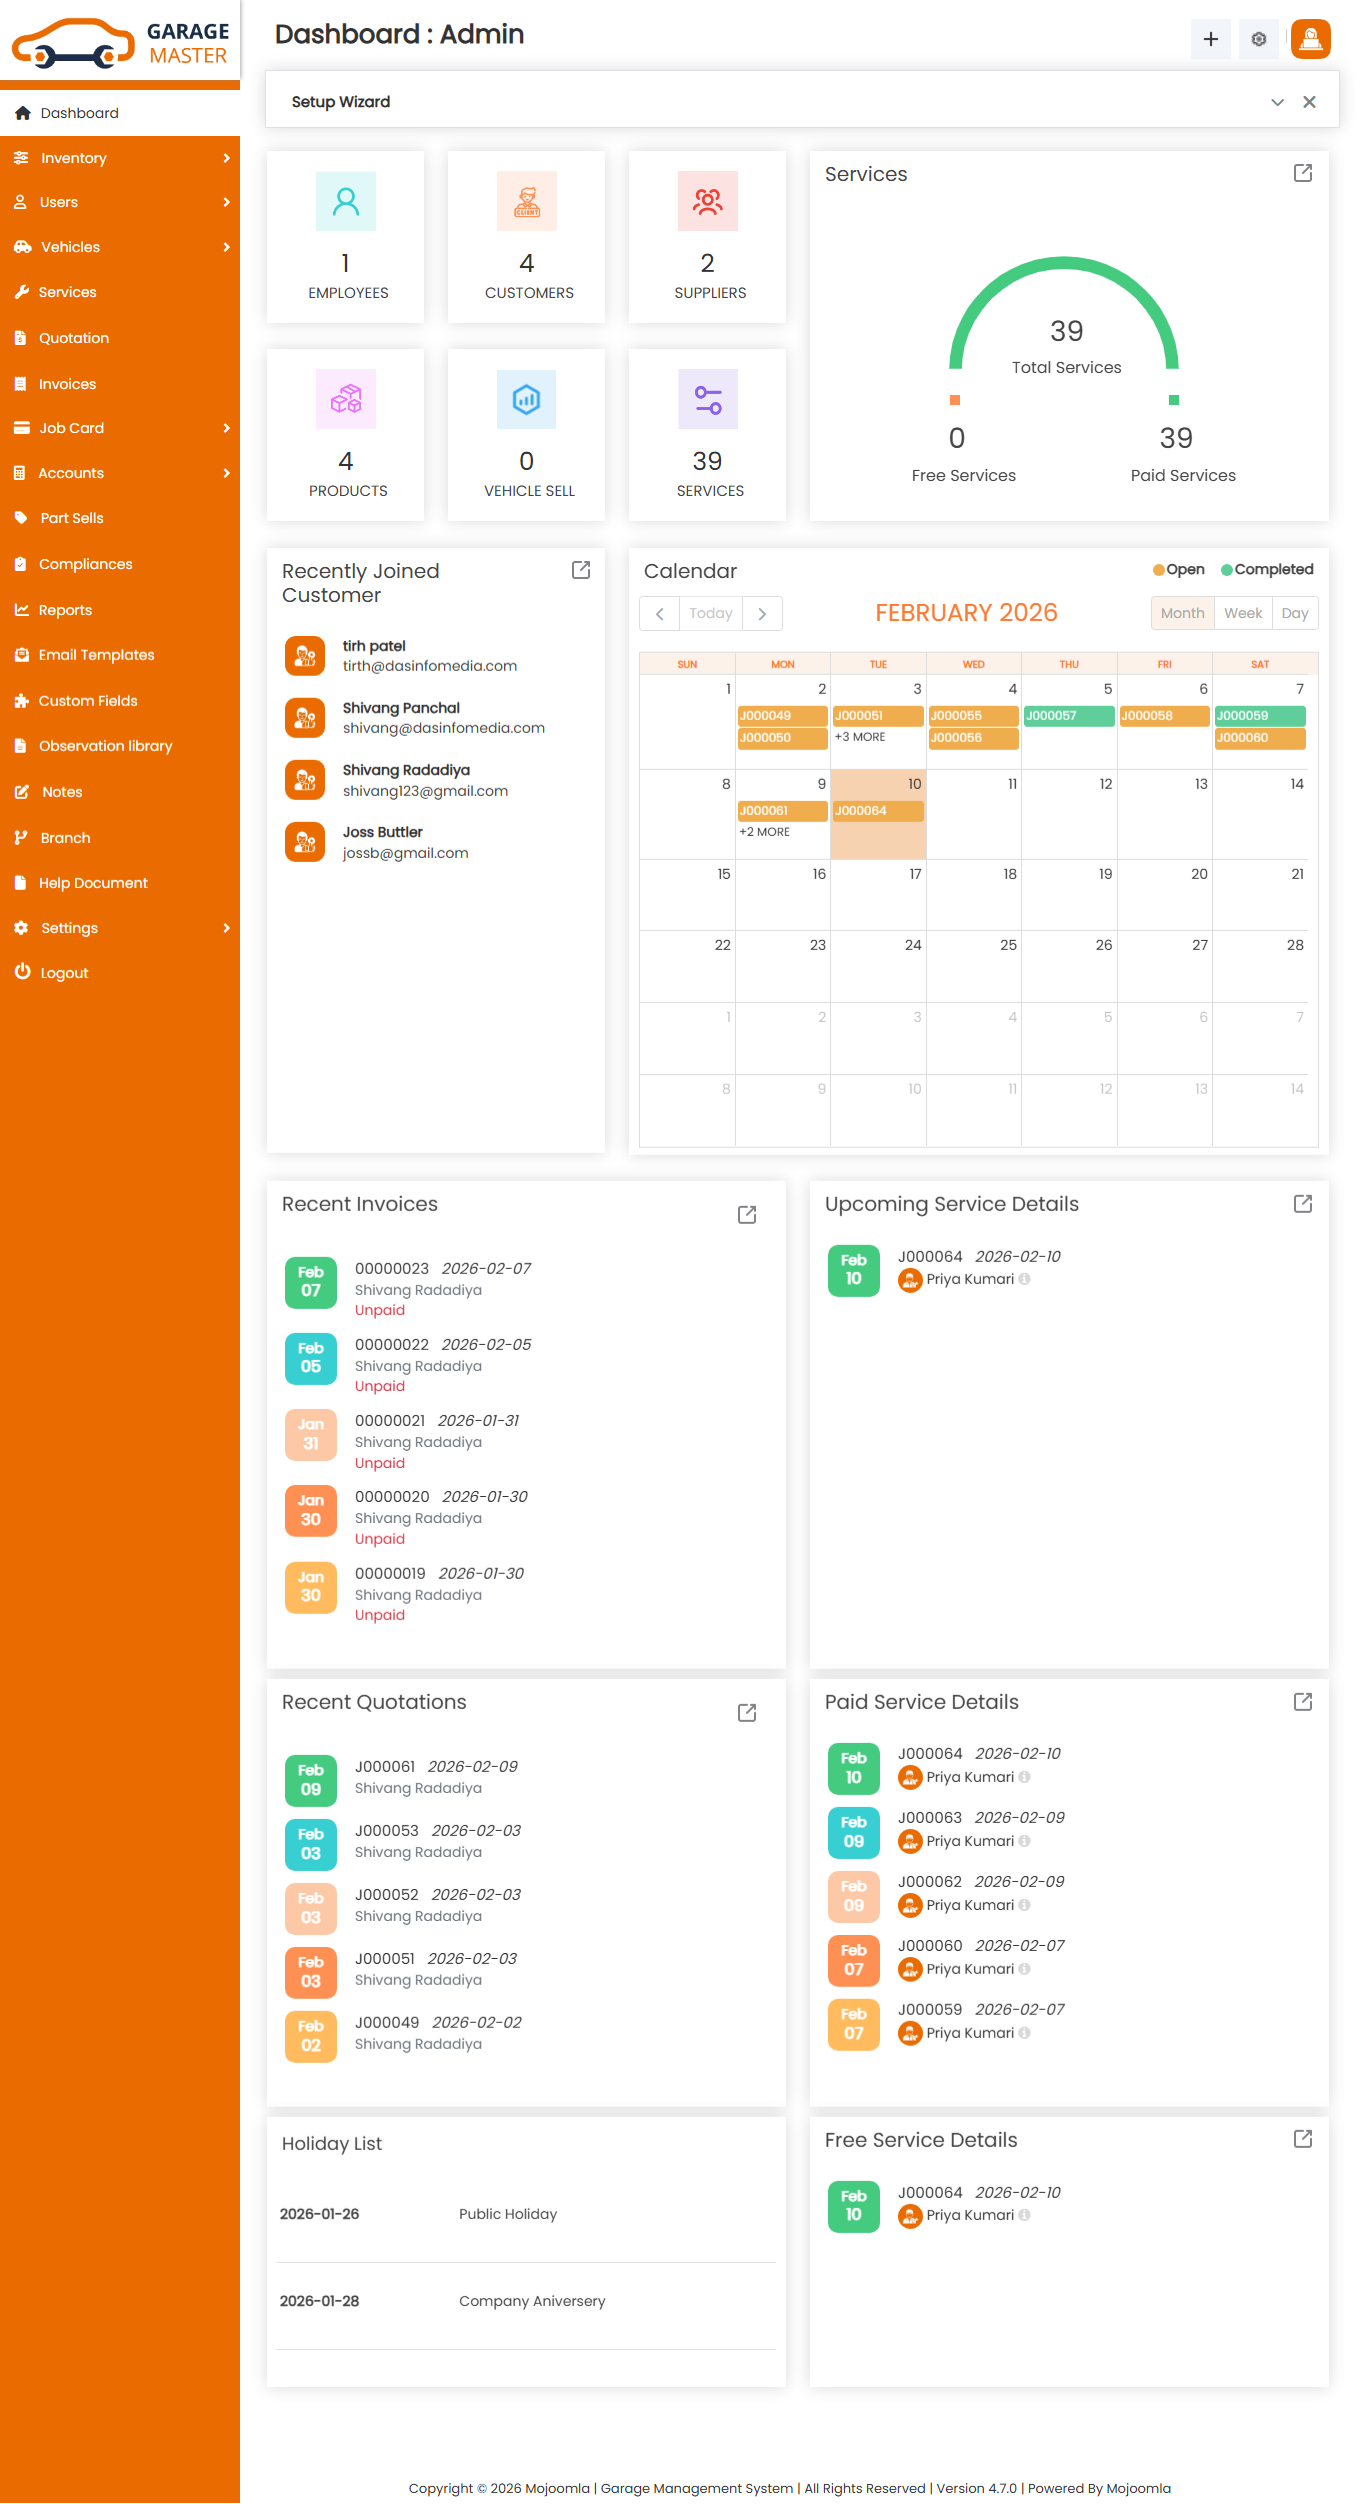
1)Dashboard:
Admin side dashboard view.
2)Settings
A) General Settings
Click on Setting inside Click on General Setting to start setting up the system. You are advised to fill all fields of General settings as these details are used in a different section of the whole system. You can change these settings as per your requirement.
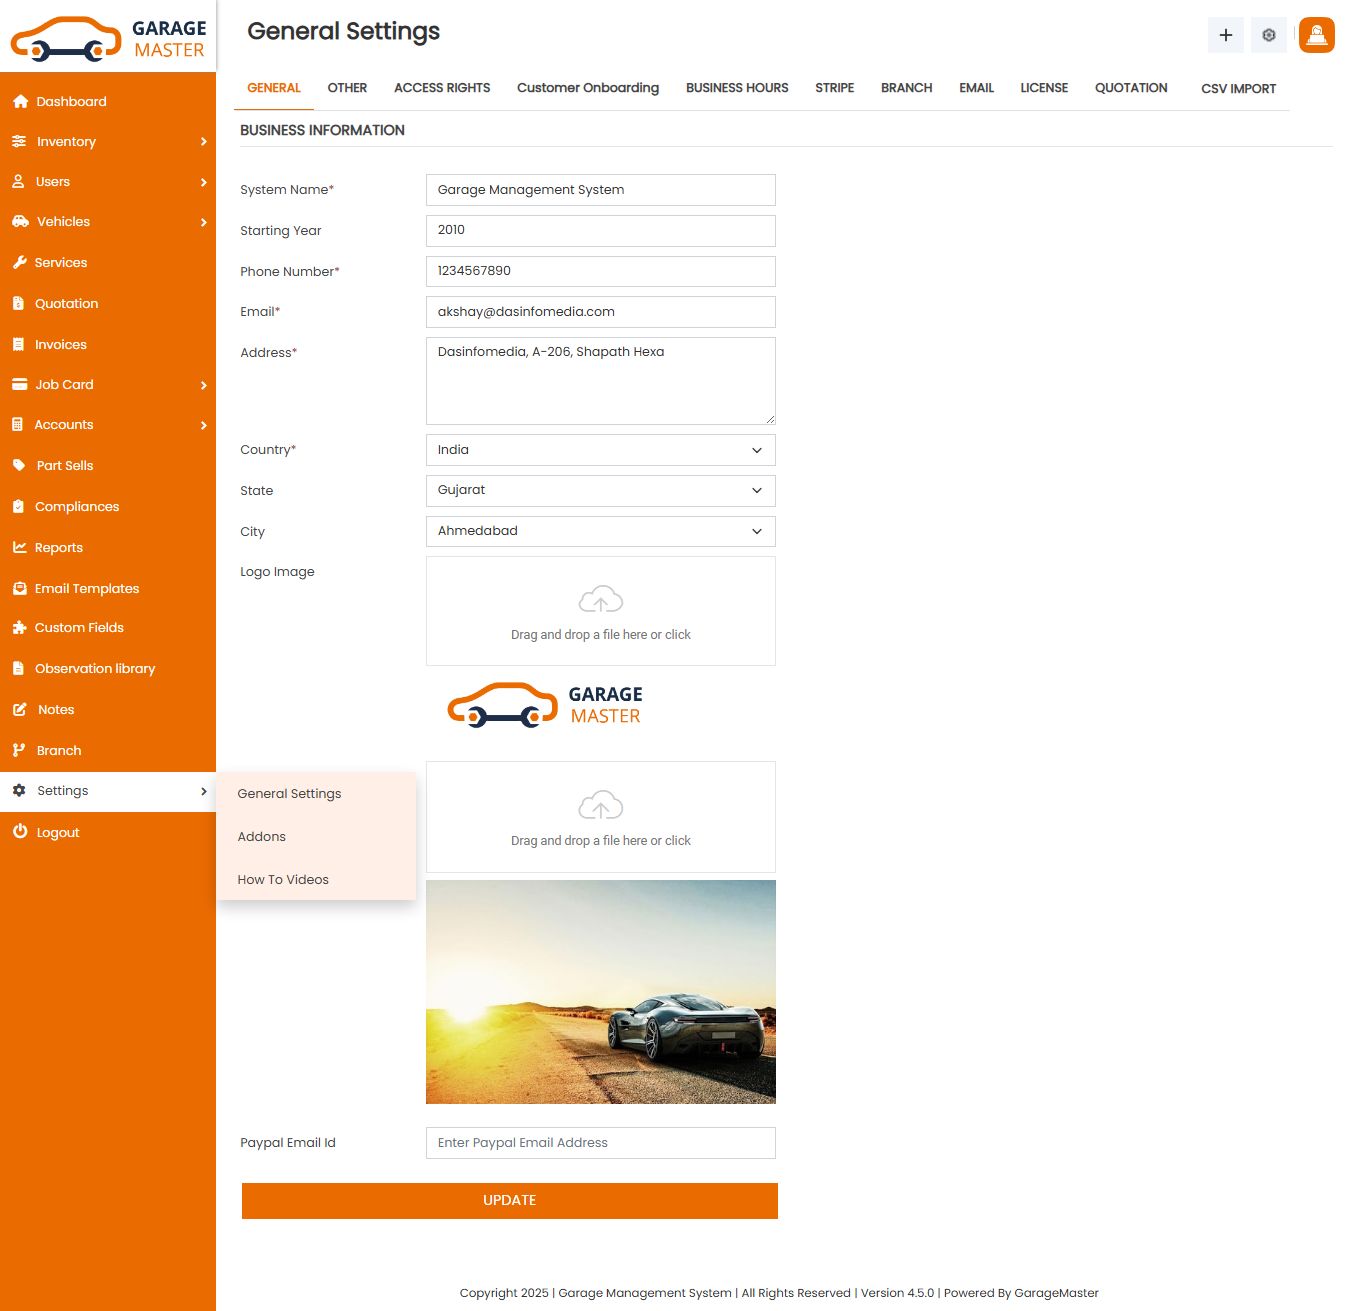
- System Name: Enter a new system name for this general settings.
- Starting Year: Enter a new starting year for this general settings.
- Phone Number: Enter a new phone number for this general settings.
- E-mail: Enter a new e-mail for this general settings.
- Address: Enter a new address for this general settings.
- Country: Select country for this general settings.
- State: Select state for this general settings.
- City: Select city for this general settings.
- Logo Image: Upload logo image for this general settings.
- Cover Image: Upload cover image for this general settings.
- Paypal Email Id: Enter a new paypal email id for this general settings.
Business Information
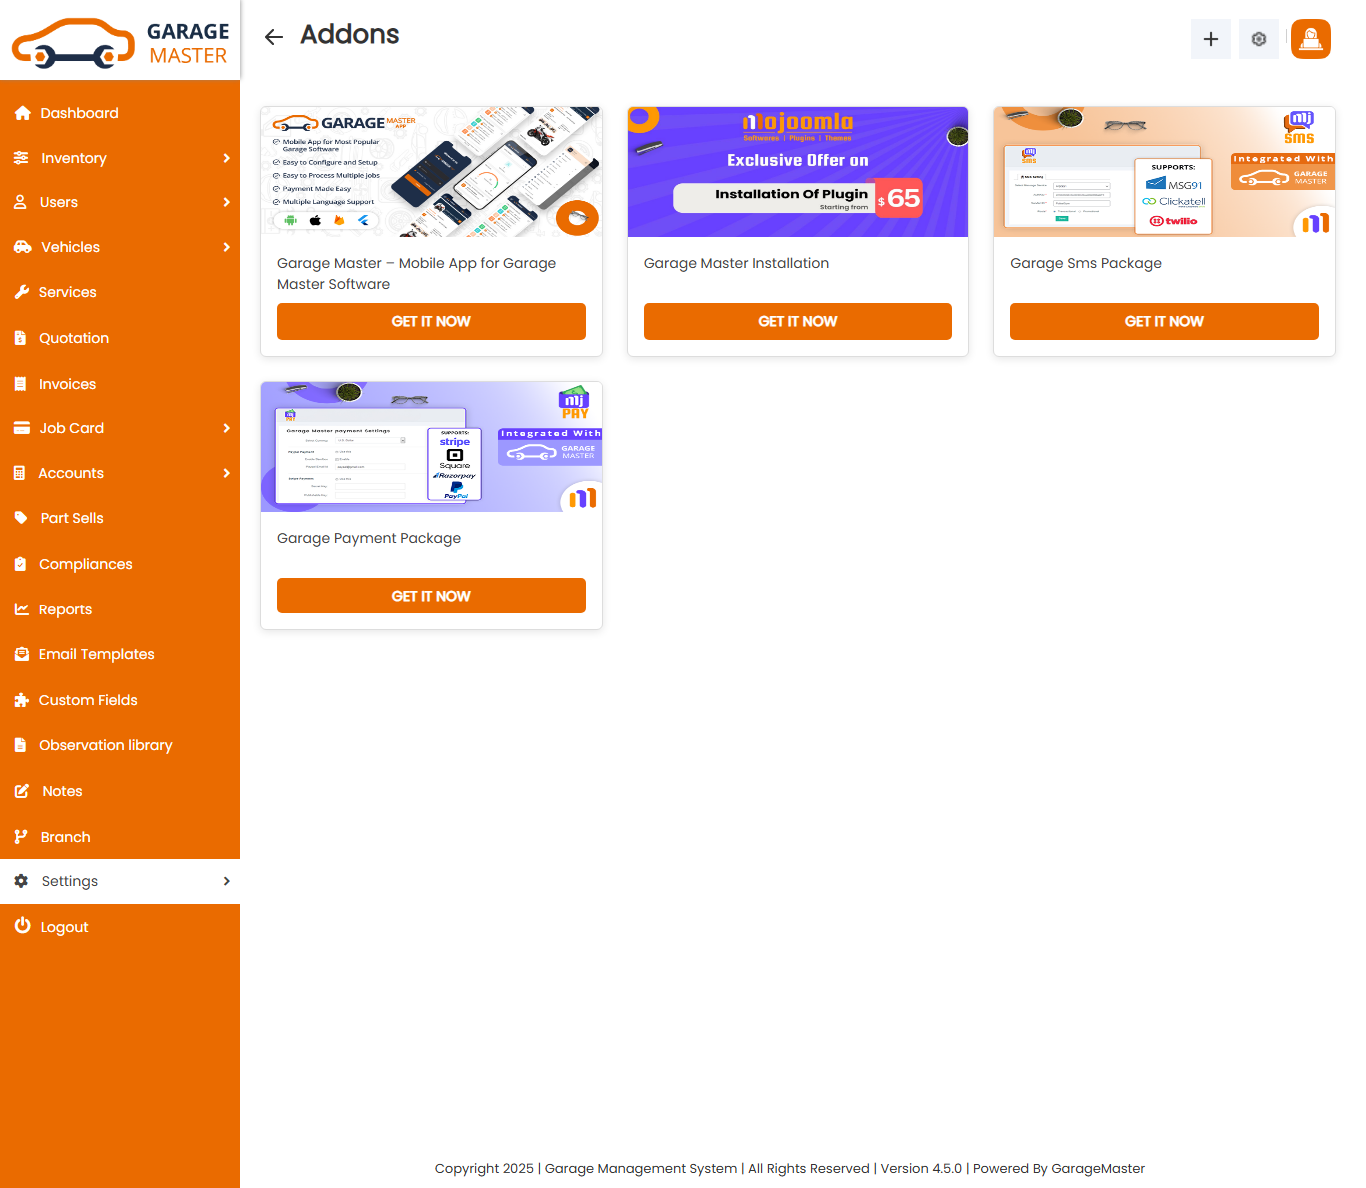
2.1)Addons
Addon packages & Other Softwares
Click on Setting inside Click on Addons to see Addons menu.In this menu provide garage addon packages and other softwares system.click get it button to purchase addon packages and other softwares
2.2)How to Videos
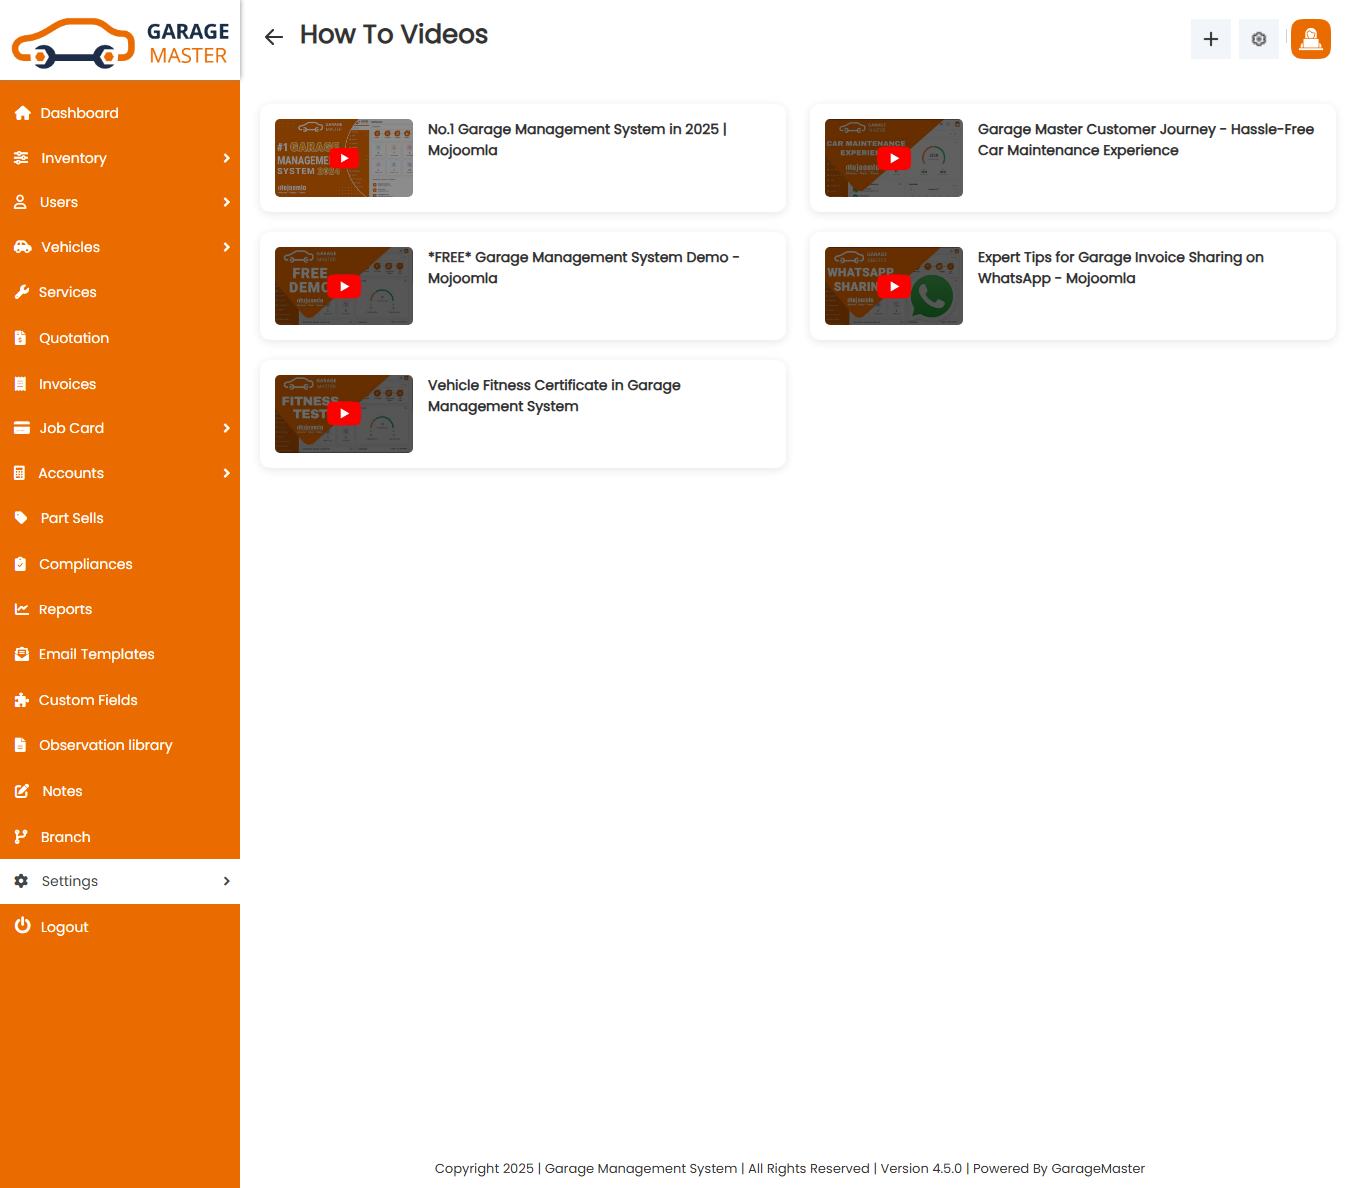
How to Videos
In this menu it provide video guidance.Click on Setting inside Click on How to Videos to open this menu.
B) Other Settings
Click on Setting inside Click on Other Setting to start setting up the system. You are advised to fill all fields of Other Settings as these details are used in a different section of the whole system. You can change these settings as per your requirement.
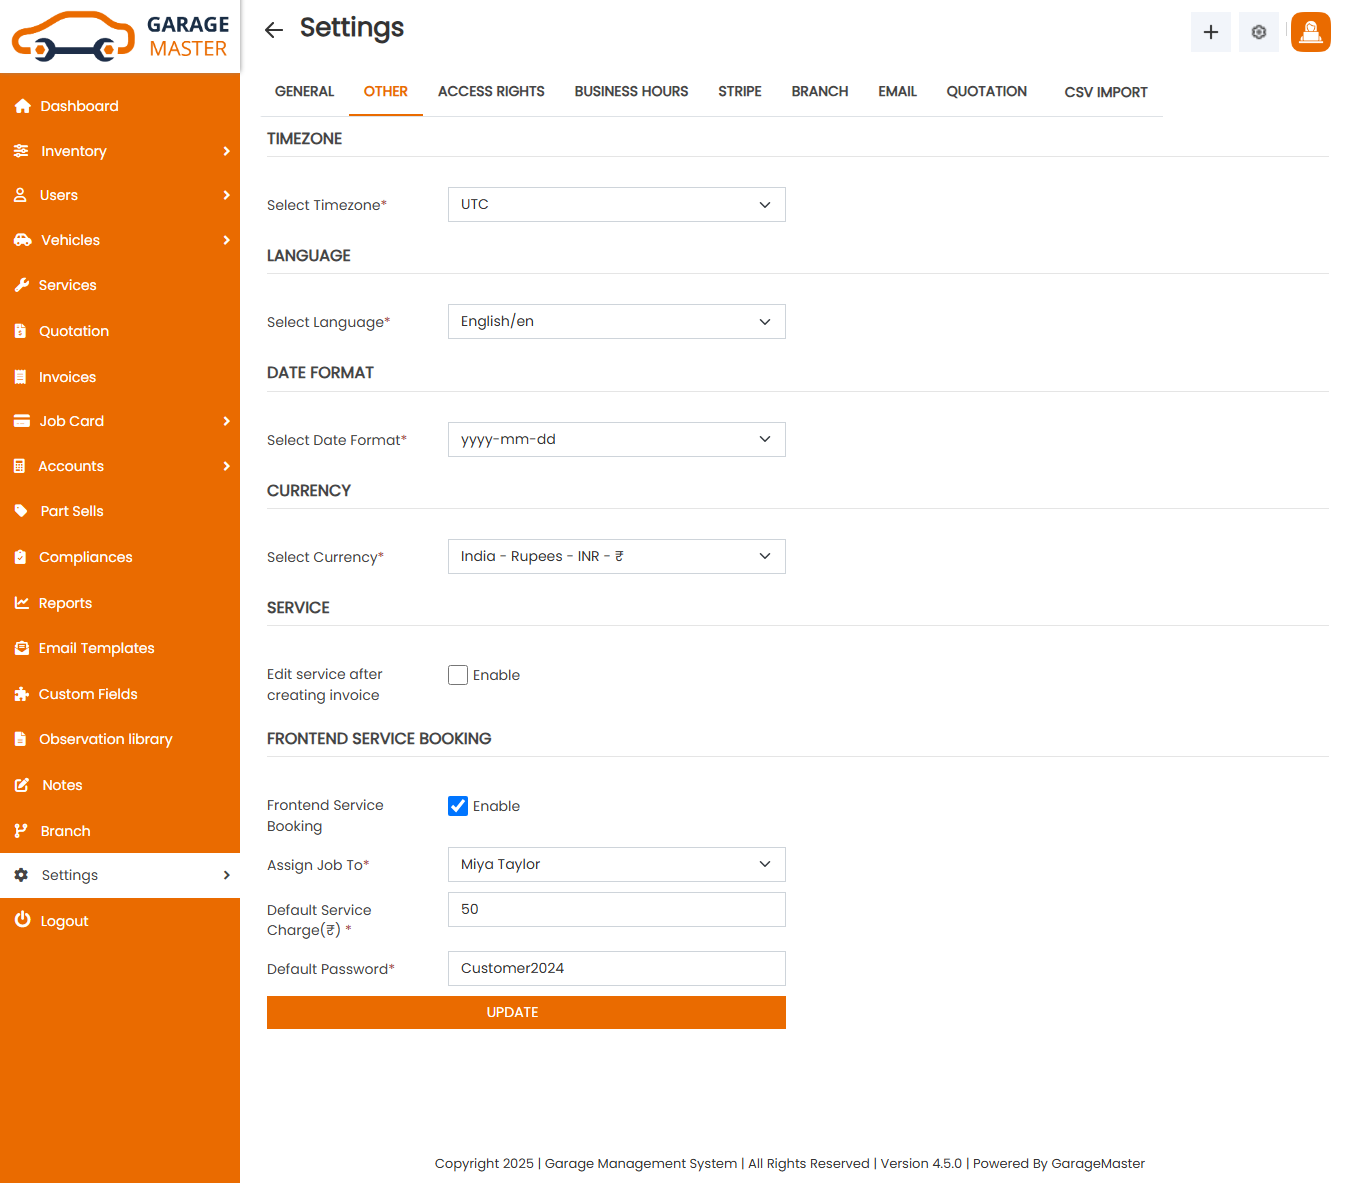
- Select Timezone: Select timezone for this setting.
- Select Language: Select language for this setting.
- Select Date Format: Select date format for this setting.
- Select Currency: Select currency for this setting.
Time Zone
Language
Date Format
Currency
C) Access Right Settings
Click on Setting inside. Click on Access Right Setting to start setting up the system. Access rights is a functionality for all users like Customer, Support Staff, Employee, Accountant and Branch Admin to give access rights for use modules of this system. Here all modules like Inventory, Users, Vehicles, Service etc. in this modules which module with access to add, edit, view and delete access right for all users. So basically admin can give rights to all users for access right to operate this all modules.
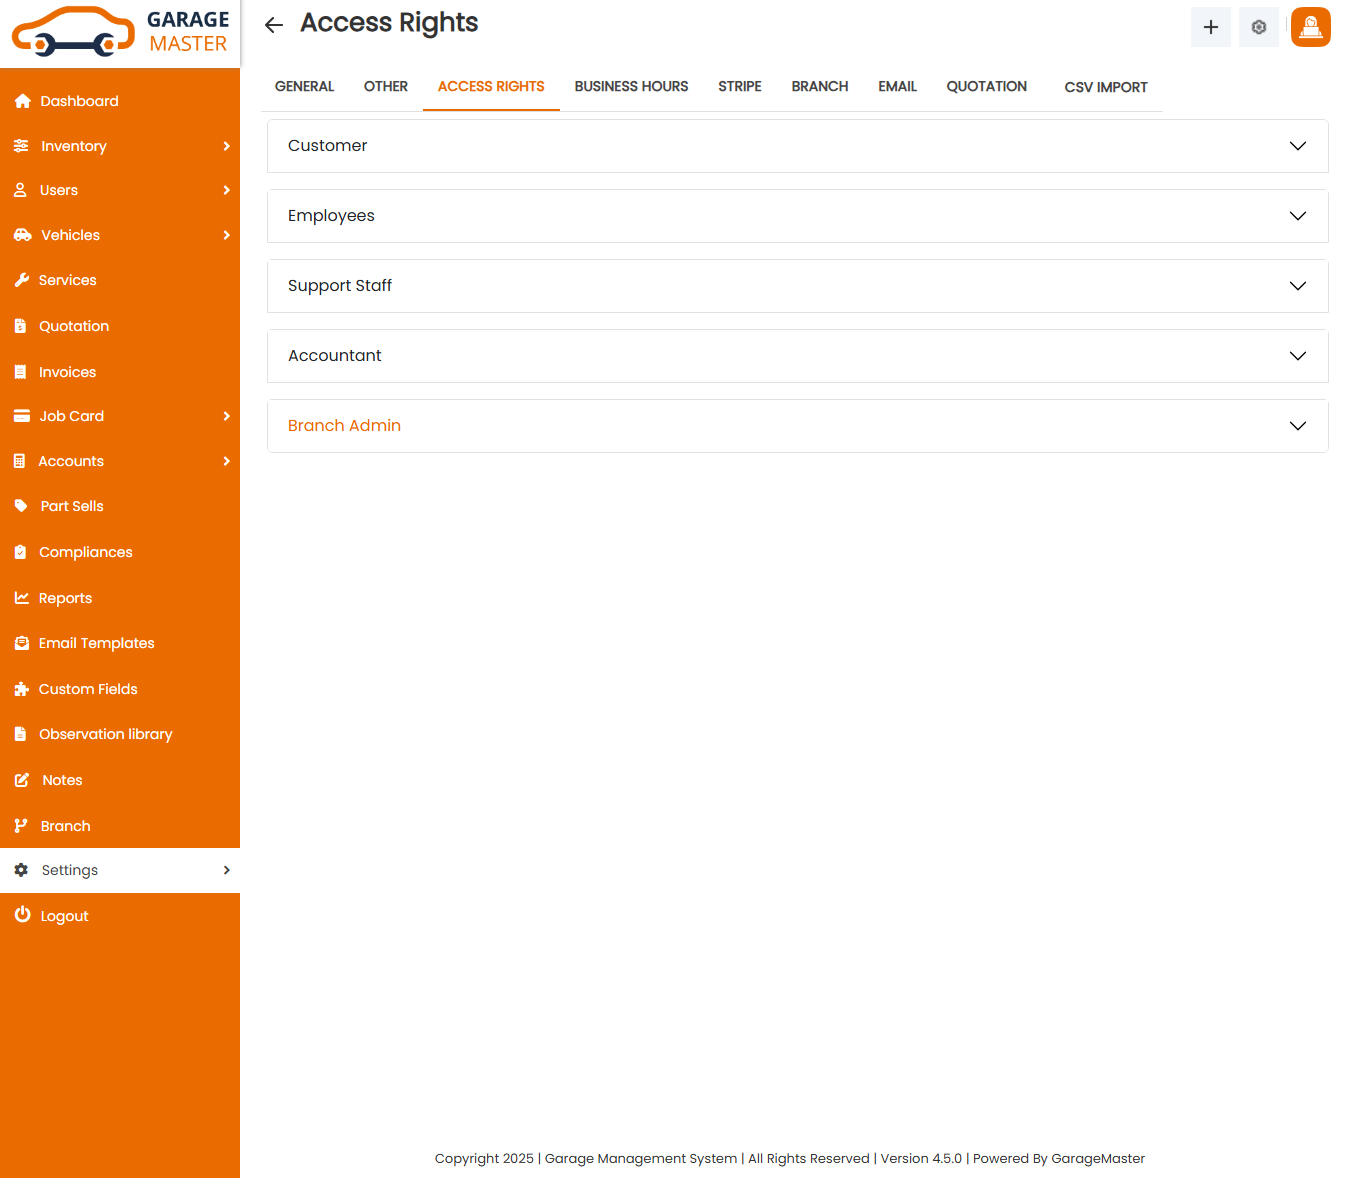
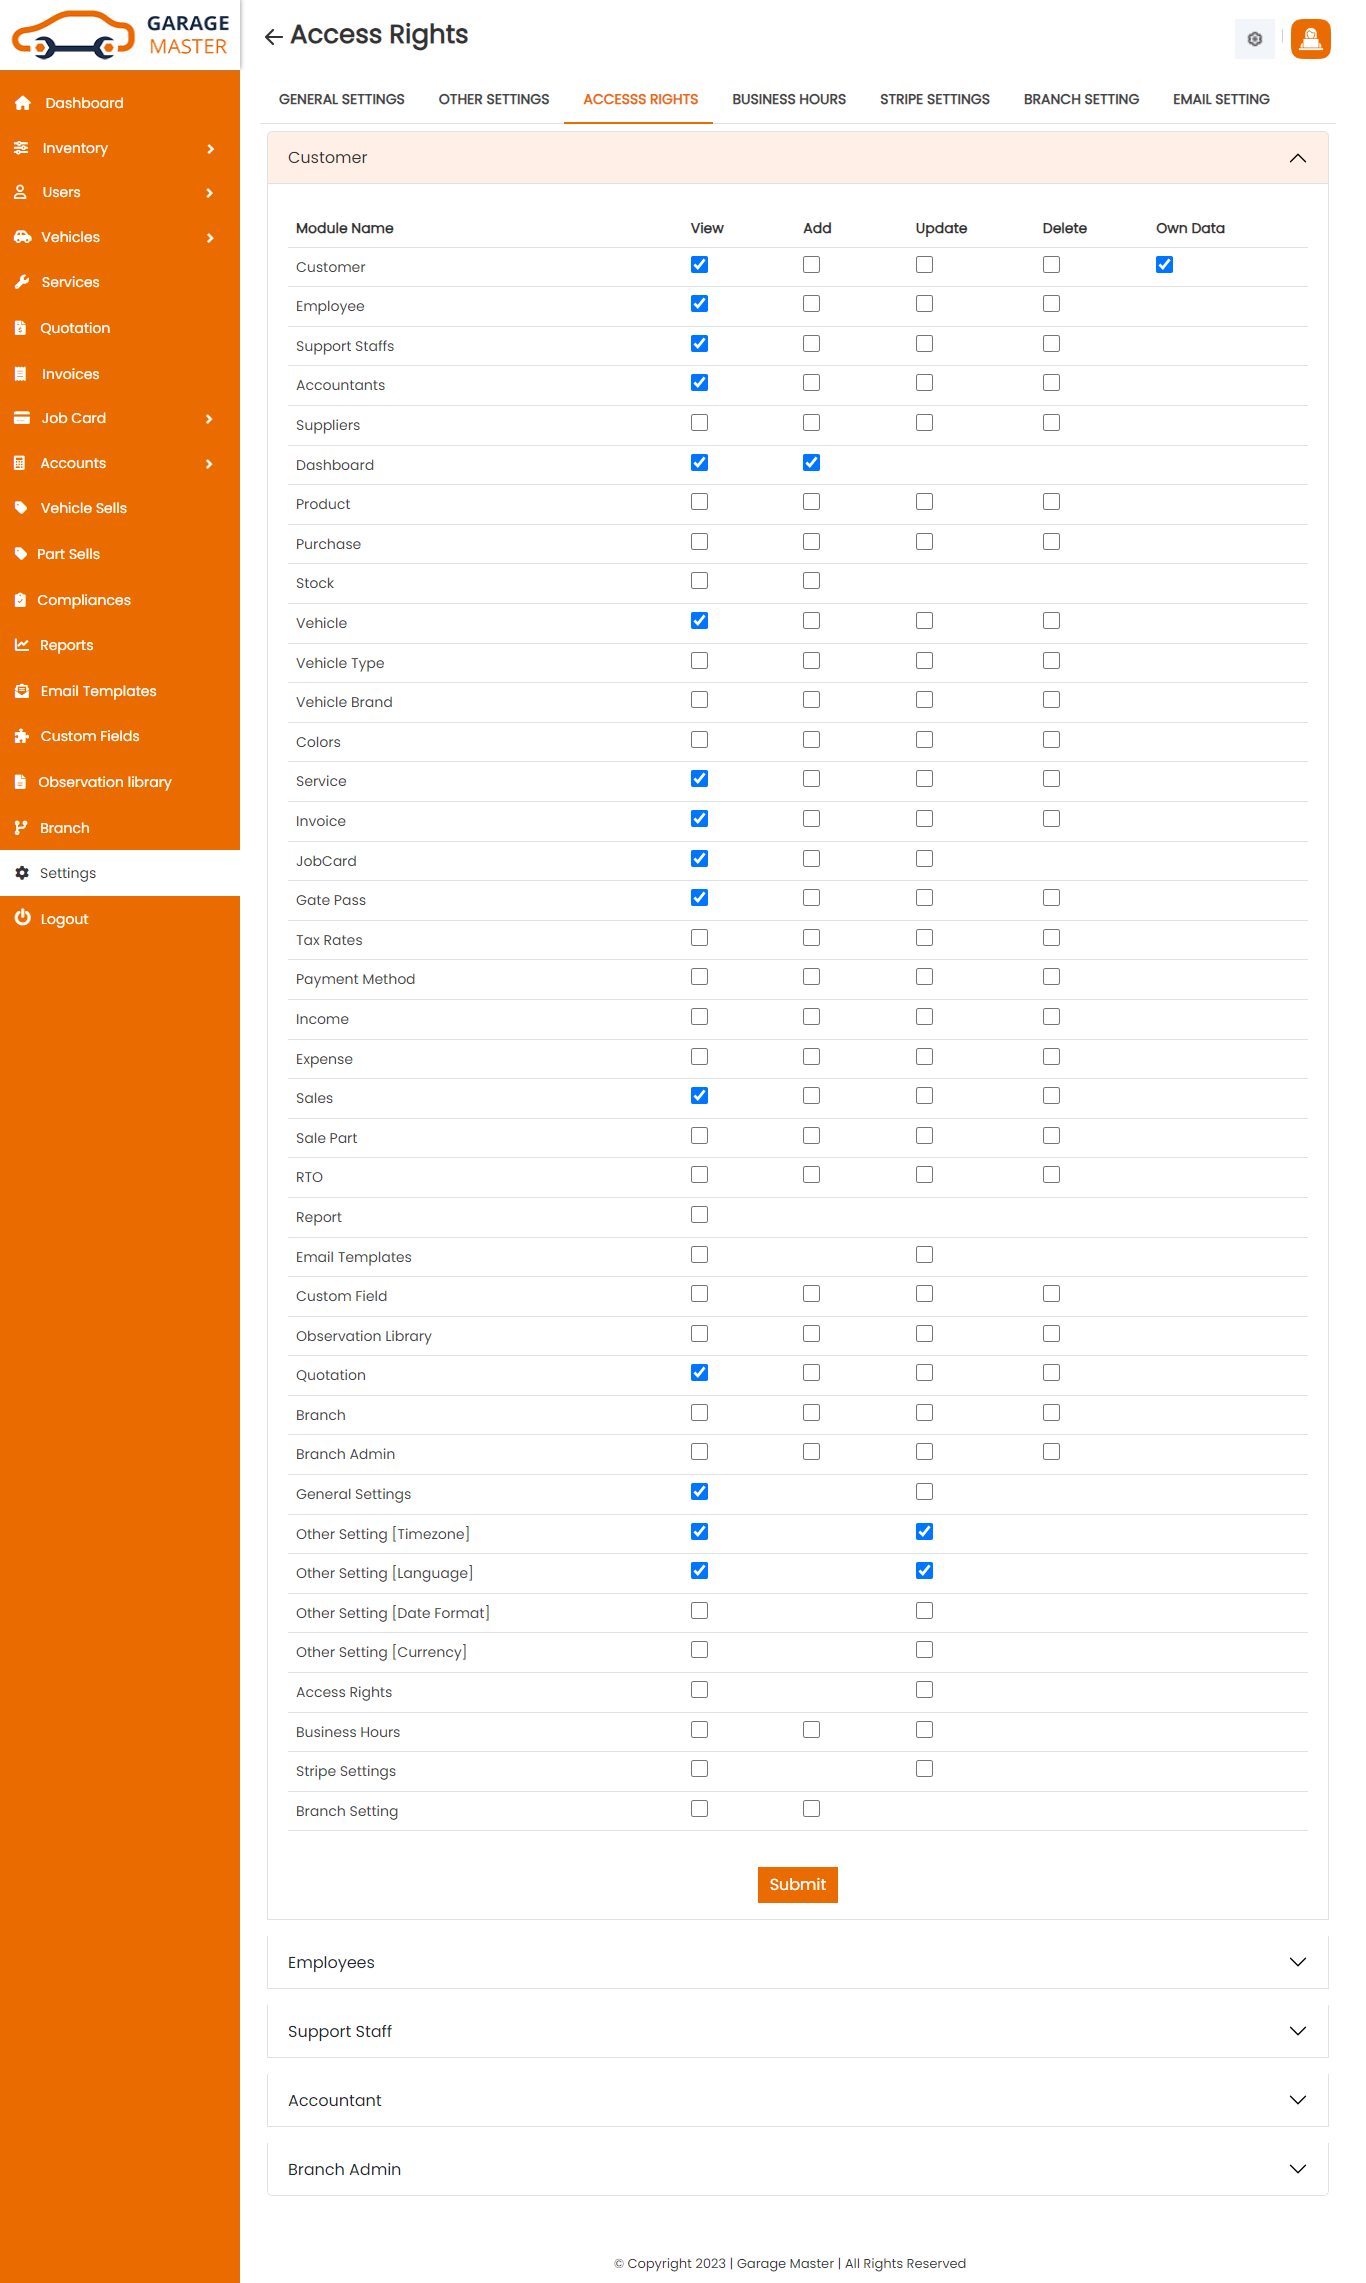
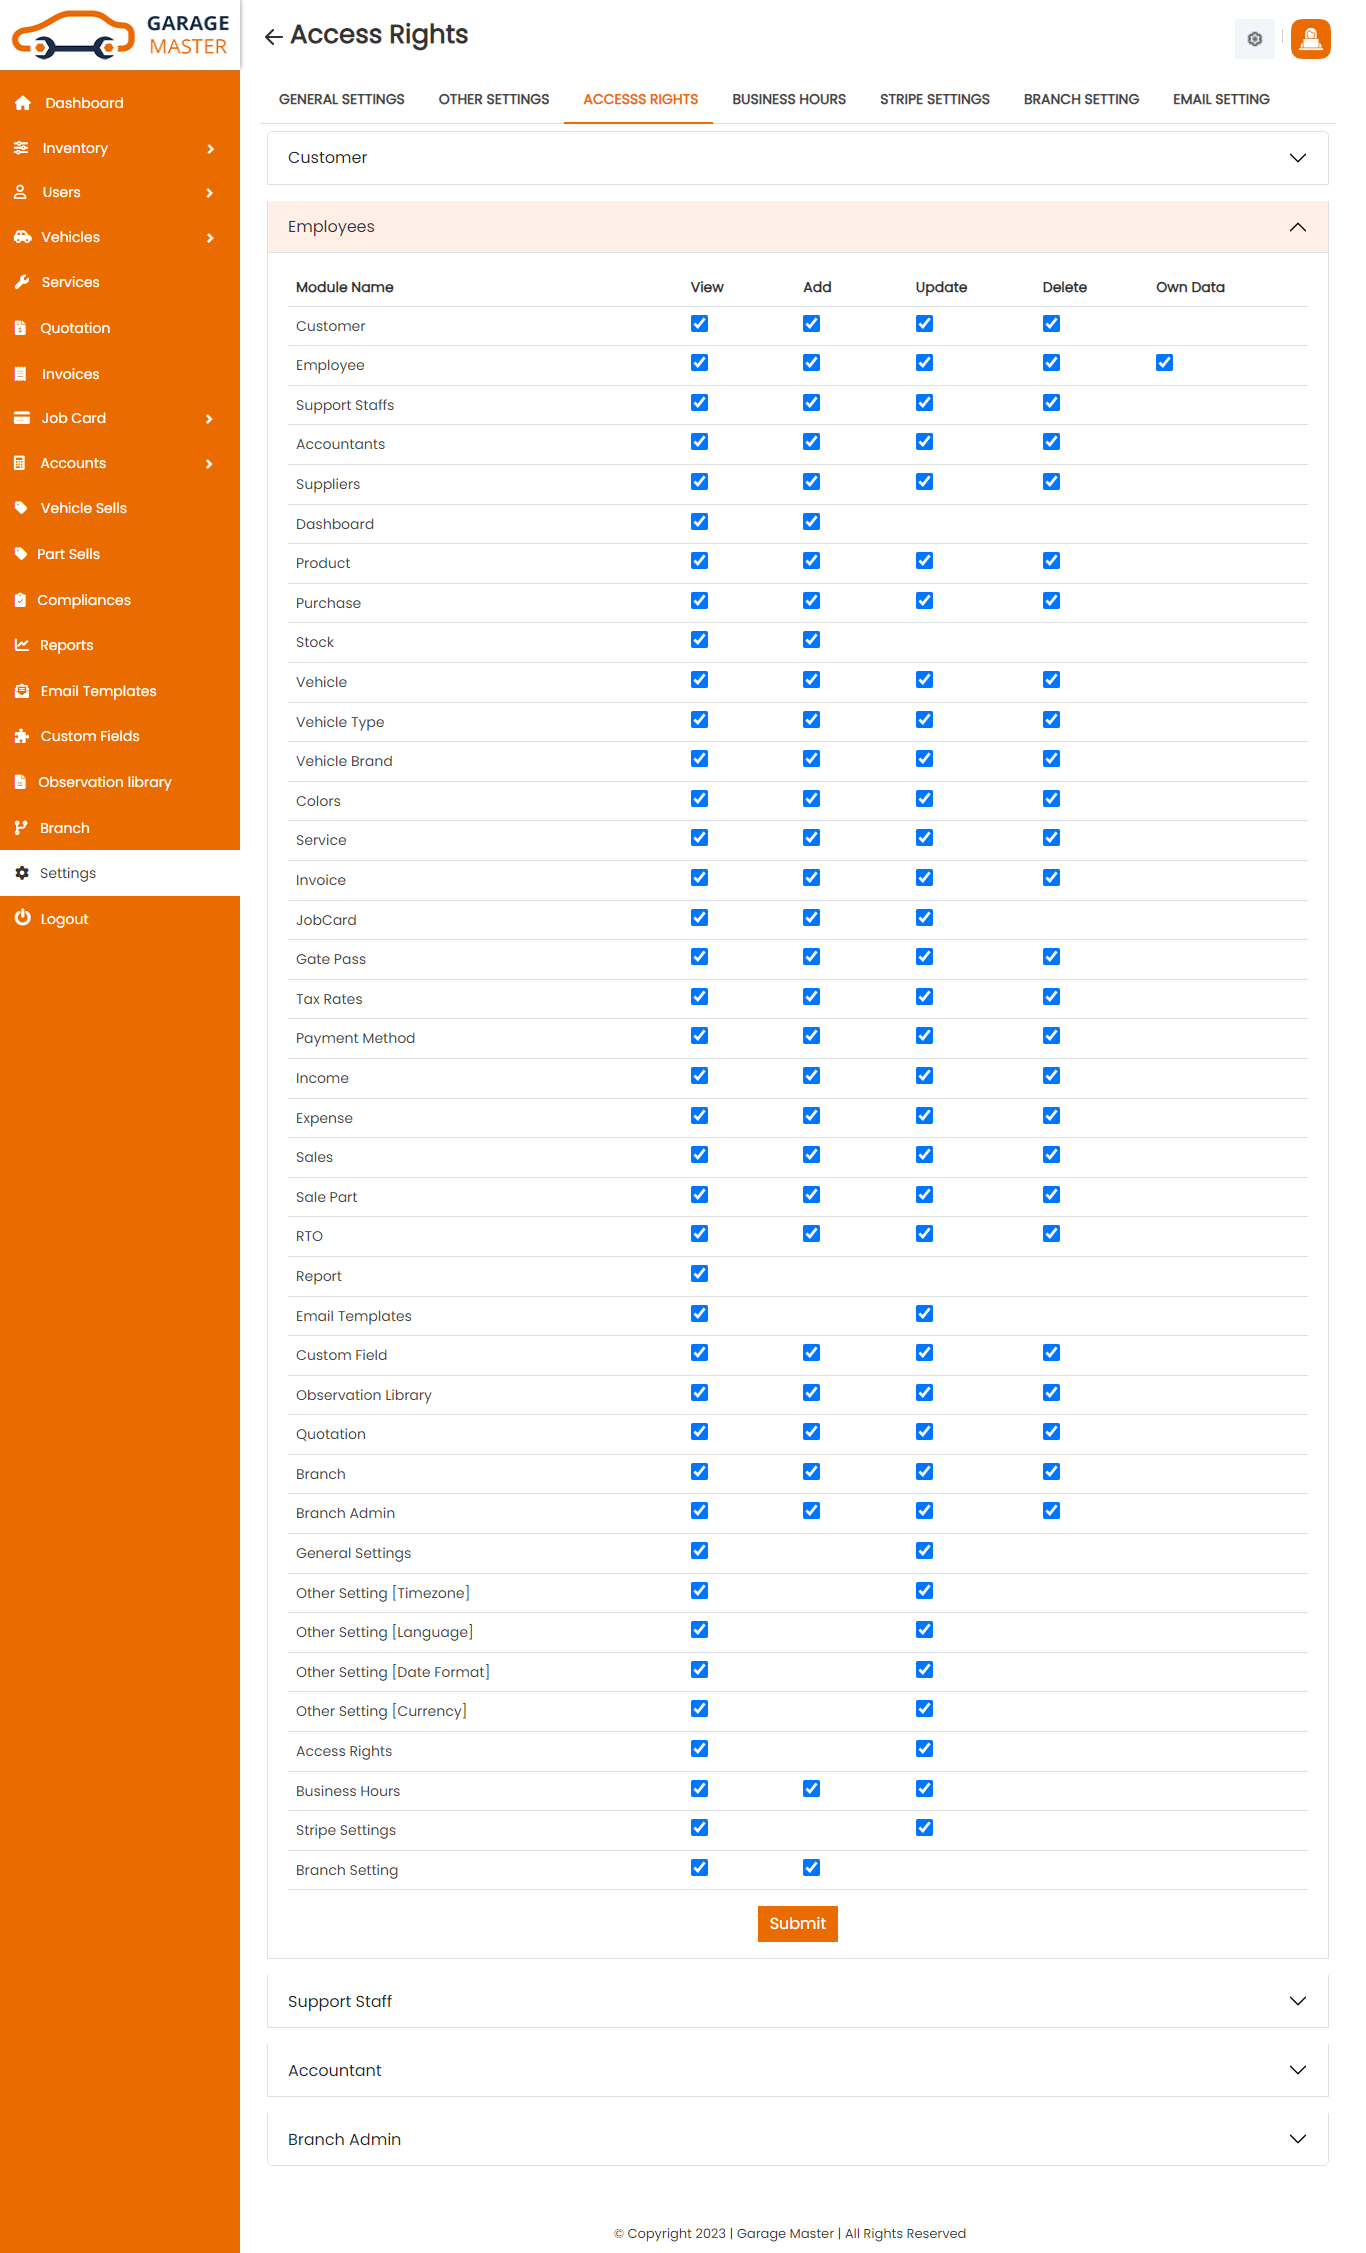
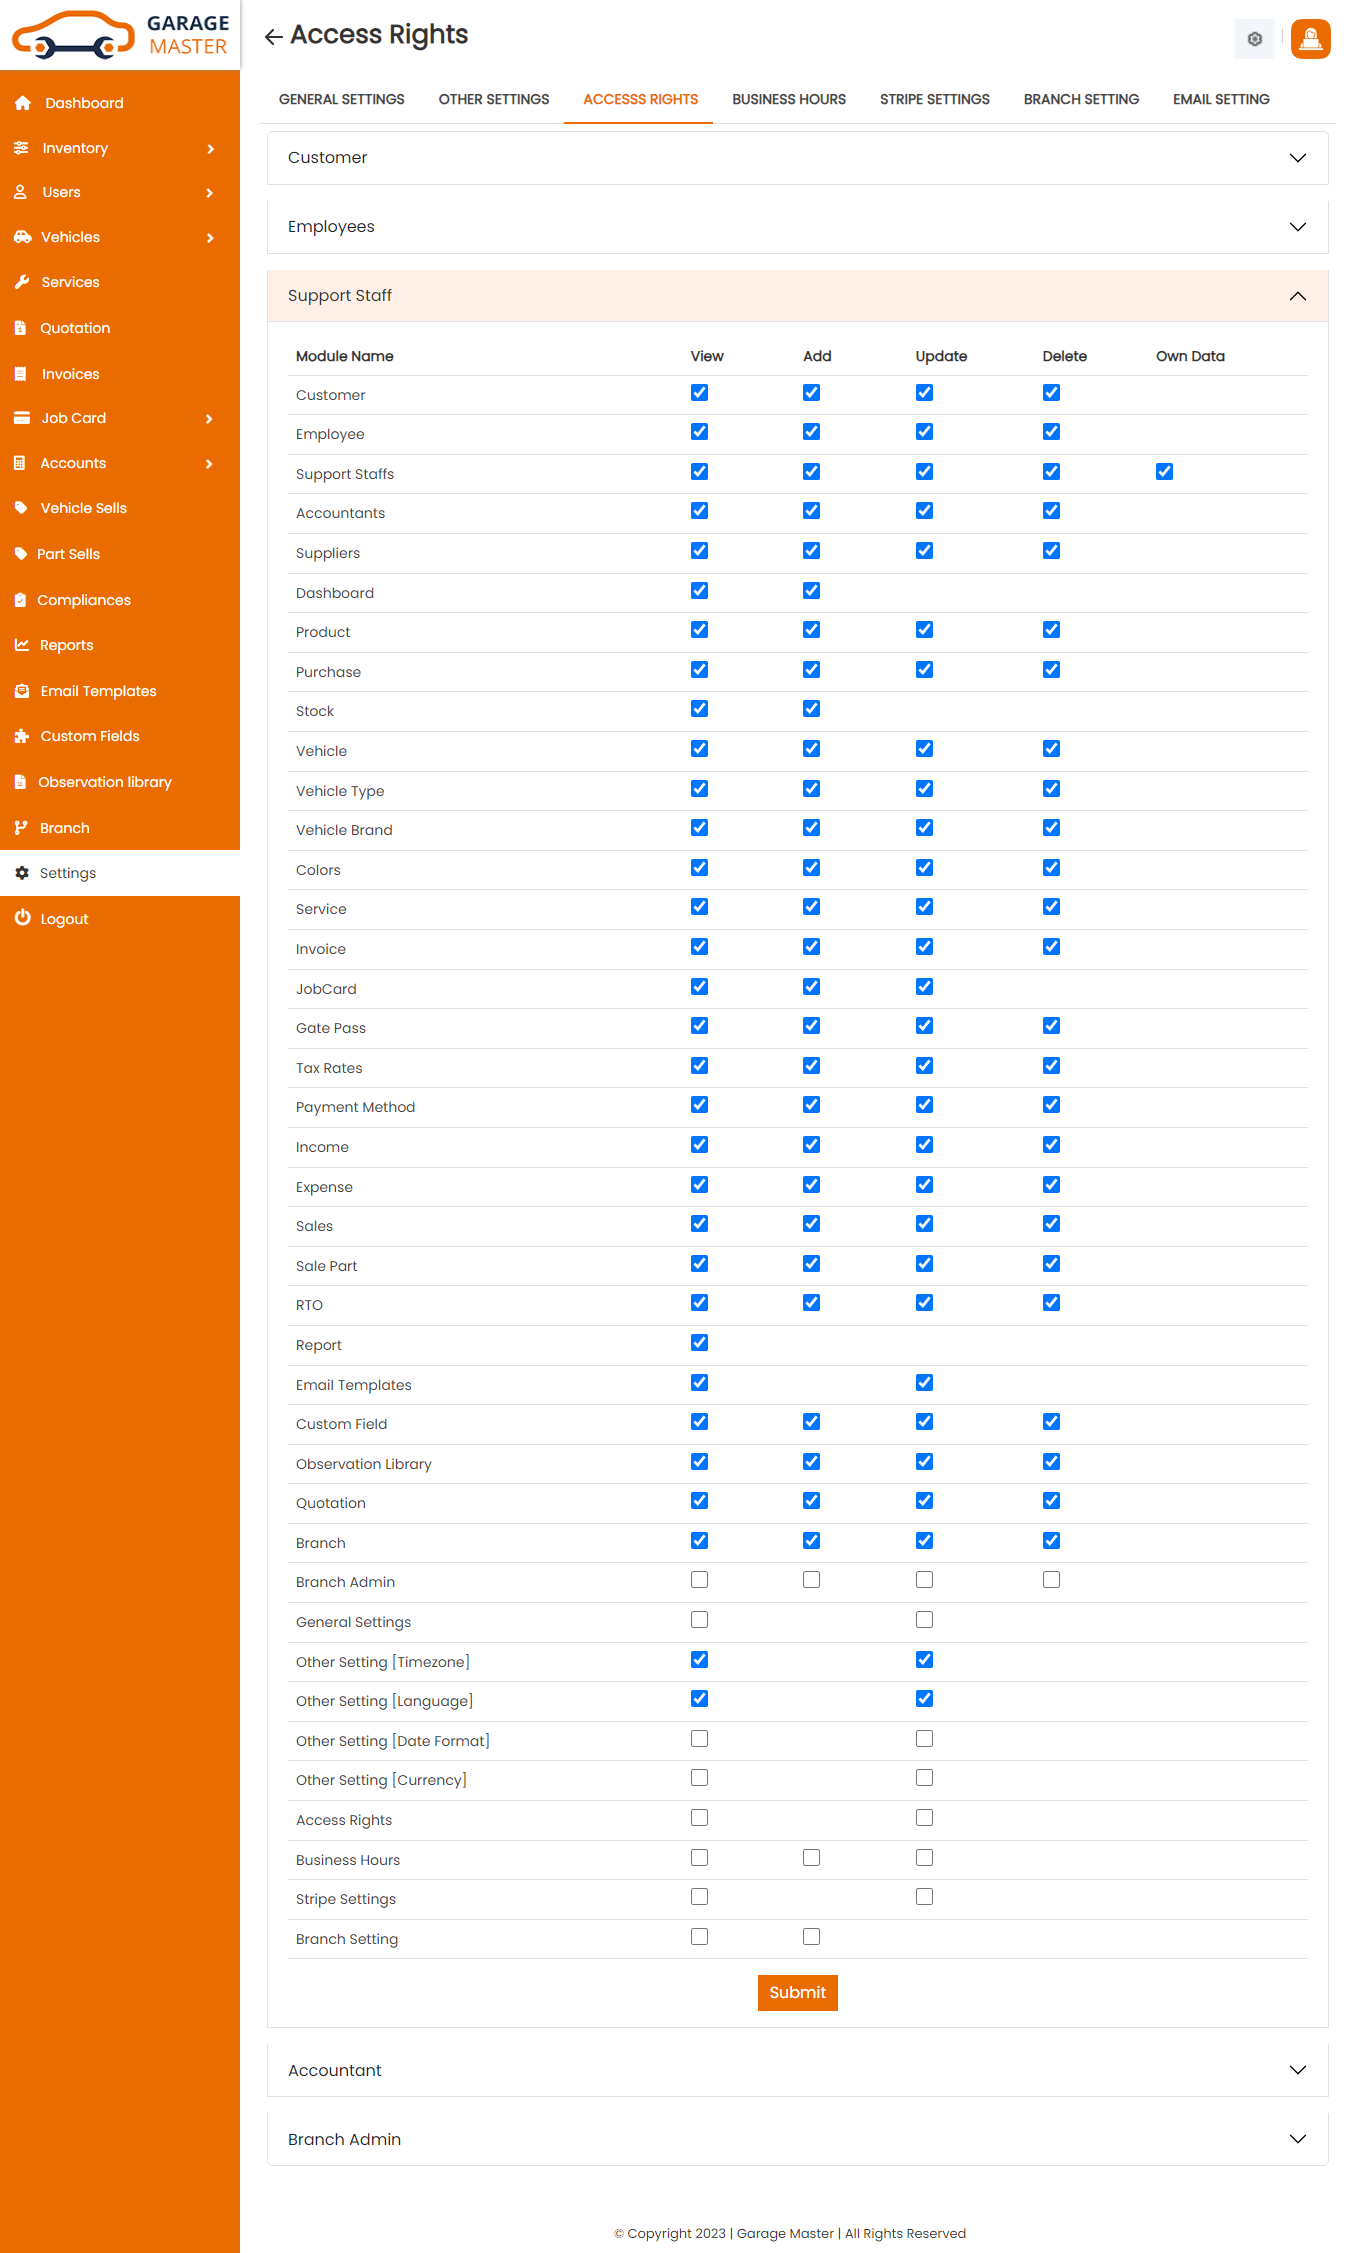
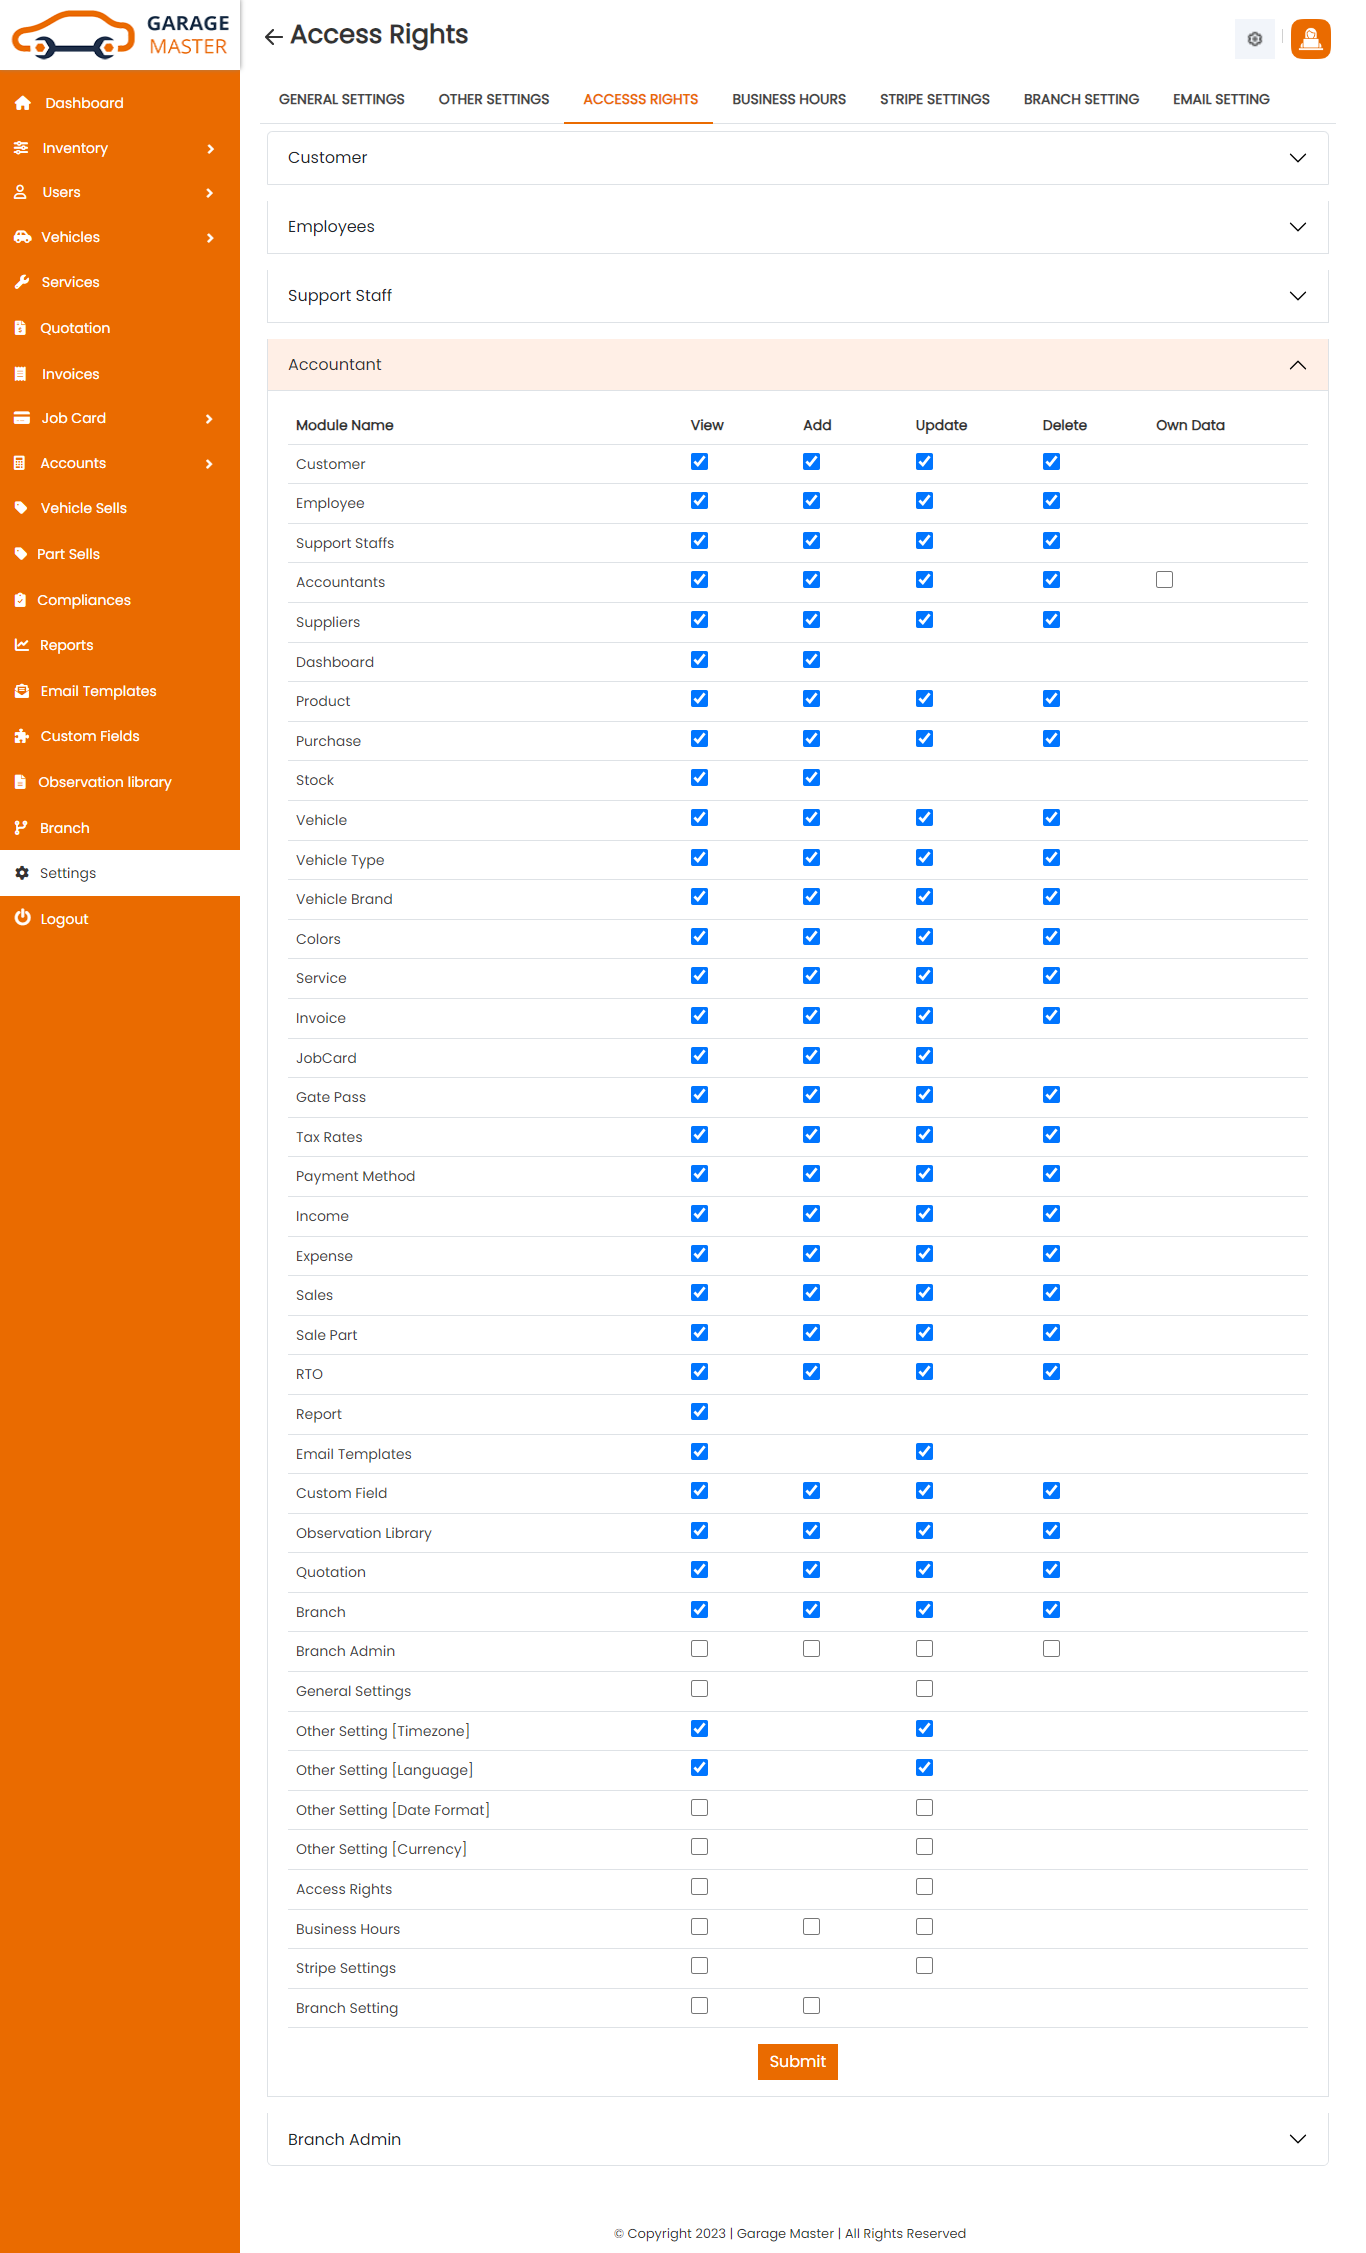
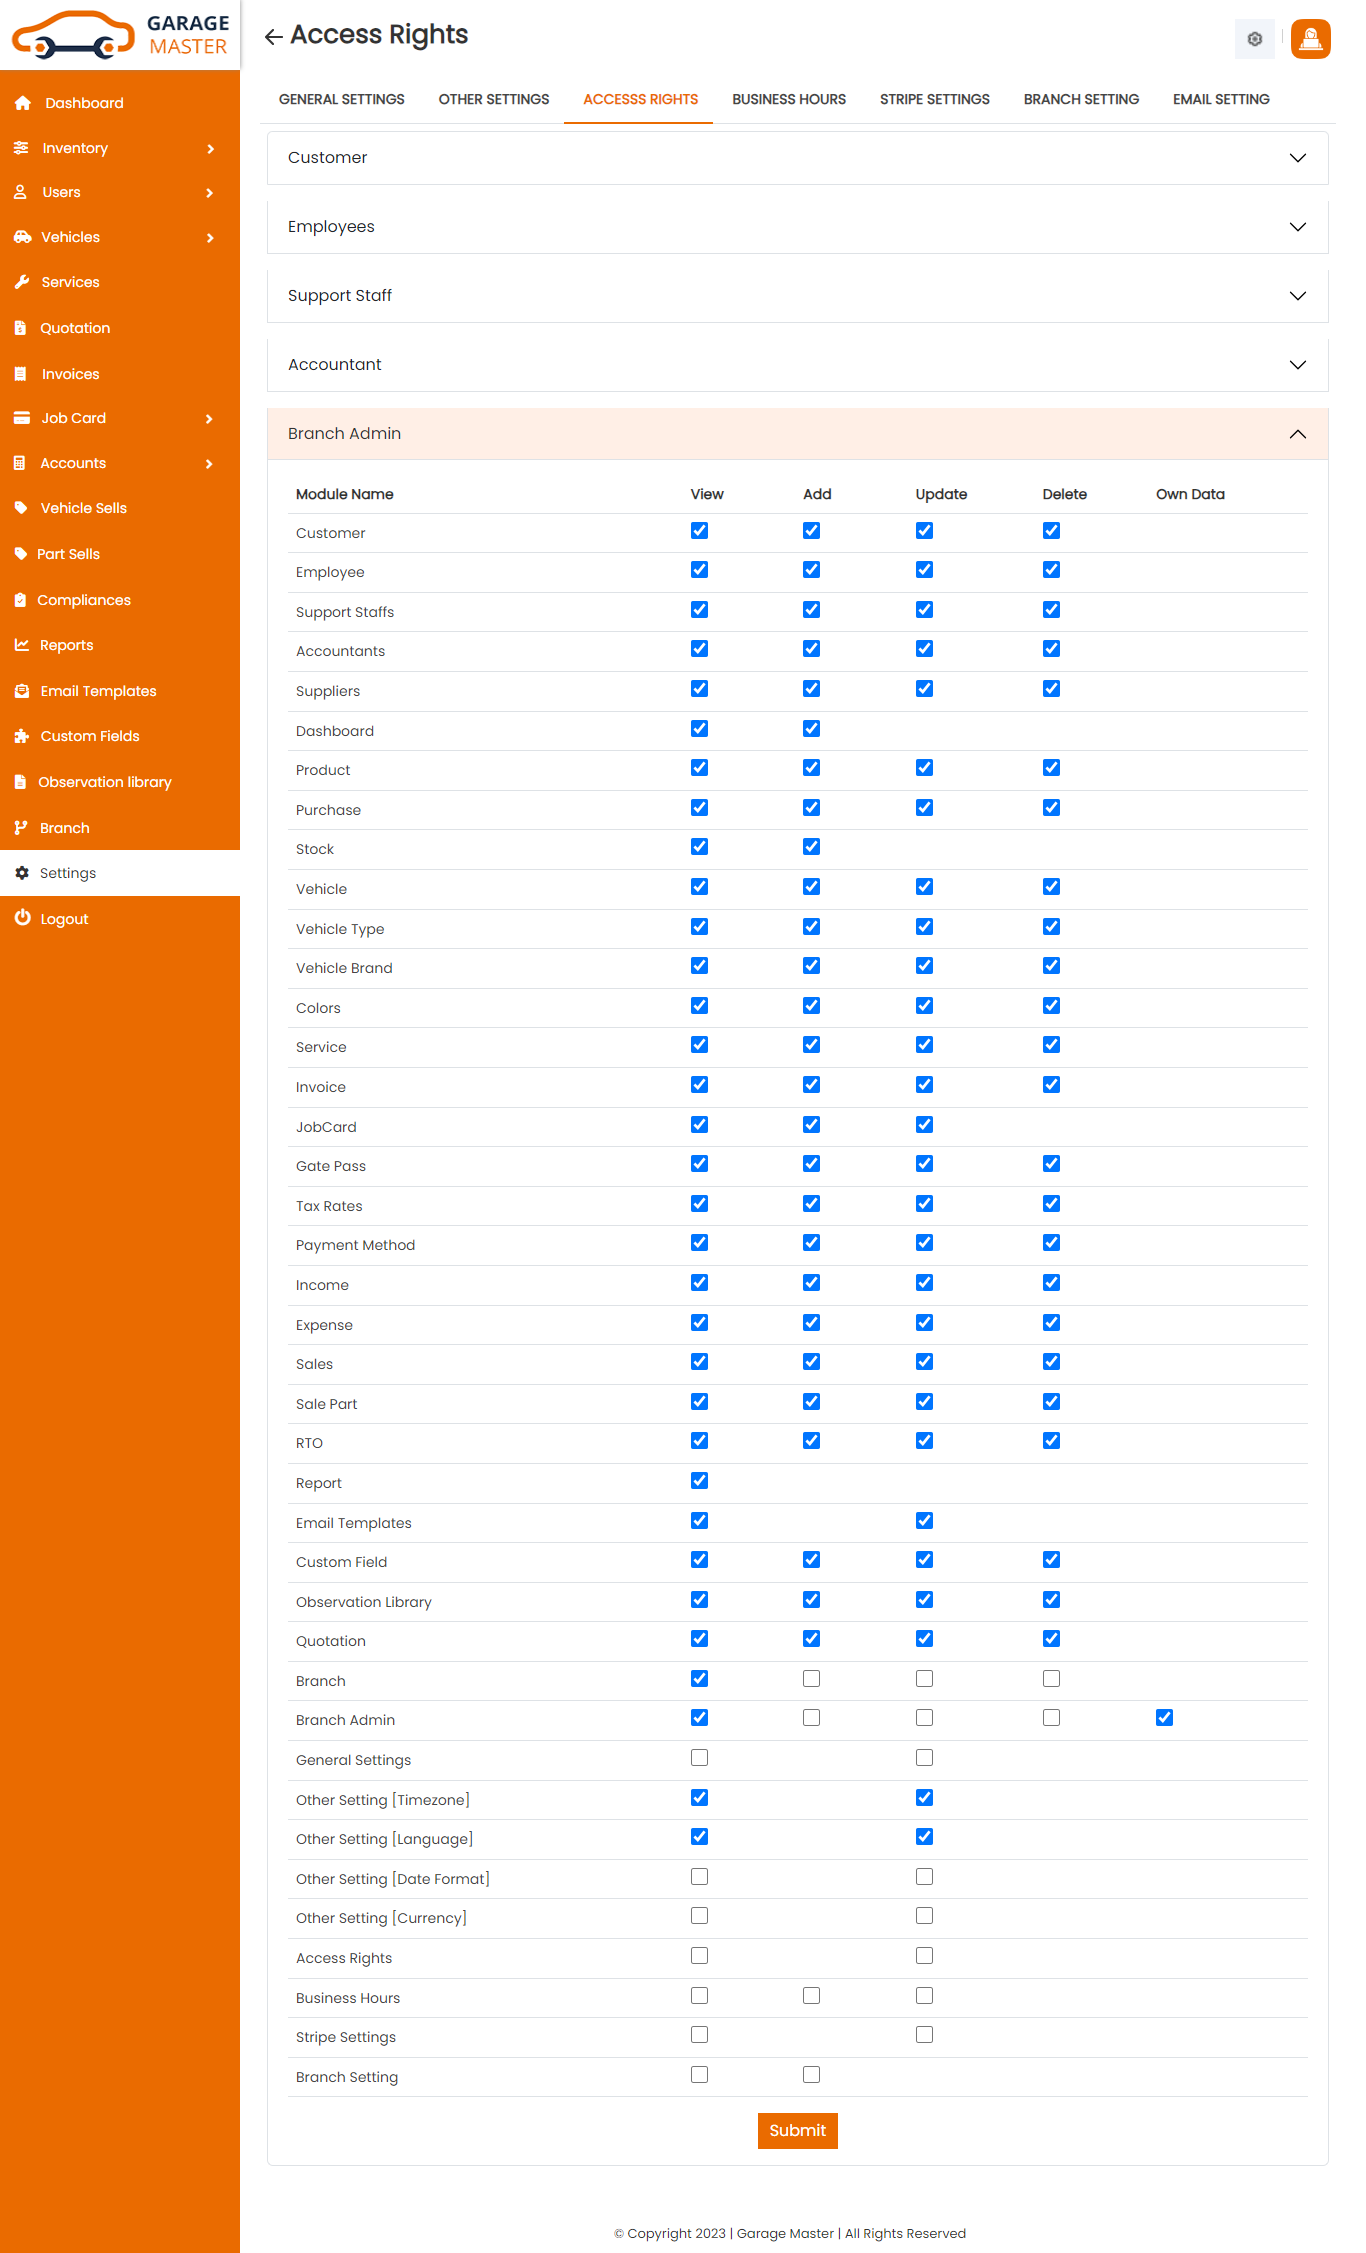
- Accordion with user name: Customer, Employee, Support Staff, Accountant and Branch Admin.
- Module Name: Modules like Vehicle, Supplier, Product, Service etc. This all module have data and this data with make operations like, Add, Edit, Delete, View also Owndata.
- View: For modules with rights to view this data.
- Add: For modules with rights to add this data.
- Update: For modules with rights to update this data.
- Delete: For modules with rights to delete this data.
- Owndata: For modules with rights to make operation like edit, and view data, this is owndata rights.
Access Right Settings
D) Customer onboarding
Click on Setting inside. Click on Customer onboarding to start setting up the system.
- In this customer onboarding you can give access for enable or disable customer login
- If you want to enable customer login then click on Yes
- There are two login types are available in garage master
- Default login is email and password
- If you want to use mobile login feature you can first purchase mjsms package to enable sms service in garage
- If you want to purchase mjsms. go to setting/addon or Click here
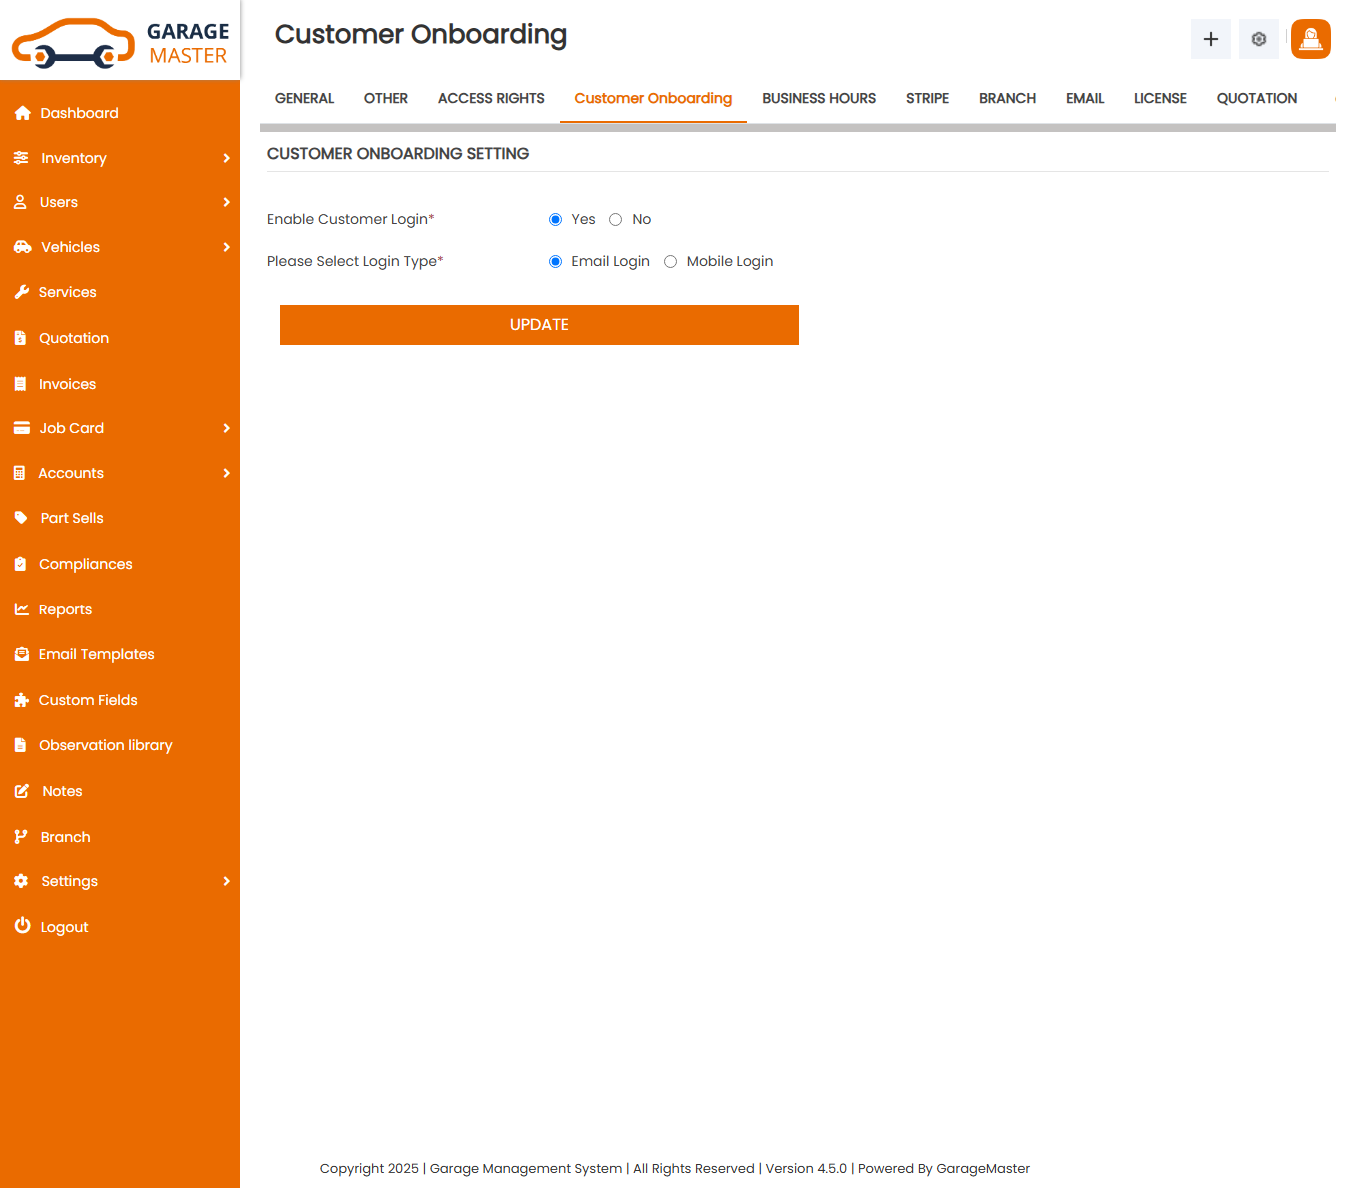
After enabling mobile login you can see this page.
E) Business Hours Settings
Click on Setting inside Click on BusinessHours Setting to start setting up the system. You are advised to fill all fields of BusinessHours settings as these details are used a different section of the whole system. You can change these business Hours and holiday as per your requirement.
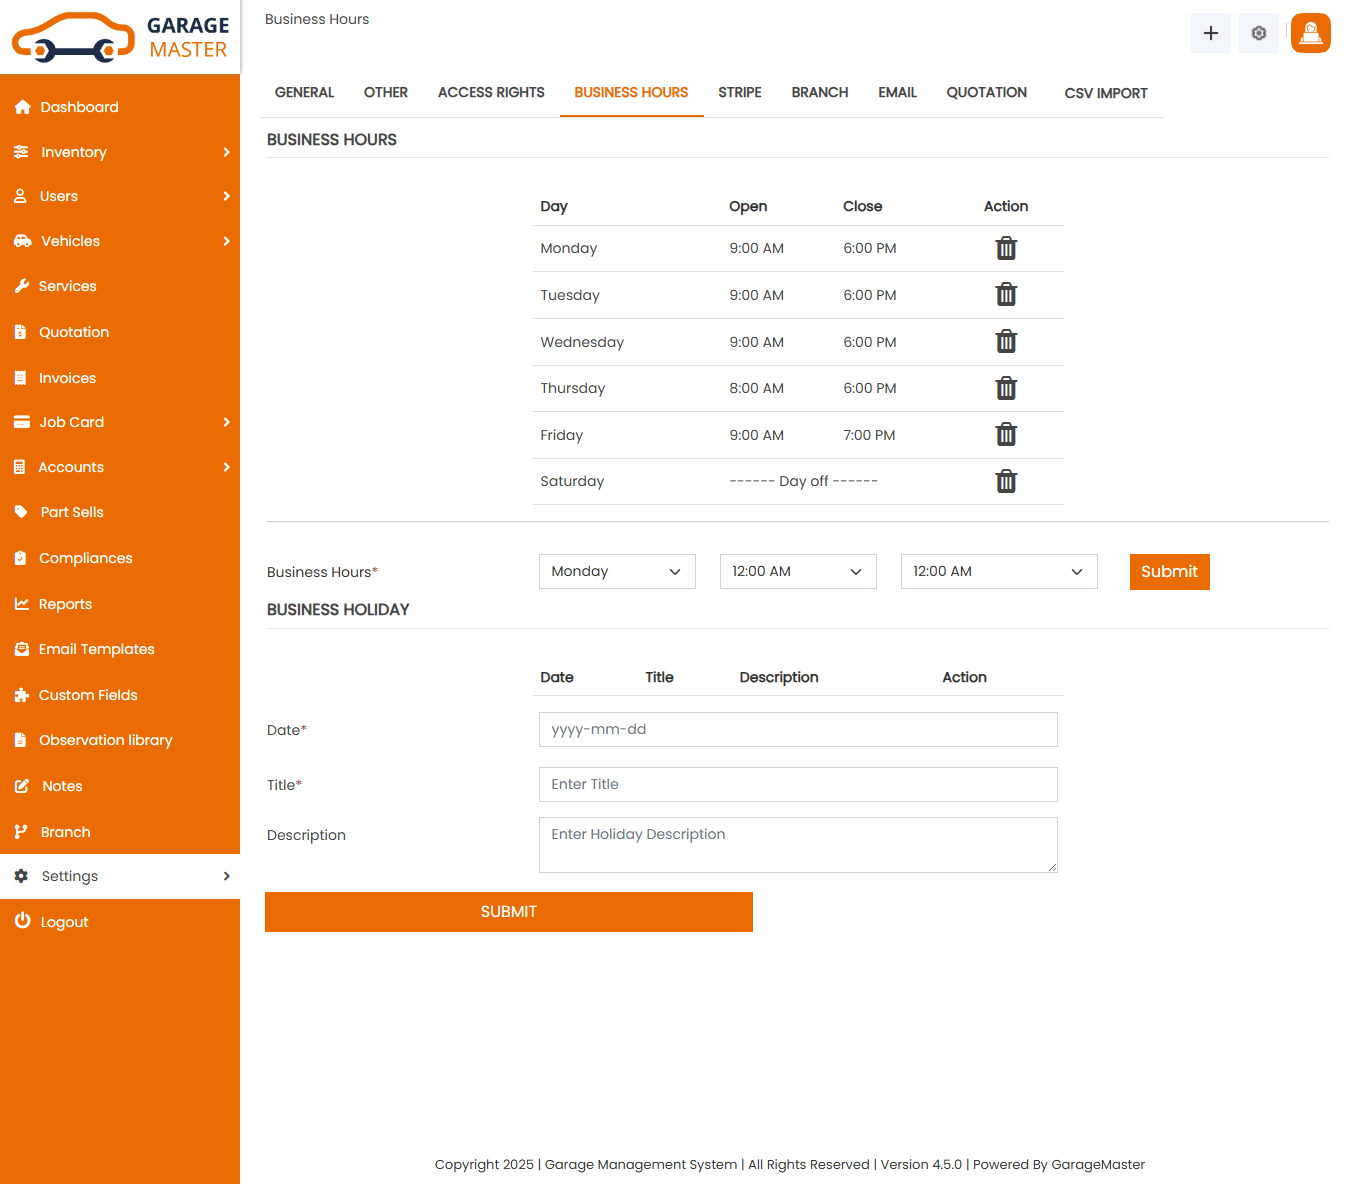
- Select day. Select open hours. Select close hours.
- select open hours and close hours a same time select in day off.
- Date: Select date for this business Hours.
- Title: Enter a new title name for this business hours.
- Description: Enter a new description for this business hours.
Business Hours
Business Holiday
F) Stripe Settings
Click on Settings within Stripe Settings to configure your payment gateway. The Garage Master system supports two methods for Stripe integration depending on your country.
Stripe Connection Status
To accept online payments, you must connect your Stripe account to the system. The connection method varies based on your selected country.
Step 1: Select Your Stripe Account Country
First, select your Stripe account country from the dropdown menu. The system will automatically determine the best integration method for your country.
Step 2: Choose Your Integration Method
Based on your selected country, one of the following options will appear:
Option A: Stripe Connect (Recommended for Supported Countries)
If your country supports Stripe Connect (e.g., United States, United Kingdom, Canada, Australia, and other supported regions), you'll see the "Connect Your Stripe Account" button.
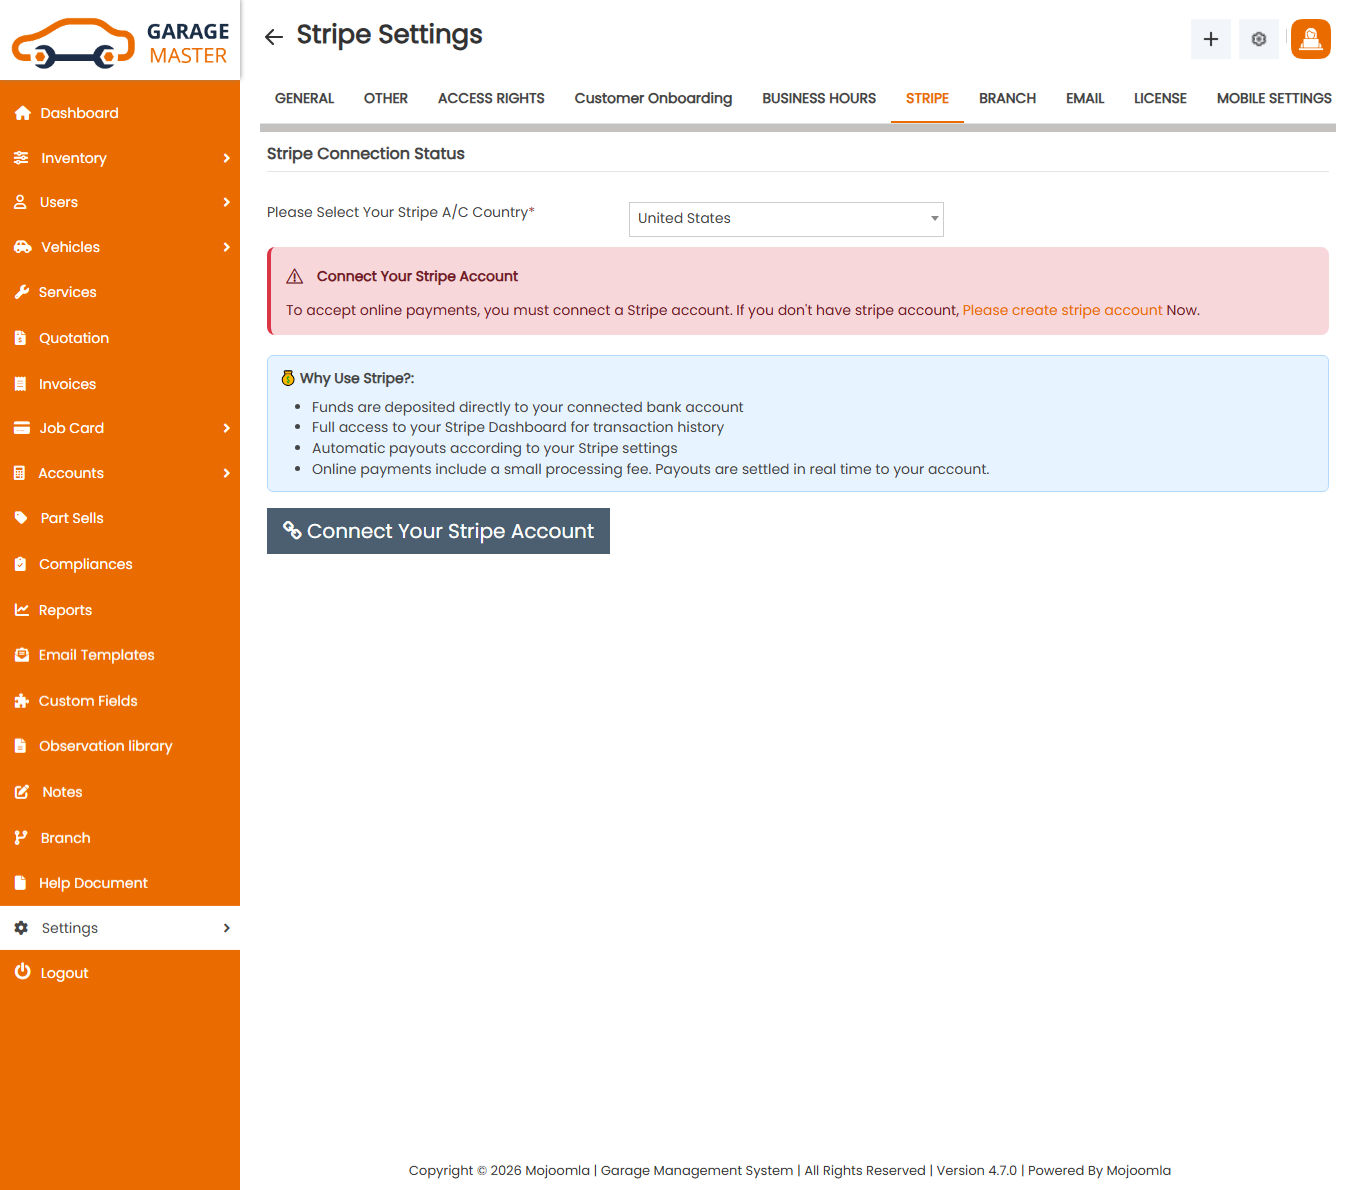
Click the button to securely connect your Stripe account. If you don't have a Stripe account yet, click on "Please create stripe account" to set up a new account first.
Once connected successfully, you'll see a confirmation message indicating your Stripe account is active and ready to receive payments:
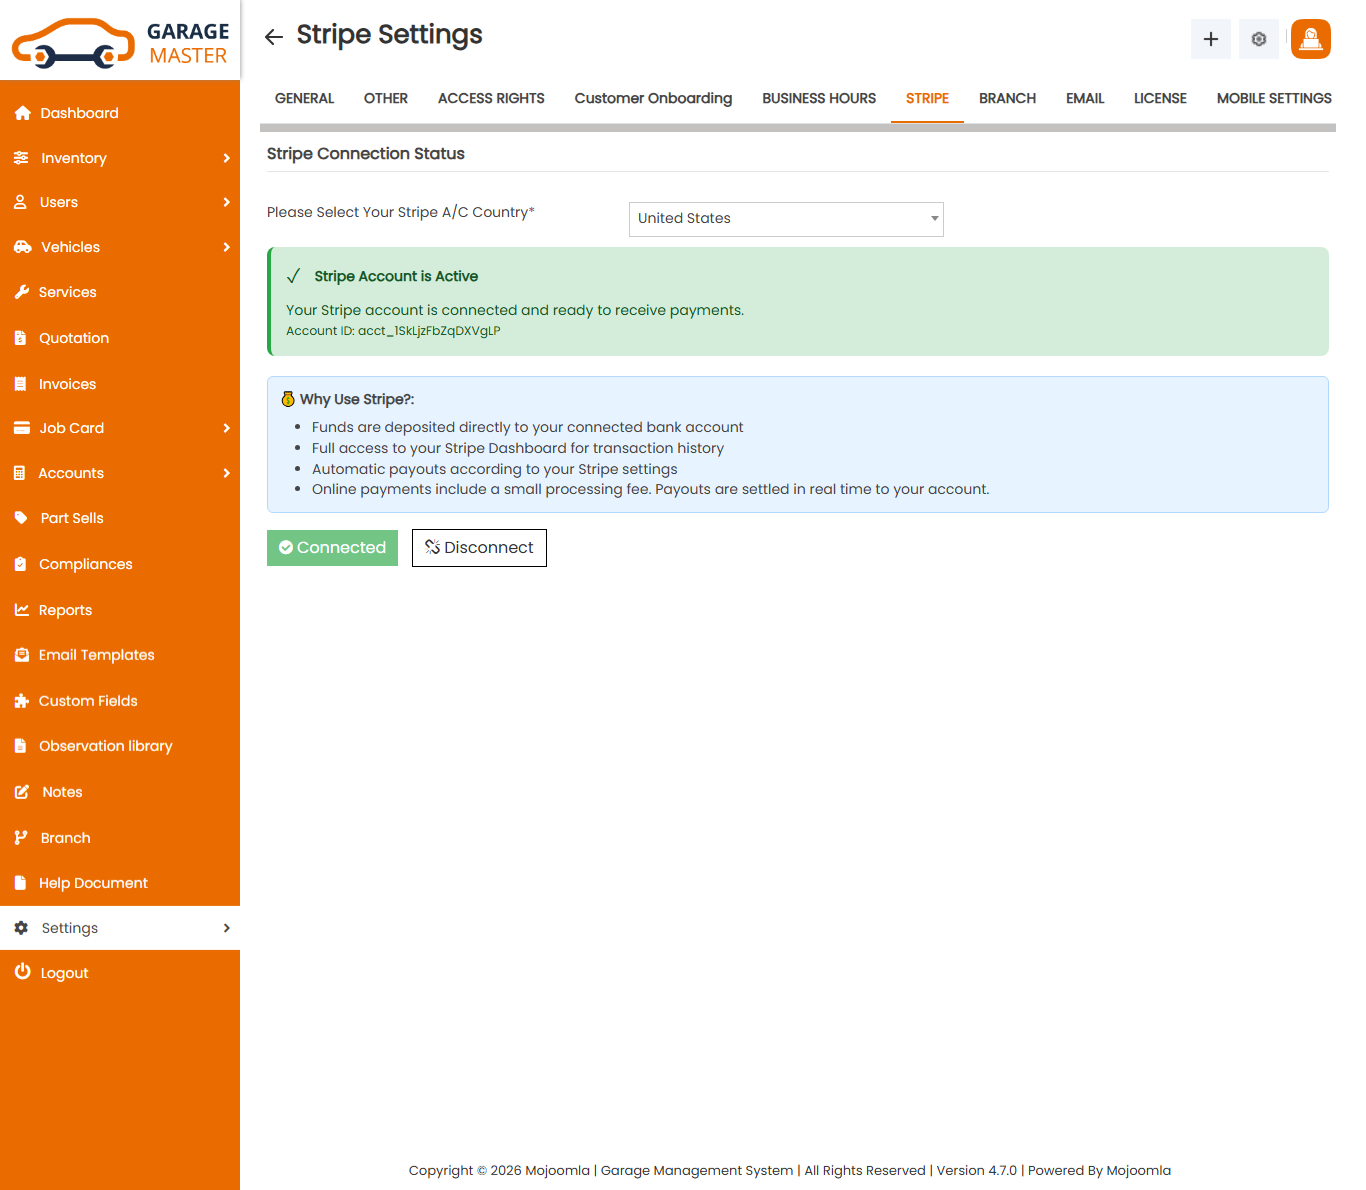
Note: You can disconnect your Stripe account at any time by clicking the "Disconnect" button.
Option B: Manual API Key Integration (For Non-Stripe Connect Countries)
If your country doesn't support Stripe Connect (e.g., India and other regions), you'll see a form to manually enter your Stripe API keys:
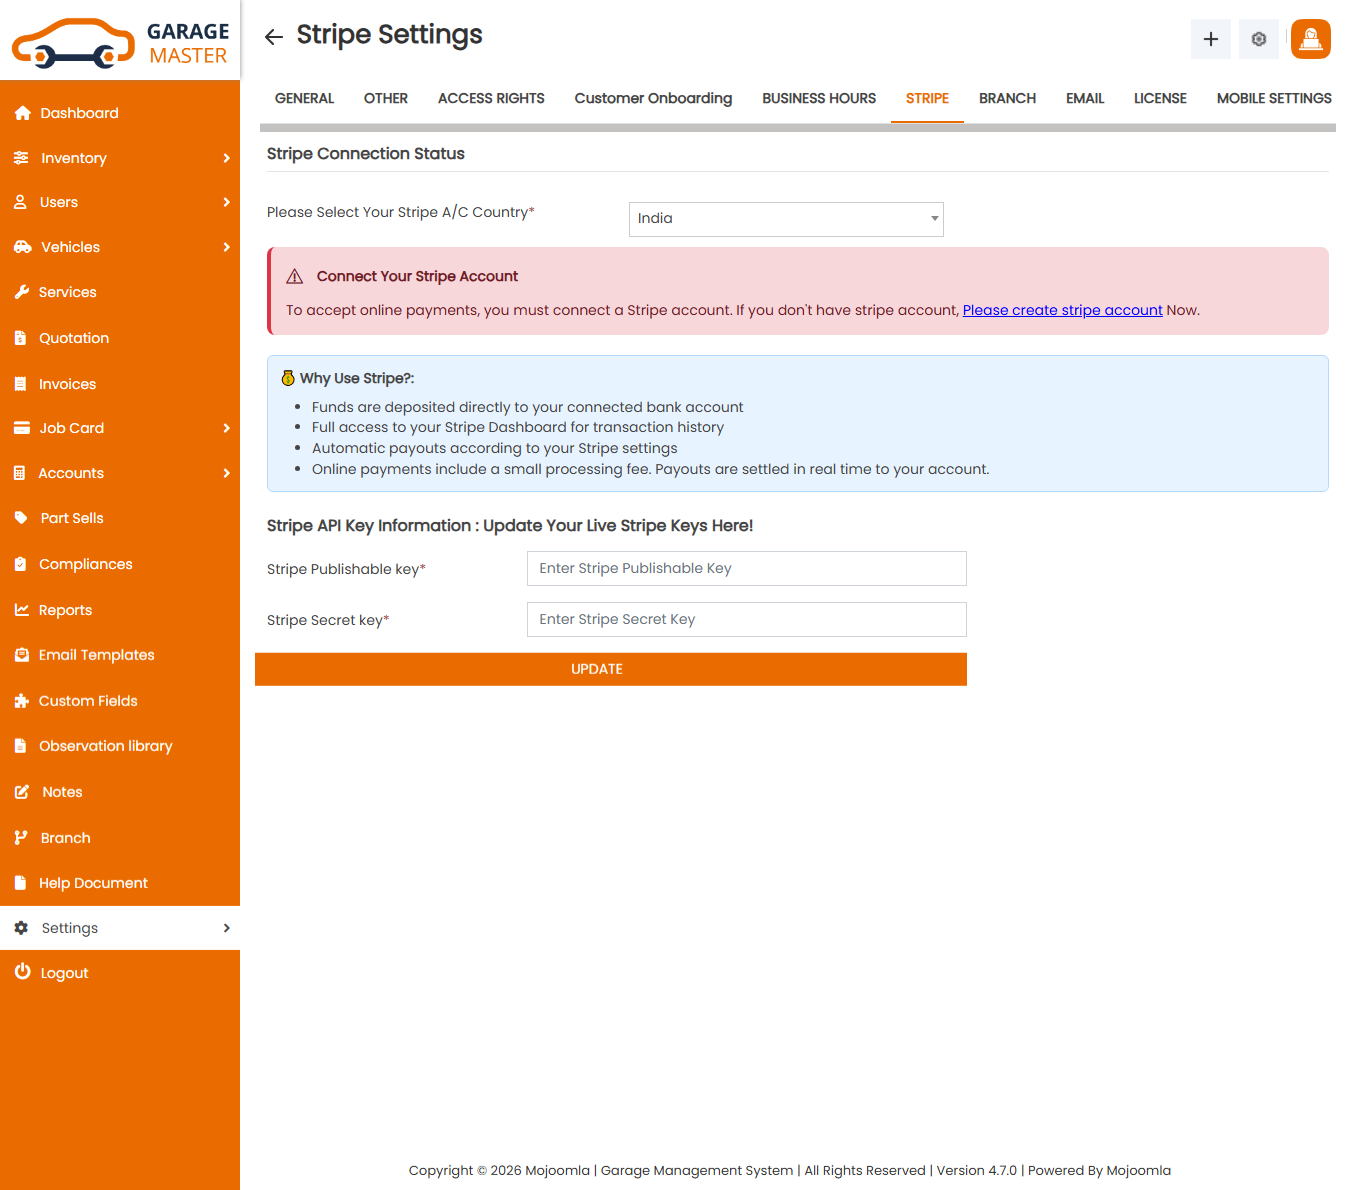
To enable online payments with manual integration, enter your Stripe API keys below:
- Stripe Publishable Key
- Stripe Secret Key
This is your public key used for client-side operations.
(Example: pk_test_gMHgW5FAxW4GUHu1I4gfZzxj or pk_live_...)
This is your private key used for server-side operations. Keep this confidential.
(Example: sk_test_*********** or sk_live_***********)
How to Get Your Stripe API Keys:
- Log in to your Stripe Dashboard at https://dashboard.stripe.com
- Navigate to Developers → API keys
- Copy your Publishable key and Secret key
- Paste them into the respective fields above
- Click "UPDATE" to save your keys
Important: Use test keys (starting with pk_test_ and sk_test_) during testing, and switch to live keys (starting with pk_live_ and sk_live_) when running in production.
After successfully connecting via either method, your system will be ready to securely process online payments through Stripe.
G) Branch Settings
Click on Setting inside Click on Branch Setting tab to start setting up the system. You are advised that Admin can update it's current branch from its Branch Setting tab, select the branch name and click on the update button, after that Admin can move to another branch. All the details and data also, like Support Staff, Employee, Service, Quotation, Invoice and Reports. All the module data shown on this system is only the current branch, which is selected by the Admin.
- 1) Firstly, install successfully a fresh Garage Package. After that, Branch Module does not show any branch data because this is a main branch, so the branch name and details are not shown on Branch Module. If you need to show the Main Branch details, then you can go to Settings and click on the General Setting tab.
- 2) If Admin needs to create another branch at that time, Admin goes to Branch Module and clicks on add branch and fills in all required data and submits it. Now we have successfully created a branch, then Admin can see details of this branch on the Branch Module listing page. Also, Admin can add, edit, view and delete this branch from the Branch Module.
- 3) Now inside Branch Module, we have shown one branch entry, so inside Branch Setting Tab Admin can show two branch names on Branch Select Box like (Main Branch and New branch name).
- 4) Now on Branch Setting Tab , Admin can select names and update branches, so Admin is currently active for this particular selected branch. So, now Admin shows, adds, edits, views and deletes data from this current branch, which is selected by Admin.
- 5) Admin is on the current active branch at a time. Add one Support Staff, so this Support Staff belongs only to this branch, not to any other branch. This Support Staff is able to do or perform any kind of action for only his/her branch based on being given permission by Admin.
- 6) All roles and data added by Admin is for Admin's current selected branch. But the customer and the supplier cases are both common for all the branches. Both these roles don't have a single branch. This is common for all branches. And on the customer side, any customer logs into Garage System at a time, the customer can show all the details of all his or her branch data like sale, service, quotation and other data.
- 7) Admin or Support Staff add any kind of data from any module the time he/she is shown one field of the selected branch name, to just confirm this data is added to this selected branch, because this person is for add data is it currently/active on this particular branch and add this data for this particular branch.
Basic Steps For Use Of Branch Feature:
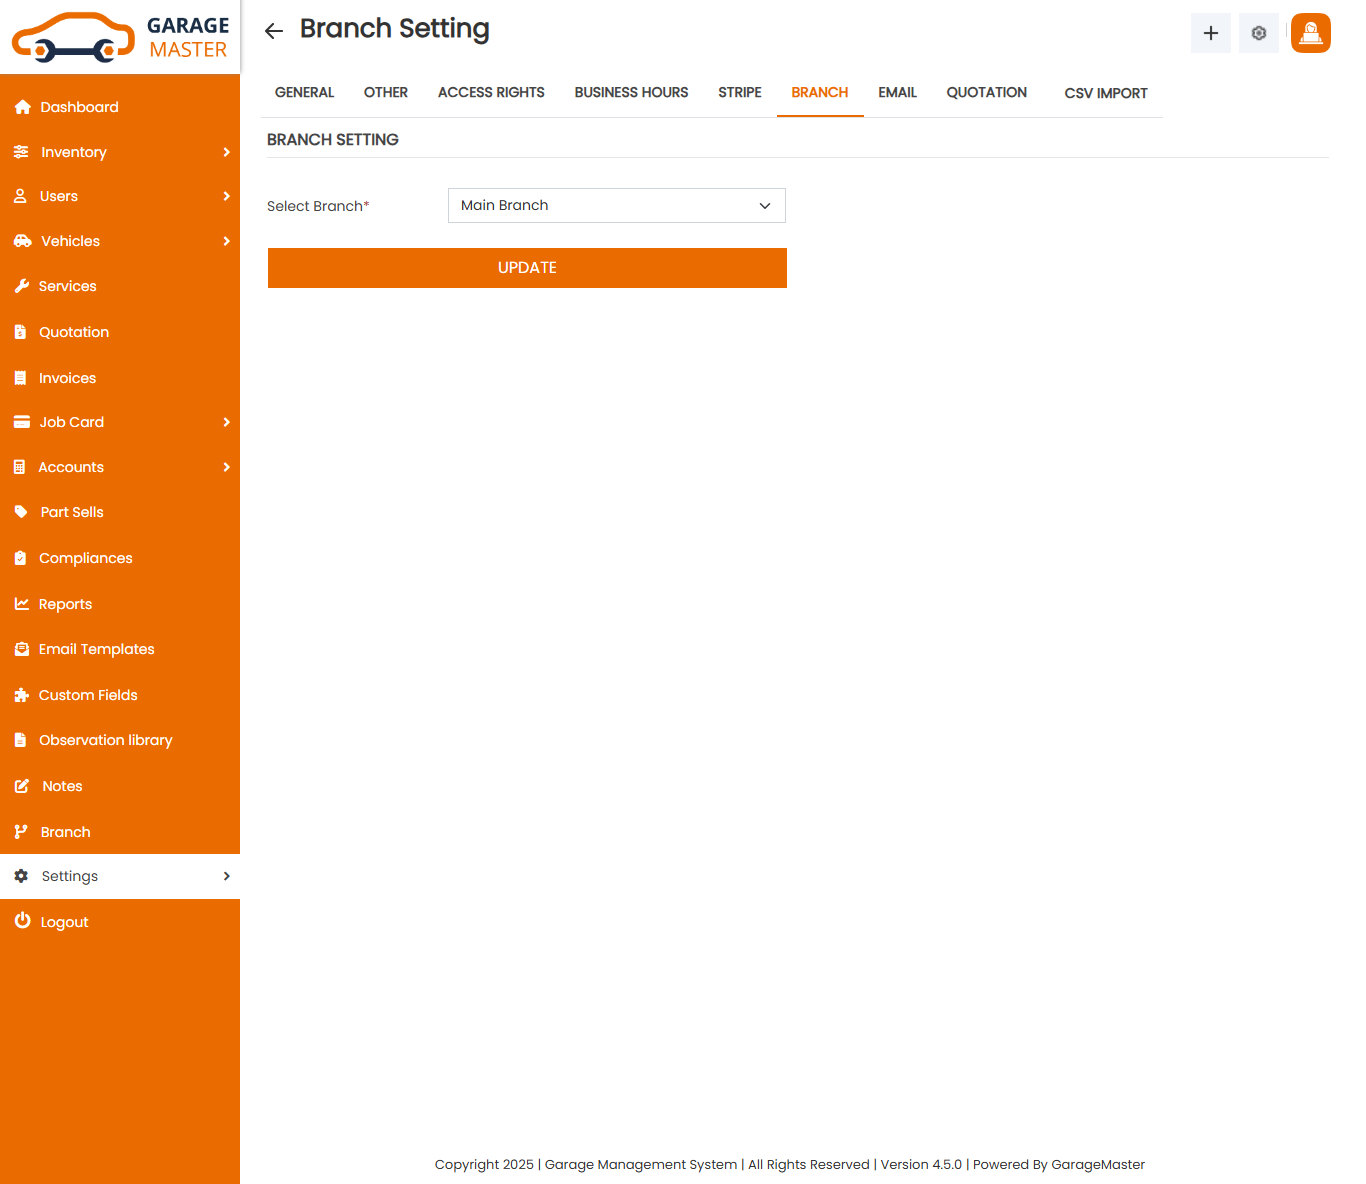
- Select branch name from select branch option and update this branch then you can show data of current selected branch only.
Select Branch Option
Admin Currently Selected Branch is Main Branch:
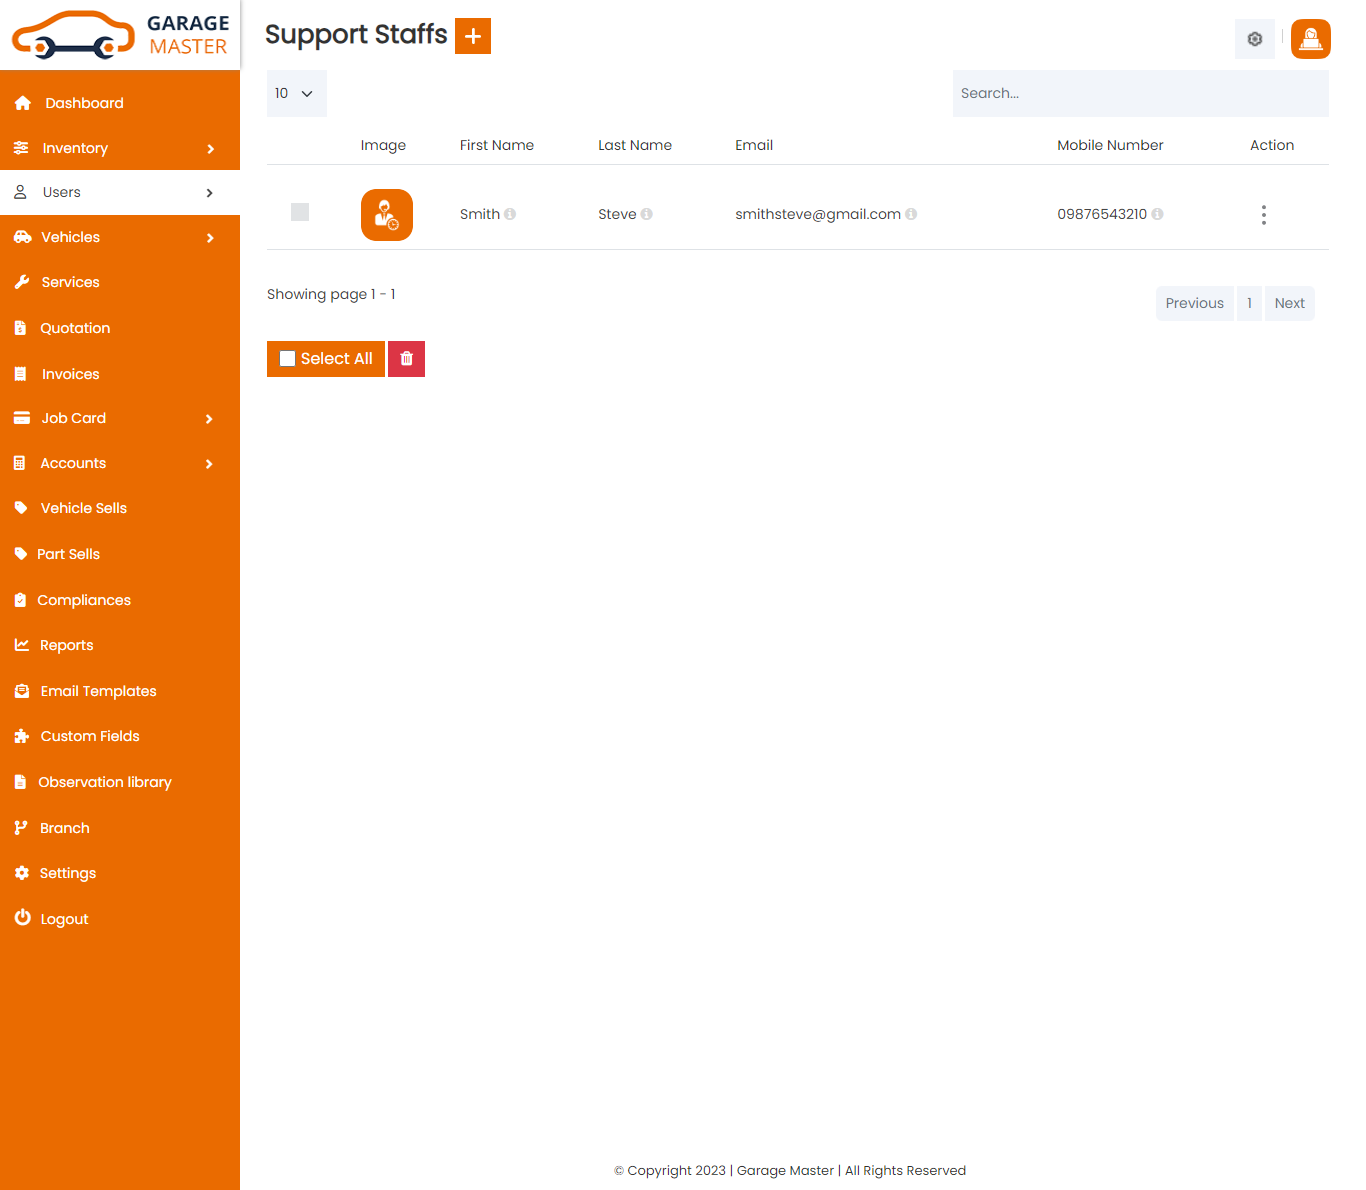
Here you can see the Admin. The currently selected branch is Main Branch and now in the next image you can see the Support Staff list of only Main Branch have registered Support Staff only. And also, the third image you can see in the Gujarat University Road Branch branch has registered Support Staff only.

Here you can see Admin has currently selected branch is Main Branch and this branch have registered Support Staff list is on bellow image.
Admin Currently Selected Branch is Gujarat University Road:
Here you can see Admin has currently selected branch is Gujarat University Road Branch from Branch Setting Tab.
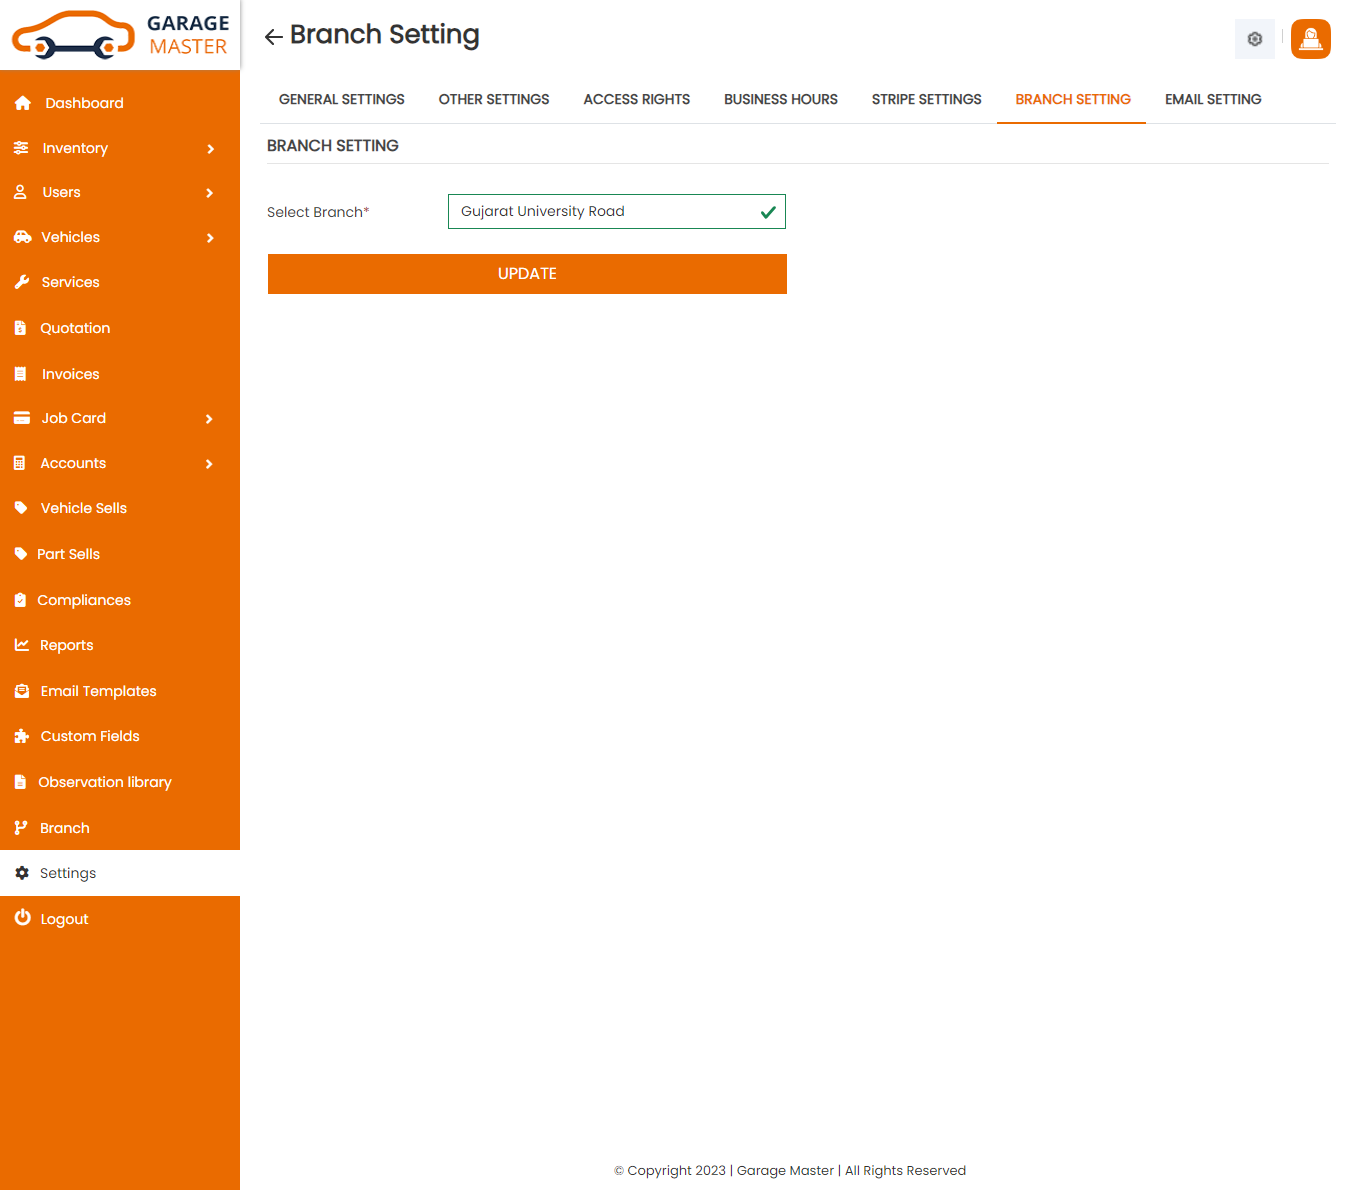
Here you can see Admin has currently selected branch is Gujarat University road Branch and this branch have registered Support Staff list is on bellow image.
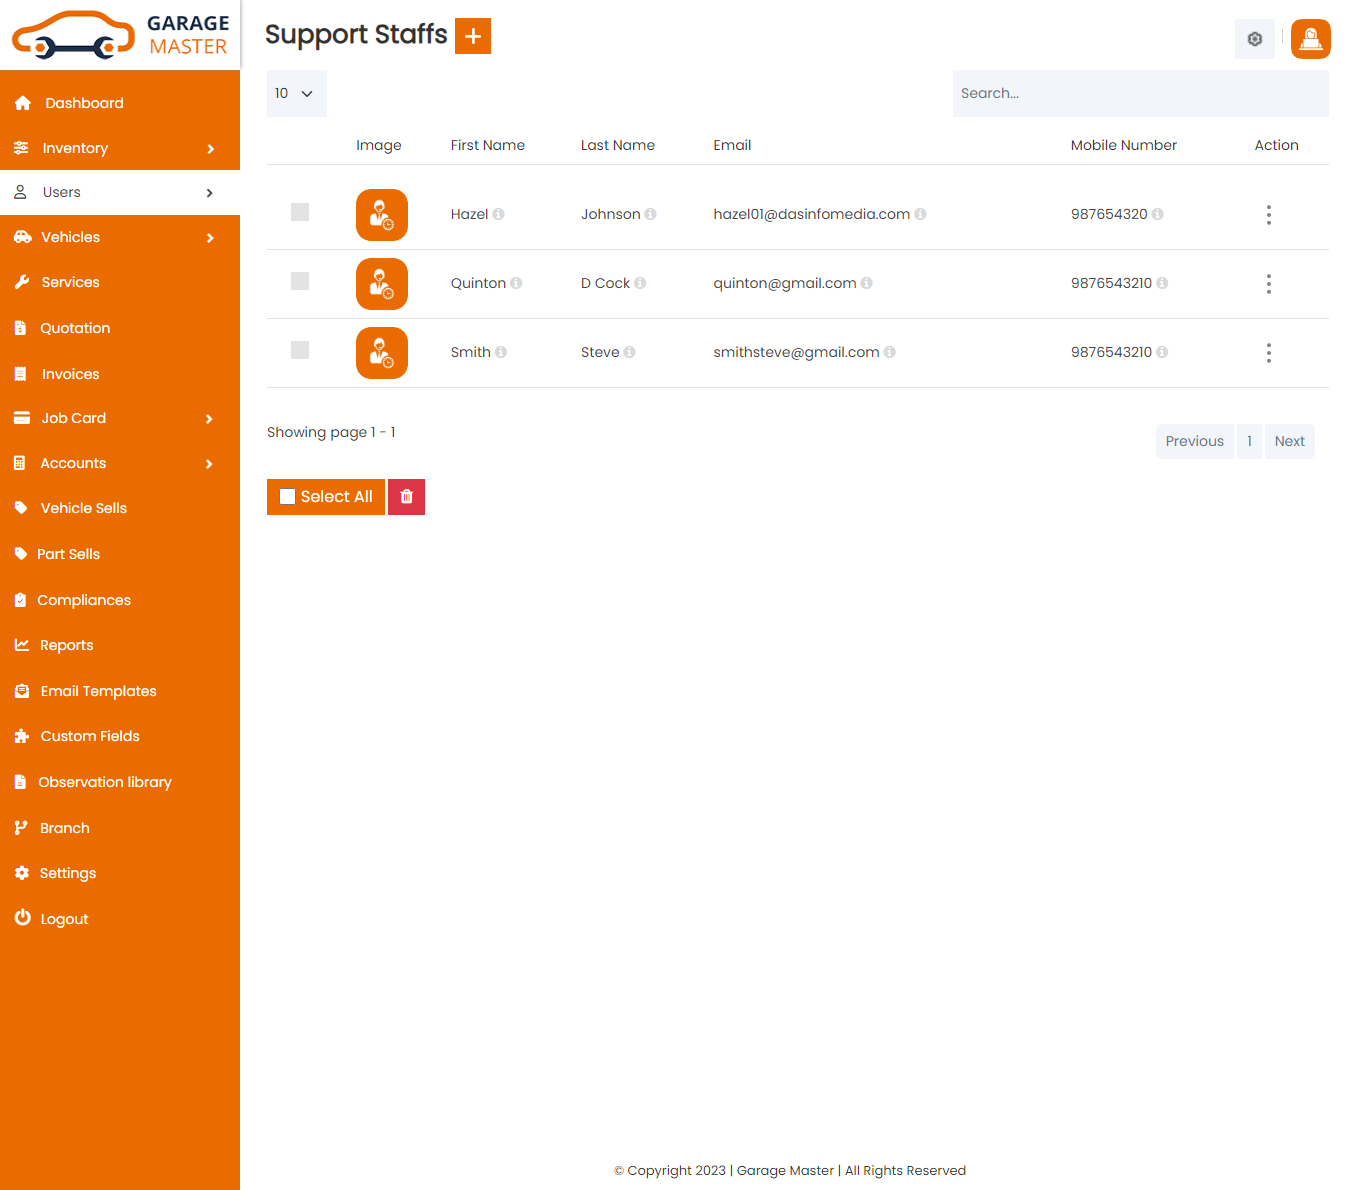
Now you can see the difference between both selected branches. The main branch has one other Support Staff and Gujarat University Road Branch has one other Support Staff. Both Support Staff are not shown inside one branch. So this is a feature of the Branch Module.
H) Email Settings
Click on Setting within Email Setting to start setting up the system. To configure your email settings, be sure to fill out all fields. These details are required to configure and send an email. So, the admin can configure email settings.
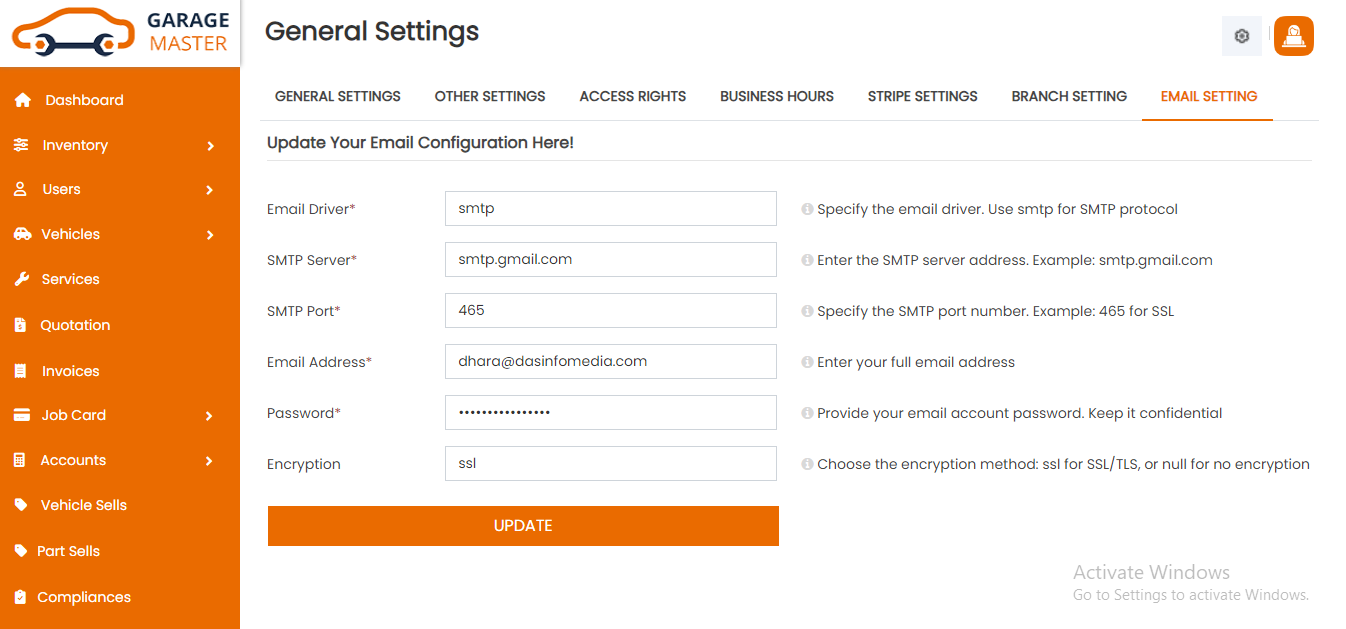
- Email Driver: Specify the email driver. Use smtp for SMTP protocol.
- SMTP Server: Enter the SMTP server address. Example: smtp.gmail.com.
- SMTP Port: Specify the SMTP port number. Example: 465 for SSL.
- Email Address: Enter your full email address.
- Password: Provide your email account password. Keep it confidential.
- Encryption: Choose the encryption method: ssl for SSL/TLS, or null for no encryption.
If you are using the Garage System on your local server (XAMPP or Laragon) and have configured email settings with invalid credentials for sending real emails, please follow this below method to properly set up your email configuration.
Brevo (Sendinblue) SMTP Setup
Step 1: Get Brevo SMTP credentials- Log in at: https://app.brevo.com
- Navigate to SMTP & API → SMTP Settings
- Copy your SMTP Username and SMTP Password
Step 2: Enter the following details in Garage email settings:
- Email Driver: smtp
- SMTP Server(host): smtp-relay.brevo.com
- SMTP Port: 587
- Email Address: your Brevo email
- Password: your Brevo SMTP password
- Encryption: tls
- From Email: your Brevo verified sender email(https://app.brevo.com/senders/list)
I) License Reset Settings
Click on Setting within License to start setting up the system.If you want to transfer your license to a new domain, please reset this license. This action will deactivate your current license on this domain and allow you to register a new domain.
- Enter your license key or Purchase key.
- Enter your email to get license reset otp
- Enter your otp to reset license
- After successfully reset license your current domain will be deactivated
- Use this same license key in new domain

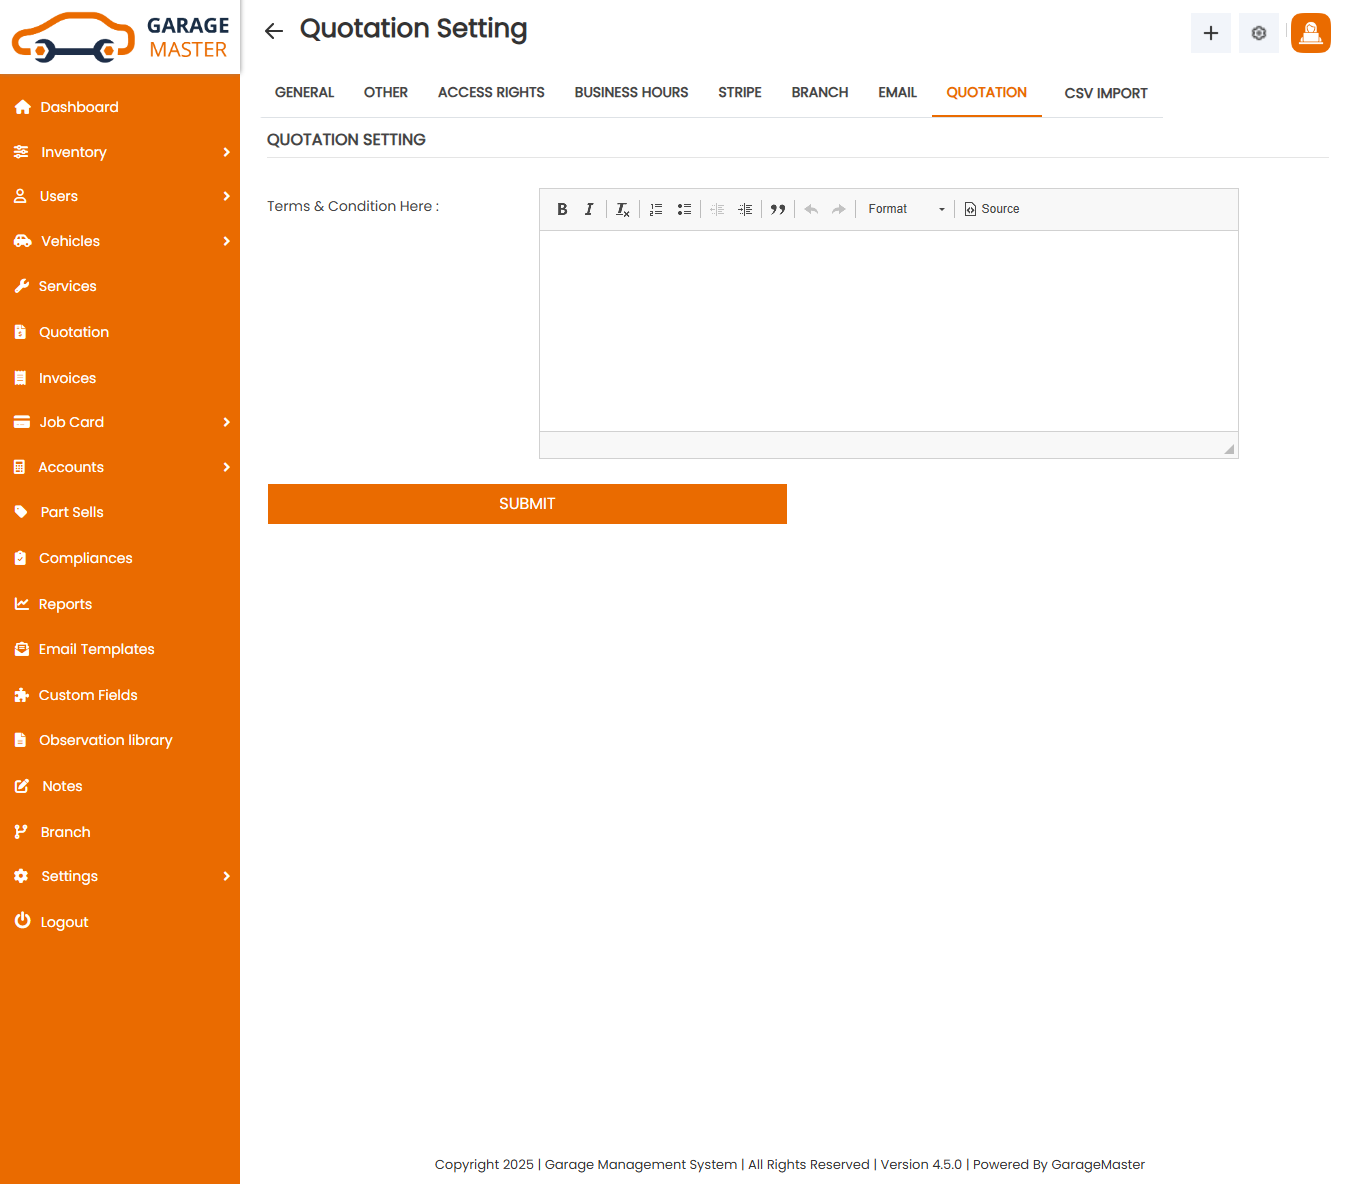
J) Quotation Settings
Click on Setting within Quotation Setting to start setting up the system. To configure your Quotation settings. You can Add your Terms and Condition here and submit it.Then it will shows in Invoice and Quotation
K) CSV Import
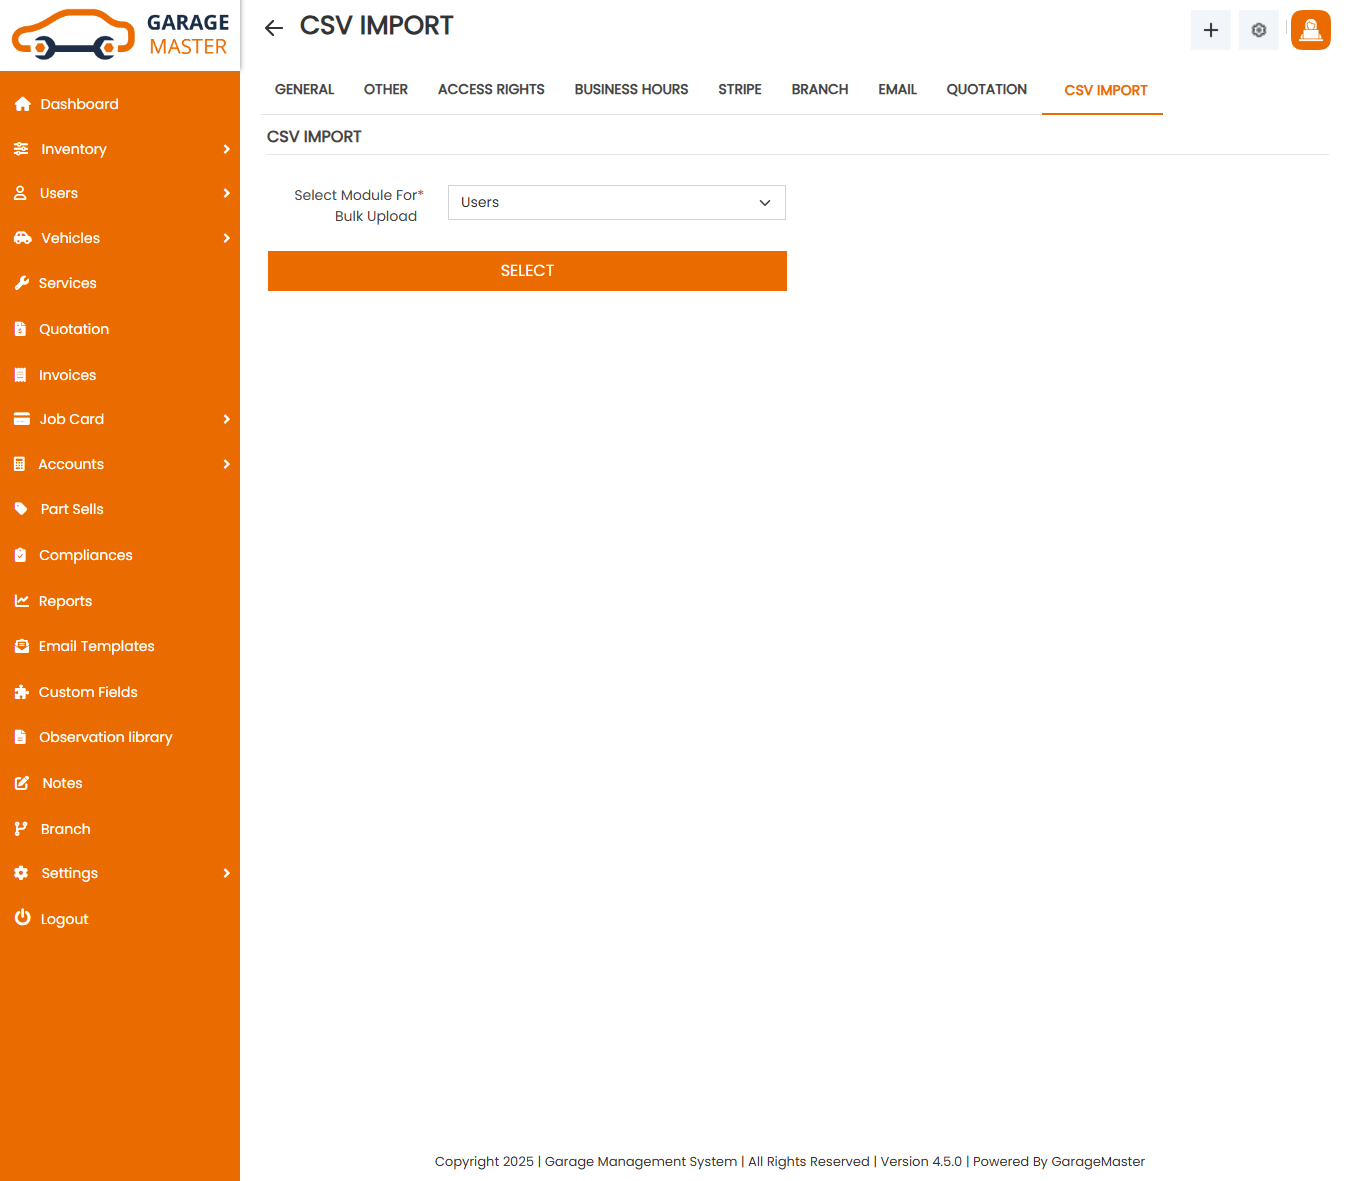
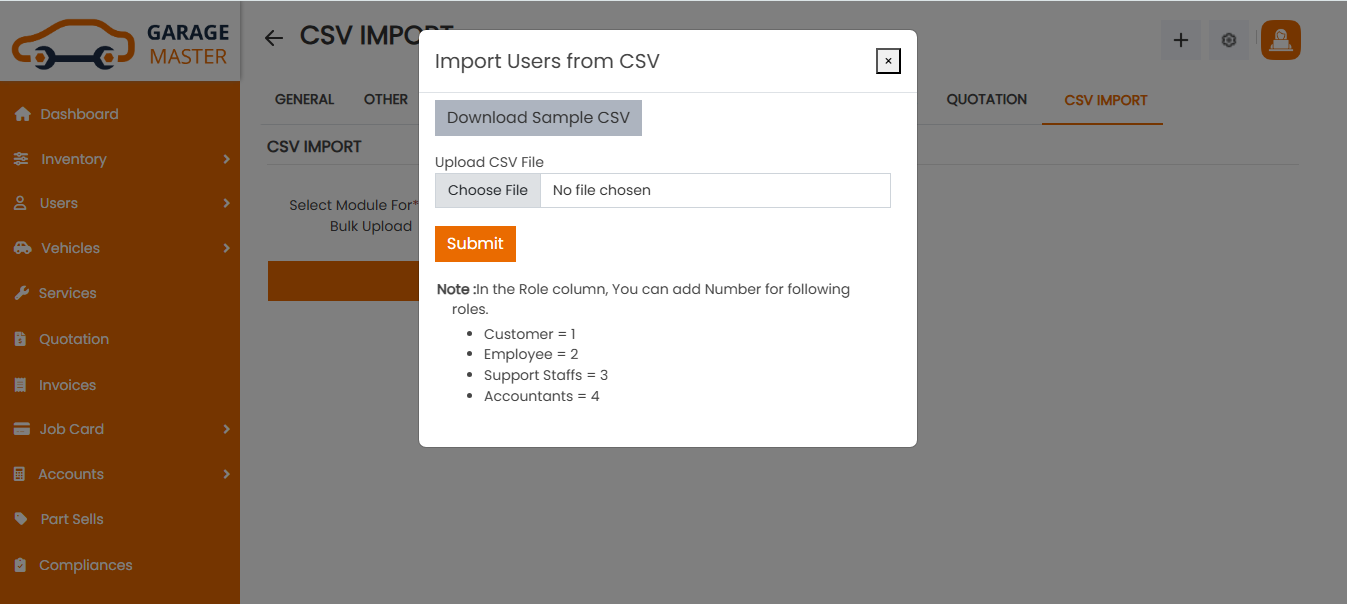
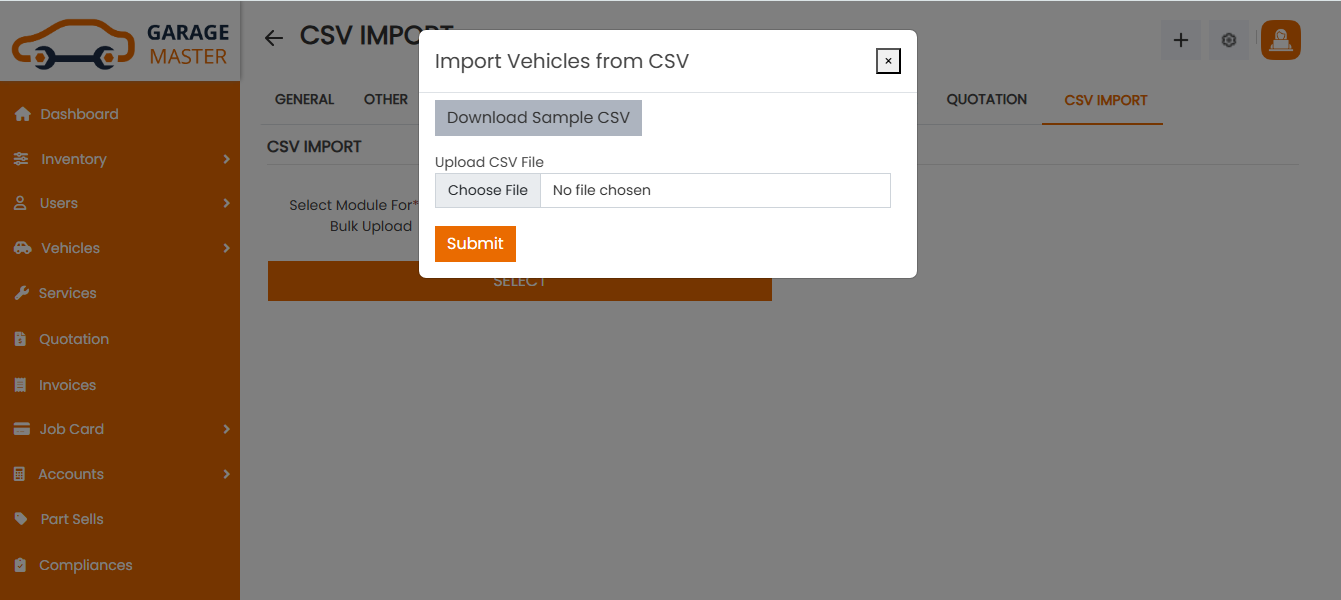
Click on Setting within CSV Import to start importing csv data you can follow these steps.
Step1 : User Import
- Select User in given dropdown and click select button
- You can see user import popup box click download sample csv file
- You can add your users data in downloaded csv files and Save it.
- After saved you can upload this file in popup
Note: Do not Change column name in csv file.Also in role column you can user number like 1,2,3,4

Step2 : Vehicles Import
- Select Vehicle in given dropdown and click select button
- You can see vehicle import popup box click download sample csv file
- You can add your vehicles data in downloaded csv files and Save it.
- After saved you can upload this file in popup

L) Mobile App Settings
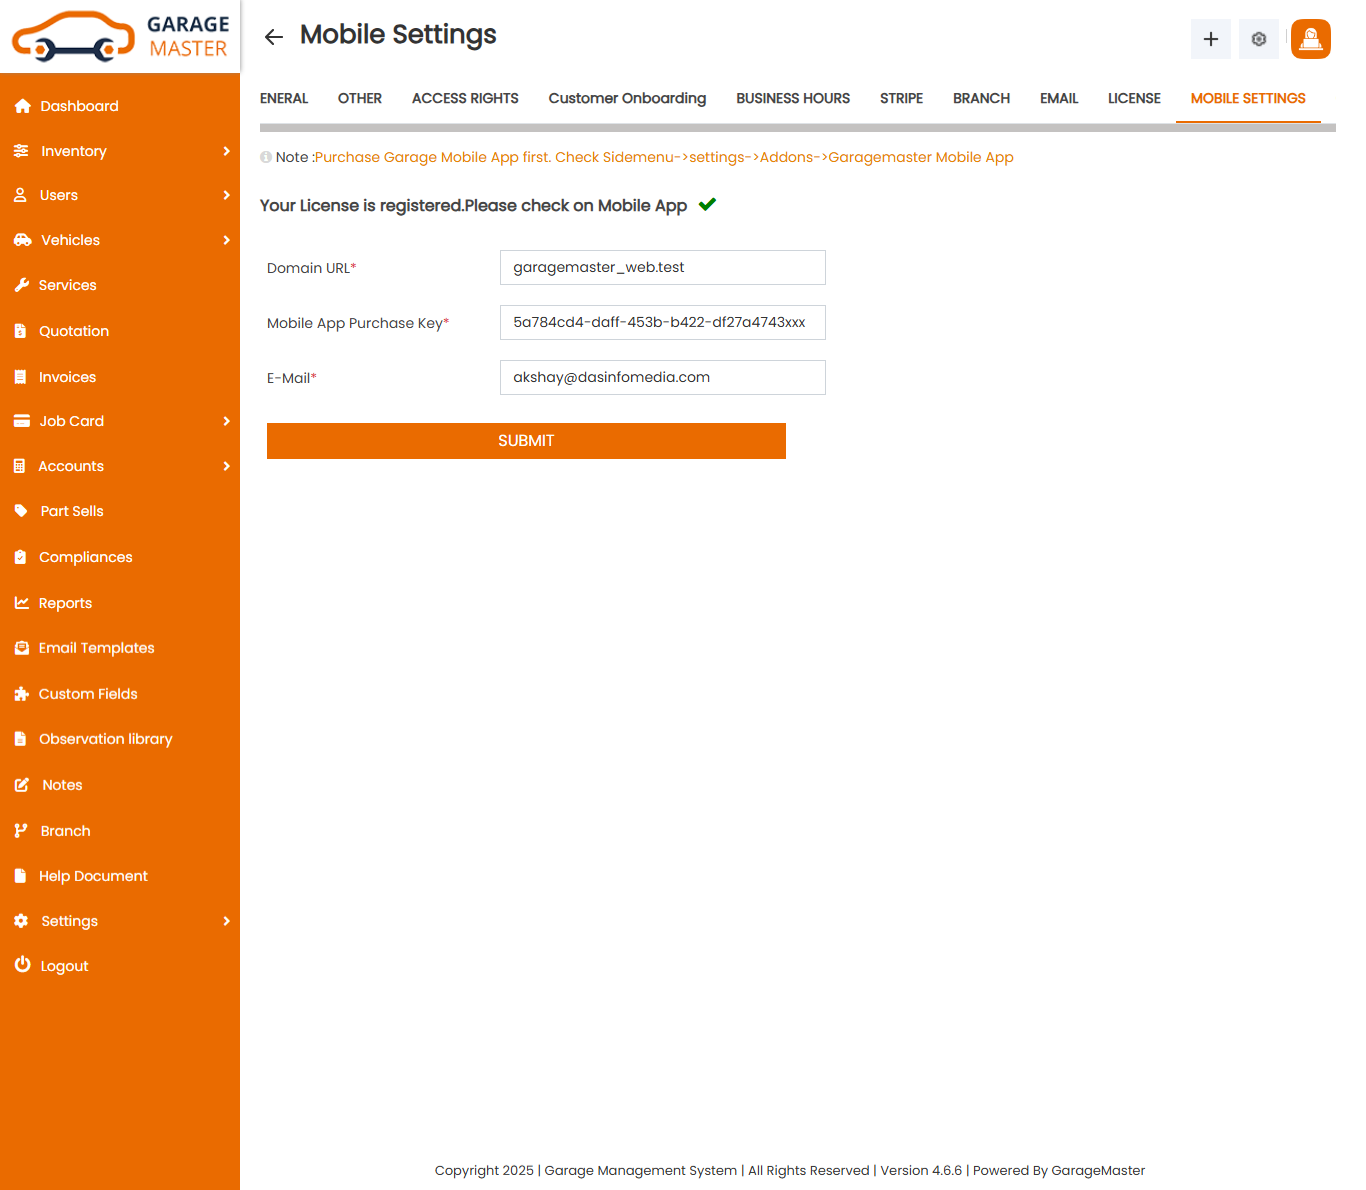
Click on Setting within Mobile App Setting to registered Your mobile app.
Please Registred Your Mobile App and Link with your system
- Domain URL: Your System domain url
- Mobile App Purchase Key:Enter Your Garage App License or Purchase key.Provided by mojoomla
- E-Mail:Enter Your Email Address
- After Submit form your mobile app will be registered. and linked with your web.So in app you can use same login credentials
3)Inventory
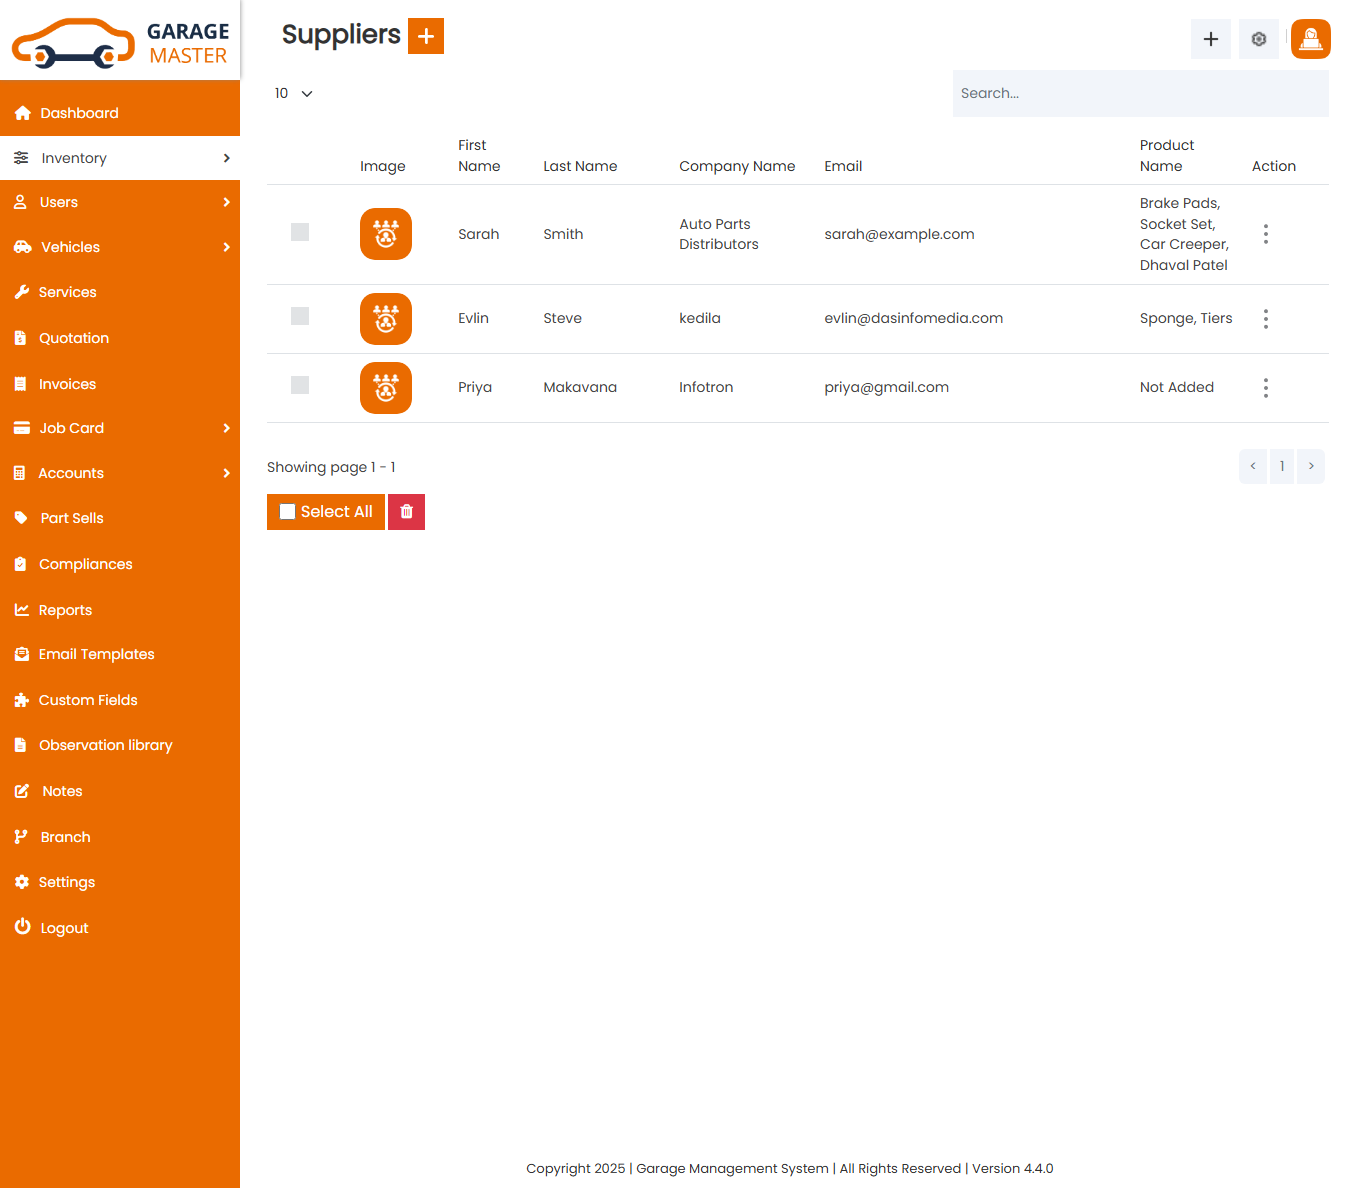
A) Supplier
Supplier List: Admin can add new Supplier, manage all Supplier and view a complete list of all Supplier.
Add Supplier: Admin can add supplier details.
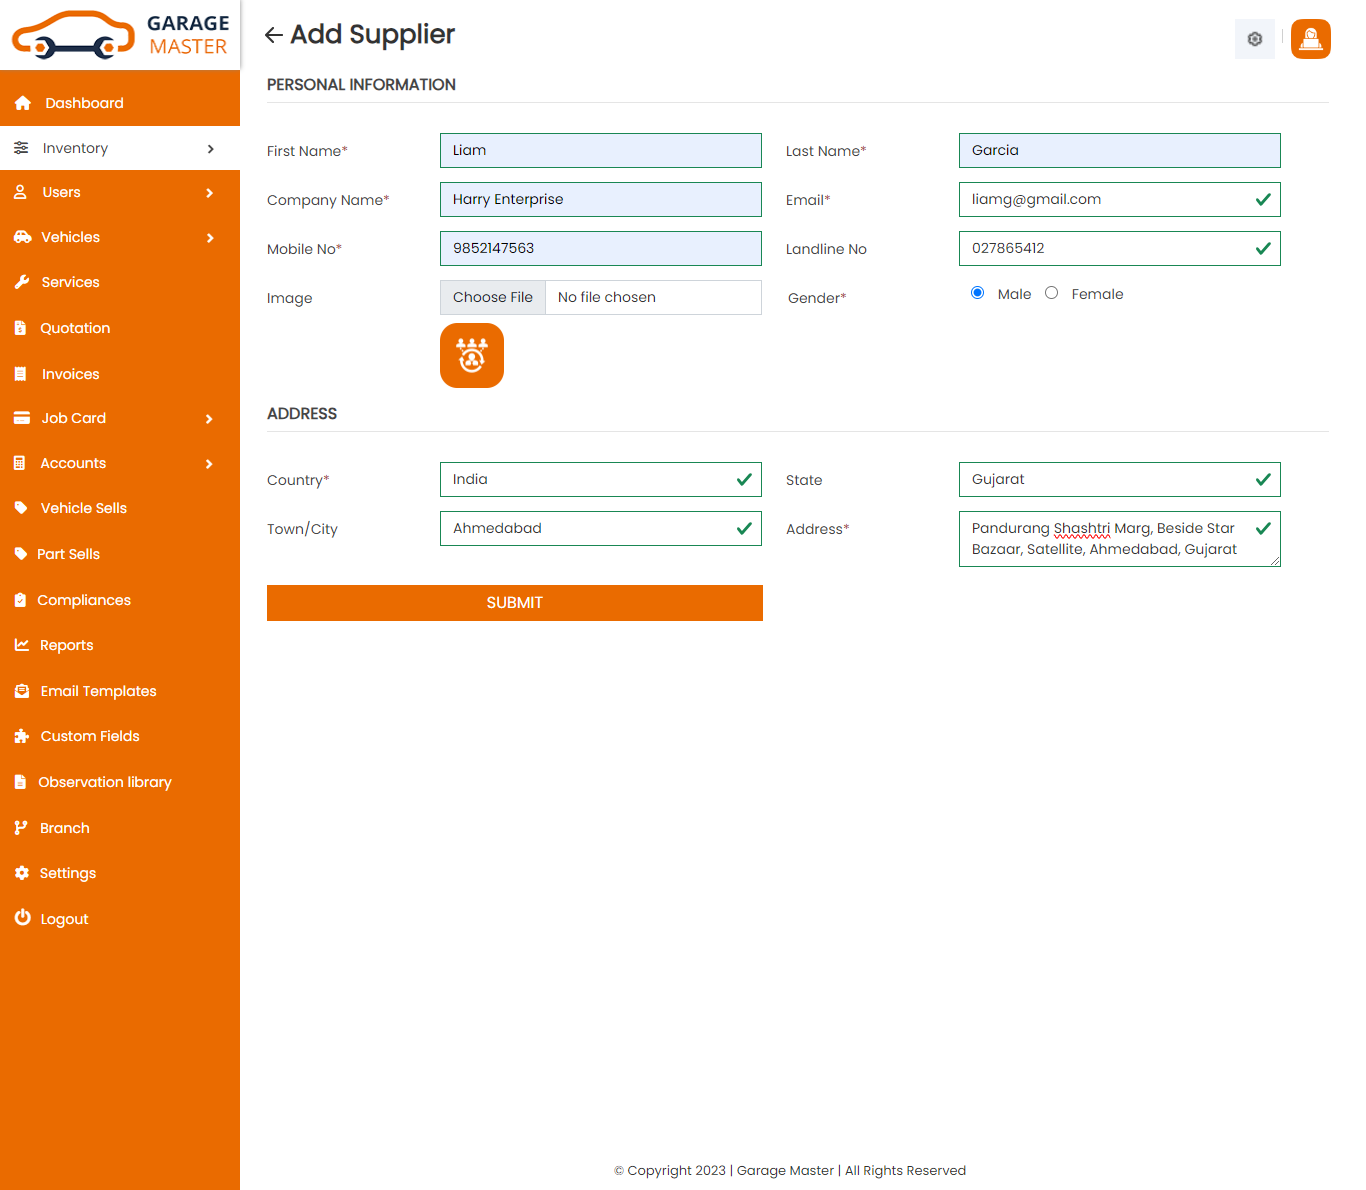
- First Name: Enter a new first name for this supplier.
- Last Name: Enter a new last name for this supplier.
- Company Name: Enter a new company name for this supplier.
- Gender: Select gender for this supplier.
- Date of Birth: Enter a new date of birth for this supplier.
- Contact Person: Enter a new contact person for this supplier.
- Email: Enter a new email for this supplier.
- Mobile No: Enter a new mobile number for this supplier.
- Landline No: Enter a new landlines number for this supplier.
- Image: Upload image for this supplier.
- Country: Select country for this supplier.
- State: Select state for this supplier.
- City: Select city for this supplier.
- Address: Enter a new address for this supplier.
- Add new custom field in go to custom Fields module in add custom field then select form name in supplier and add custom field for this supplier.
- Add notes in supplier.
Personal Information
Address
Custom Fields
Notes
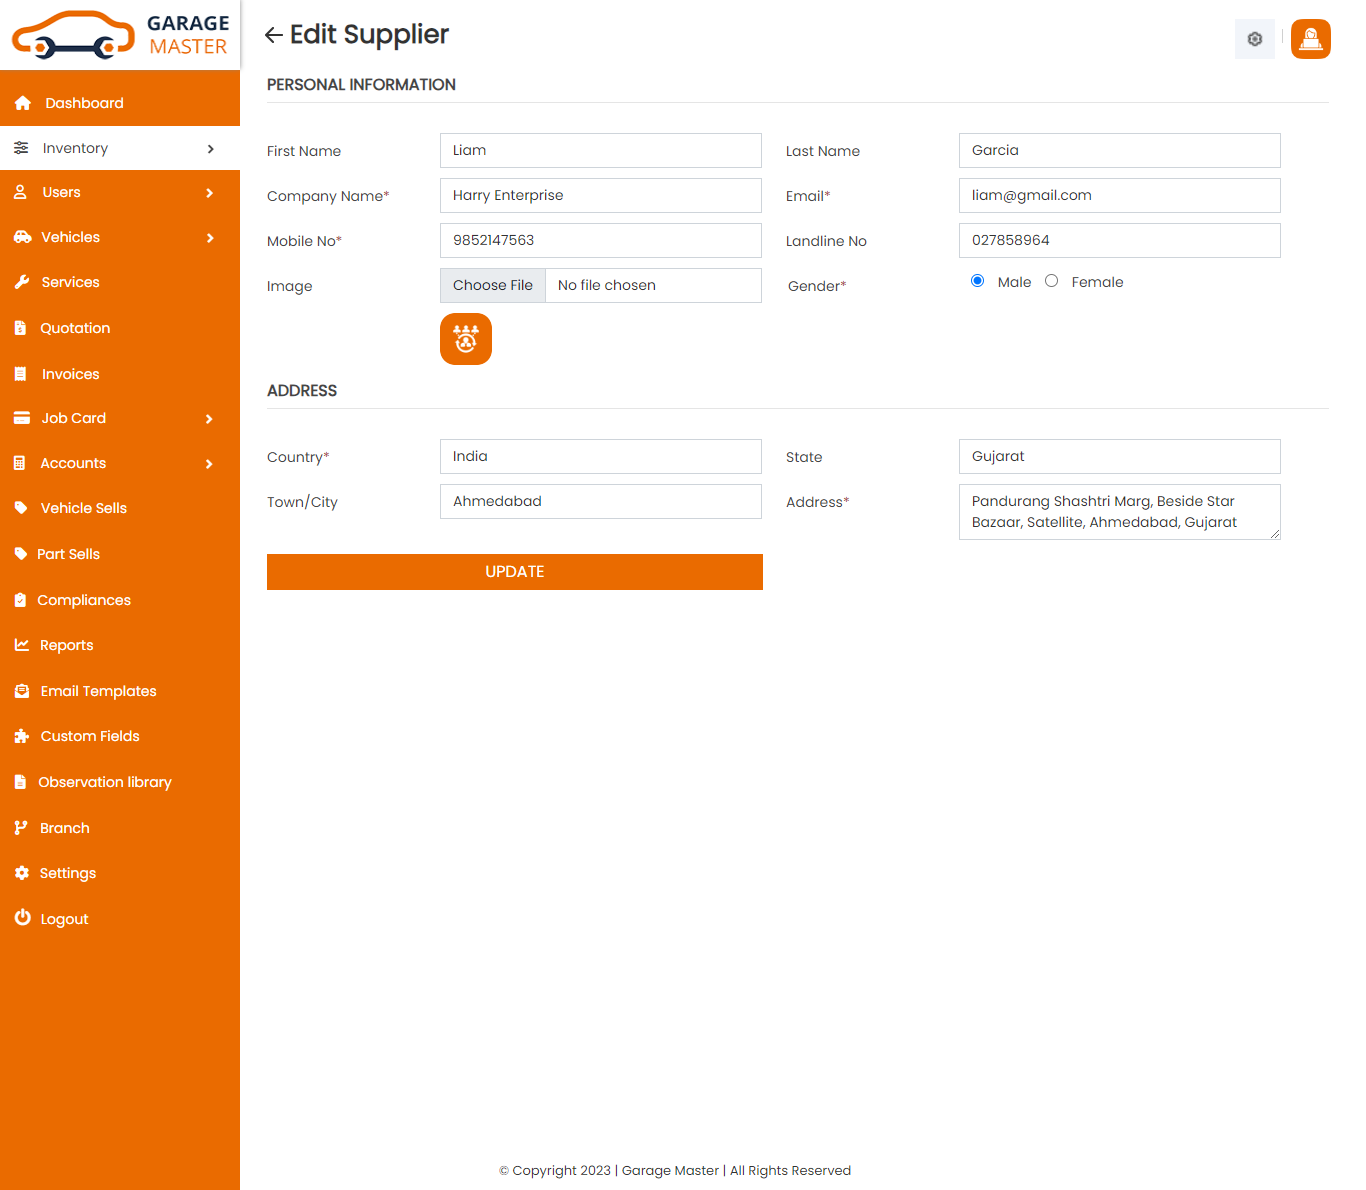
Edit Supplier: Admin can Edit detail of particular Supplier by clicking on Edit detail button. This will open up details. From here admin can Change Supplier Details.
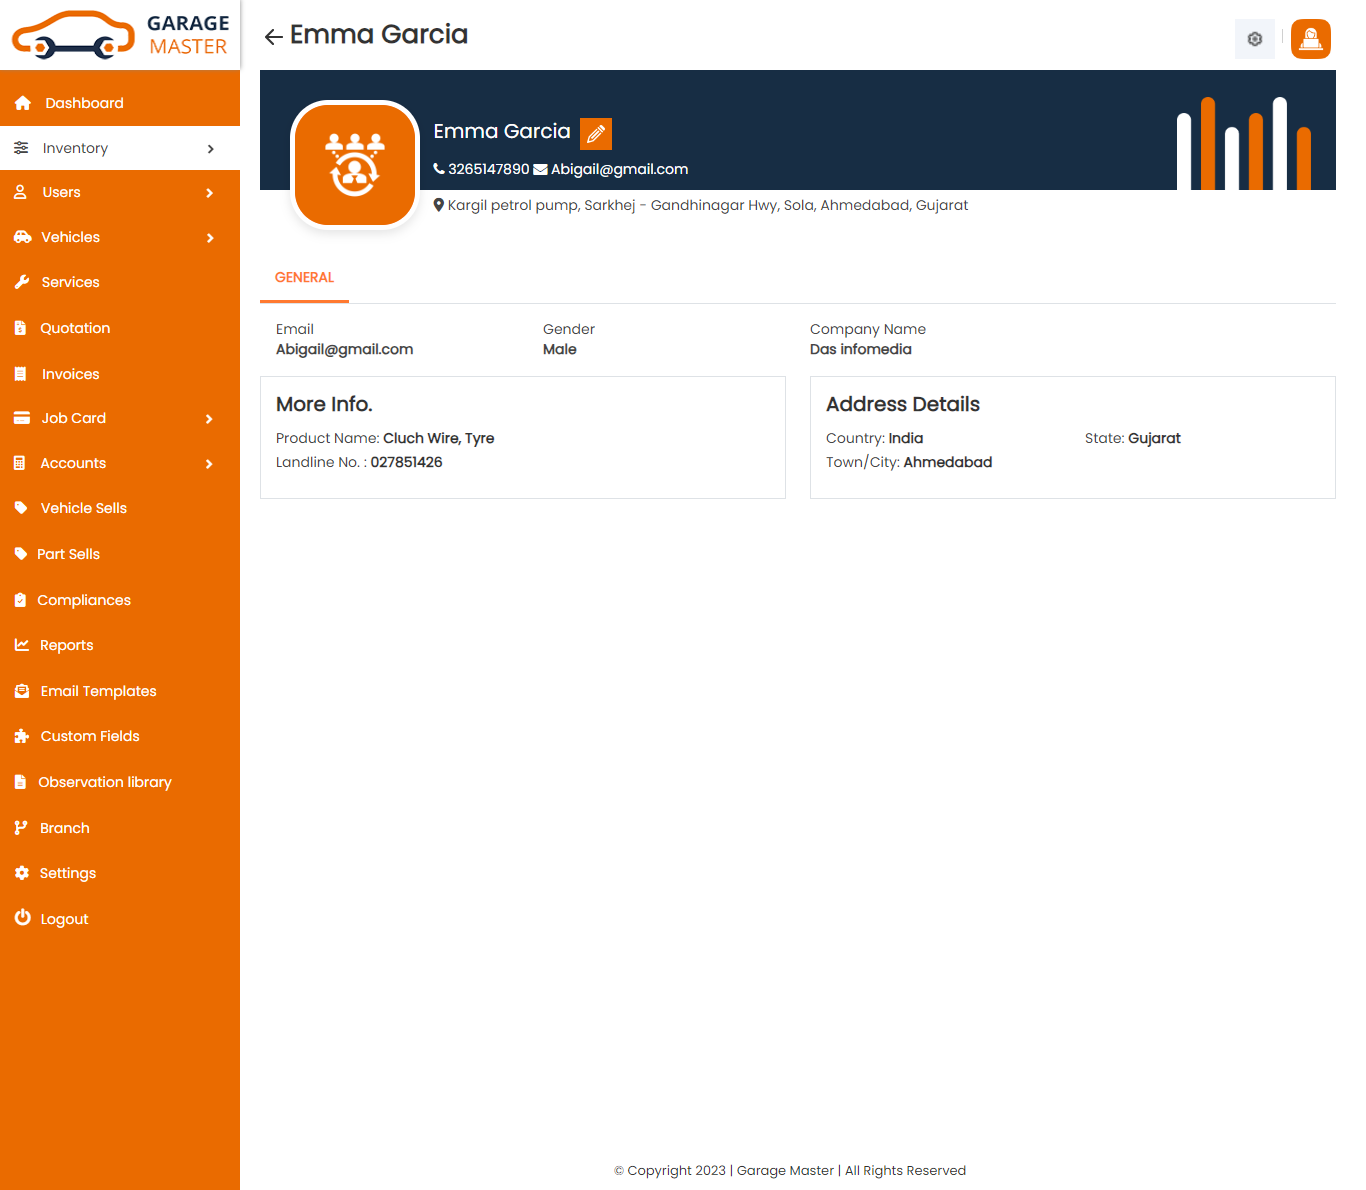
View Supplier: Admin can view a complete list of all Supplier and view detail of particular Supplier by clicking on view detail button. This will open up details.
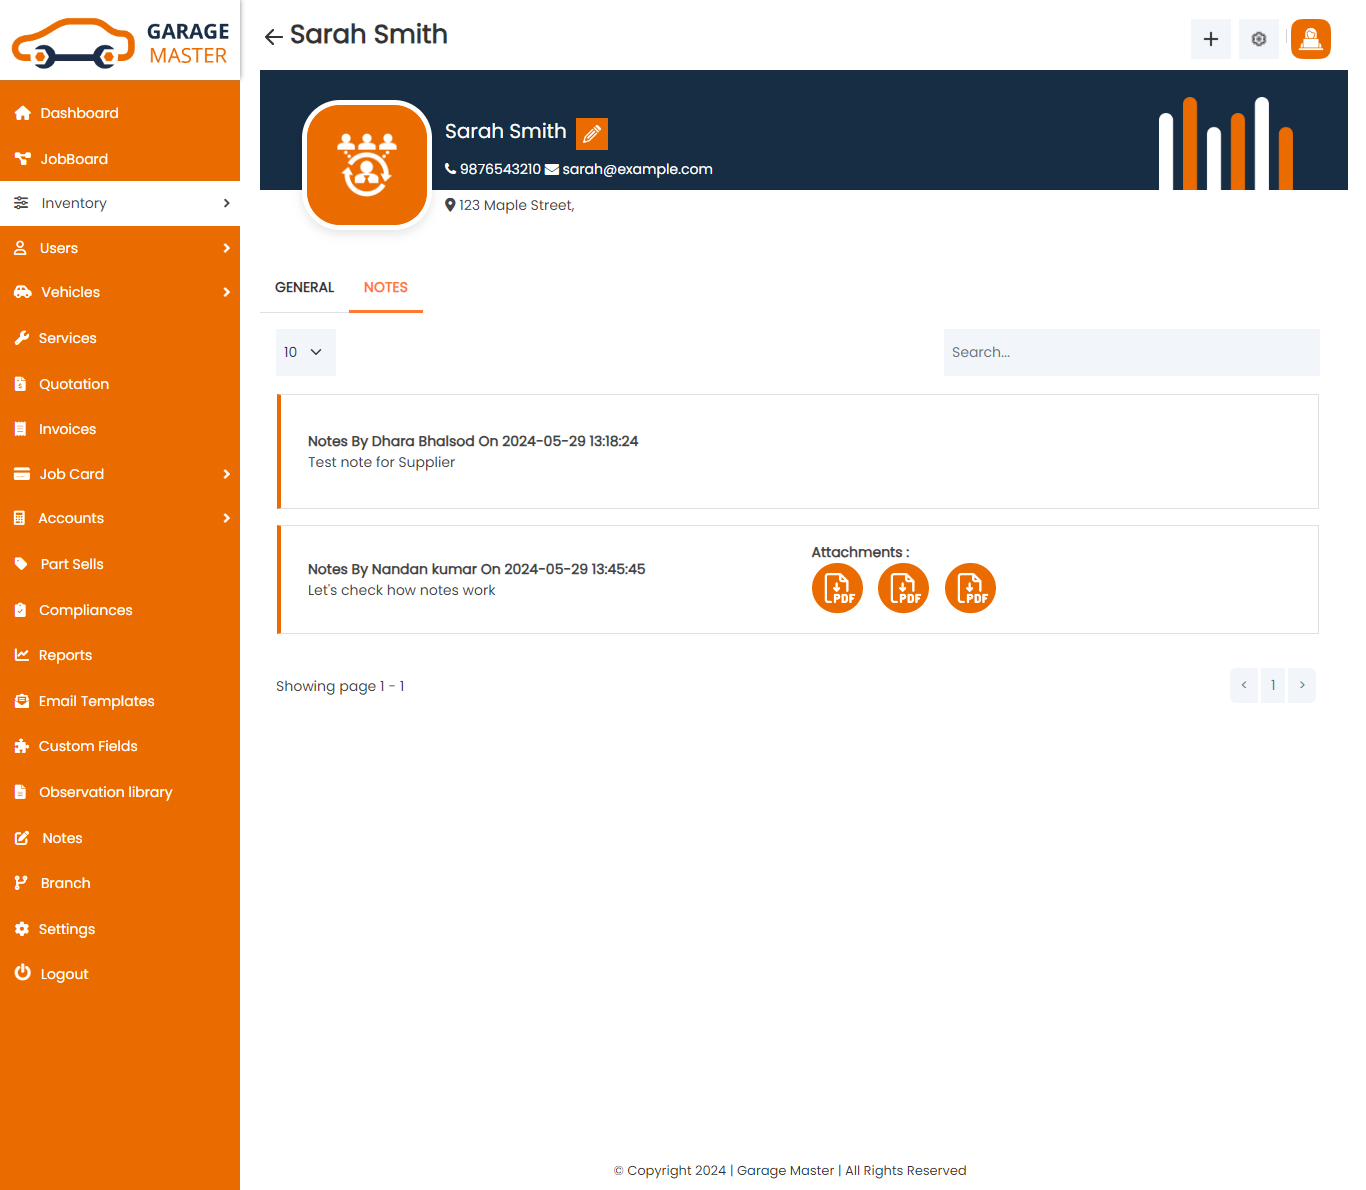
View Notes: View notes in supplier
Delete Supplier: Admin can delete a complete list of all Supplier and delete detail of particular Supplier by clicking on delete detail button. This will delete details.
B)Product
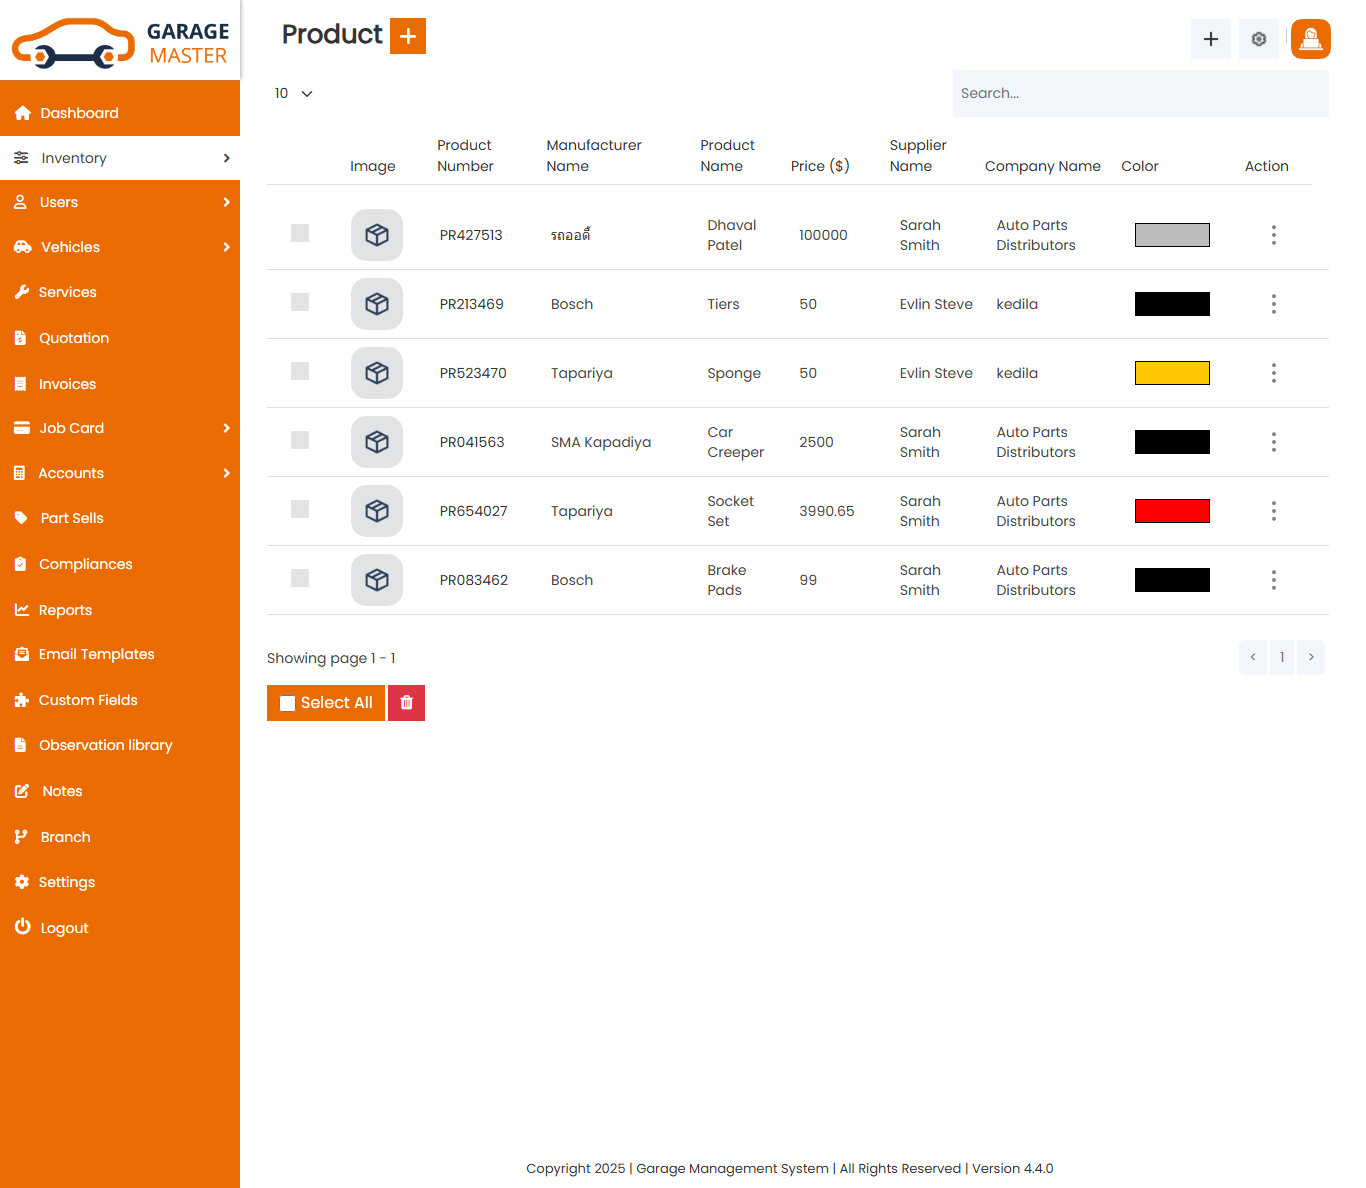
Product List: Admin can add new Product and manage all types of Product as well as view a complete list of all Product.
Add Product: Admin can add product details
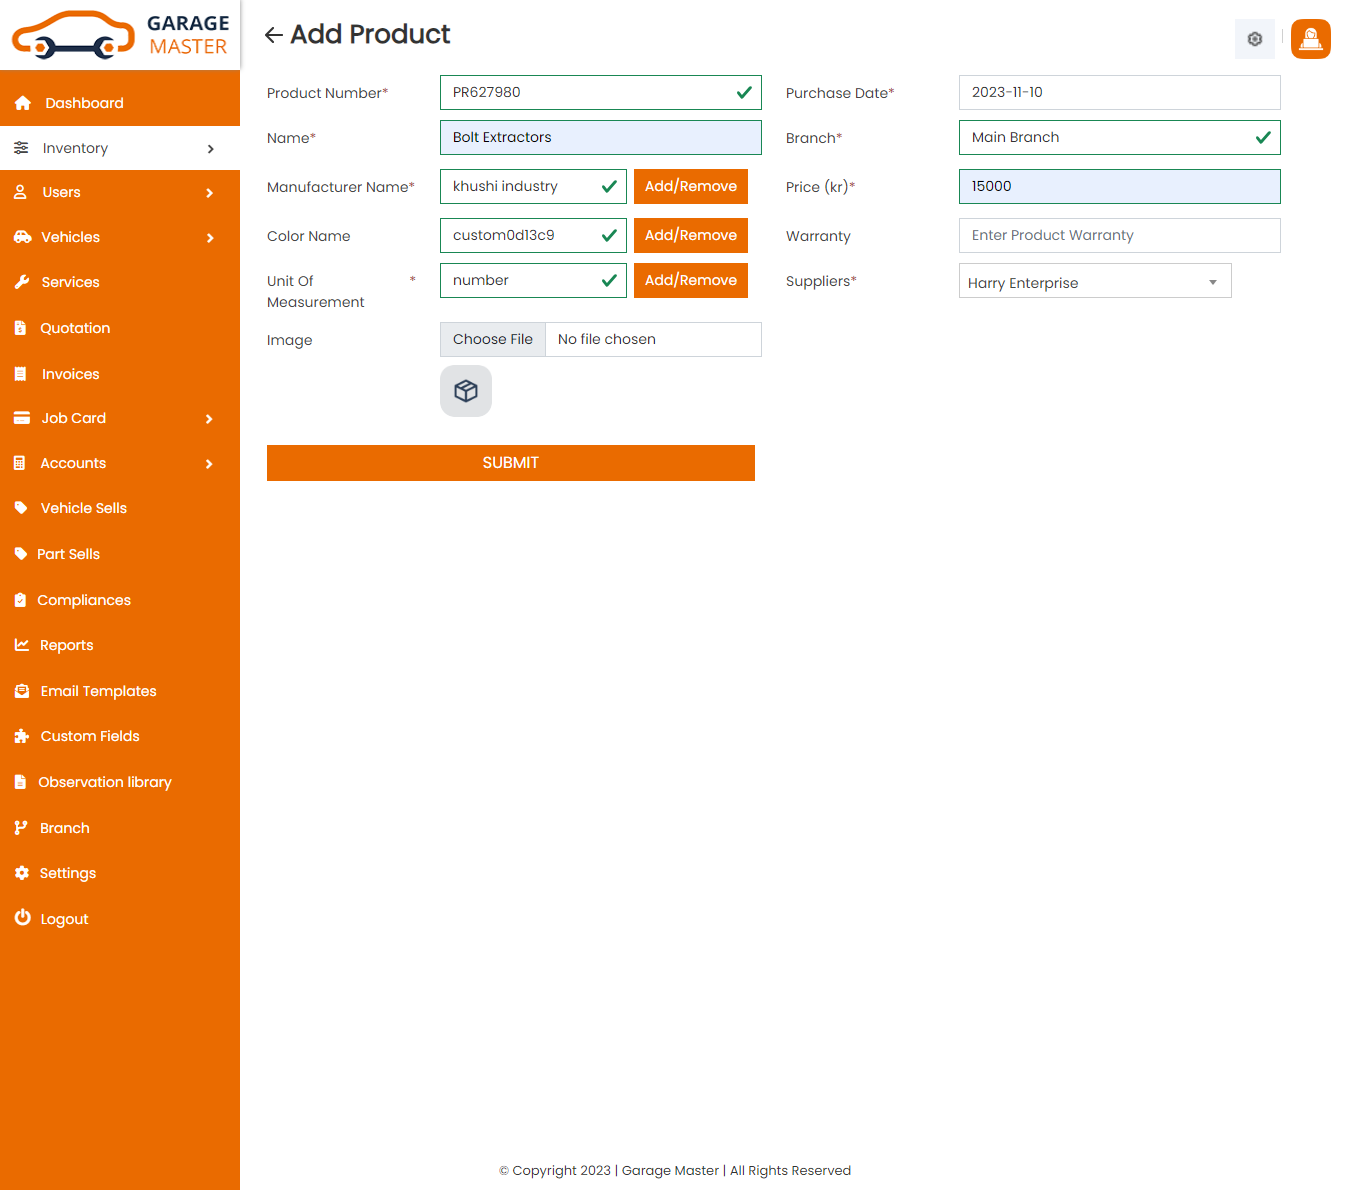
- Product Number: Product number auto generated.
- Product Date: Enter a new product date for this product.
- Product Image: Upload image for this product.
- Name: Enter a new name for this product.
- Manufacturer Name: Select manufacturer name for this product.
- Add Or Remove: If desired manufacturer name is not available in a list then click on Add Or Remove button. You can add new manufacturer name from here.
- Notes: Add notes for product
- Price: Enter a new price for this product.
- Color: Select color for this product.
- Add Or Remove: If the desired color is not available in a list then click on Add Or Remove button. You can add new color from here.
- Warranty: Enter a new warranty for this product.
- Supplier: Select supplier for this product.
- Quantity: Enter a new quantity for this product.
- Unit of Measurement: Select unit of measurement for this product.
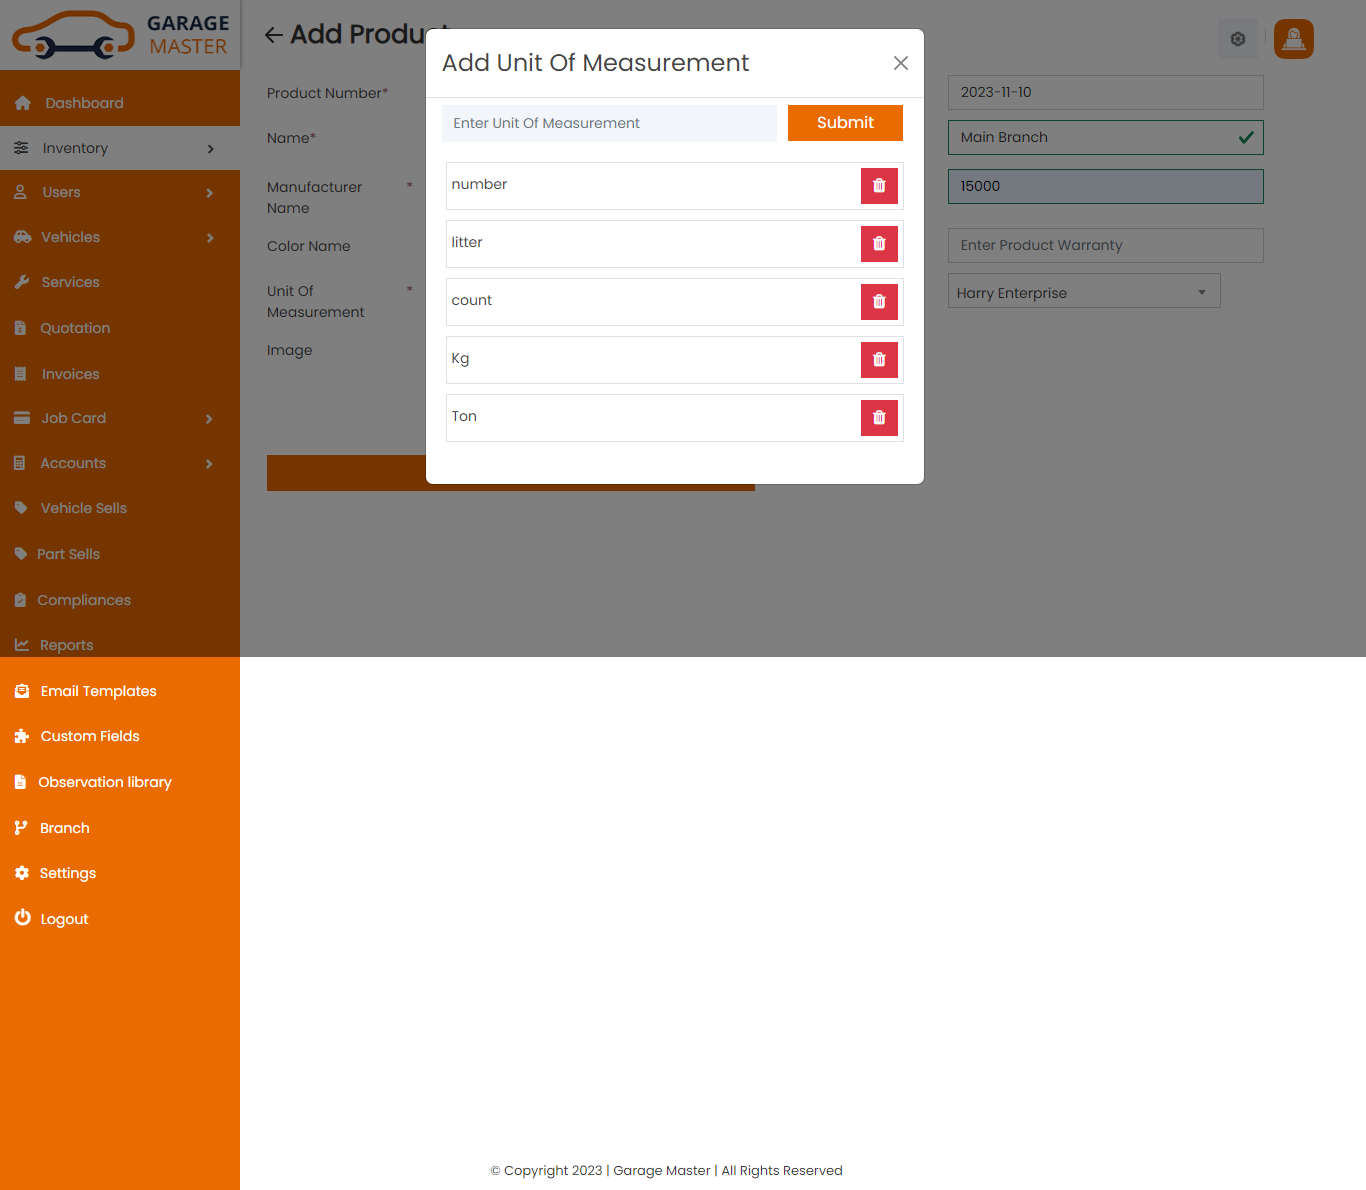
- Add Or Remove: If the desired unit of measurement is not available in a list then click on Add Or Remove button. You can add new unit of measurement from here.
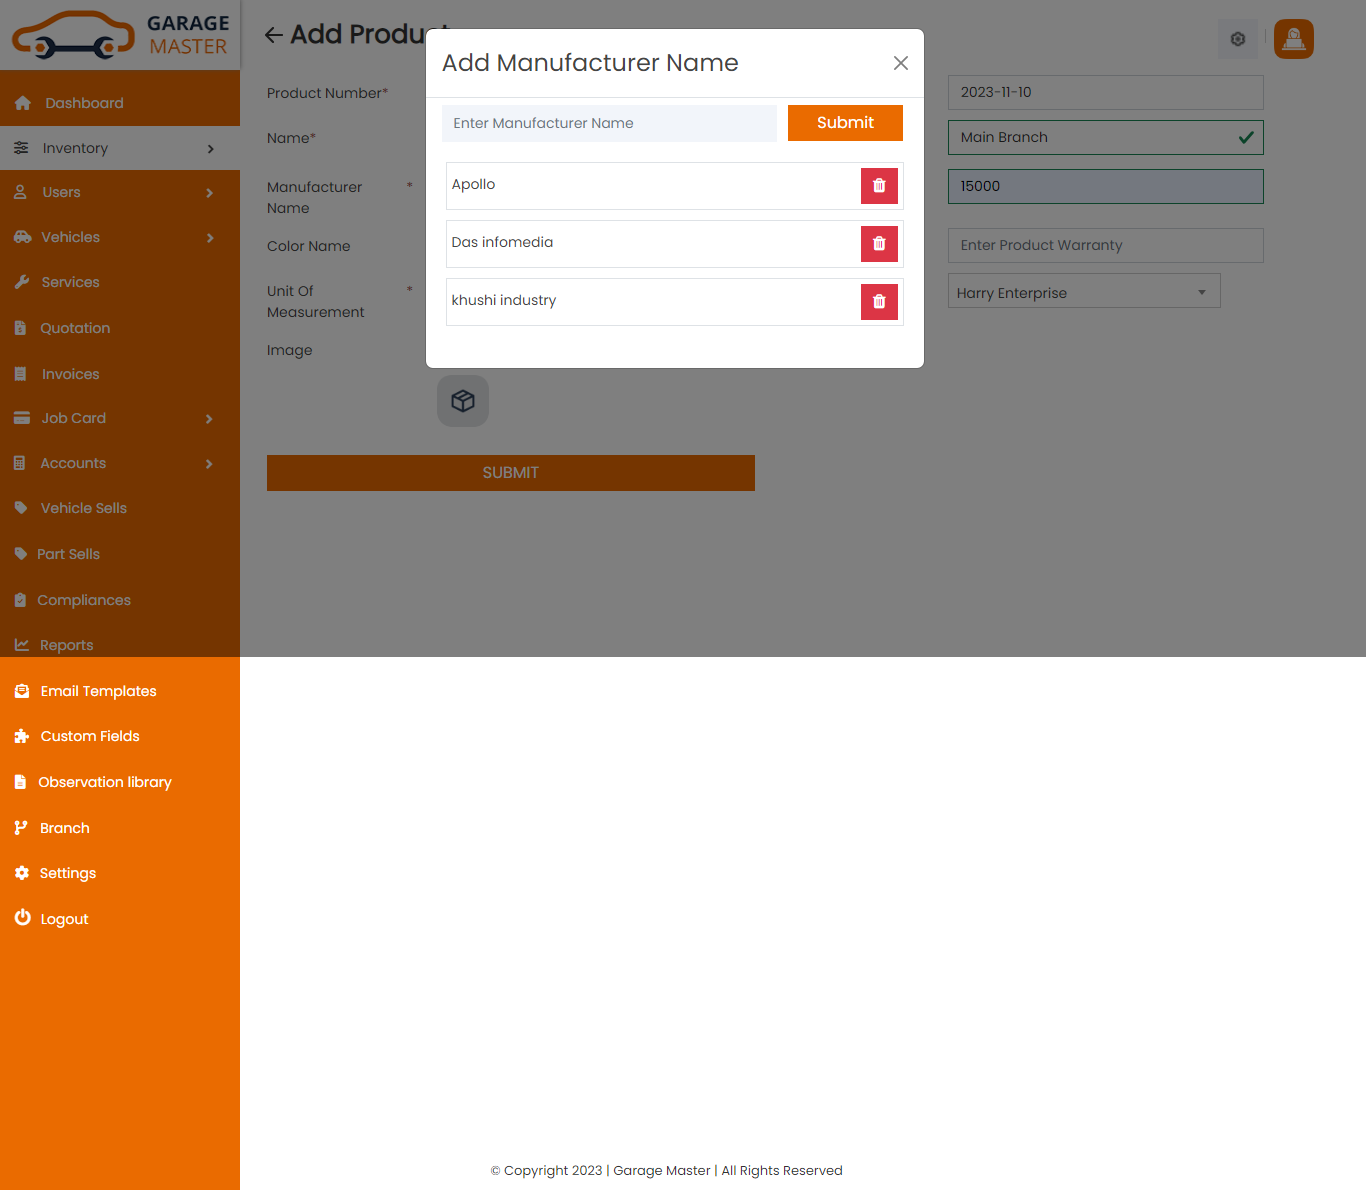
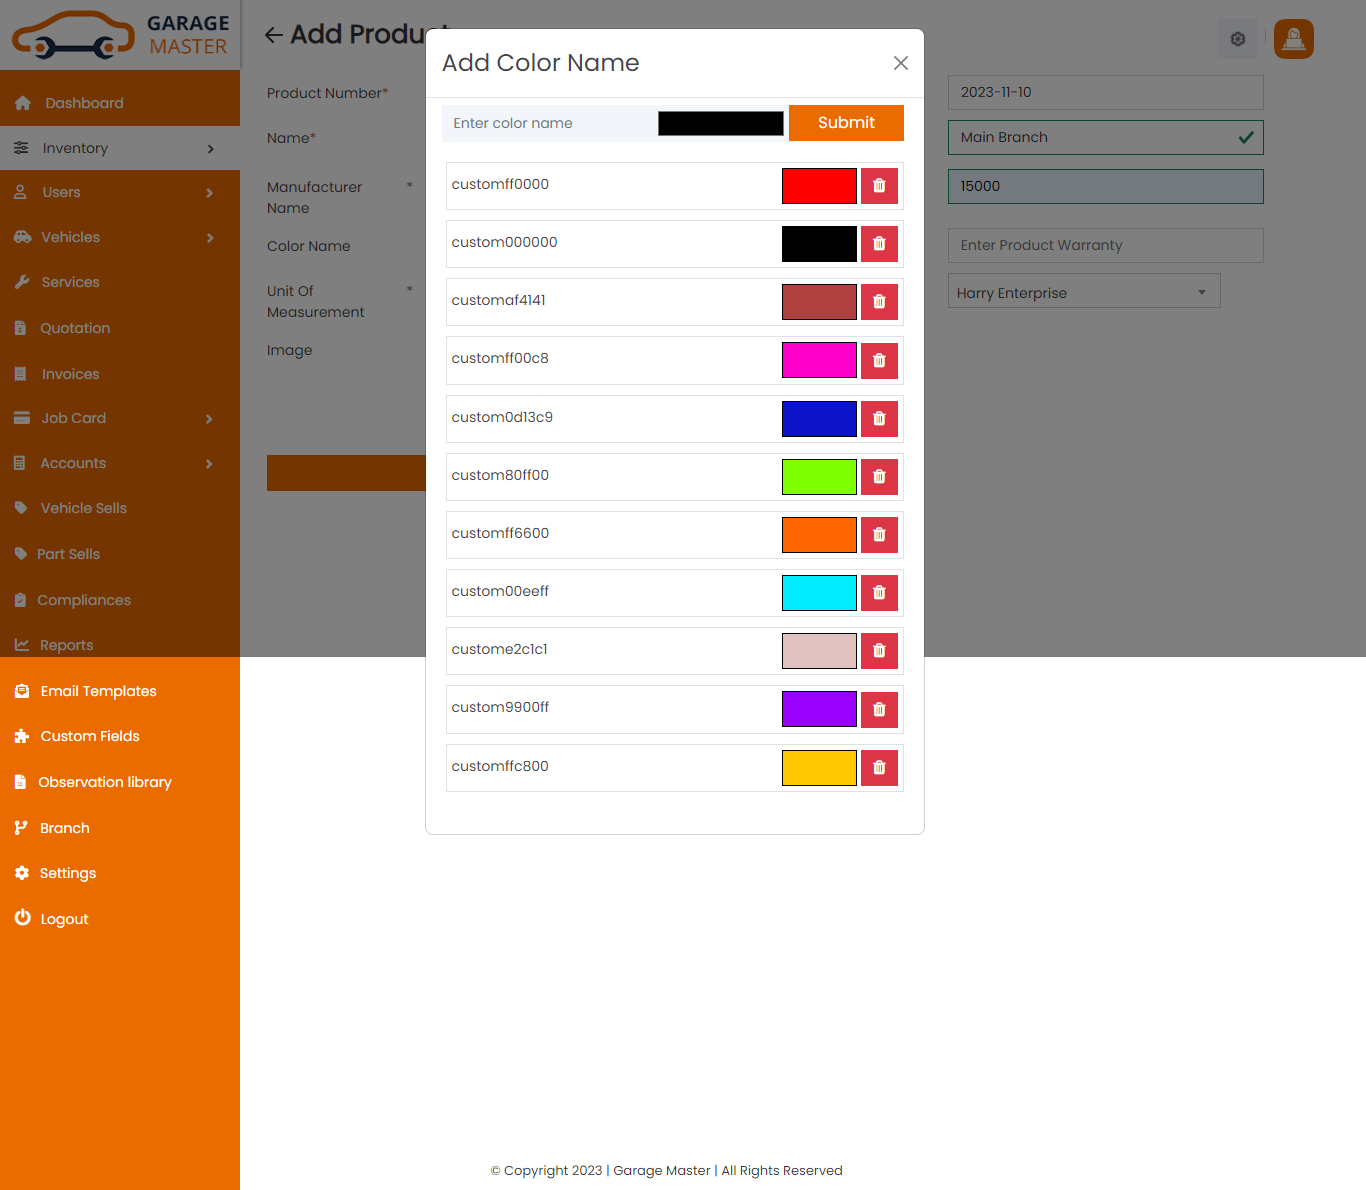
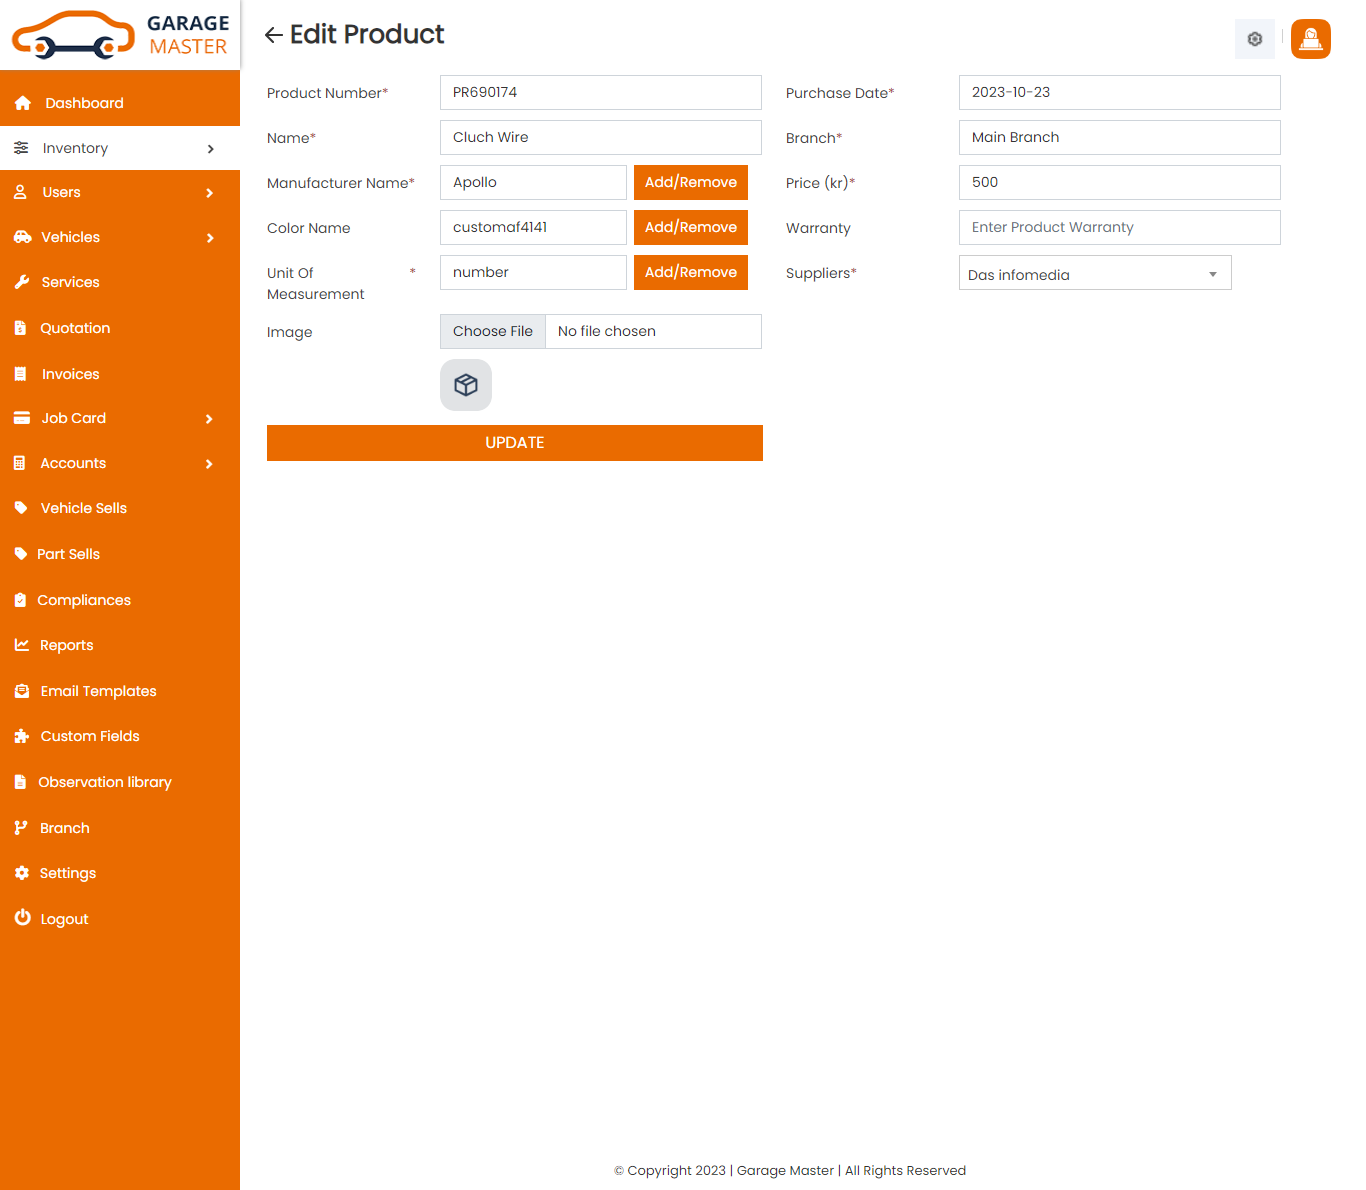
Edit Product: Admin can Edit detail of particular Product by clicking on Edit detail button. This will open up details. From here admin can Change Product Details.
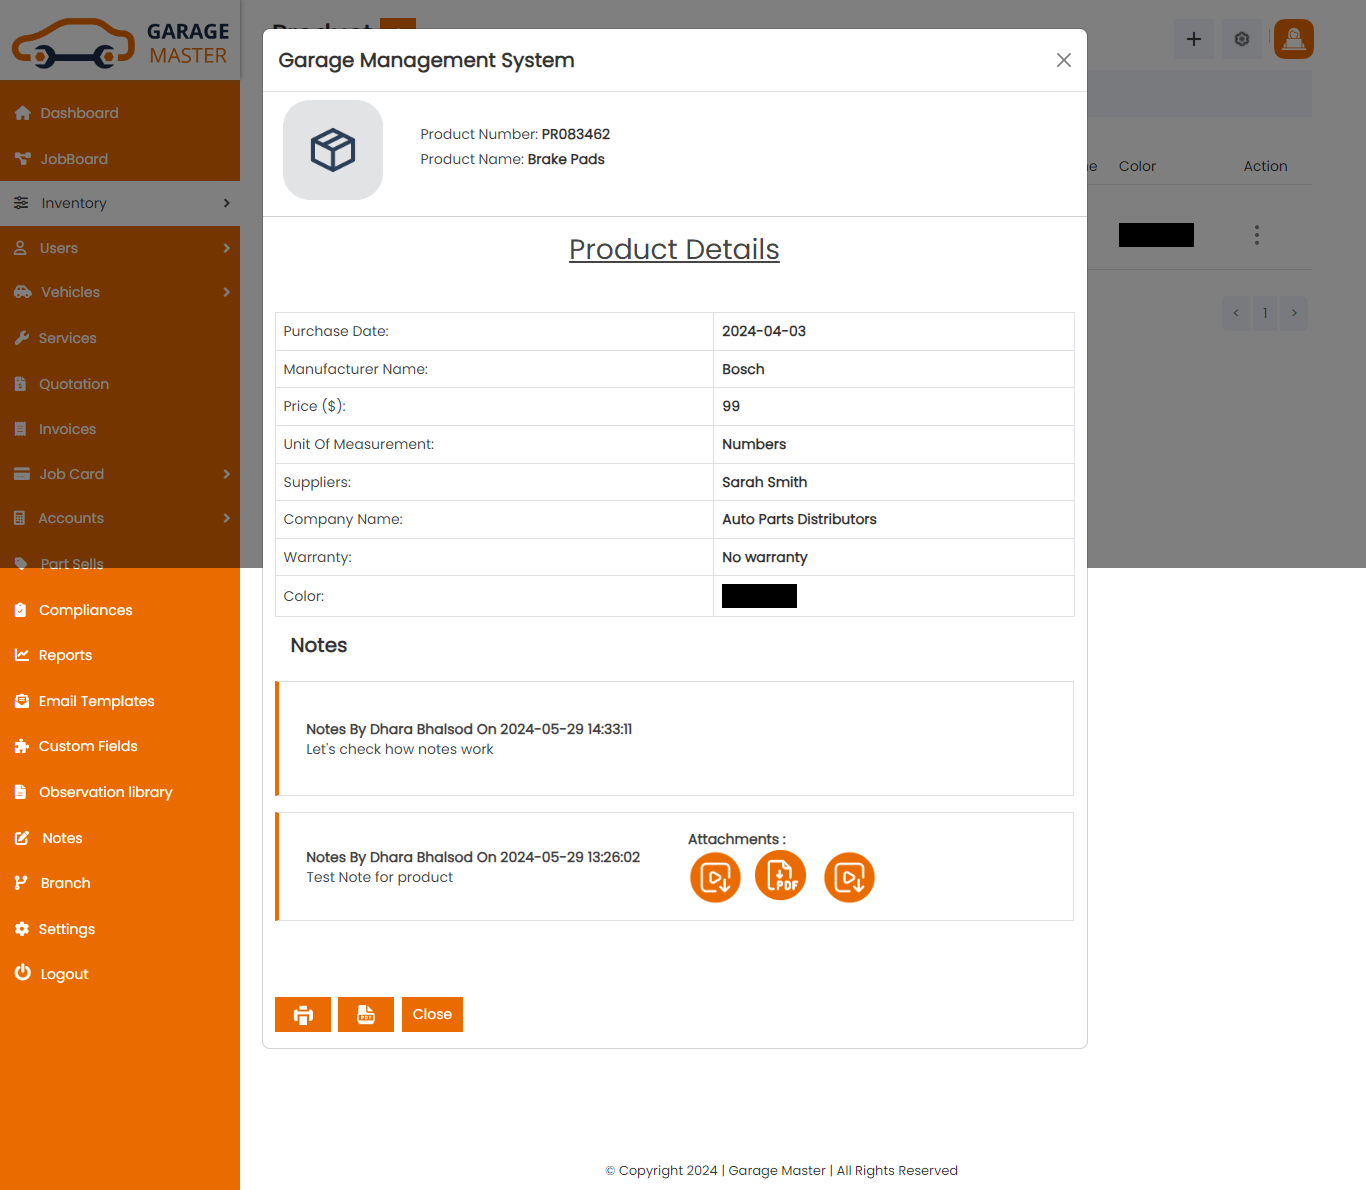
View Product: Admin can View detail of particular Product by clicking on View detail button. This will open up details. From here admin can View Product Details.
Delete Product: Admin can delete a complete list of all Product and delete detail of particular Product by clicking on delete detail button. This will delete details.
C)Purchase
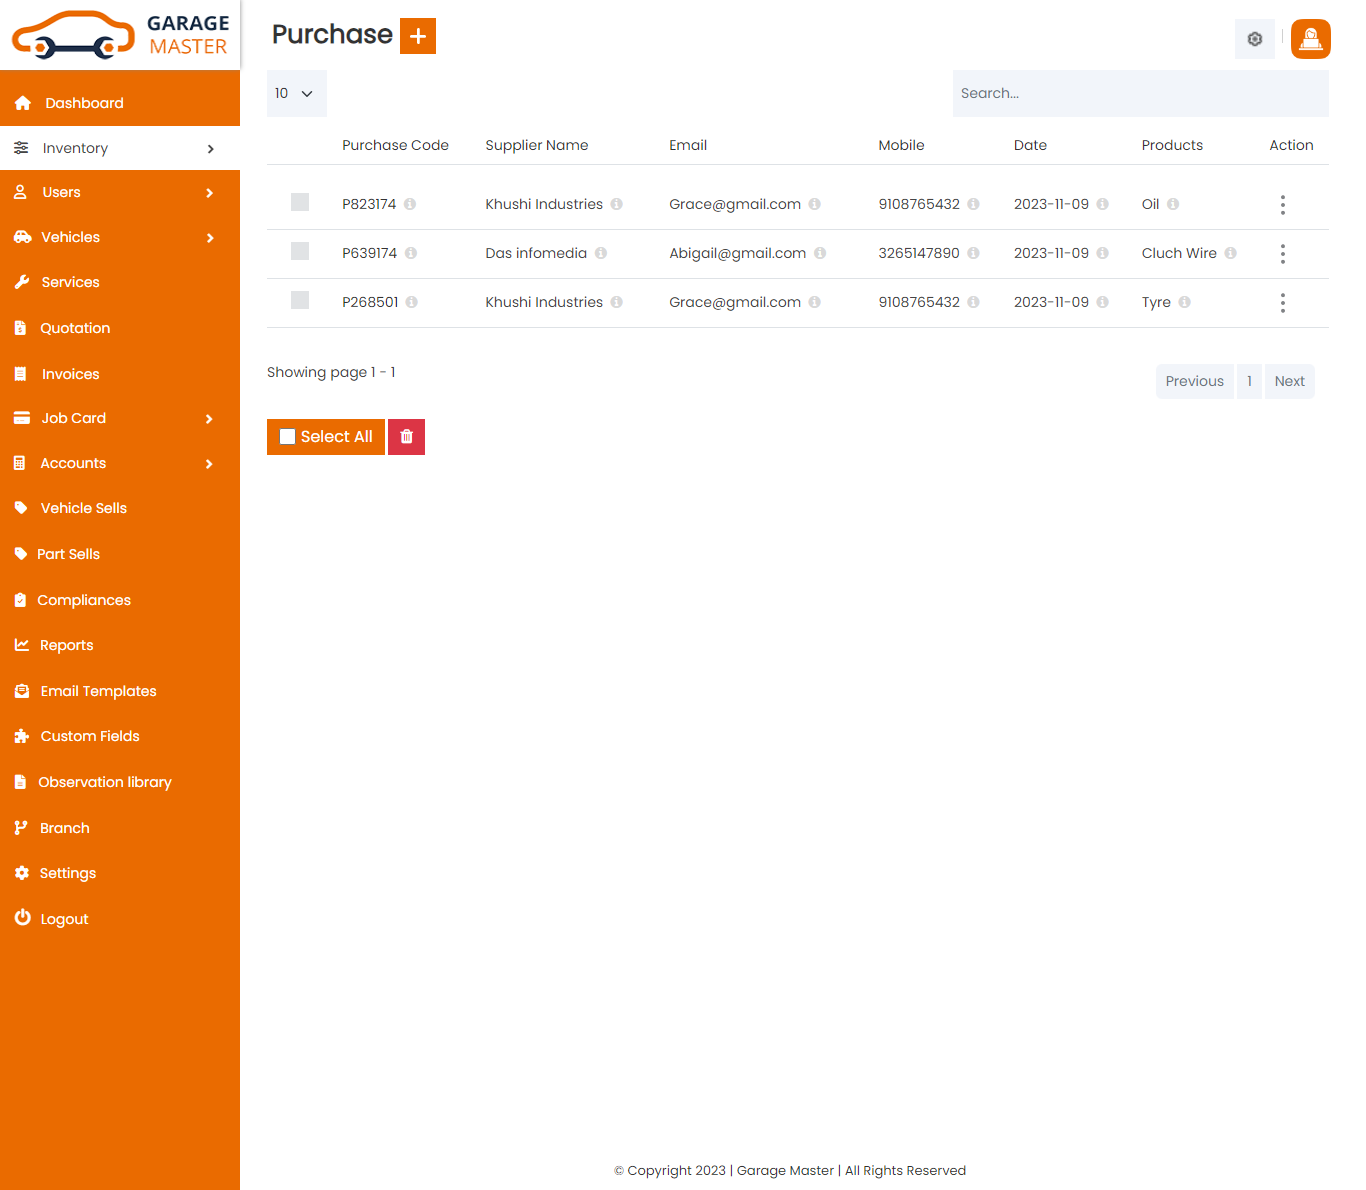
Purchase List: You can add new Purchase, manage all Purchase and view a complete list of all Purchase.
Add Purchase: You can add purchase details.
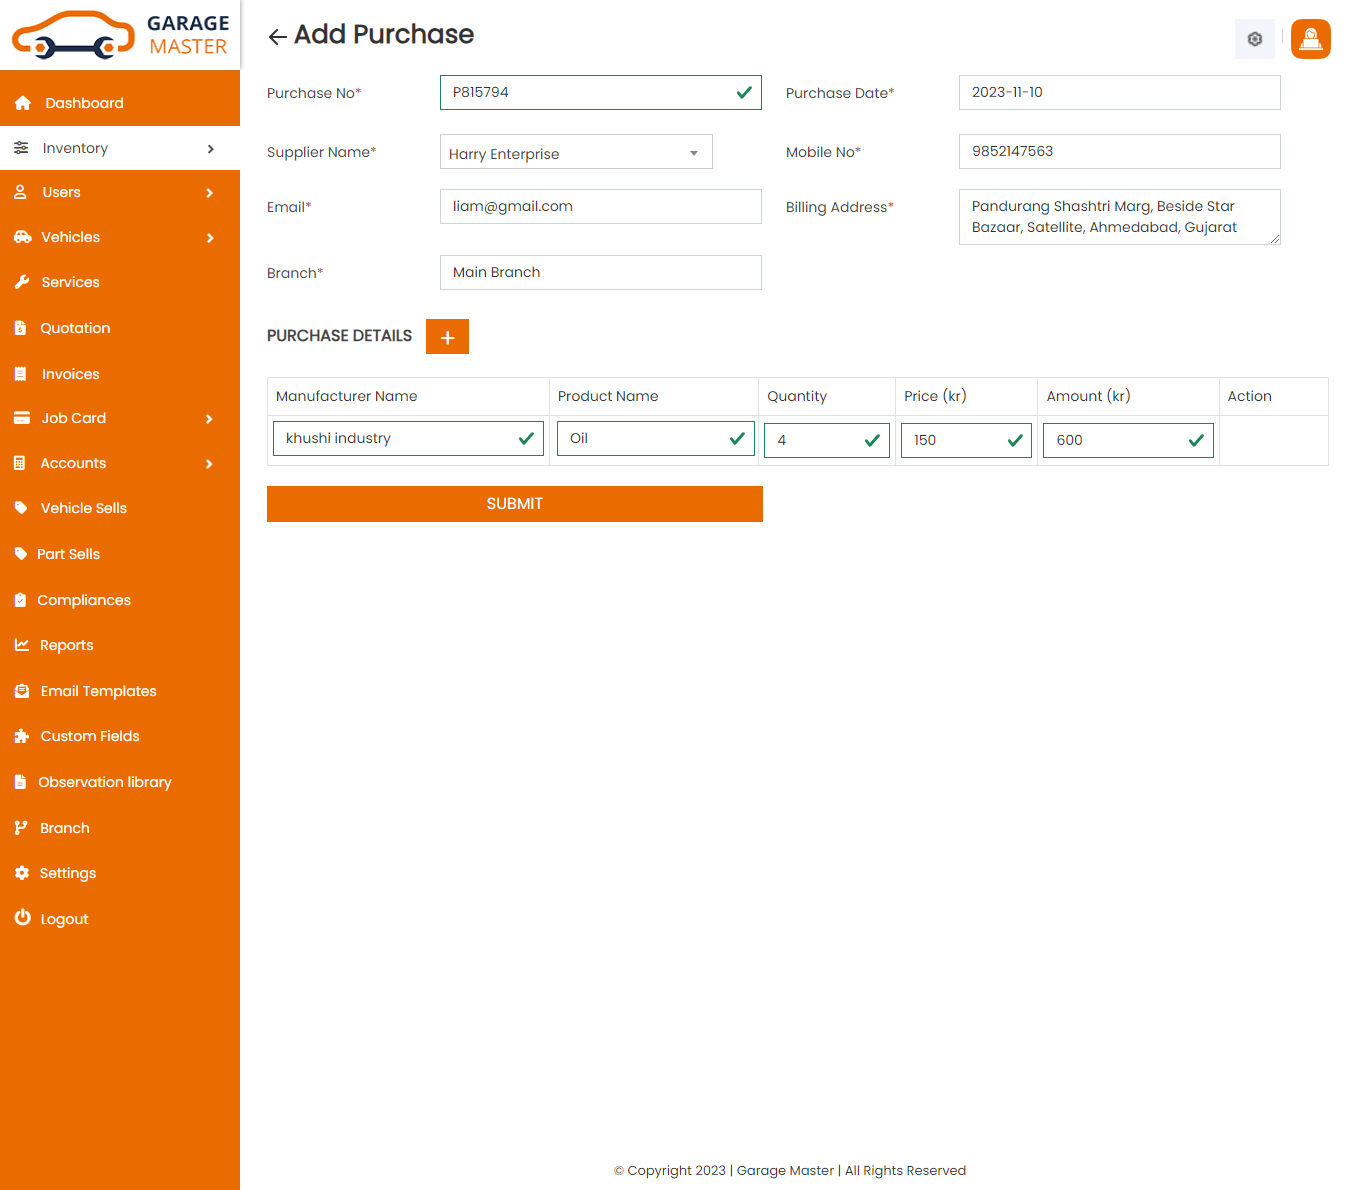
- Purchase No: Purchase number auto generated.
- Purchase Date: Enter a new purchase date for this purchase.
- Supplier Name: Select supplier name for this purchase.
- Mobile Number: Select supplier and auto generated mobile.
- Email: Select supplier and auto generated email.
- Billing Address: Select supplier and auto generated address.
- Add New: Add new product for this purchase.
- Manufacturer Name: Select manufacturer name for this purchase.
- Product Name: Select product name for this purchase.
- Quantity: Enter a new quantity for this purchase.
- Price: Select product name and auto generated price
- Amount: Select product name and quantity and auto generated amount.
- Action: Delete product for this purchase
- Add notes for Purchase
Purchase Details
Notes
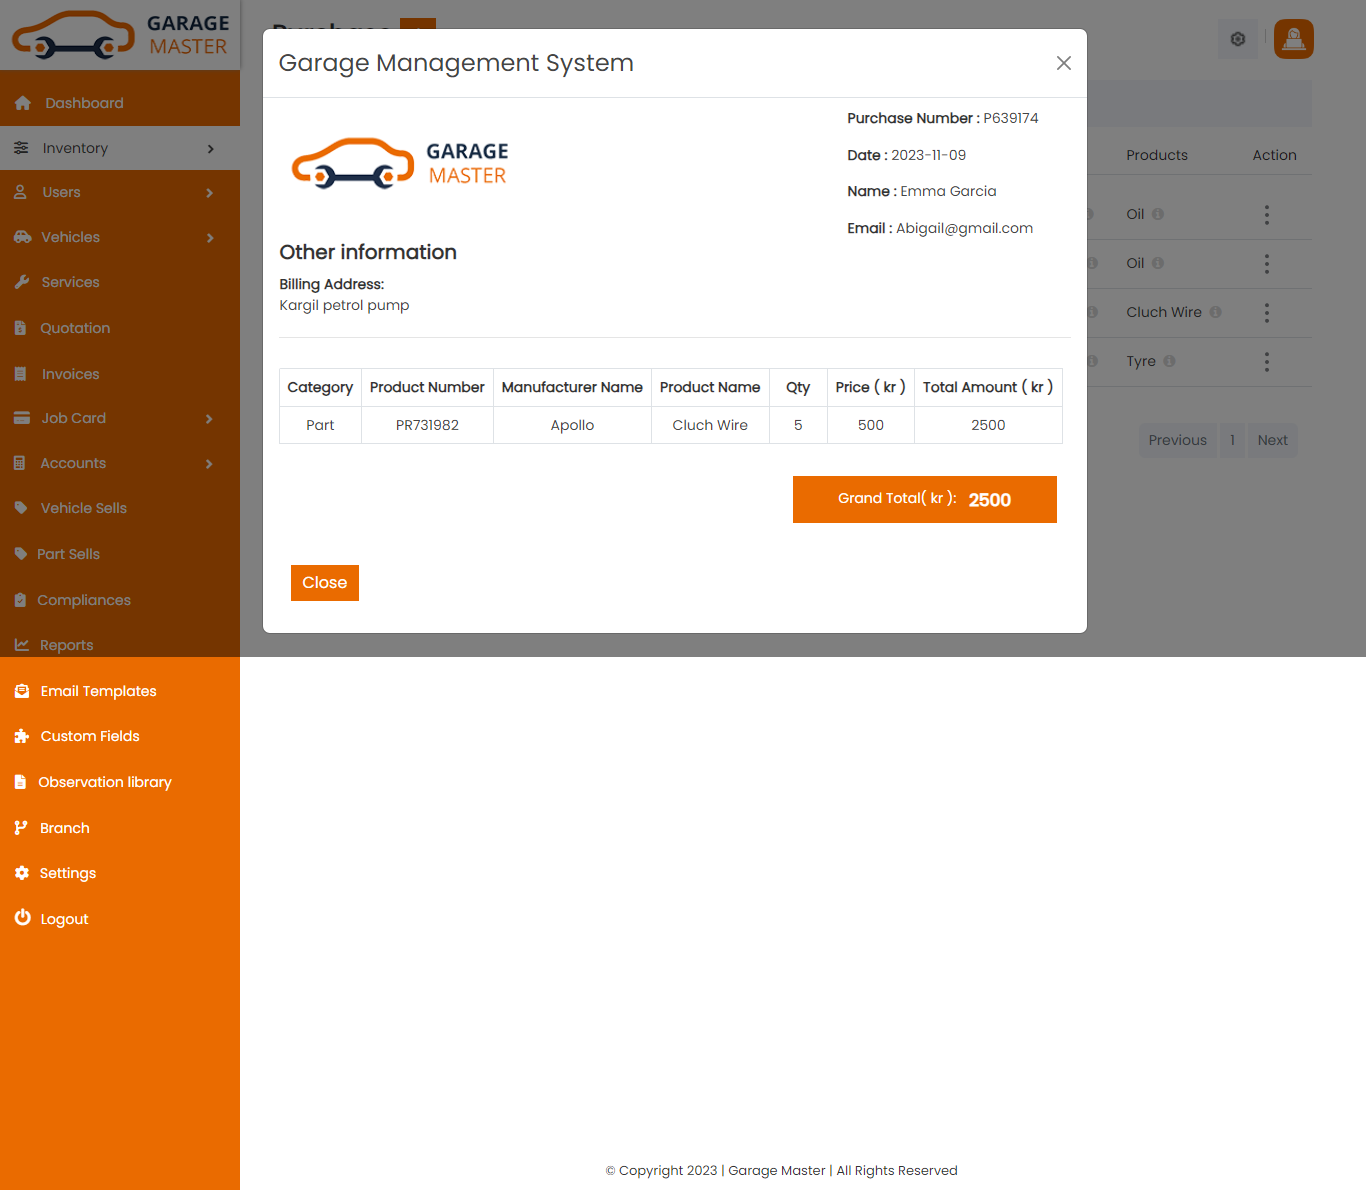
View Purchase: Admin can view detail of particular Purchase by clicking on view detail button. This will open up details.
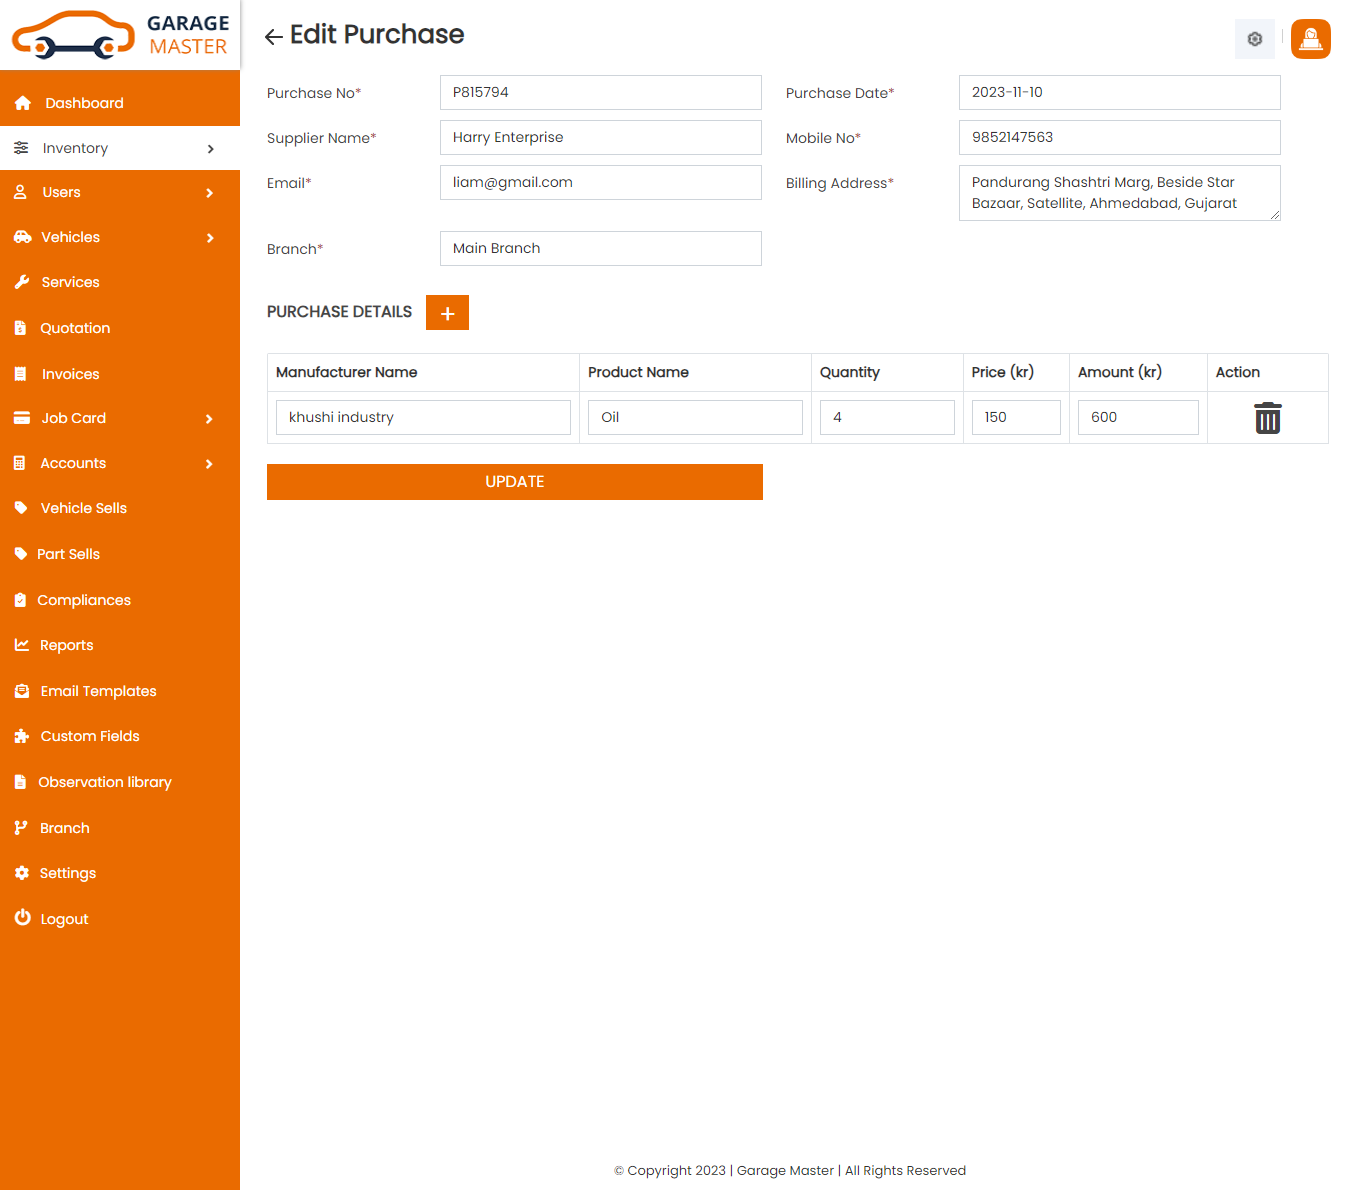
Edit Purchase: Admin can Edit detail of particular Purchase by clicking on Edit detail button. This will open up details. From here admin can Change Purchase Details.
Delete Purchase: Admin can delete a complete list of all Purchase and delete detail of particular Purchase by clicking on delete detail button. This will delete details.
D)Stock
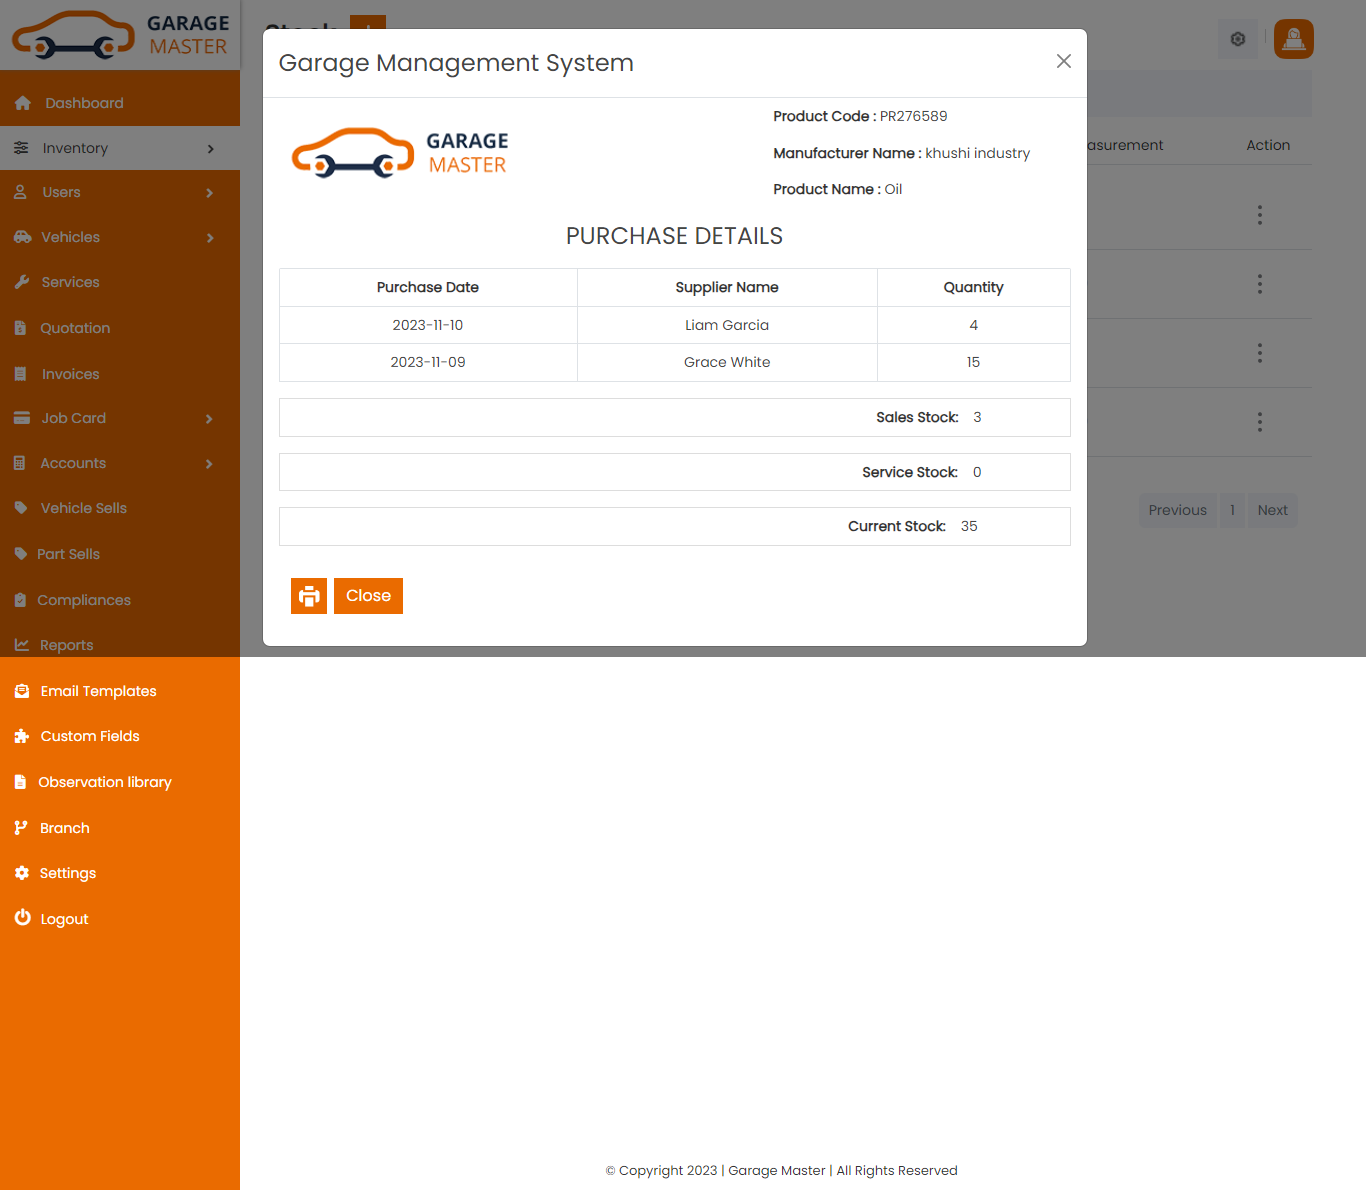
Stock List: Admin can view a complete list of all Stock and view detail of particular Stock by clicking on view detail button. This will open up details. From here admin can also Print Out view Stock.
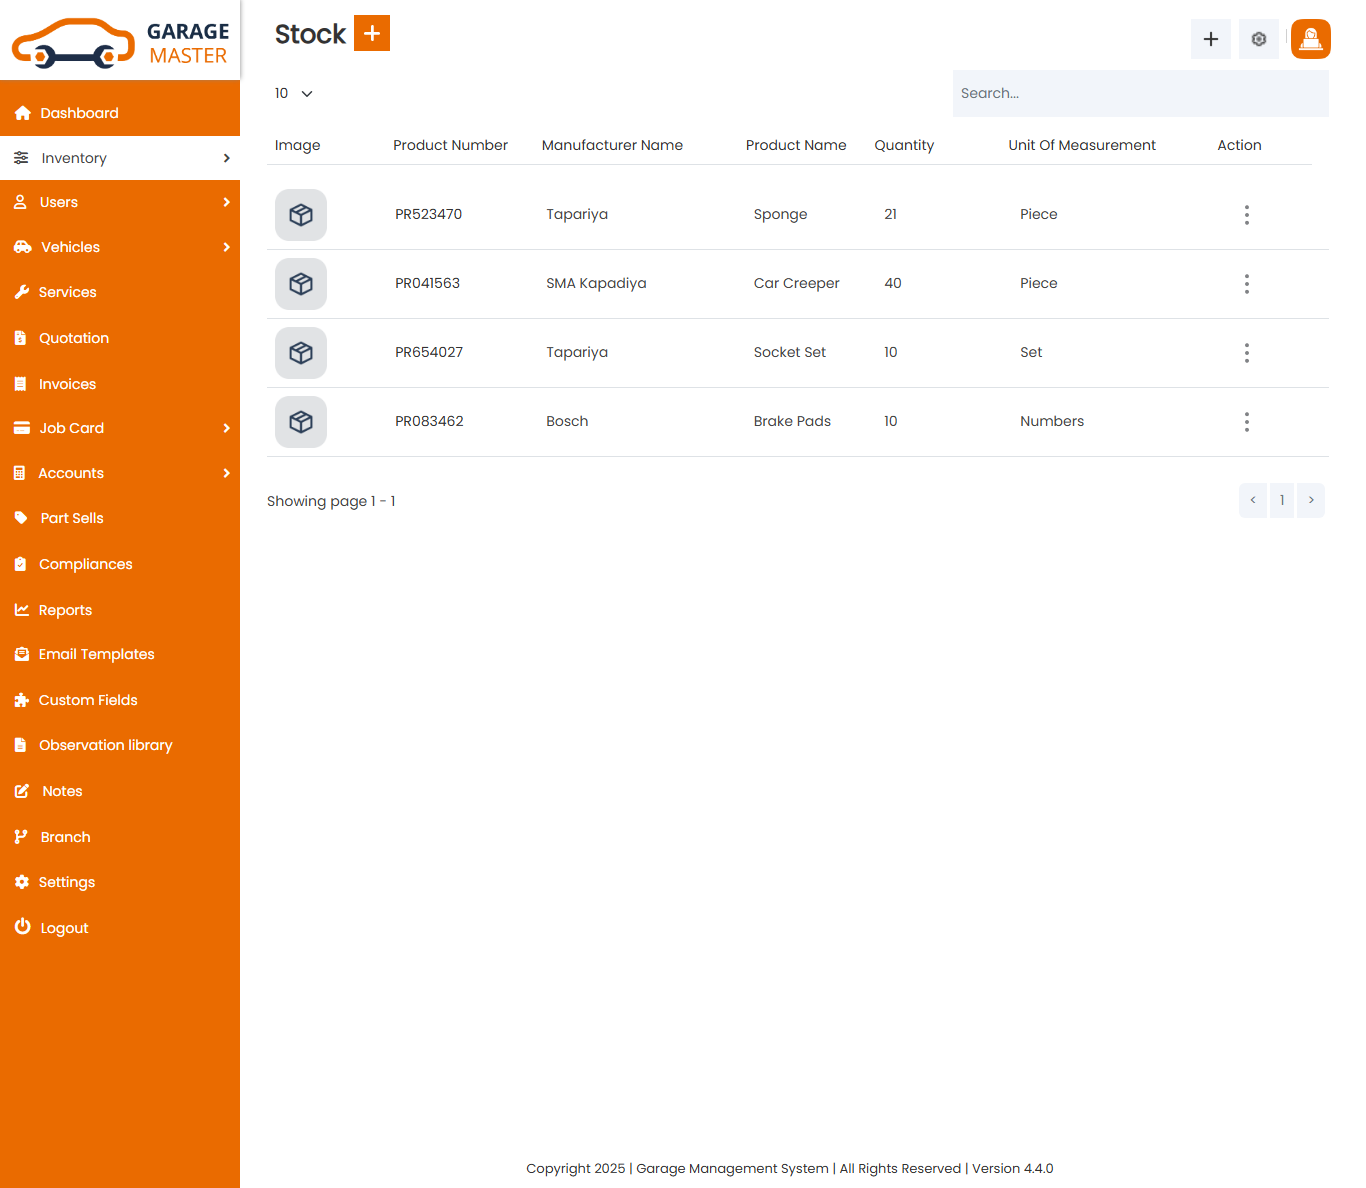
Add Stock: You can add Stock details.

- Purchase No: Purchase number auto generated.
- Purchase Date: Enter a new purchase date for this purchase.
- Supplier Name: Select supplier name for this purchase.
- Mobile Number: Select supplier and auto generated mobile.
- Email: Select supplier and auto generated email.
- Billing Address: Select supplier and auto generated address.
- Add New: Add new product for this purchase.
- Manufacturer Name: Select manufacturer name for this purchase.
- Product Name: Select product name for this purchase.
- Quantity: Enter a new quantity for this purchase.
- Price: Select product name and auto generated price
- Amount: Select product name and quantity and auto generated amount.
- Action: Delete product for this purchase
Purchase Details
View Stock: Admin can view the particular stock details.
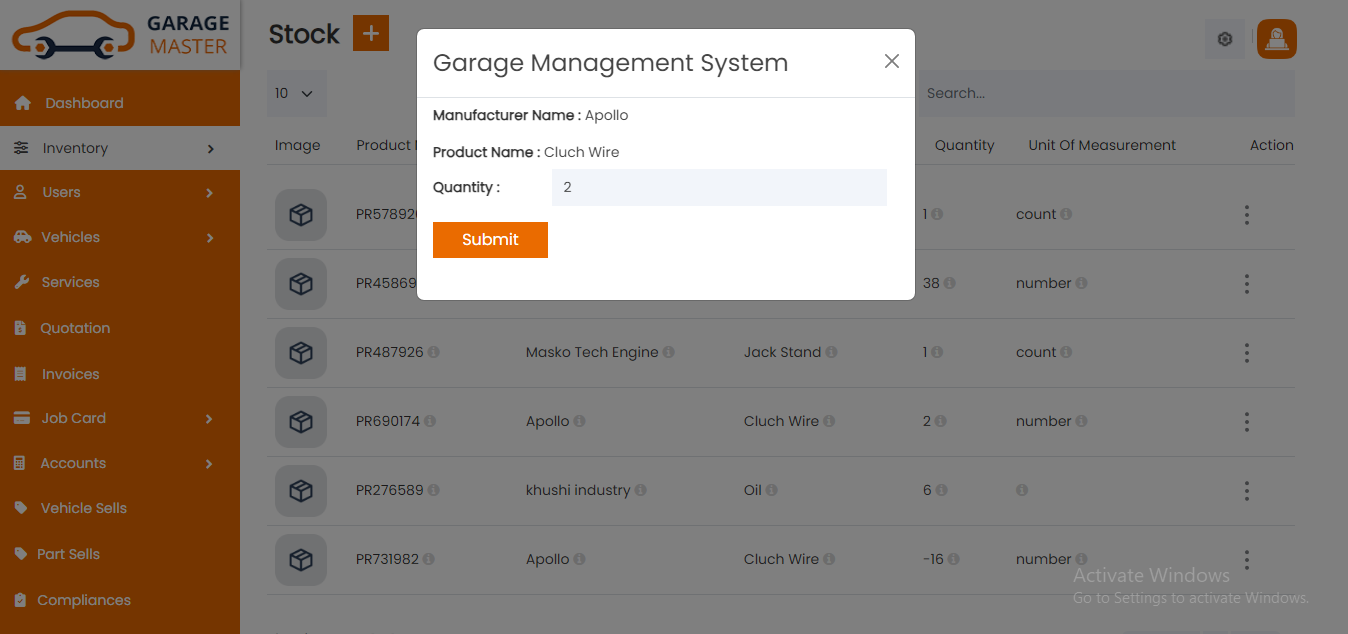
Manage Stock: Admin can manage the quantity of a particular stock.
4)Users
A) Customer
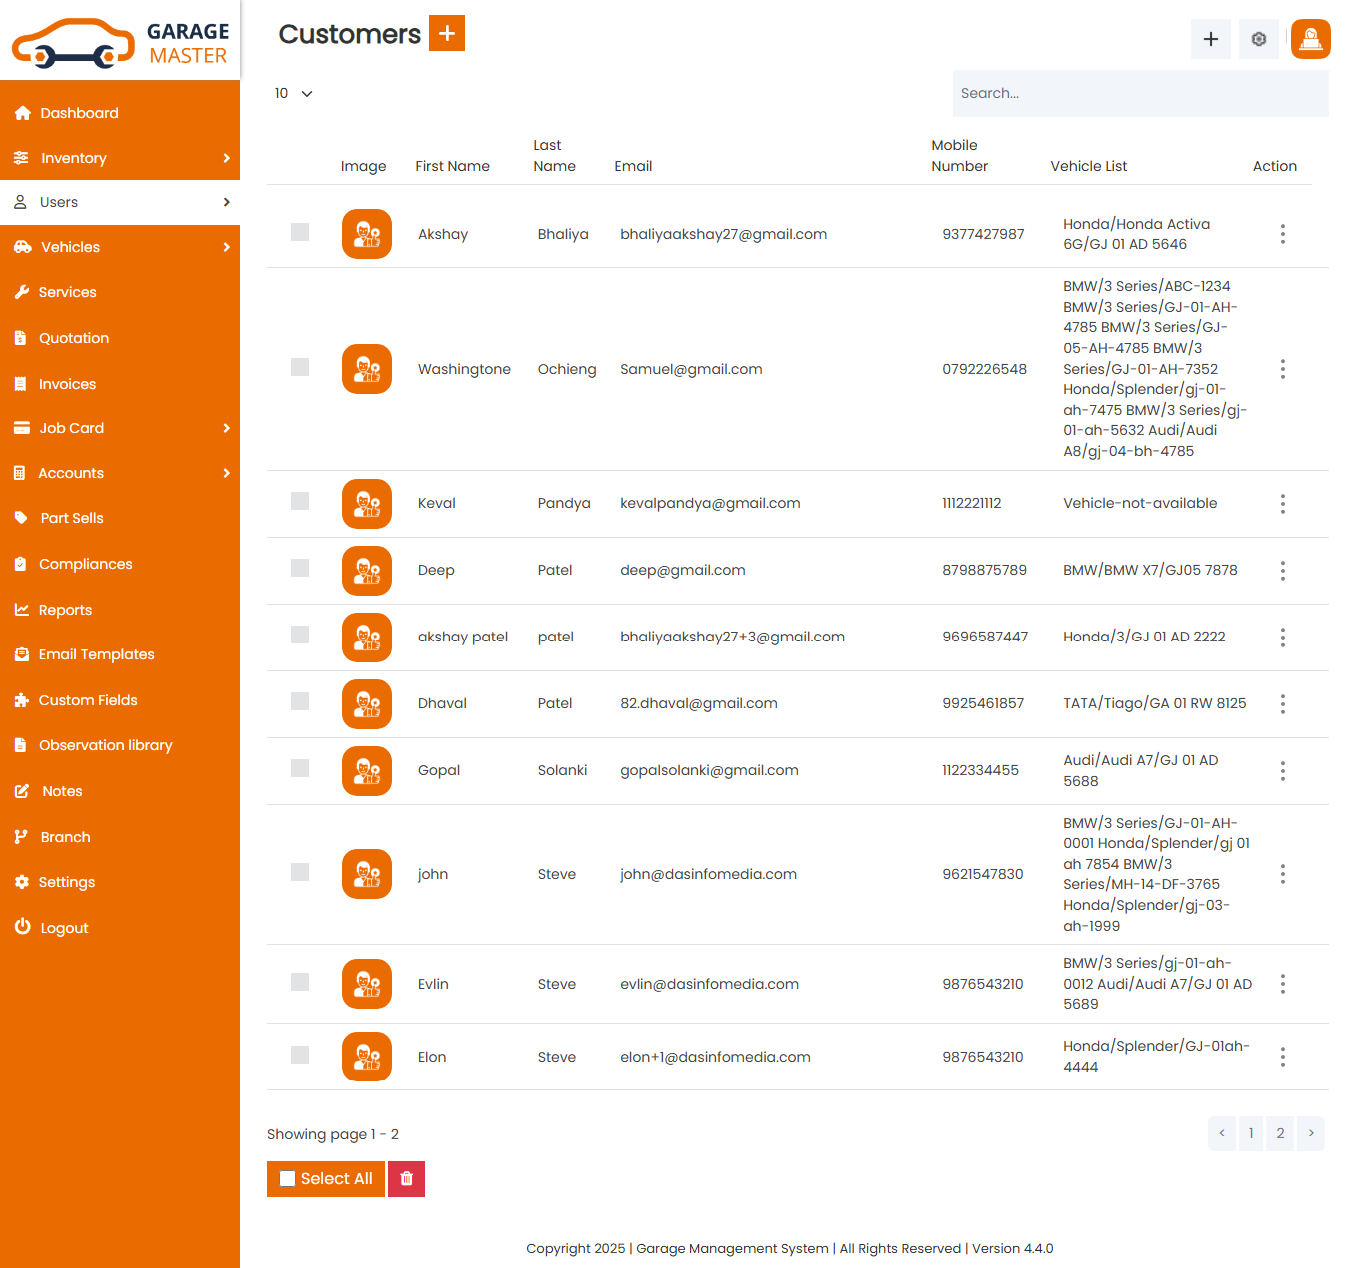
Customer List: Admin can add new Customer, manage all Customer and view a complete list of all Customer.
Add Customer: Admin can add Customer details.
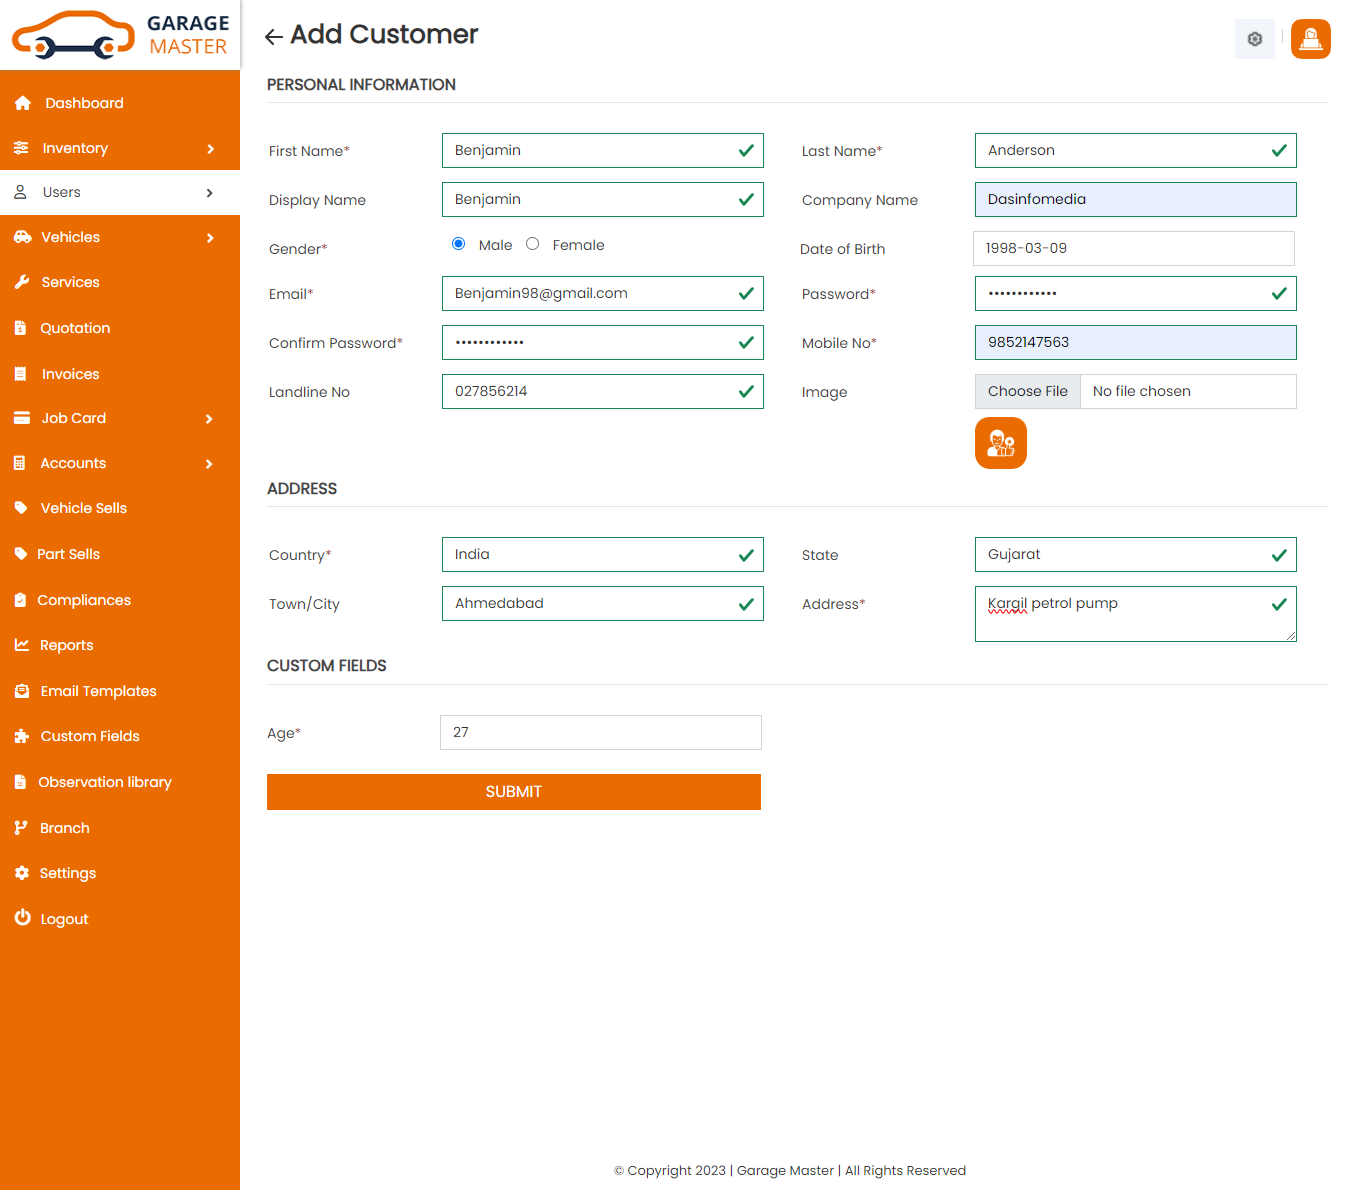
- First Name: Enter a new first name for this customer.
- Last Name: Enter a new last name for this customer.
- Display Name: Enter a new display name for this customer.
- Gender: Select gender for this customer.
- Date of Birth: Enter a new date of birth for this customer.
- Email: Enter a new email for this customer.
- Password: Enter a new password for this customer.
- Confirm Password: Enter a new confirm password for this customer.
- Mobile No: Enter a new mobile number for this customer.
- Landline No: Enter a new landline number for this customer.
- Image: Upload image for this customer.
- Country: Select country for this customer.
- State: Select state for this customer.
- City: Select city for this customer.
- Address: Enter a new address for this customer.
- Add new custom field in go to custom Fields module in add custom field then select form name in customer and add custom field for this customer.
- Add notes for Customer.
Personal Information
Address
CustomField
Notes
Edit Customer: Admin can Edit detail of particular customer by clicking on Edit detail button. This will open up details. From here admin can Change customer Details.
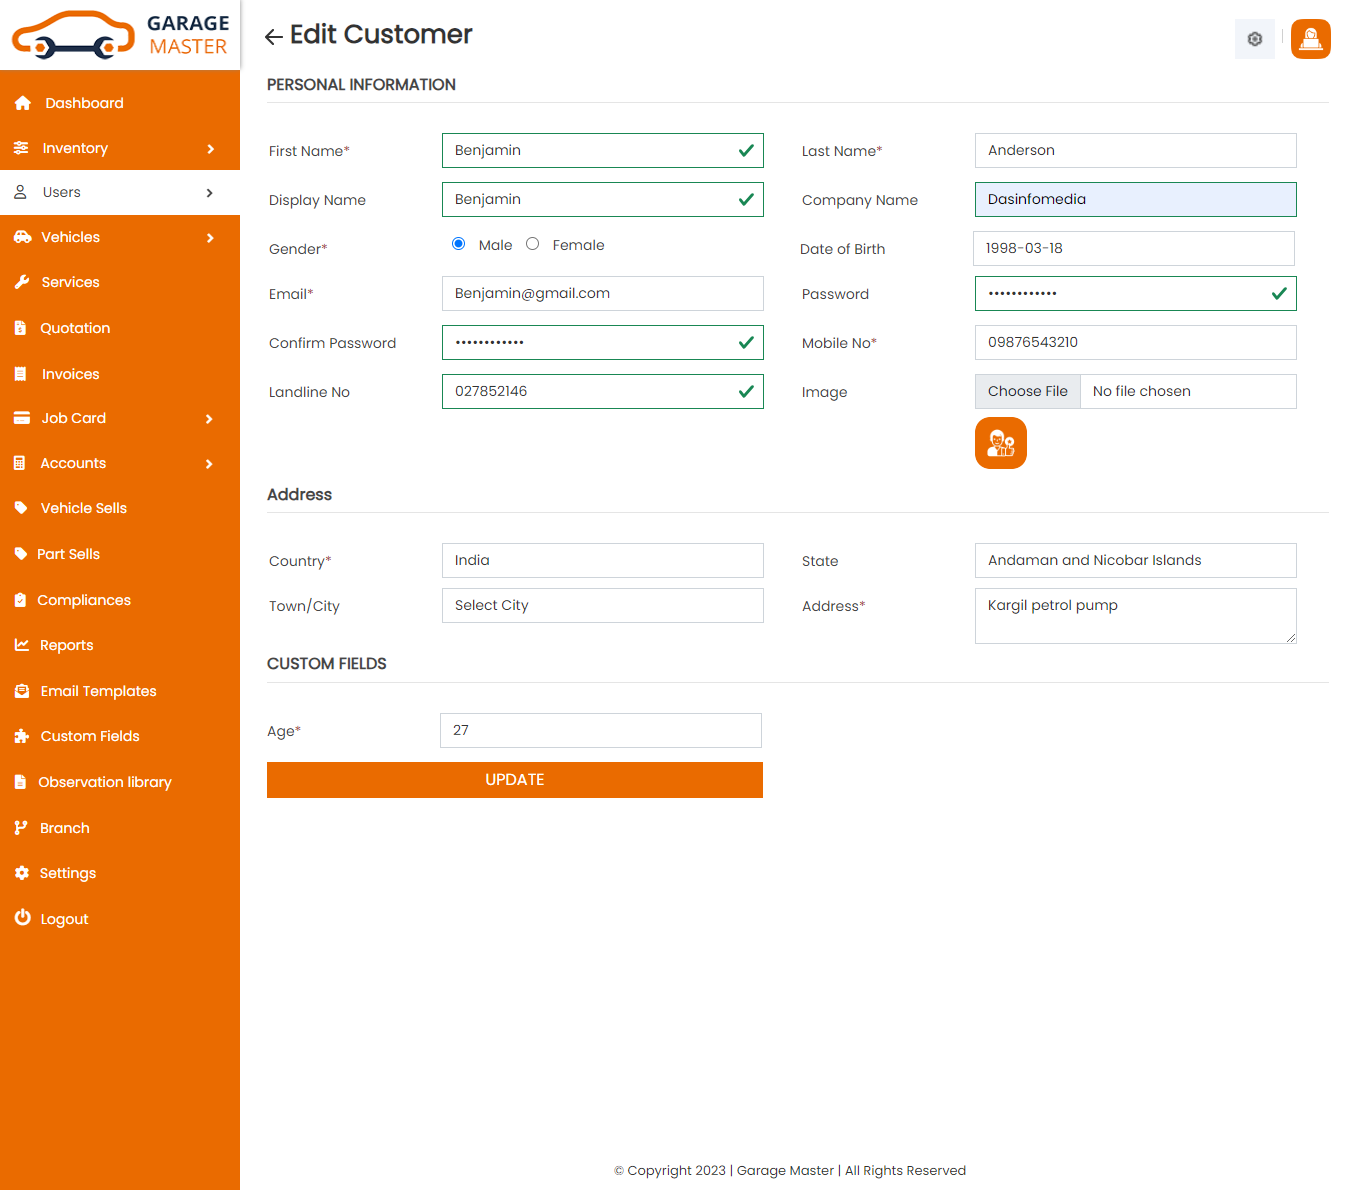
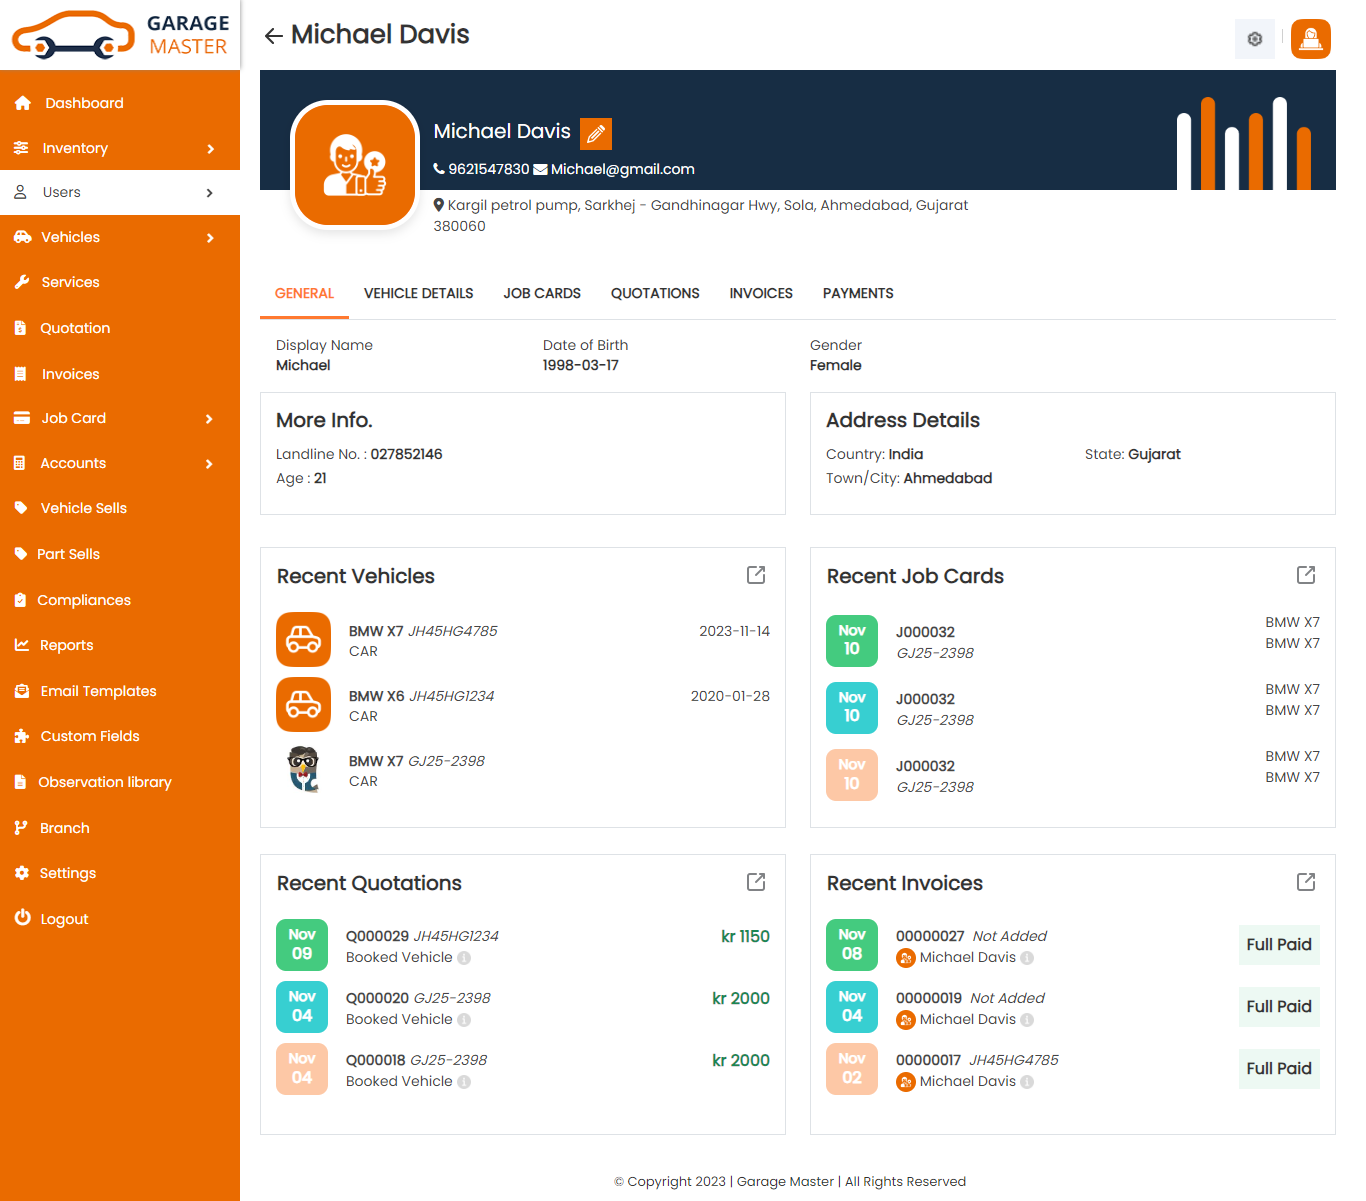
View Customer: Admin can view a complete list of all Customer and view detail of particular Customer by clicking on view detail button. This will open up details.
Delete Customer: Admin can delete a complete list of all Customer and delete detail of particular Customer by clicking on delete detail button. This will delete details.
B) Employee
Employee List: Admin can add new Employee, manage all Employee and view a complete list of all Employee.
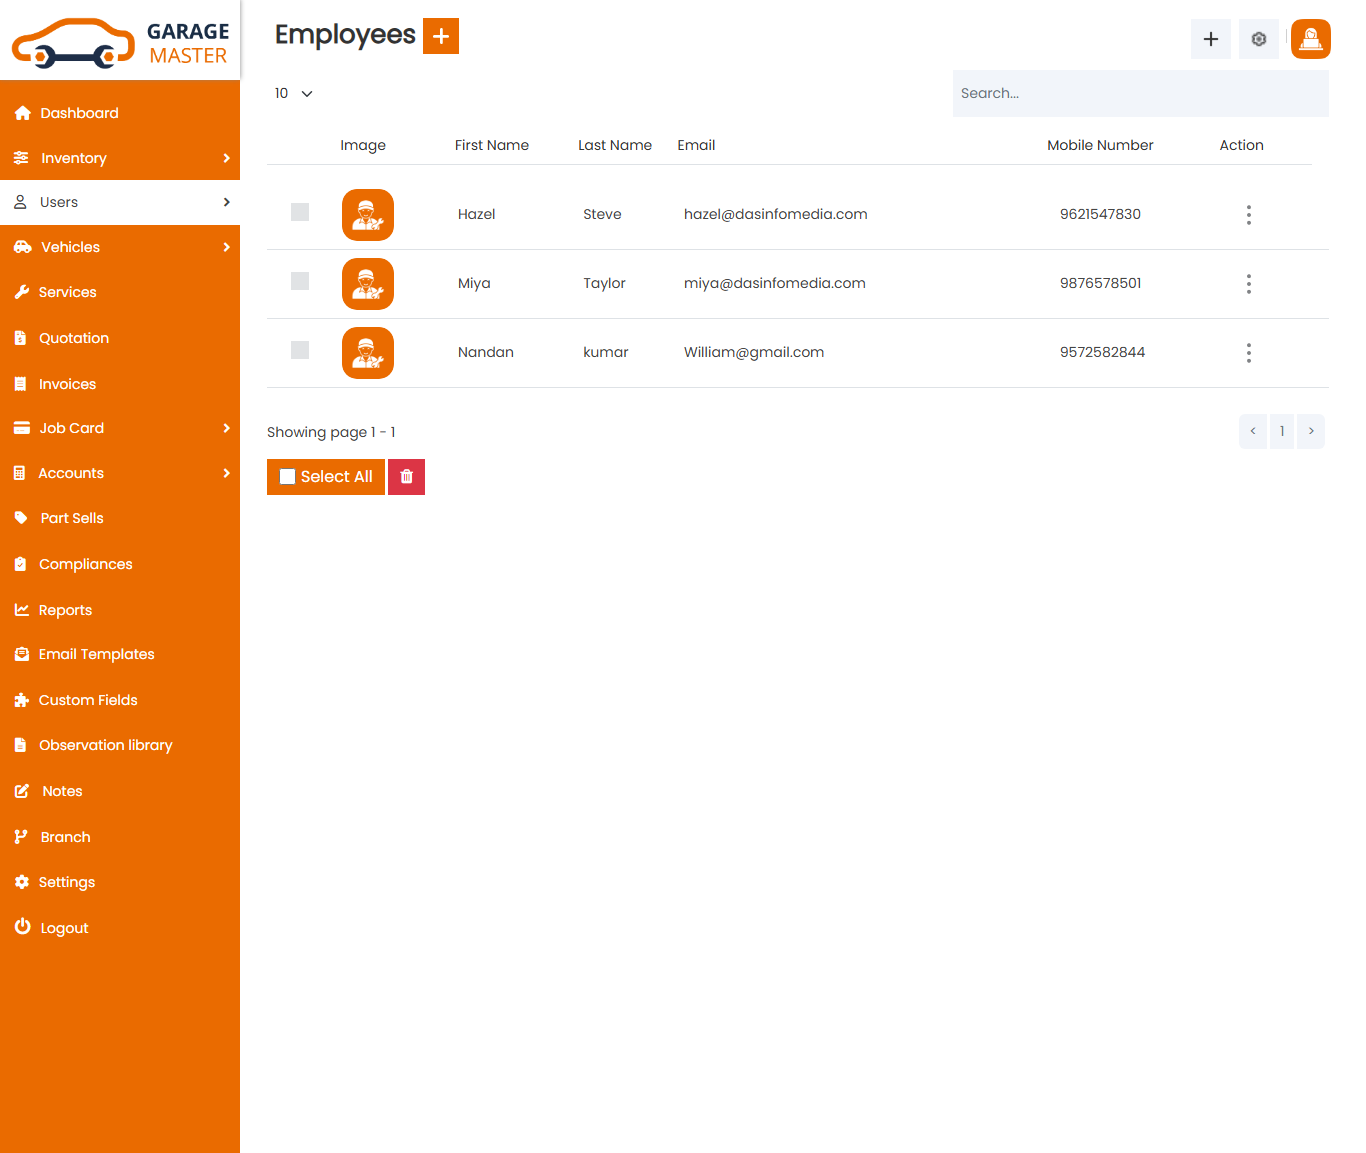
Add Employee: Admin can add Employee details.
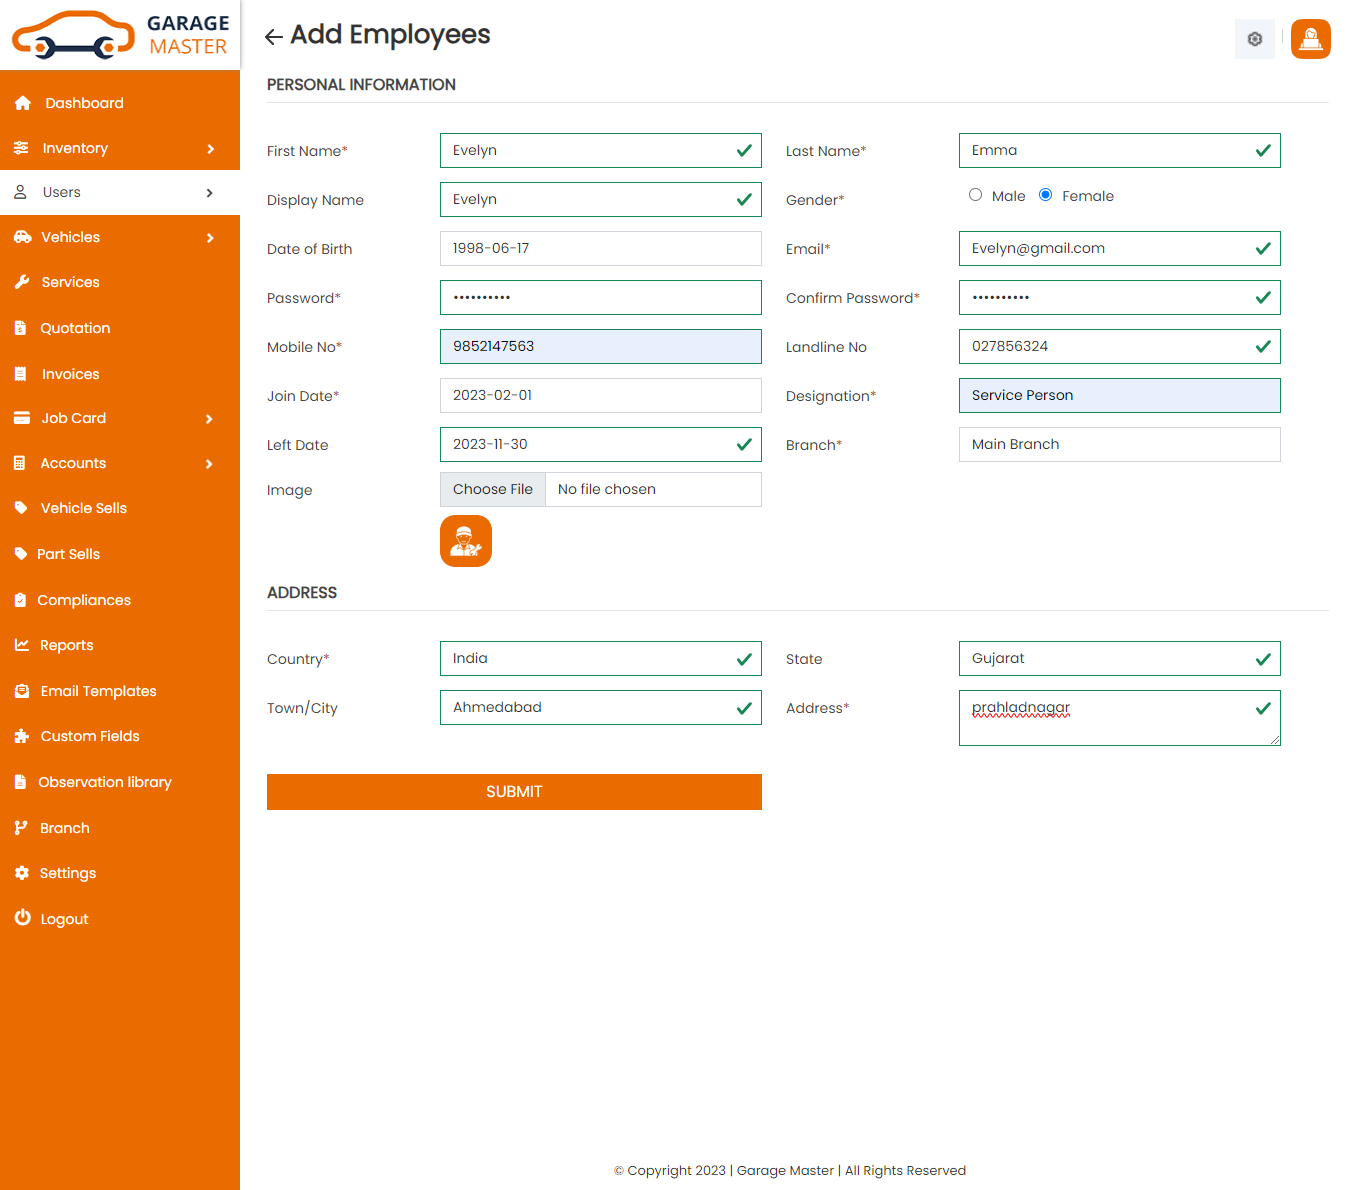
- First Name: Enter a new first name for this employee.
- Last Name: Enter a new last name for this employee.
- Display Name: Enter a new display name for this employee.
- Gender: Select gender for this employee.
- Date of Birth: Enter a new date of birth for this employee.
- Email: Enter a new email for this employee.
- Password: Enter a new password for this employee.
- Confirm Password: Enter a new confirm password for this employee.
- Mobile No: Enter a new mobile number for this employee.
- Landline No: Enter a new landline number for this employee.
- Join Date: Enter a new join date for this employee.
- Left Date: Enter a new left date for this employee.
- Designation: Enter a new designation for this employee.
- Image: Upload image for this employee.
- Country: Select country for this employee.
- State: Select state for this employee.
- City: Select city for this employee.
- Address: Enter a new address for this employee.
- Add new custom field in go to custom Fields module in add custom field then select form name in employee and add custom field for this employee.
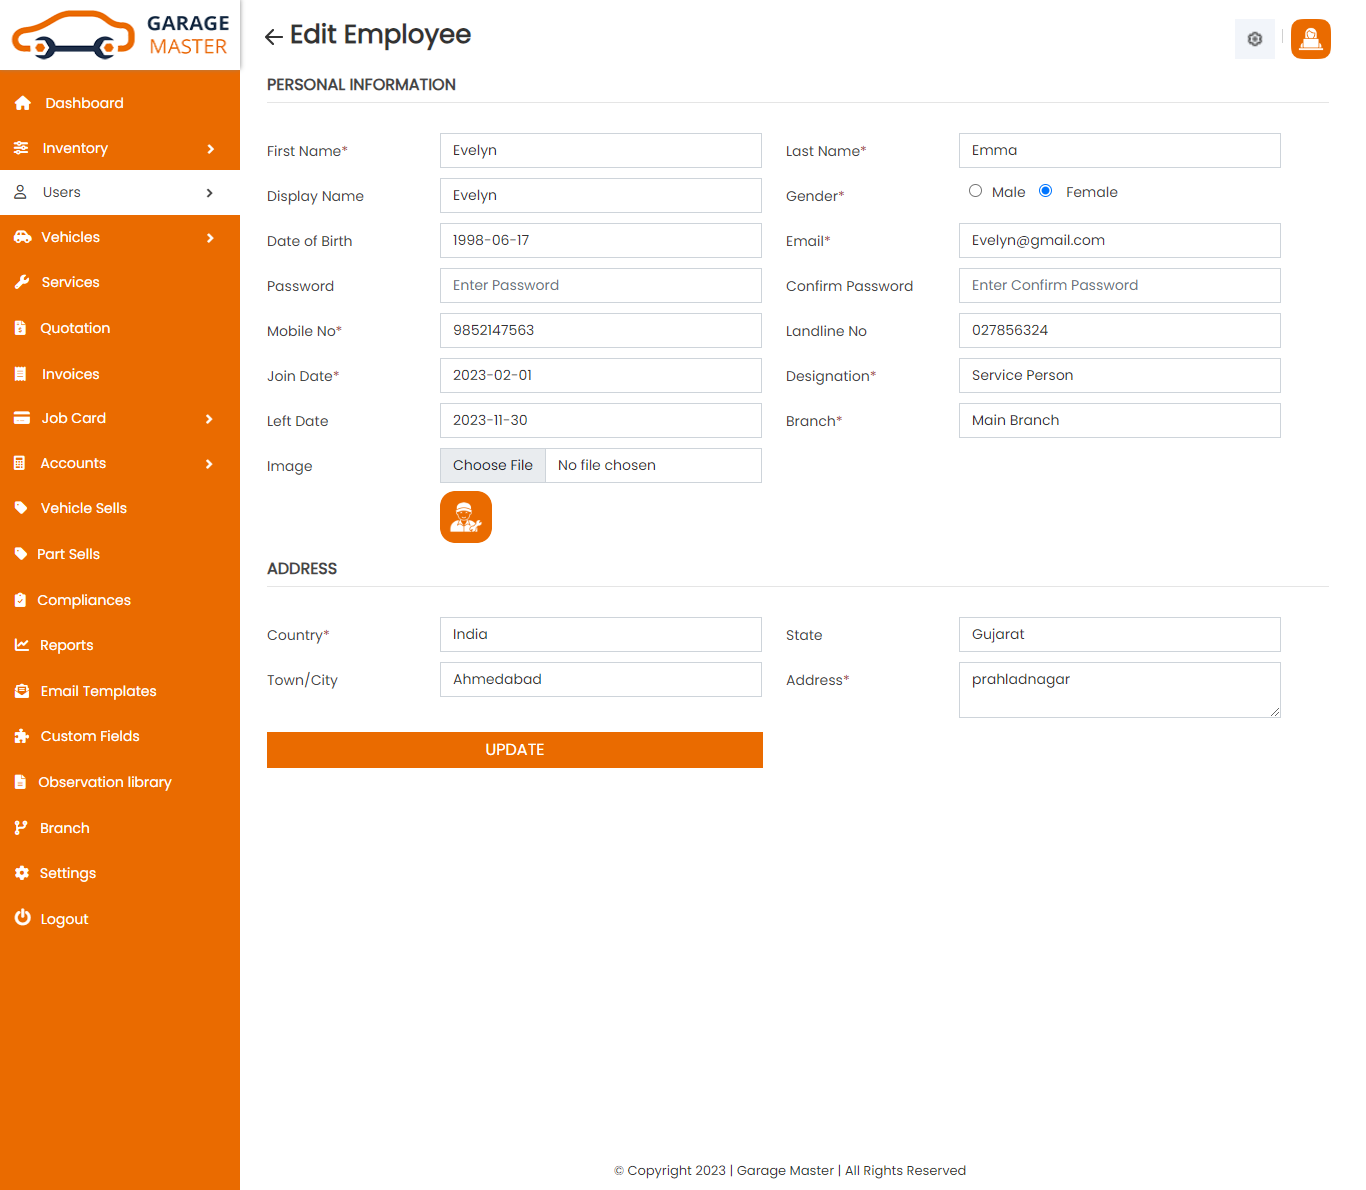
Personal Information
Address
CustomField
Edit Employee: Admin can Edit detail of particular employee by clicking on Edit detail button. This will open up details. From here admin can Change employee Details.
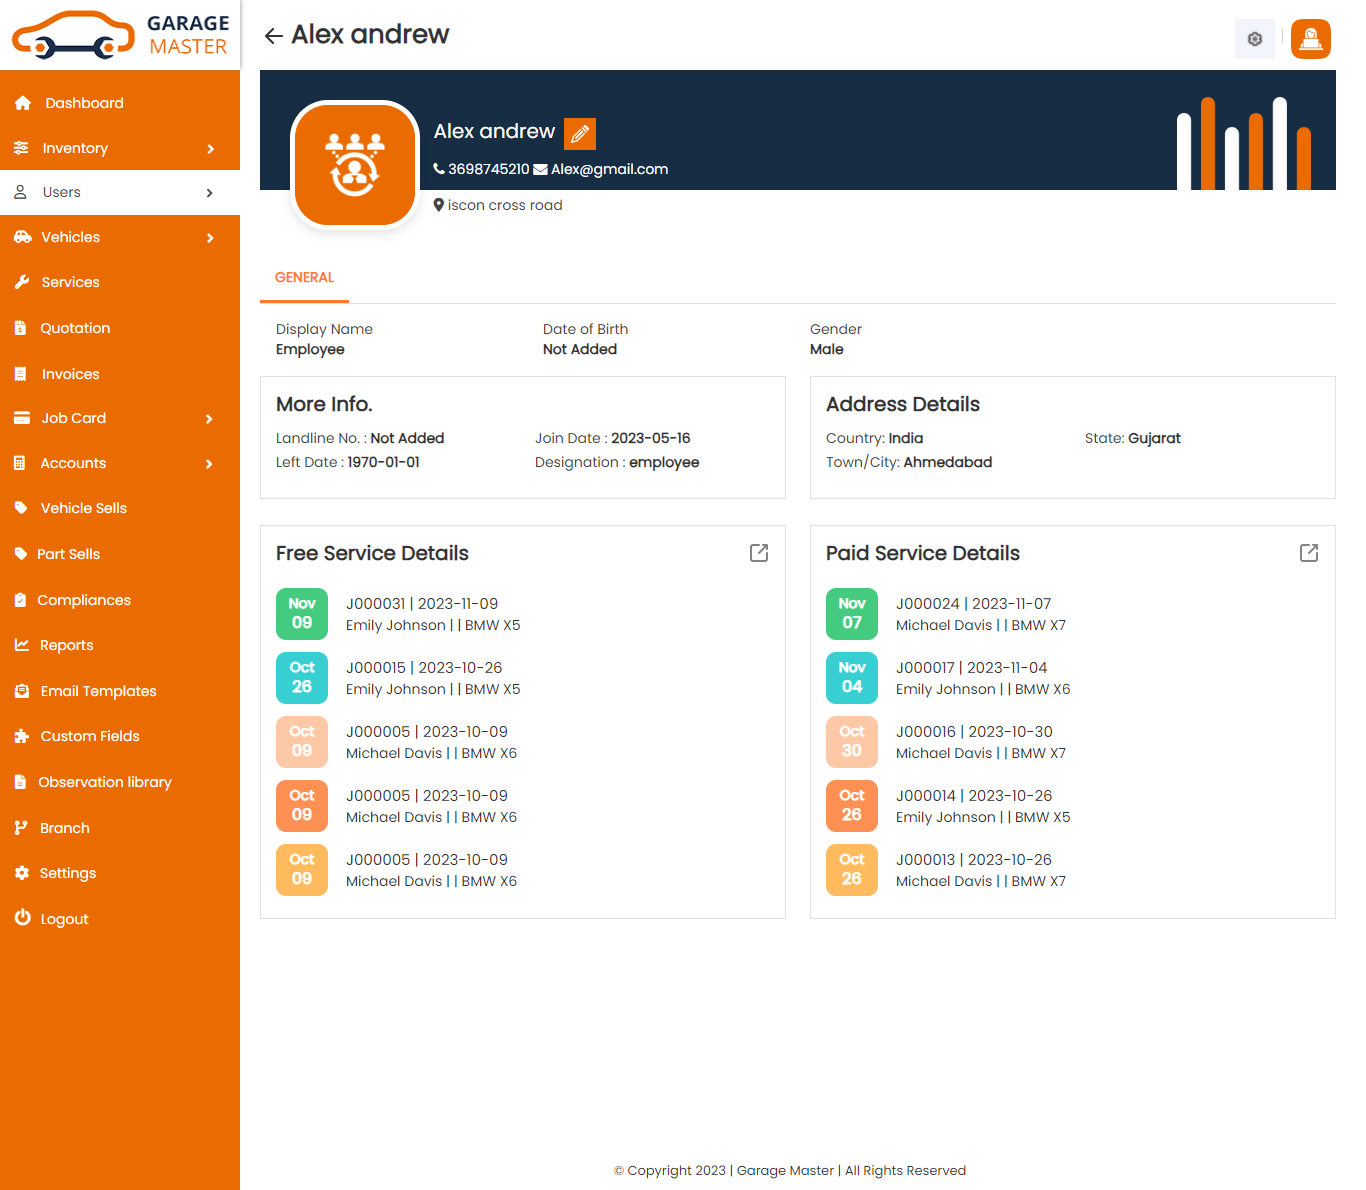
View employee: Admin can view a complete list of all employee and view detail of particular employee by clicking on view detail button. This will open up details.
Delete Employee: Admin can delete a complete list of all Employee and delete detail of particular Employee by clicking on delete detail button. This will delete details.
C) Support Staff
SupportStaff List: Admin can add new SupportStaff, manage all SupportStaff and view a complete list of all Support Staff.
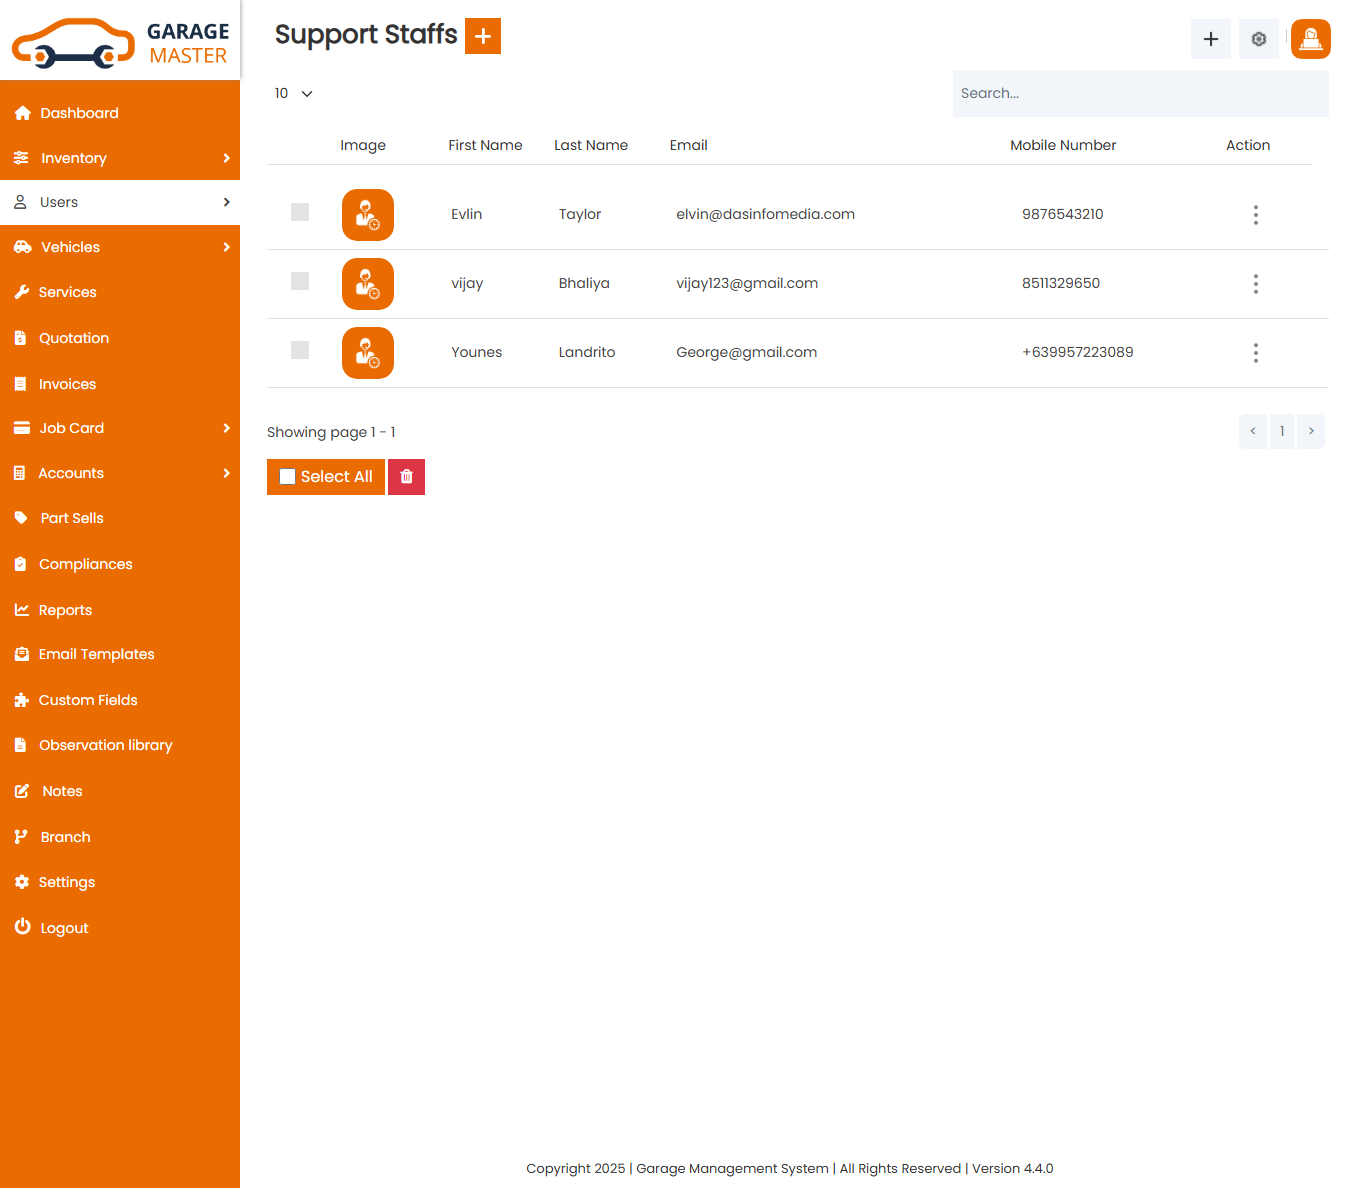
Add SupportStaff: Admin can add SupportStaff details.
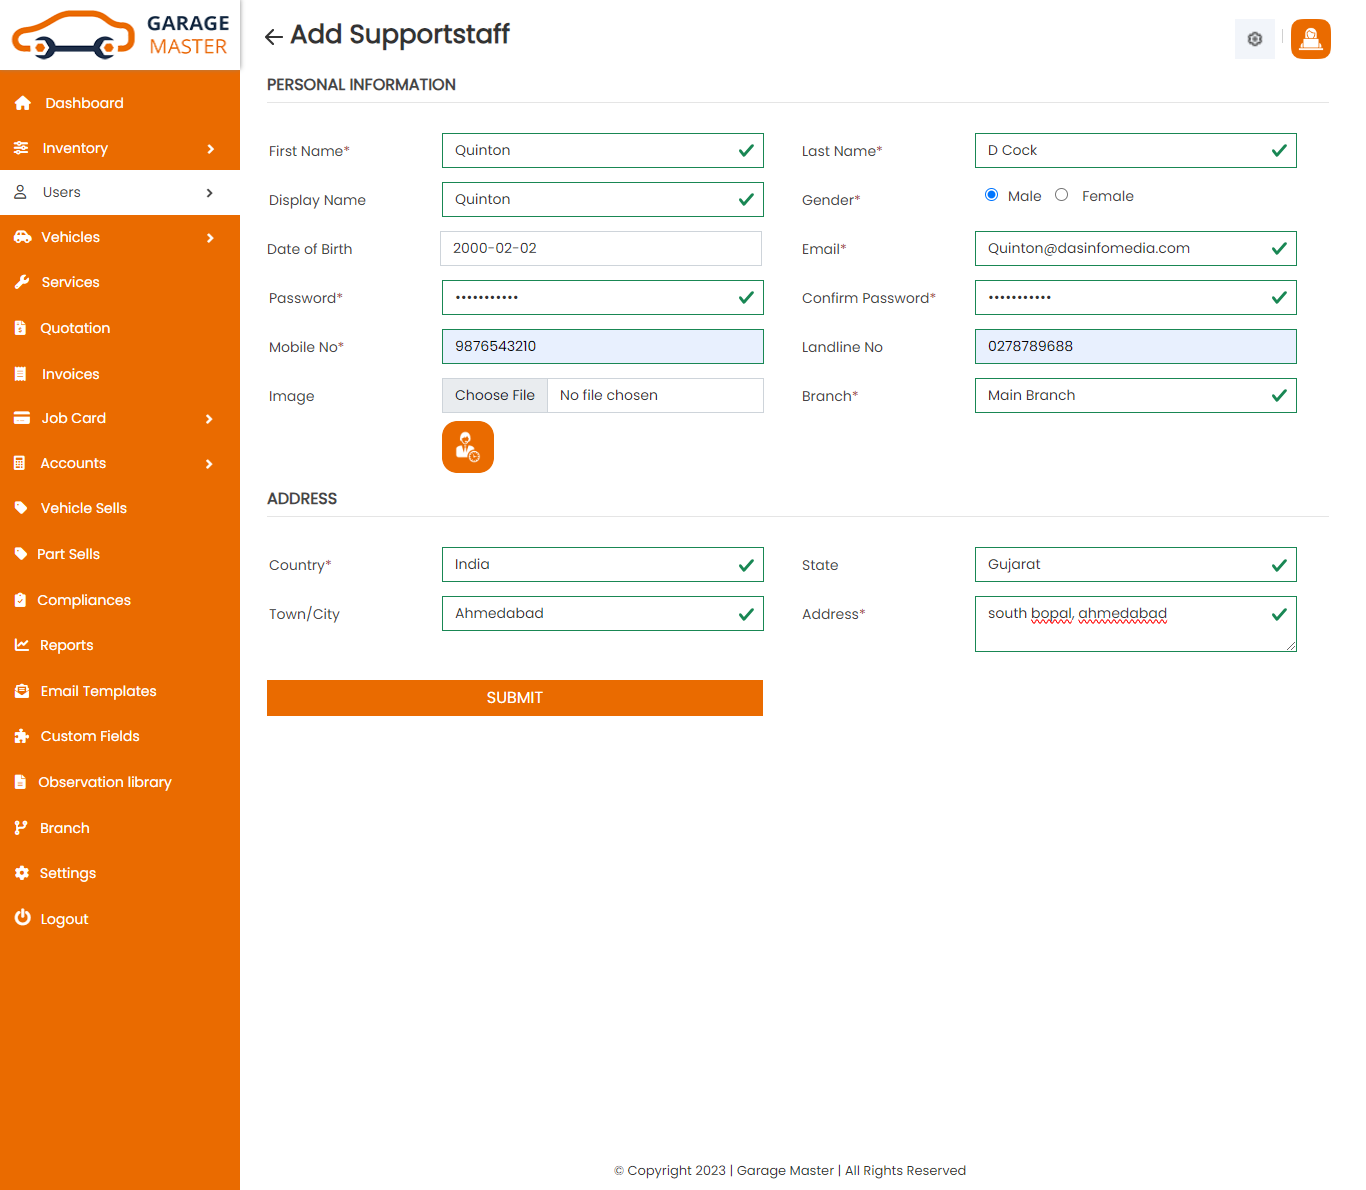
- First Name: Enter a new first name for this support staff.
- Last Name: Enter a new last name for this support staff.
- Display Name: Enter a new display name for this support staff.
- Gender: Select gender for this support staff.
- Date of Birth: Enter a new date of birth for this support staff.
- Email: Enter a new email for this support staff.
- Password: Enter a new password for this support staff.
- Confirm Password: Enter a new confirm password for this support staff.
- Mobile No: Enter a new mobile number for this support staff.
- Landline No: Enter a new landline number for this support staff.
- Image: Upload image for this support staff.
- Country: Select country for this support staff.
- State: Select state for this support staff.
- City: Select city for this support staff.
- Address: Enter a new address for this support staff.
Personal Information
Address
Edit SupportStaff: Admin can Edit detail of particular support Staff by clicking on Edit detail button. This will open up details. From here admin can Change support Staff Details.
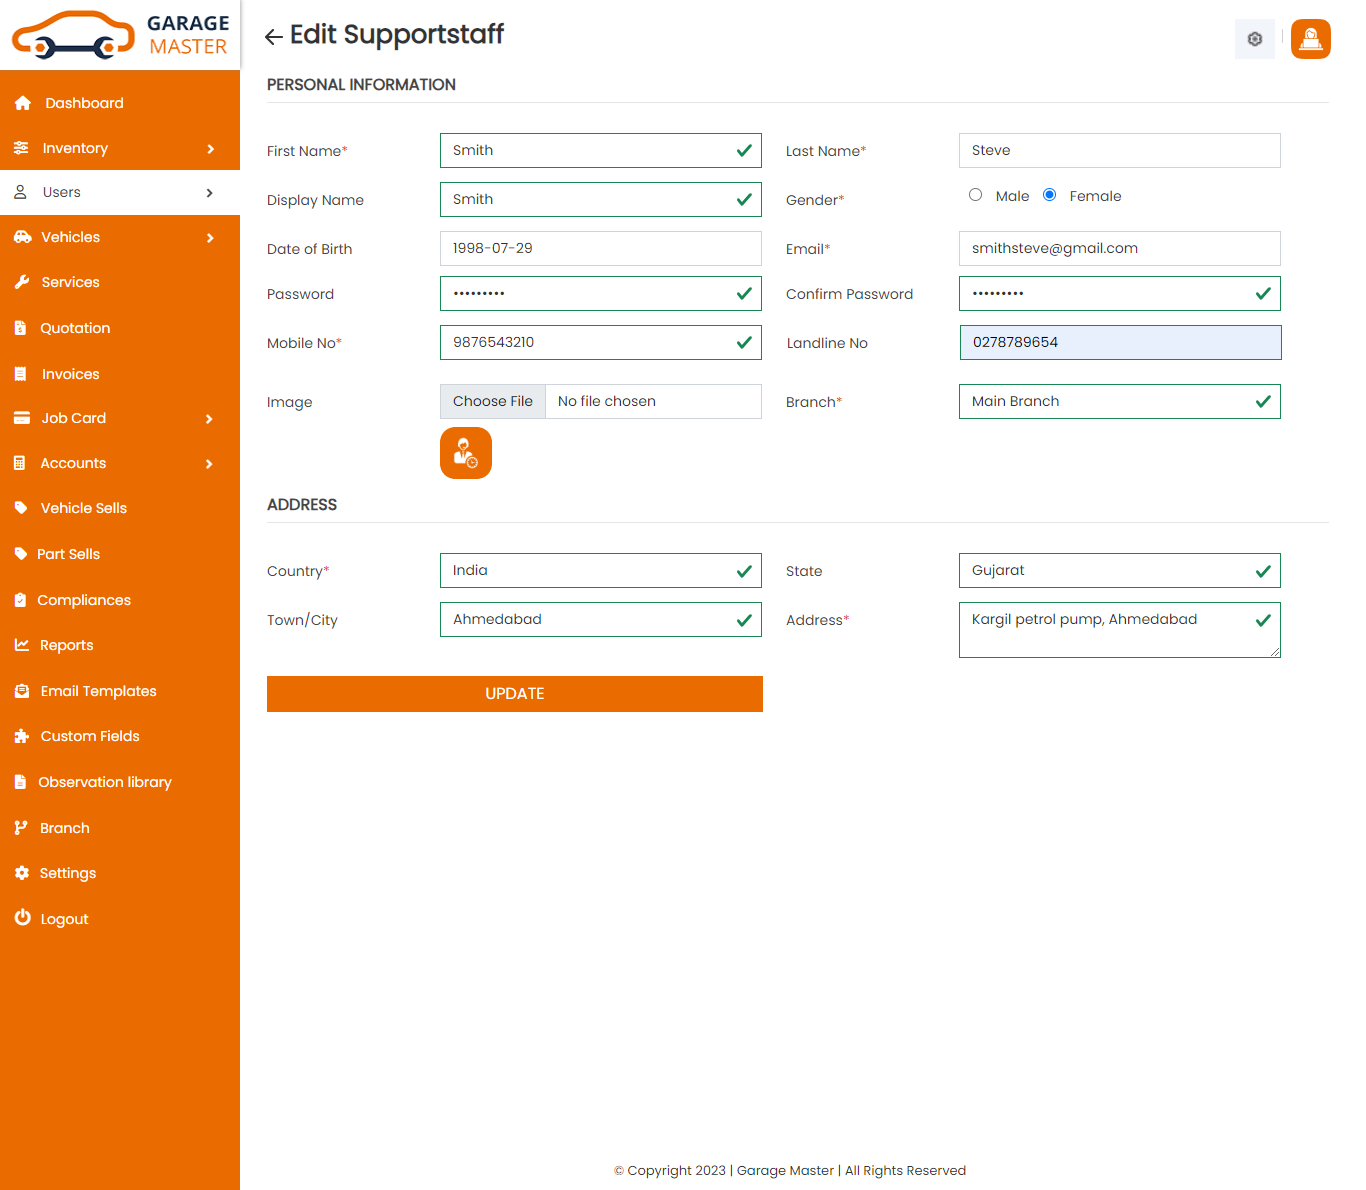
View SupportStaff: Admin can view a complete list of all support Staff and view detail of particular support Staff by clicking on view detail button. This will open up details.
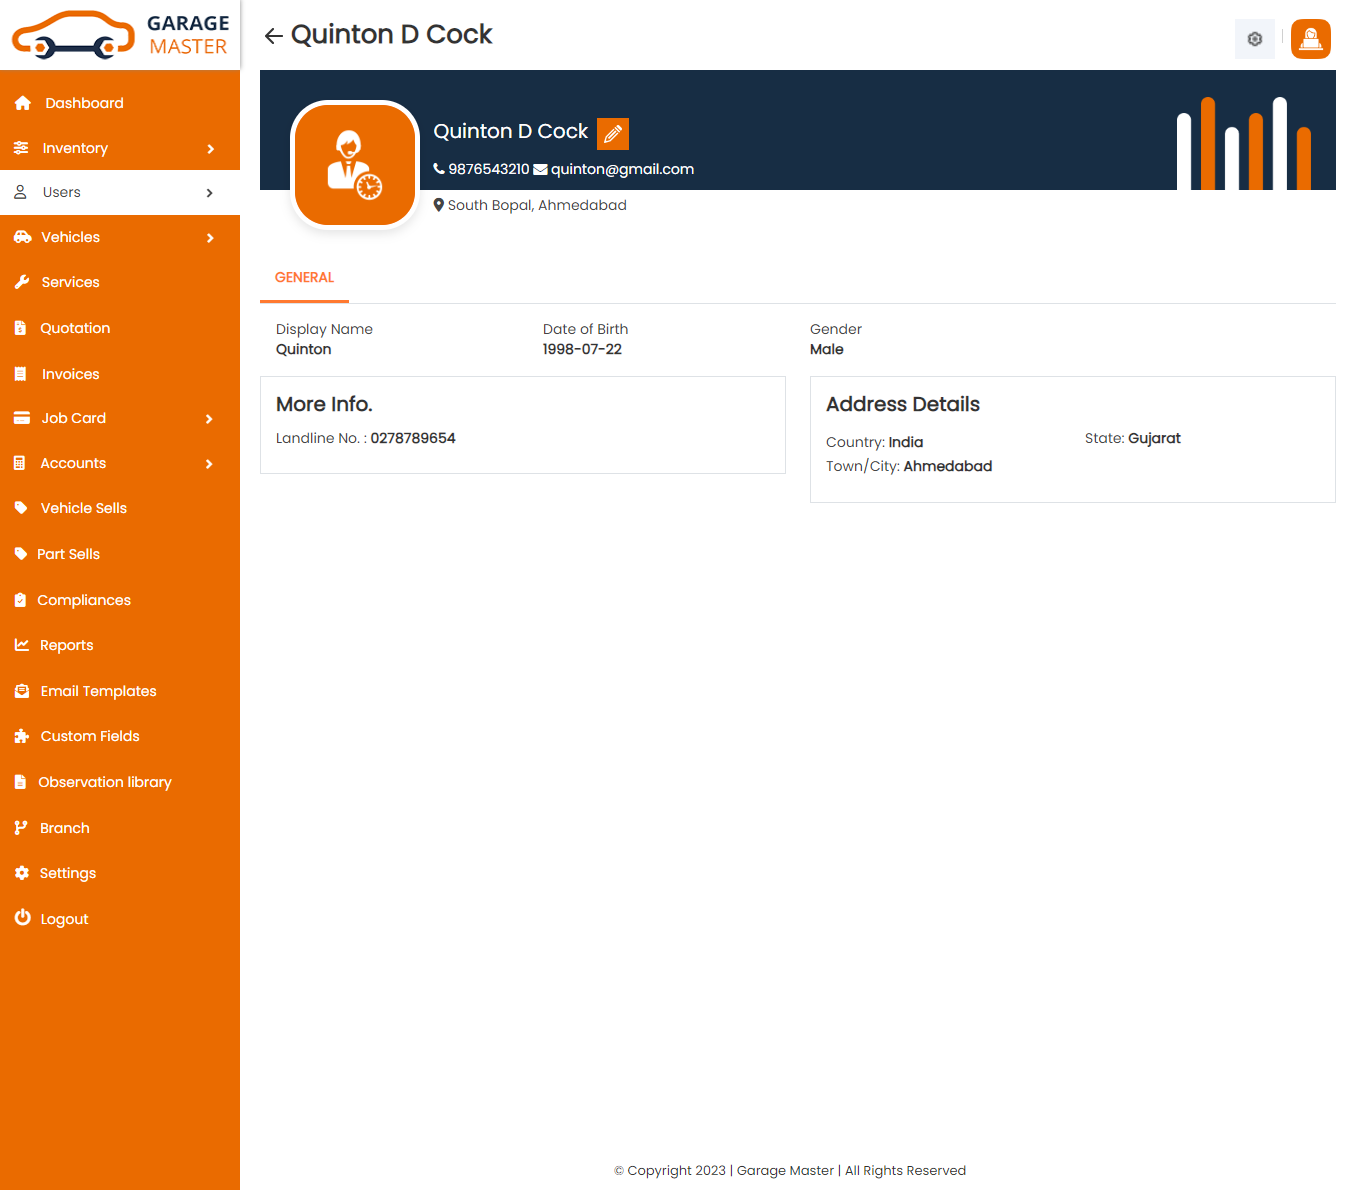
Delete SupportStaff: Admin can delete a complete list of all support Staff and delete detail of particular support Staff by clicking on delete detail button. This will delete details.
D) Accountant
Accountant List: Admin can add new accountant, manage all accountant and view a complete list of all accountant.
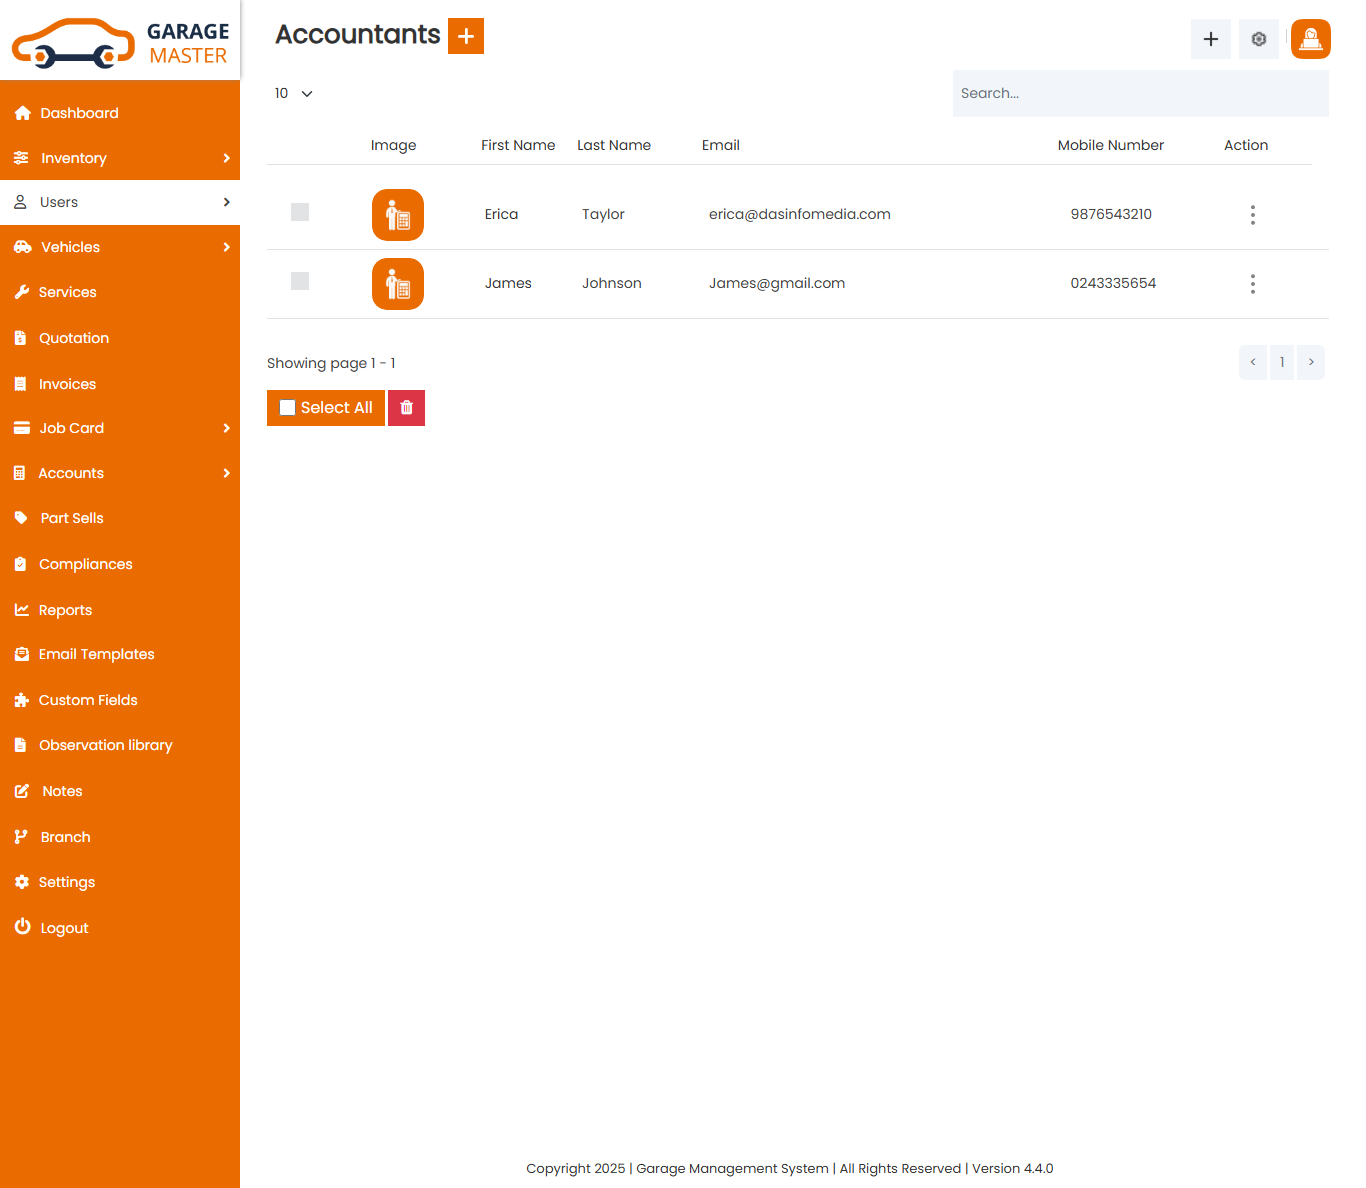
Add Accountant: Admin can add accountant details.
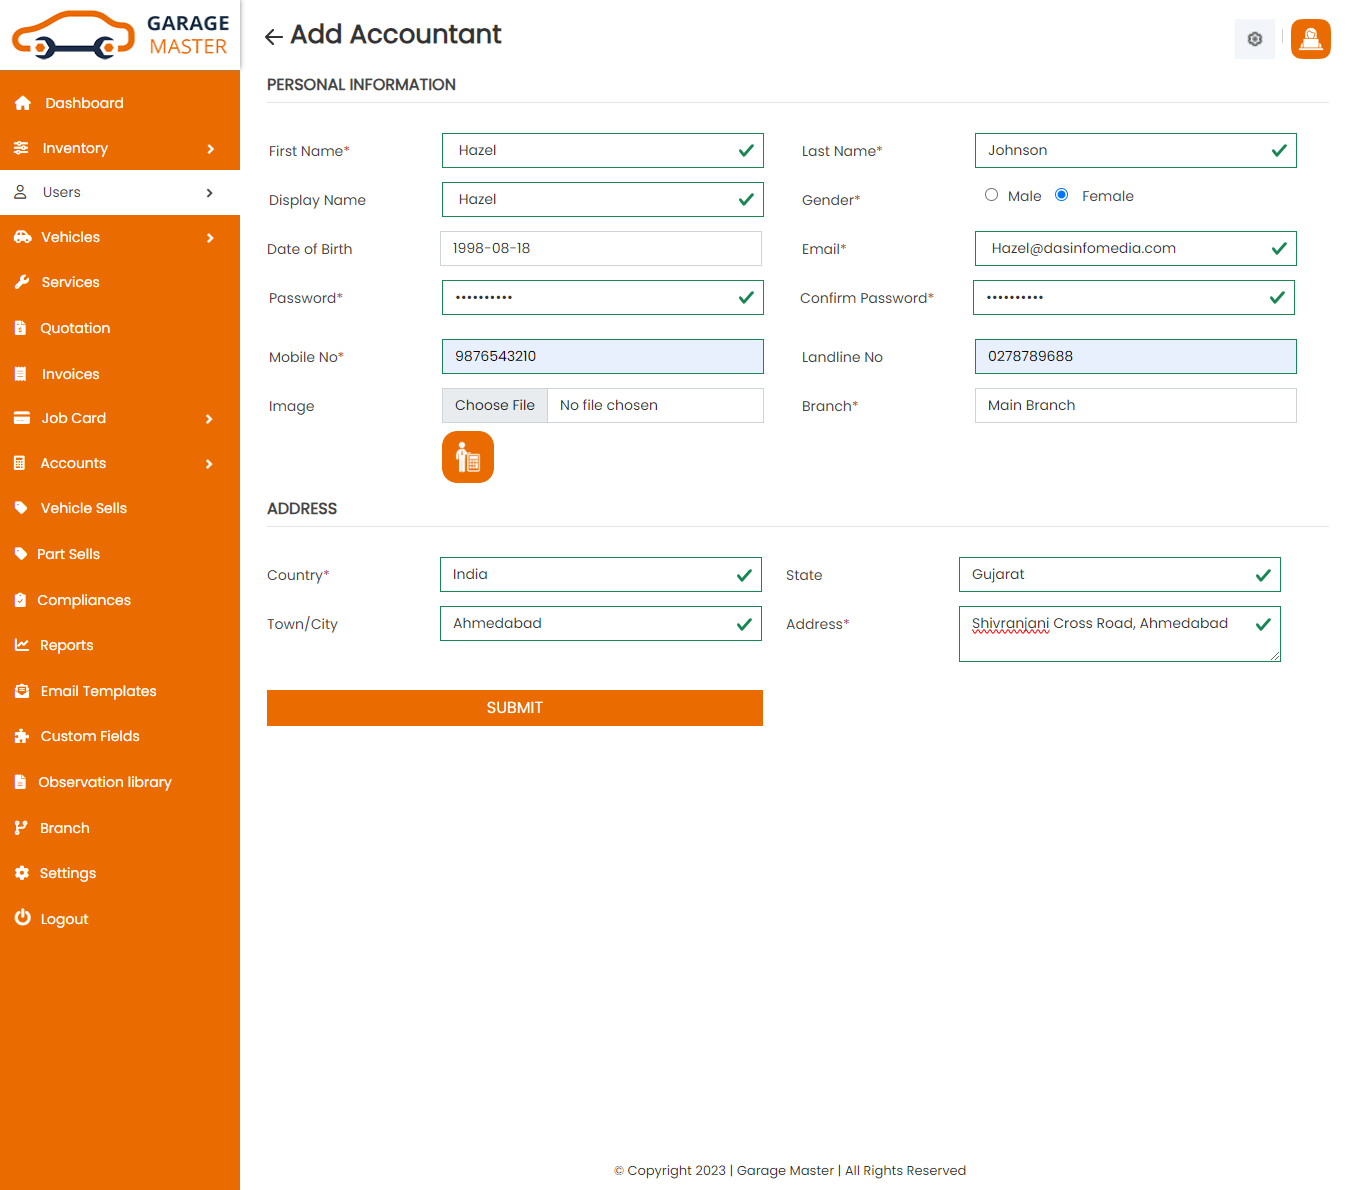
- First Name: Enter a new first name for this accountant.
- Last Name: Enter a new last name for this accountant.
- Display Name: Enter a new display name for this accountant.
- Gender: Select gender for this accountant.
- Date of Birth: Enter a new date of birth for this accountant.
- Email: Enter a new email for this accountant.
- Password: Enter a new password for this accountant.
- Confirm Password: Enter a new confirm password for this accountant.
- Mobile No: Enter a new mobile number for this accountant.
- Landline No: Enter a new landline number for this accountant.
- Image: Upload image for this accountant.
- Country: Select country for this accountant.
- State: Select state for this accountant.
- City: Select city for this accountant.
- Address: Enter a new address for this accountant.
Personal Information
Address
Edit Accountant: Admin can Edit detail of particular accountant by clicking on Edit detail button. This will open up details. From here admin can Change accountant Details.
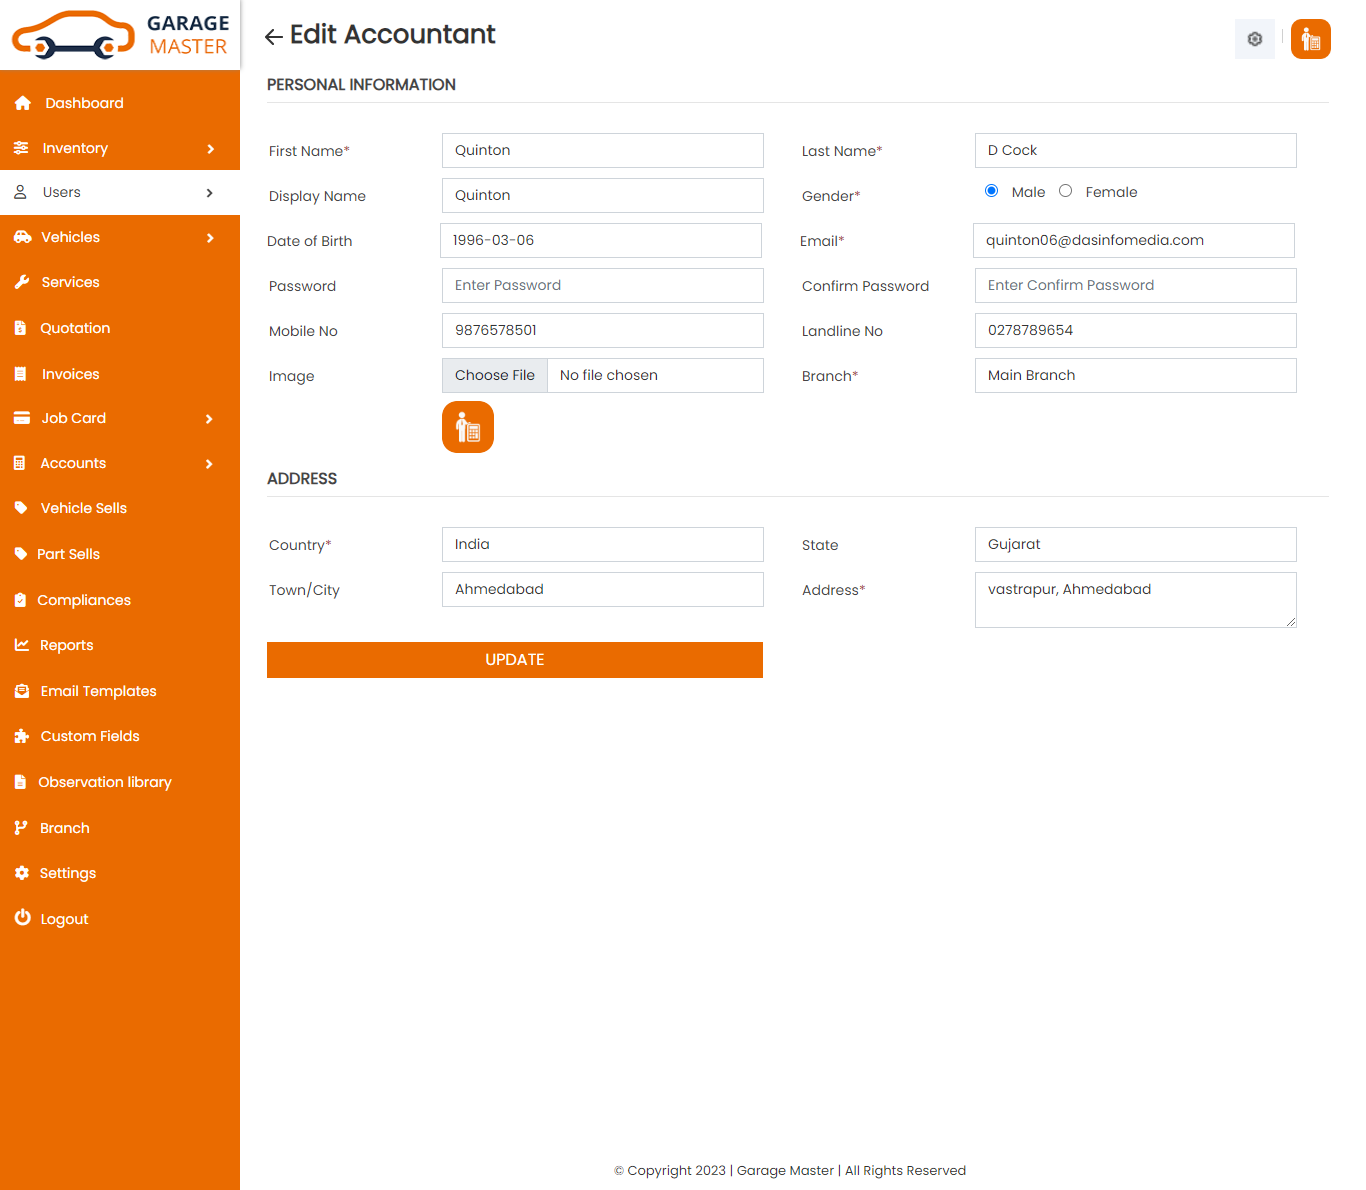
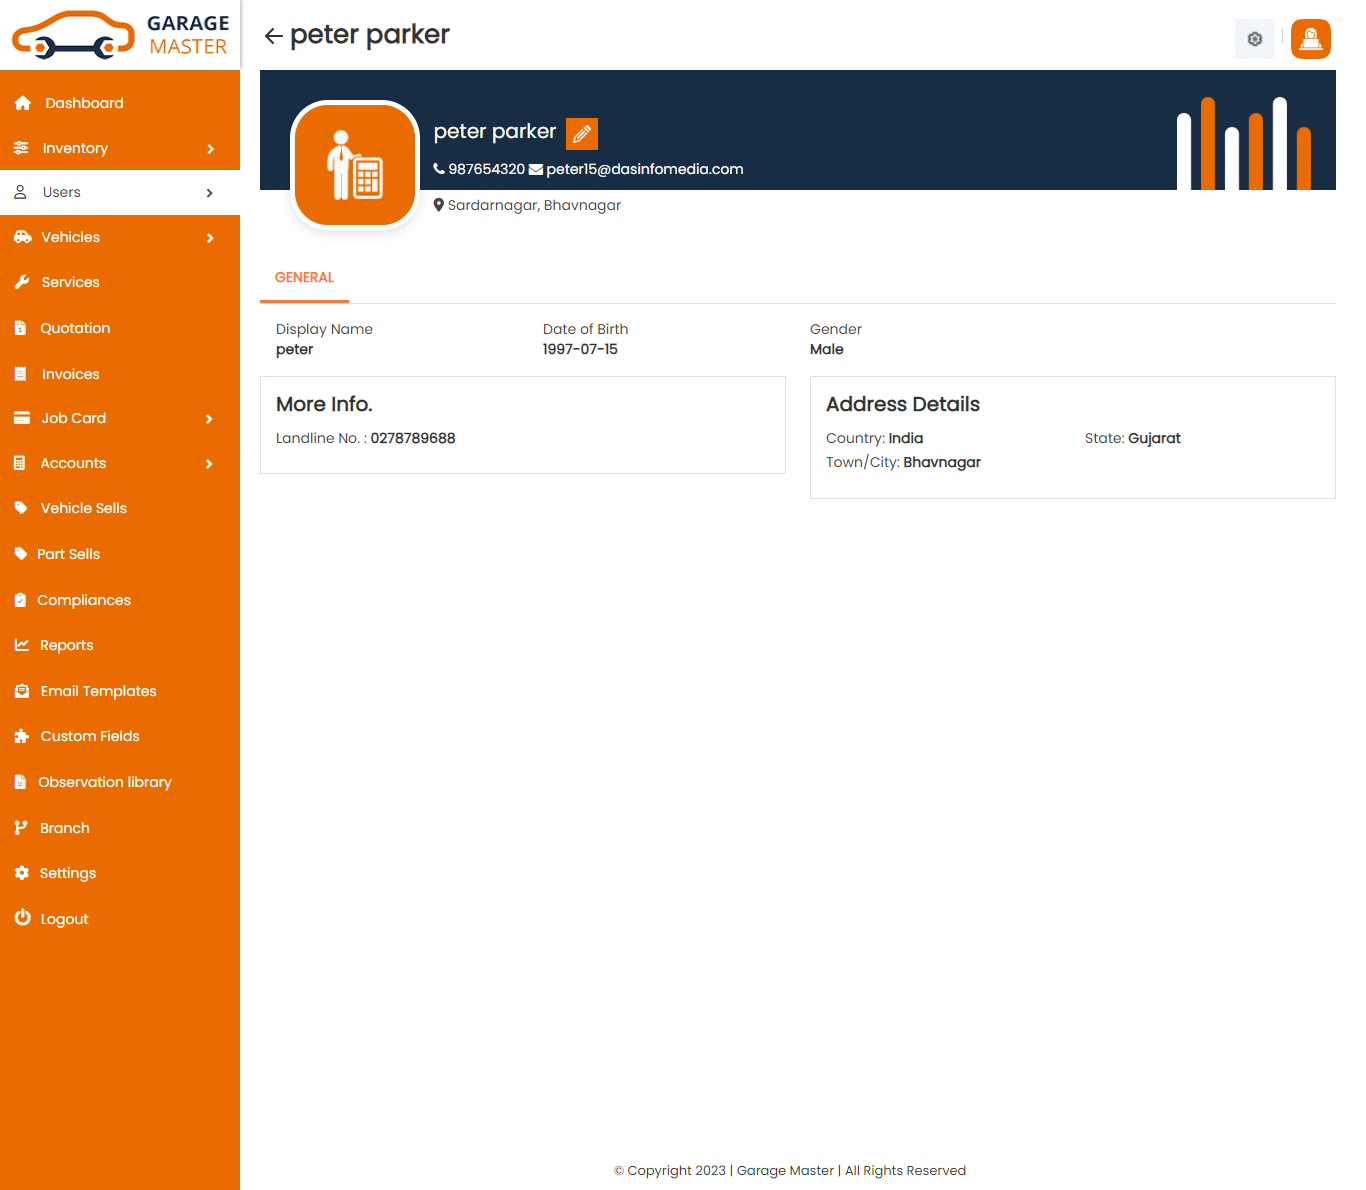
View Accountant: Admin can view a complete list of all accountant and view detail of particular accountant by clicking on view detail button. This will open up details.
Delete Accountant: Admin can delete a complete list of all accountant and delete detail of particular accountant by clicking on delete detail button. This will delete details.
E) Branch Admin
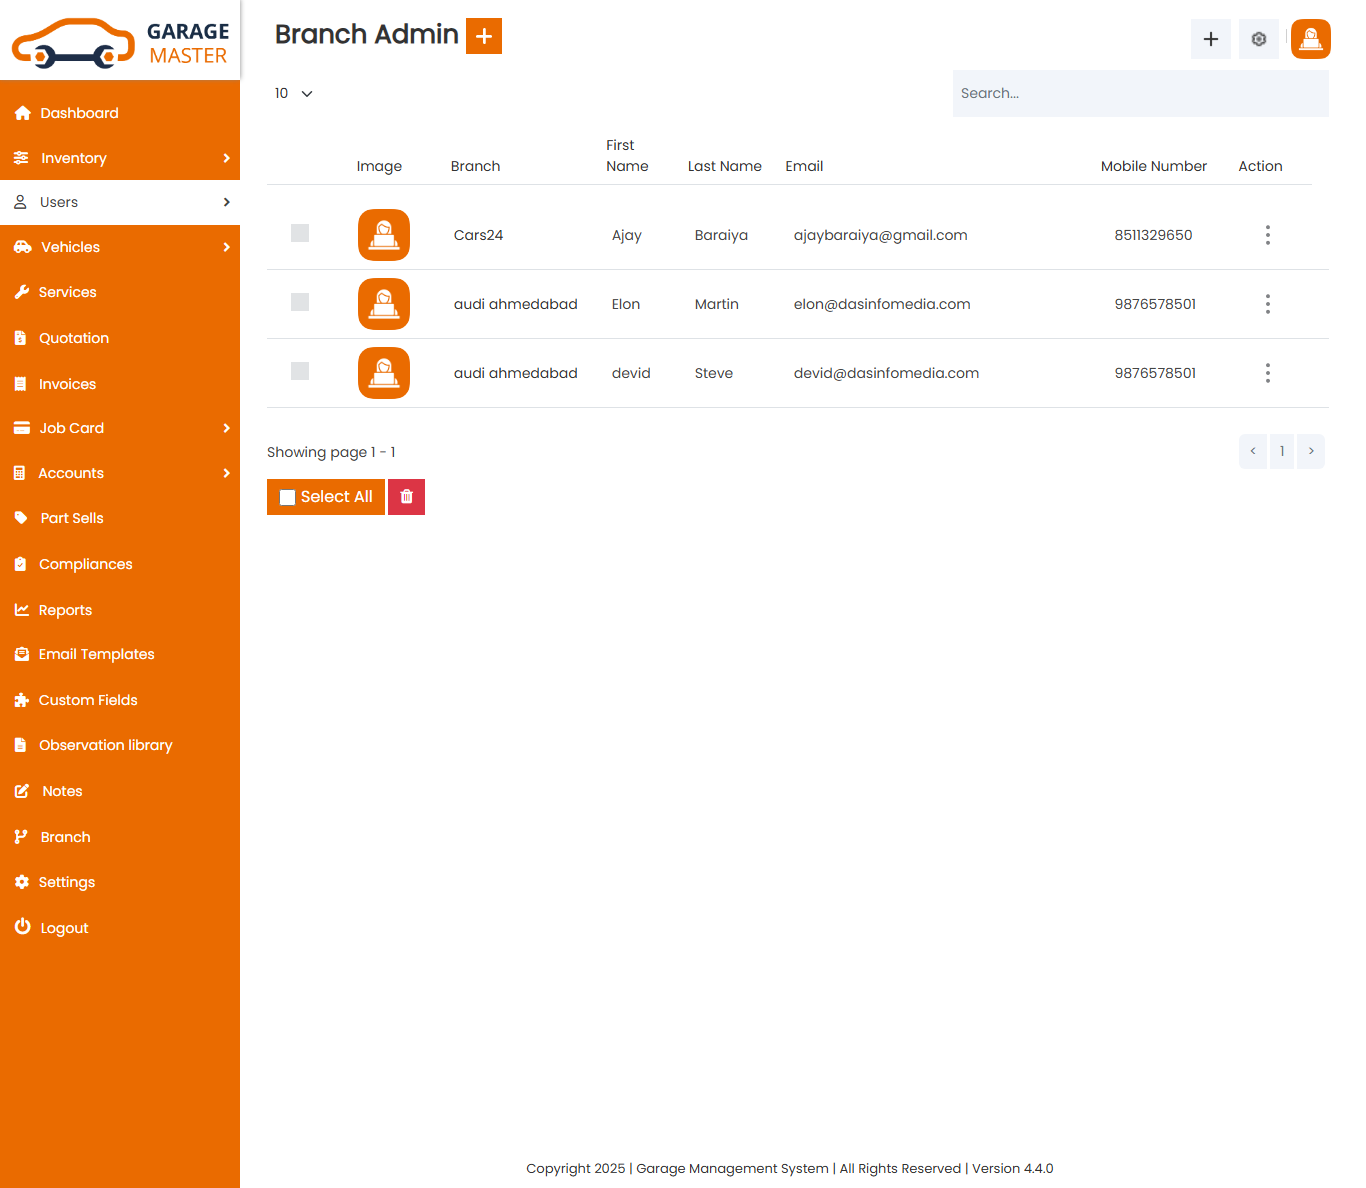
Branch Admin List: Admin can add branch admins, manage all branch admins and view a complete list of all branch admins.
Add Branch Admin: Admin can add branch admin details.
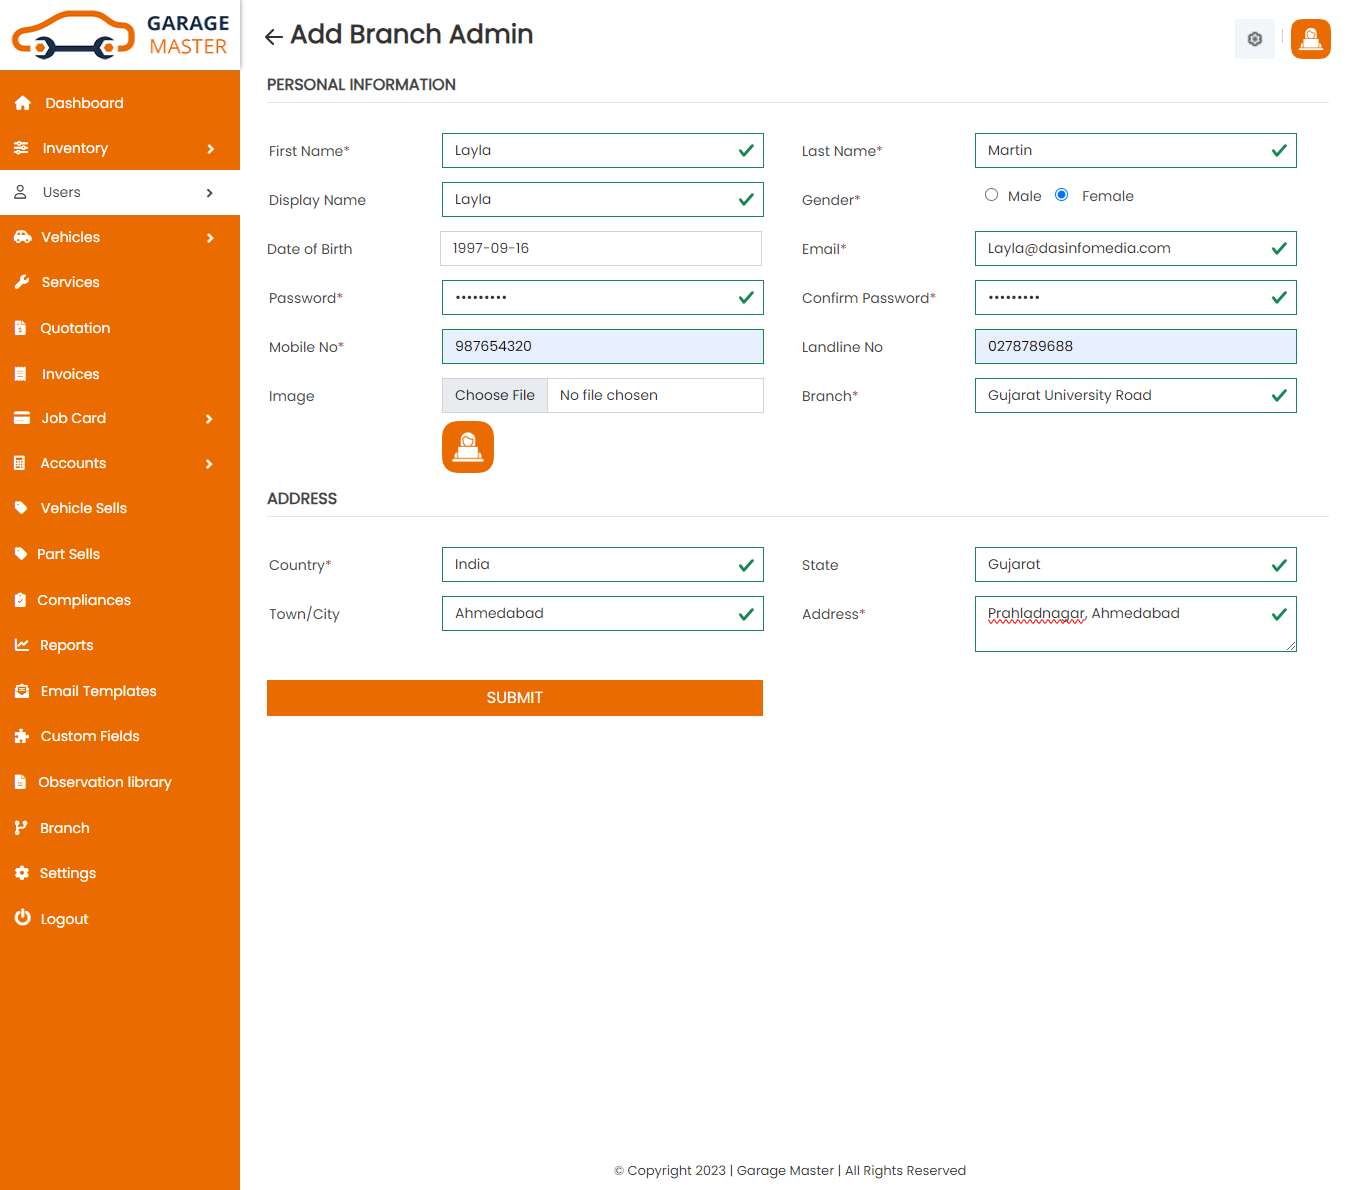
- First Name: Enter a new first name for this branch admin.
- Last Name: Enter a new last name for this branch admin.
- Display Name: Enter a new display name for this branch admin.
- Gender: Select gender for this branch admin.
- Date of Birth: Enter a new date of birth for this branch admin.
- Email: Enter a new email for this branch admin.
- Password: Enter a new password for this branch admin.
- Confirm Password: Enter a new confirm password for this branch admin.
- Mobile No: Enter a new mobile number for this branch admin.
- Landline No: Enter a new landline number for this branch admin.
- Image: Upload image for this branch admin.
- Branch: Admin can assign any branch to this branch admin.
- Country: Select country for this branch admin.
- State: Select state for this branch admin.
- City: Select city for this branch admin.
- Address: Enter a new address for this branch admin.
Personal Information
Address
Edit Branch Admin: Admin can Edit detail of particular branch admin by clicking on Edit detail button. This will open up details. From here admin can Change branch admin Details.
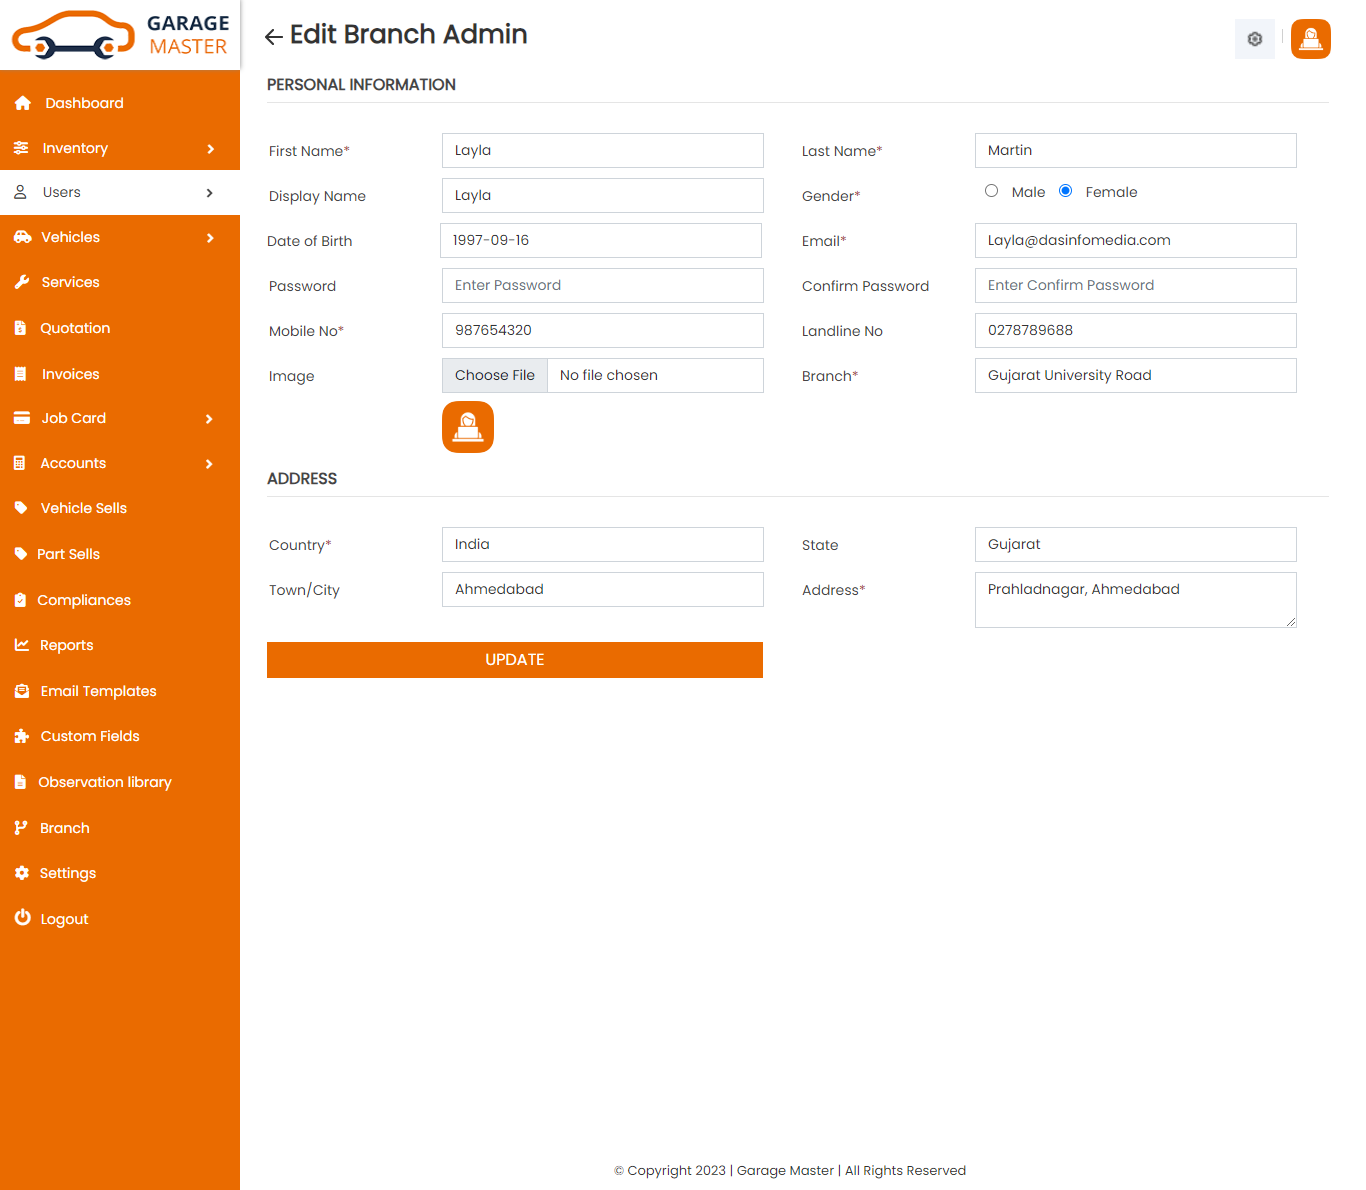
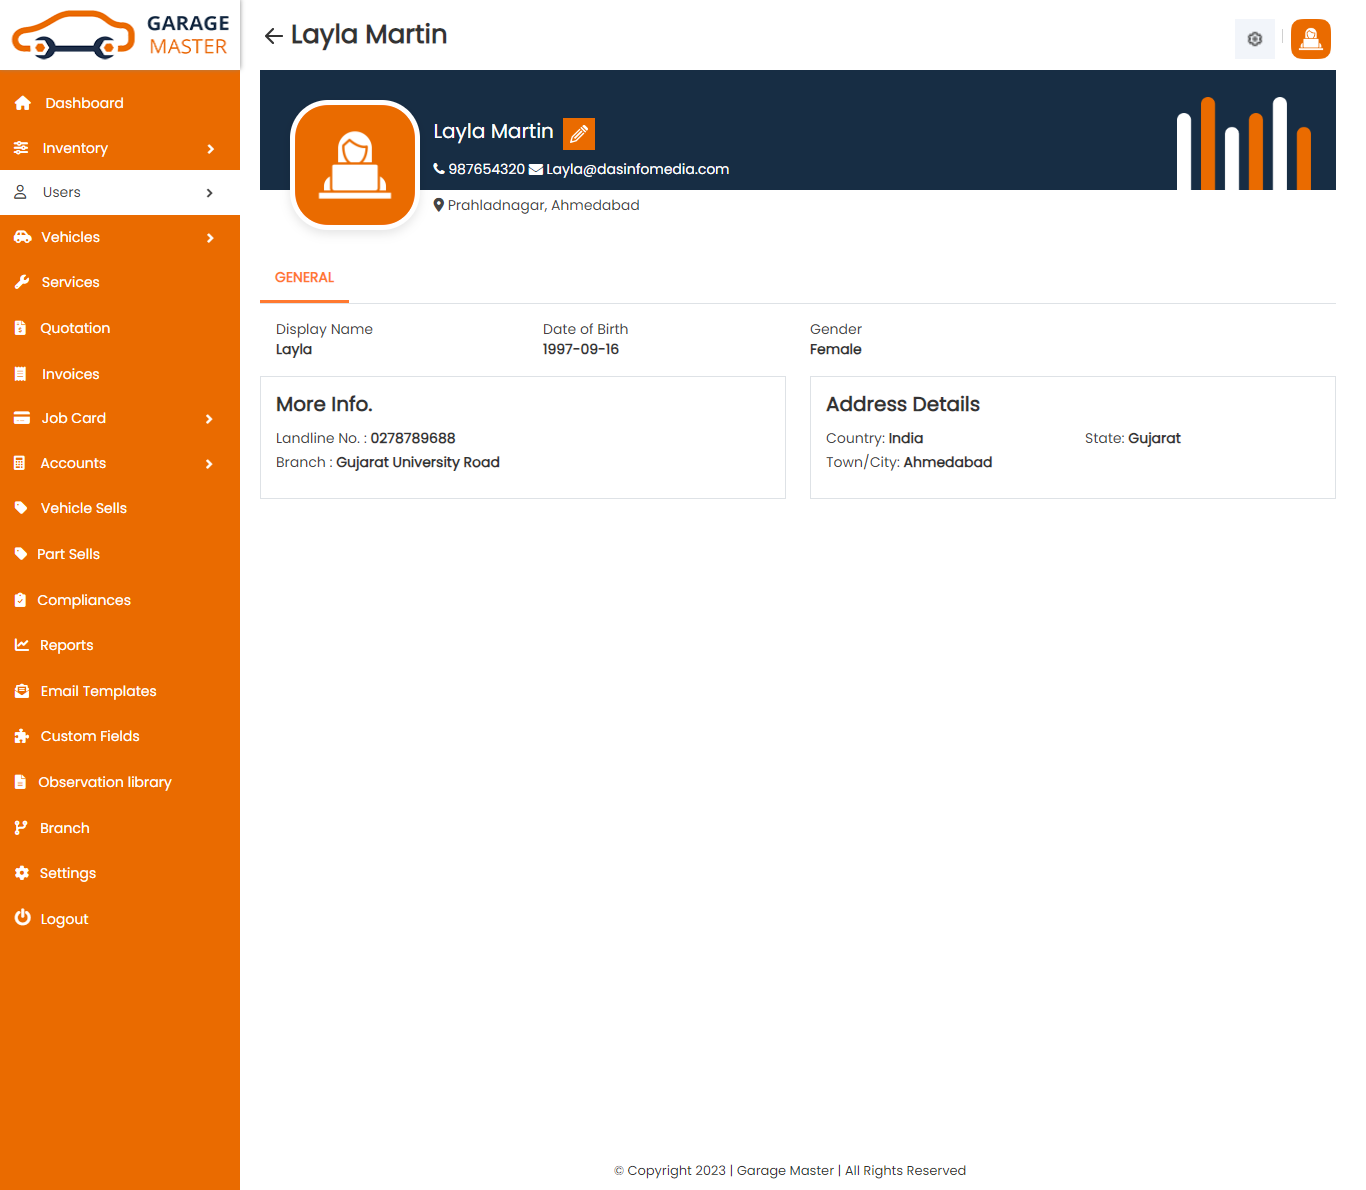
View Branch Admin: Admin can view a complete list of all branch admin and view detail of particular branch admin by clicking on view detail button. This will open up details.
Delete Branch Admin: Admin can delete a complete list of all branch admin and delete detail of particular branch admin by clicking on delete detail button. This will delete details.
5)Vehicle
A)Vehicle
Vehicle List: Admin can add new Vehicle and manage all Vehicle of Vehicle as well as view a complete list of all Vehicle.
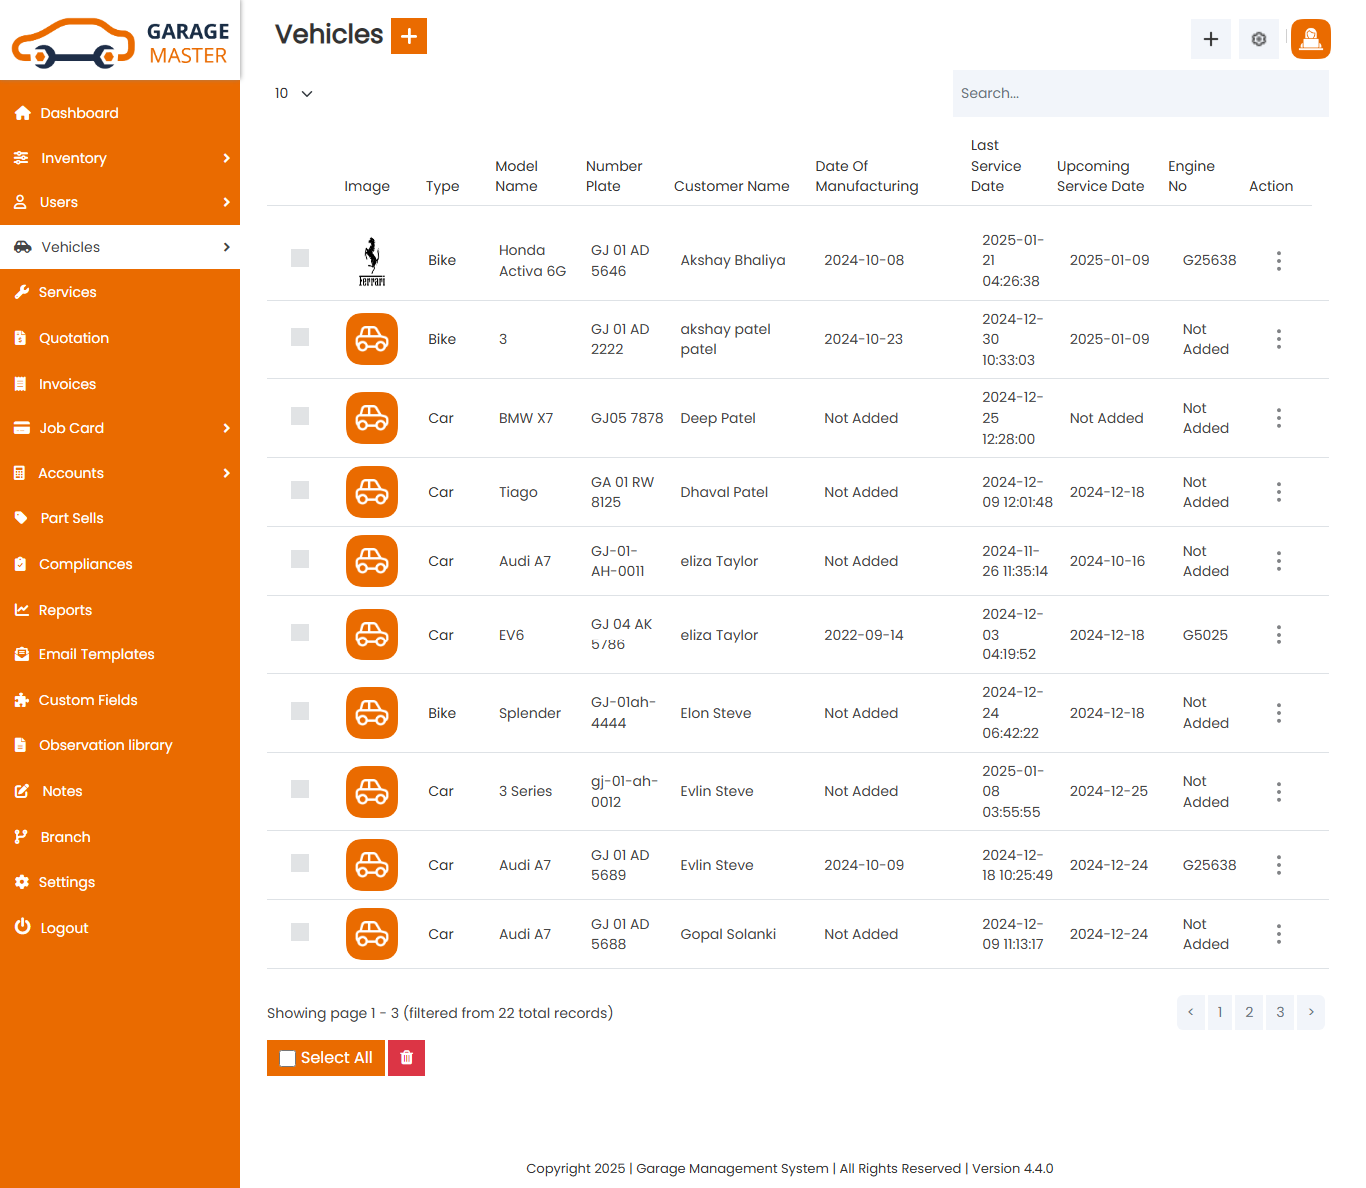
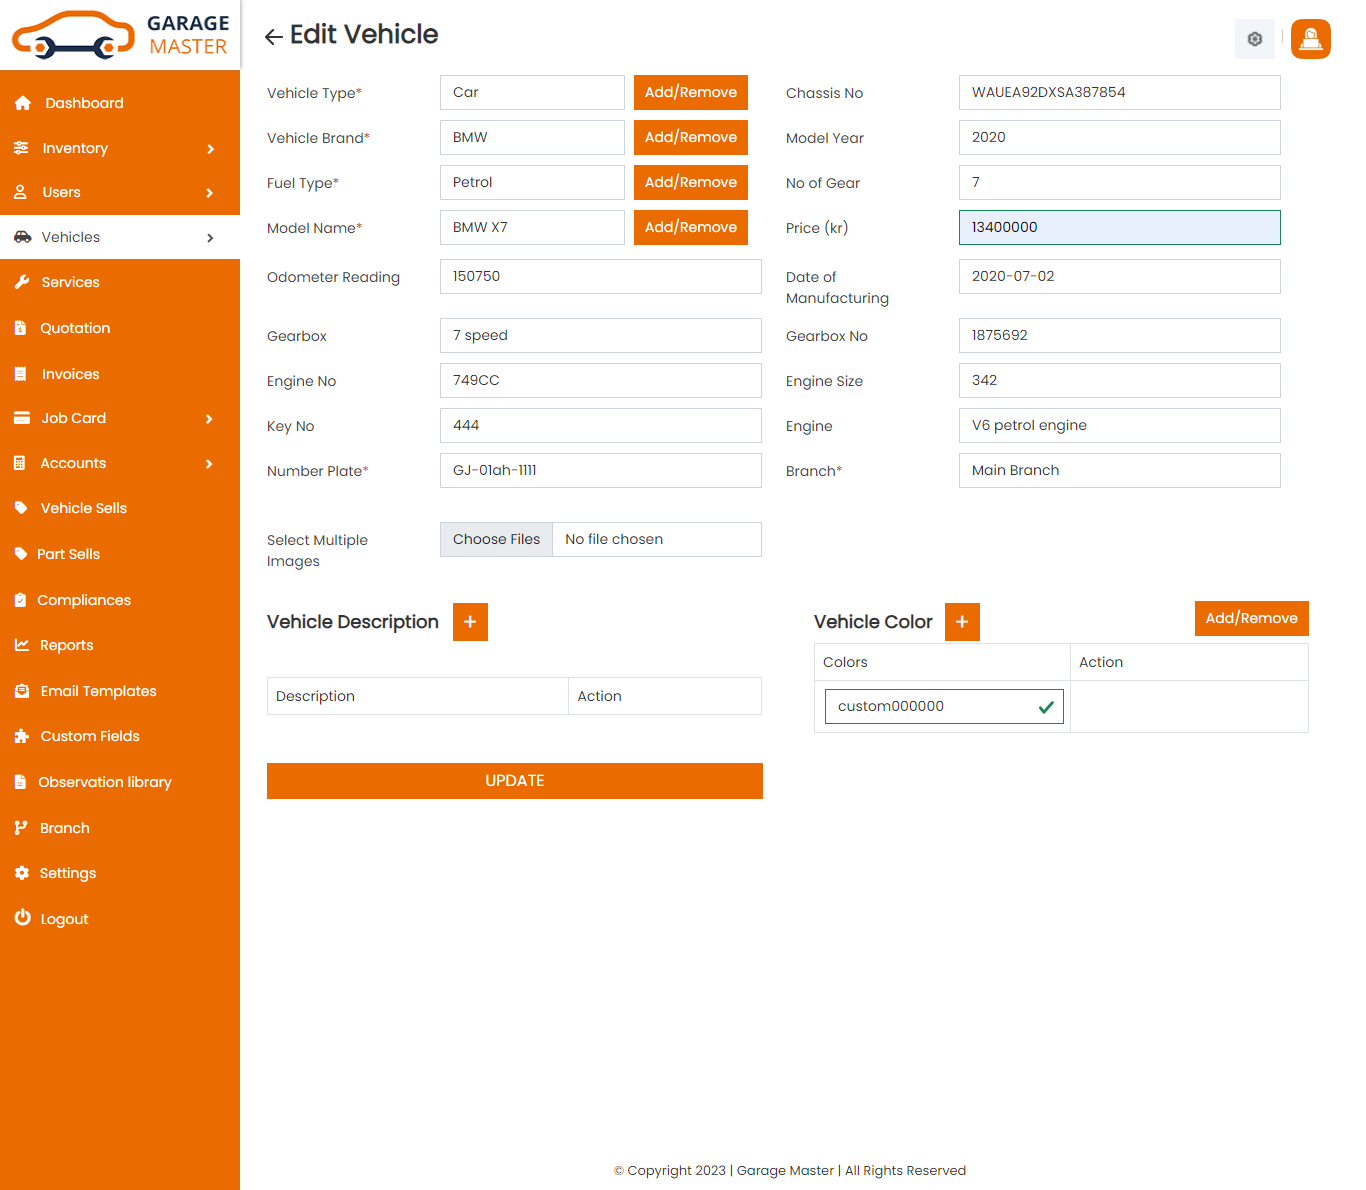
Add Vehicle: Admin can add Vehicle details
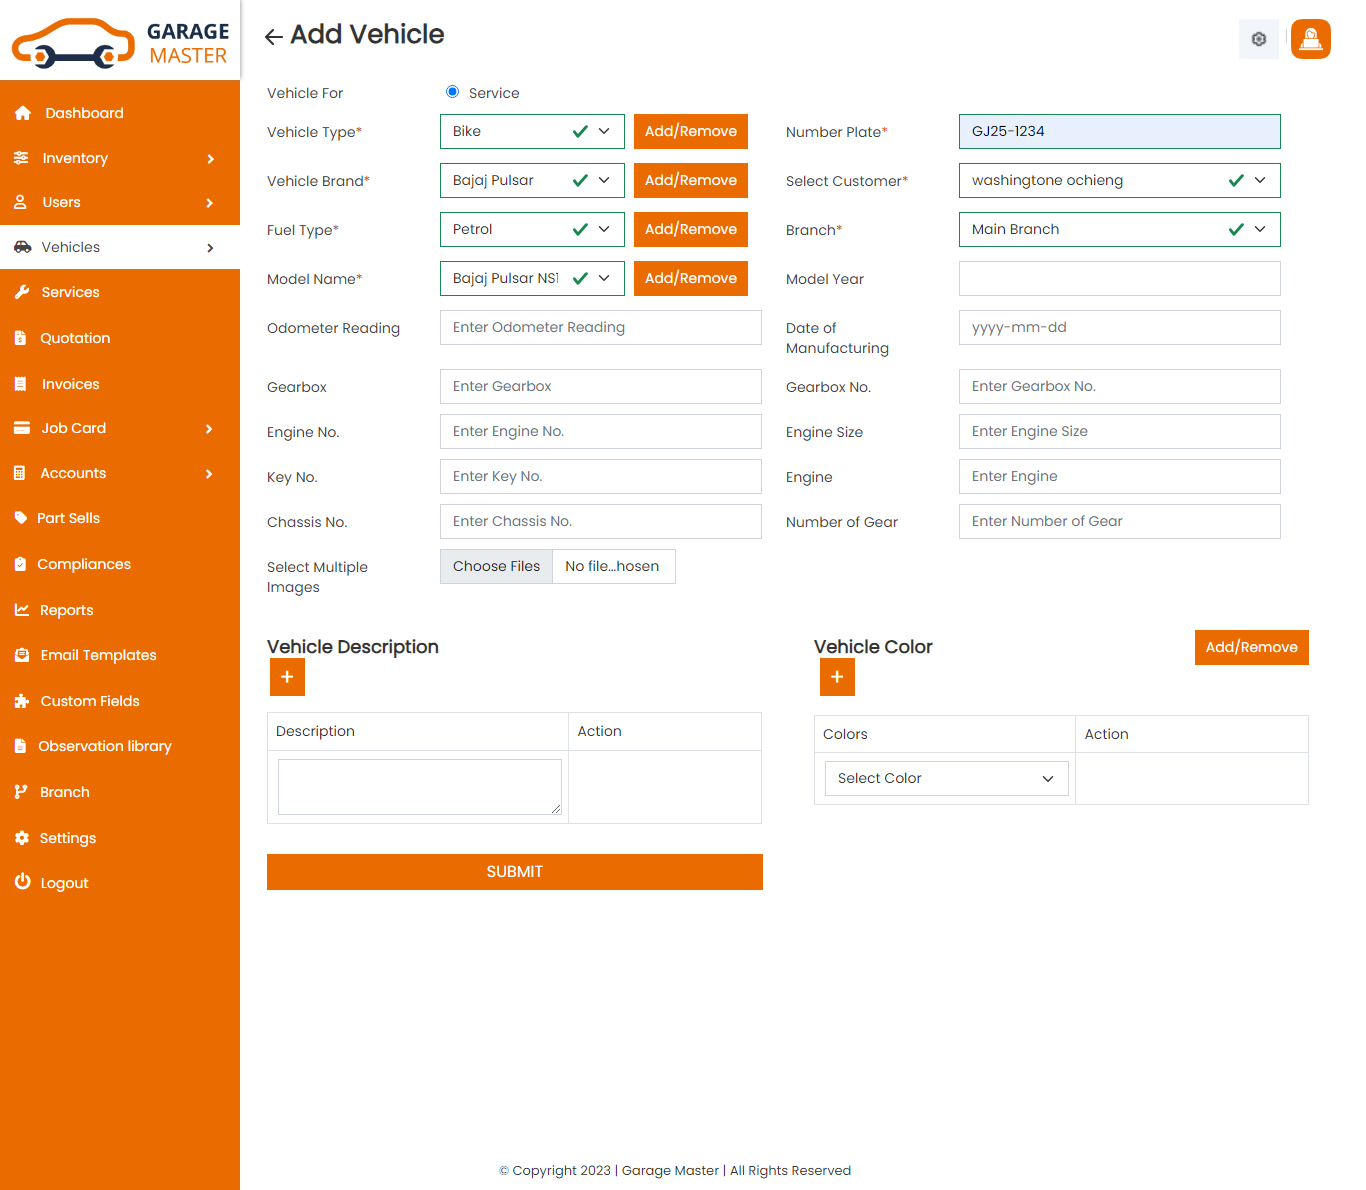
- Vehicle Type: Select vehicle type for this vehicle.
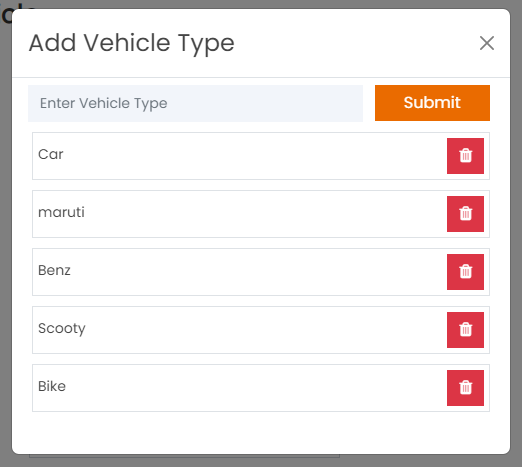
- Add Or Remove: If desired vehicle type is not available in a list then click on Add Or Remove button. You can add new vehicle type from here.
- Chasis No: Enter a new chasis number for this vehicle.
- Vehicle Brand: Select vehicle brand for this vehicle.
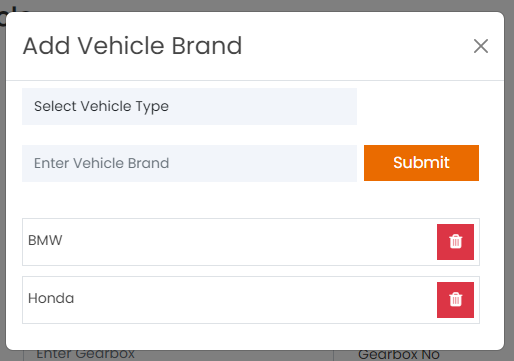
- Add Or Remove: If desired vehicle brand is not available in a list then click on Add Or Remove button. You can add new vehicle brand from here.
- Model Year: Enter a new model year for this vehicle.
- Fuel Type: Select fuel type for this vehicle.
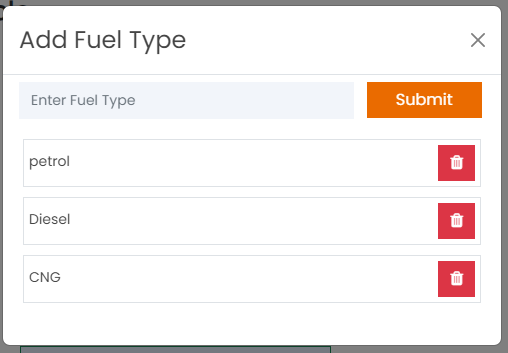
- Add Or Remove: If desired fuel type is not available in a list then click on Add Or Remove button. You can add new fuel type from here.
- No of Gear: Enter a new number of gear for this vehicle.
- Model Name: Select model name for this vehicle.
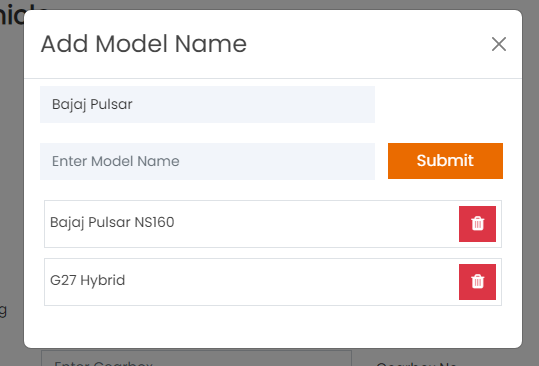
- Add Or Remove: If the desired model name is not available in a list then click on Add Or Remove button. You can add a new model name from here.
- Price: Enter a new price for this vehicle.
- Odometer Reading: Enter a new odometer reading for this vehicle.
- Date of Manufacturing: Enter a new date of manufacturing for this vehicle.
- Gearbox: Enter a new gearbox for this vehicle.
- Gearbox No: Enter a new gearbox for this vehicle.
- Engine No: Enter a new engine number for this vehicle.
- Engine Size: Enter a new engine size for this vehicle.
- Key No: Enter a new key number for this vehicle.
- Engine: Enter a new engine for this vehicle.
- Vehicle Image: Select multiple images for this vehicle.
- Add New: Add New color for this vehicle.
- Color: Select color for this vehicle.
- Add New: Add New Description for this vehicle.
- Description: Enter a new description of this vehicle.
Edit Vehicle: Admin can Edit detail of particular Vehicle by clicking on Edit detail button. This will open up details. From here admin can Change Vehicle Details.
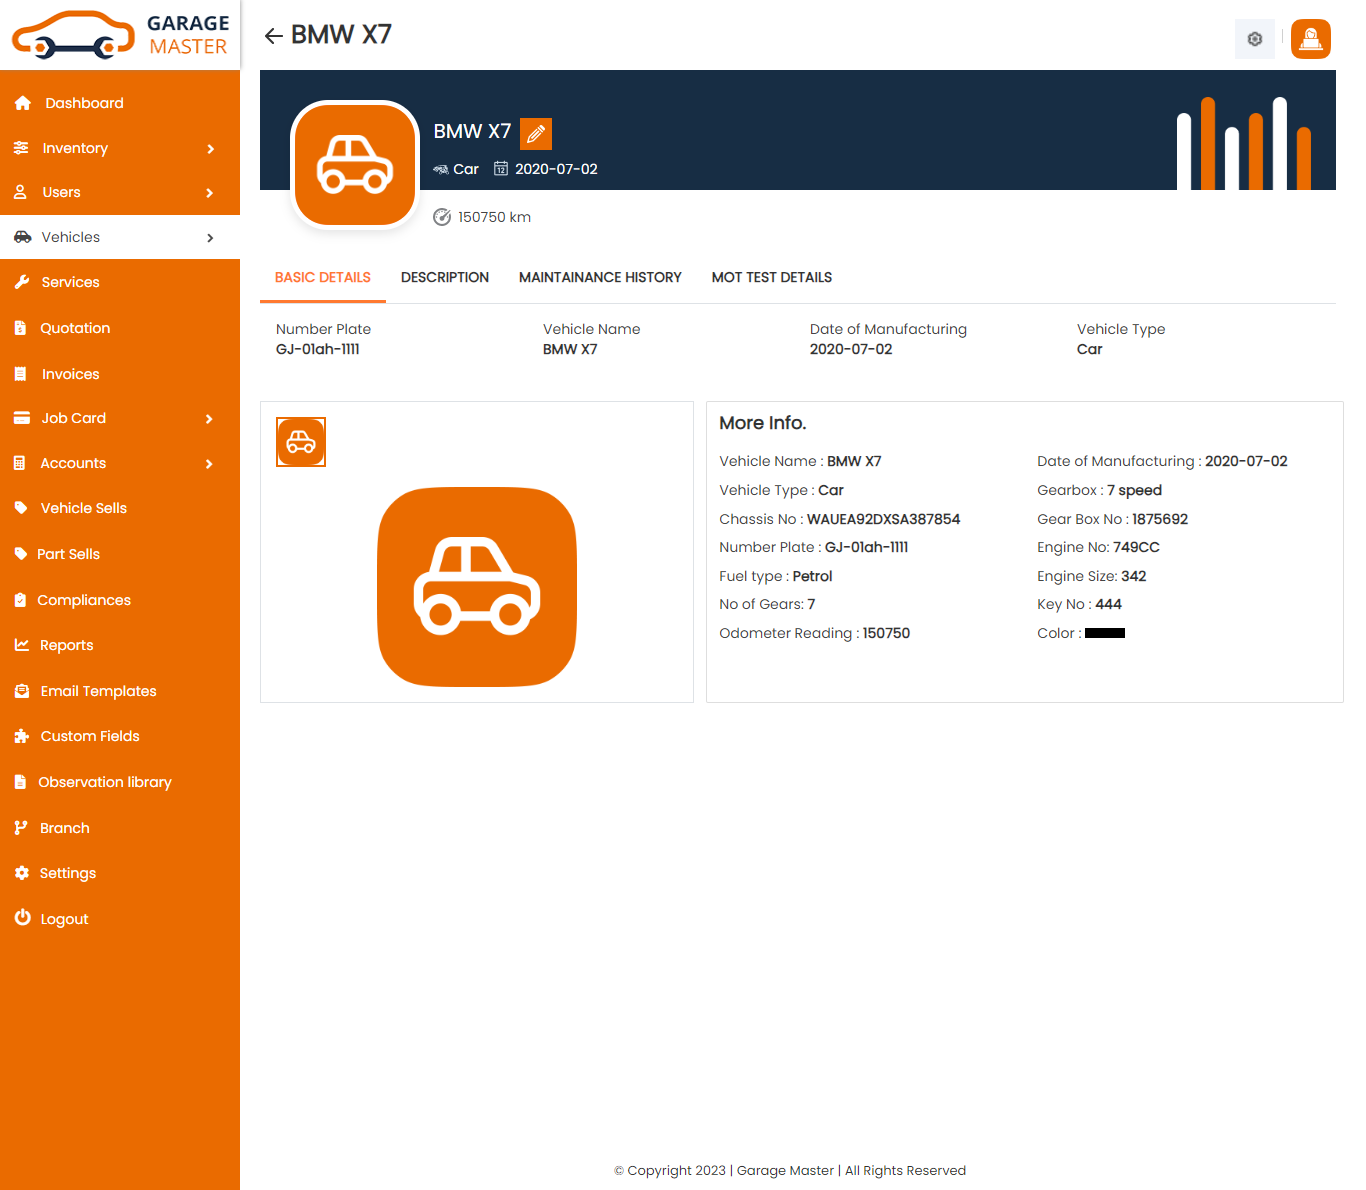
View Vehicle: Admin can view a complete list of all Vehicle and view detail of particular Vehicle by clicking on view detail button. This will open up details.
Delete Vehicle: Admin can delete a complete list of all Vehicle and delete detail of particular Vehicle by clicking on delete detail button. This will delete details.
B)Vehicle Type
Vehicle Type List: Admin can add new Vehicle Type and manage all Vehicle of Vehicle Type as well as view a complete list of all Vehicle Type.
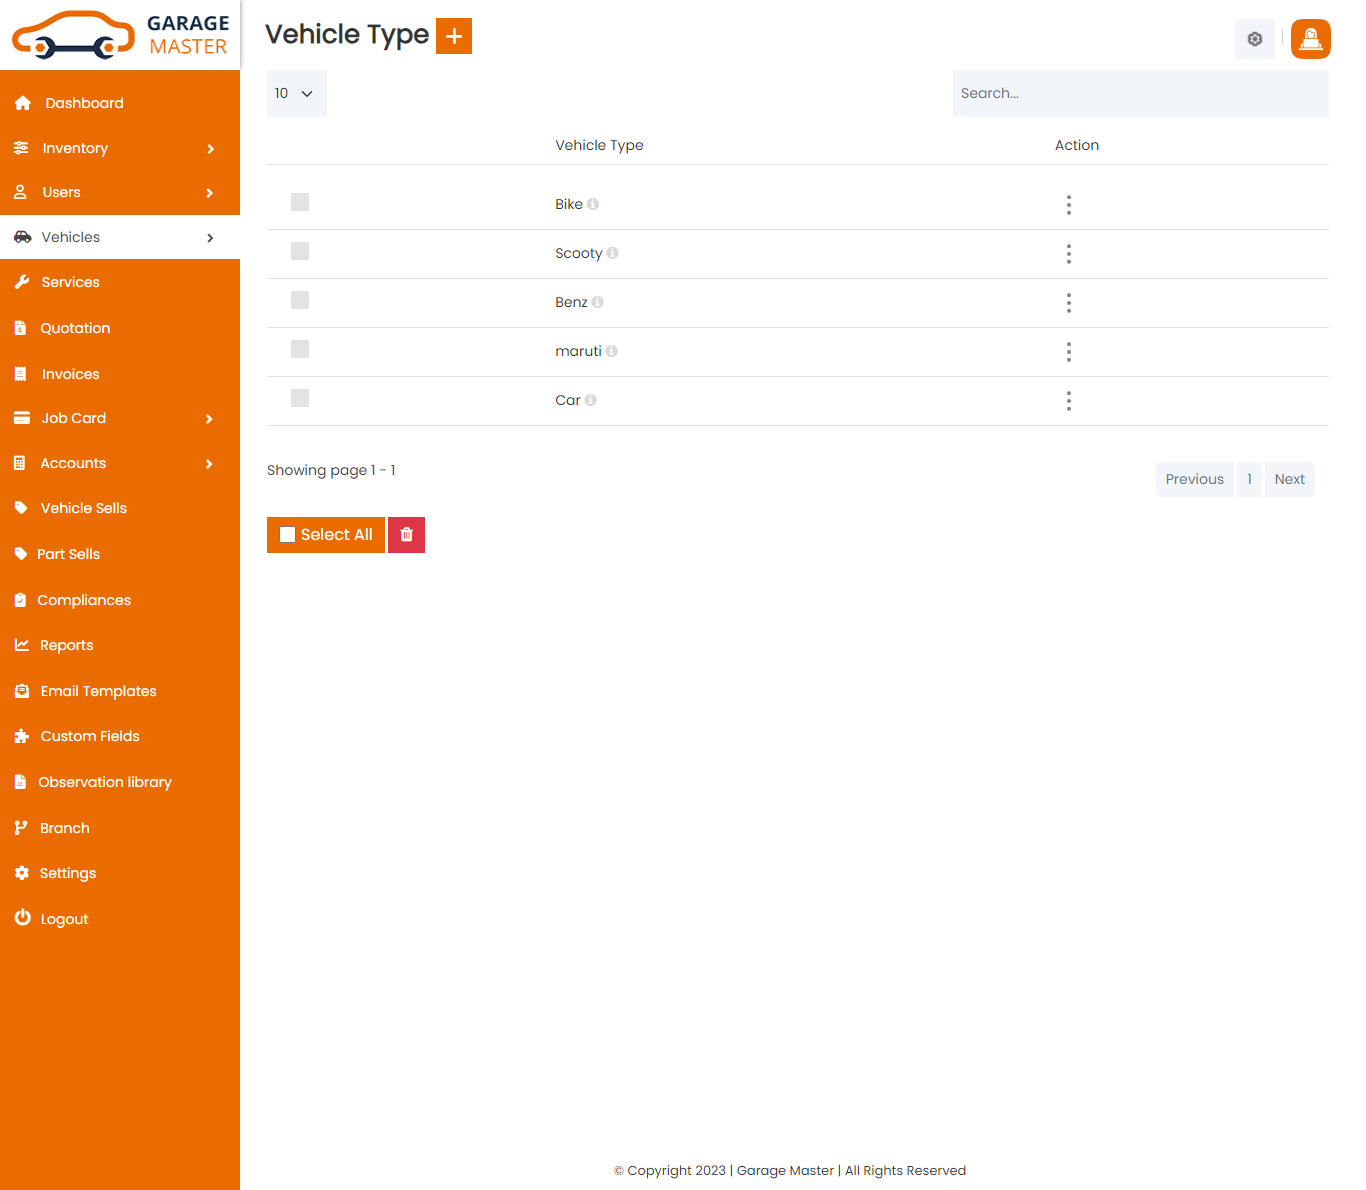
Add Vehicle Type: Admin can add Vehicle Type details
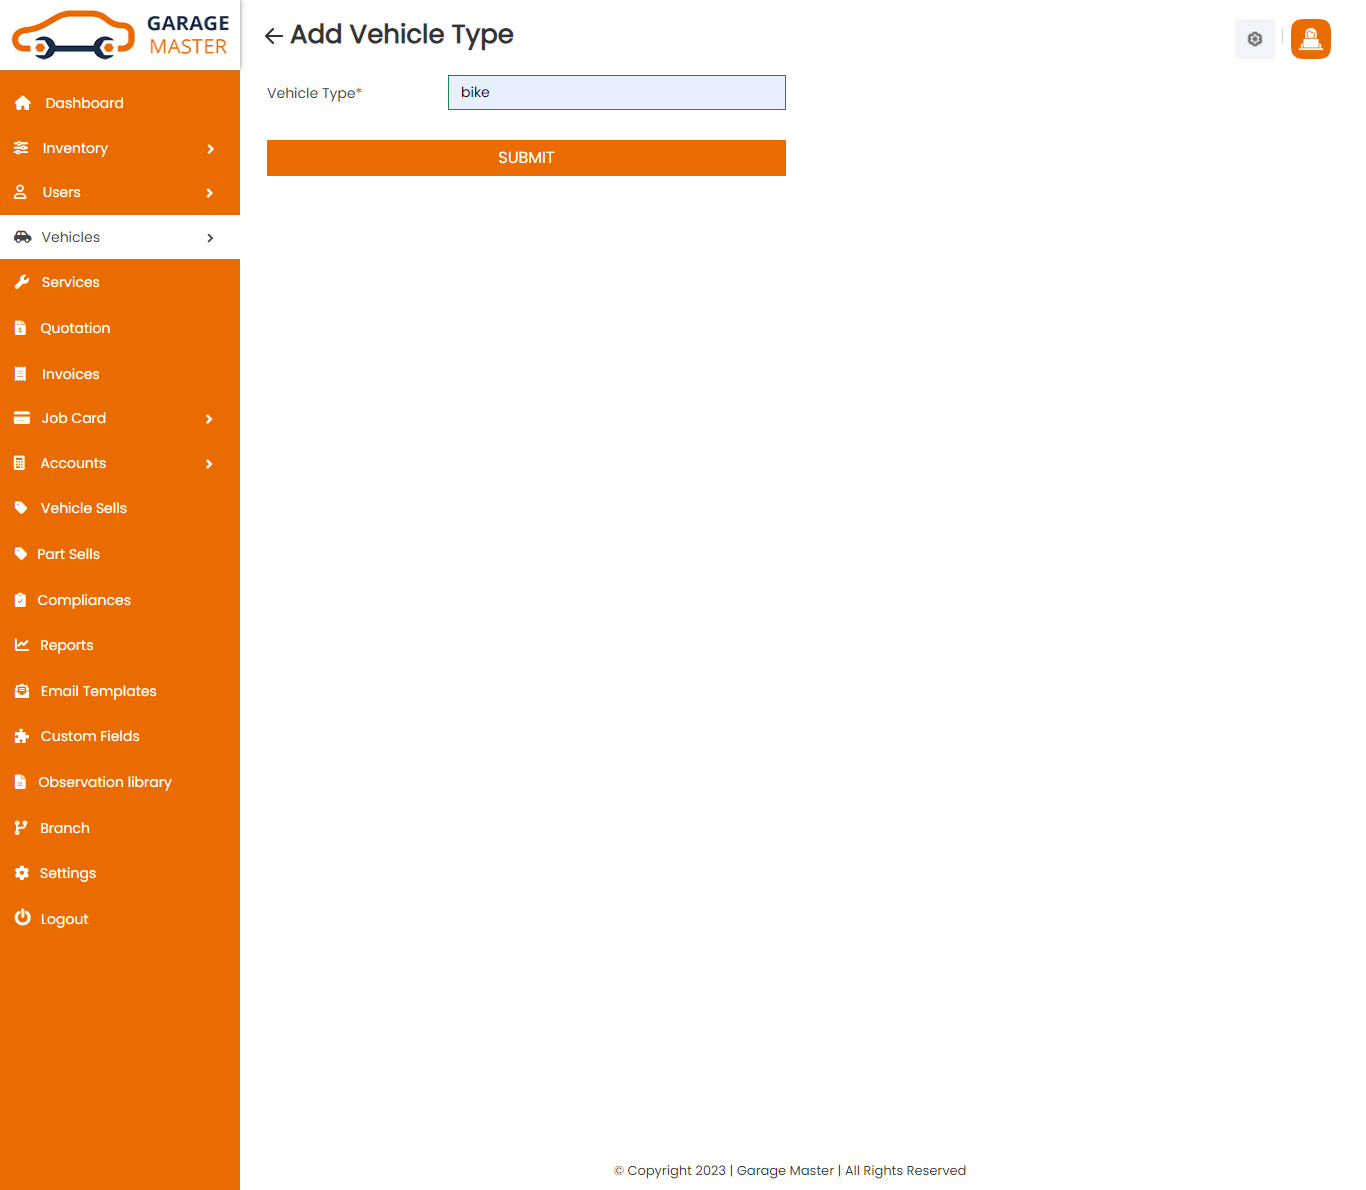
- Vehicle Type: Enter a new vehicle type for this vehicle type.
Edit Vehicle Type: Admin can Edit detail of particular Vehicle Type by clicking on Edit detail button. This will open up details. From here admin can Change Vehicle Type Details.
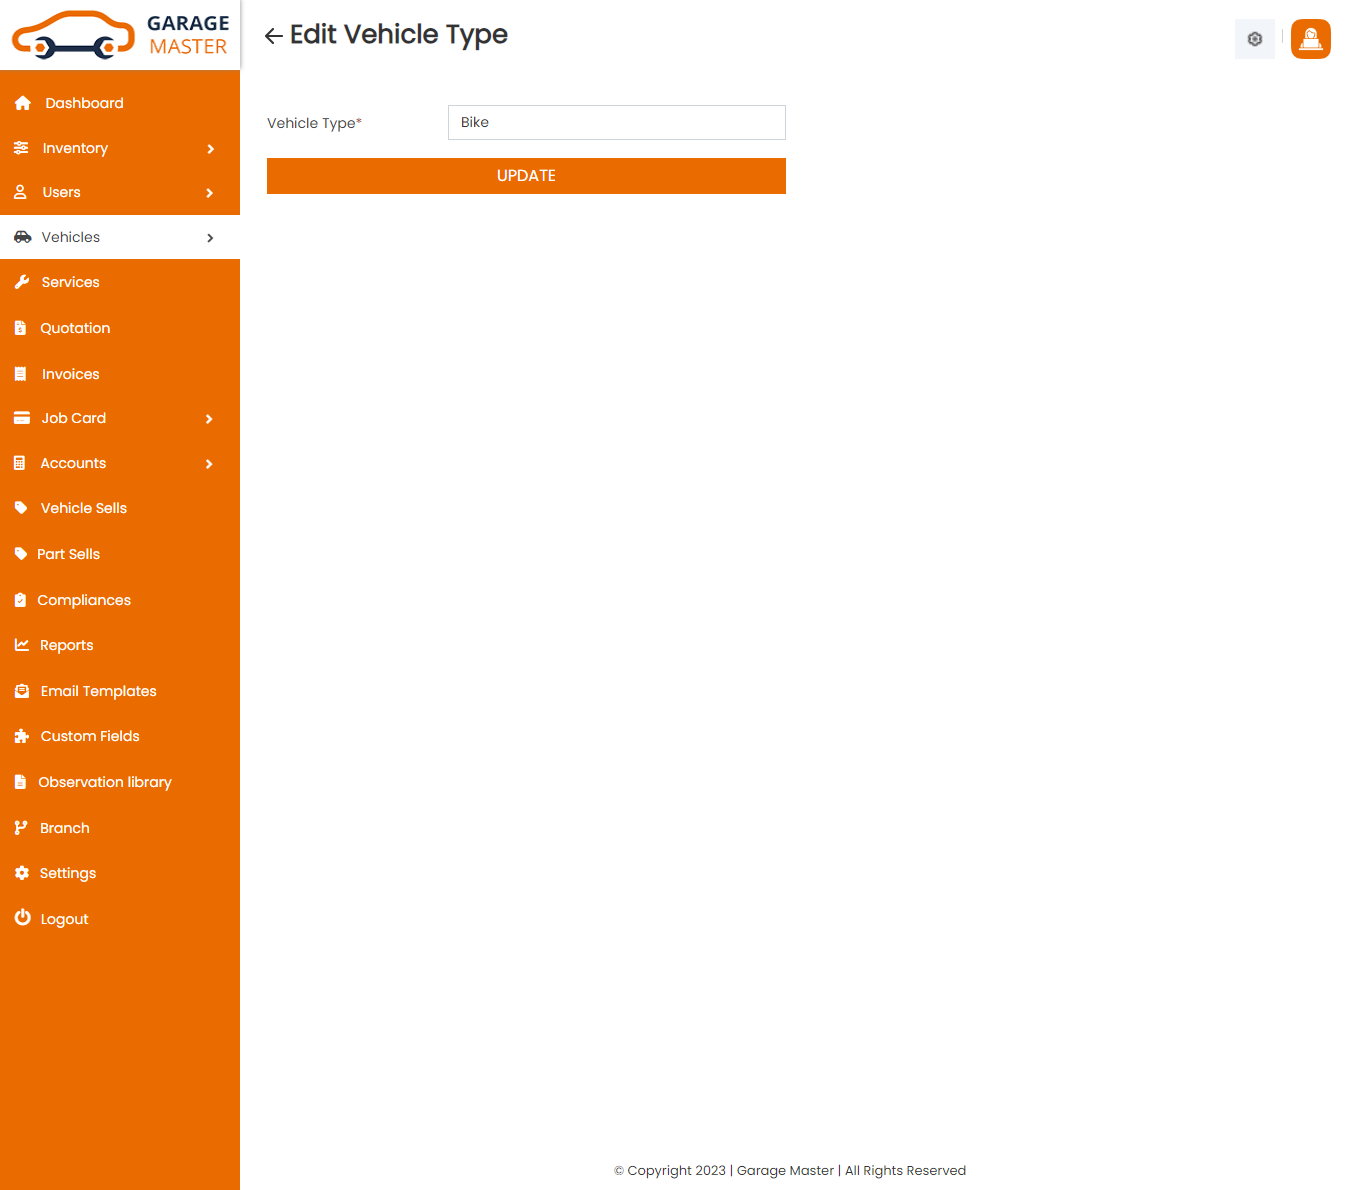
Delete Vehicle Type: Admin can delete a complete list of all Vehicle Type and delete detail of particular Vehicle Type by clicking on delete detail button. This will delete details.
C)Vehicle Brand
Vehicle Brand List: Admin can add new Vehicle Brand and manage all Vehicle of Vehicle Brand as well as view a complete list of all Vehicle brand.
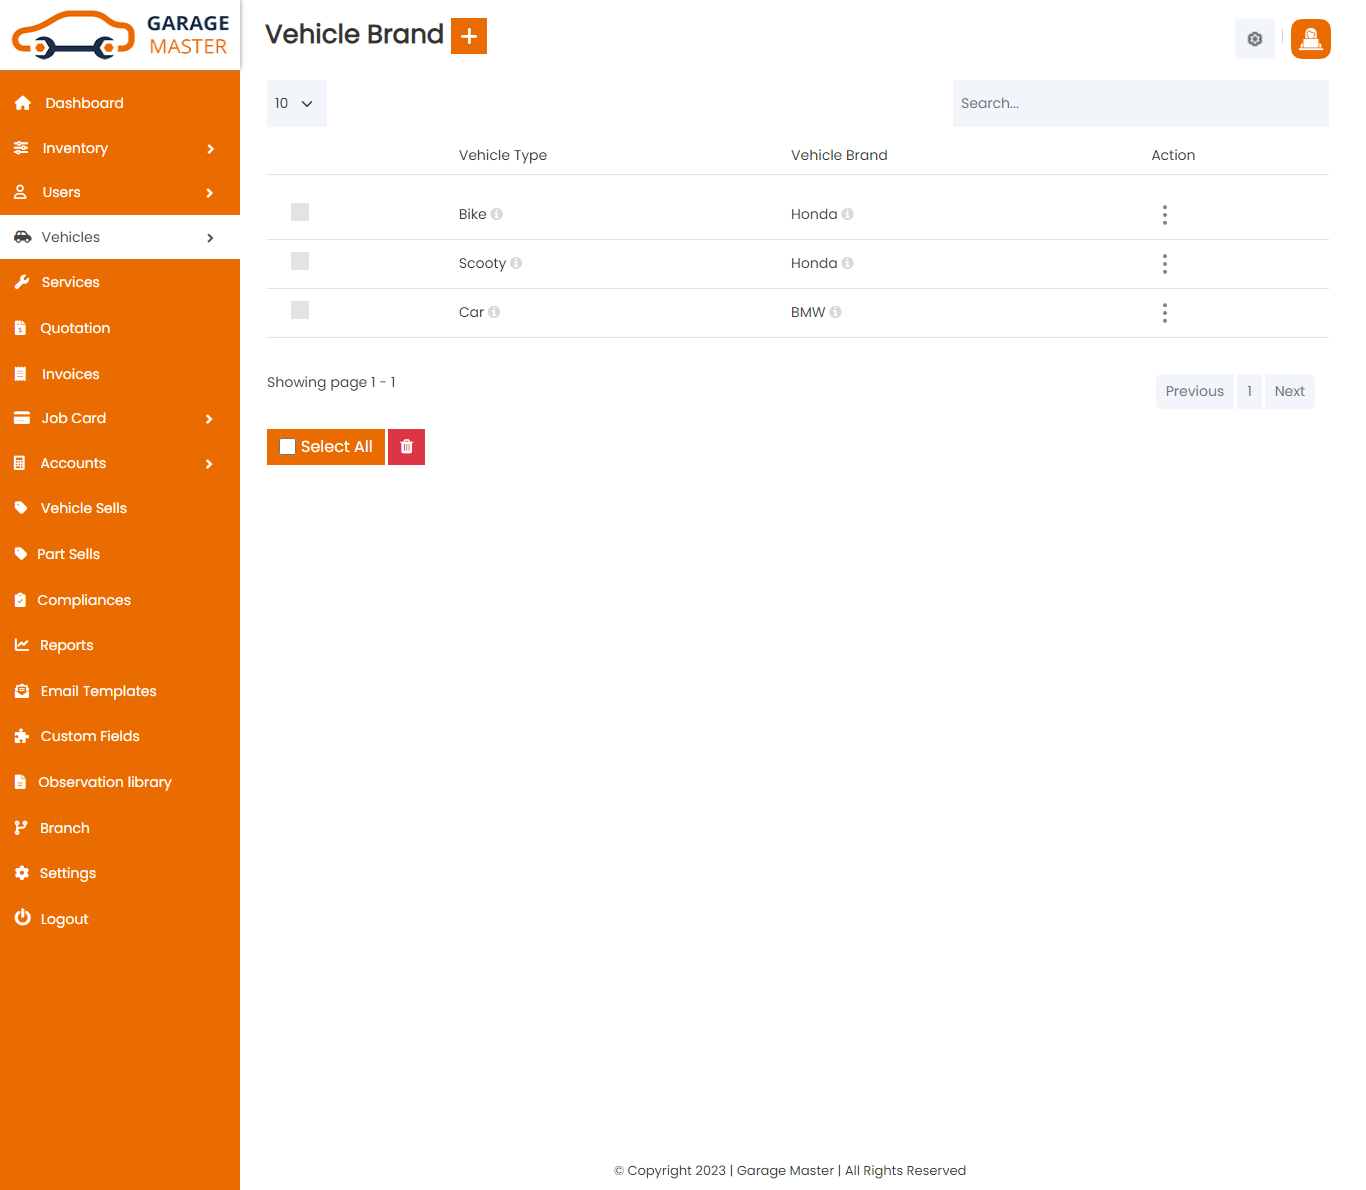
Add Vehicle Brand: Admin can add Vehicle Brand details
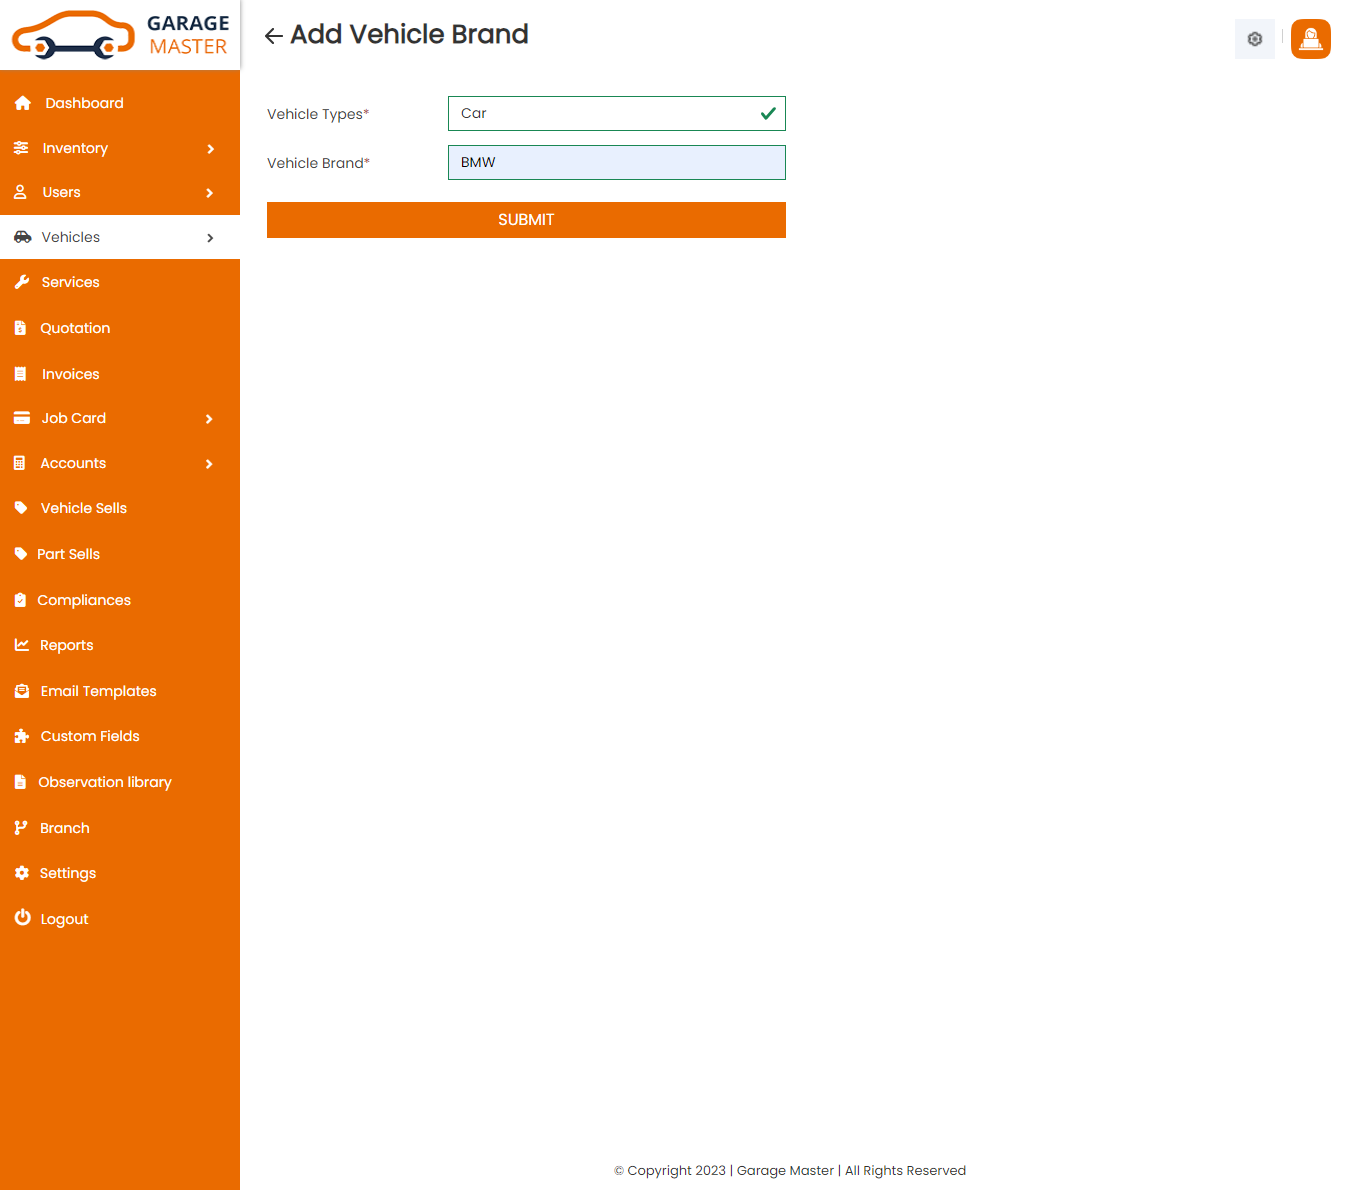
- Vehicle Type: Select vehicle type for this vehicle brand.
- Vehicle Brand: Enter a new vehicle brand for this vehicle brand.
Edit Vehicle Brand: Admin can Edit detail of particular Vehicle Brand by clicking on Edit detail button. This will open up details. From here admin can Change Vehicle Brand Details.
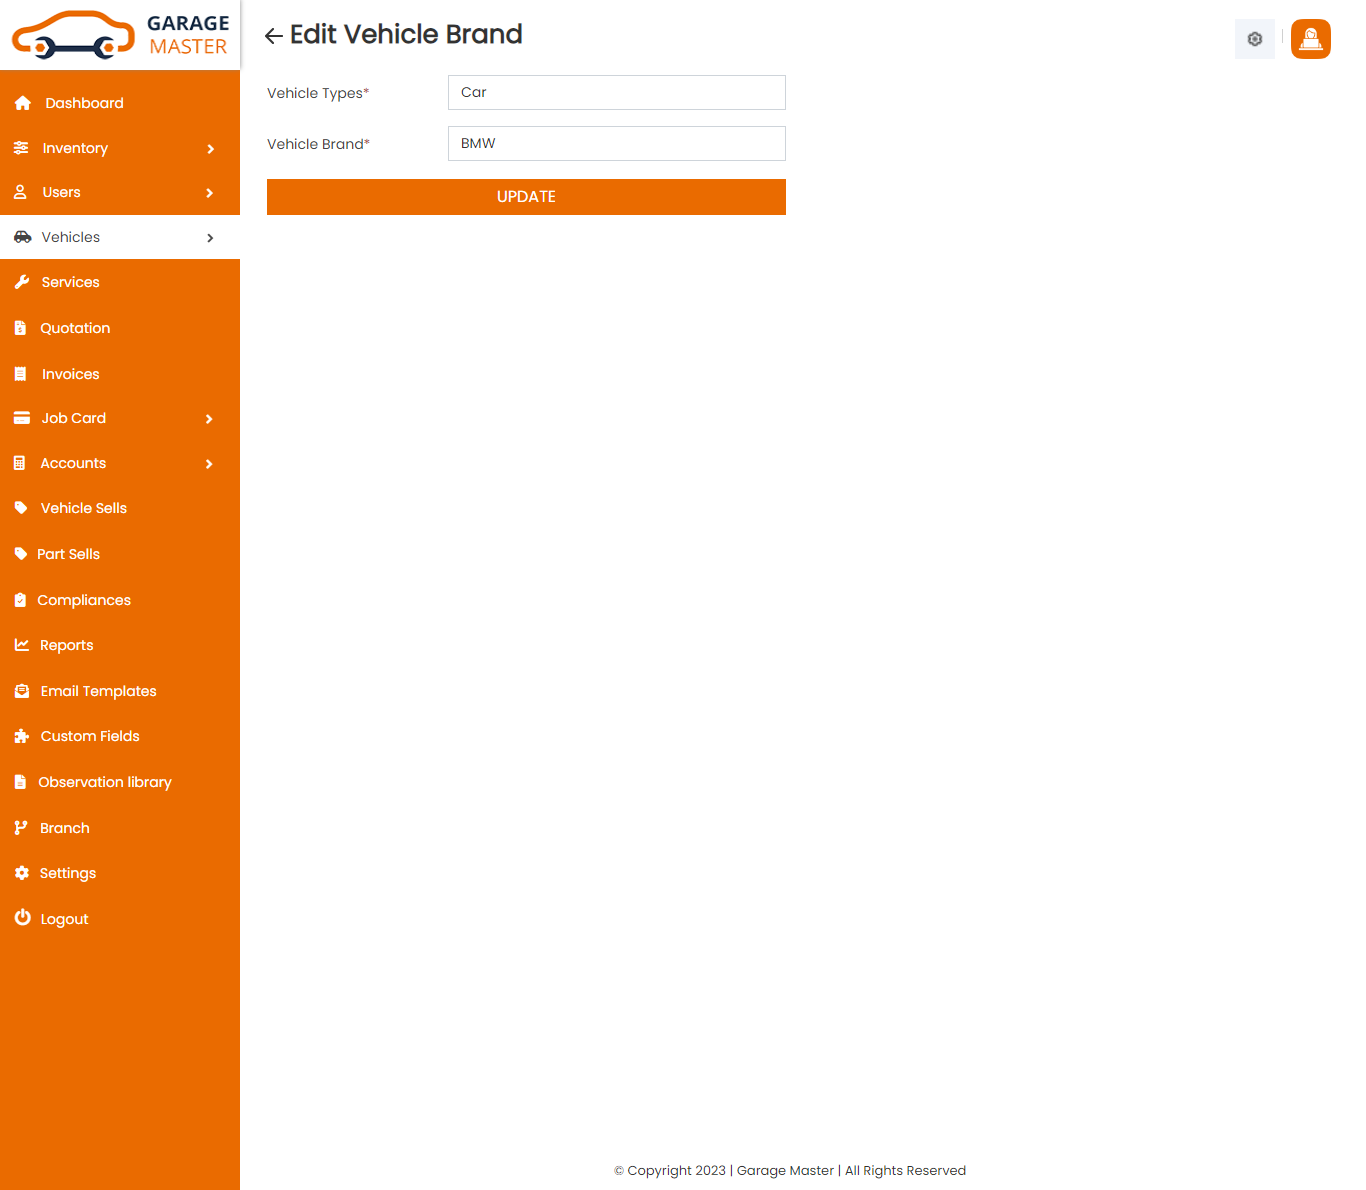
Delete Vehicle Brand: Admin can delete a complete list of all Vehicle Brand and delete detail of particular Vehicle Brand by clicking on delete detail button. This will delete details.
D)Color
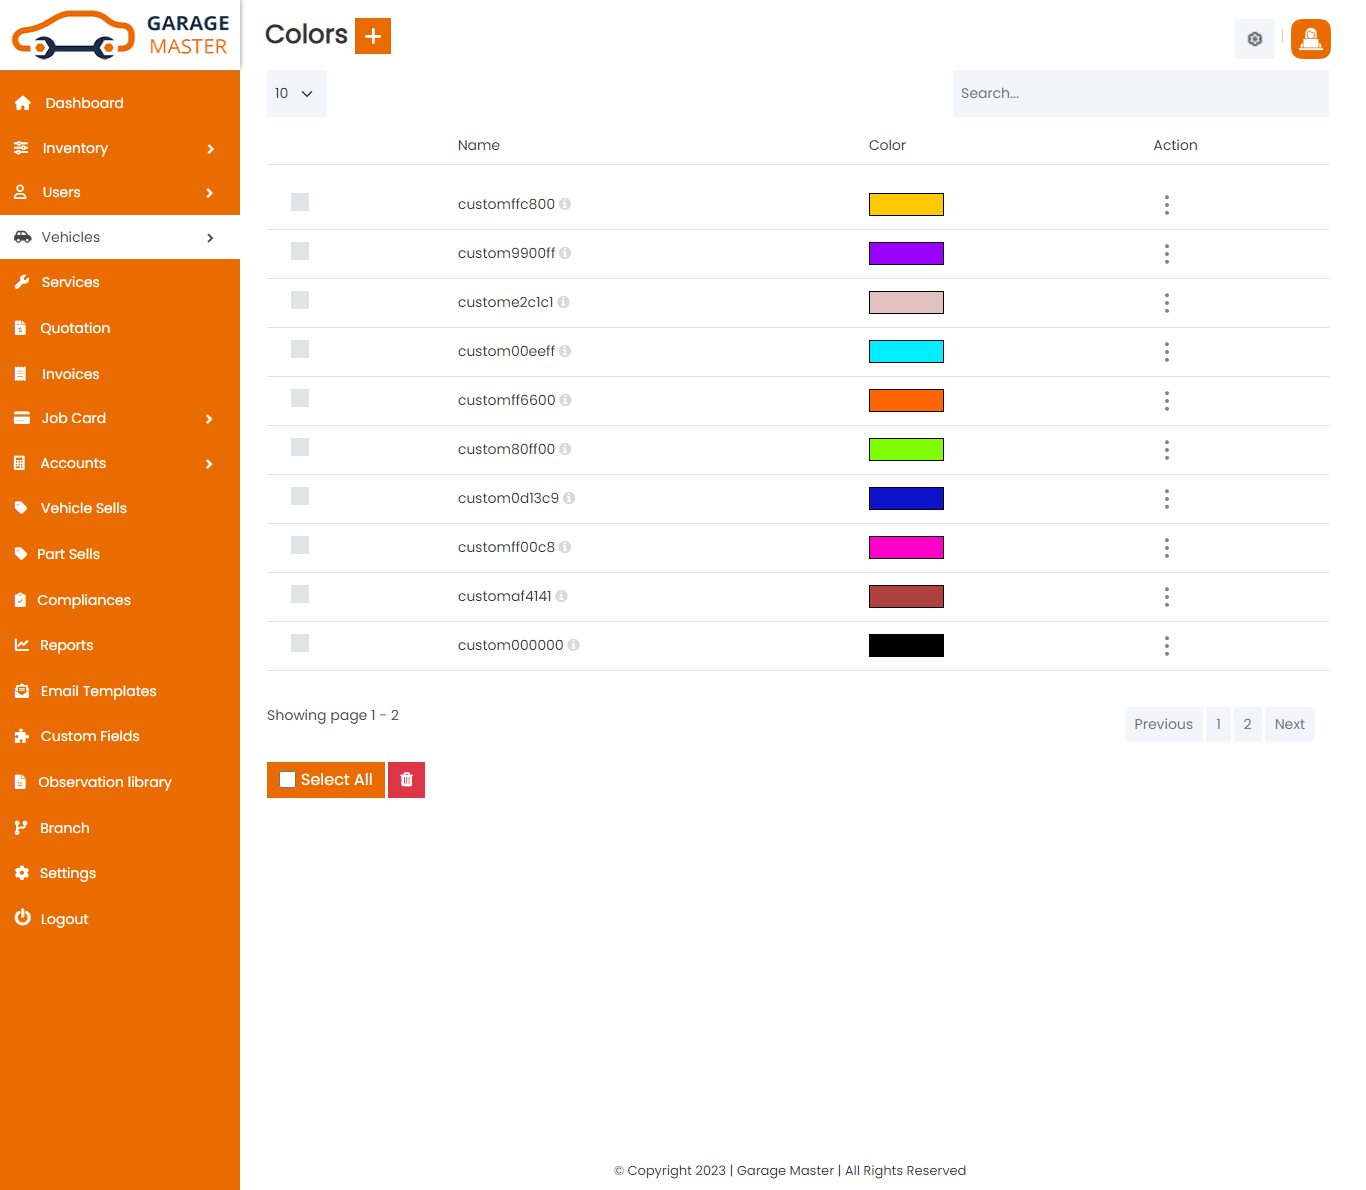
Color List: Admin can add a new color, color all color and view a complete list of all color
Add Color: Admin can add color details
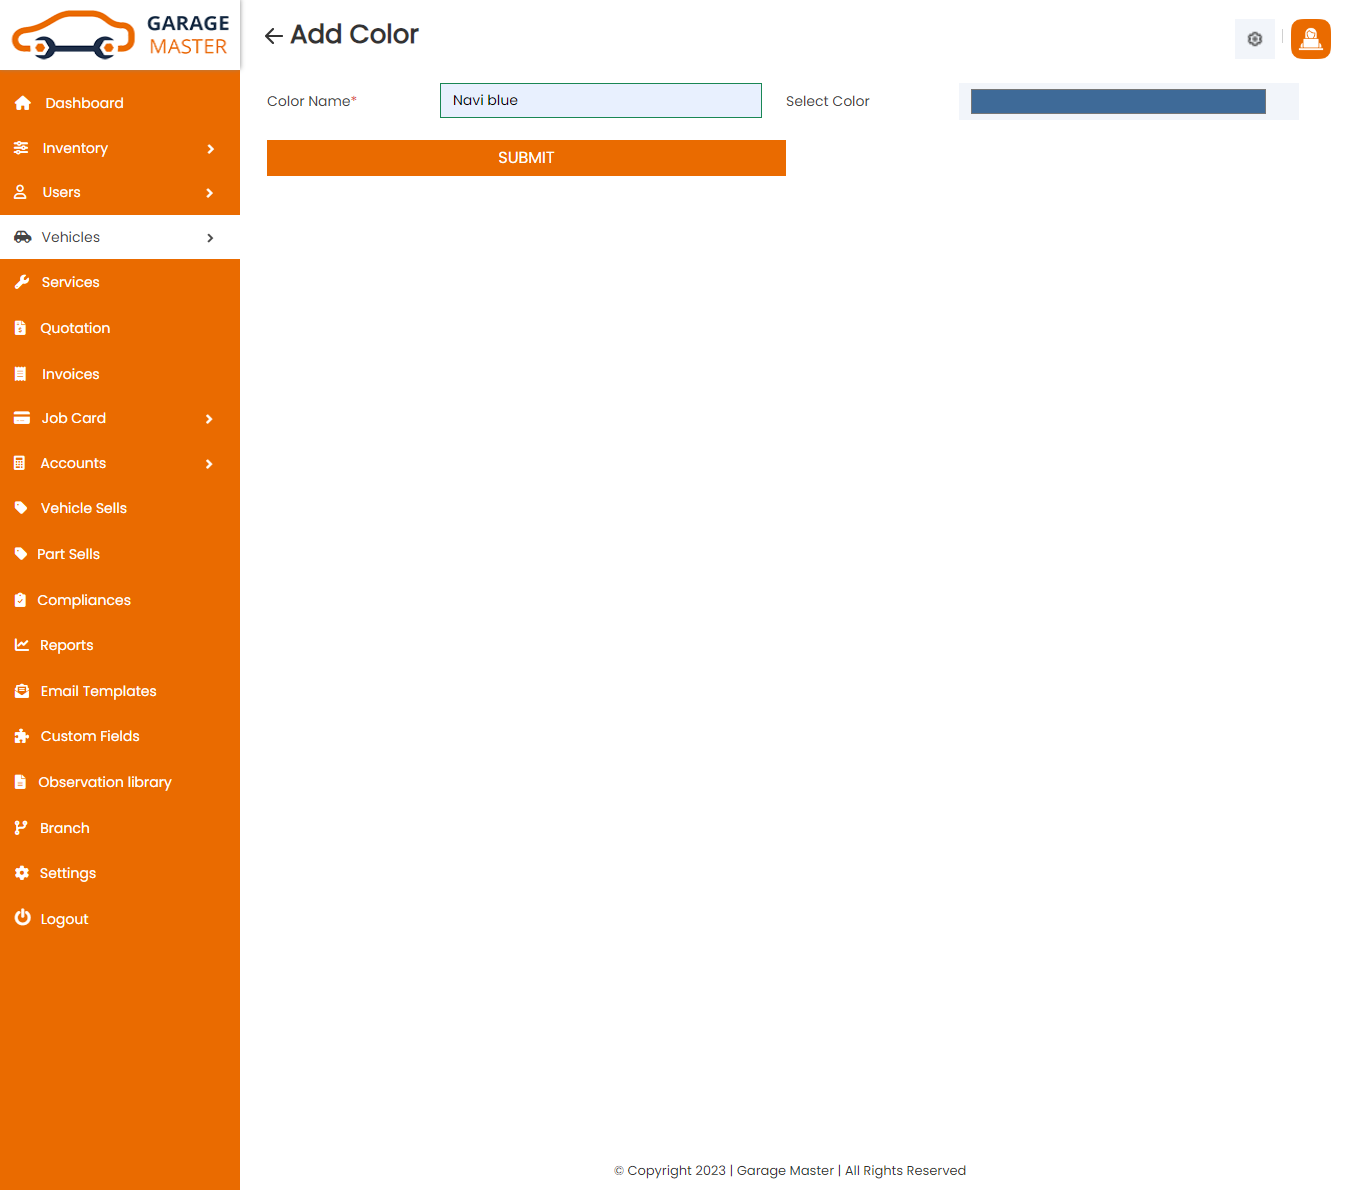
- Color Name: Enter a new color name for this color.
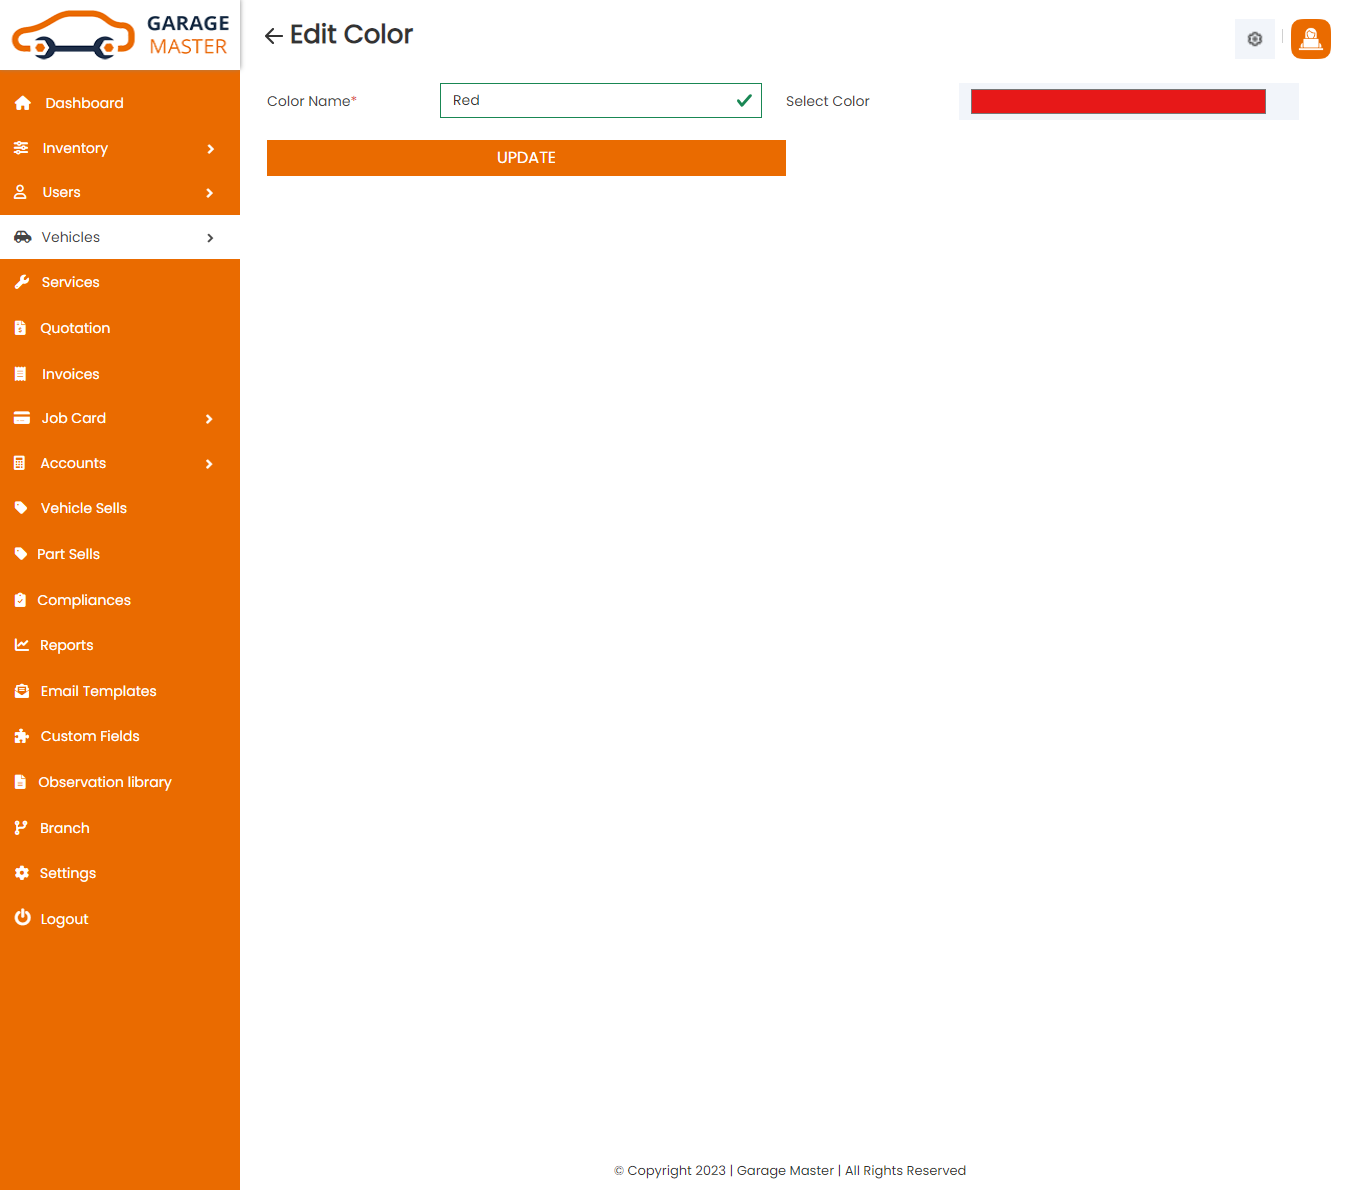
Edit Color: Admin can Edit detail of particular color by clicking on Edit detail button. This will open up details. From here admin can Change color Details.
Delete Color: Admin can delete a complete list of all color and delete detail of particular color by clicking on delete detail button. This will delete details.
6)Service
Service
Service List: Admin can add new Service, manage all Service and view a complete list of all Service.
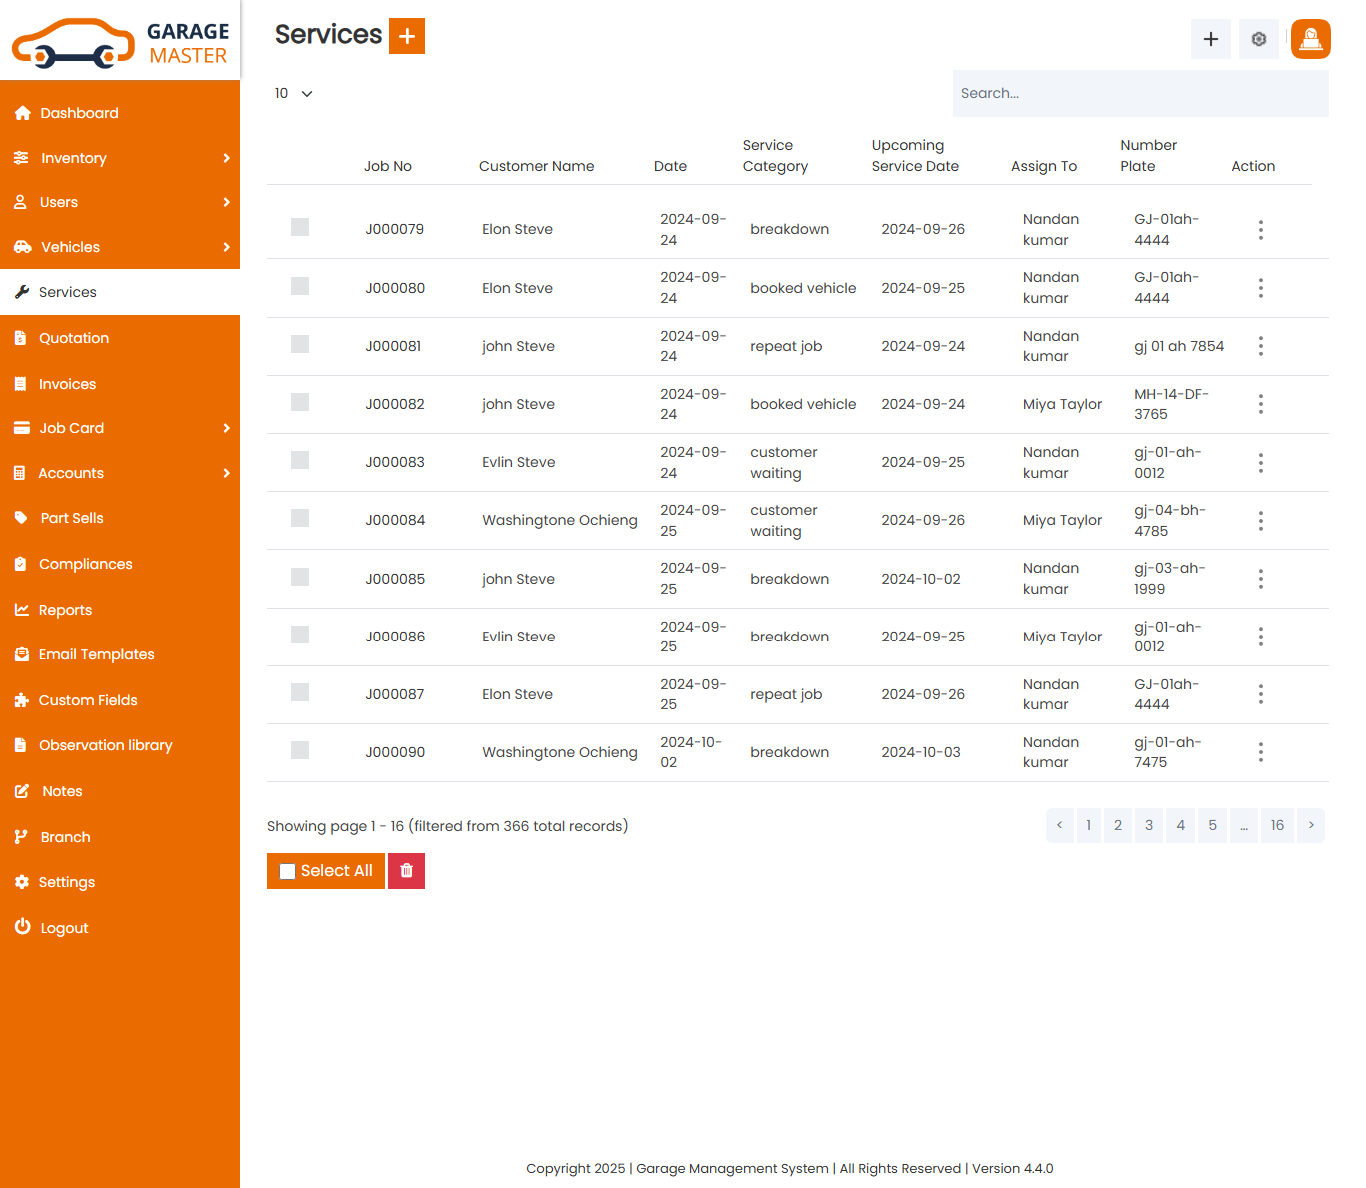
Add Service: Admin can add Service details
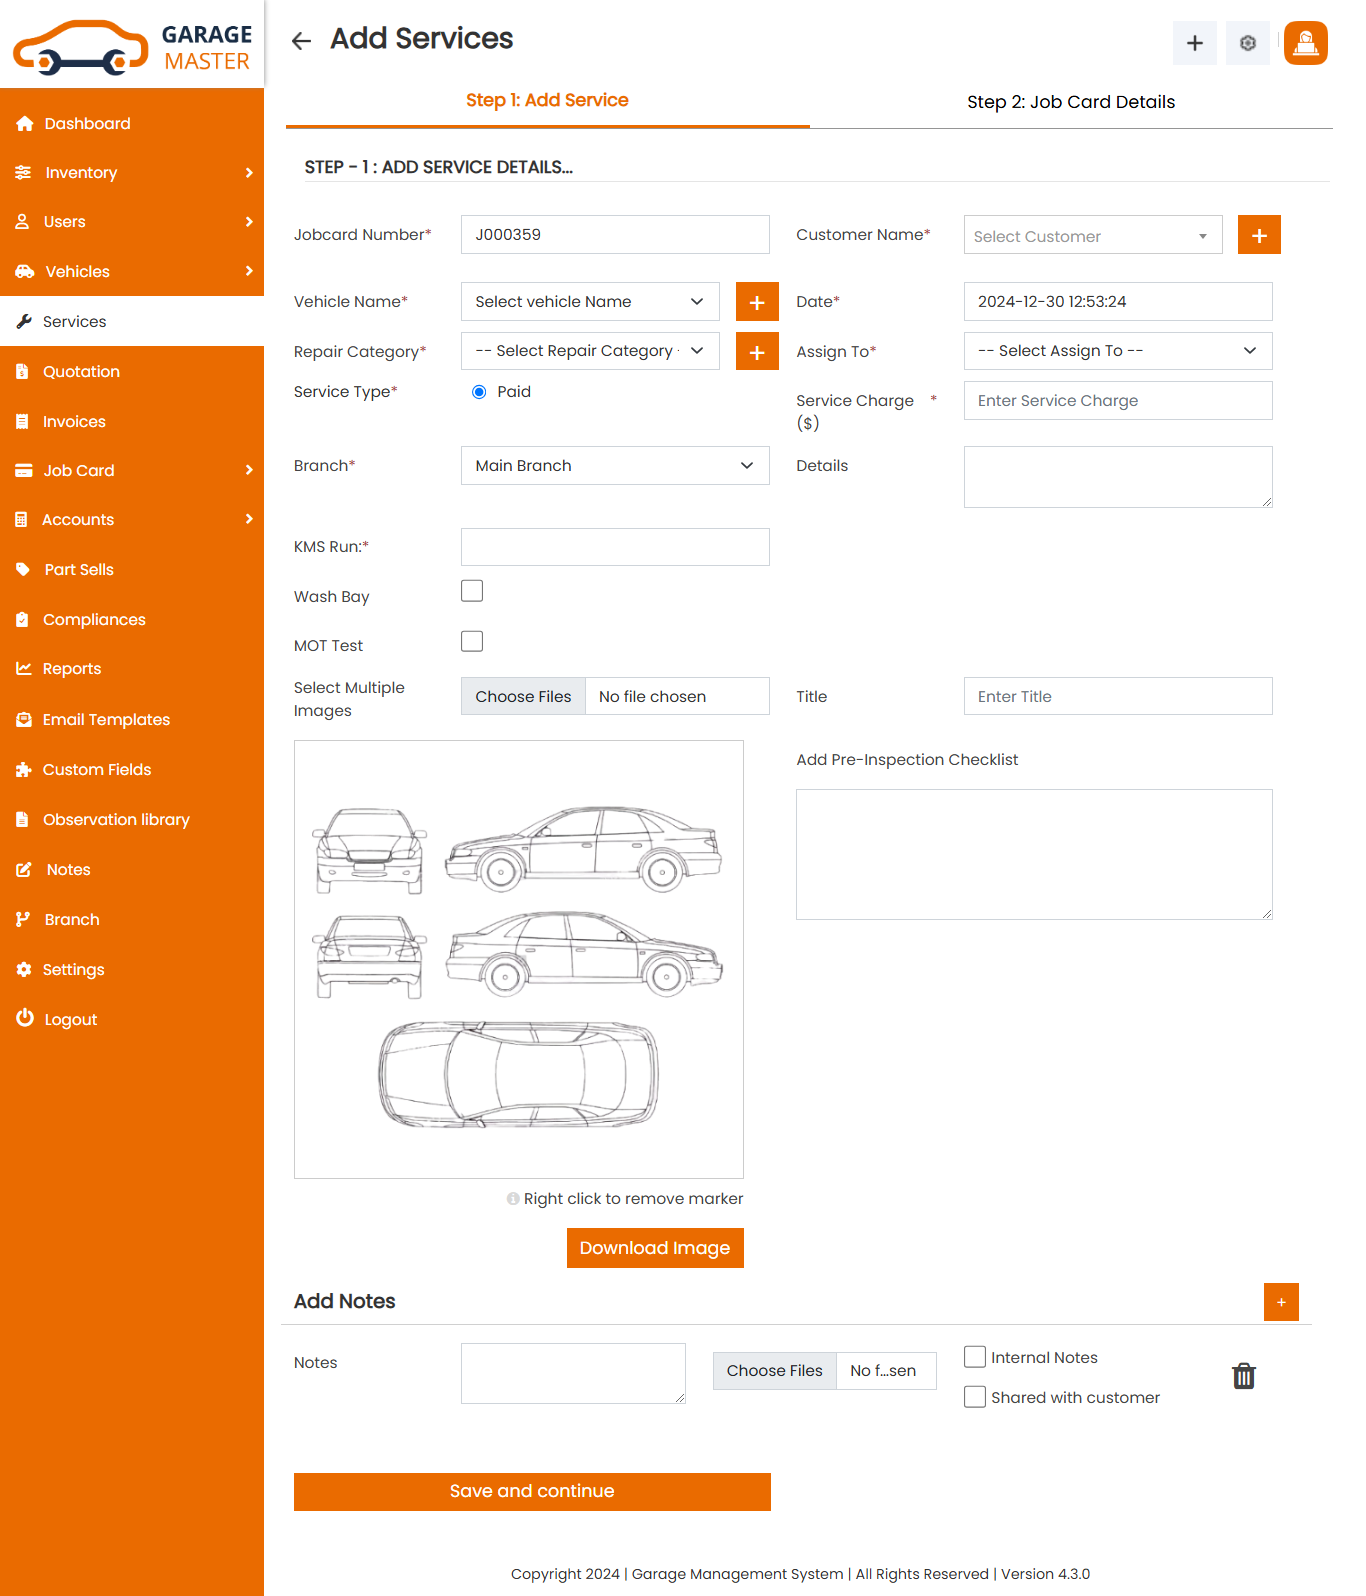
- Jobcard Number: Job card number auto generated.
- Customer Name: Select customer name for this service with searchable slectbox.
- Vehicle Name: Select vehicle name for this service.
- Date: Enter a new date for this service.
- Title: Enter a new title for this service.
- AssignTo: Select assign to for this service.
- Repair Category: Select repair category for this service.
- Service Type: Select service type for this service.
- Details: Enter a new details for this service.
- Fix Service Charge : Enter a new fix service charge for this service.
- Registration number: Enter a new registration number for this service.
- Car Damage Marker: You can Mark the damage area in given car and add damage details in Add Pre-Inspection Checklist box.
- MOT Test: Tick this check box for vehicle MOT testing.
- Job card Number: Job card number auto fields.
- In Date/Time: In date/time auto fields.
- Expected out date/time: Enter a new expected out date/time for this service.
- Name: Name auto fields.
- Address: Address auto fields.
- Contact Number: Contact number auto fields.
- Email: Email auto fields.
- Model Name: Model name auto fields.
- Chassis Number: Chassis number auto fields.
- Engine Number: Engine number auto fields.
- KMS Run: Enter a new KMS run for this service.
- Date of Sales: Date of sales auto fields.
- Color: Color auto fields.
- Add New: Select and Add New observation point for this service in given dropdown.
- Observation Point: List of the observation point.
- MOT Test View: Show details for MOT
testing.
Step 1: Fill MOT Details : Here fill MOT testing details for vehicle.
Step 2: Show Filled MOT Details : Now show here filled MOT testing details, which one is filled.
Step-1: Add Service Details.
Step-2: Add Job card Details.
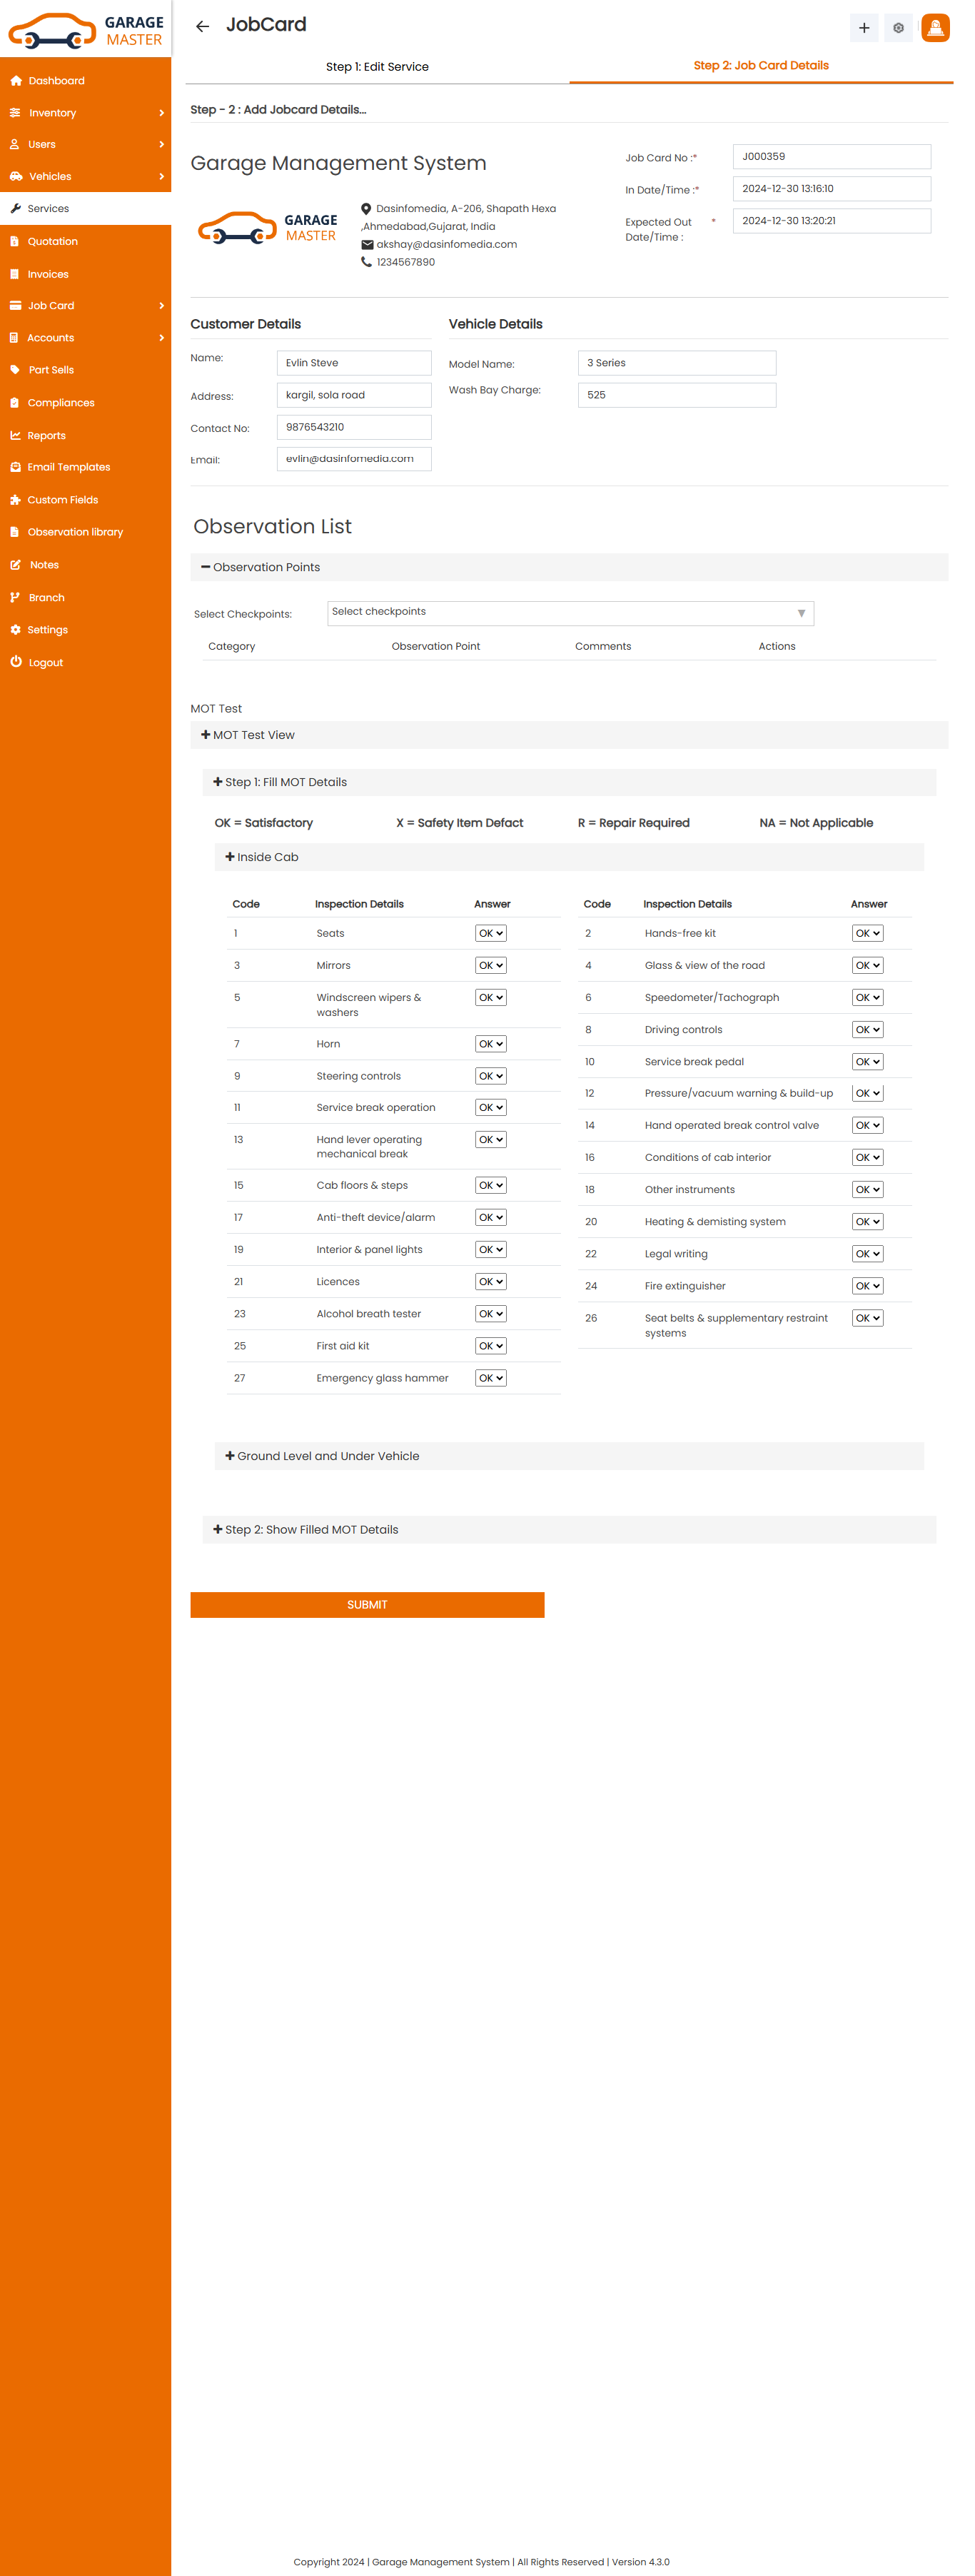
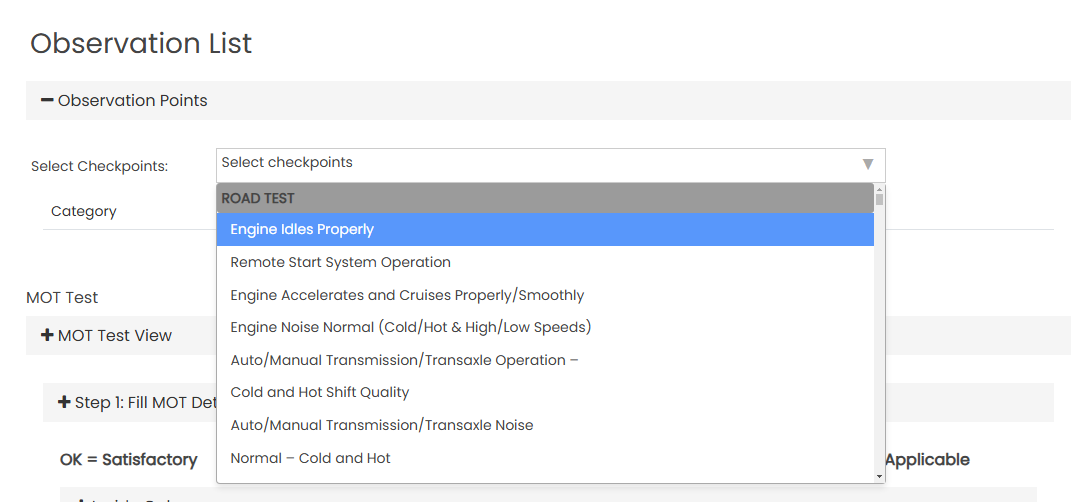
Customer Details
Vehicle Details
Observation List
MOT Test
Edit Service: Admin can Edit detail of particular Service by clicking on Edit detail button. This will open up details. From here admin can Change Service Details.
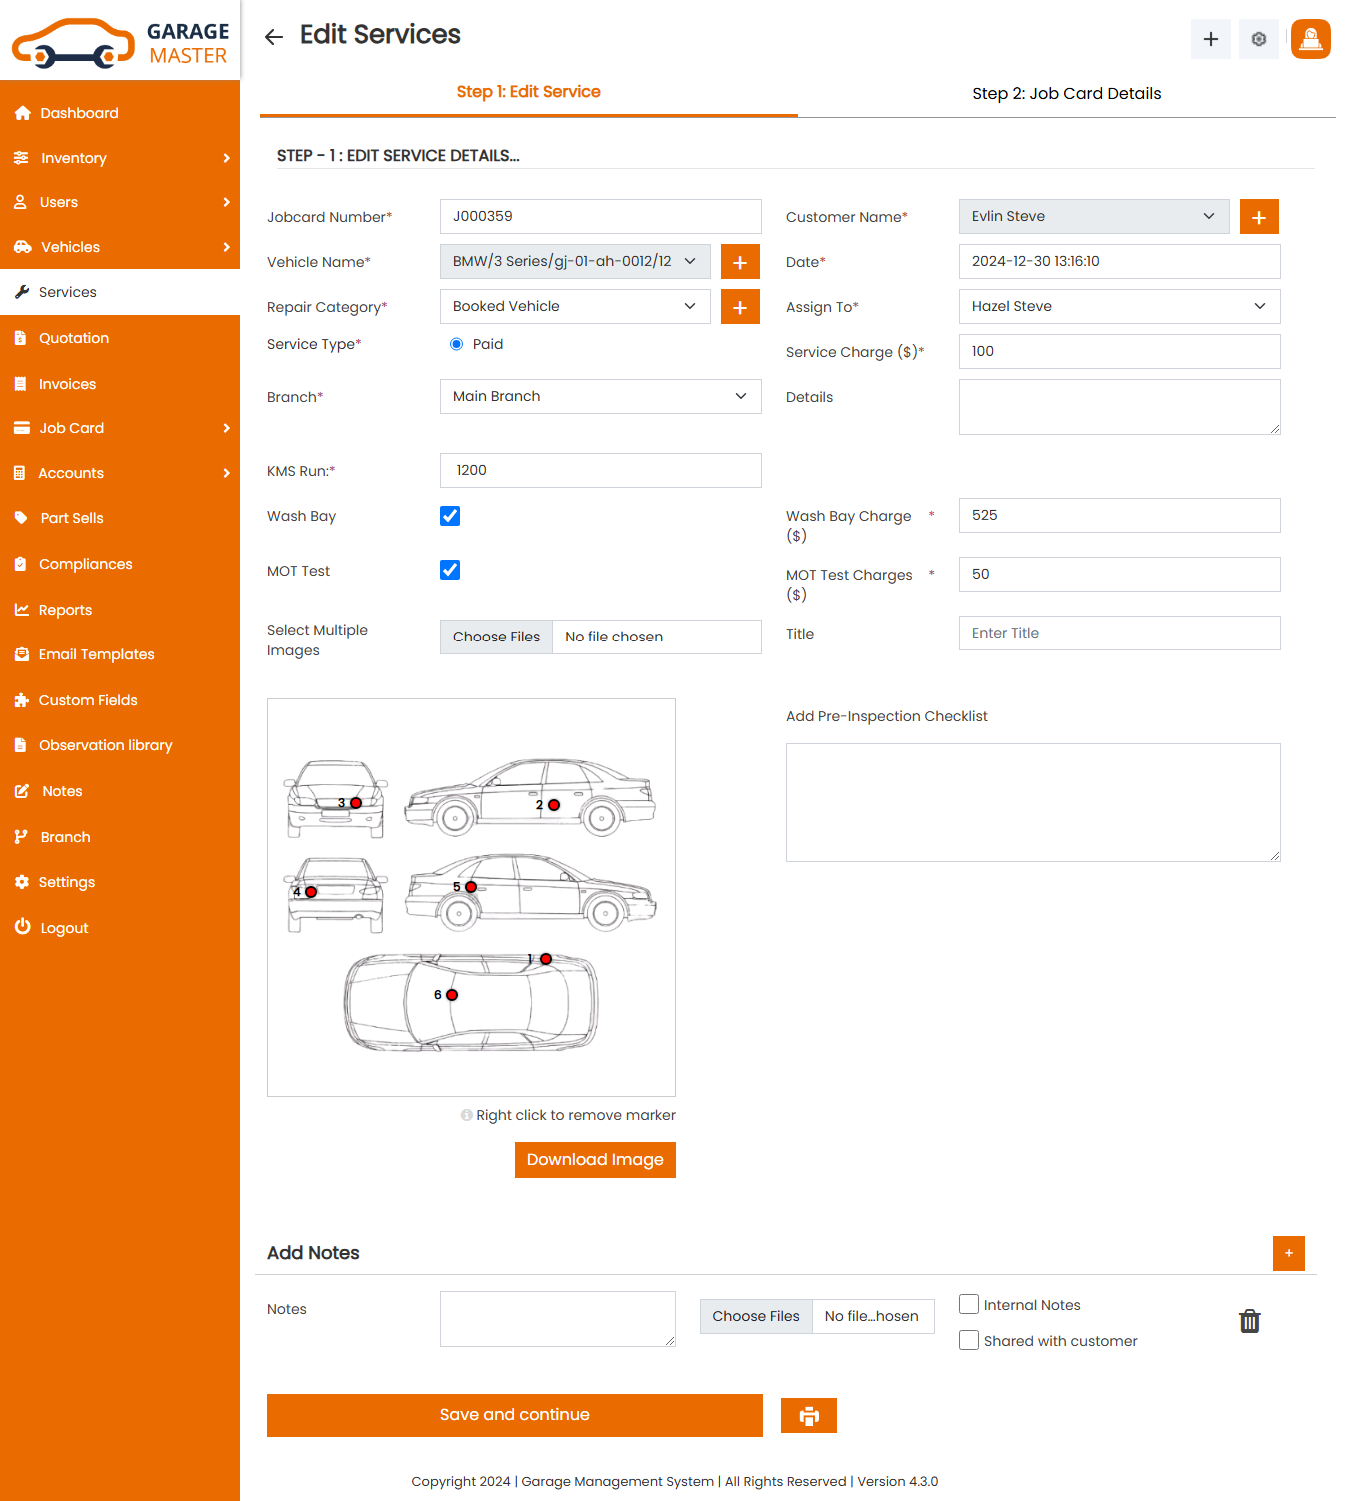
View Service: Admin can view a complete list of all Service and view detail of particular Service by clicking on view detail button. This will open up details.
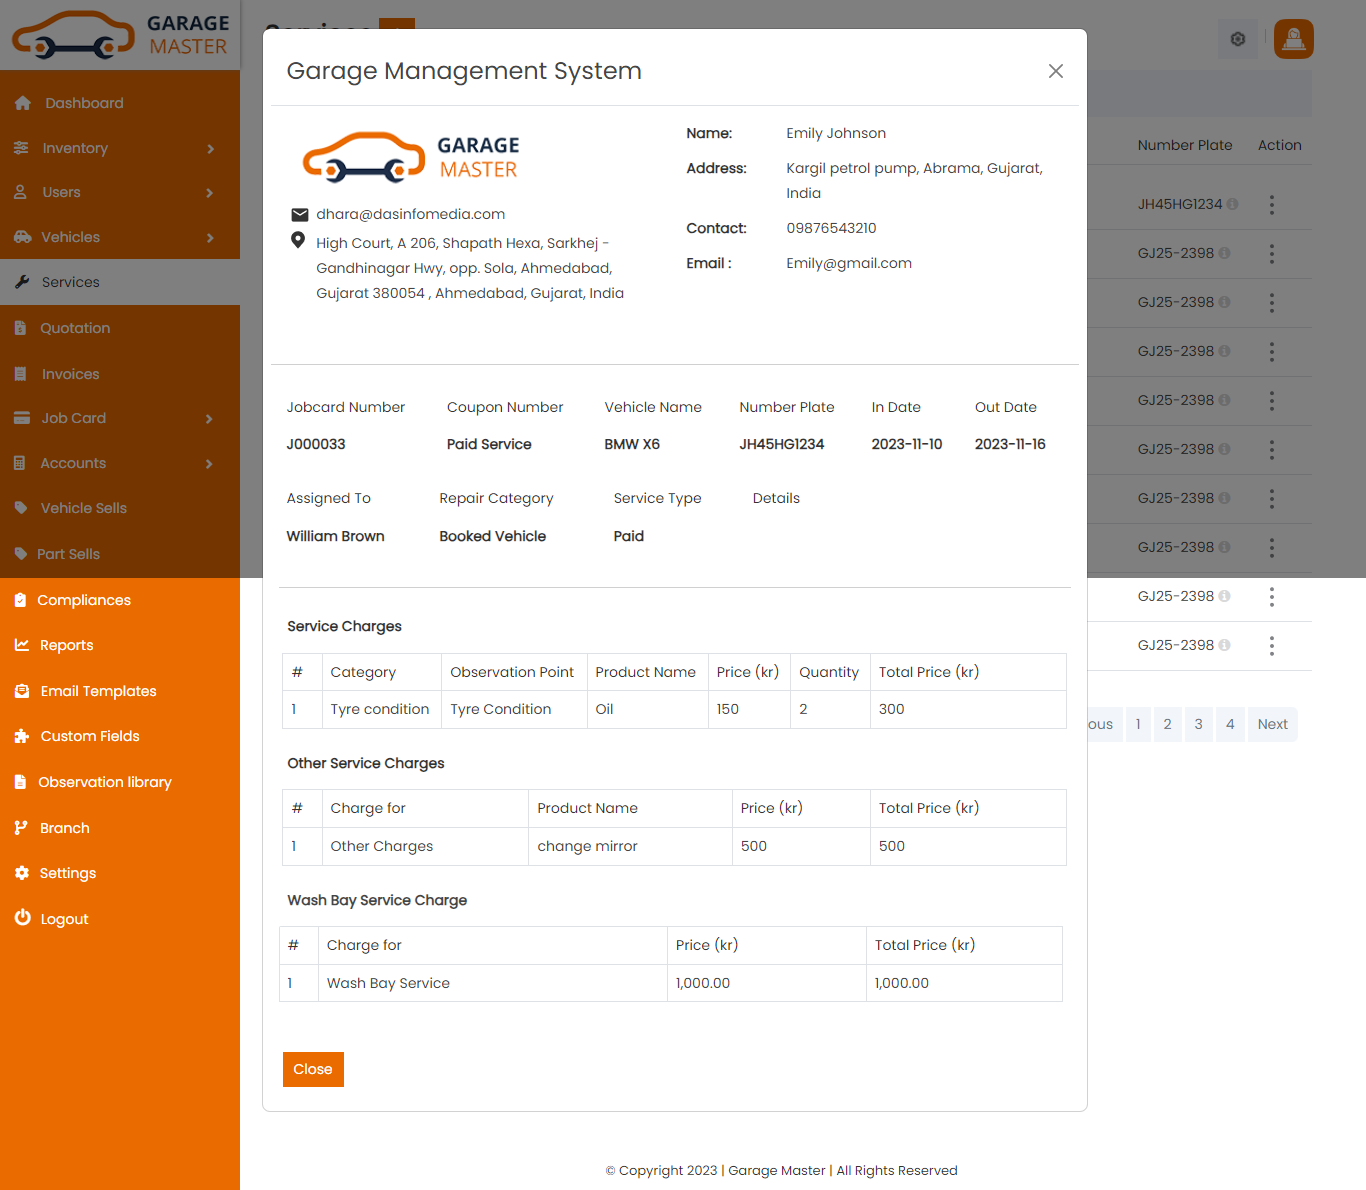
Delete Service: Admin can delete a complete list of all Service and delete detail of particular Service by clicking on delete button. This will delete details.
16)Quotation
Quotation
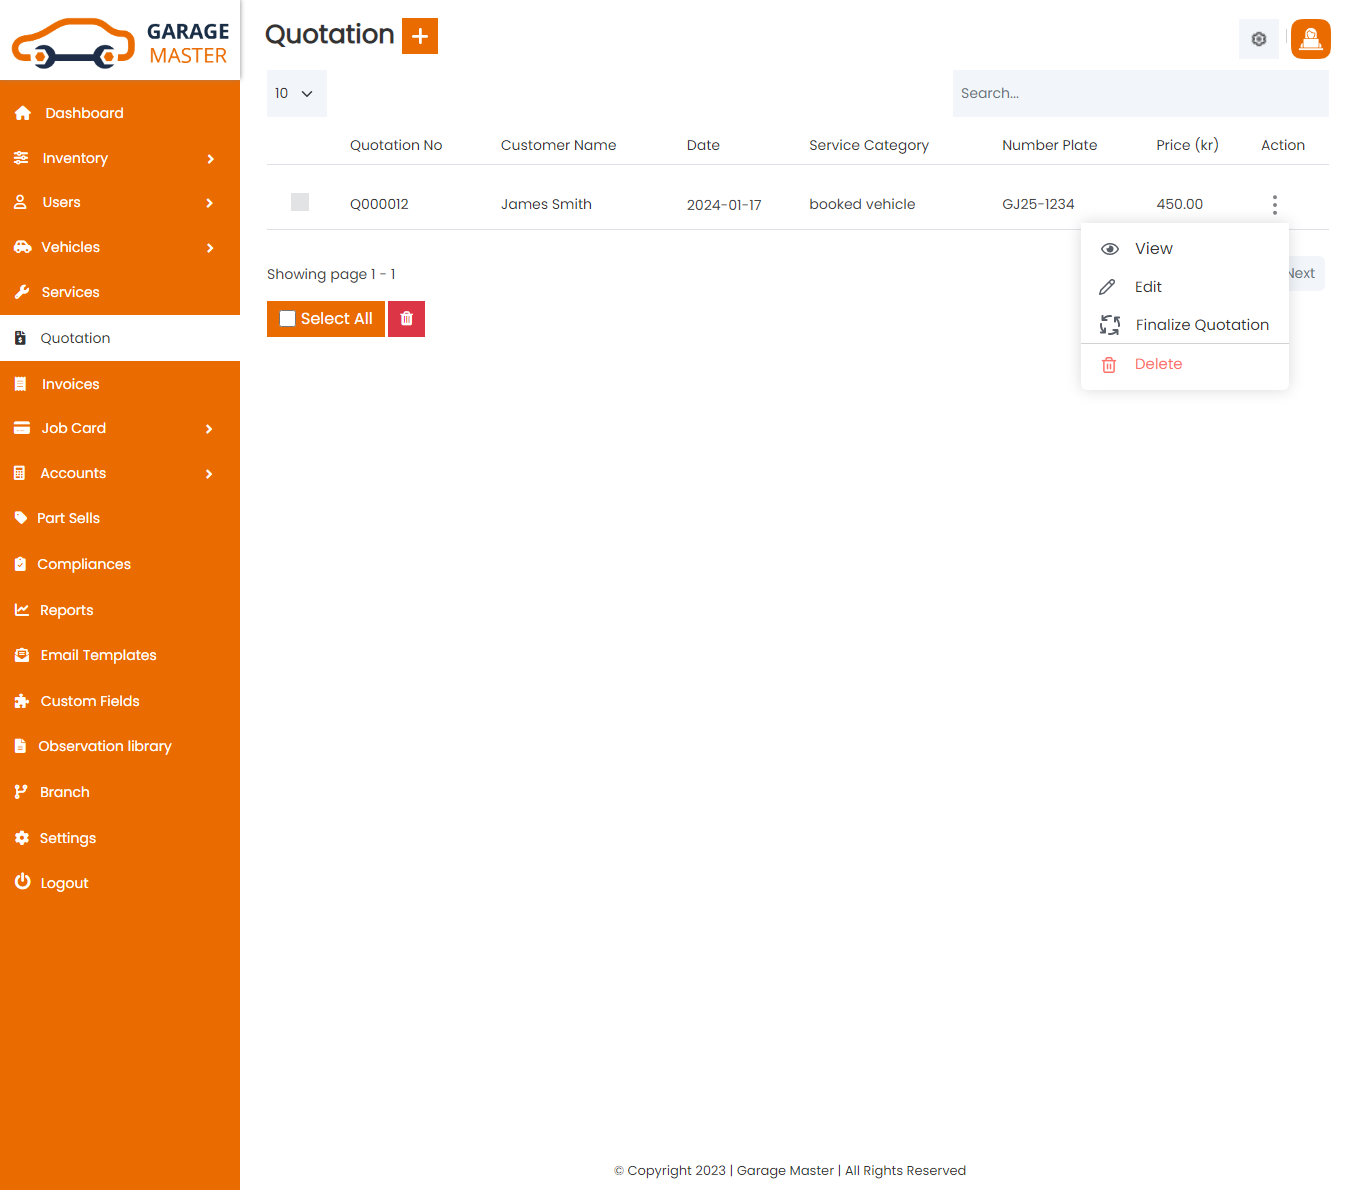
Quotation List: Admin can add new Quotation, and view a complete list of all Quotations and process them.
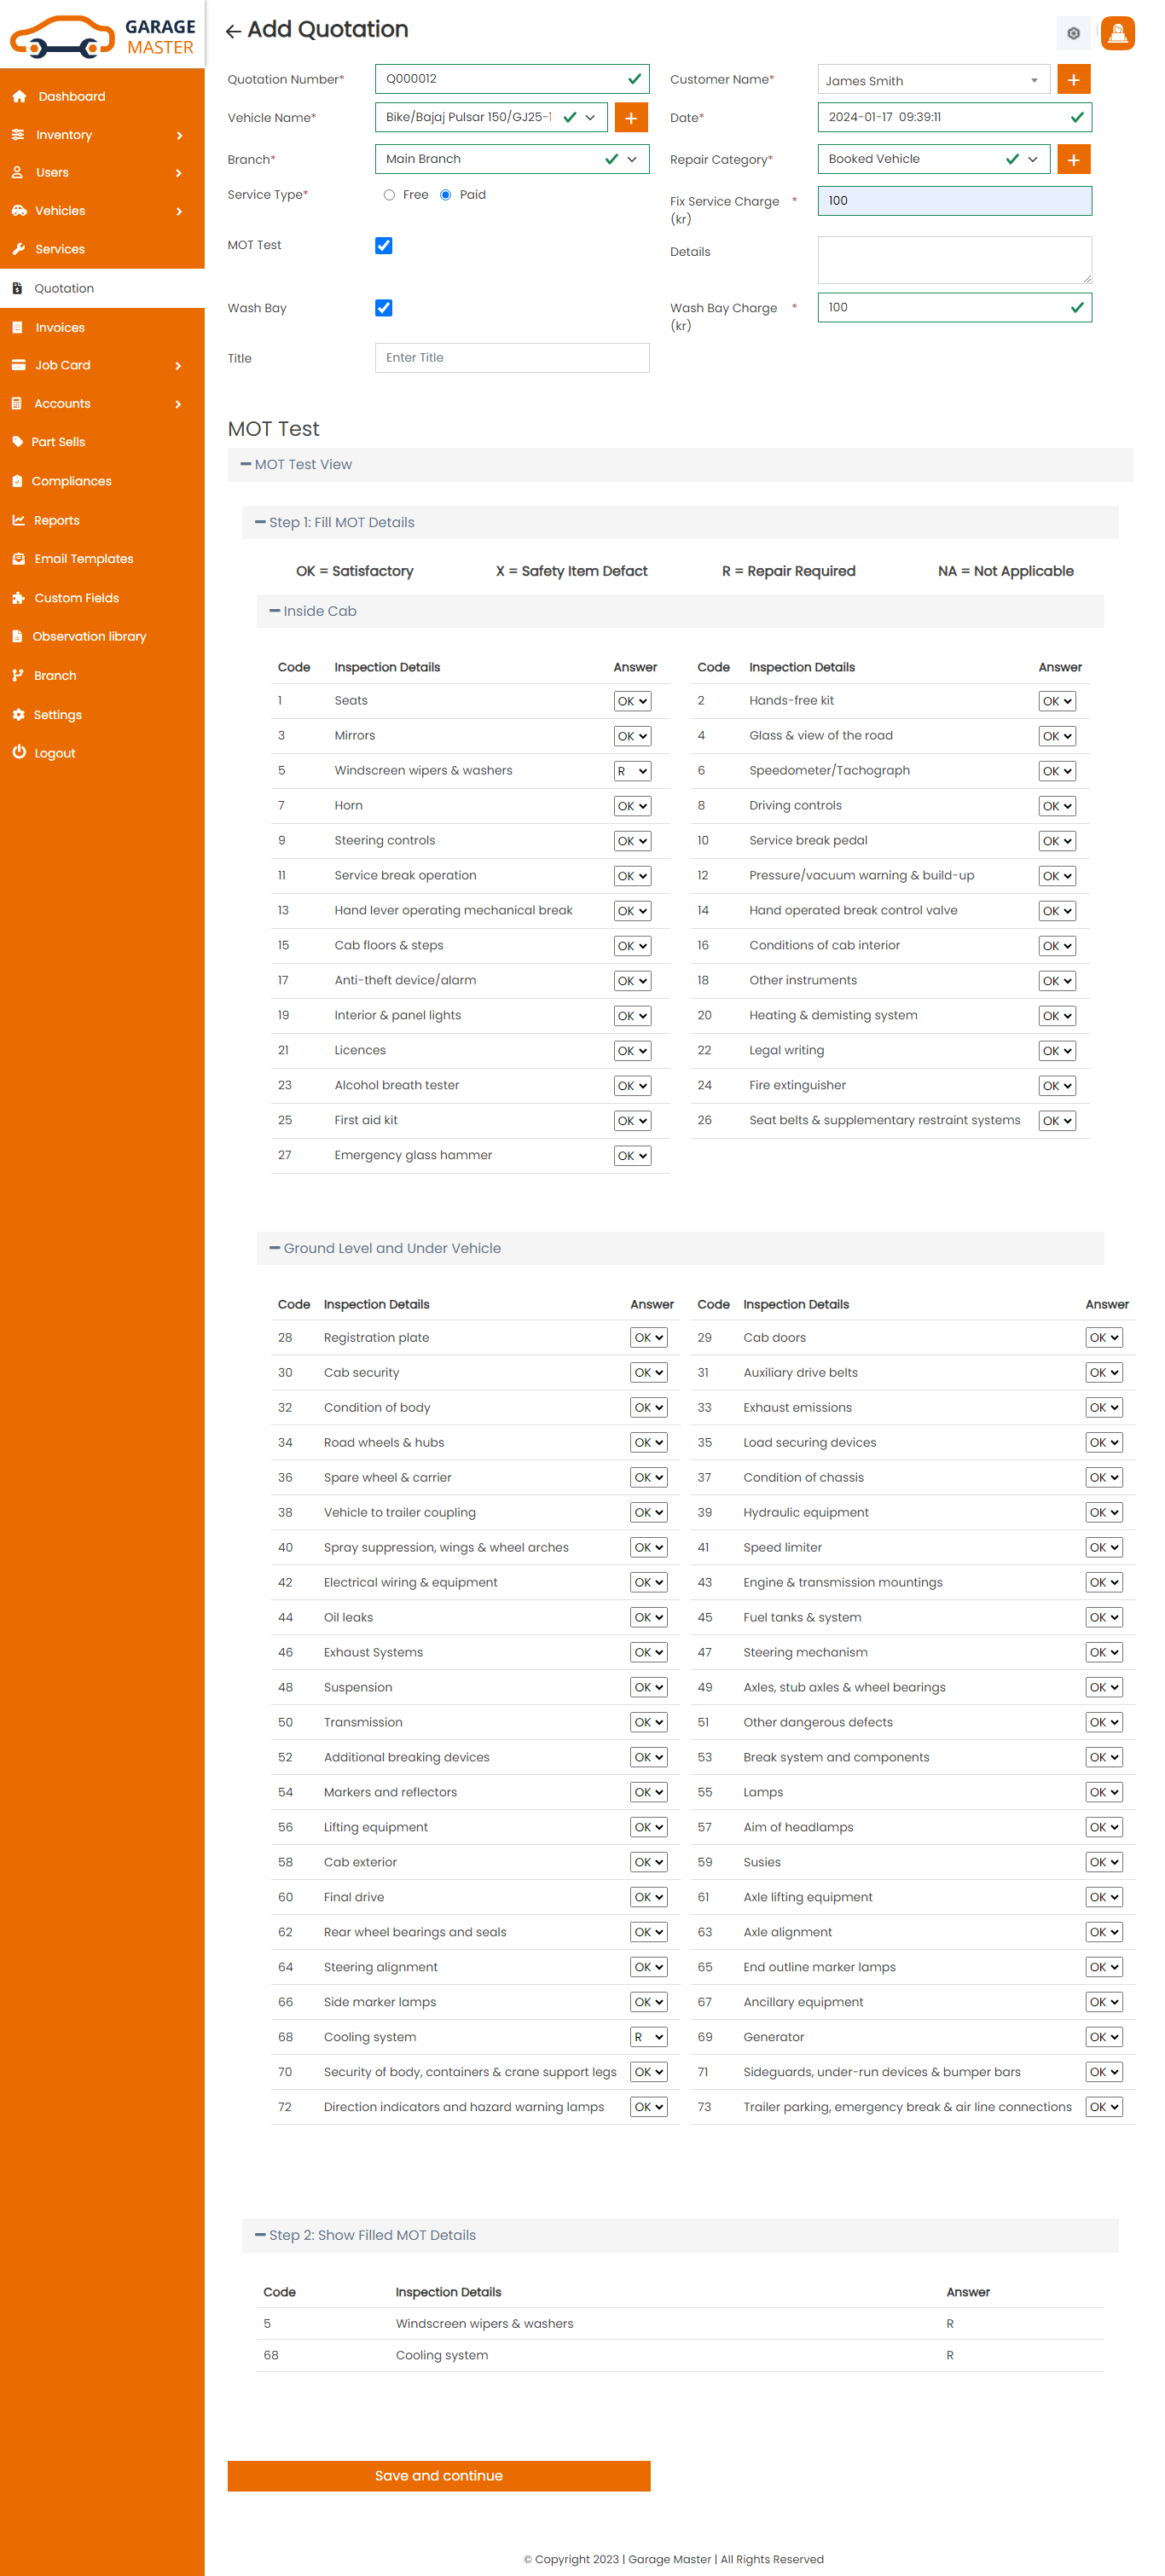
Add Quotation: Admin can add Quotation
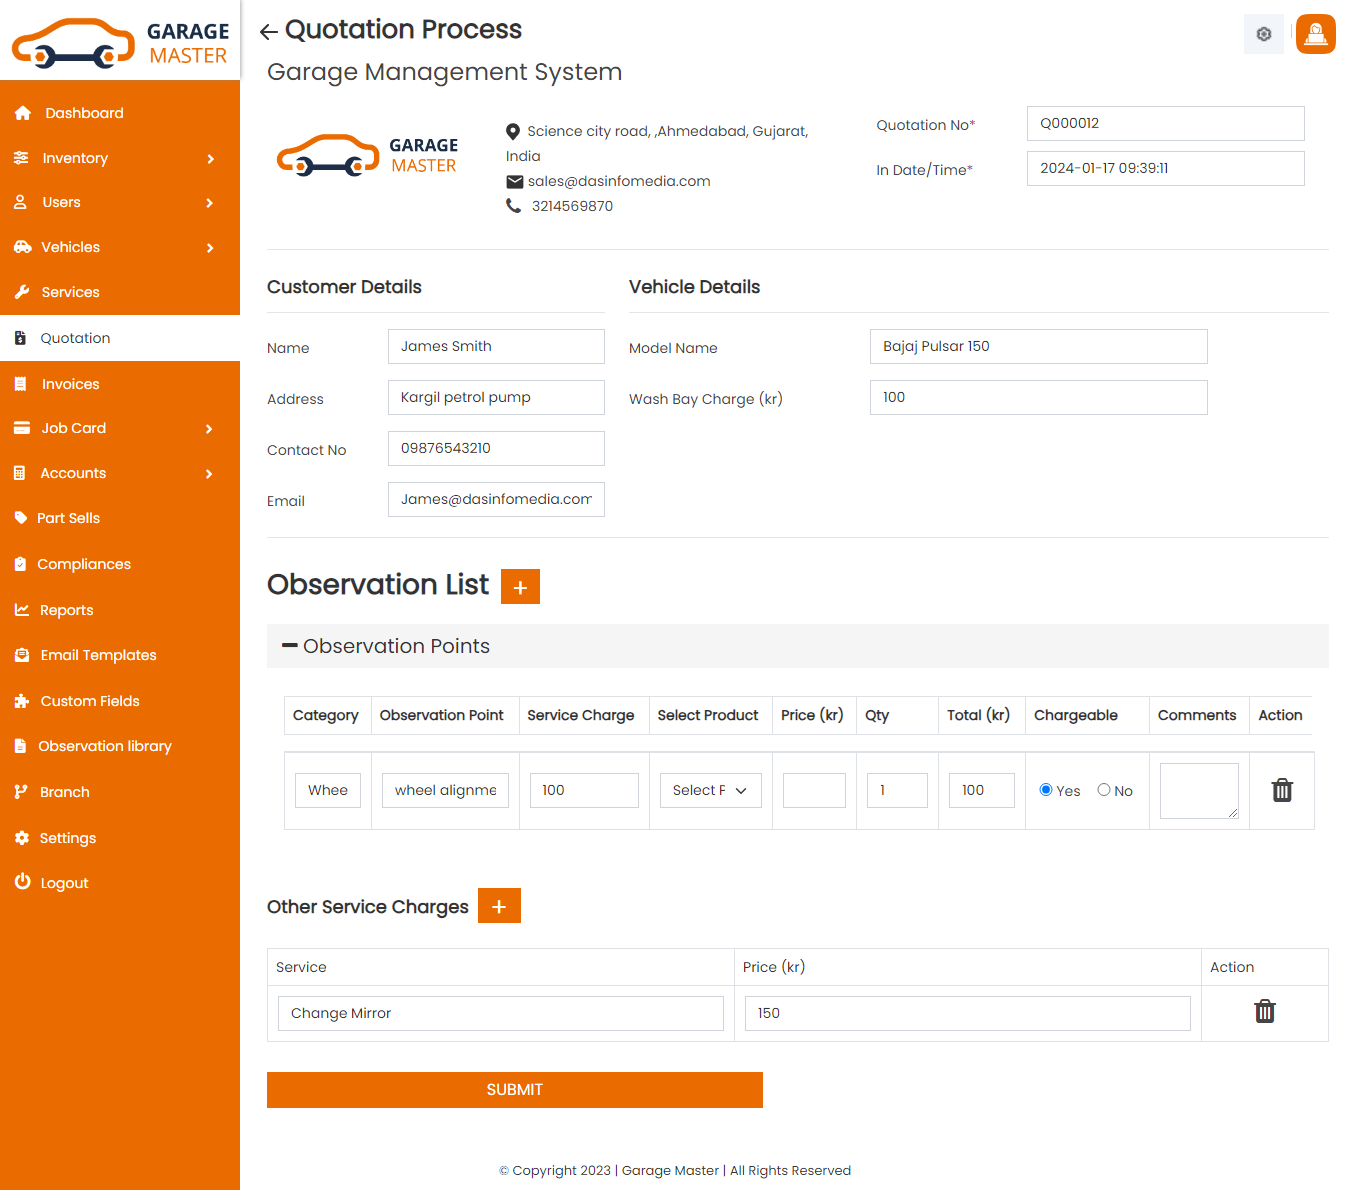
Add Items In Quotation: The Admin can add quotation items to the quotation details and then he can make the quotation final by checking the final process checkbox. And once a quotation is finally submitted, that quotation comes on the jobcard list for the further process.
7)Invoice
Invoice
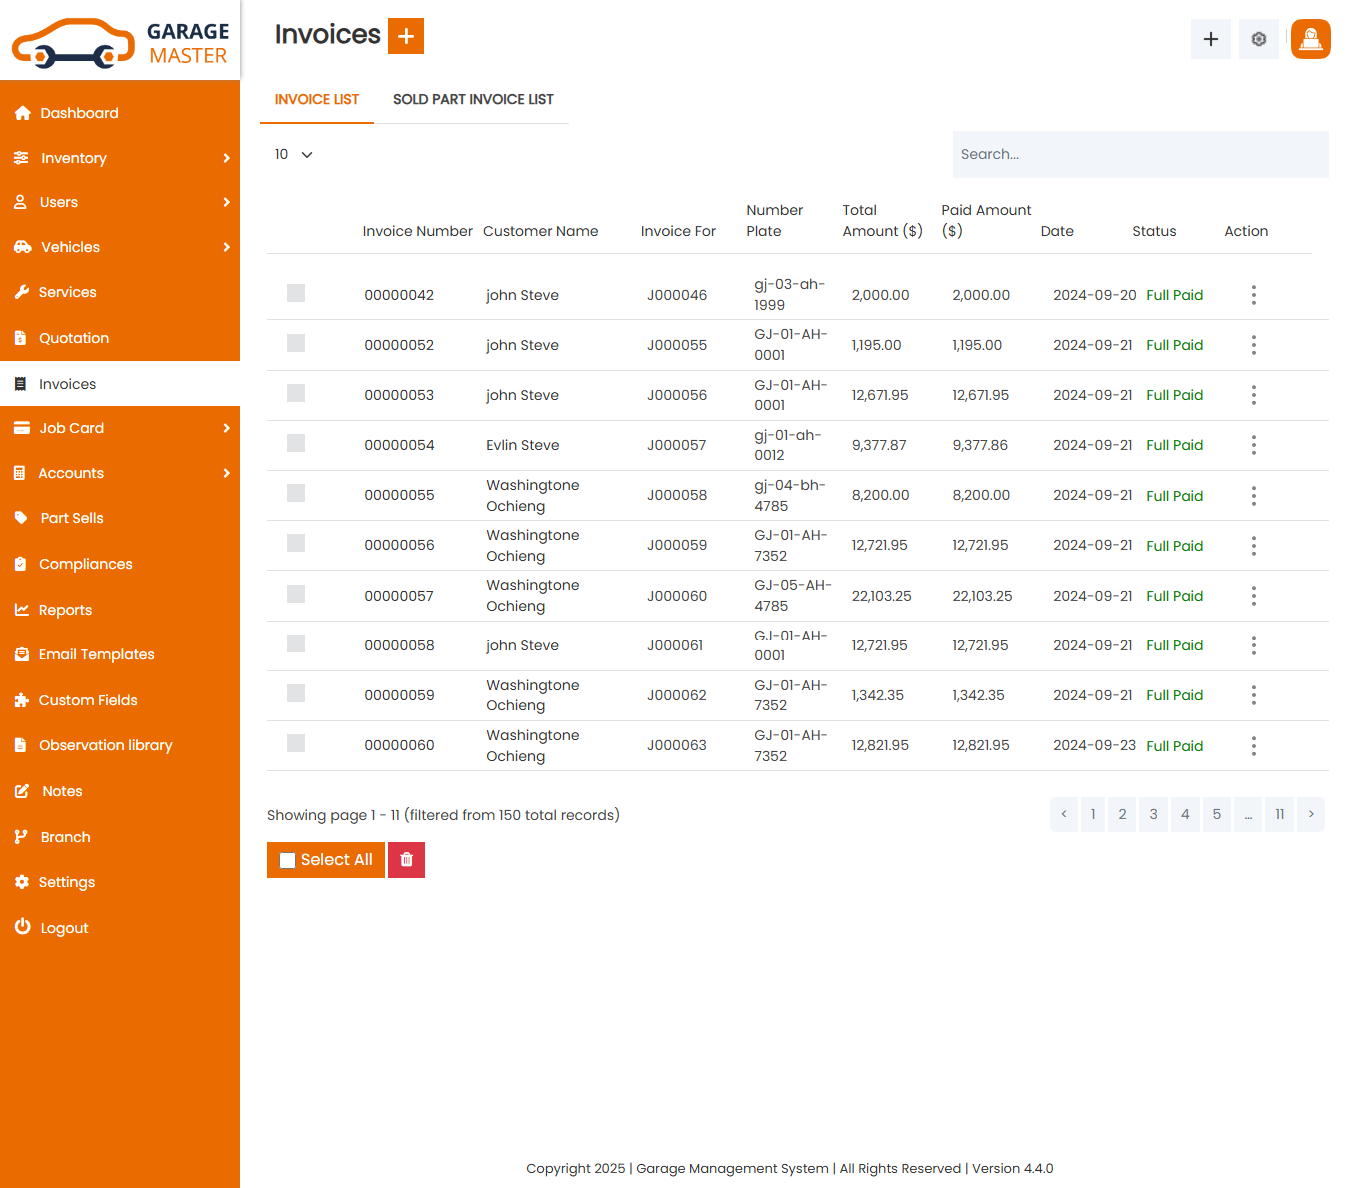
Invoice List: Admin can add a new invoice, invoice all invoice and view a complete list of all invoice.
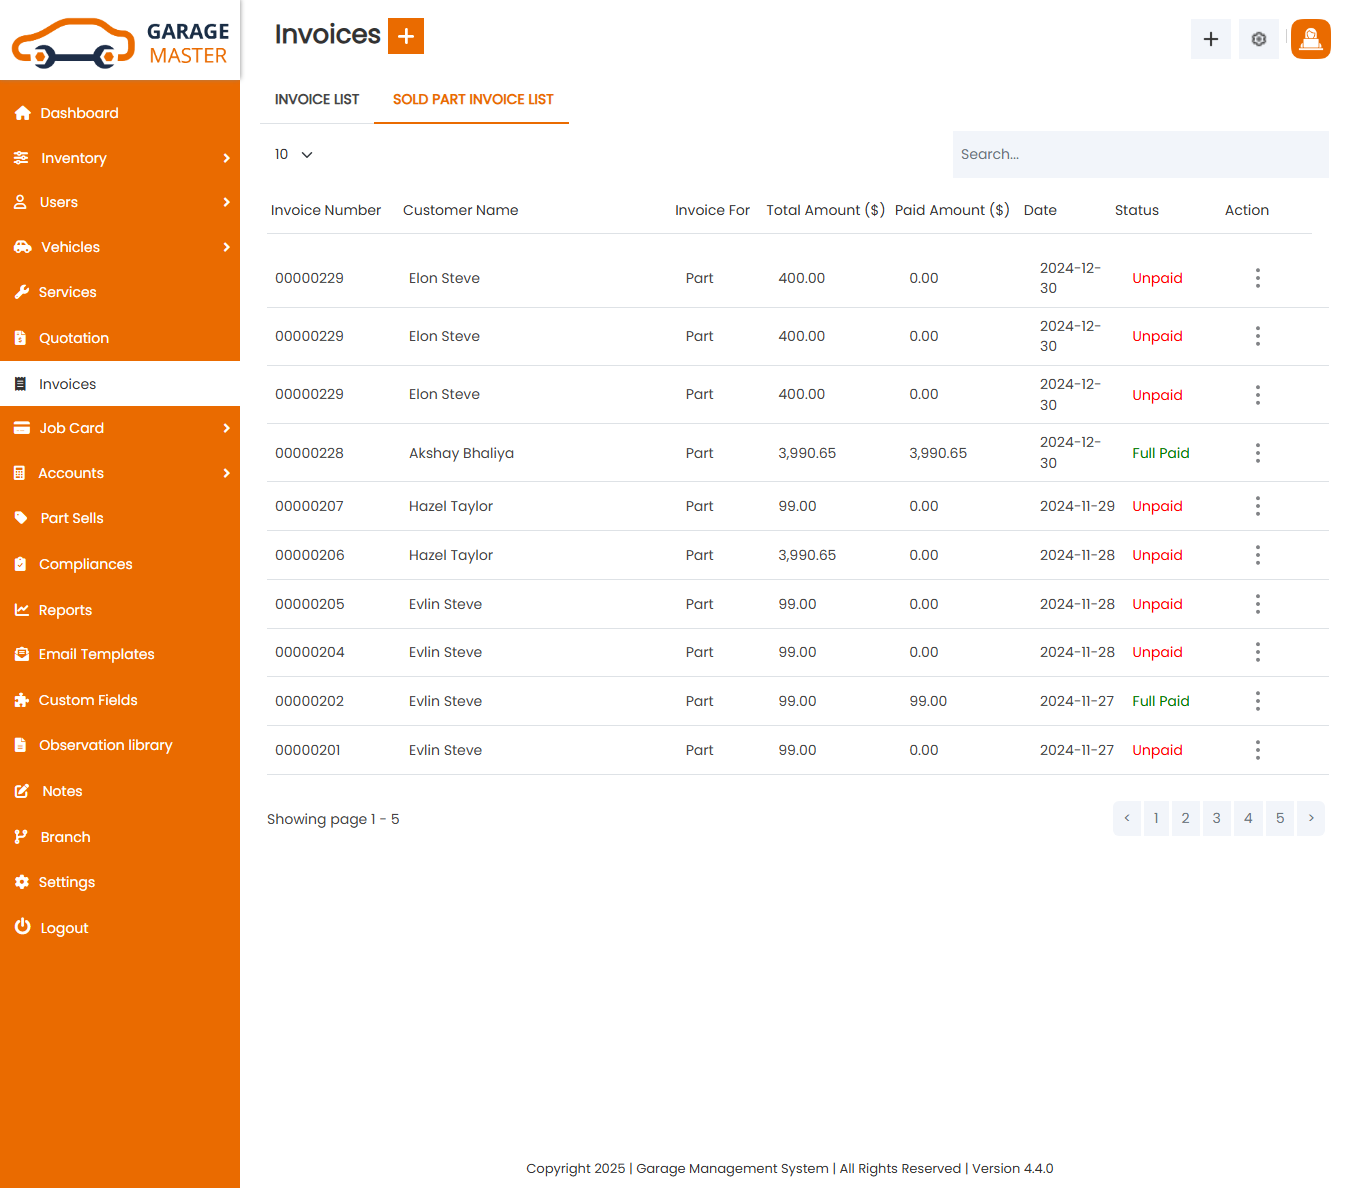
Sold Part Invoice List: Admin can add a new sold part invoice, edit sold part invoice and view a complete list of all sold part invoice.
Add Invoice: Admin can add invoice details
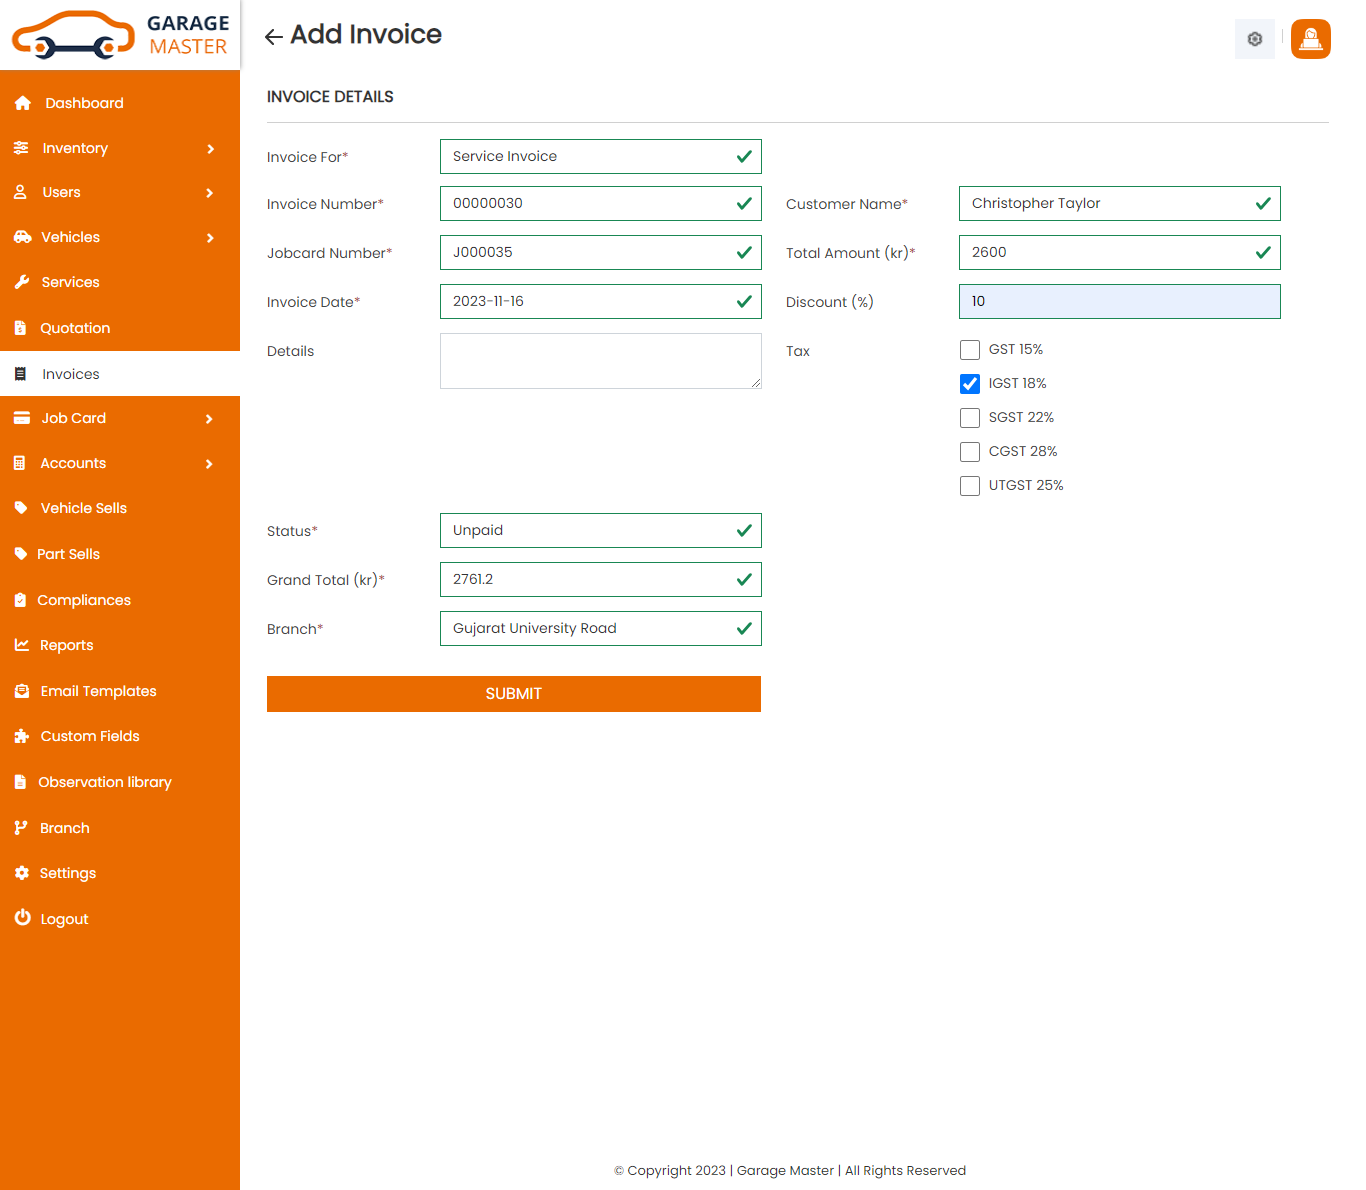
- Invoice for: Select invoice type for this invoice.
- Invoice Number: Invoice number auto generated.
- Customer Name: Select customer name for this invoice.
- Job card Number: Select job card number for this invoice.
- Date: Enter a new date for this invoice.
- Total Amount: Select job card and auto generated total amount.
- Payment Type: Select payment type for this invoice.
- Status: Select status for this invoice.
- Discount(%): Enter a new discount for this invoice.
- Details: Enter a new details for this invoice.
- Tax: Select tax for this invoice.
- Paid Amount: Enter a new paid amount for this invoice.
- Grand Total: Select customer name and job card in auto generated grand total.
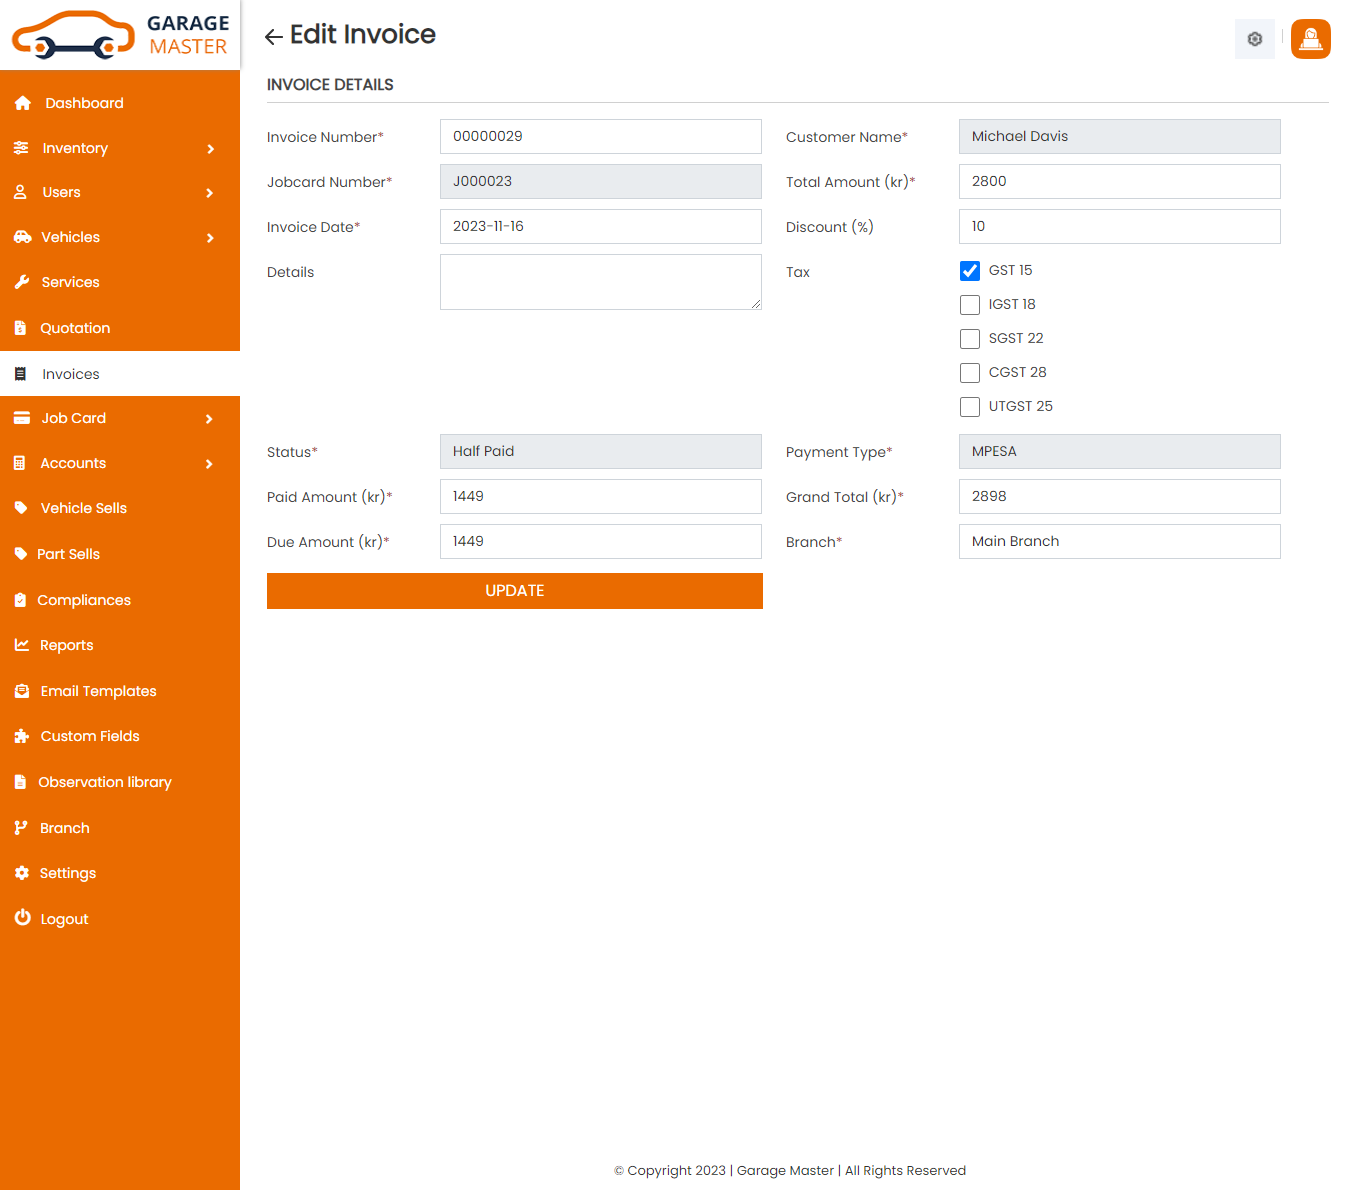
Edit invoice: Admin can Edit detail of particular invoice by clicking on Edit detail button. This will open up details. From here admin can Change invoice Details.
View invoice: Admin can view a complete list of all invoice and view detail of particular invoice by clicking on view detail button. This will open up details.From here admin can also Print Out view invoice.
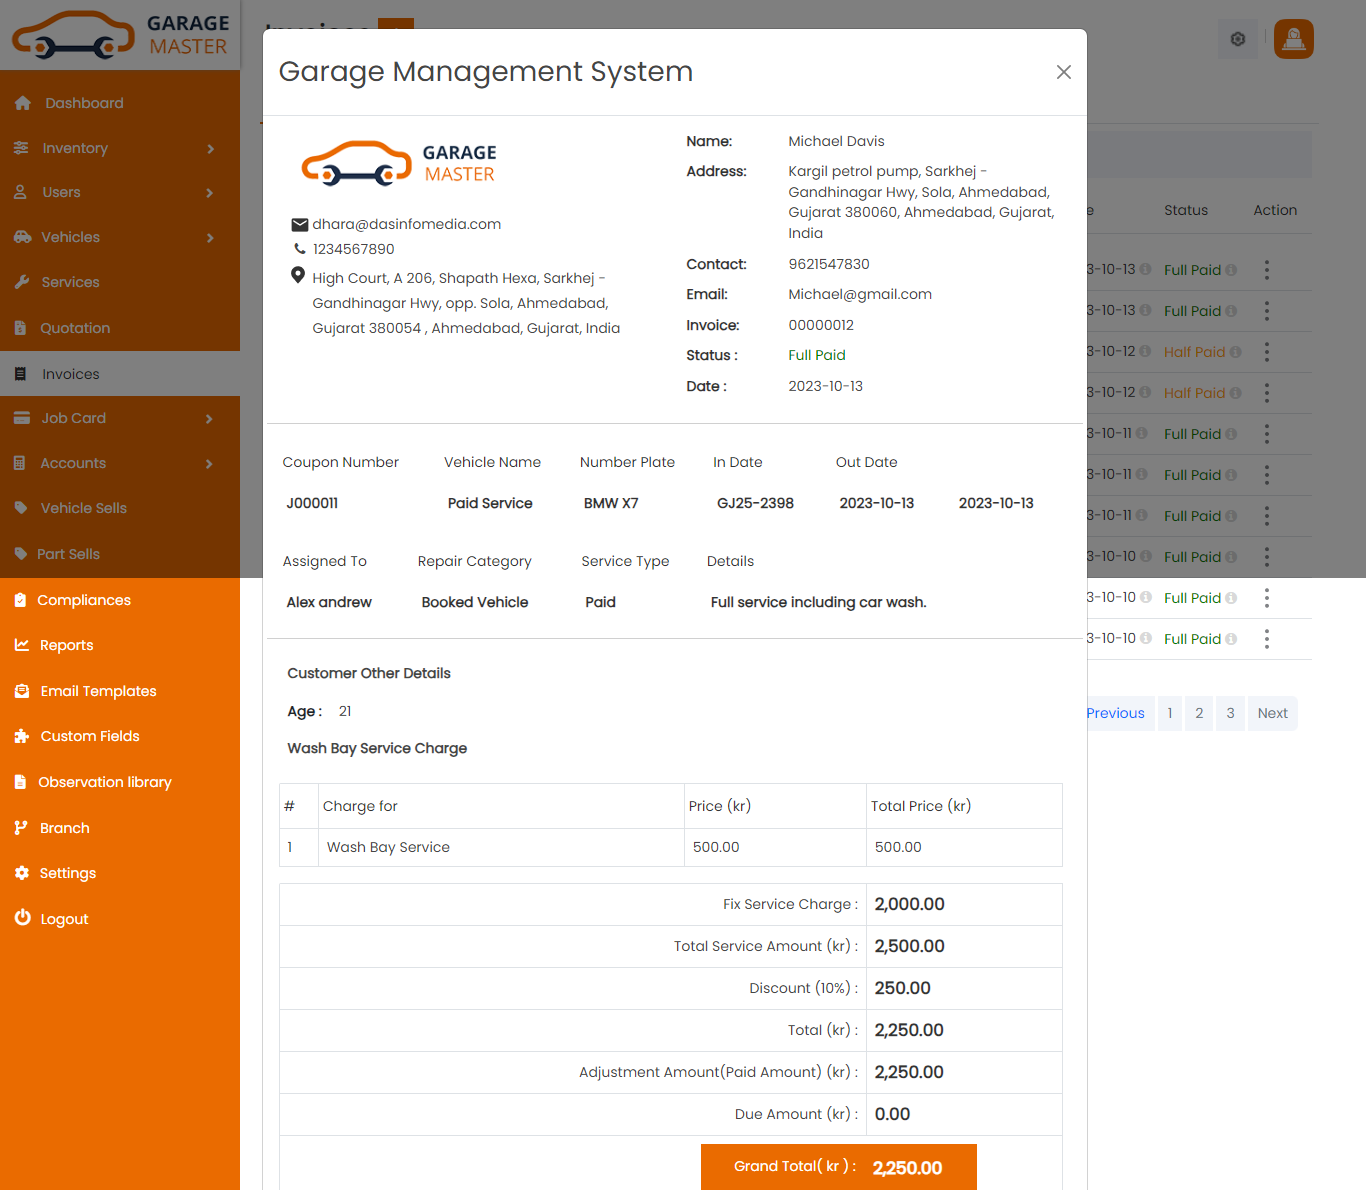
Delete invoice: Admin can delete a complete list of all invoice and delete detail of particular invoice by clicking on delete detail button. This will delete details.
Pay Invoice: Admin can pay invoice details
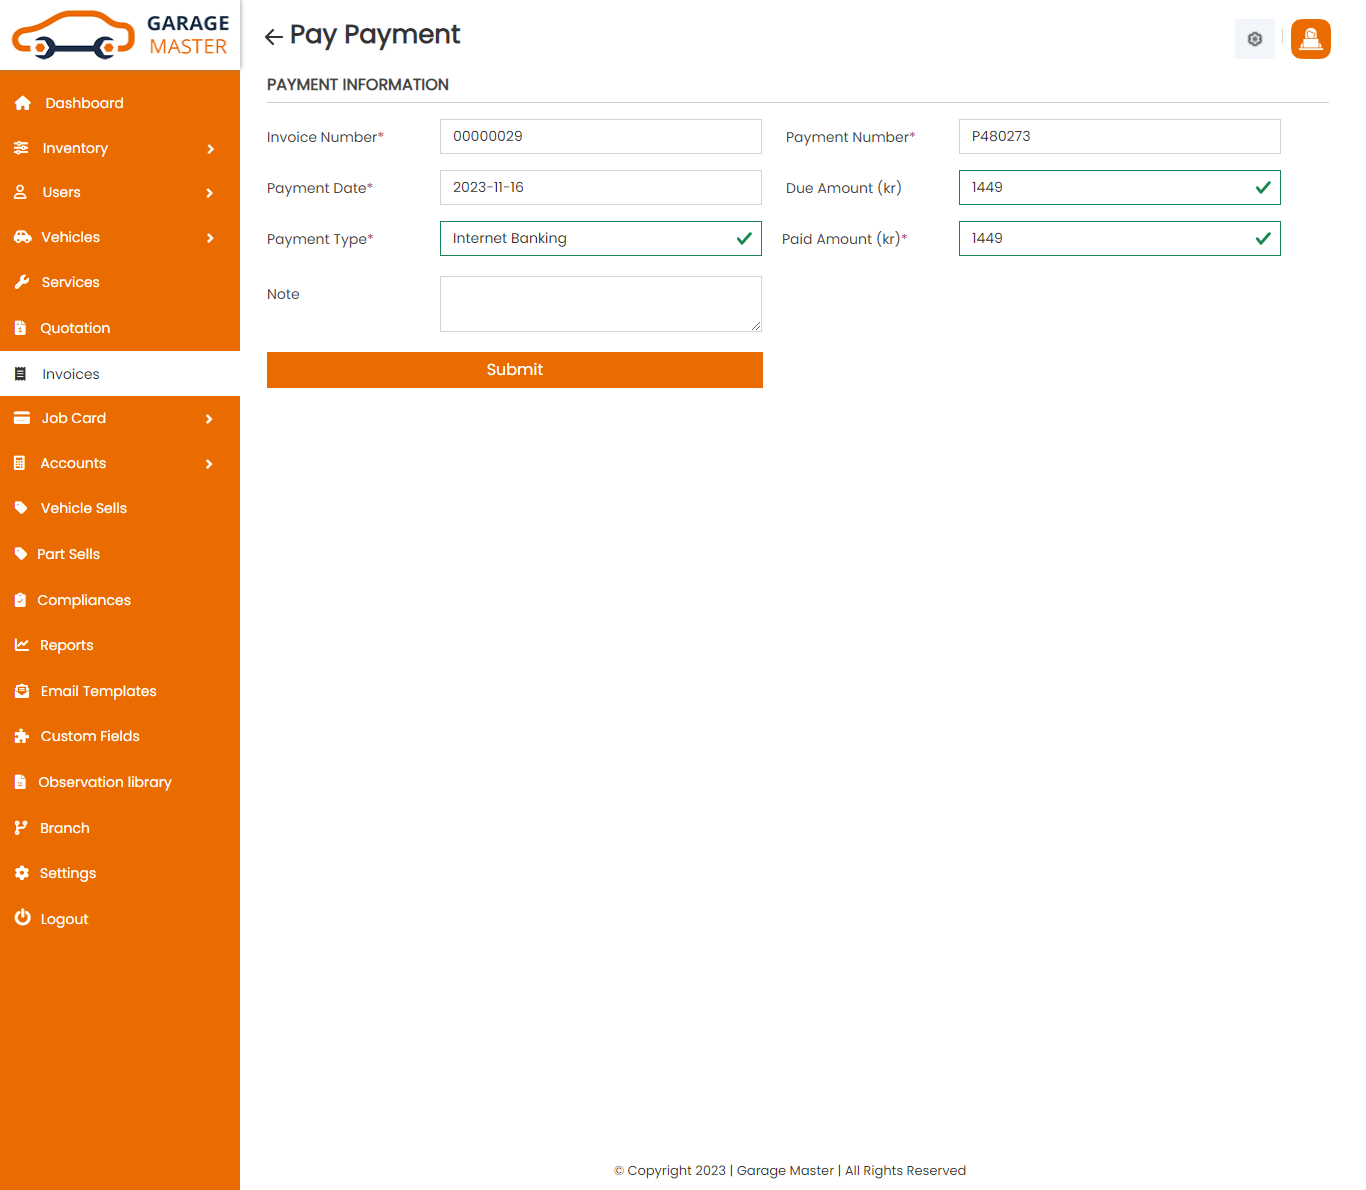
- Invoice Number: Invoice number auto generated.
- Payment Number: Payment number auto generated.
- Payment Date: Enter a new payment date for this pay invoice.
- Amount Due : Amount due auto generated.
- Payment Type: Select payment type for this pay invoice.
- Amount Received: Enter a new amount received for this pay invoice.
- Note:Enter a new note for this pay invoice.
Payment Information
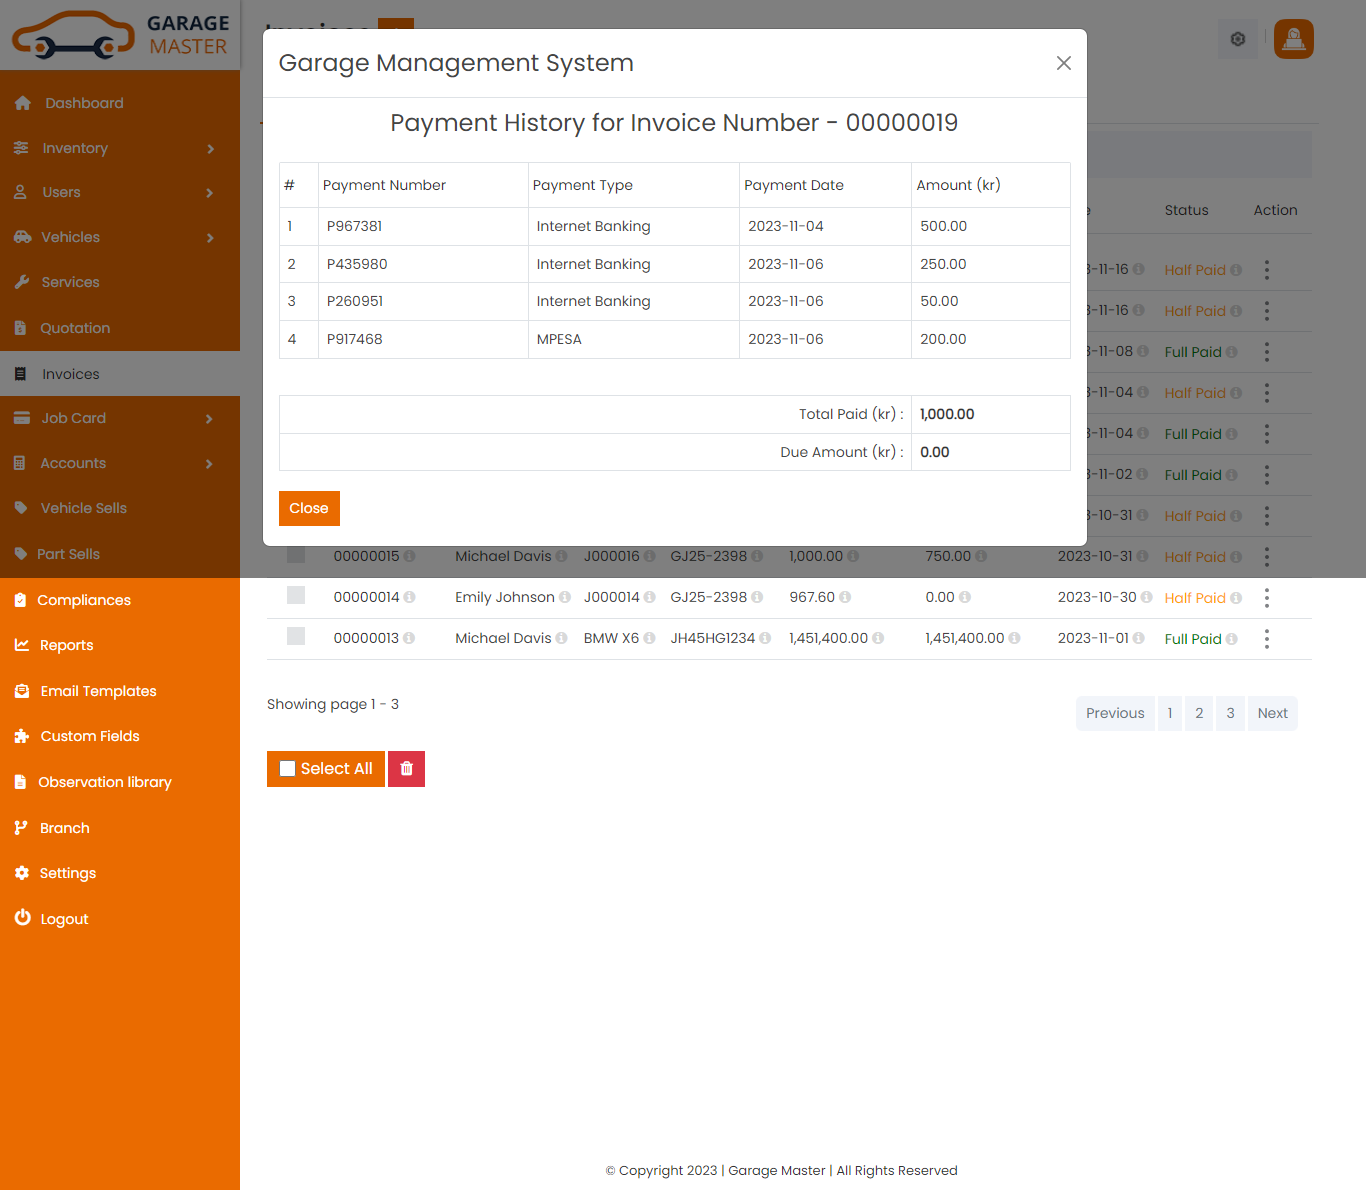
Payment History: Admin can view a complete list of all invoice and Payment History of particular invoice by clicking on Payment History detail button. This will open up details.
8)Job card
A)job card
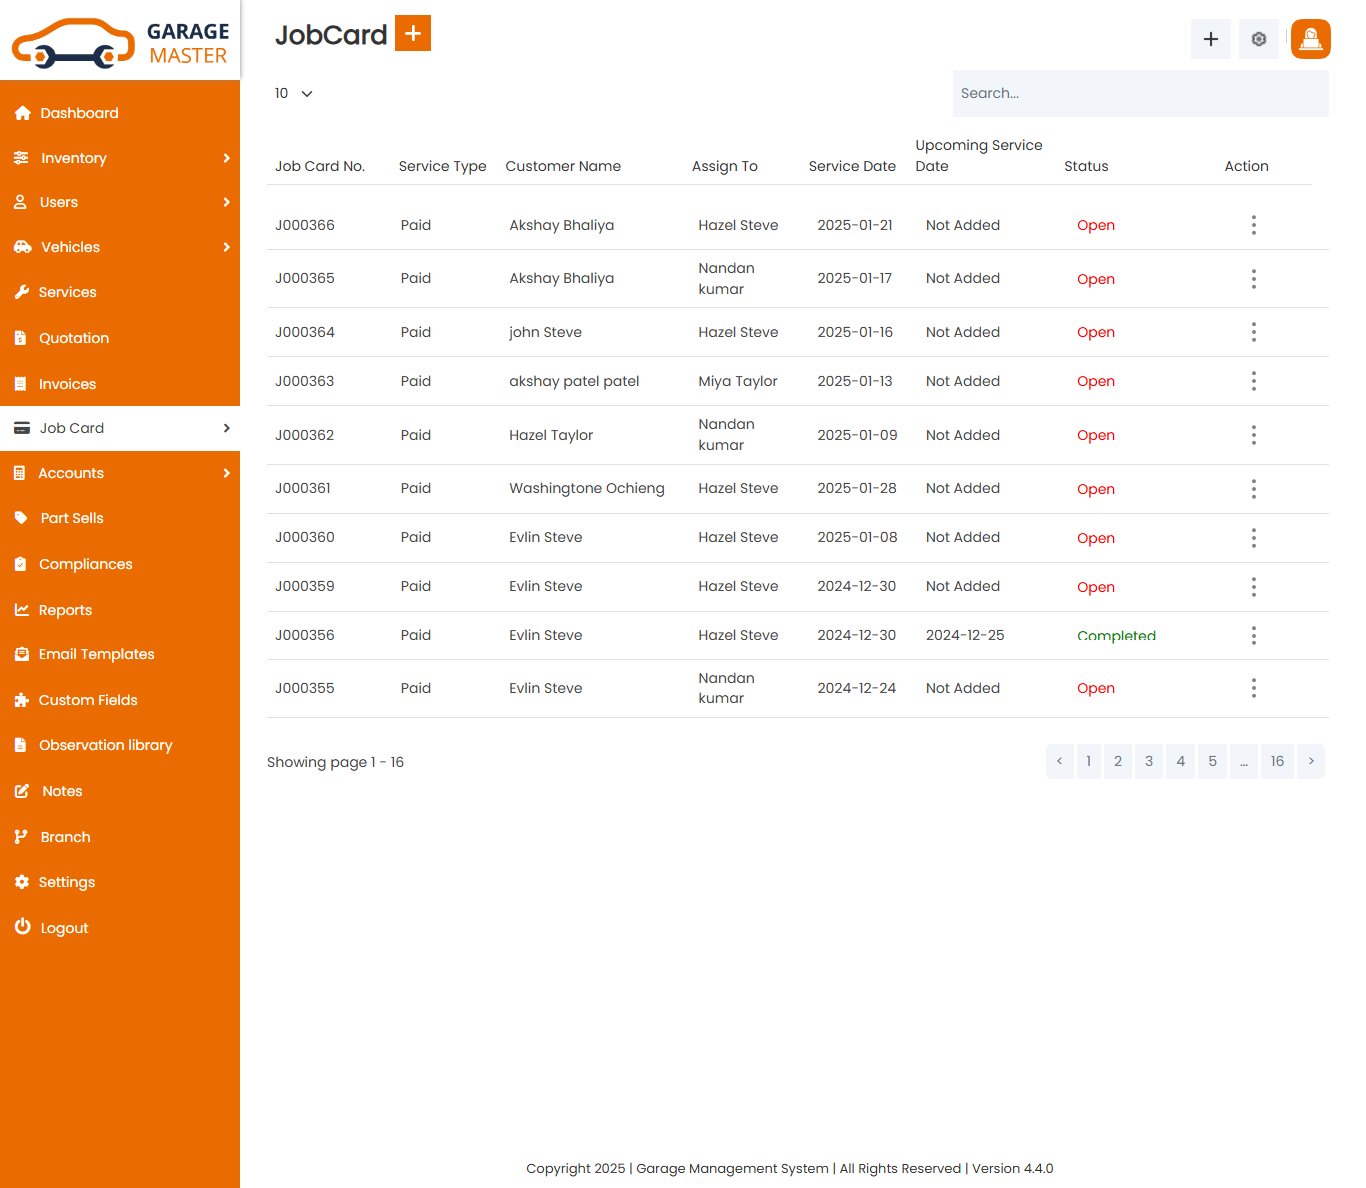
Jobcard List: Admin can add new job card, manage all job card and view a complete list of all job card
Add job card: Admin can add job card details
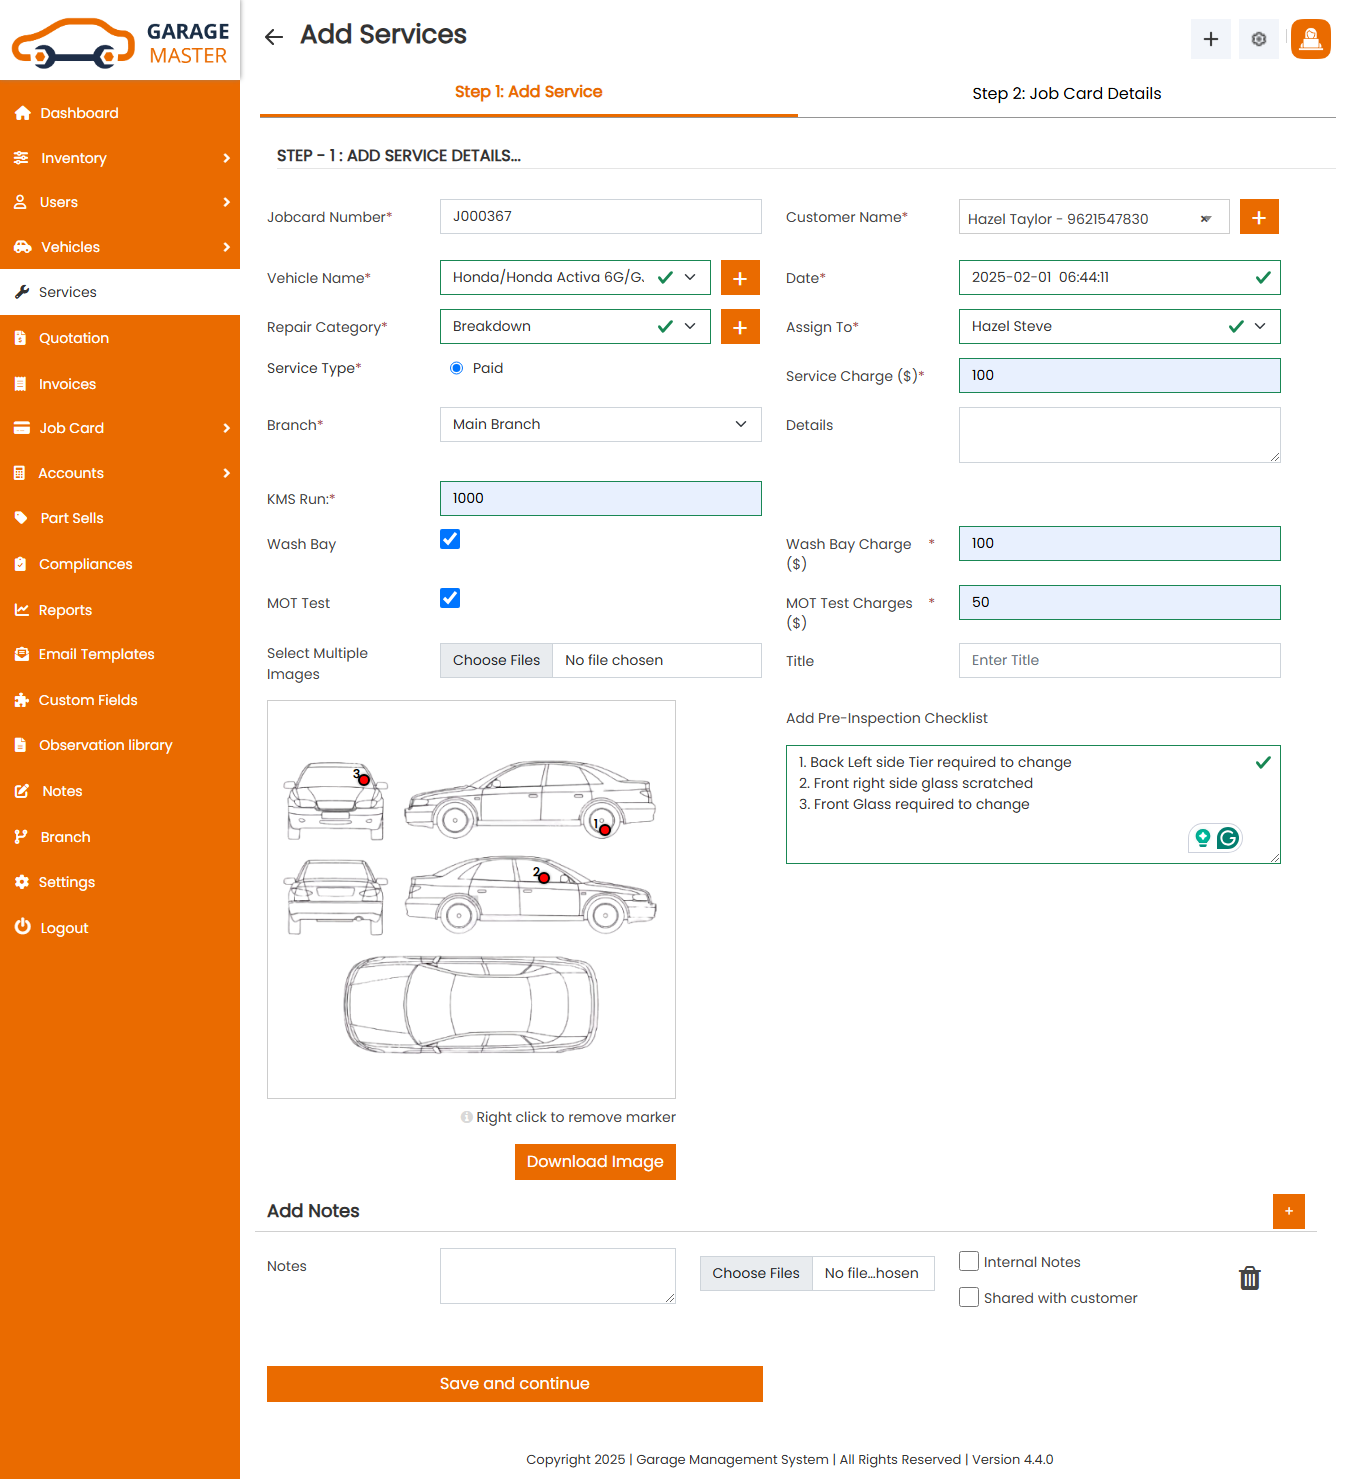
Step-1: Add Service Details.
- Job card Number: Job card number auto generated.
- Customer Name: Select customer name for this service.
- Vehicle Name: Select vehicle name for this service.
- Date: Enter a new date for this service.
- Title: Enter a new title for this service.
- AssignTo: Select assign to for this service.
- Repair Category: Select repair category for this service.
- Service Type: Select service type for this service.
- Details: Enter a new details for this service.
- Car Damage marker: Add car damage marker in given car image
- Add Pre-inspection checklist: Based on damage marker you can add details in this box
- Fix Service Charge: Enter a new fix service charge for this service.
- Registration number: Enter a new registration number for this service.
- Job card Number: Job card number auto fields.
- In Date/Time: In date/time auto fields.
- Expected out date/time: Enter a new expected out date/time for this jobcard.
- Name: Name auto fields.
- Address: Address auto fields.
- Contact Number: Contact number auto fields.
- Email: Email auto fields.
- Model Name: Model name auto fields.
- Chassis Number: Chassis number auto fields.
- Engine Number: Engine number auto fields.
- KMS Run: Enter a new KMS run for this jobcard.
- Date of Sales: Date of sales auto fields.
- Color: Color auto fields.
- Add New: Select and Add New observation point for this service in given dropdown.
- Observation Point: After selecting points it listed in this part
Step-2: Add Job card Details.

Customer Details
Vehicle Details
Observation List
Process Job: Admin can add and edit Process job detail of particular job card by clicking on process job detail button. This will open up details. From here admin can add and edit process job Details.
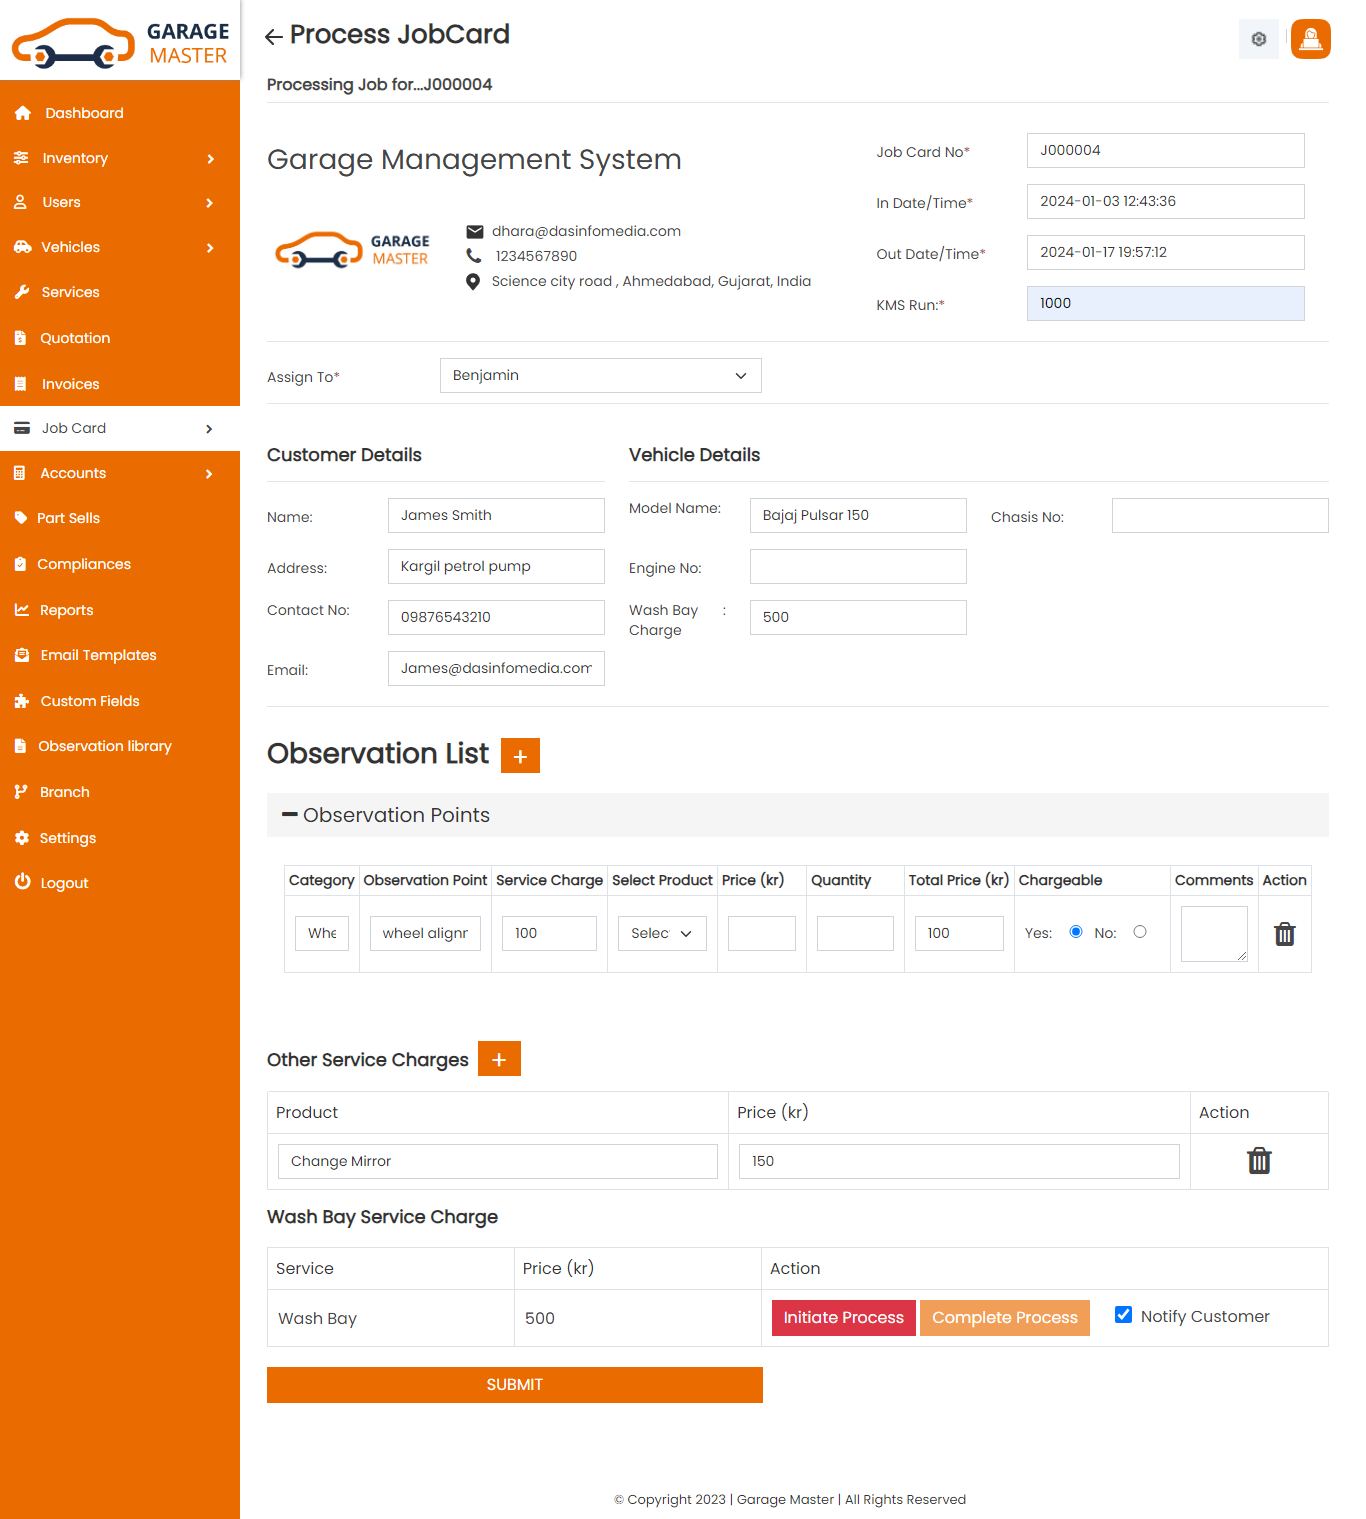
- Job card Number: Job card number auto fields.
- In Date/Time: In date/time auto fields.
- Expected out date/time: Enter a new expected out date/time for this jobcard.
- Name: Name auto fields.
- Address: Address auto fields.
- Contact Number: Contact number auto fields.
- Email: Email auto fields.
- Model Name: Model name auto fields.
- Chassis Number: Chassis number auto fields.
- Engine Number: Engine number auto fields.
- KMS Run: Enter a new KMS run for this jobcard.
- Date of Sales: Date of sales auto fields.
- Color: Color auto fields.
- Add New: Add new observation point for this jobcard.
- Observation Point: List of the observation point.
- Category: Category auto field.
- observation point: Observation point auto field.
- Product: Select product name for this job card.
- Price: Select product and auto generated price
- Quantity: Enter a new quantity for this job card.
- Amount: Select product and quantity and auto generated total price.
- Chargeable: Select Chargeable for this jobcard.
- comment: Enter a new comment for this jobcard.
- Action: Delete product for this job card.
- Add New: Add new other service charges for this jobcard.
- Product: Enter a new product for this jobcard.
- Price: Enter a new price for this jobcard.
- action: Delete other service charges for this jobcard.
Processing job for particular job card
Customer Details
Vehicle Details
Observation List
Other Service Charges
Create Invoice: Admin can Create invoice details

- Invoice for: Select invoice type for this invoice.
- Invoice Number: Invoice number auto generated.
- Customer Name: Select customer name for this invoice.
- Job card Number: Select job card number for this invoice.
- Date: Enter a new date for this invoice.
- Total Amount: Select job card and auto generated total amount.
- Payment Type: Select payment type for this invoice.
- Status: Select status for this invoice.
- Discount(%): Enter a new discount for this invoice.
- Details: Enter a new details for this invoice.
- Tax: Select tax for this invoice.
- Paid Amount: Enter a new paid amount for this invoice.
- Grand Total: Select customer name and job card in auto generated grand total.
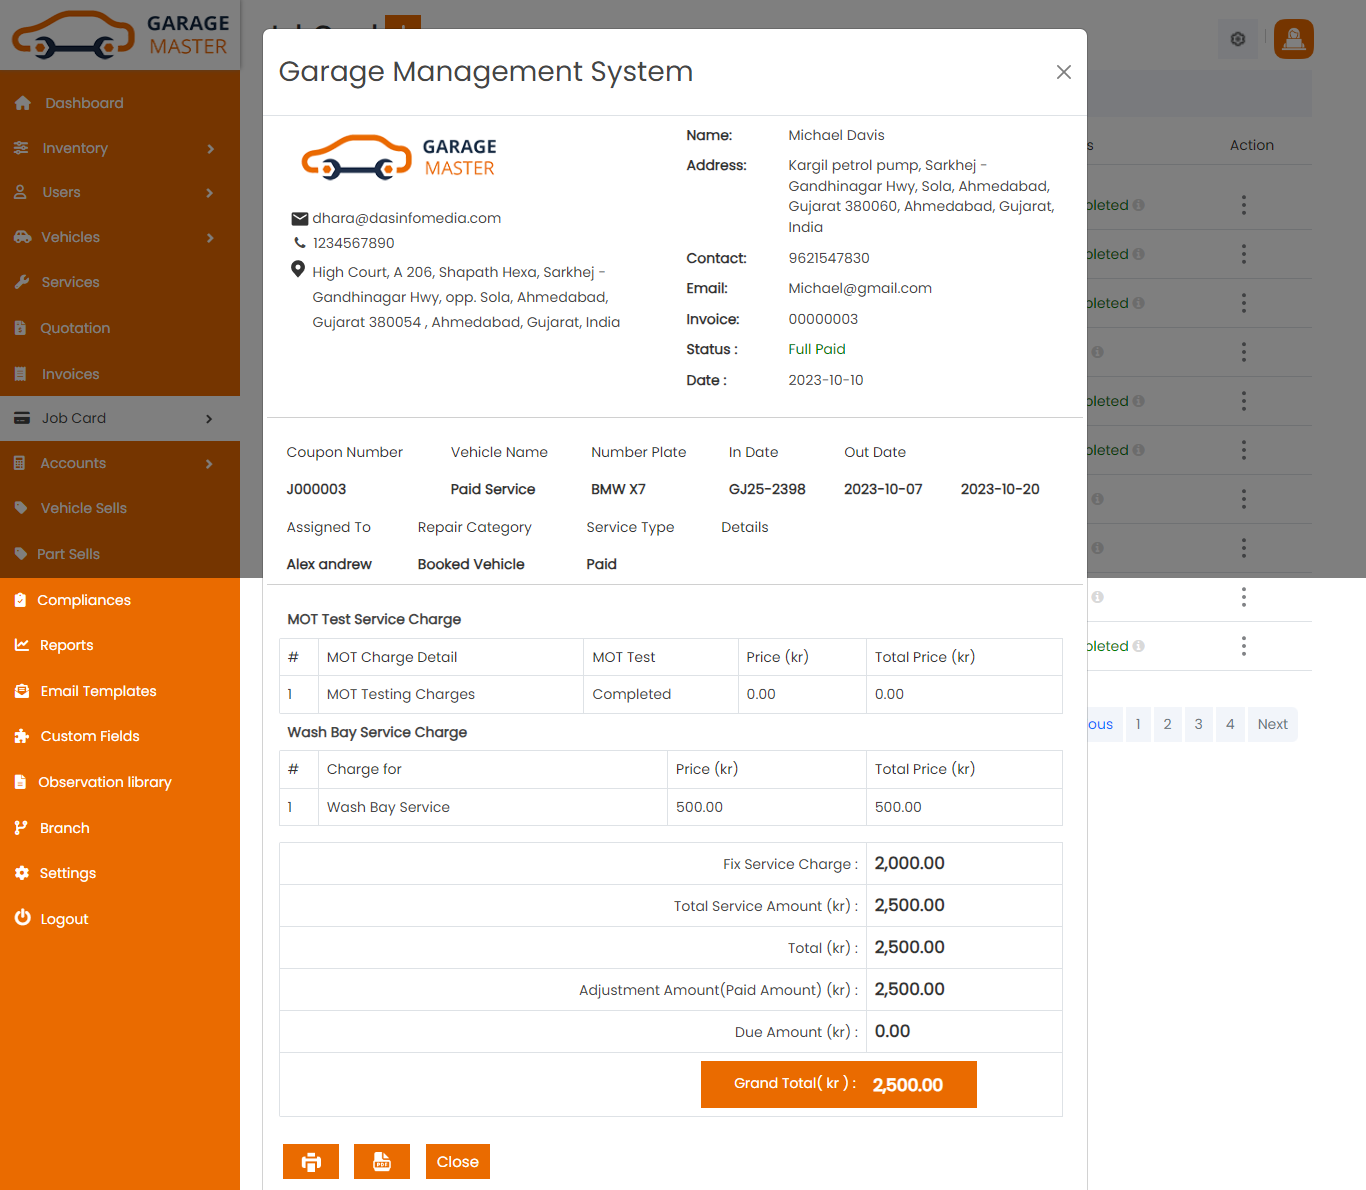
View invoice: Admin can view a complete list of all job card and view detail of particular invoice by clicking on view invoice detail button. This will open up details.From here admin can also Print Out view invoice.
Gate Pass: Admin can add gate pass details
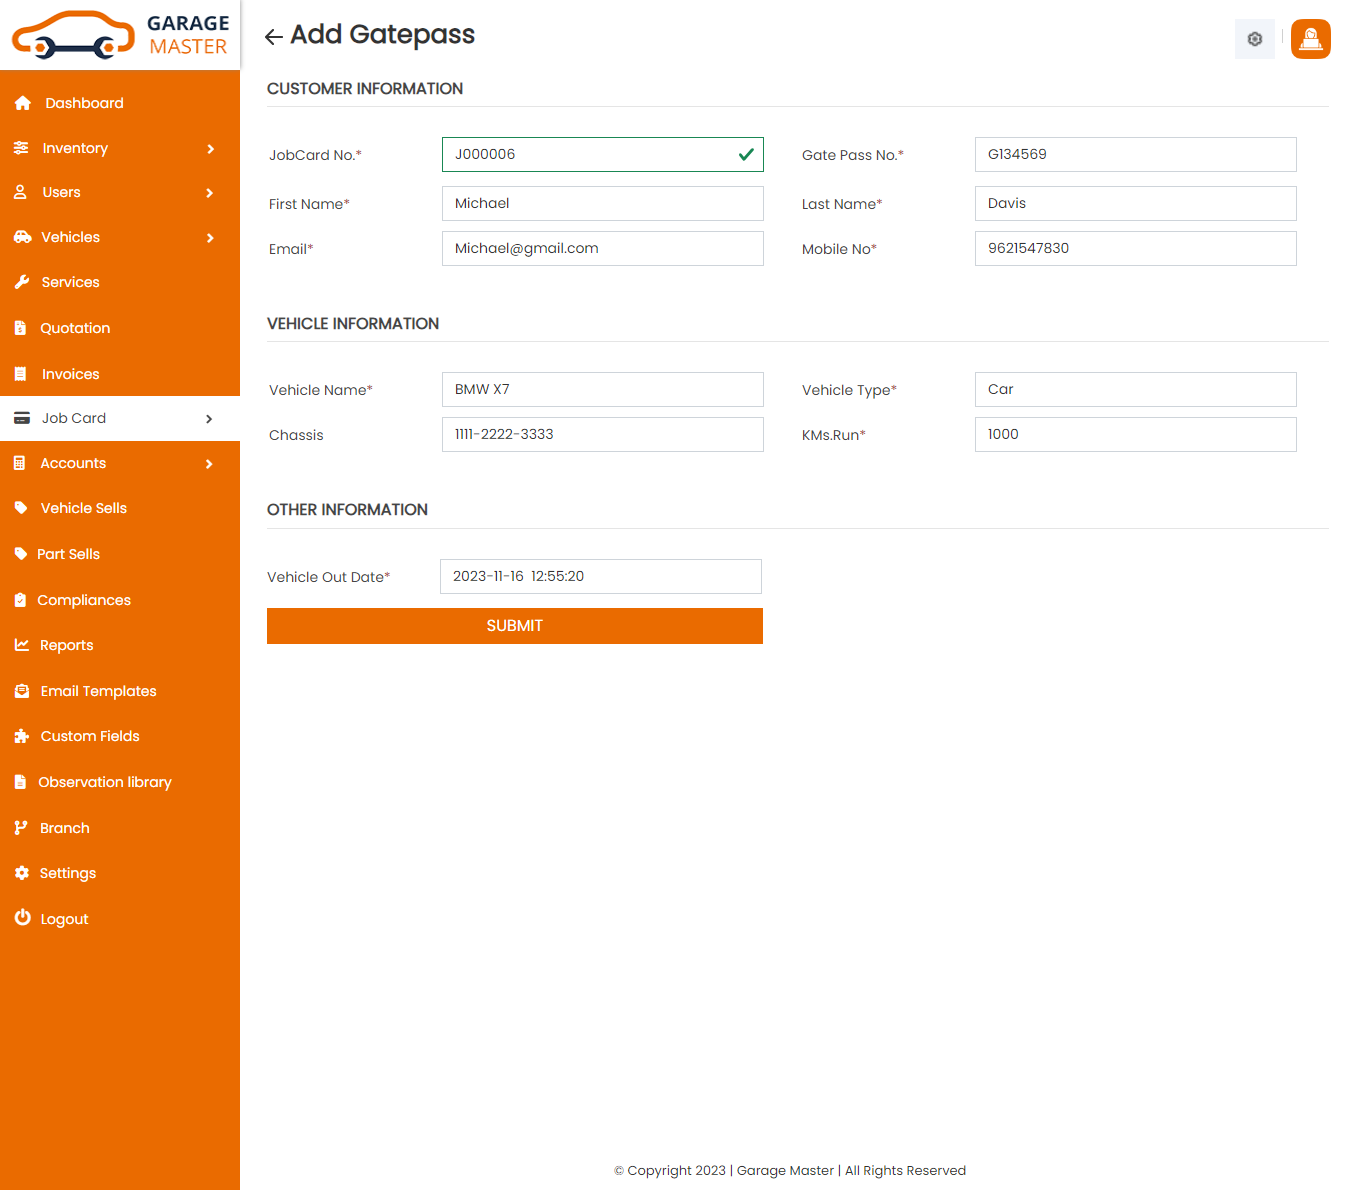
- Job card Number: Job card number auto field.
- Gate Pass Number : Gate pass number auto generated.
- First Name: First name auto field.
- last Name: last name auto field.
- Email: Email auto field.
- Mobile number: Mobile number auto field.
- Model Name: Model name auto fields.
- Vehicle Type: Vehicle type auto fields.
- Chassis Number: Chassis number auto fields.
- KMS Run: Enter a new KMS run for this gate pass.
- Service Out Date: Enter a new service out date for this gate pass.
Customer Information
Vehicle Information
Other Information
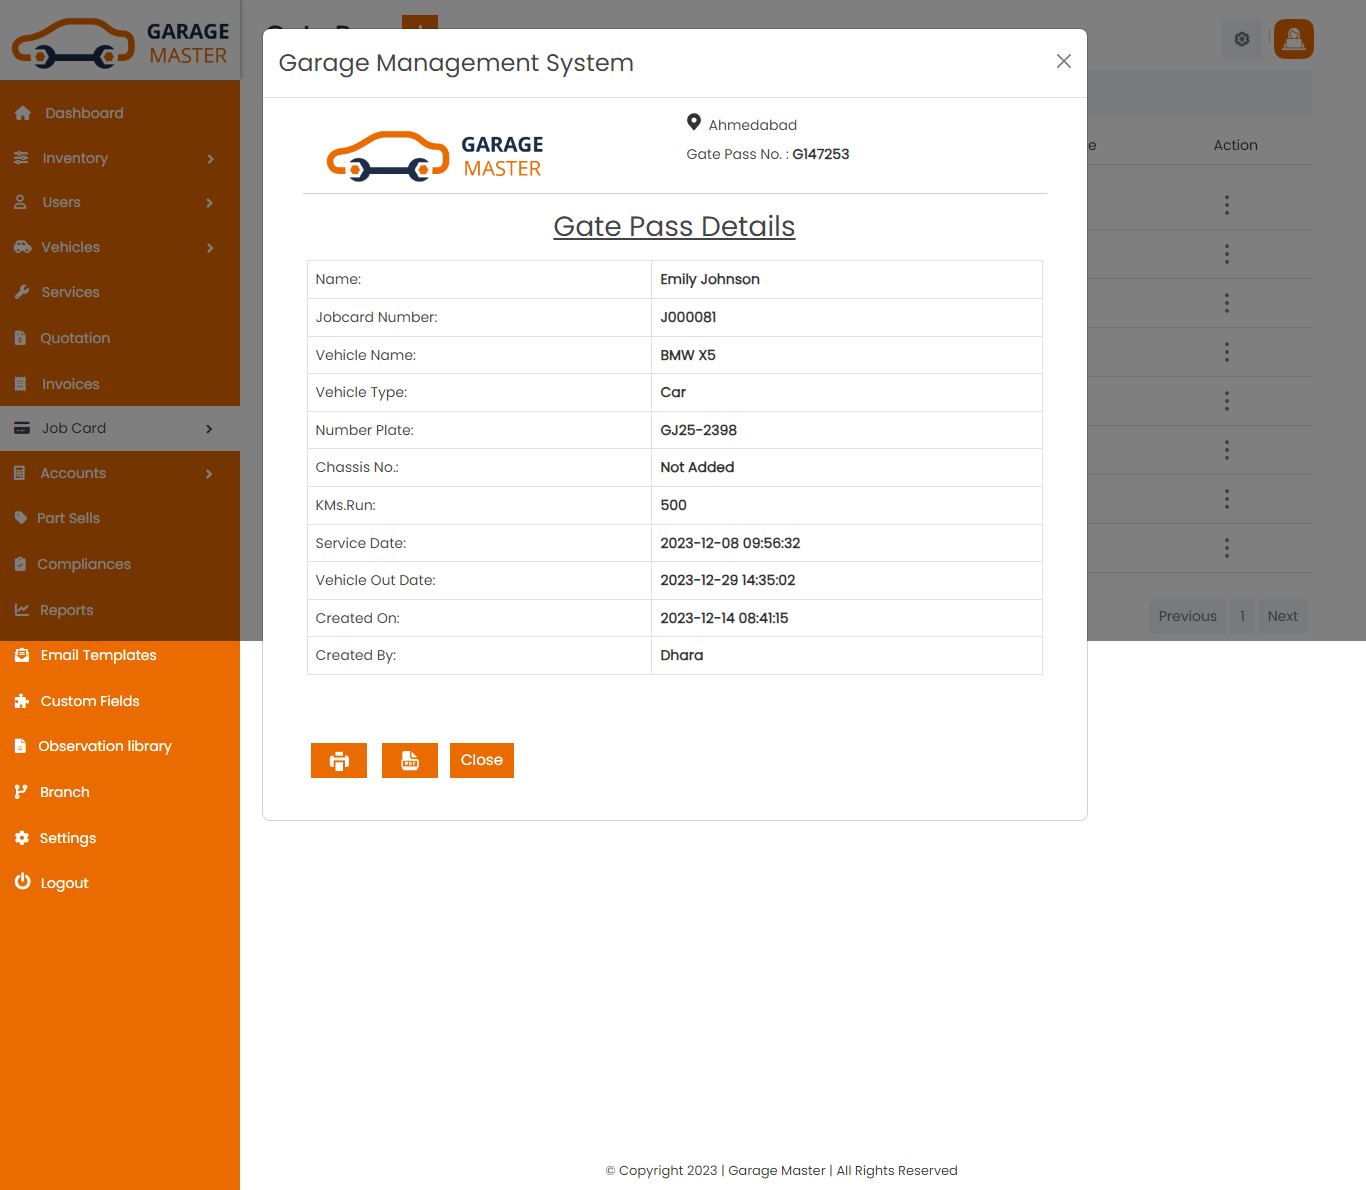
Gate Receipt: Admin can view a complete list of all Gate Receipt and view detail of particular Gate Receipt by clicking on Gate Receipt detail button. This will open up details.From here admin can also Print Out Gate Receipt.
B)Gate Pass
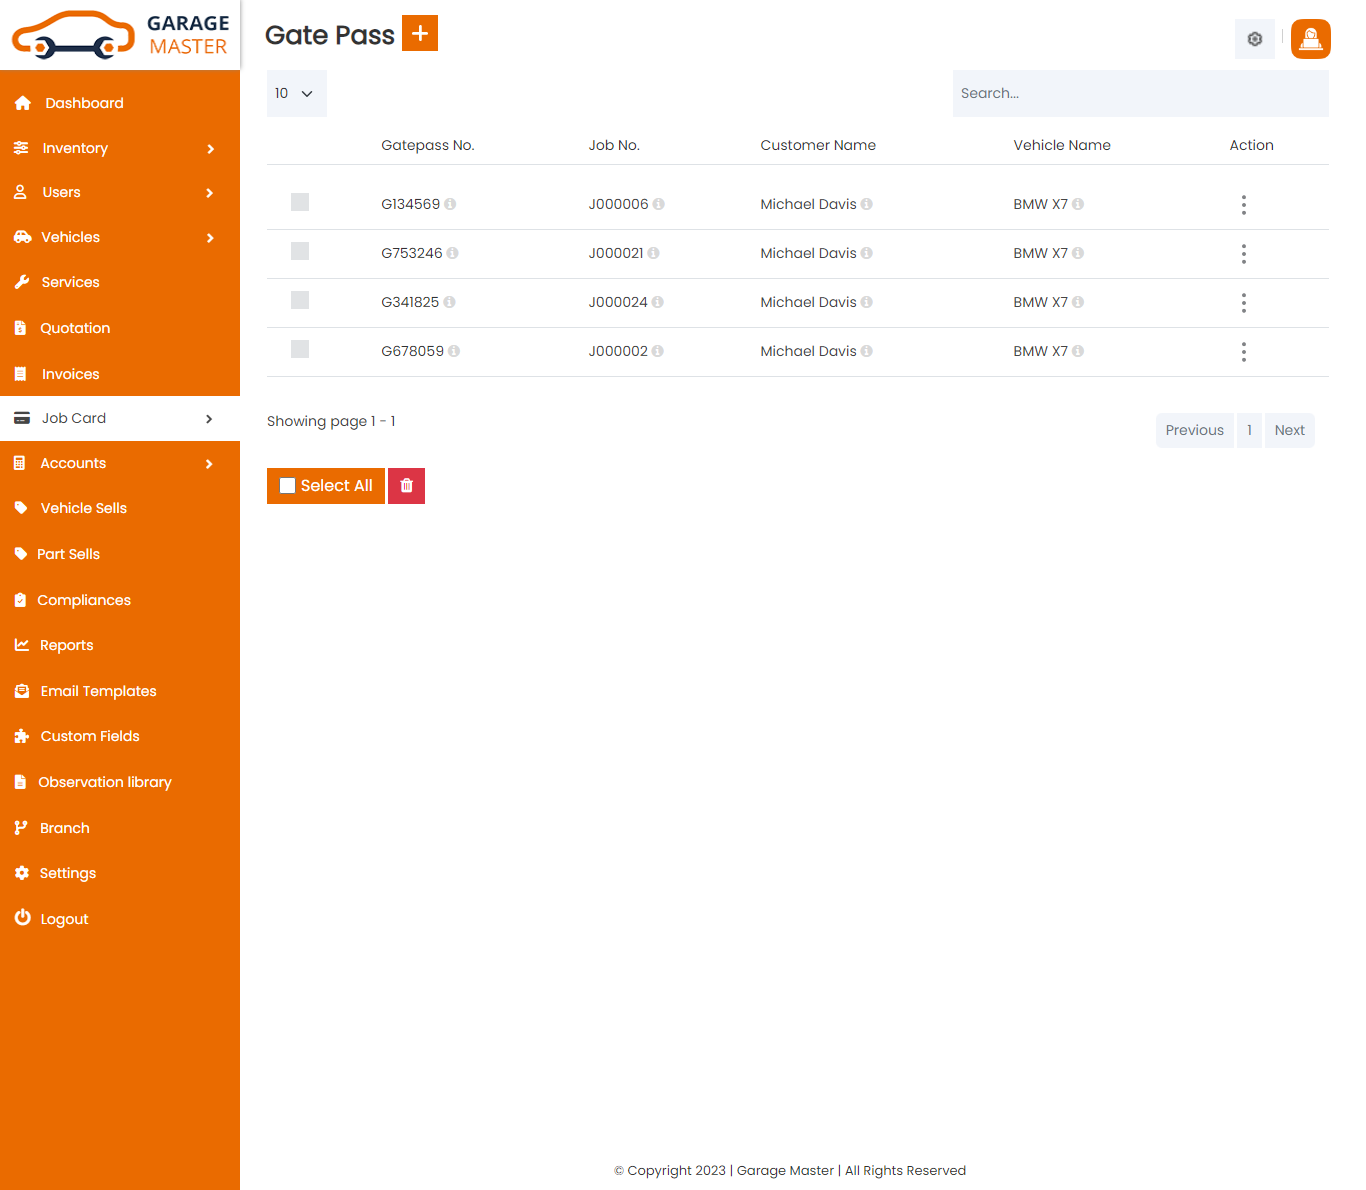
GatePass List: Admin can add new gate pass, manage all gate pass and view a complete list of all gate pass
Add GatePass: Admin can add gate pass details
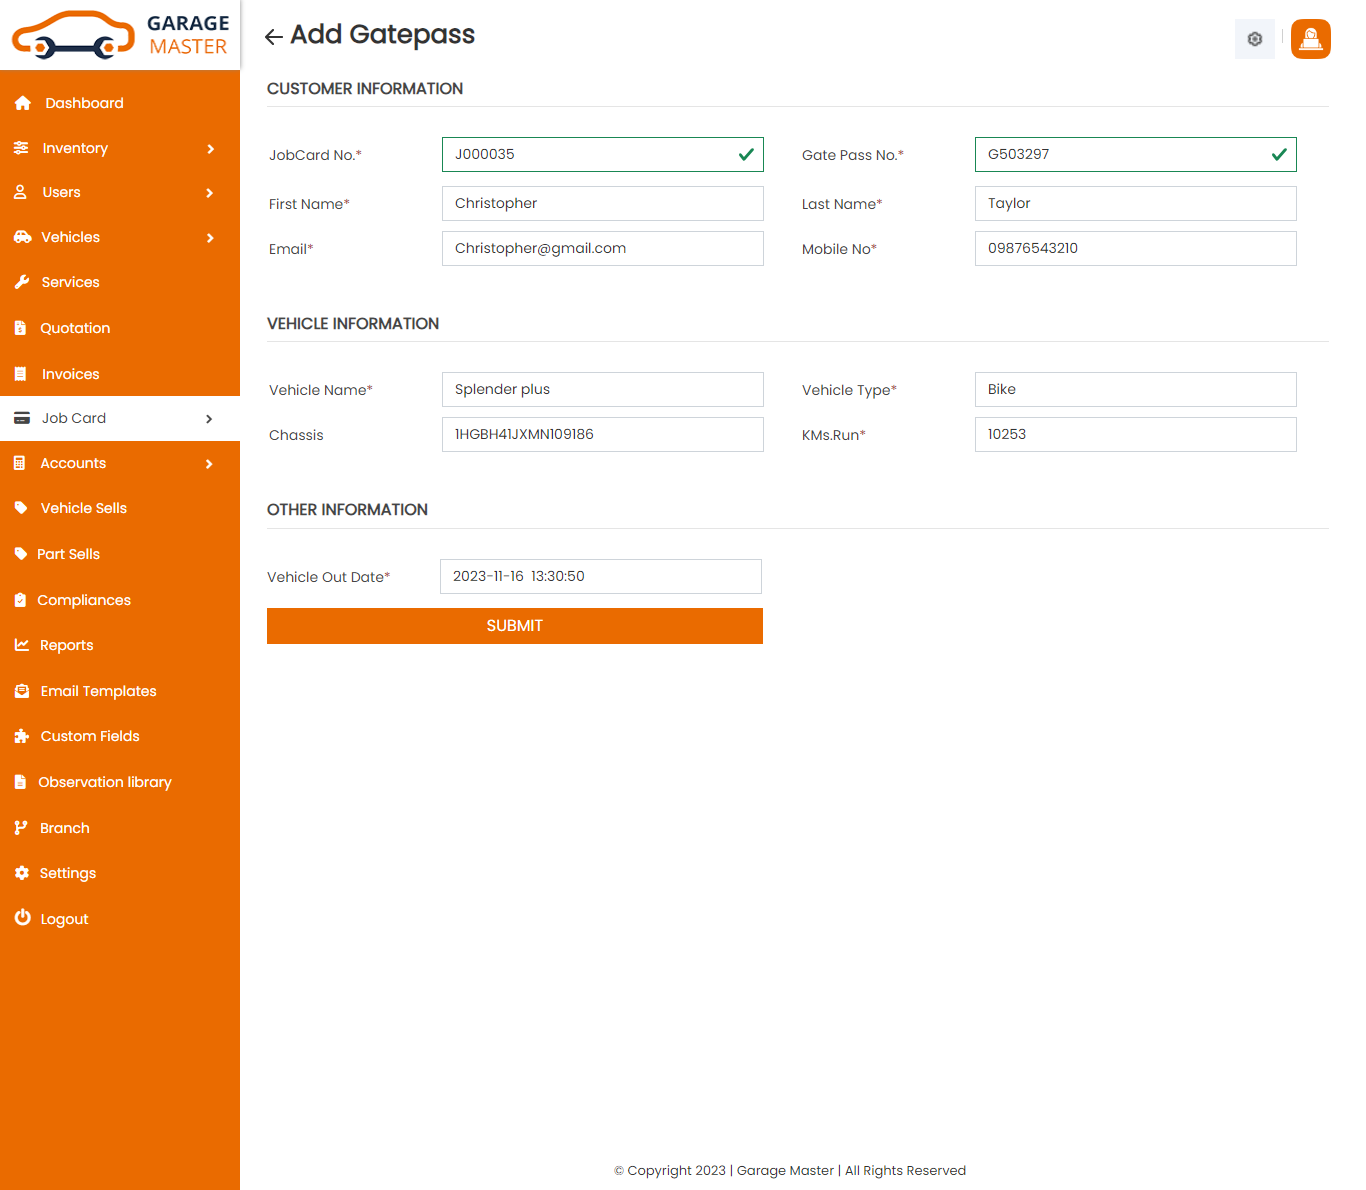
- Job card Number: Select job card number for this gate pass.
- Gate Pass Number: Gate pass number auto generated.
- First Name: First name auto field.
- last Name: last name auto field.
- Email: Email auto field.
- Mobile number: Mobile number auto field.
- Vehicle Name: Vehicle name auto fields.
- Vehicle Type: Vehicle type auto fields.
- Chassis Number: Chassis number auto fields.
- KMS Run: Enter a new KMS run for this gate pass.
- Vehicle Out Date: Enter a new vehicle out date for this gate pass.
Customer Information
Vehicle Information
Other Information
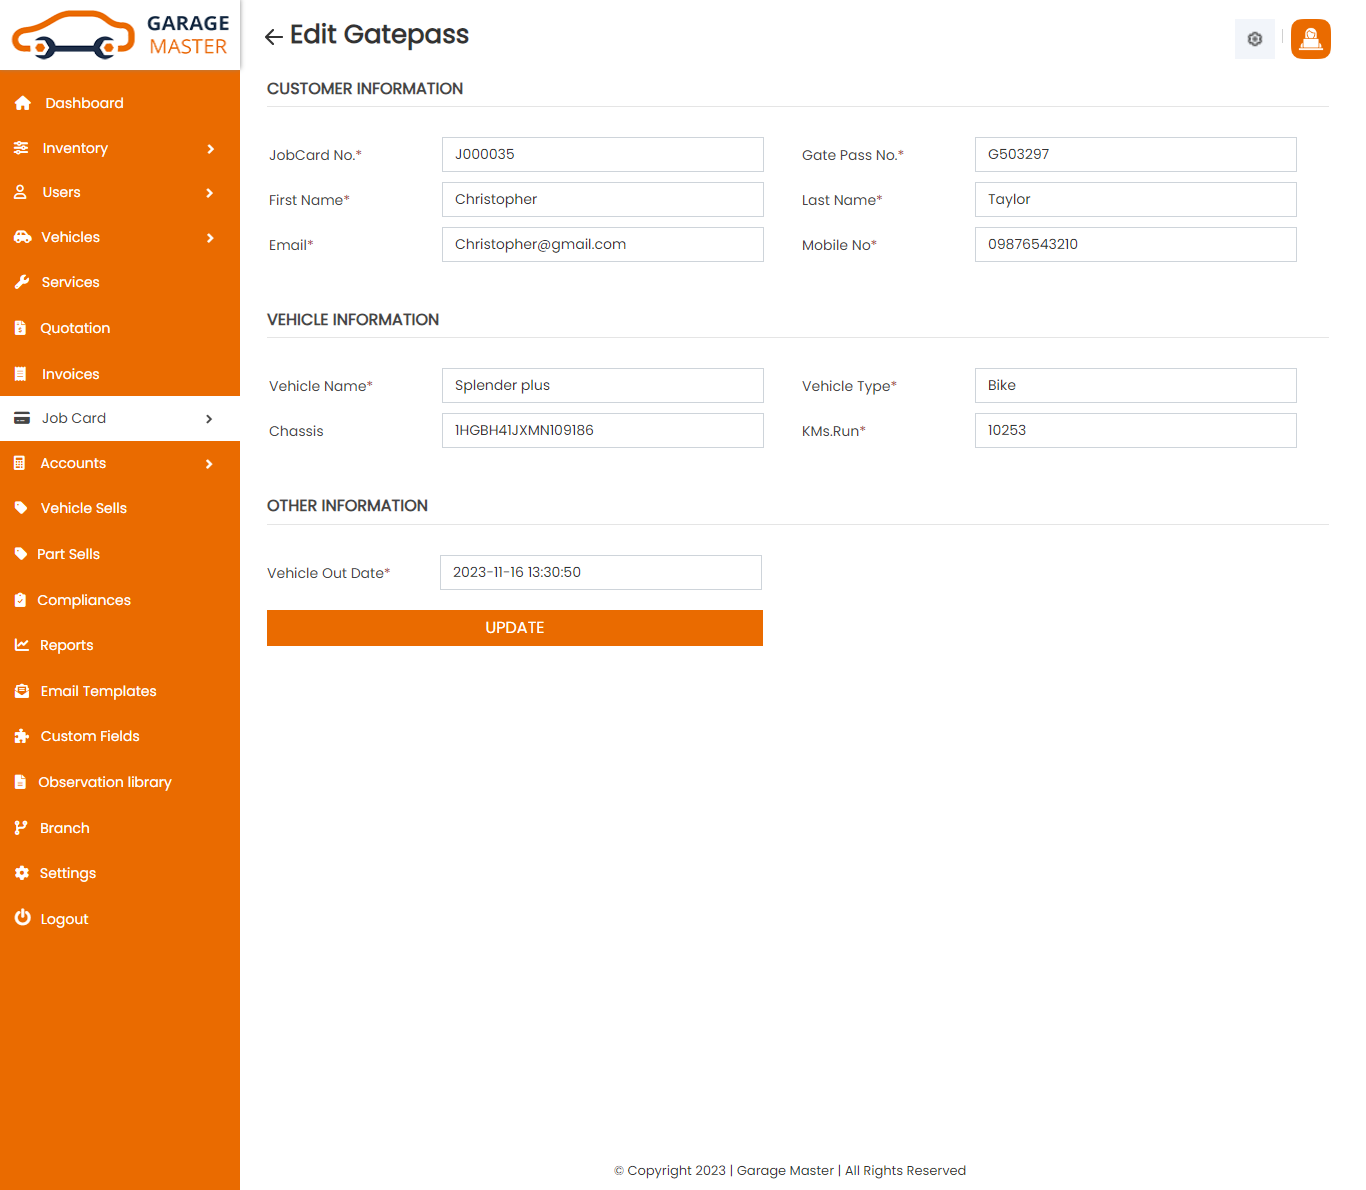
Edit Gate pass: Admin can Edit detail of particular gate pass by clicking on Edit detail button. This will open up details. From here admin can Change gate pass Details.
Gate Receipt: Admin can view a complete list of all Gate Receipt and view detail of particular Gate Receipt by clicking on Gate Receipt detail button. This will open up details.From here admin can also Print Out Gate Receipt.

Delete Gate pass: Admin can delete a complete list of all gate pass and delete detail of particular gate pass by clicking on delete detail button. This will delete details.
9)Account & Tax Rates
A)Tax Rates
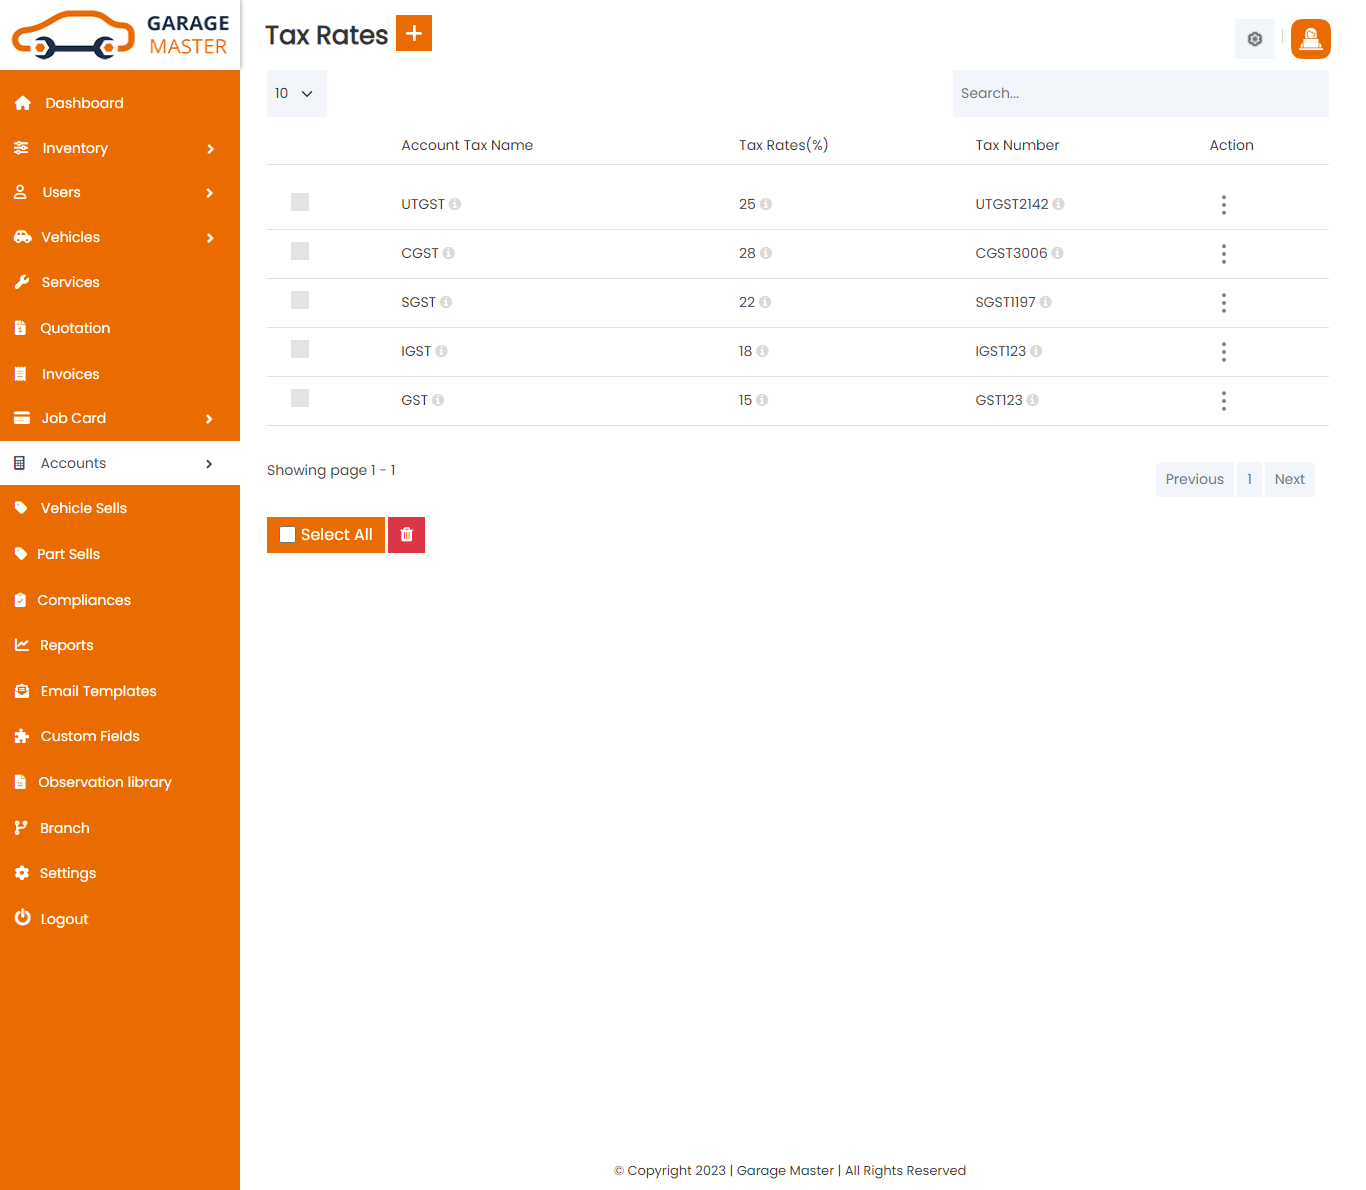
List Account Tax: Admin can add new account tax, account tax all account tax and view a complete list of all account tax.
Add Account Tax: Admin can add Account Tax details
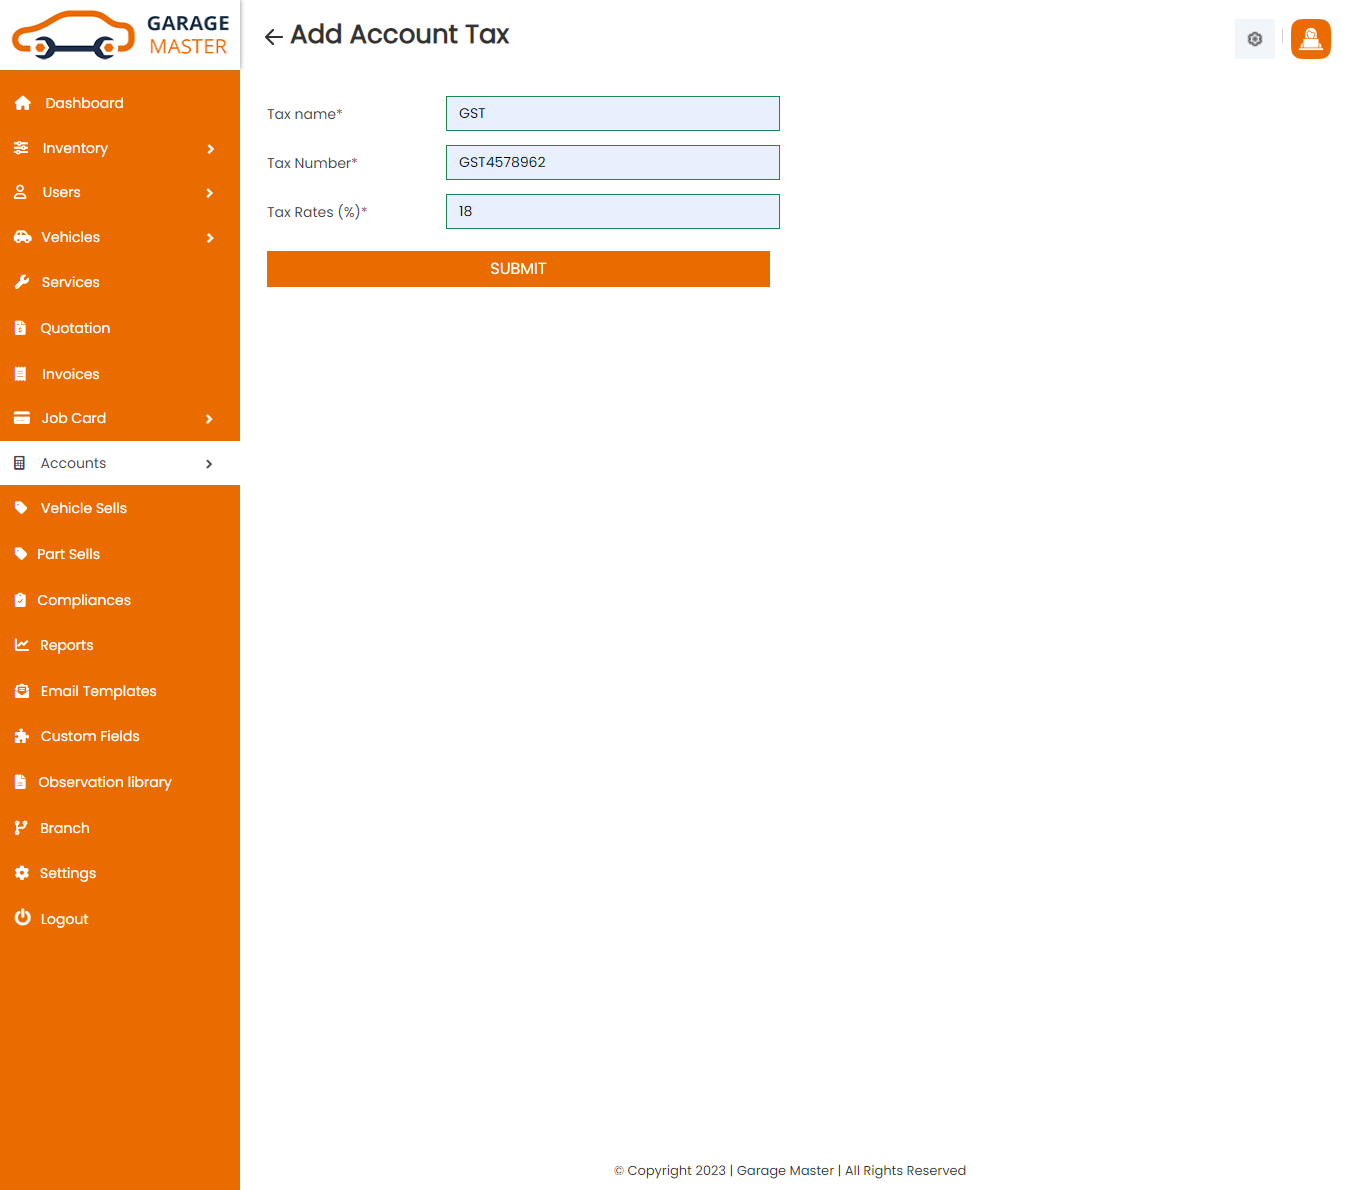
- Tax Name: Enter a new tax name for this account tax.
- Tax Rates: Enter a new tax rates for this account tax.
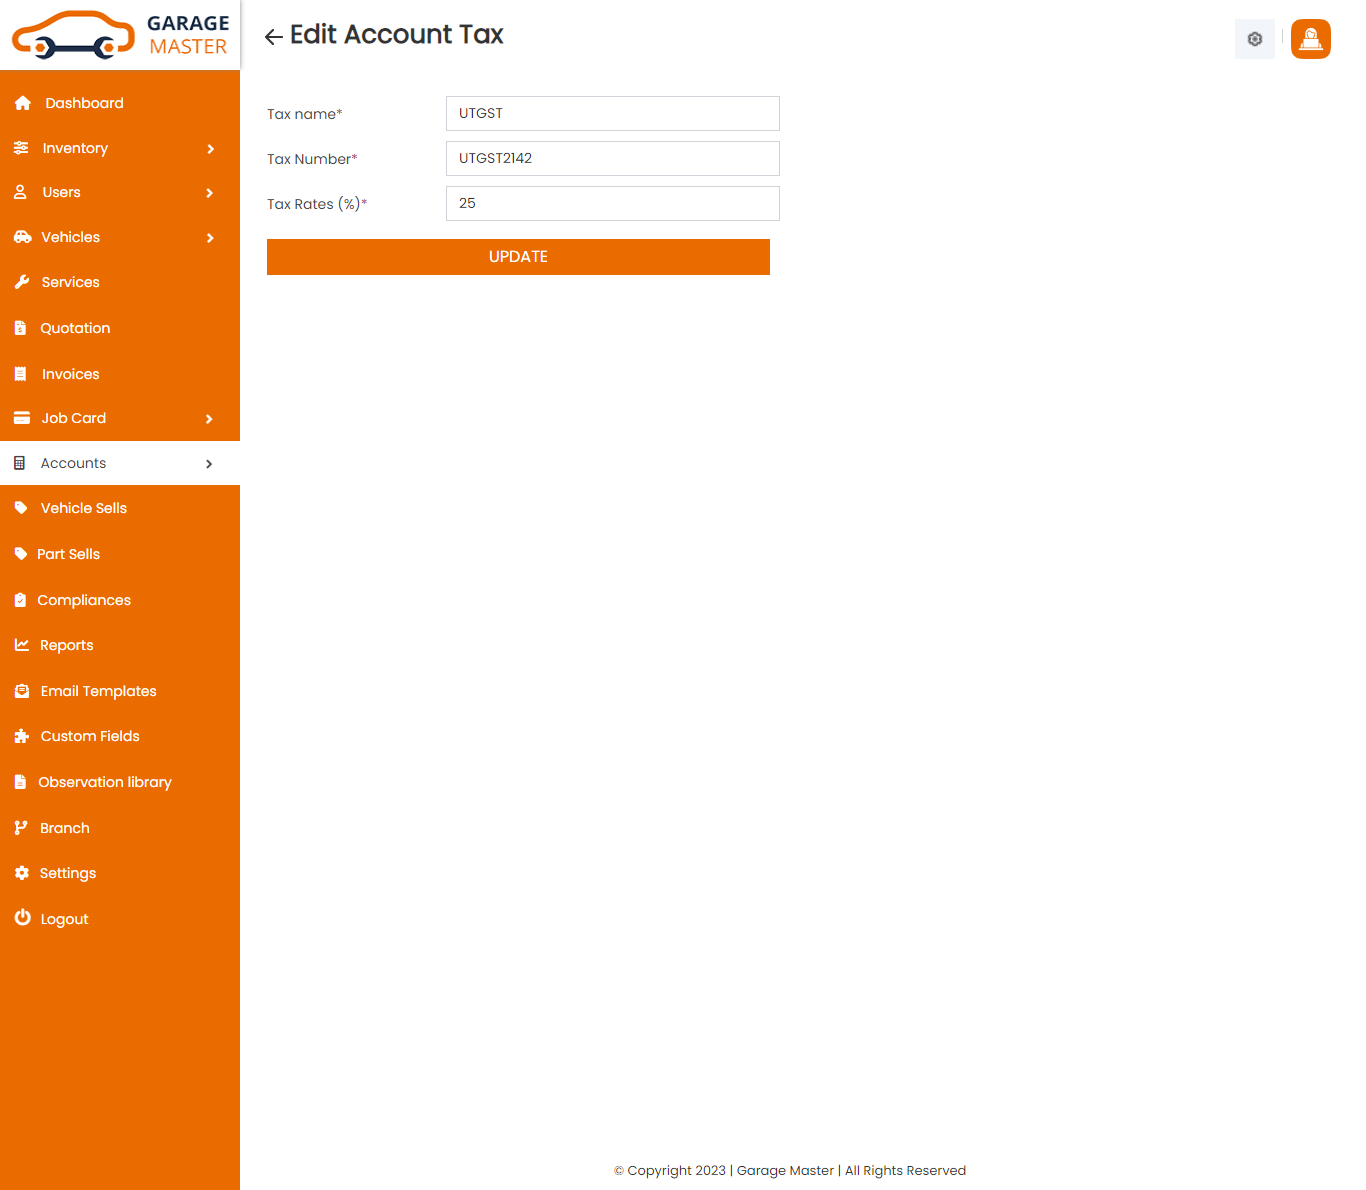
Edit Account Tax: Admin can Edit detail of particular account tax by clicking on Edit detail button. This will open up details. From here admin can Change account tax Details.
Delete Account Tax: Admin can delete a complete list of all account tax and delete detail of particular account tax by clicking on delete detail button. This will delete details.
B)Payment Method
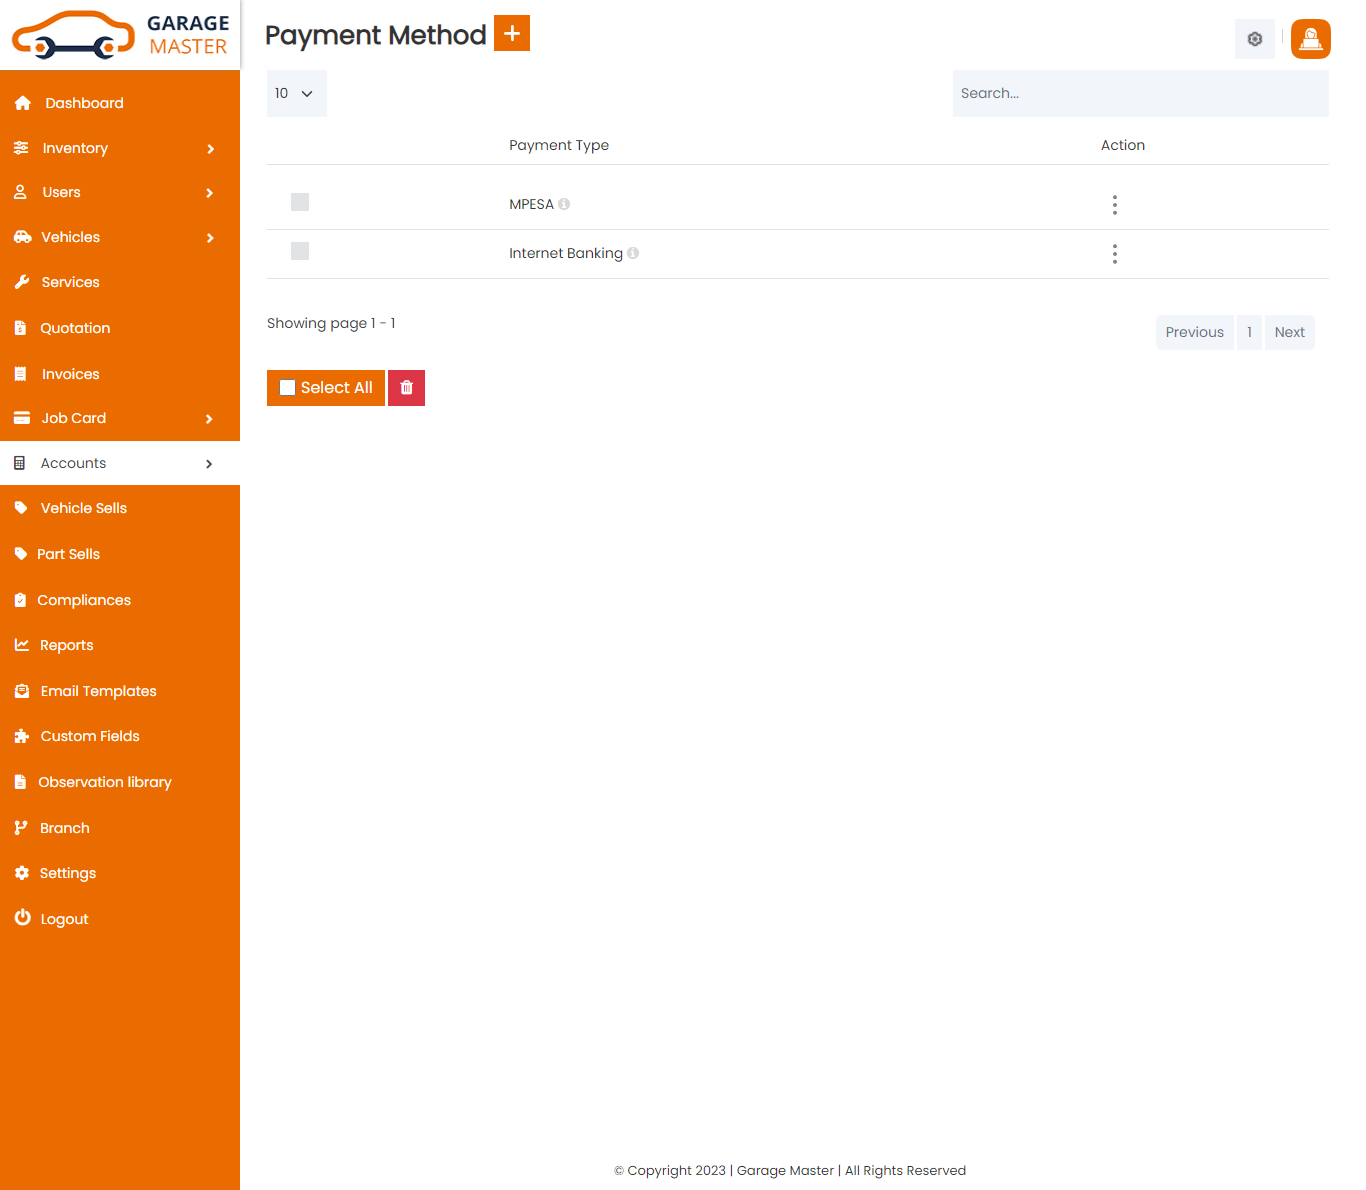
List PaymentMethod: Admin can add new PaymentMethod, PaymentMethod all PaymentMethod and view a complete list of all PaymentMethod.
Add PaymentMethod: Admin can add PaymentMethod details
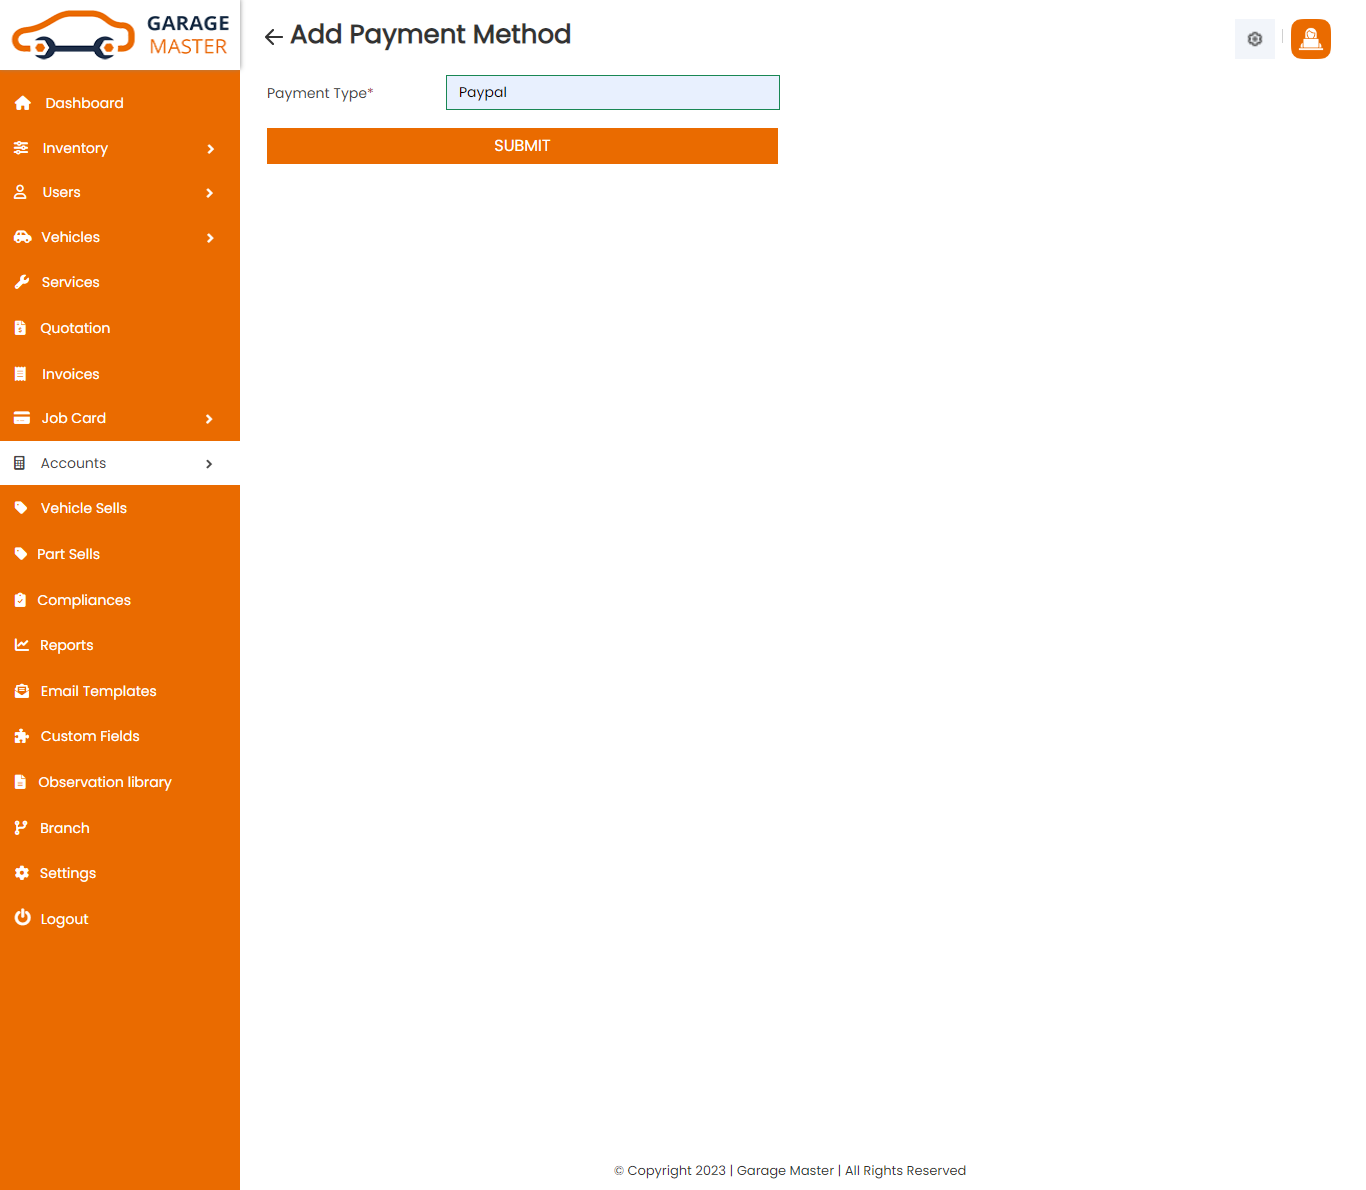
- Payment type: Enter a new payment type for this payment method.
Edit PaymentMethod: Admin can Edit detail of particular PaymentMethod by clicking on Edit detail button. This will open up details. From here admin can Change PaymentMethod Details.
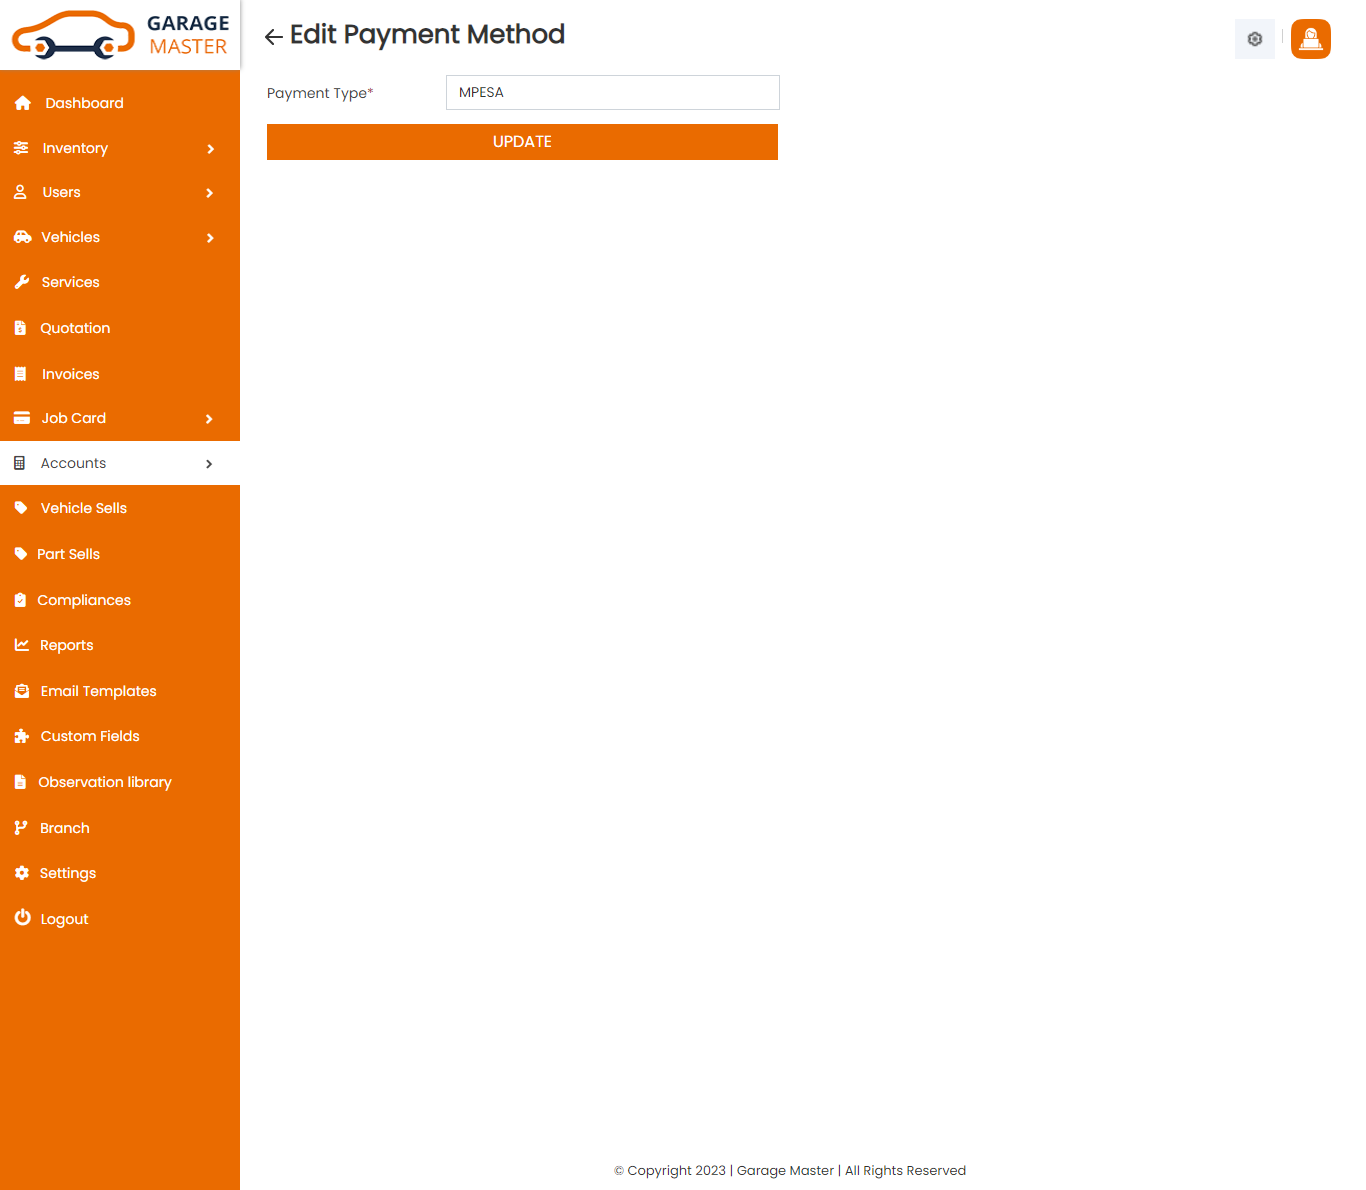
Delete PaymentMethod: Admin can delete a complete list of all PaymentMethod and delete detail of particular PaymentMethod by clicking on delete detail button. This will delete details.
C)Income
List Income: Admin can add new Income, Income all Income and view a complete list of all Income.
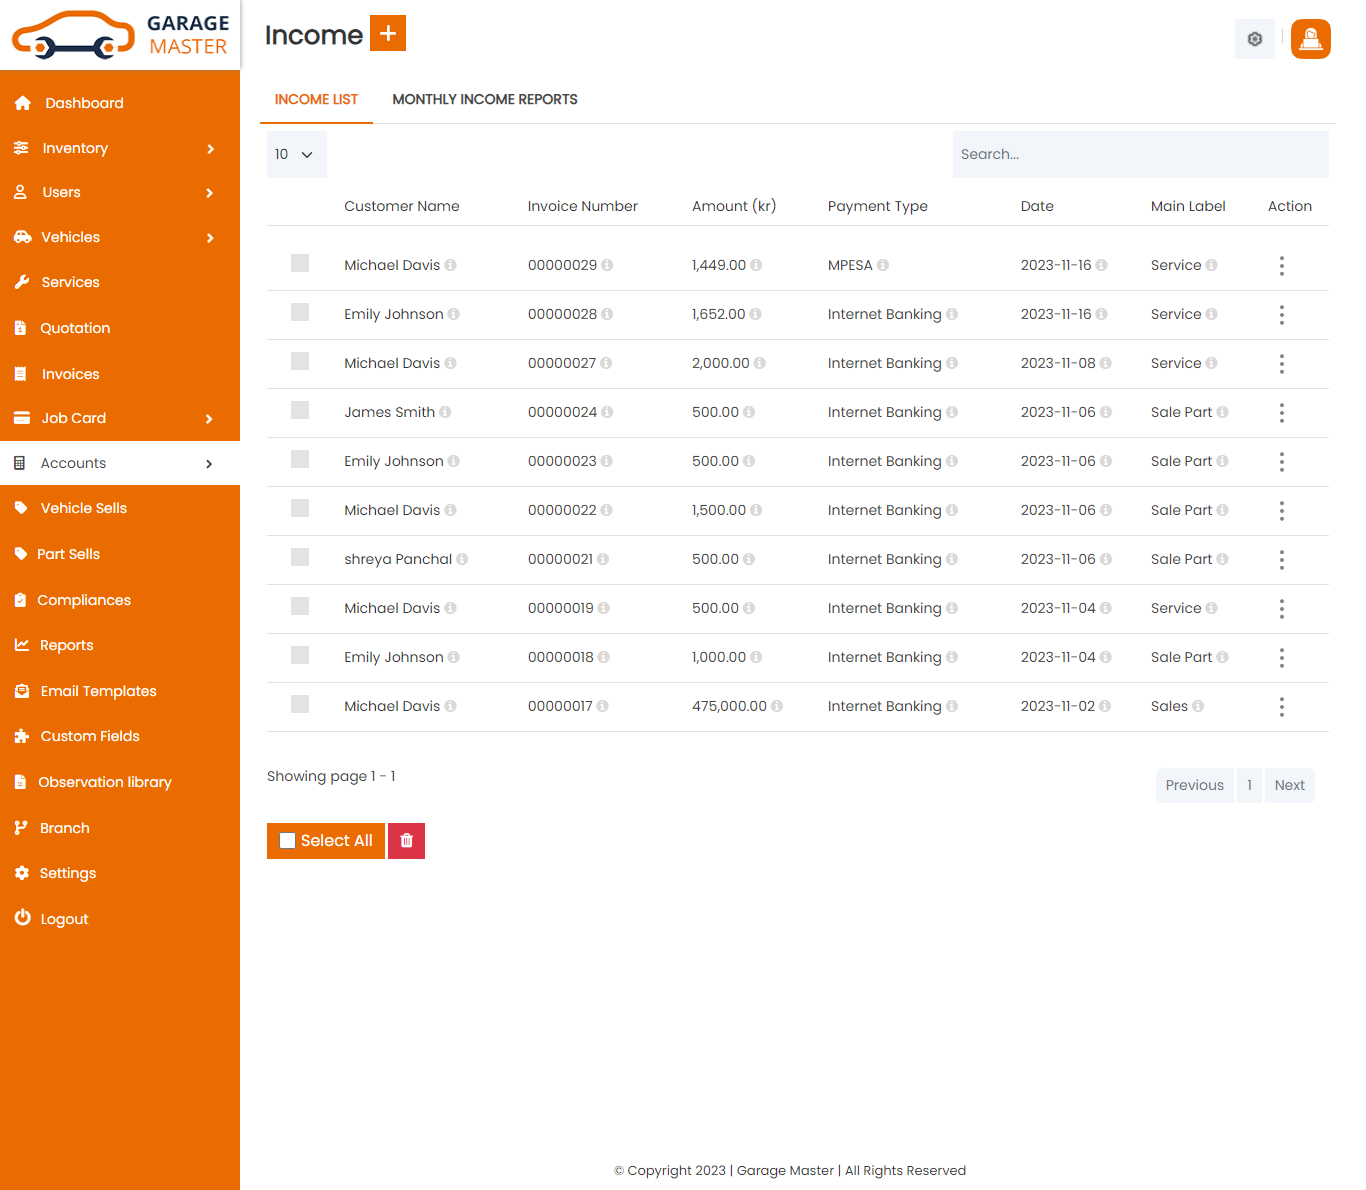
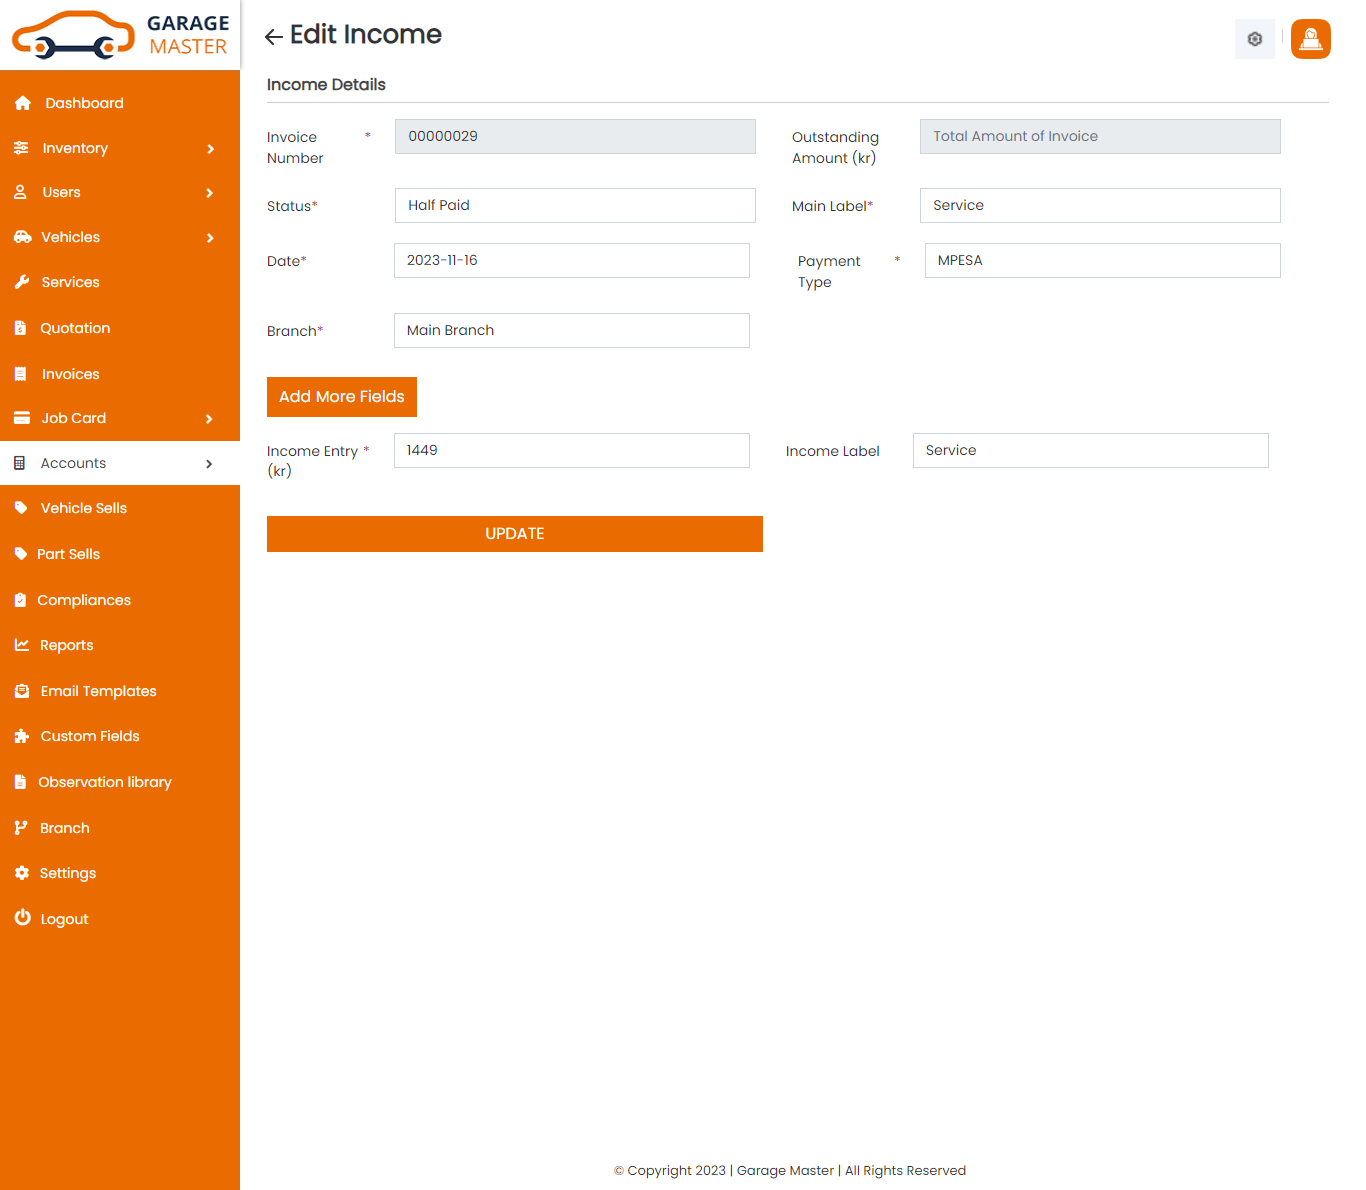
Add Income: Admin can add Income details
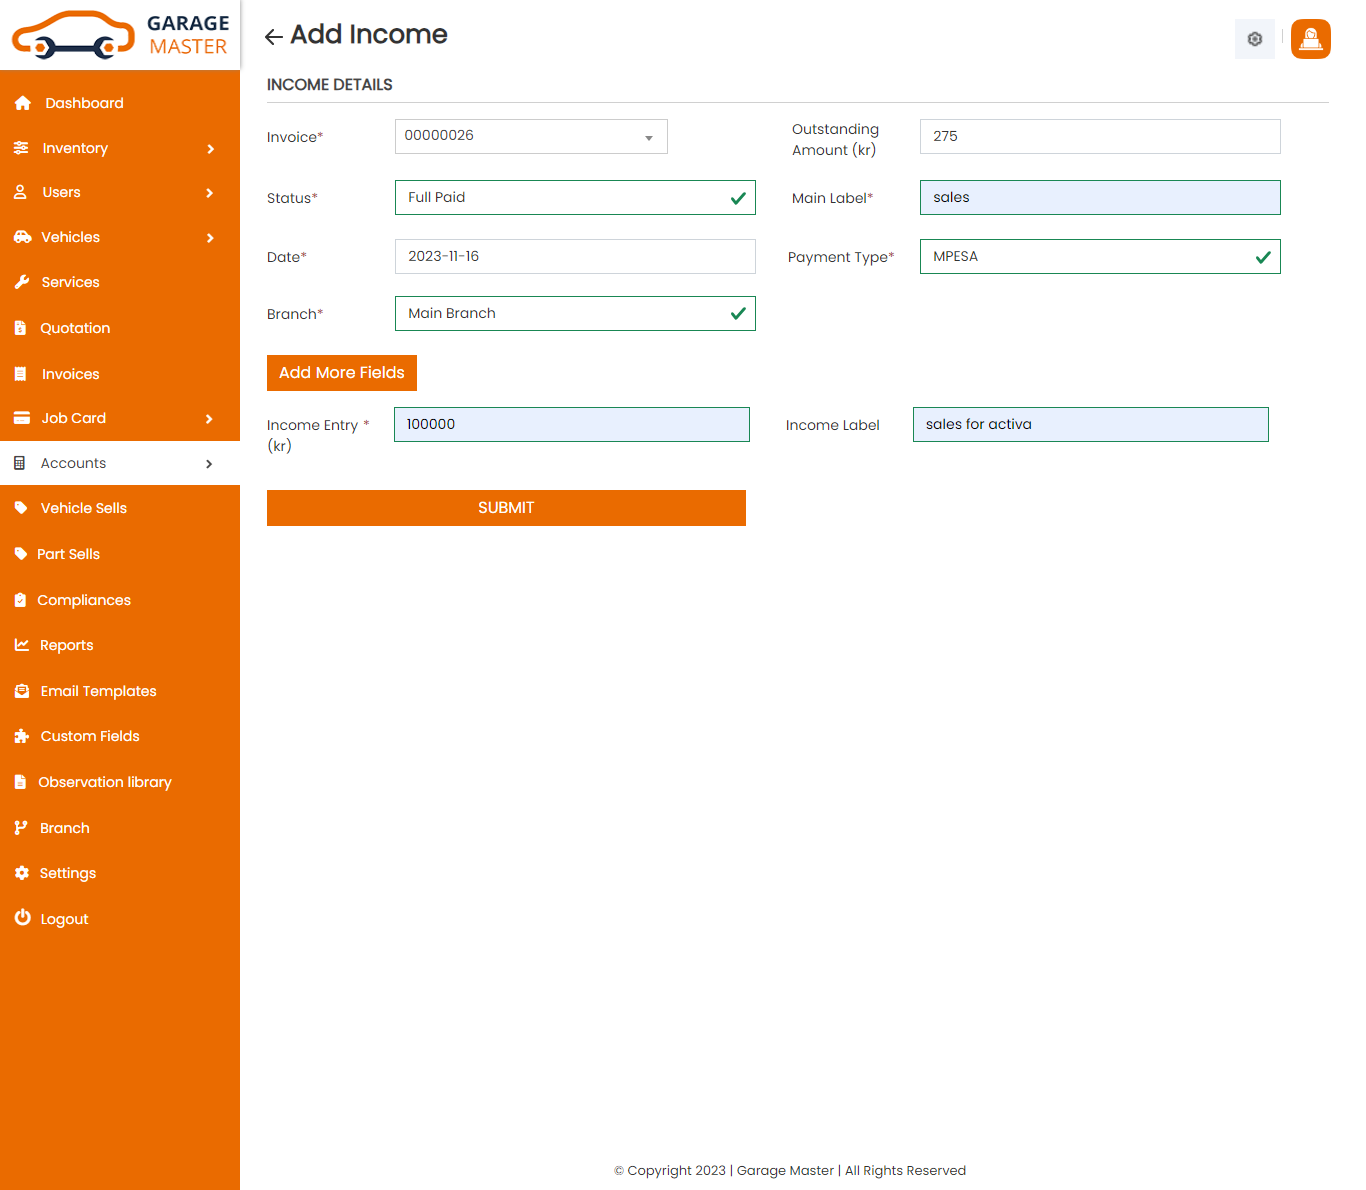
- Invoice Number: Select invoice number for this income.
- Outstanding Amount: Select invoice number and auto-generated outstanding amount.
- Status: Select status for this income.
- Main Label: Enter a new main label for this income.
- Date: Enter a new date for this income.
- PaymentType: Select paymenttype for this income.
- Income Entry: Enter a new income entry for this income.
- Income Label: Enter a new income label for this income.
- Add More Fields: Add new more fields click add Income entry, income label for this income.
Income Details
Edit Income: Admin can Edit detail of particular income by clicking on Edit detail button. This will open up details. From here admin can Change income Details.
Monthly Income: Admin can View Monthly Income details.
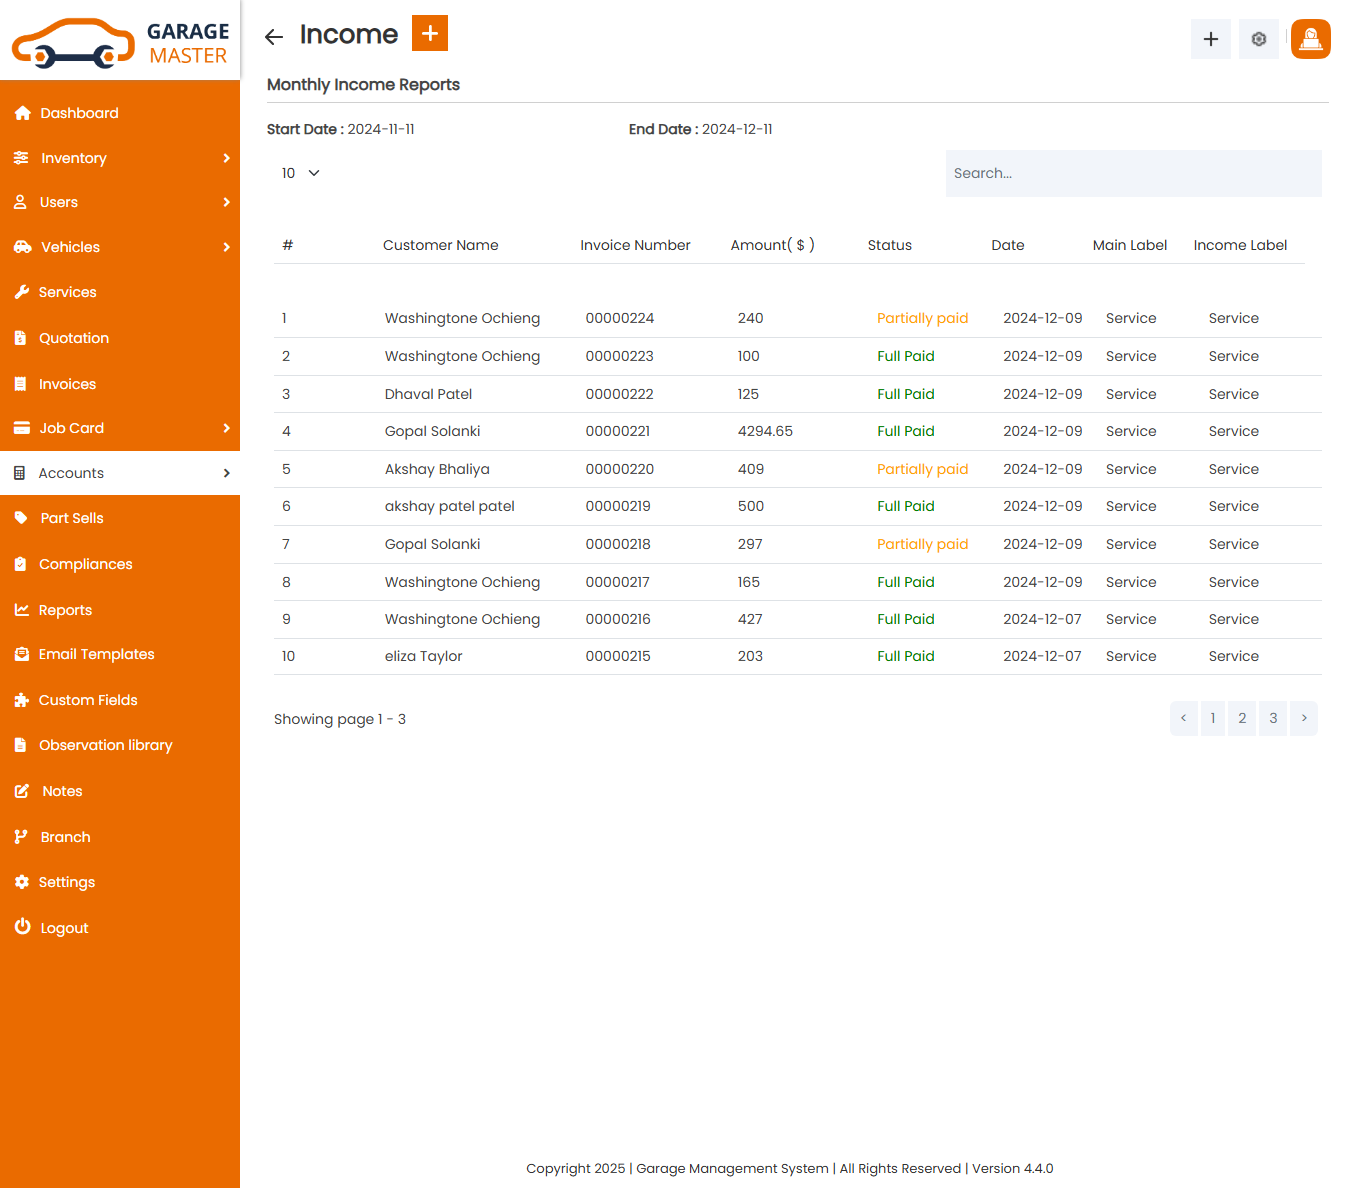
- start Date: Enter a new start date for this income.
- End Date: Enter a new end date for this income.
Income Details
Delete Income: Admin can delete a complete list of all Income and delete detail of particular Income by clicking on delete detail button. This will delete details.
D)Expenses
List Expenses: Admin can add new Expenses, Expenses all Expenses and view a complete list of all Expenses.
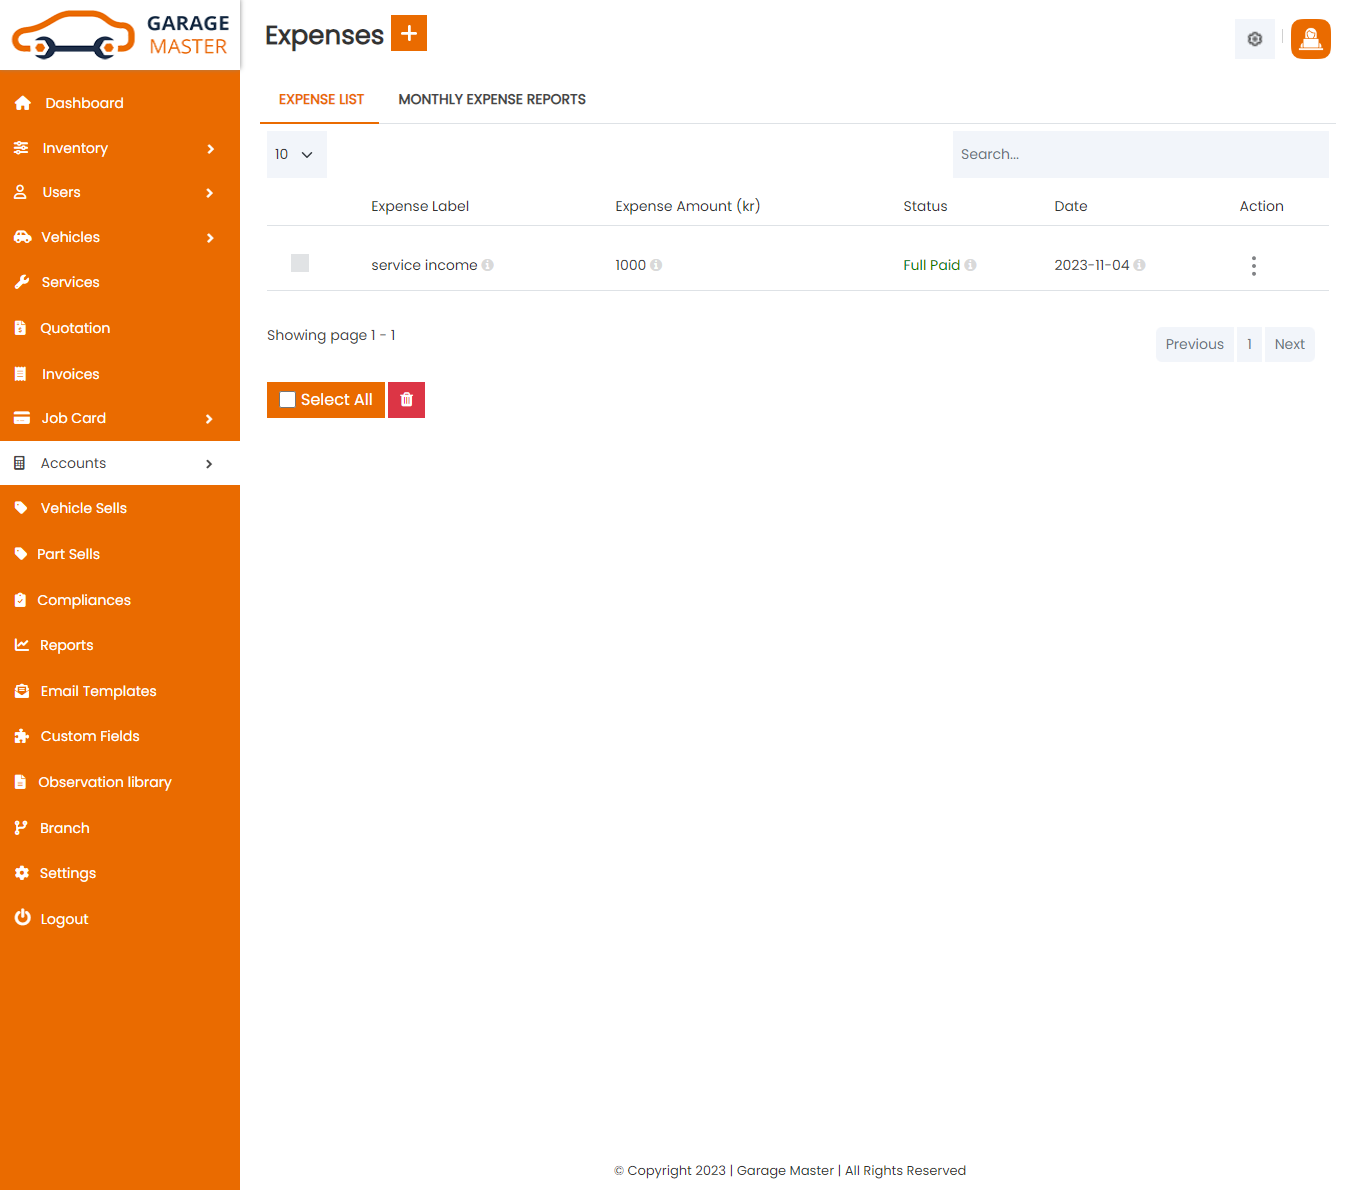
Add Expenses: Admin can add Expenses details
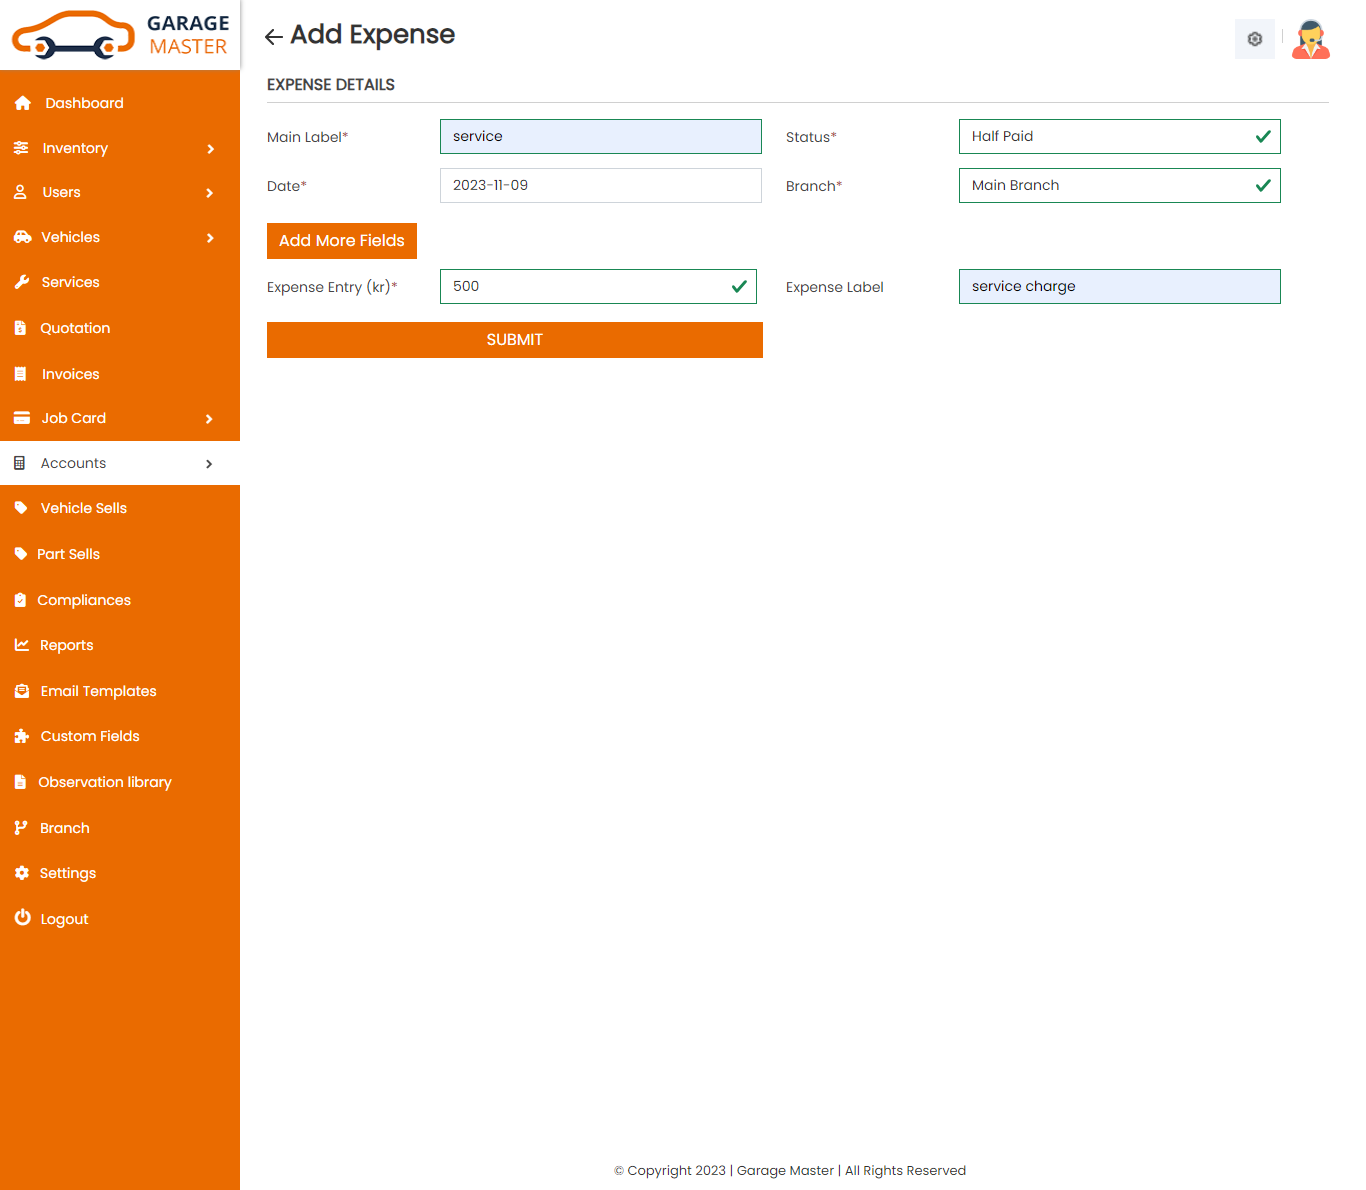
- Main Label: Enter a new main label for this expenses.
- Status: Select status for this expenses.
- Date: Enter a new date for this expenses.
- Expenses Entry: Enter a new expenses entry for this expenses.
- Expenses Label: Enter a new expenses label for this expenses.
- Add More Fields: Add new more fields click add expenses entry, expenses label for the expenses.
Expenses Details
Edit Expenses: Admin can Edit detail of particular Expenses by clicking on Edit detail button. This will open up details. From here admin can Change Expenses Details.
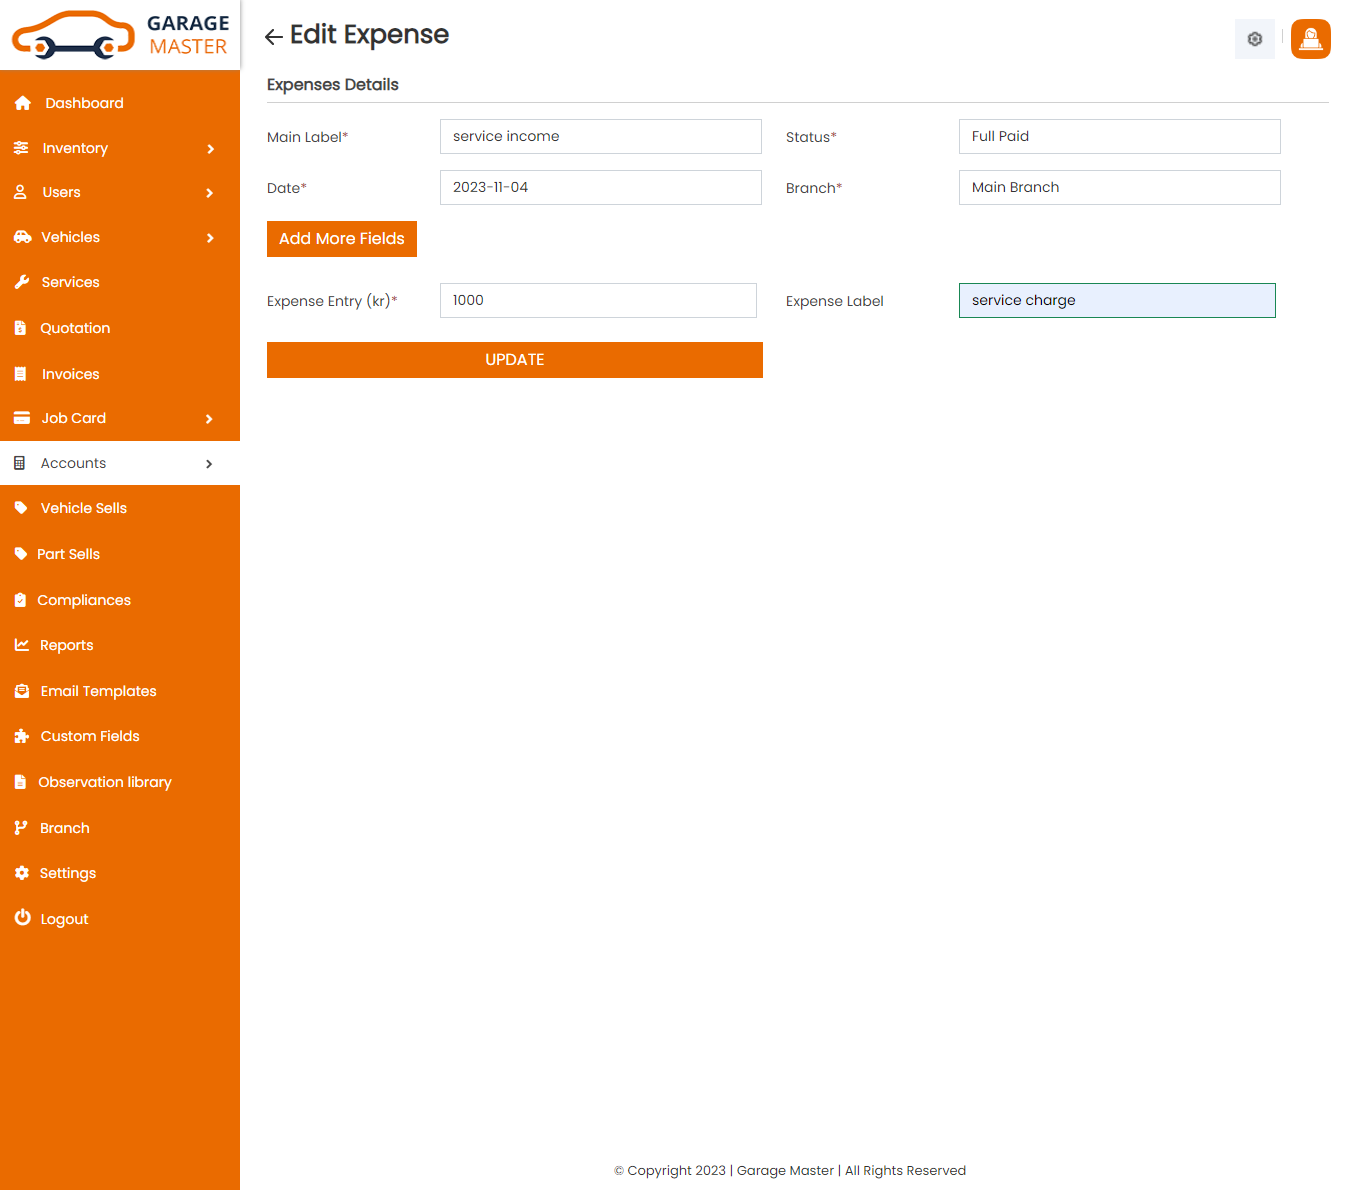
Monthly Expenses: Admin can View Monthly Expenses details.
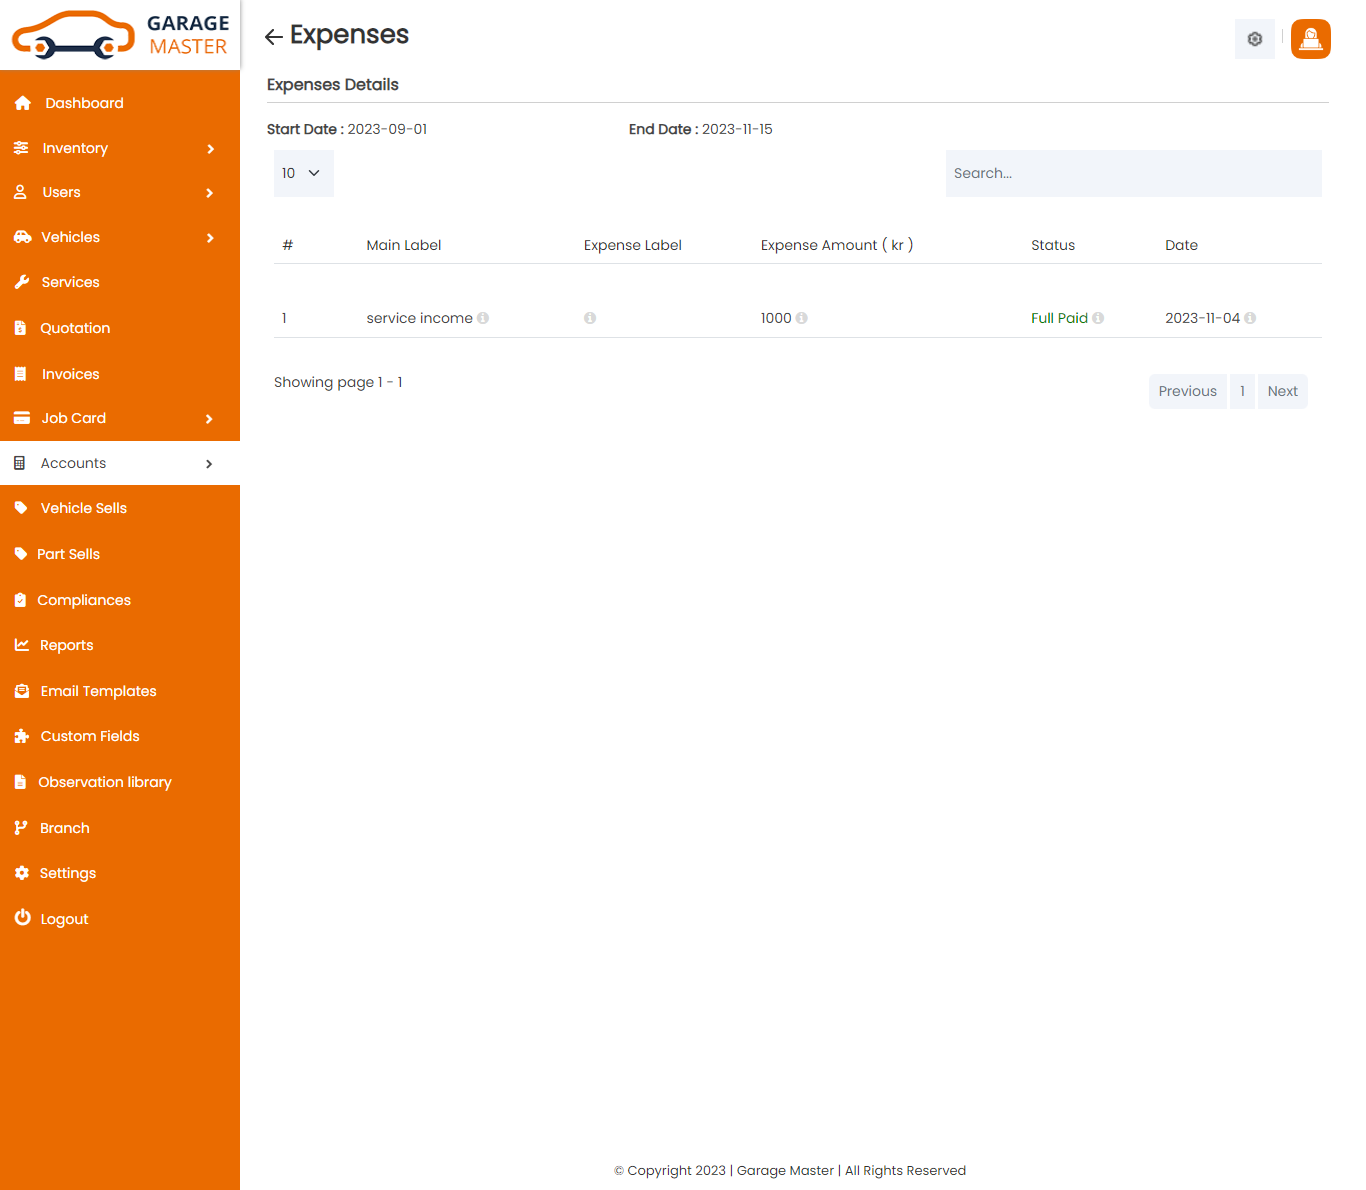
- start Date: Enter a new start date for this expenses.
- End Date: Enter a new end date for this expenses.
Expenses Details
Delete Expenses: Admin can delete a complete list of all Expenses and delete detail of particular Expenses by clicking on delete detail button. This will delete details.
10)Sells
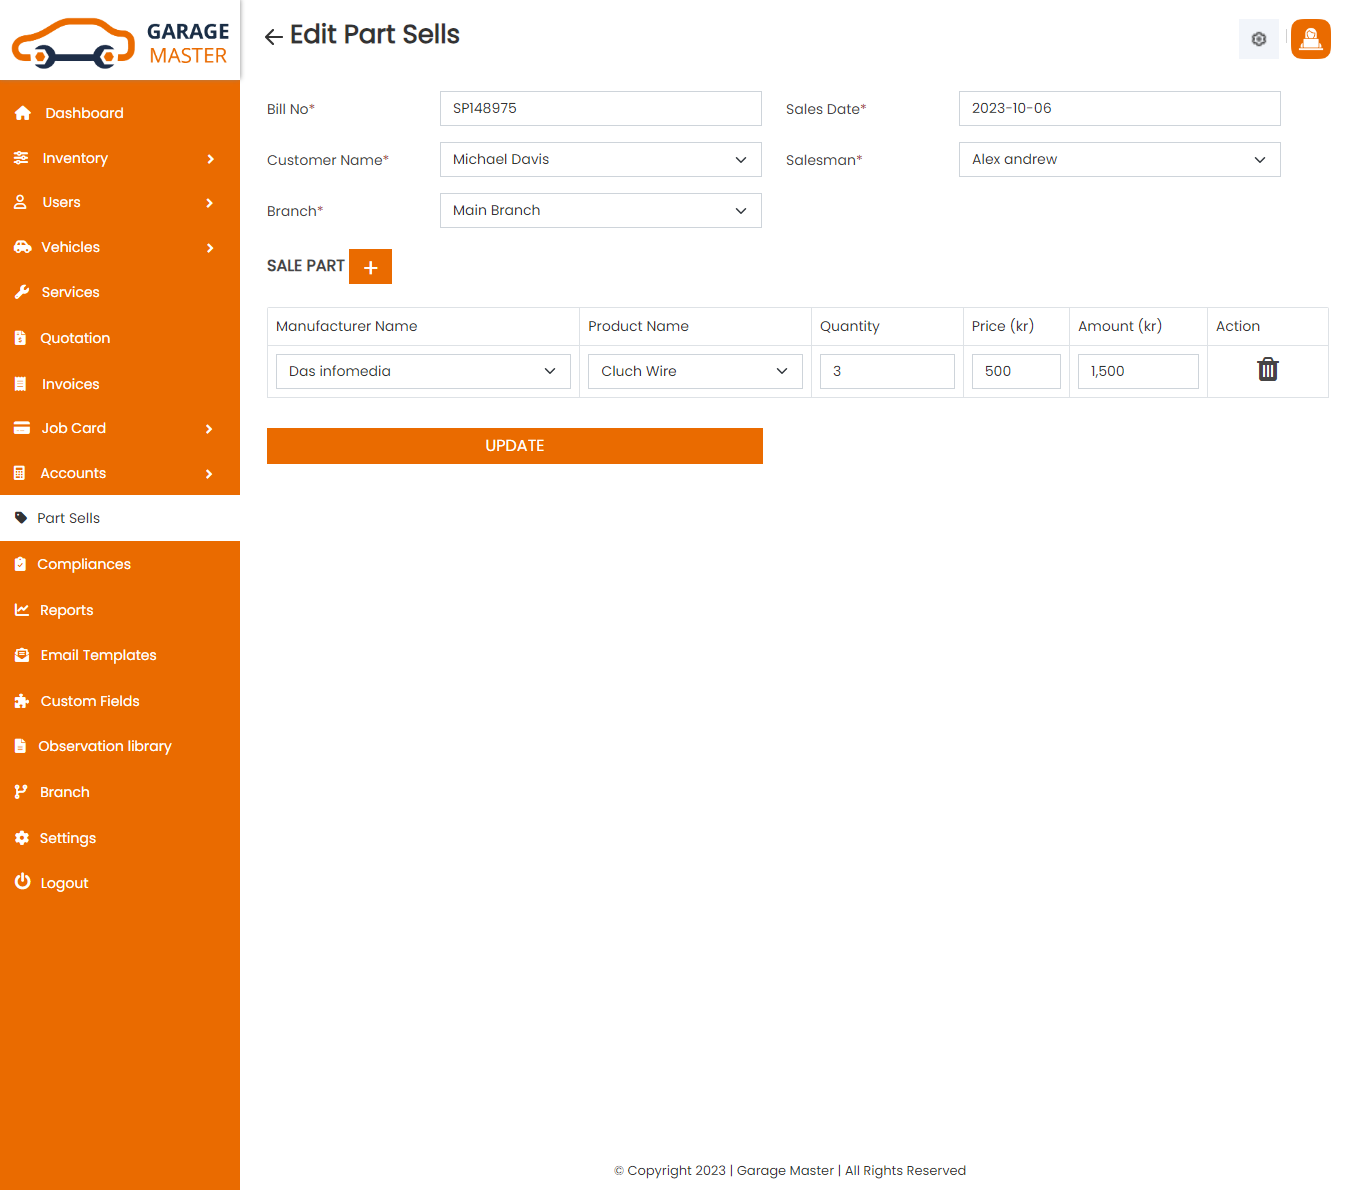
Part Sells: Admin can add new part Sells, edit all part Sells and view a complete list of all part Sells.
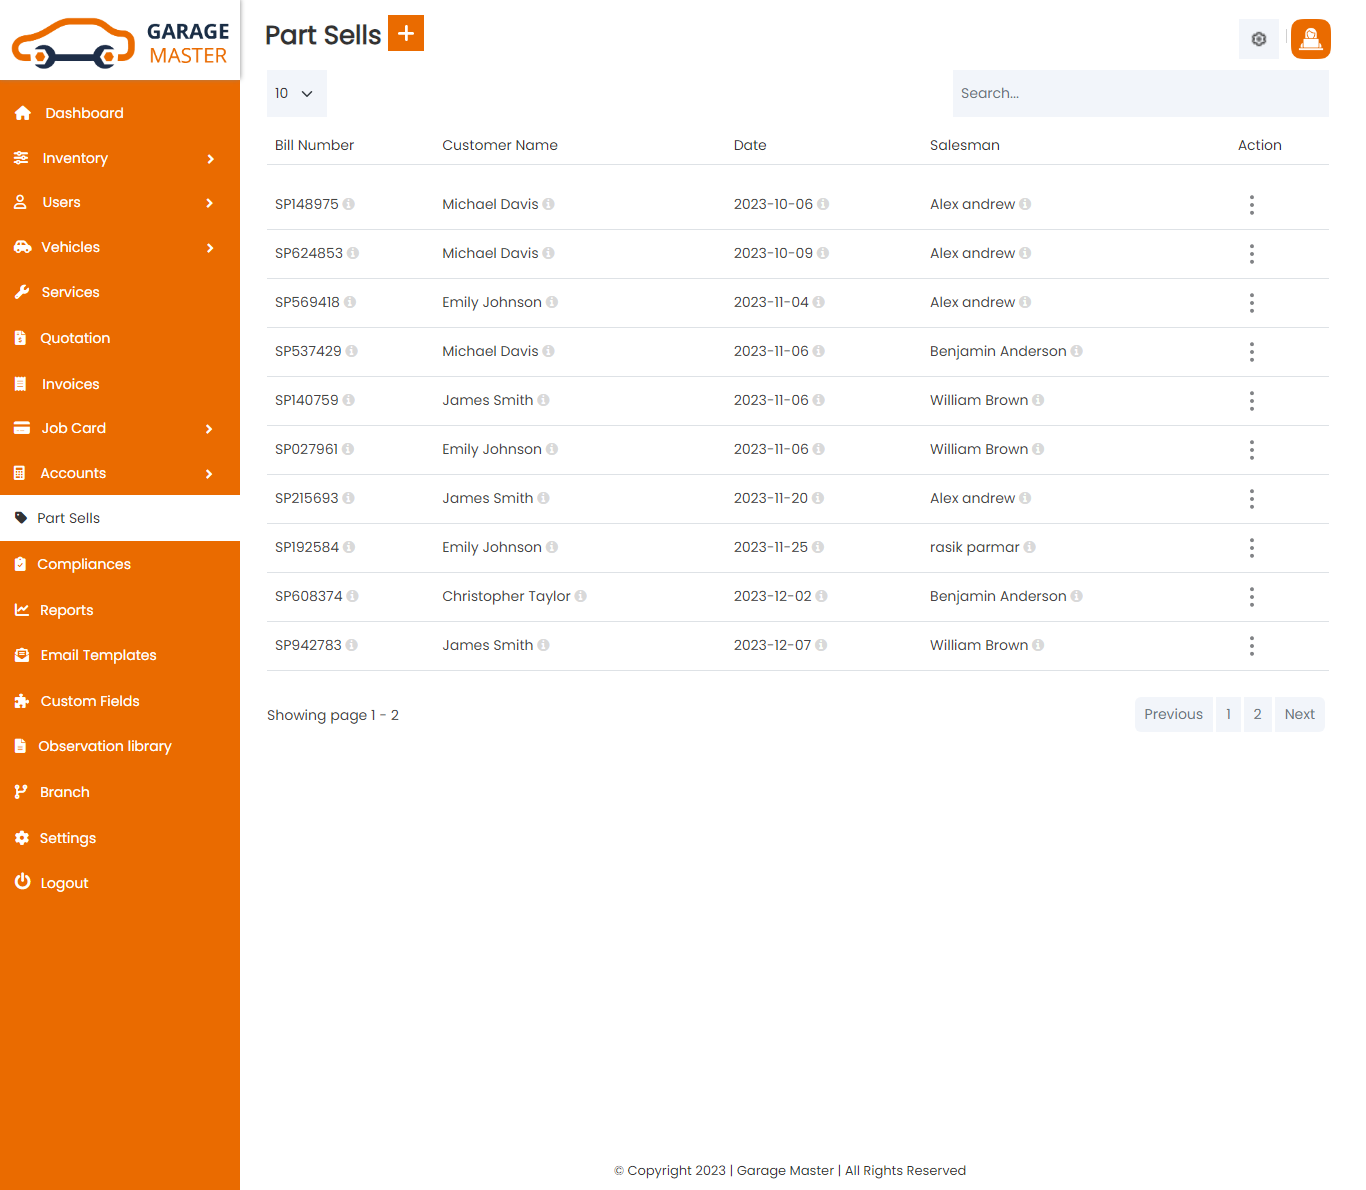
Add Sells: Admin can add Sells details
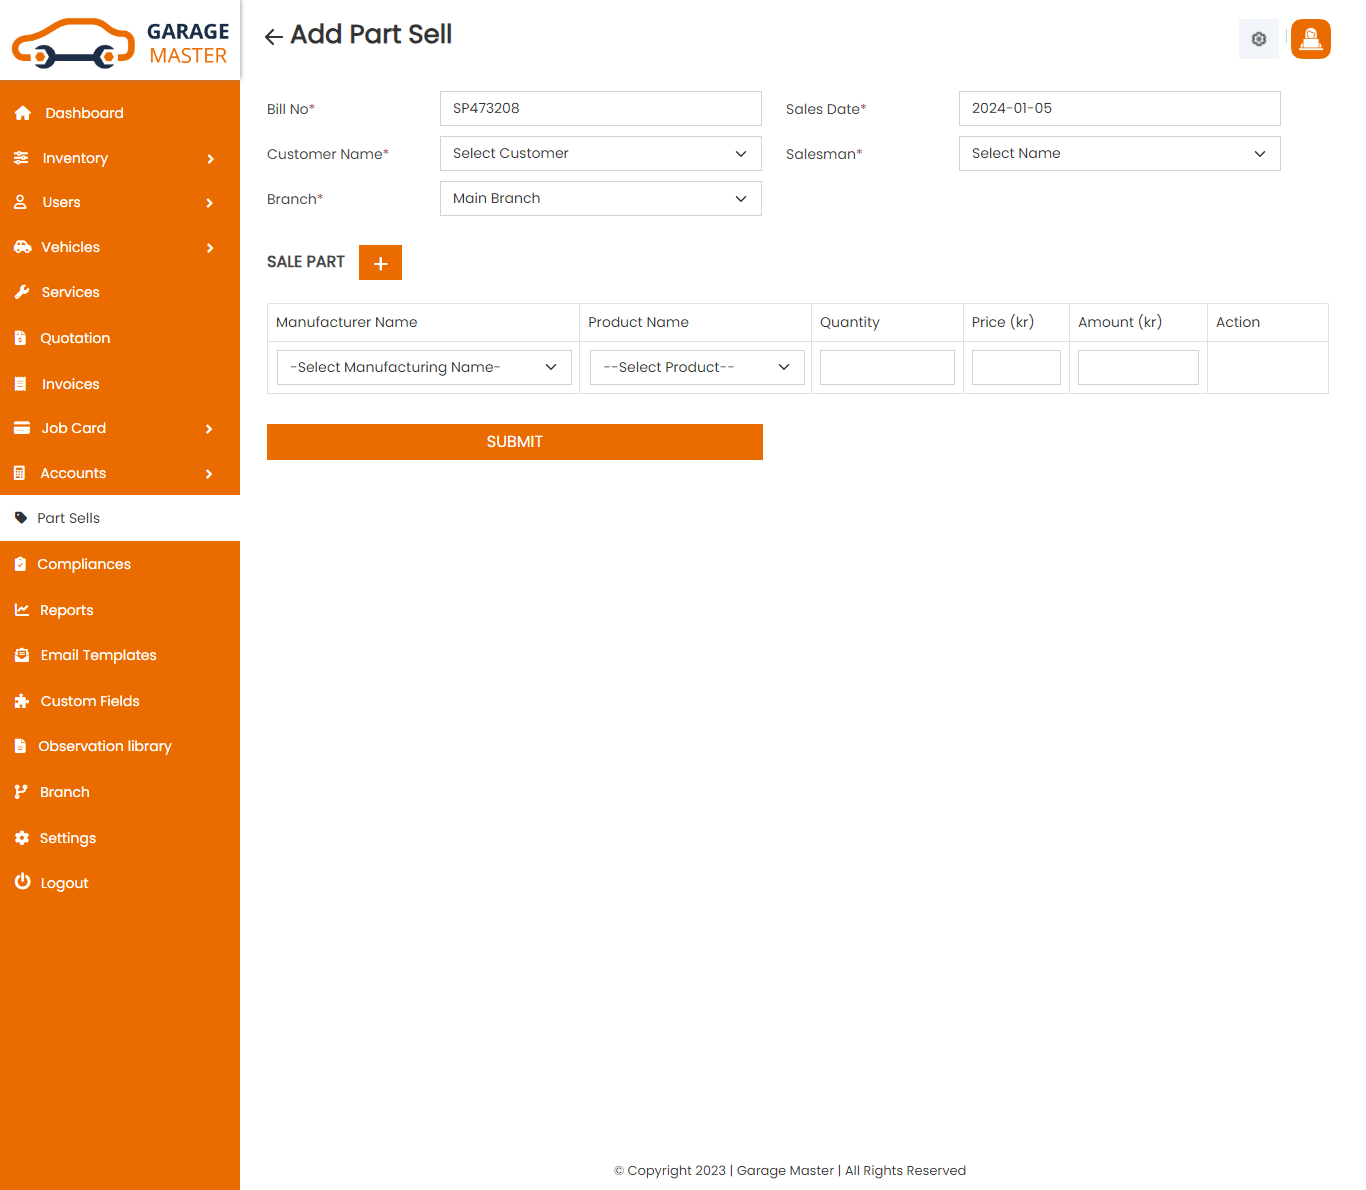
- Bill number: Bill number auto generated.
- Customer Name: Select customer name for this sales.
- Sales Date: Enter a new sales date for this sales.
- Quantity: Enter a new quantity for this sales.
- Price: Select product name and auto generated price.
- Total price: Select product name and quantity and auto generated total price.
- Salesman: Select salesman for this sales.
- Branch: Select branch for this sales.
Edit Sells: Admin can Edit detail of particular sells by clicking on Edit detail button. This will open up details. From here Admin can Change sells Details.
Create Invoice: Admin can Create invoice details

- Invoice for: Select invoice type for this invoice.
- Invoice Number: Invoice number auto generated.
- Customer Name: Select customer name for this invoice.
- Job card Number: Select job card number for this invoice.
- Date: Enter a new date for this invoice.
- Total Amount: Select job card and auto generated total amount.
- Payment Type: Select payment type for this invoice.
- Status: Select status for this invoice.
- Discount(%): Enter a new discount for this invoice.
- Details: Enter a new details for this invoice.
- Tax: Select tax for this invoice.
- Paid Amount: Enter a new paid amount for this invoice.
- Grand Total: Select customer name and job card in auto generated grand total.
View Invoice: Admin can view a complete list of all sells and view detail of particular sells by clicking on view detail button. This will open up details.
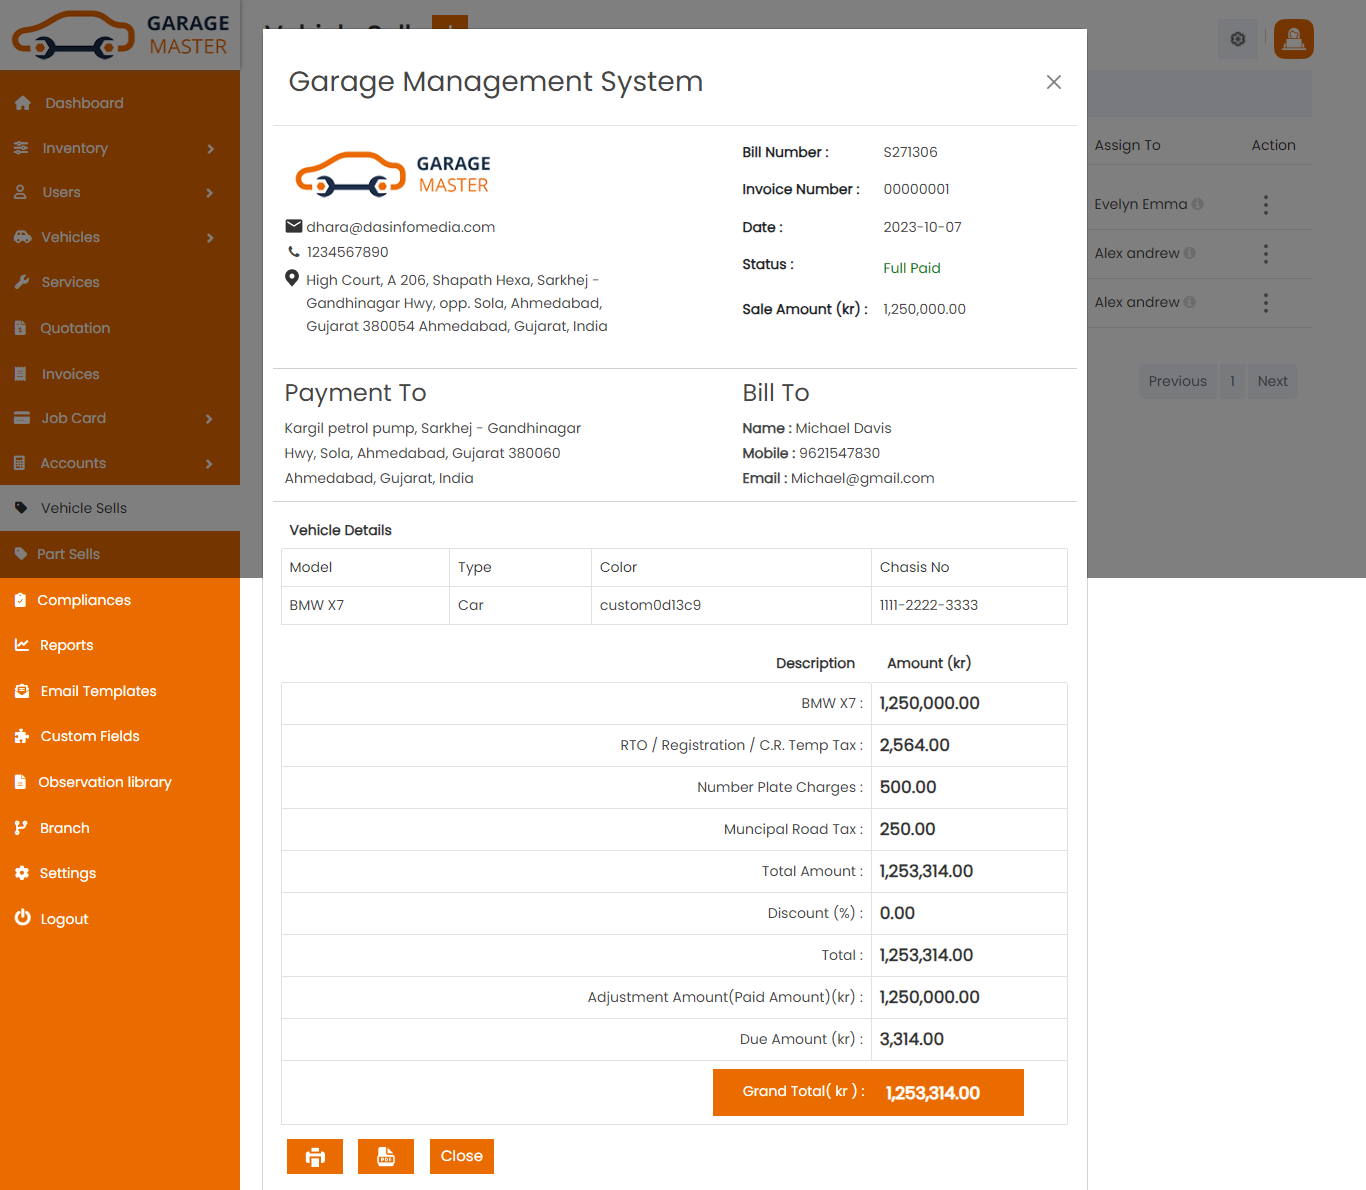
Delete sells: Admin can delete a complete list of all sells and delete detail of particular sells by clicking on delete detail button. This will delete details.
11)Compliance Management
Compliance Management
List Of RTO Taxes: Admin can add new RTO Taxes, RTO Taxes all RTO Taxes and view a complete list of all RTO Taxes.
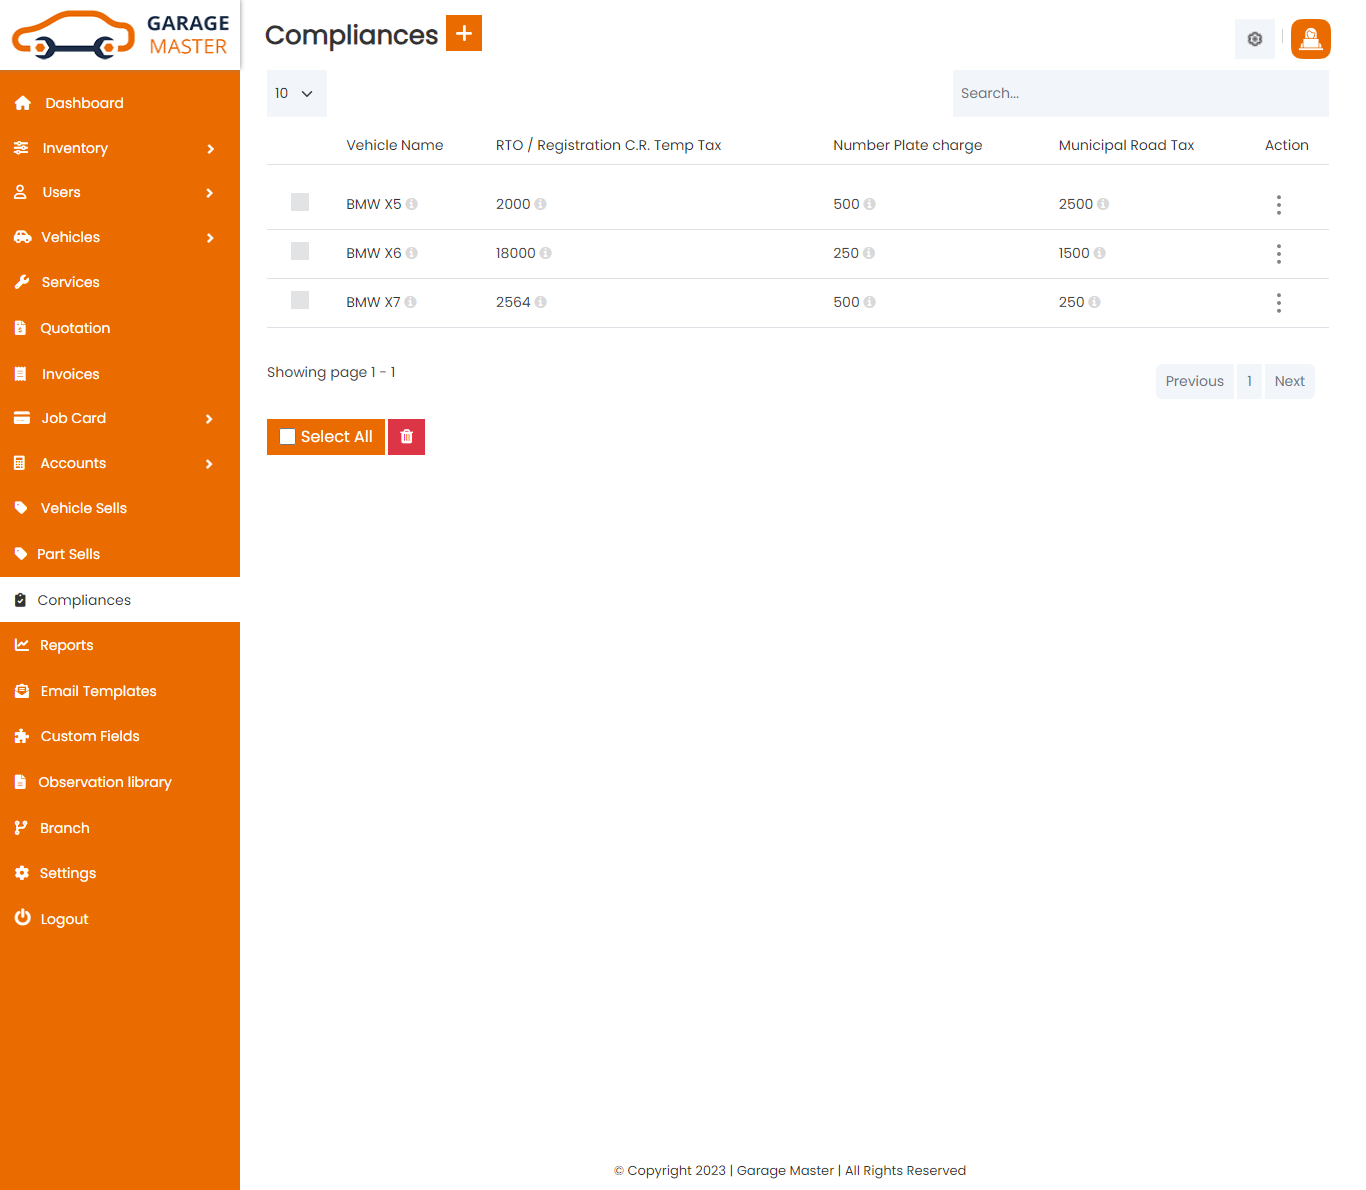
Add RTO Taxes: Admin can add RTO Taxes details
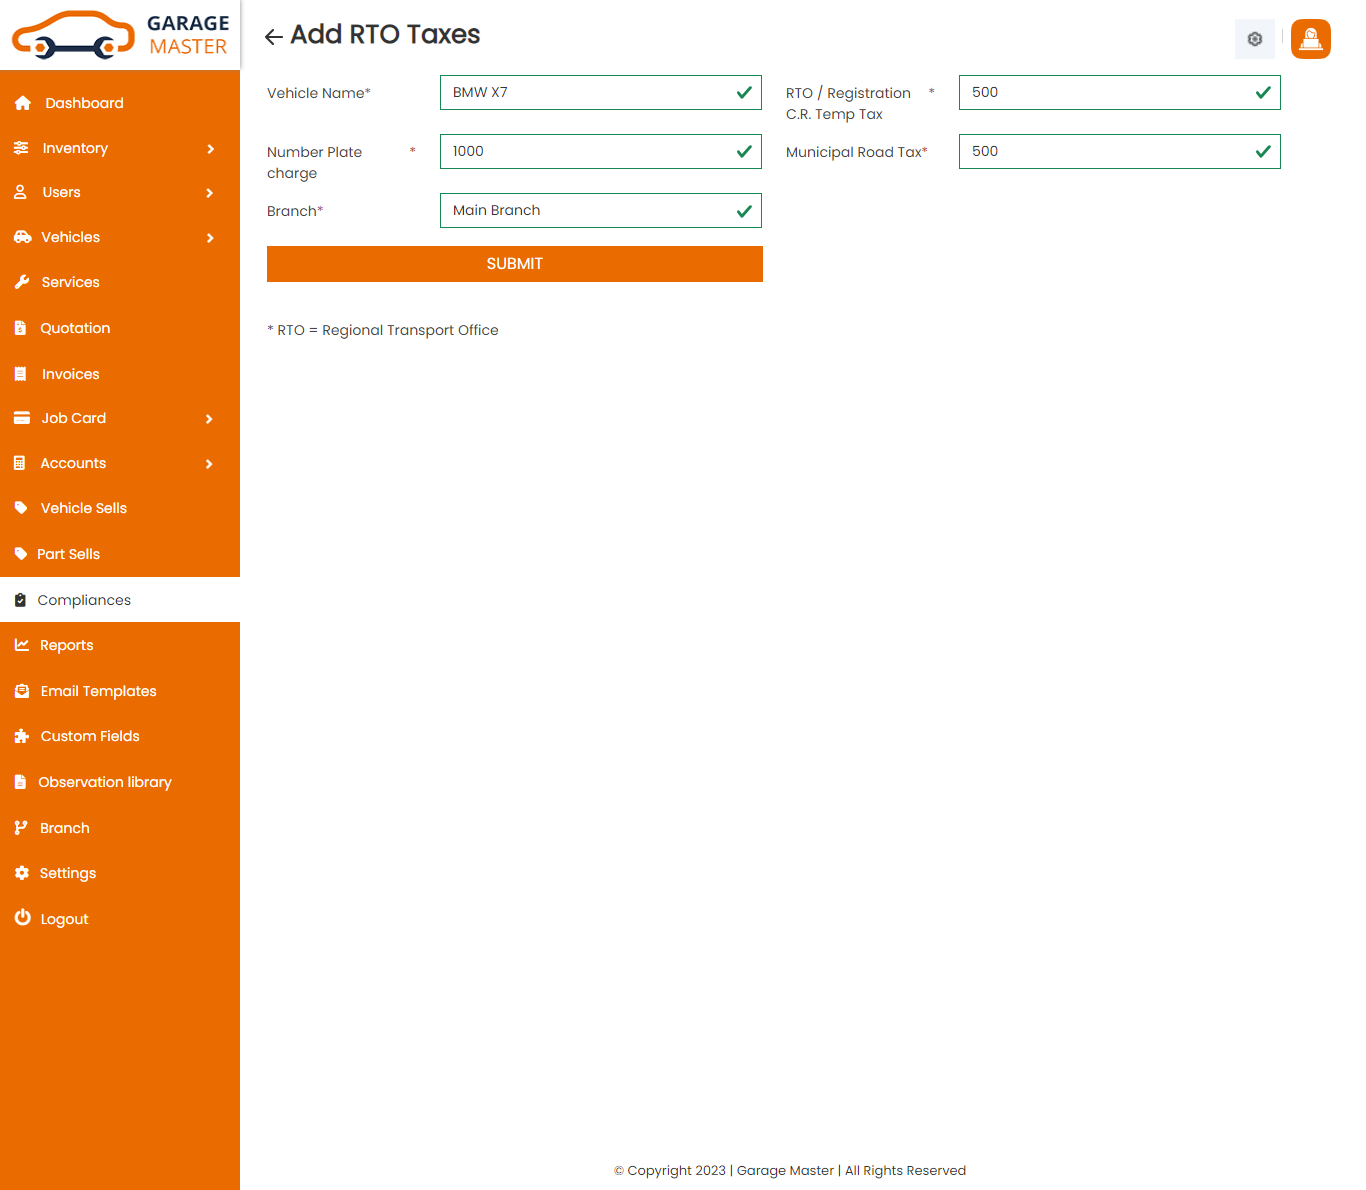
- Select Vehicle: Select vehicle for this RTO taxes.
- RTO/Registration C.R Temp Tax: Enter a new RTO/registration C.R temp tax for this RTO taxes.
- Number Plate Charge: Enter a new number plate charge for this RTO taxes.
- Municipal Road Tax: Enter a new municipal road tax for this RTO taxes.
Edit RTO Taxes: Admin can Edit detail of particular RTO Taxes by clicking on Edit detail button. This will open up details. From here admin can Change RTO Taxes Details.
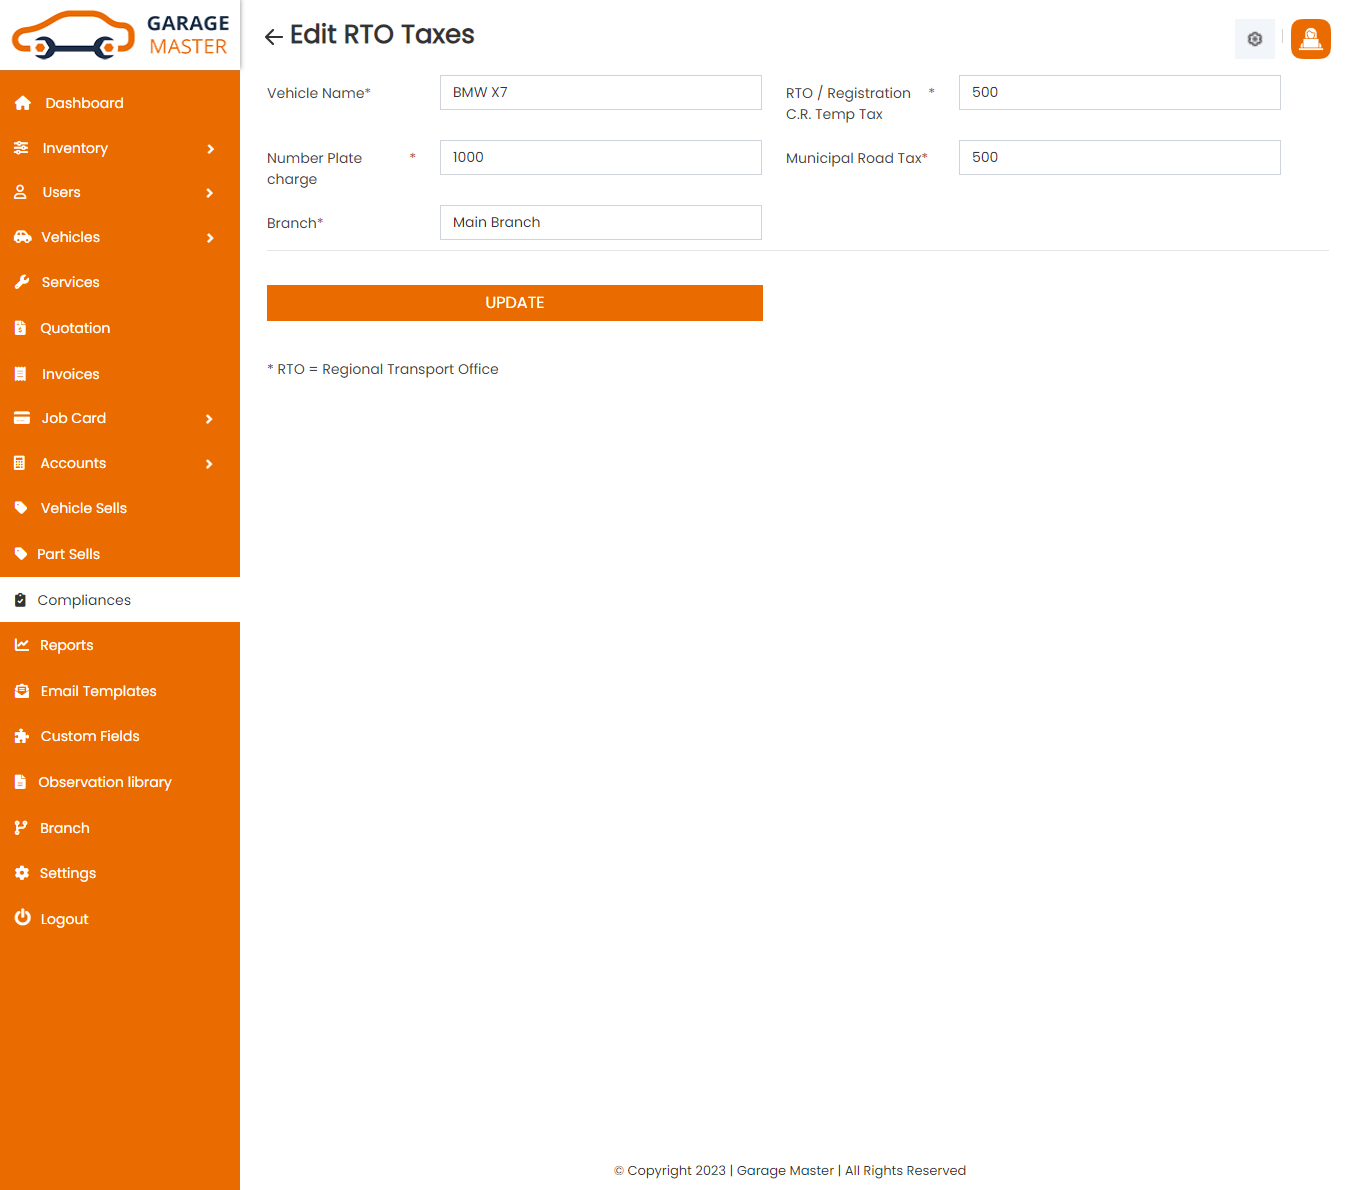
Delete RTO Taxes: Admin can delete a complete list of all RTO Taxes and delete detail of particular RTO Taxes type by clicking on delete detail button. This will delete details.
12)Report
A)Service Report
You can start date and end date of view Service report.
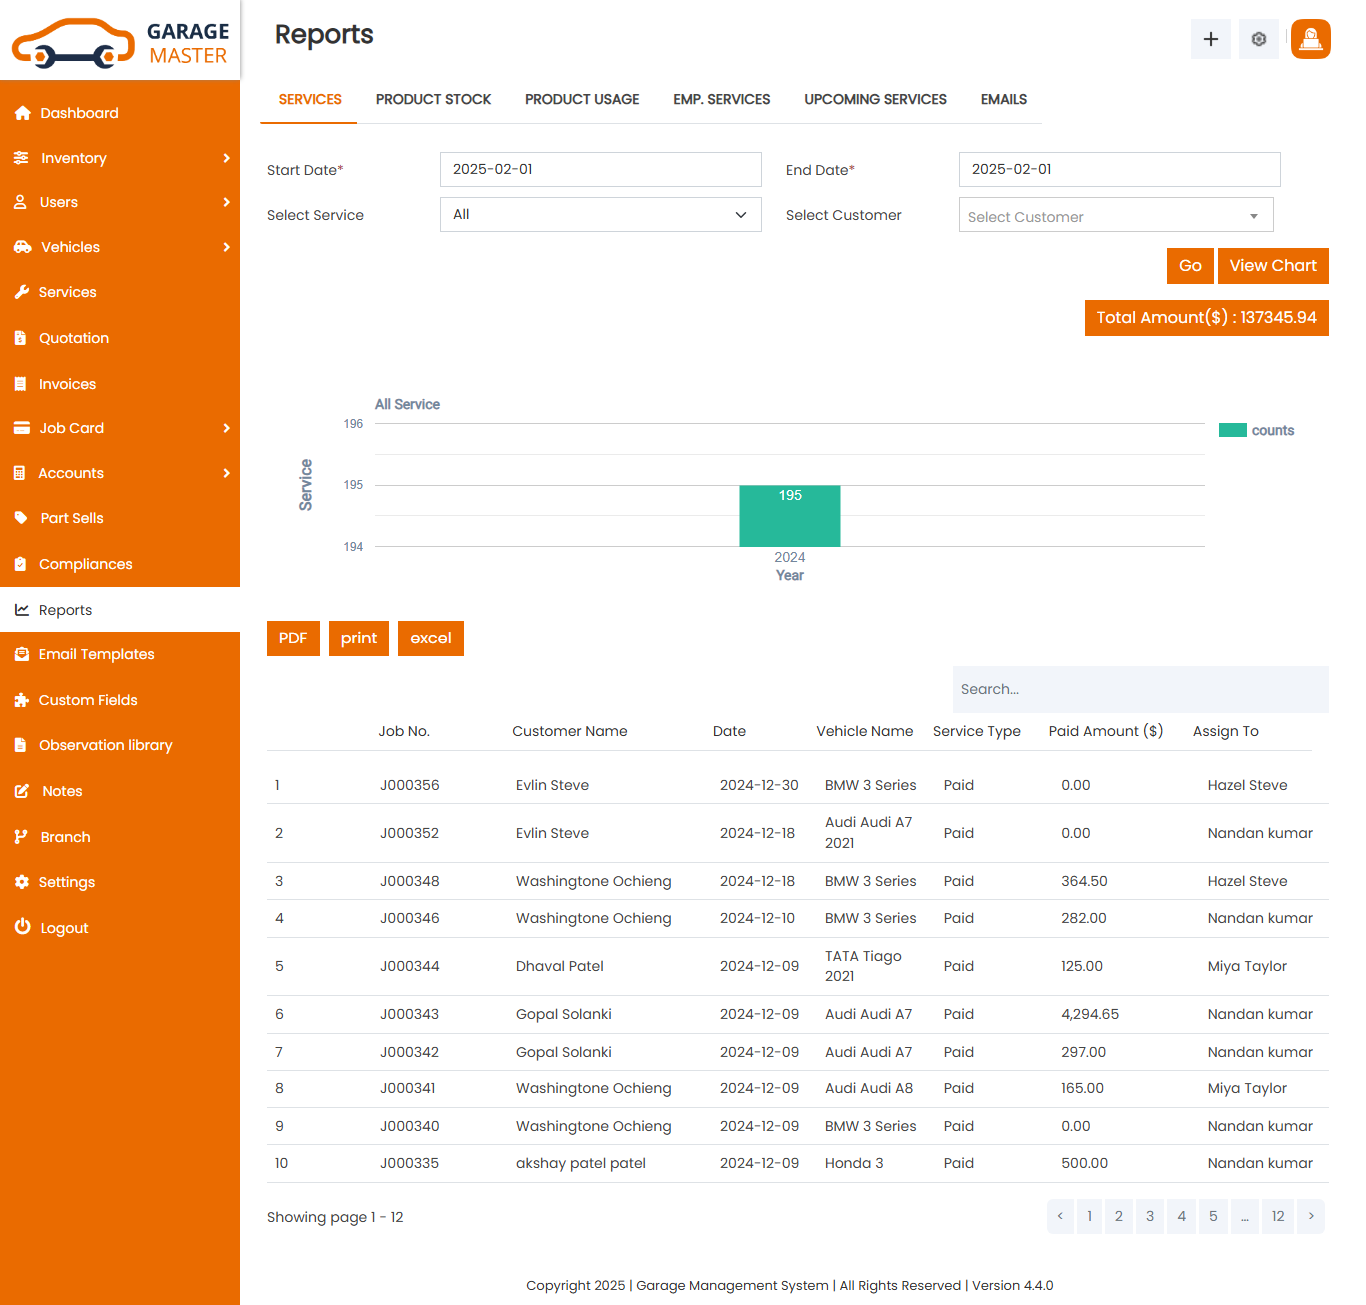
- Start Date: Enter a new start date for this service report.
- End Date: Enter a new end date for this service report.
- Select Service: Select service for this service report.
When clicking on GO button. This will open Start Date and End date Between In Service Report and Service list.
You can easily download pdf and print these report.
B)Product Stock
You can Manufacturer Name and Product Name of view Product stock report.
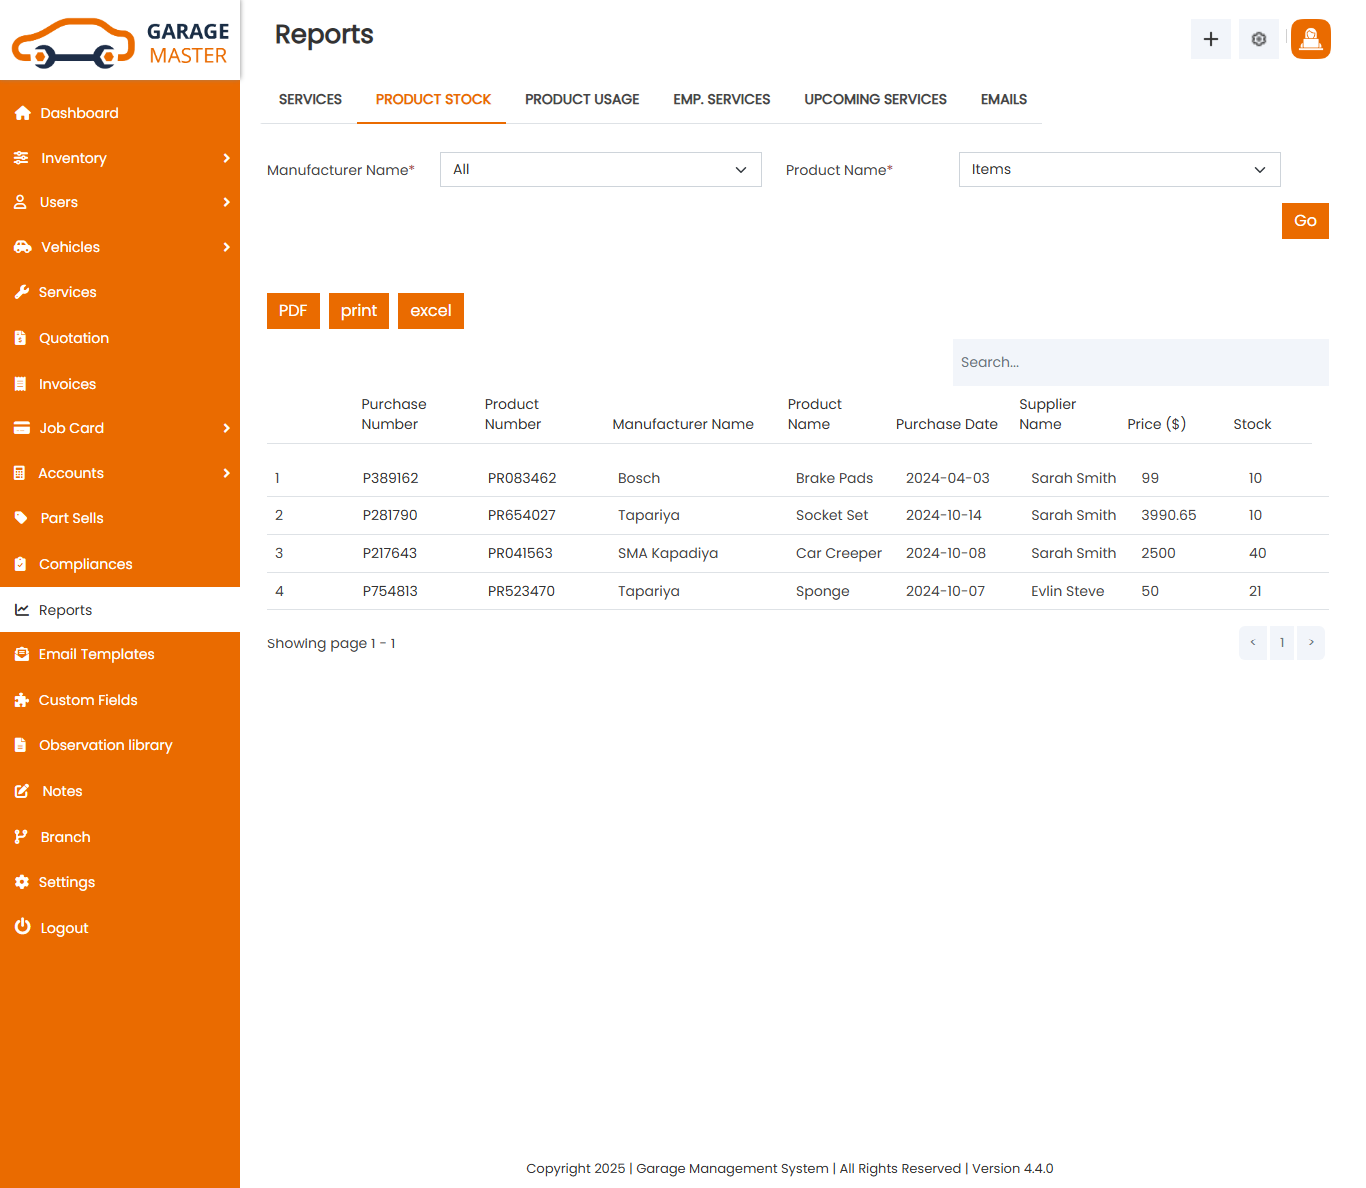
- Select Manufacturer Name: Select manufacturer name for this product stock.
- Select Product Name: Select product name for this product stock.
When clicking on GO button. This will open In Product stock list.
You can easily download pdf and print these report.
C)Product Usage
You can start date and end date of view Product Usage report.
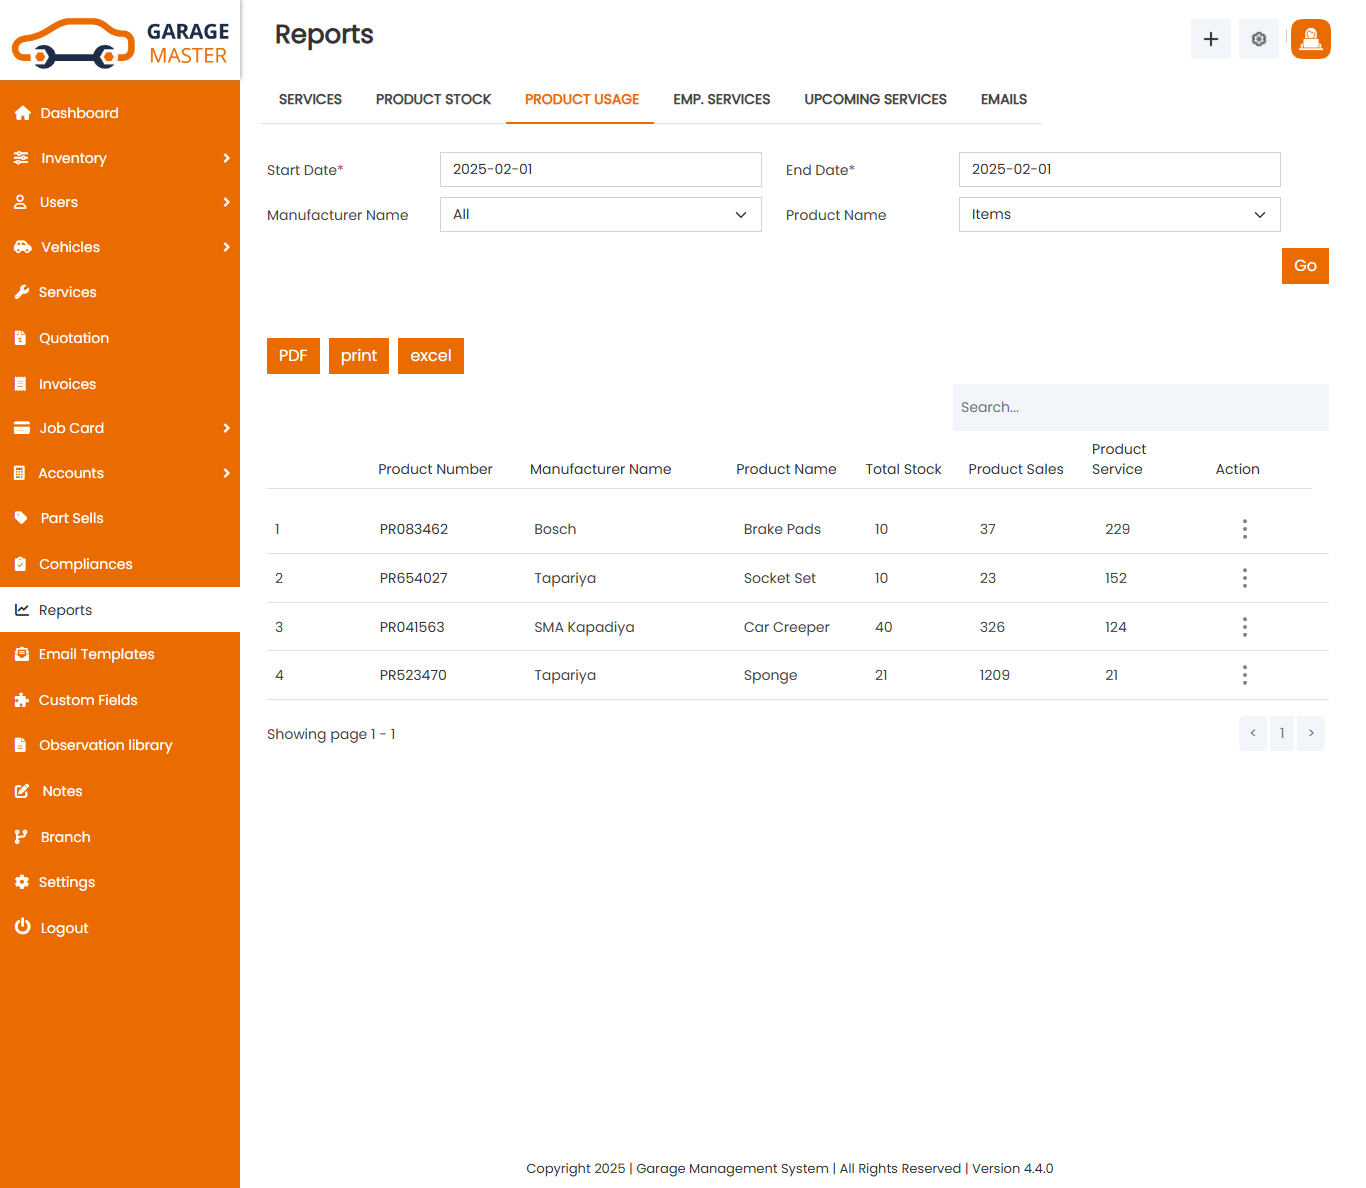
- Start Date: Enter a new start date for this product usage report.
- End Date: Enter a new end date for this product usage report.
- Select Manufacturer Name: Select manufacturer name for this product usage report.
- Select Product Name: Select product name for this product usage report.
When clicking on GO button. This will open Start Date and End date Between In Product Usage list.
View Product Usage: Accountant can view a complete list of all Product Usage and view detail of particular Product Usage by clicking on view detail button. This will open up details.
You can easily download pdf and print these report.
D)Employee Service Report
You can start date and end date of view Employee Service report.
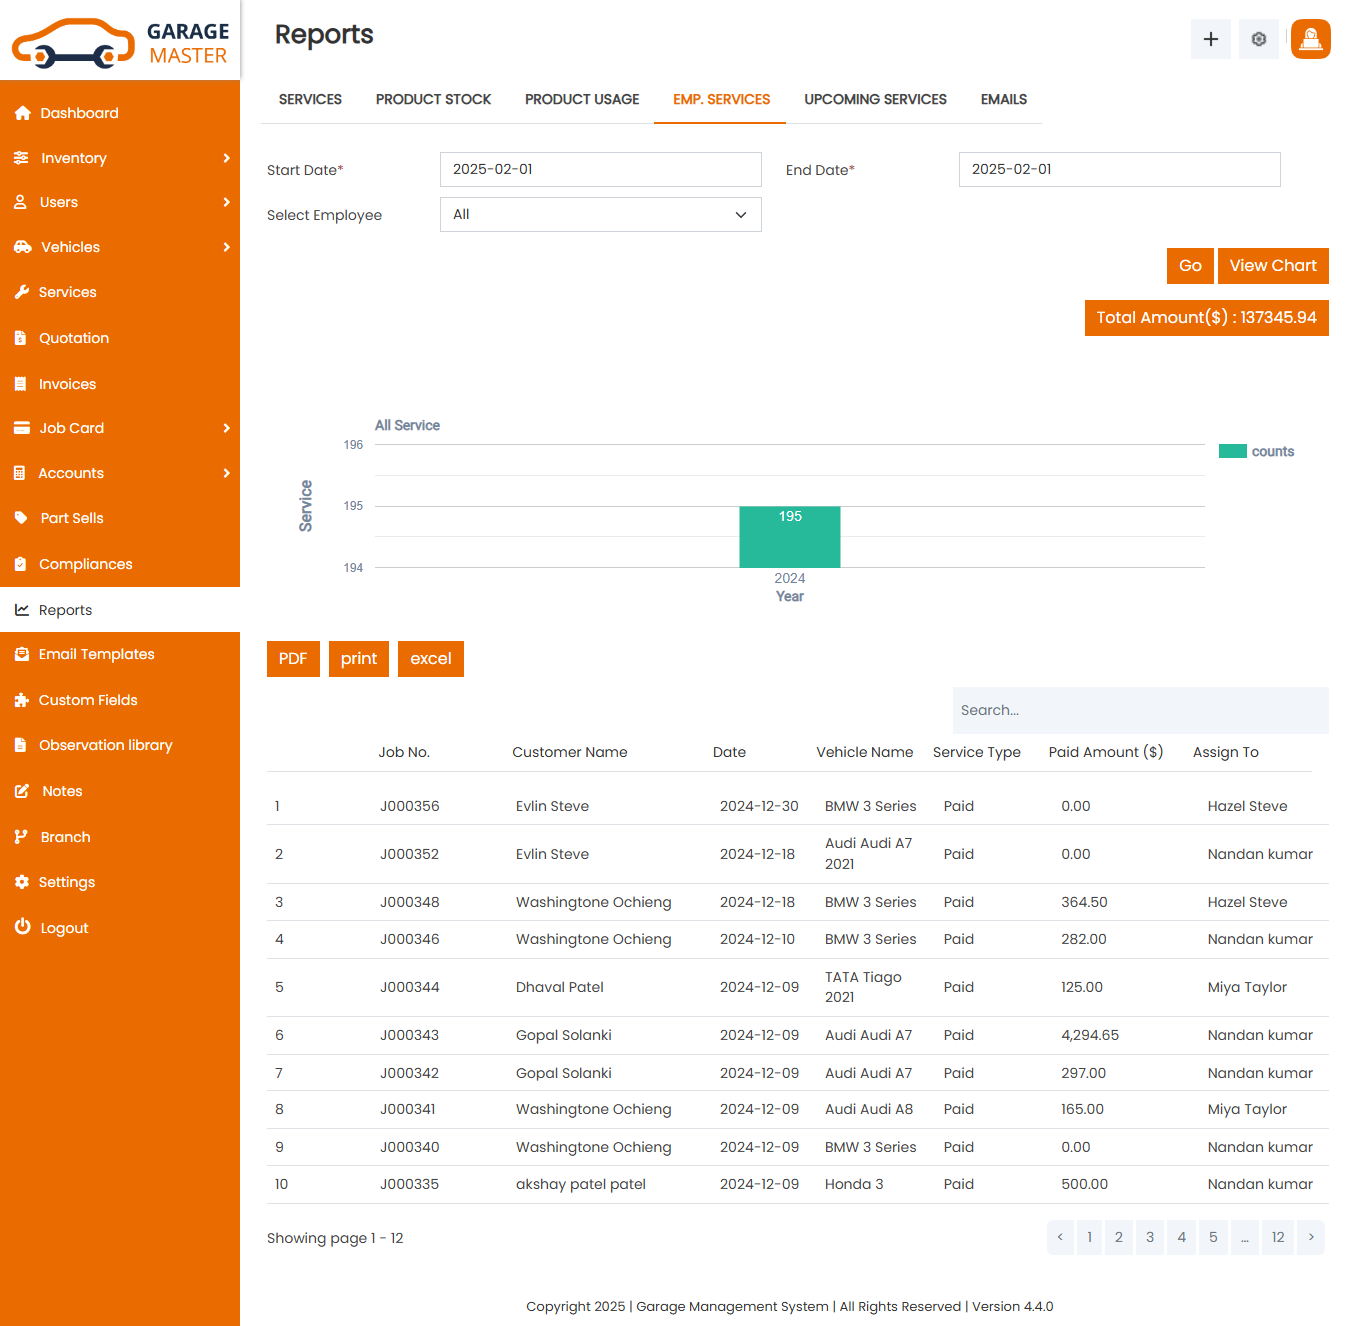
- Start Date: Enter a new start date for this employee service report.
- End Date: Enter a new end date for this employee service report.
- Select Employee: Select employee for this employee service report.
When clicking on GO button. This will open Start Date and End date Between In Employee service Report and employee service list.
E)Upcoming Service Report
You can start date and end date of view Upcoming Service report.
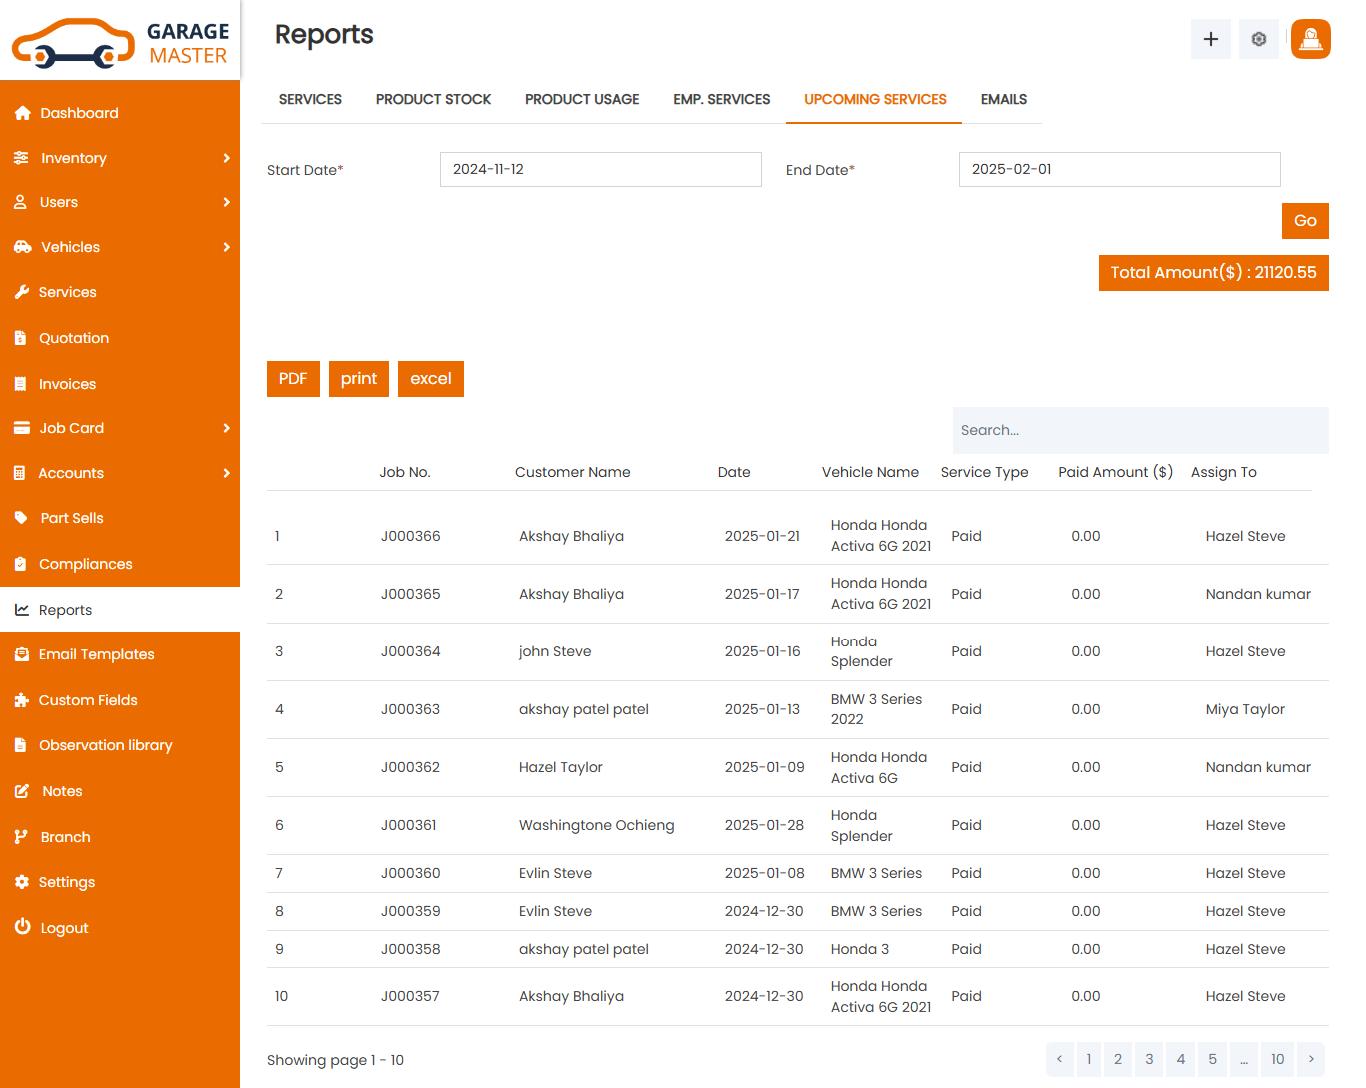
- Start Date: Enter a new start date for this upcoming service report.
- End Date: Enter a new end date for this upcoming service report.
When clicking on GO button. This will open Start Date and End date Between In Upcoming service Report and Upcoming service list.
You can easily download pdf and print these report.
F)Email Sent Report
You can start date and end date of the view Email Sent report.
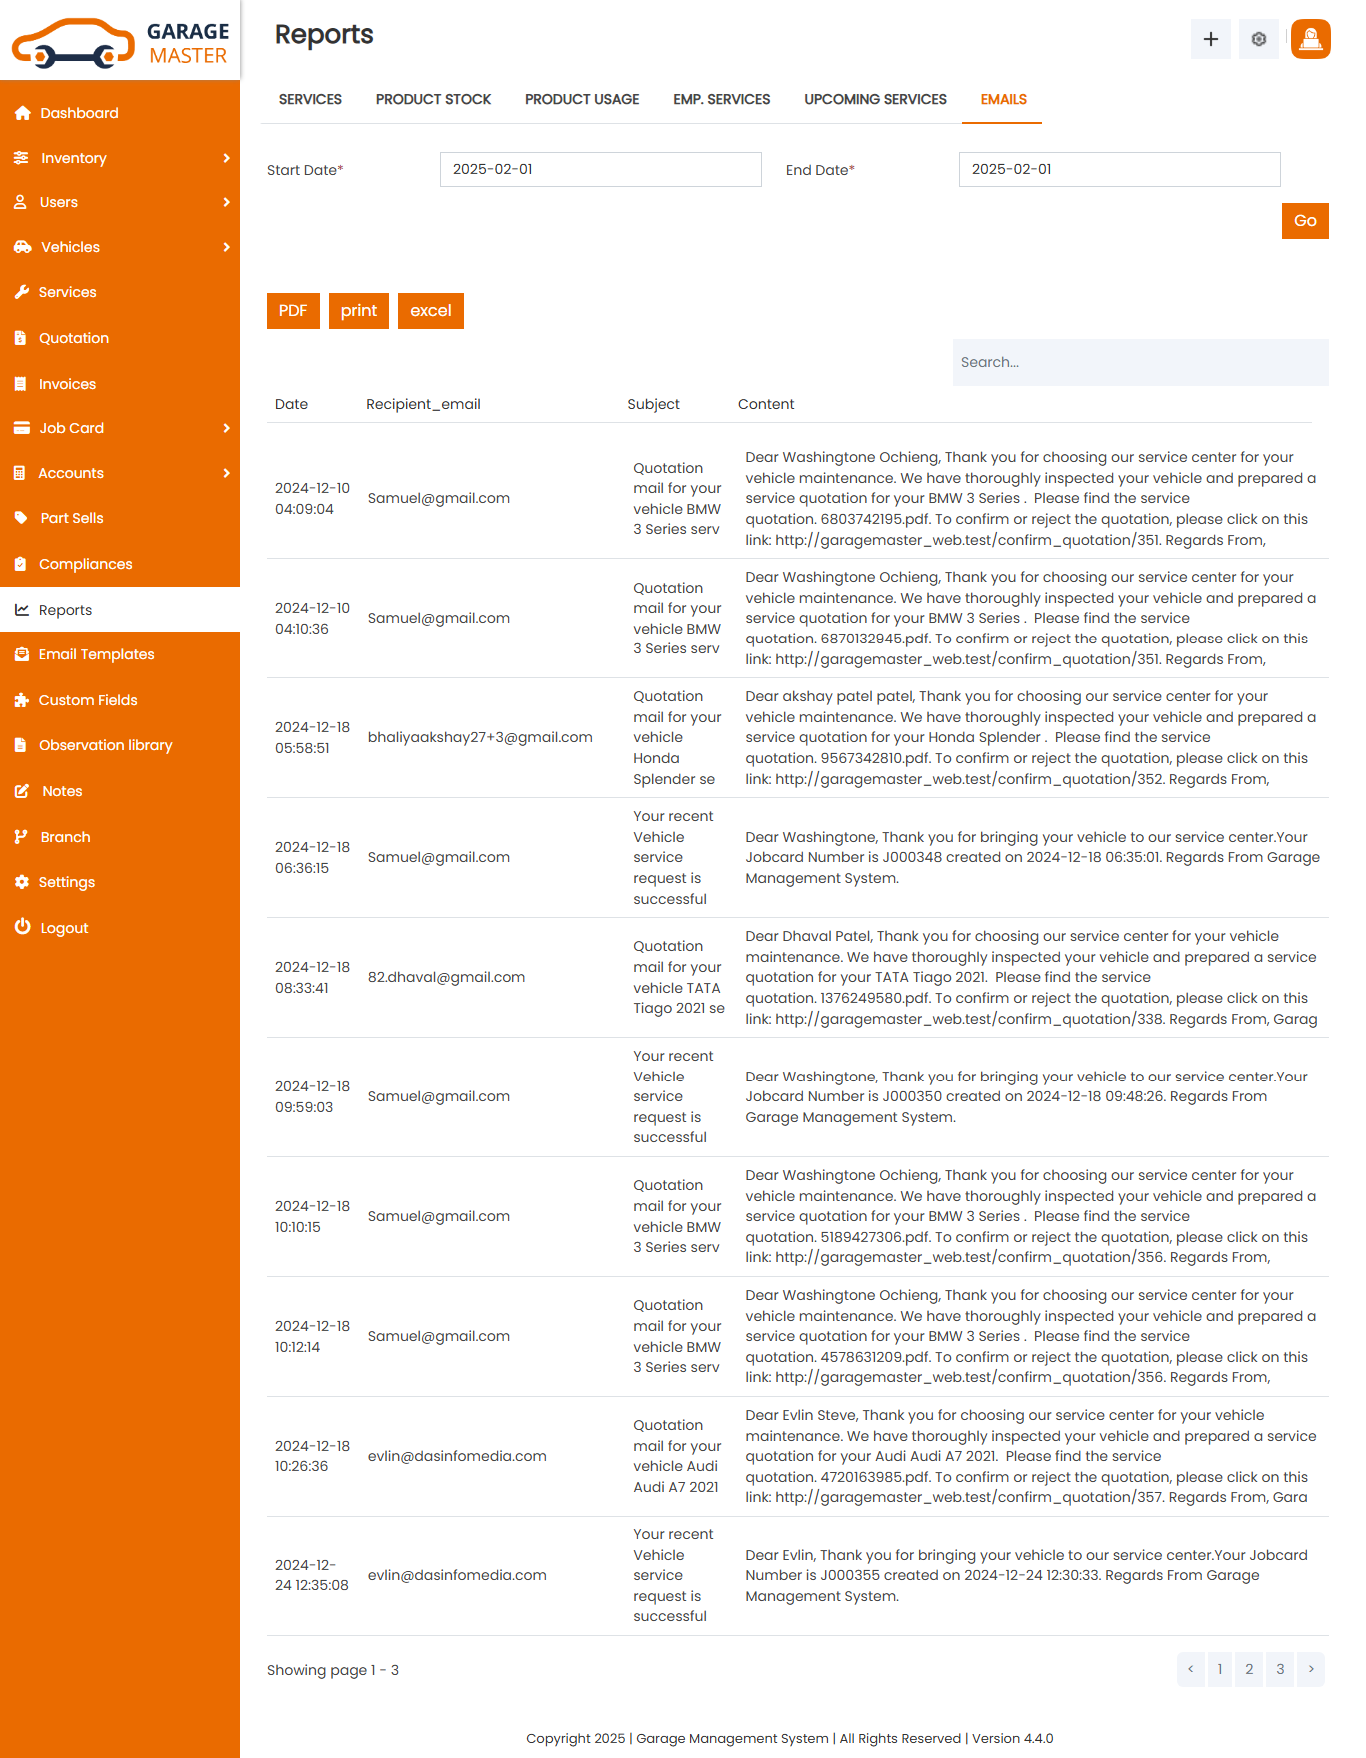
- Start Date: Enter a new start date for this Email Sent report.
- End Date: Enter a new end date for this Email sent report.
When clicking on GO button. This will open Start Date and End date Between In Email Sent Report and Email sent report list.
You can easily download pdf and print these report.
13)Email Template
EmailTemplate
Admin can set Email Template using this details.

14)Custom Field
Custom Field
List Custom Field: Admin can add new Custom Field, Custom Field all Custom Field and view a complete list of all Custom Field.
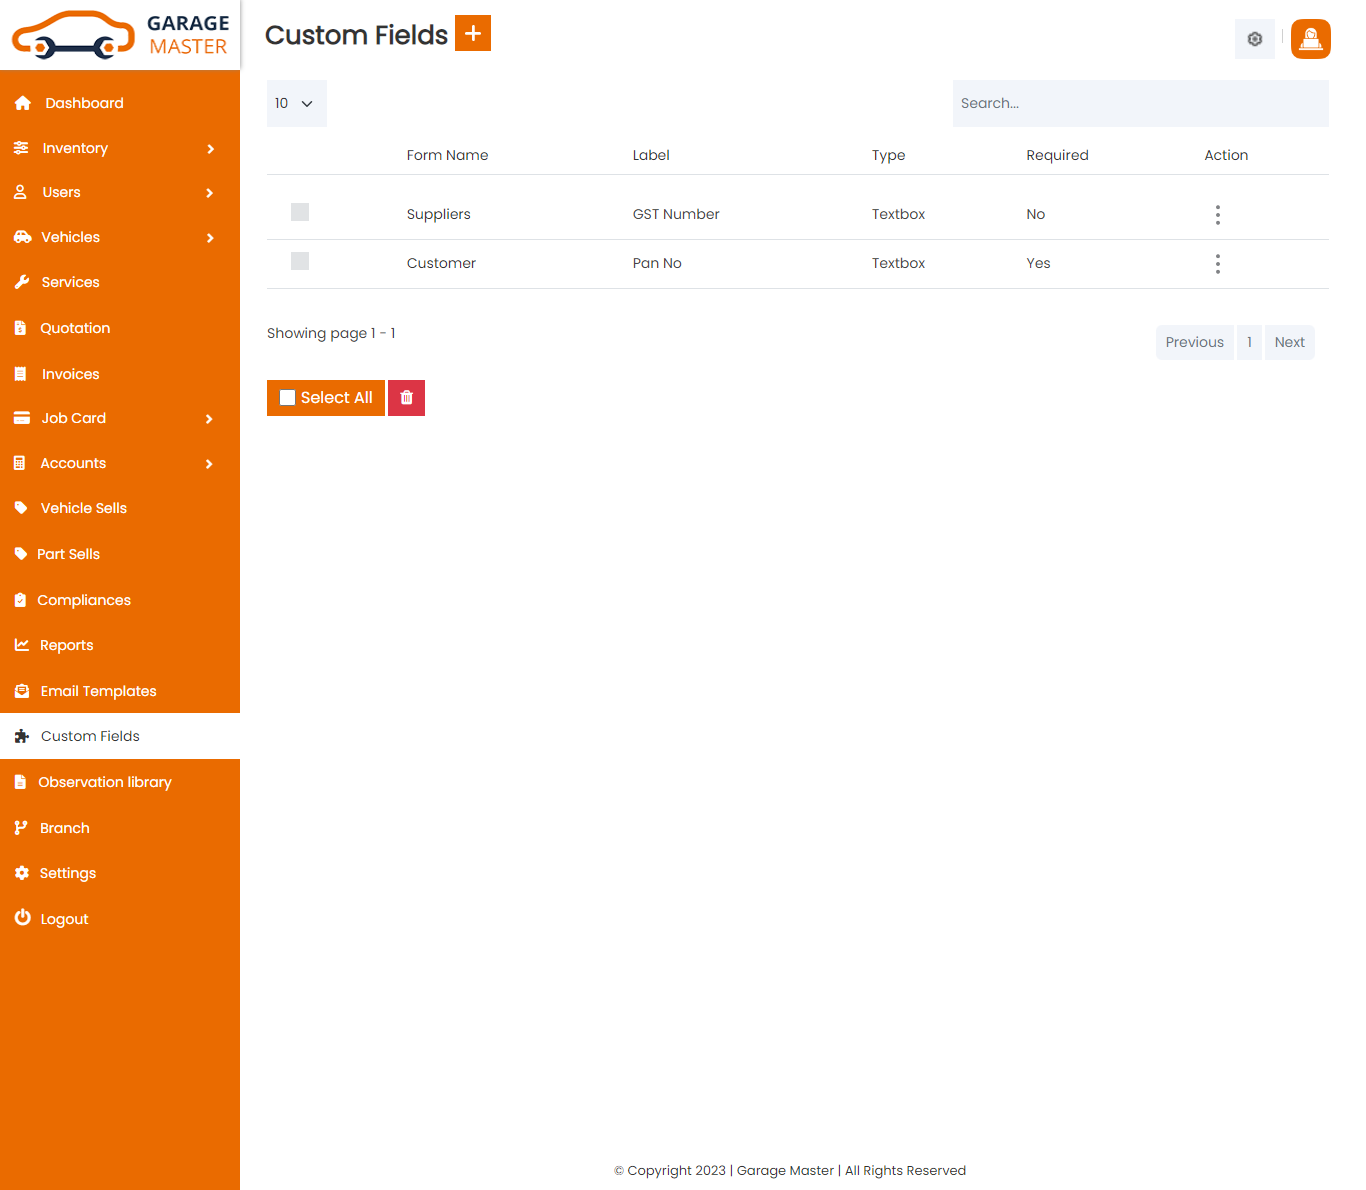
Add Custom Field: Admin can add Custom Field details.
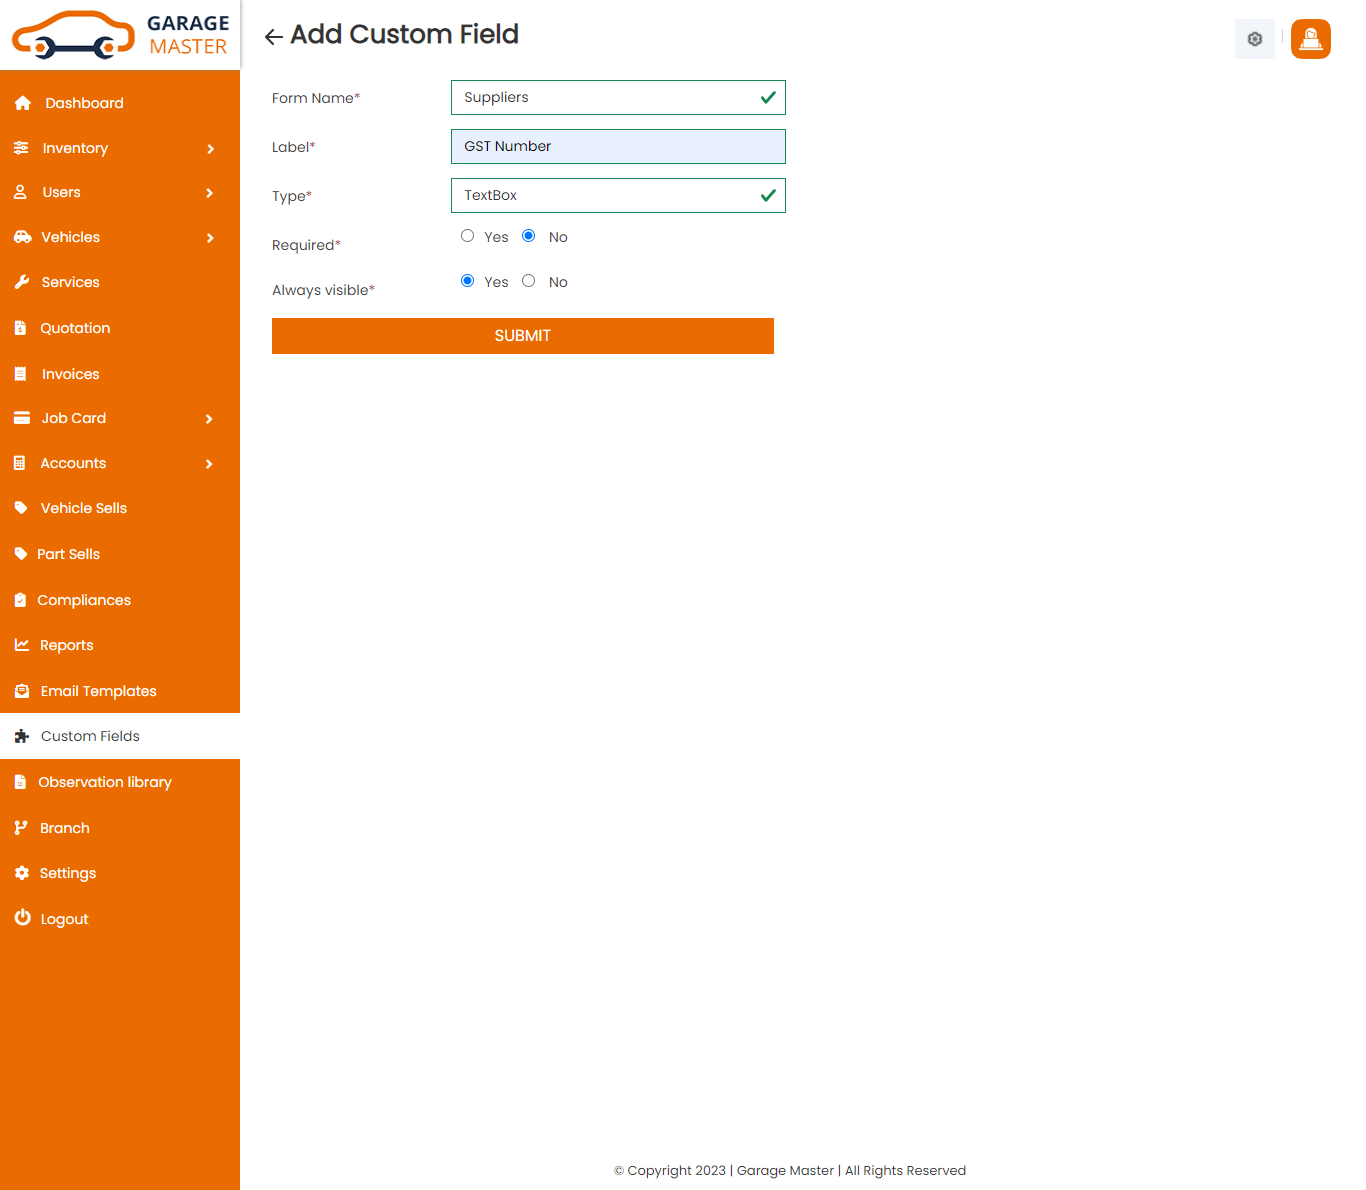
- Form Name: Select form name for this custom field.
- Label: Enter a new label for this custom field.
- Type: Select type for this custom field.
- Required: Select required for this custom field.
- Always visible: Select always visible for this custom field.
Edit Custom Field: Admin can Edit detail of particular Custom Field by clicking on Edit detail button. This will open up details. From here admin can Change Custom Field Details.
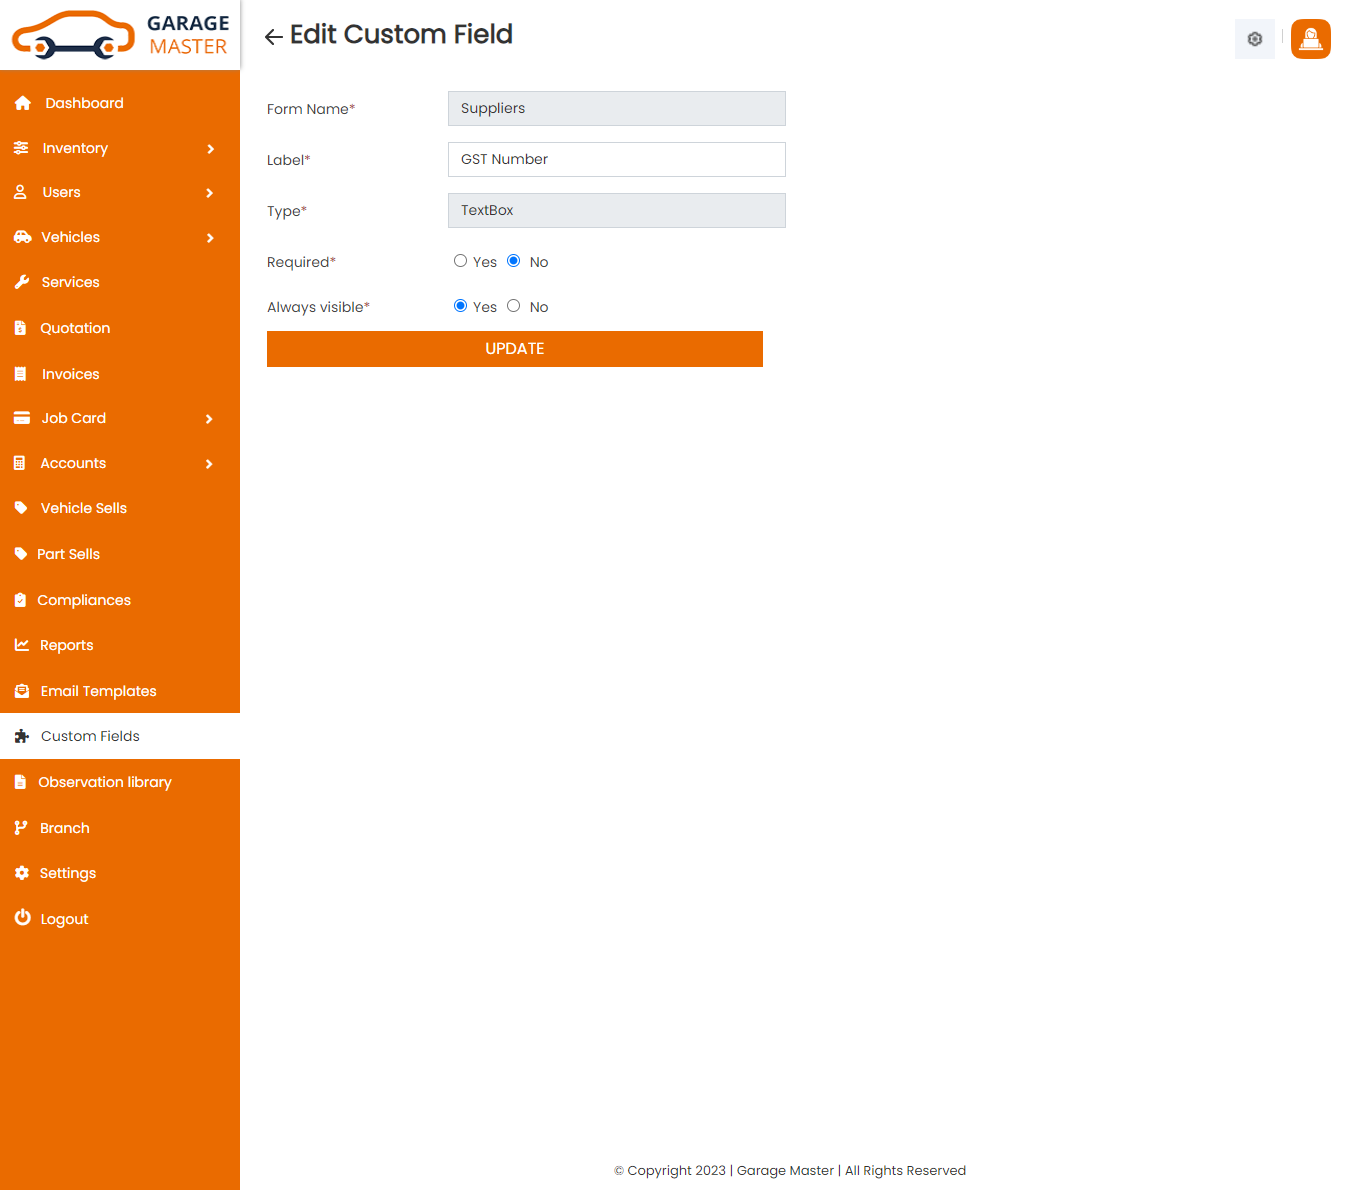
Delete Custom Field: Admin can delete a complete list of all Custom Field and delete detail of particular Custom Field by clicking on delete detail button. This will delete details.
15)Observation Library
Observation
Observation List: Admin can add new Observation, Observation all Observation and view a complete list of all Observation.
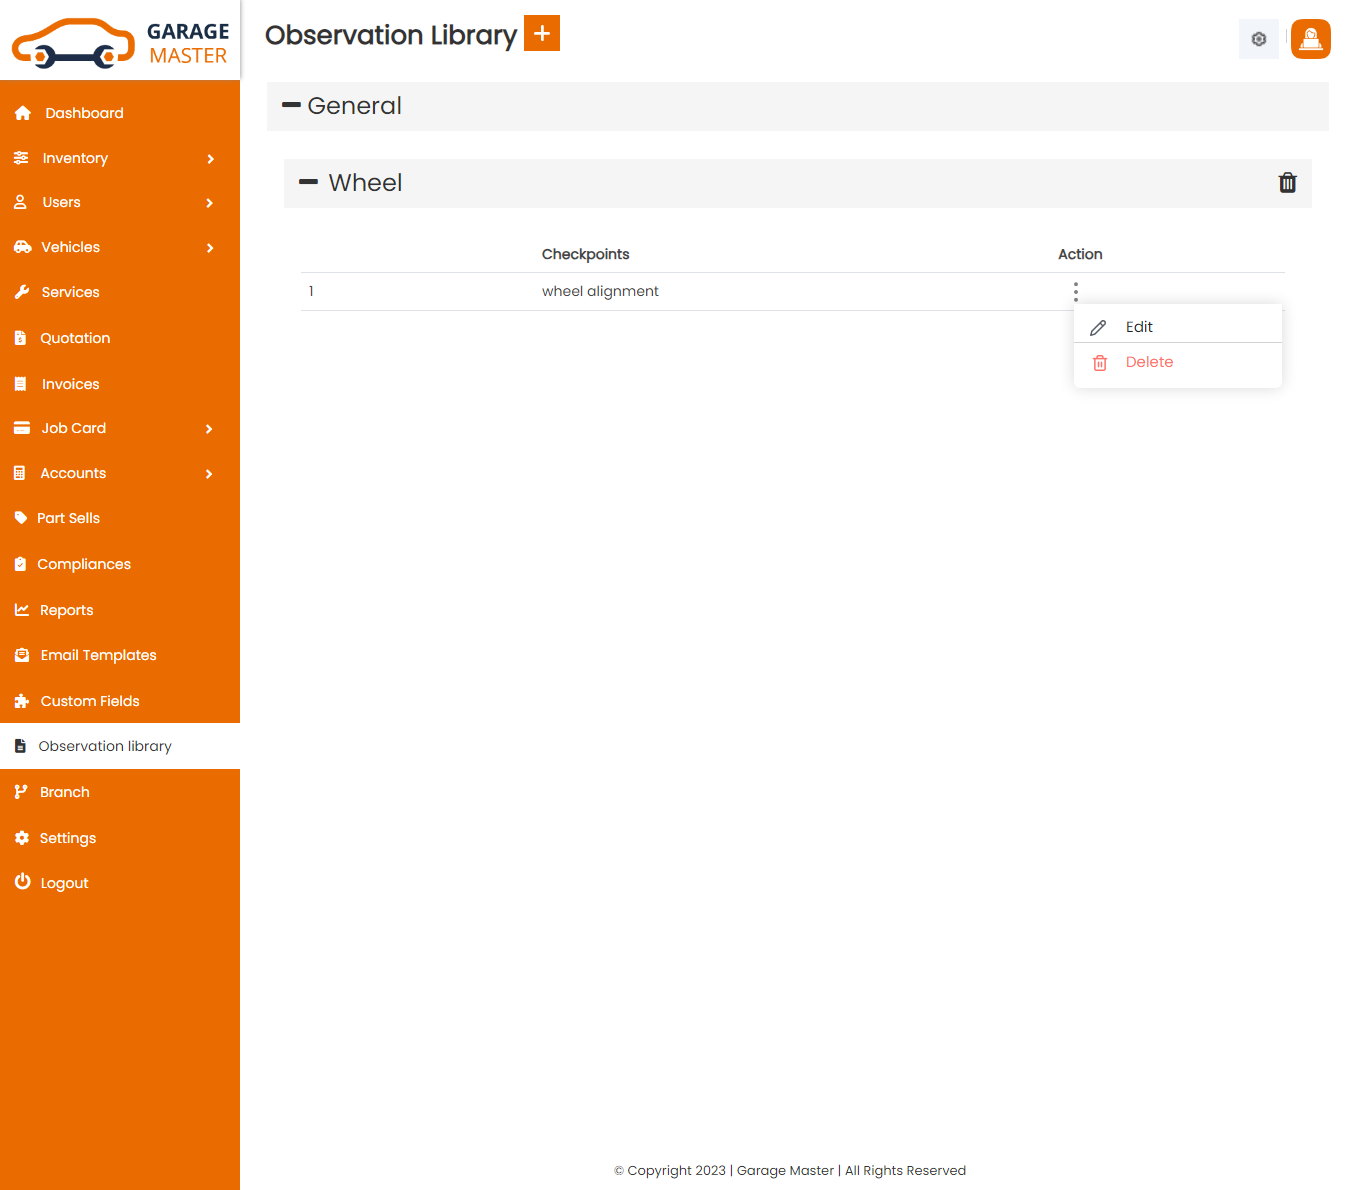
Observation Libraries Information: Some Observation Libraries are Added by default.
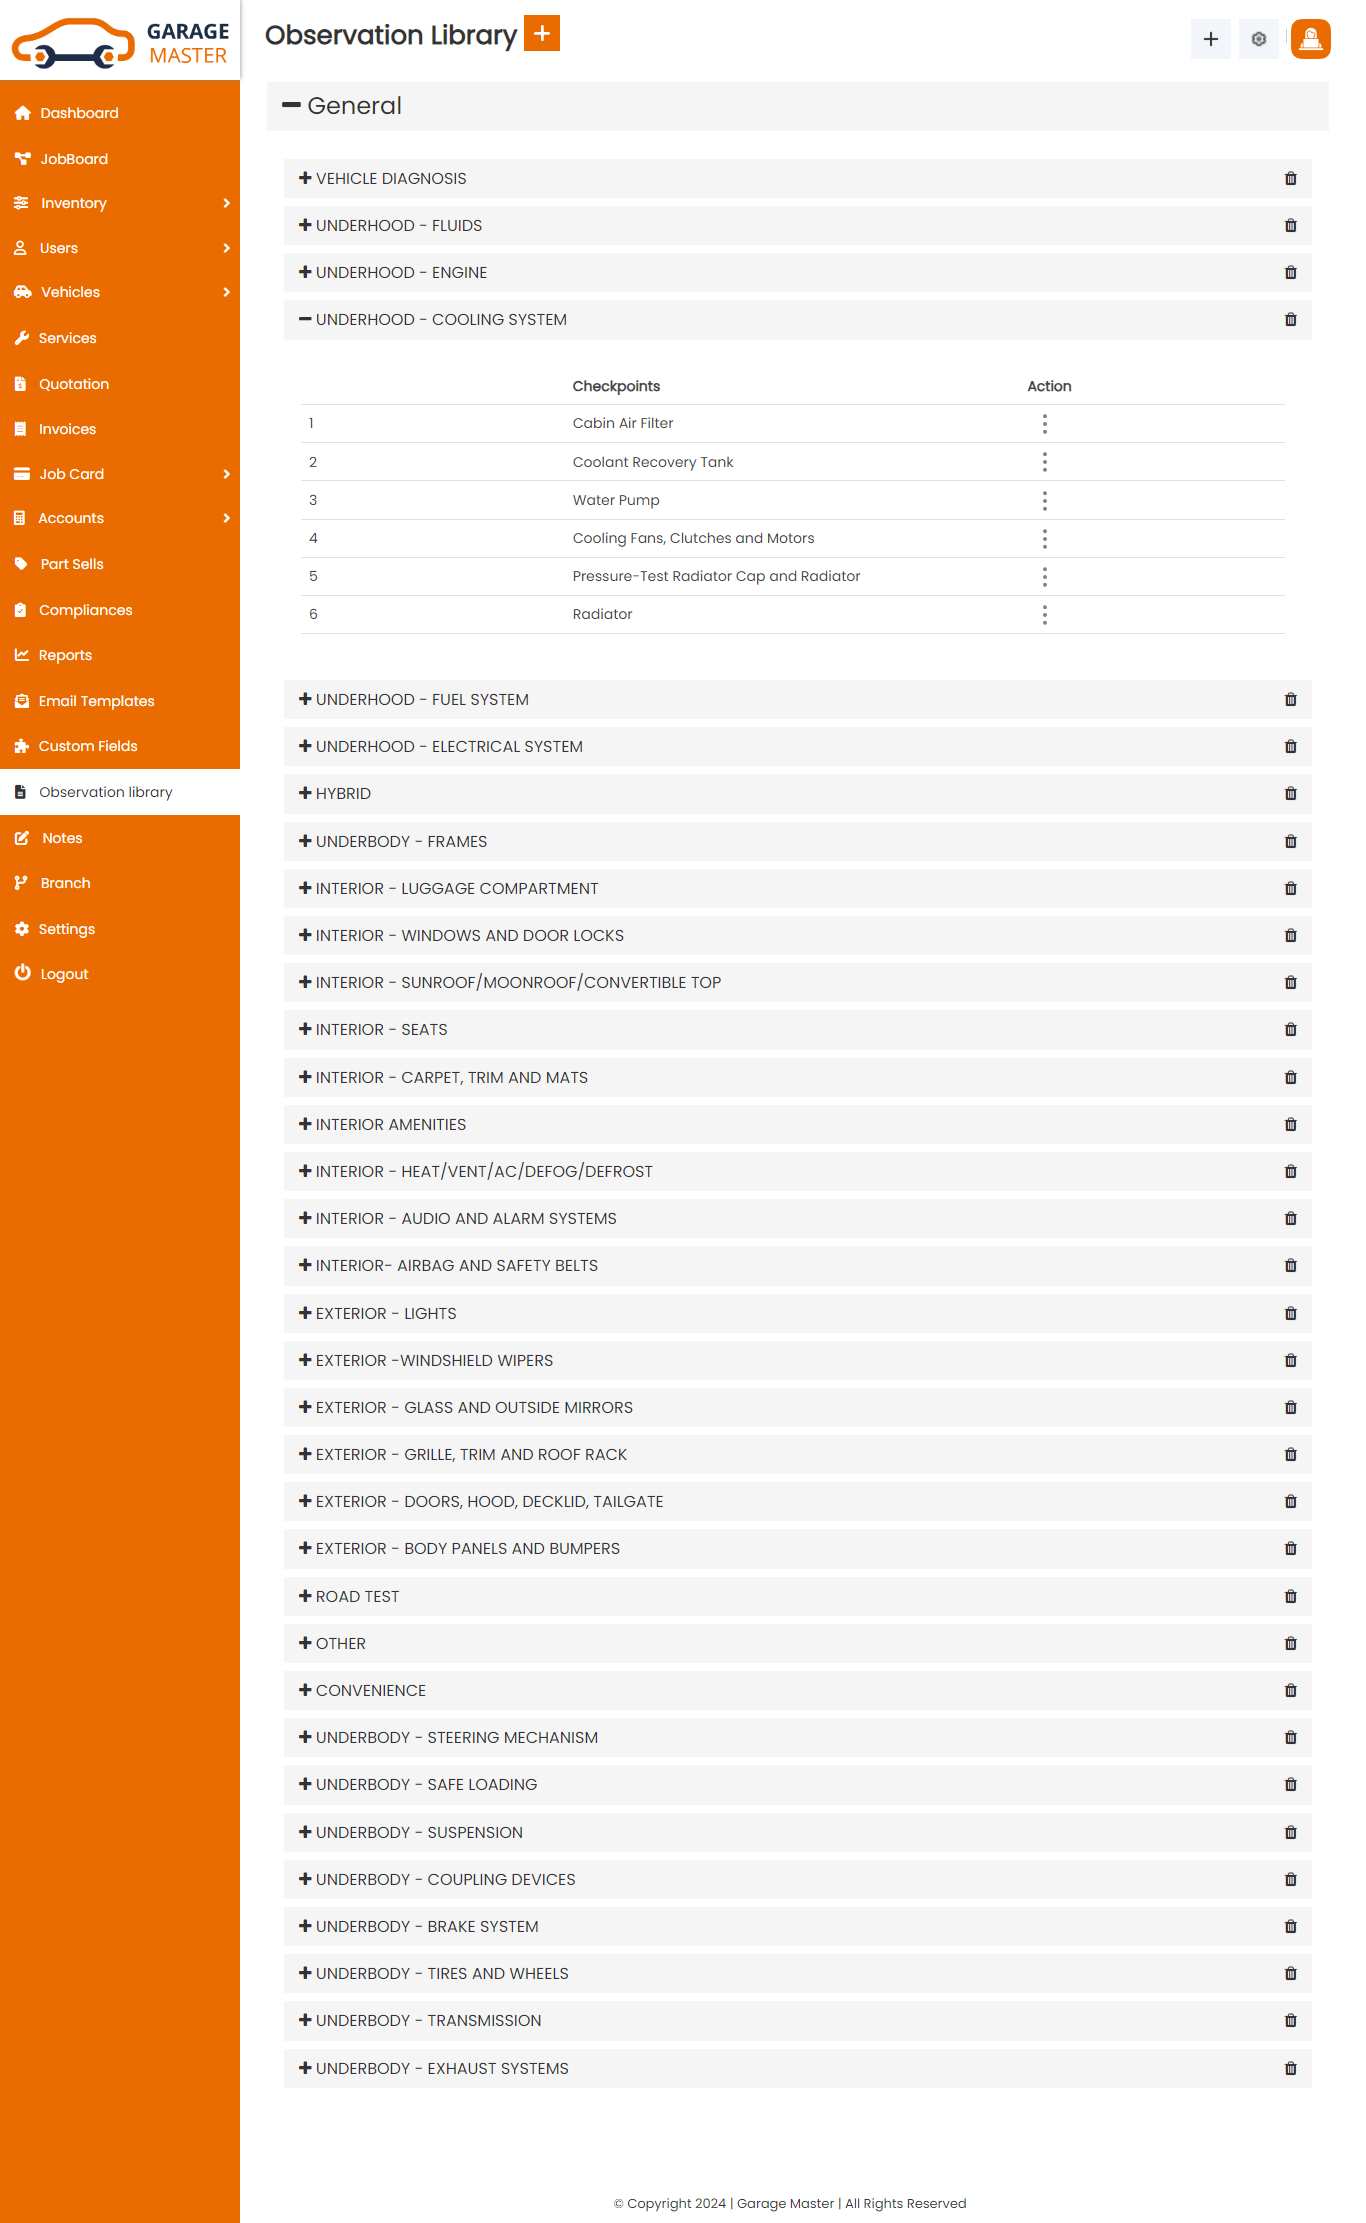
Add Observation: Admin can add Observation details
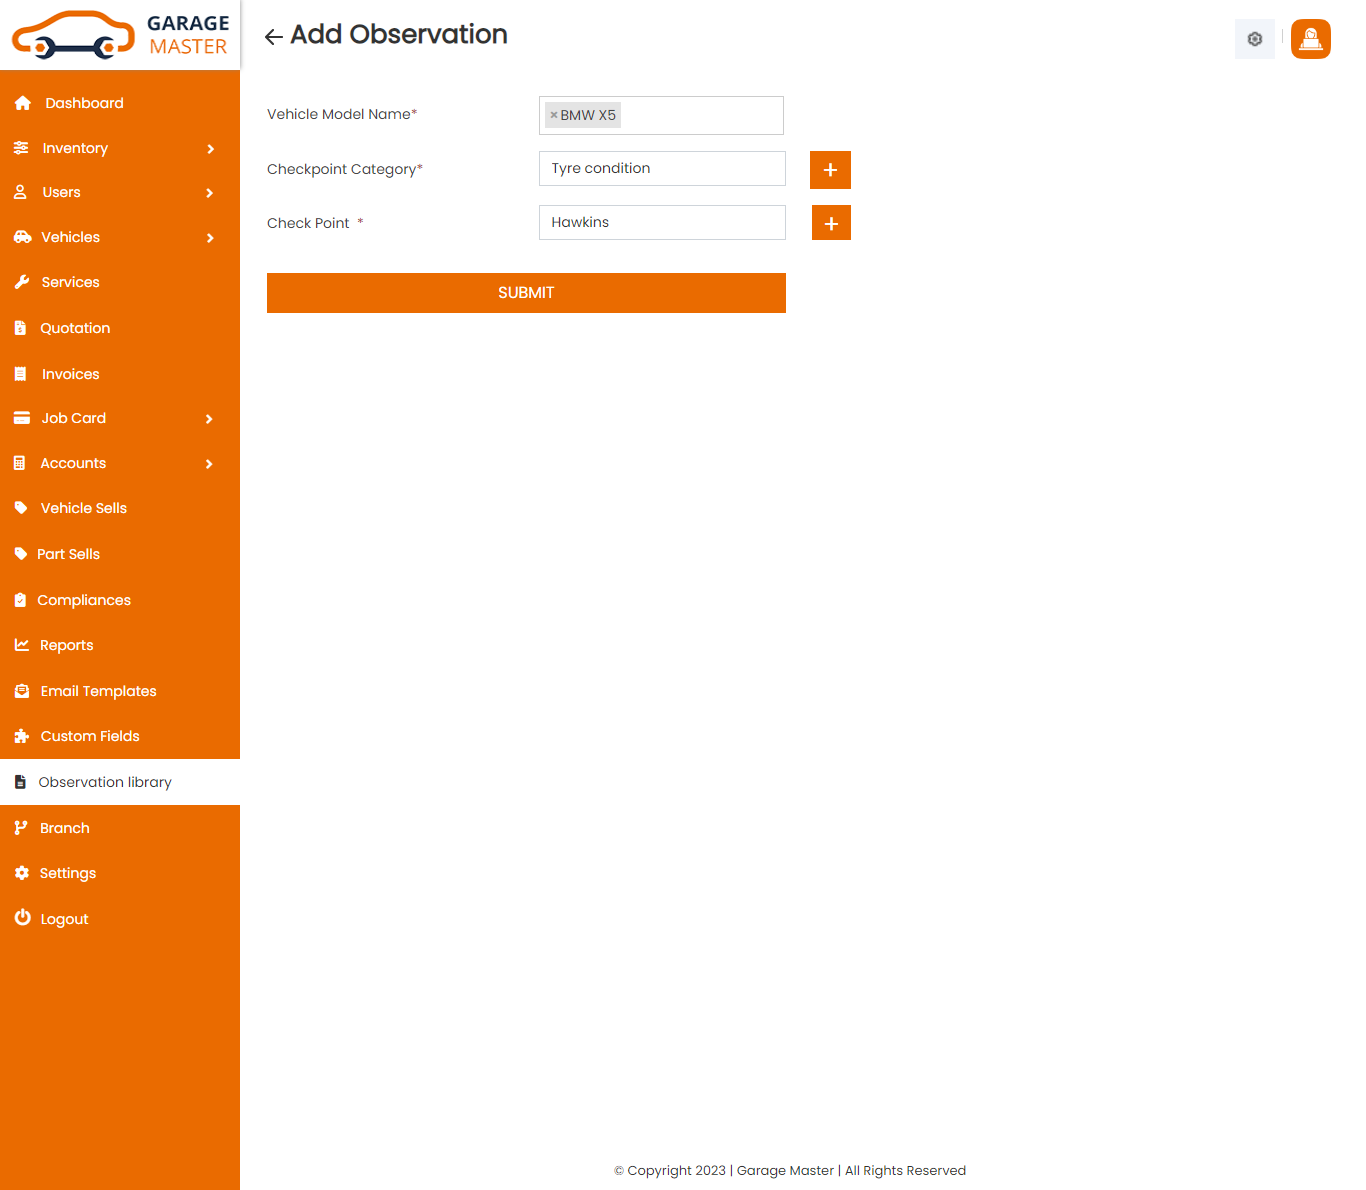
- Vehicle Name: Select multiple vehicles for this observation.
- Checkpoint Category: Select checkpoint category for this observation.
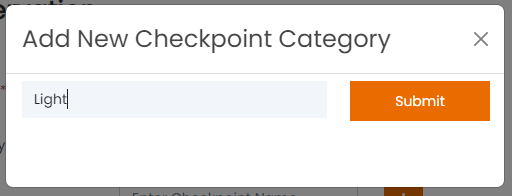
- Add Category: then click on Add category button. You can add new add category from here.
- Checkpoint: Enter a new checkpoint for this observation.
- Add Checkpoint: then click on Add Checkpoint (+) button. You can add new add checkpoint.
Edit Observation: Admin can Edit detail of particular Observation by clicking on Edit detail button. This will open up details. From here admin can Change Observation Details.

Delete Observation: Admin can delete a complete list of all Observation and delete detail of particular Observation by clicking on delete detail button. This will delete details.
17)Notes
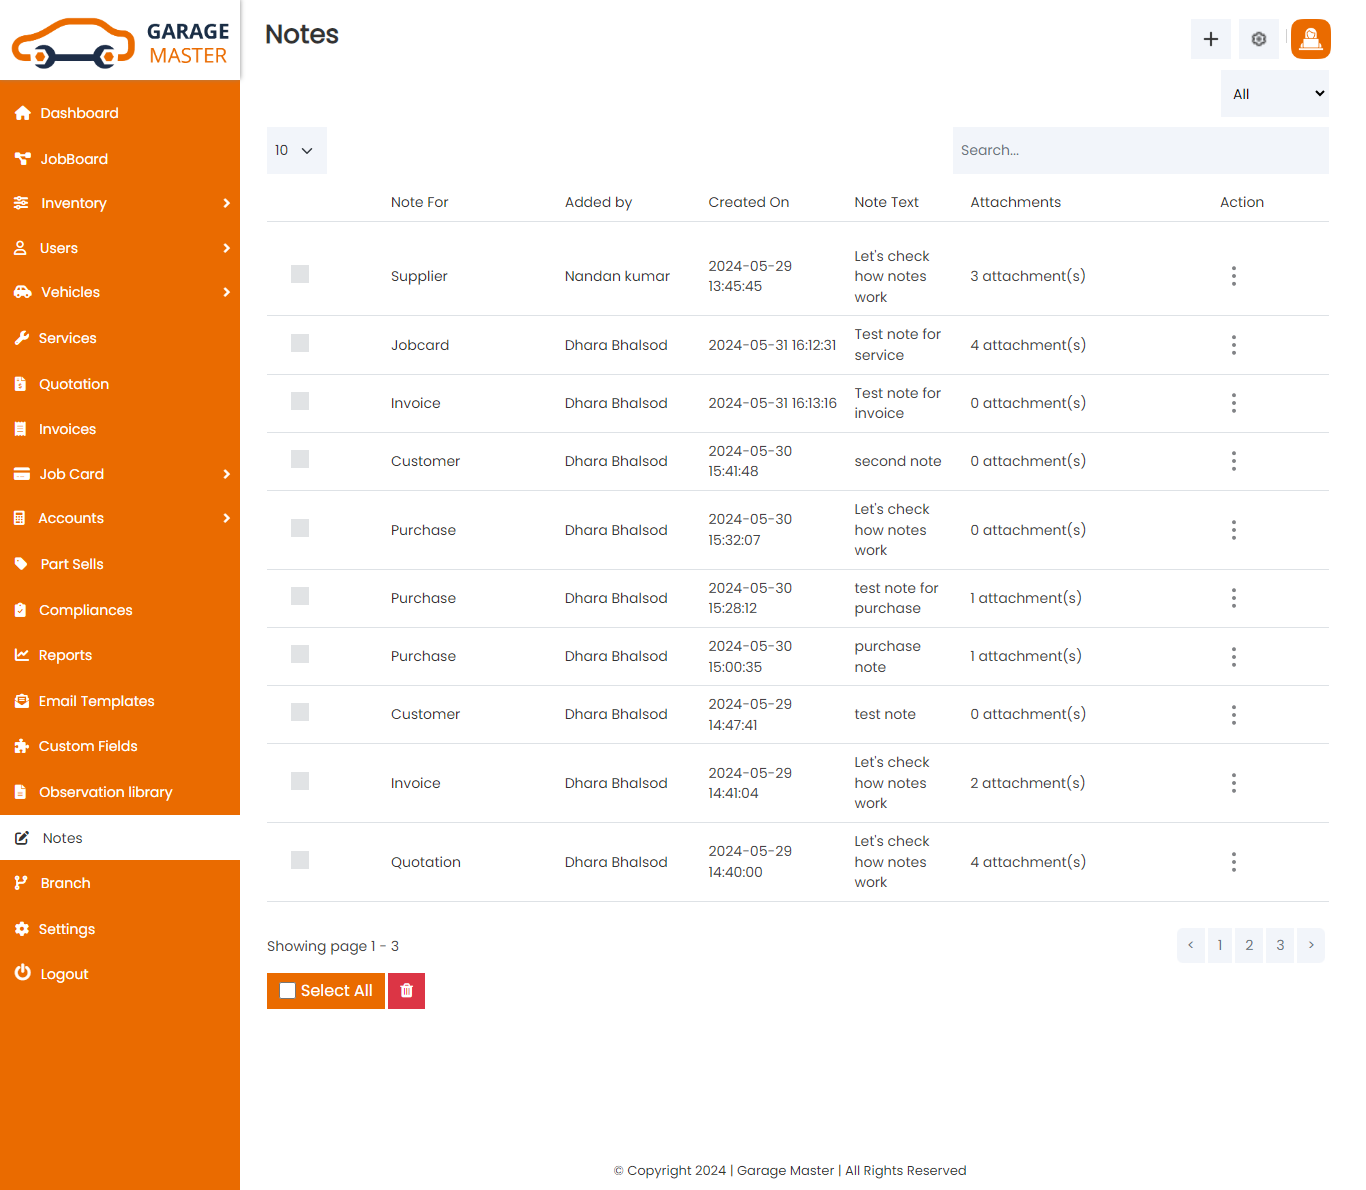
Notes Module
Notes List: You can check All module notes here
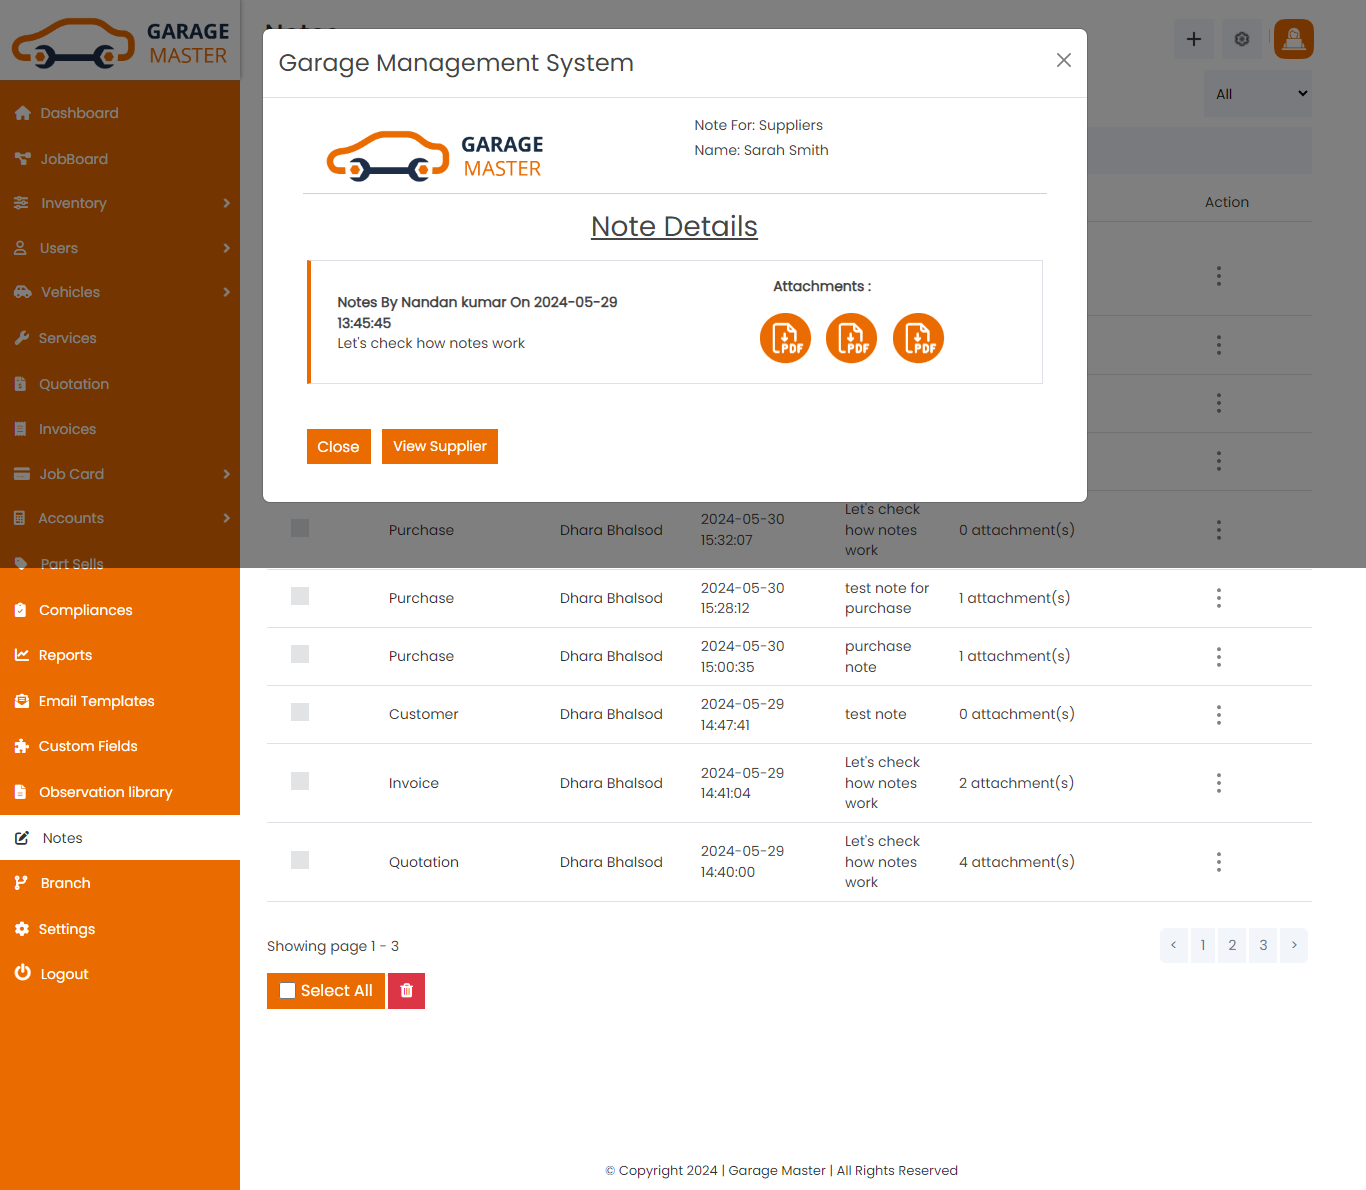
View Notes List: You can view note details here
Delete Notes: Admin can delete a complete list of all Notes and delete detail of particular Notes by clicking on delete button. This will delete particular Notes all the details.
18)Branch
Branch Module
*Note: When the first time install this Garage Package at that time you can see only one branch and it is called as a "Main Branch". And this "Main Brach" is not displayed inside the Branch Module. If you can add a new branch, then the new added branch will show inside the Branch Module on the listing page. For Add Branch rights branch is only for Admin. If Admin wants to give rights to employees or Support Staff, then Admin can do it. But it is good practice and advice to add branches by Admin only, because we handle multiple branches on database and platform, so it is a very important thing. If you have not added any branch, then you have only a "Main Branch", so the branch relates any data not shown inside the Branch Module. This module is not for customer use or any kind of view.
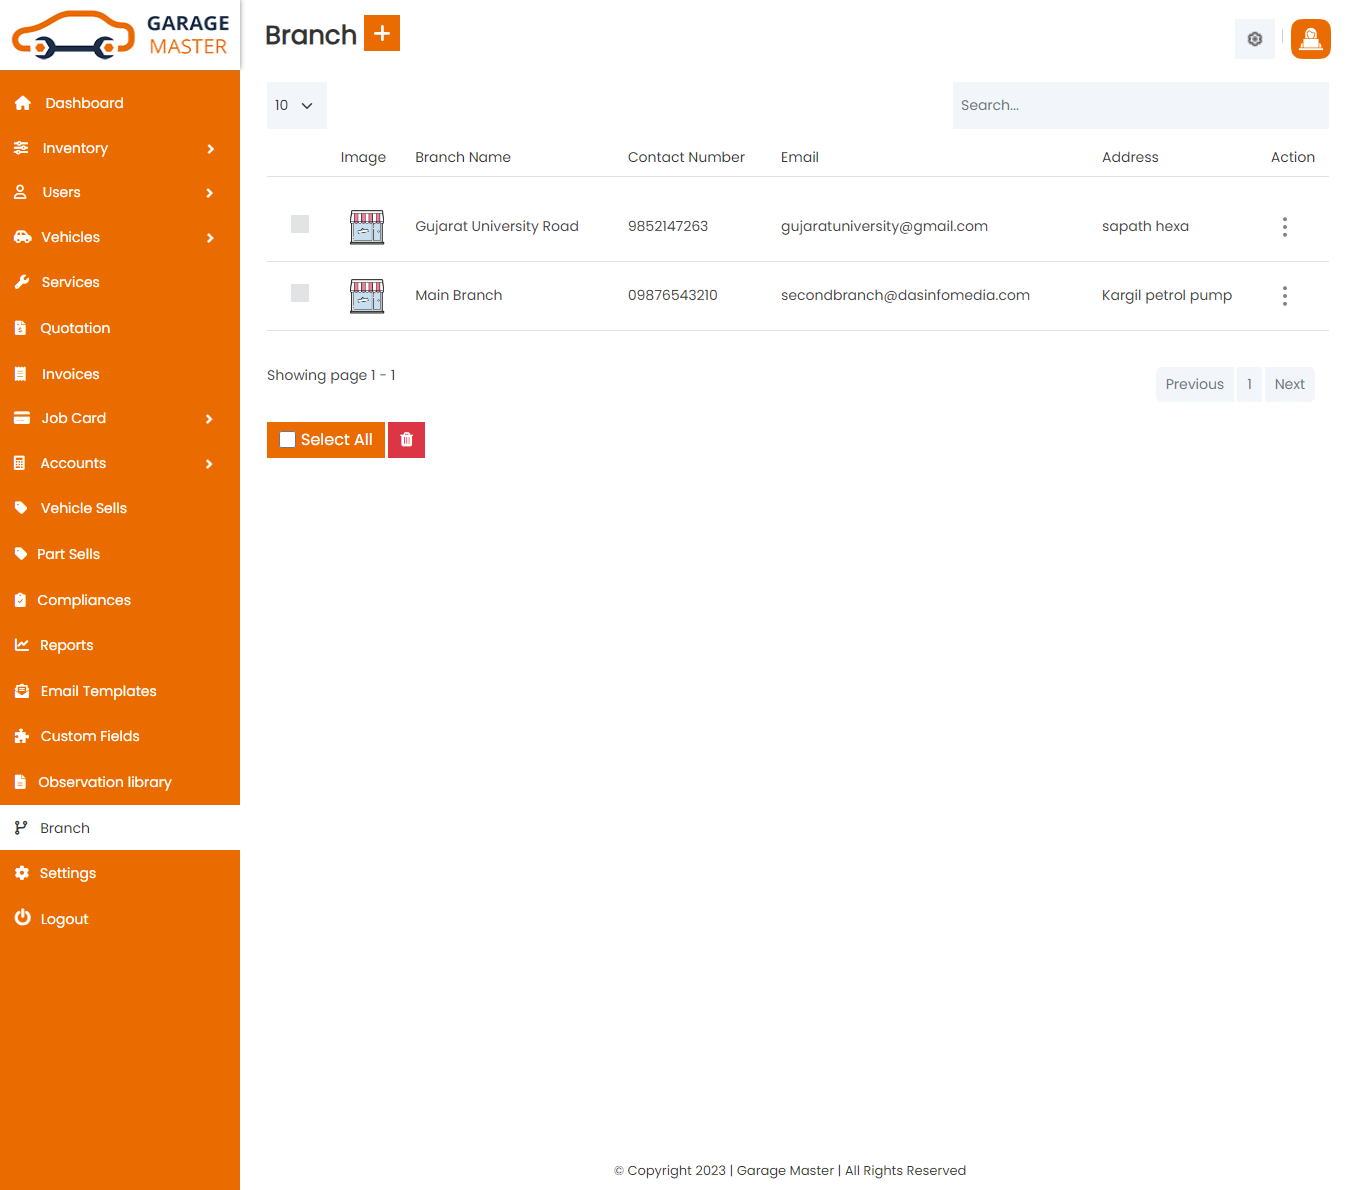
Branch List: Admin can add new Branch, and view a complete list of all Branch and also Add, Edit, View and Delete them. Following is listing of all added Branch.
Add Branch: Admin can add Branch with details
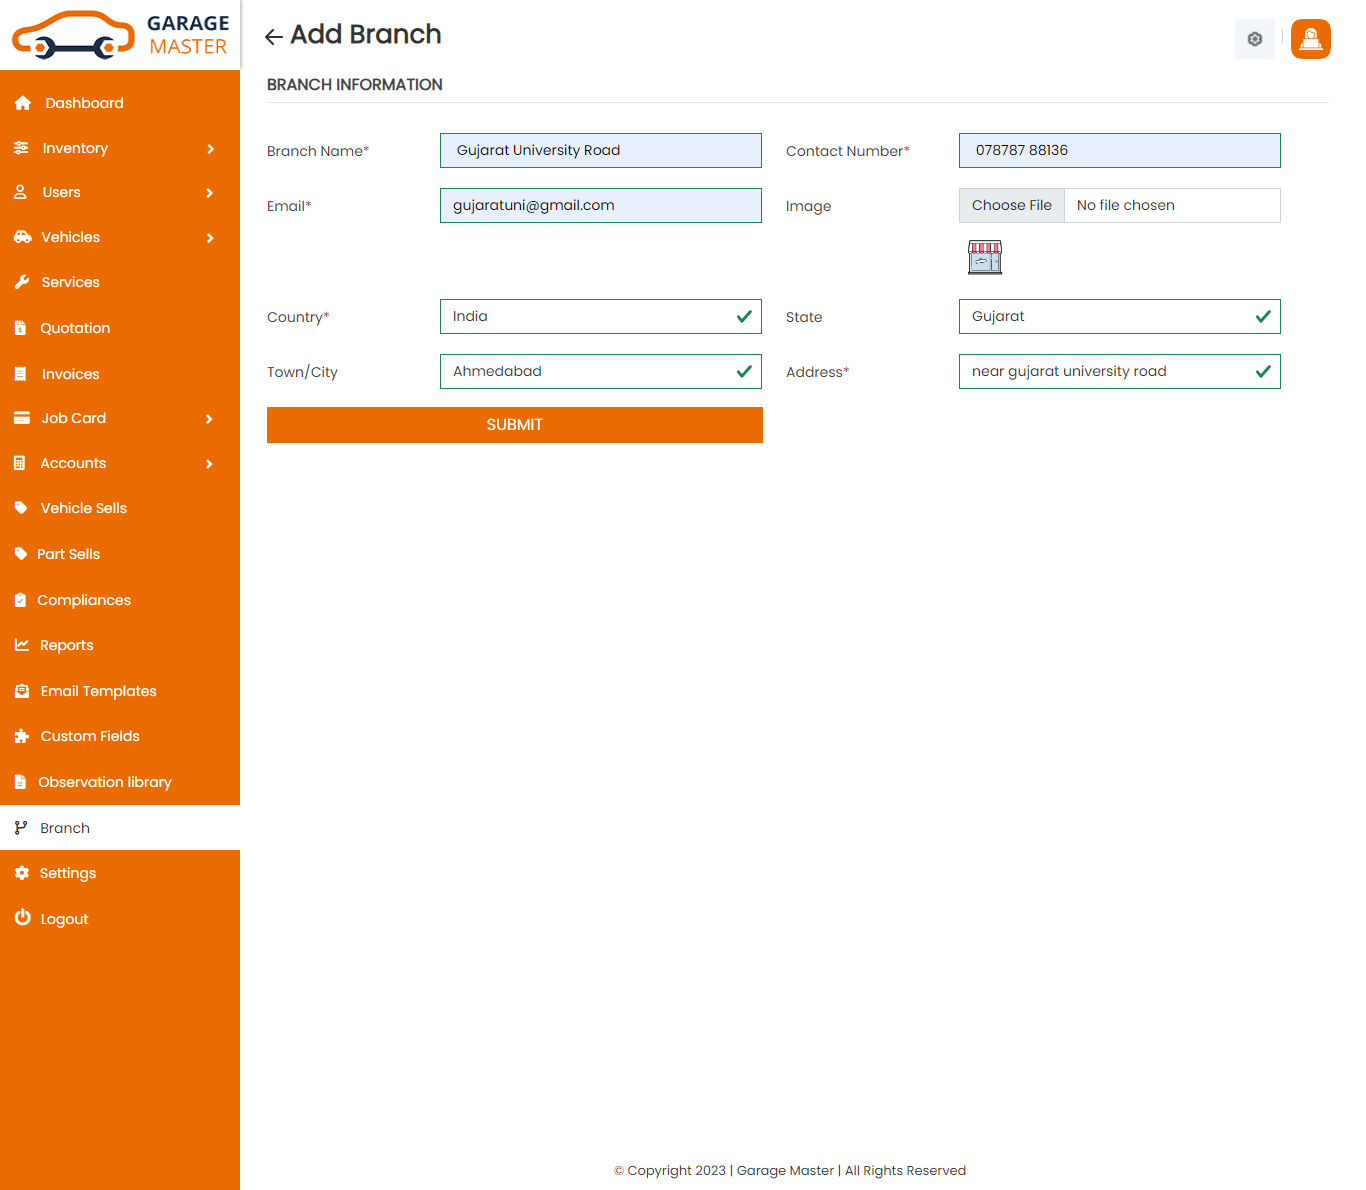
- Branch Name: Enter branch name.
- Branch Contact Number: Enter contact number of this branch.
- Branch Email: Enter an email id of this branch.
- Branch Image: Upload image for this branch.
- Branch Country: Select country for this branch.
- Branch State: Select state for this branch.
- Branch City: Select city for this branch.
- Branch Address: Enter address for this branch.
Branch Information
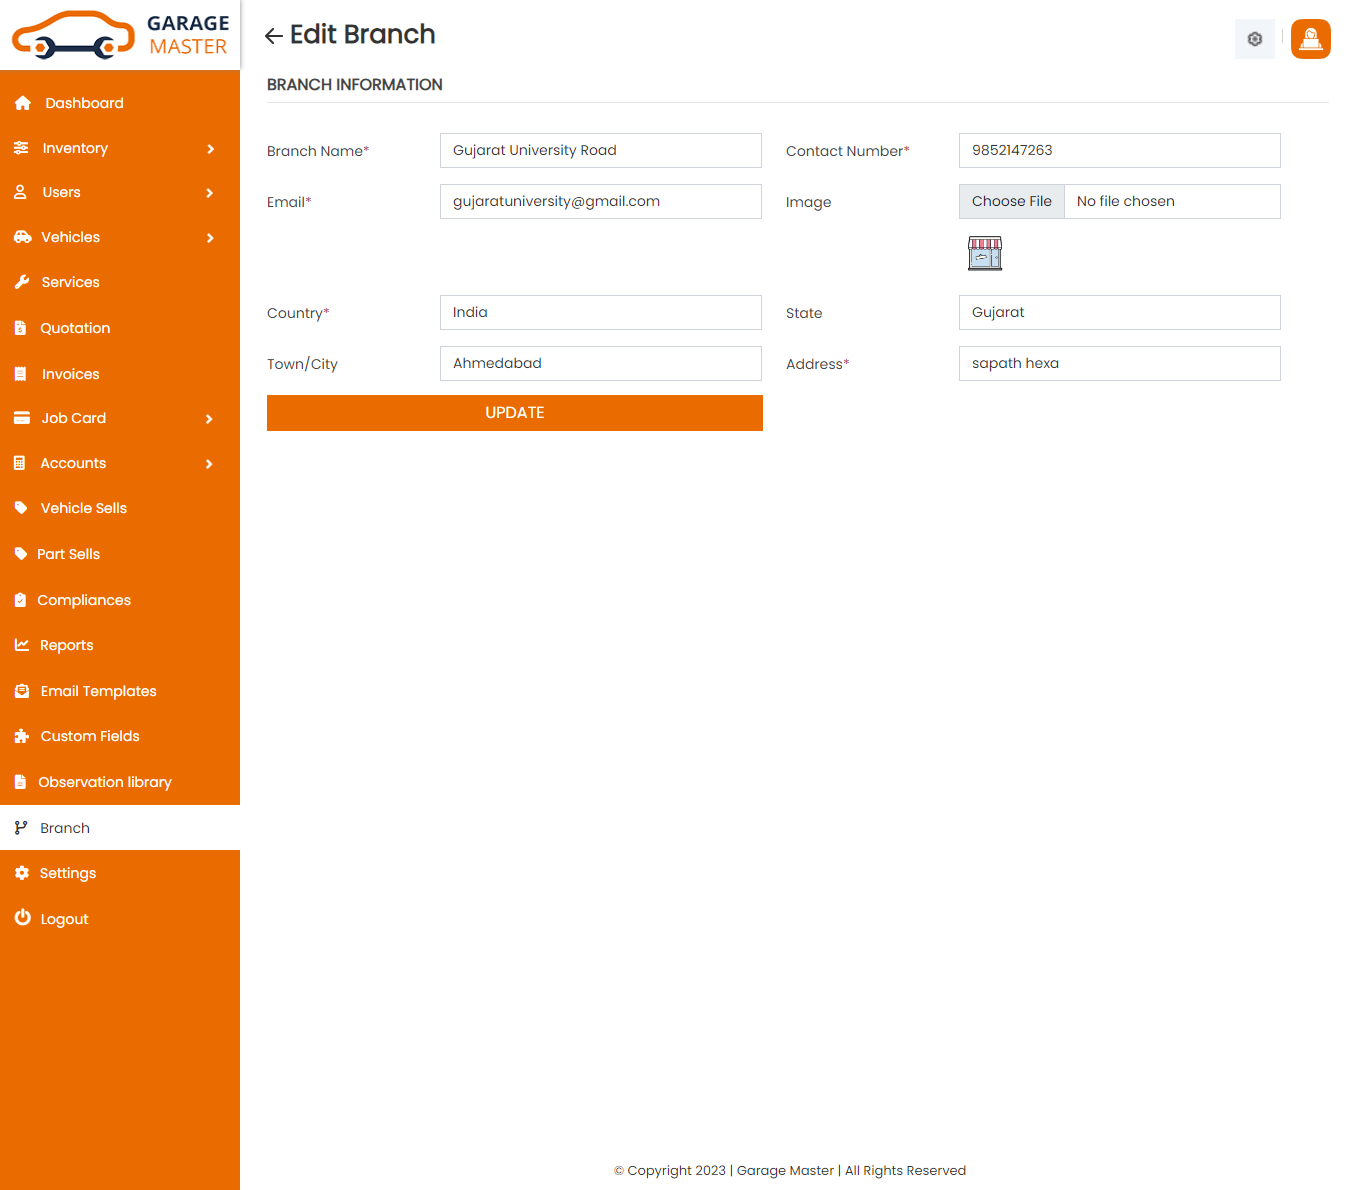
Edit Branch: Admin can Edit detail of particular Branch by clicking on Edit button on Branch listing Page. This will open up Branch details. From here admin can change Branch details.
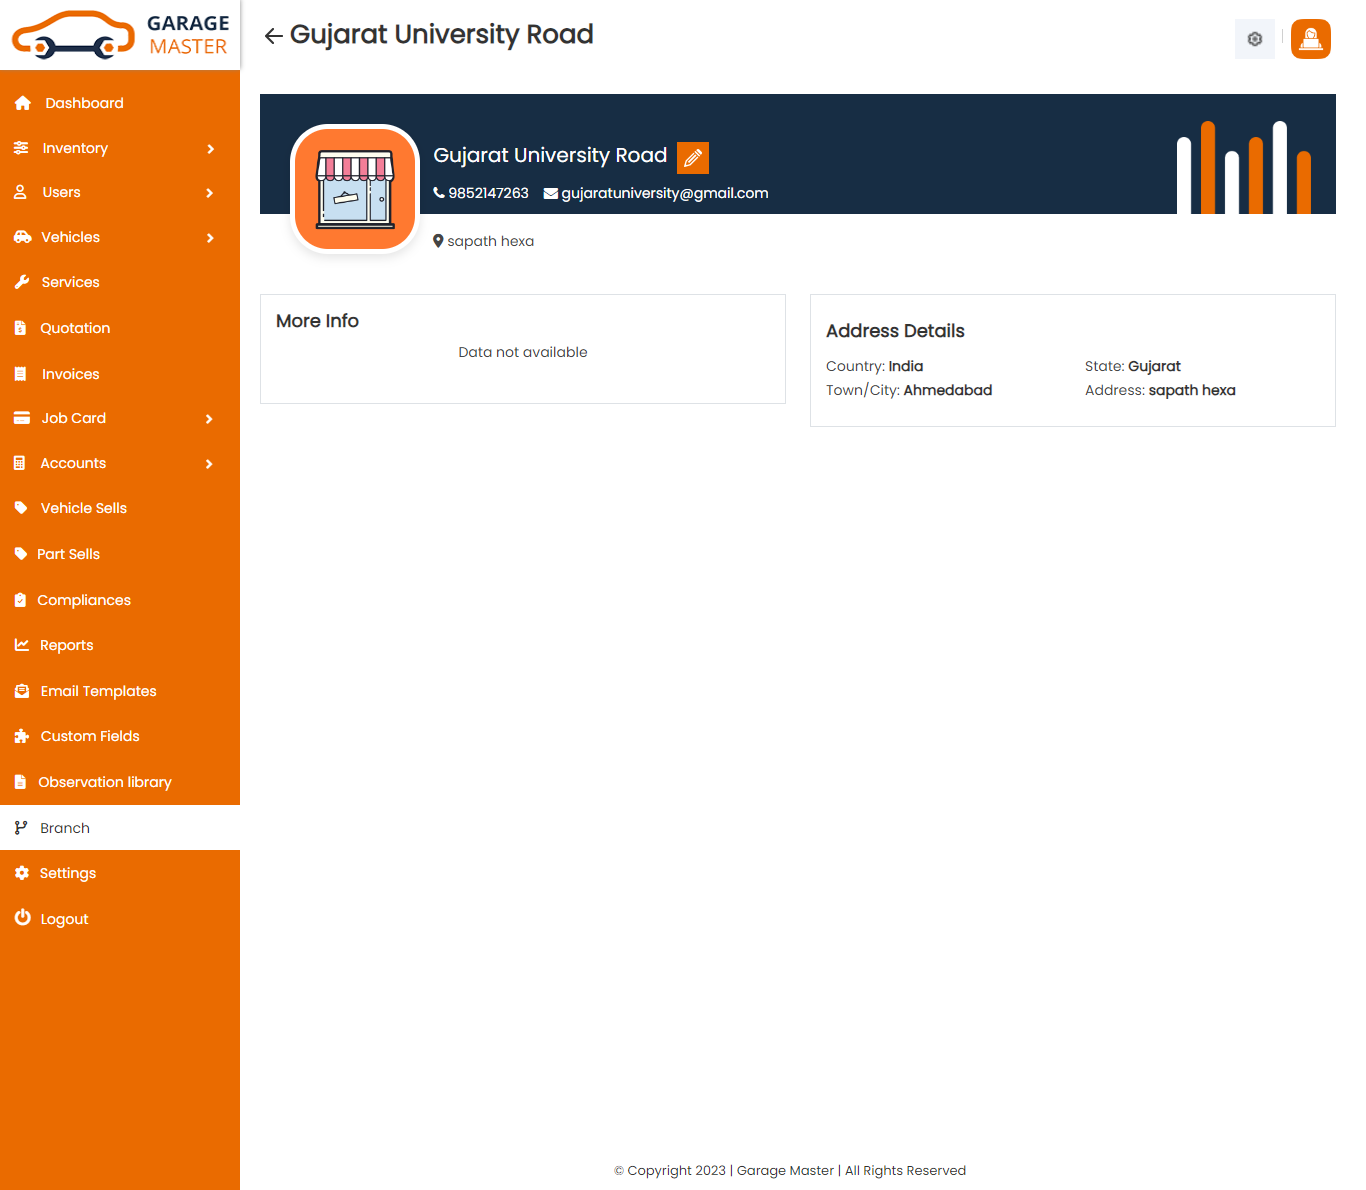
View Branch: Admin can view a complete list of all Branch and view detail of particular Branch by clicking on view button. This will open up details of particular Branch.
Delete Branch: Admin can delete a complete list of all Branch and delete detail of particular Branch by clicking on delete button. This will delete particular Branch all the details.
F) Customer View:
1)Dashboard:
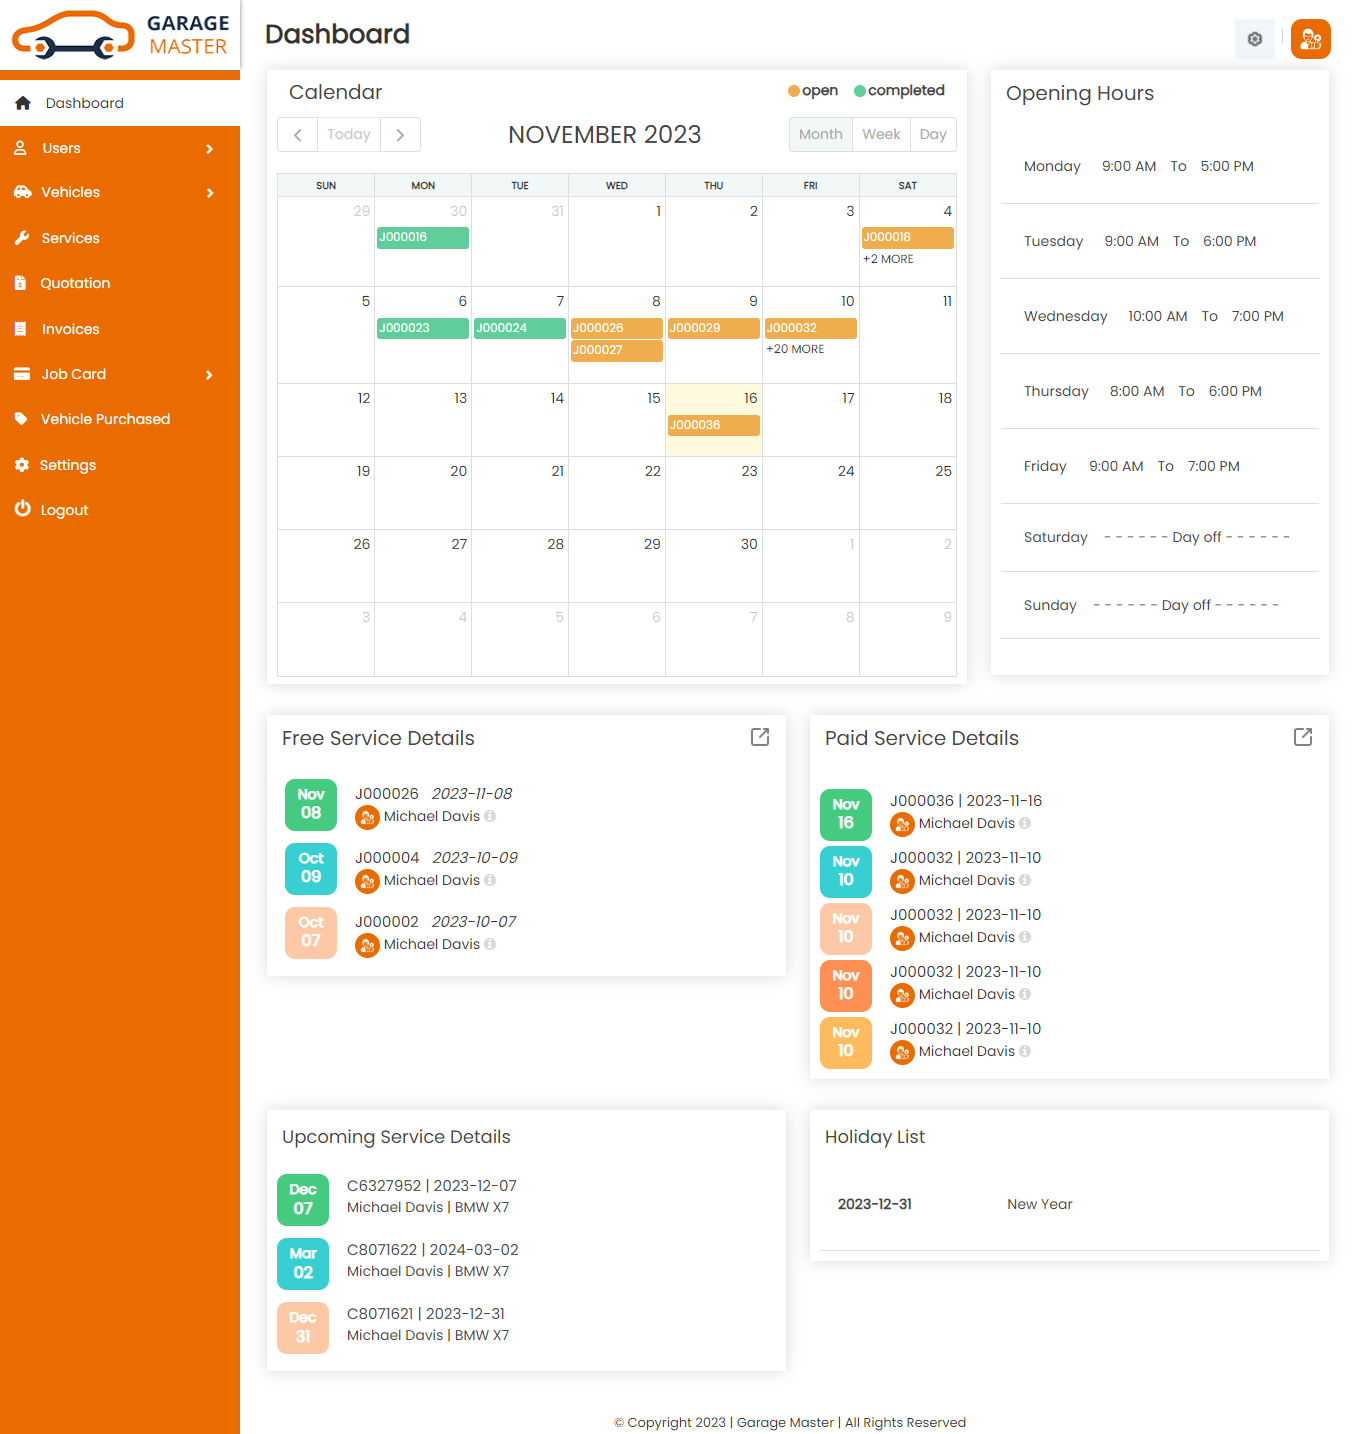
Customer side dashboard view.
2)Settings
Other Settings
Click on Setting inside Click on Other Setting to start setting up the system. You are advised to fill all fields of Other settings as these details are used in a different section of the whole system. You can change these settings as per your requirement.

- Select Timezone: Select timezone for this setting.
- Select Language: Select language for this setting.
Time Zone
Language
2.1)How to Videos
How to Videos
In this menu it provide video guidance.Click on Setting inside Click on How to Videos to open this menu.

3)Users
A) Customer
Customer List: Customer can see his own details.
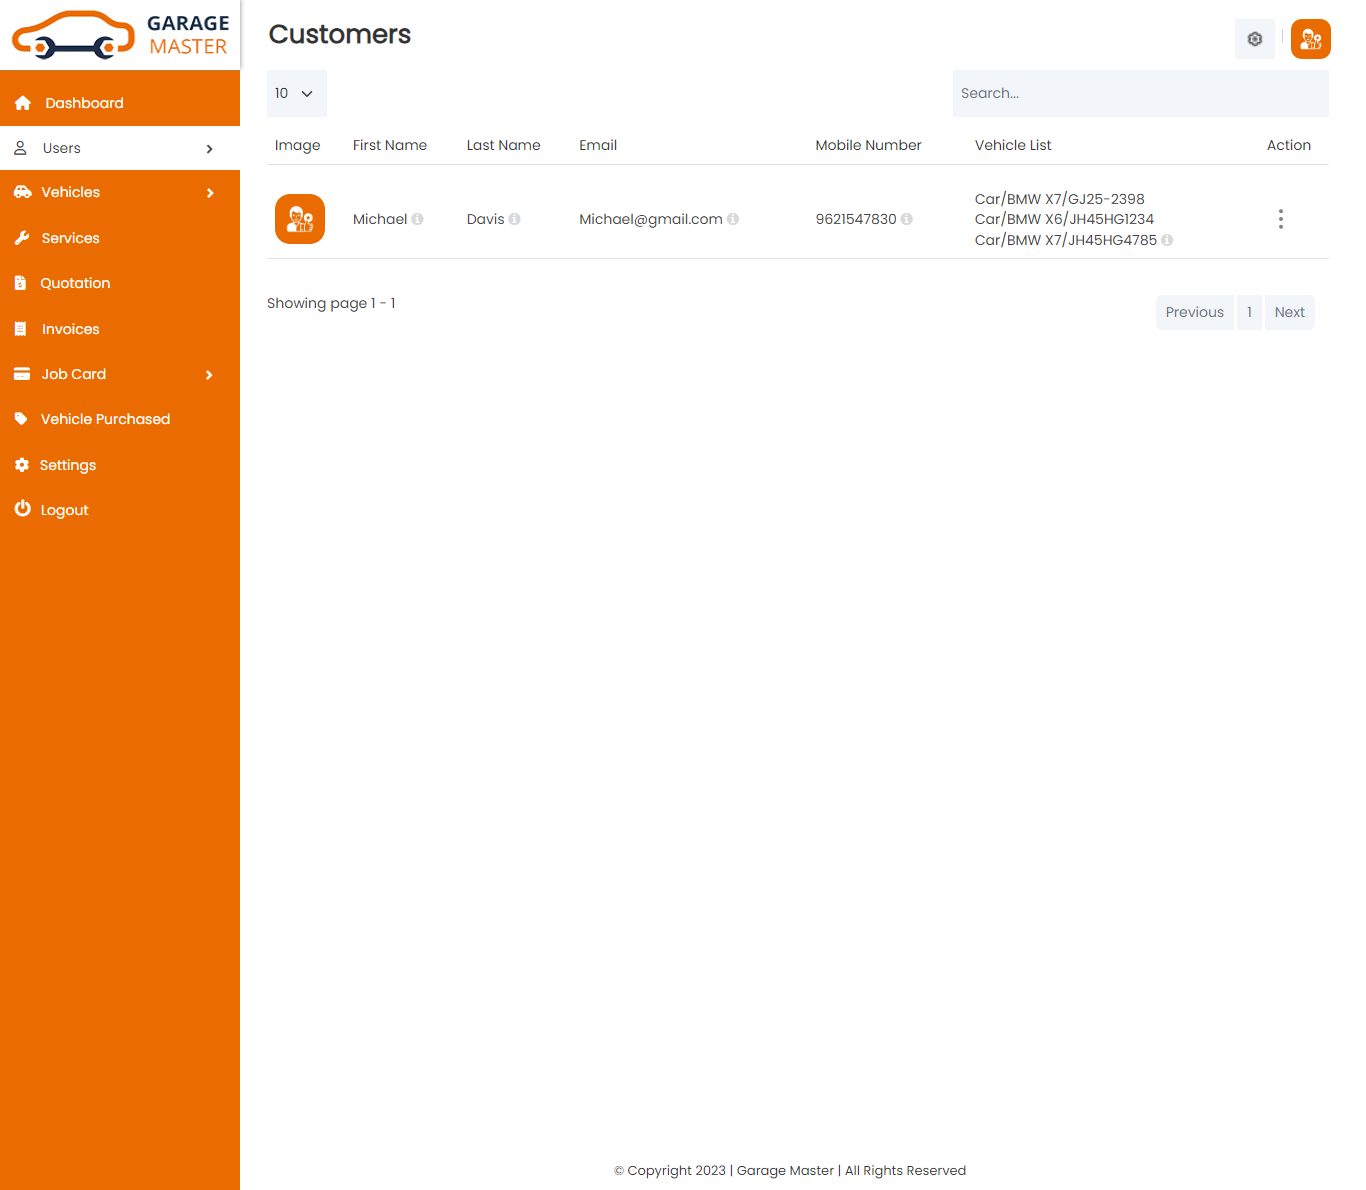
Edit Customer: Customer can his own details Edit detail button. This will open up details. From here Customer can Change customer Details.

View Customer: Customer view with much more details.

B) Employee
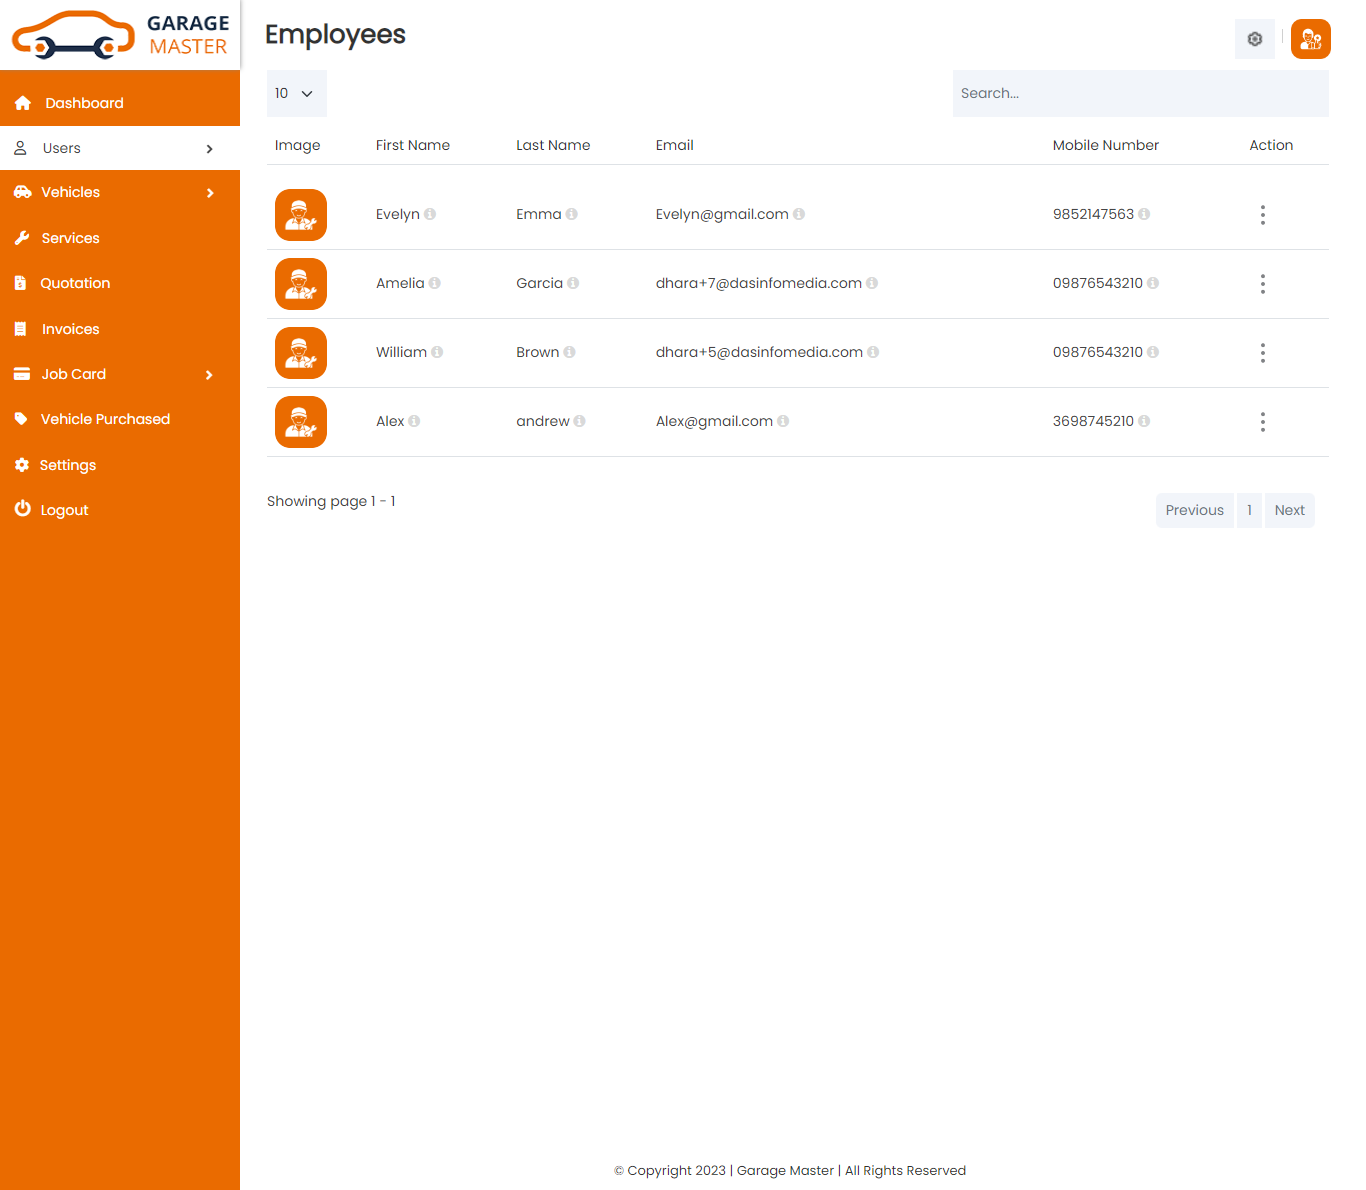
Employee List: Customer can see a list of the employee.
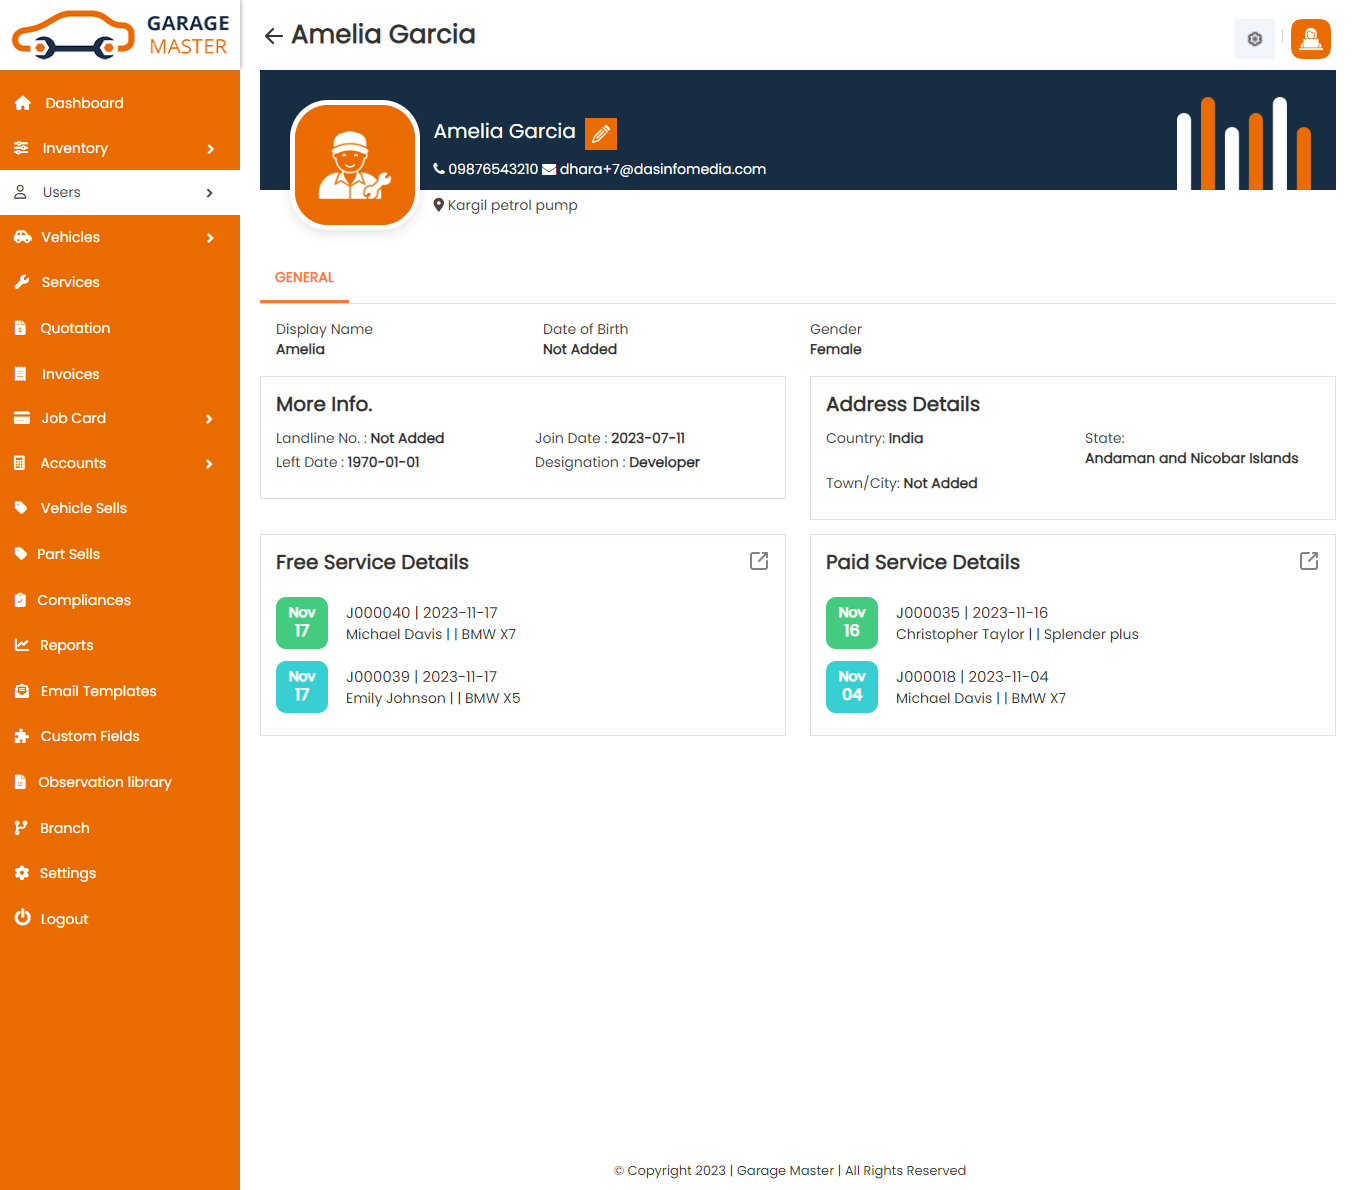
Employee View: Customer can view more details of the employee.
C) Support Staff
SupportStaff List: Customer can see a list of Support Staff.
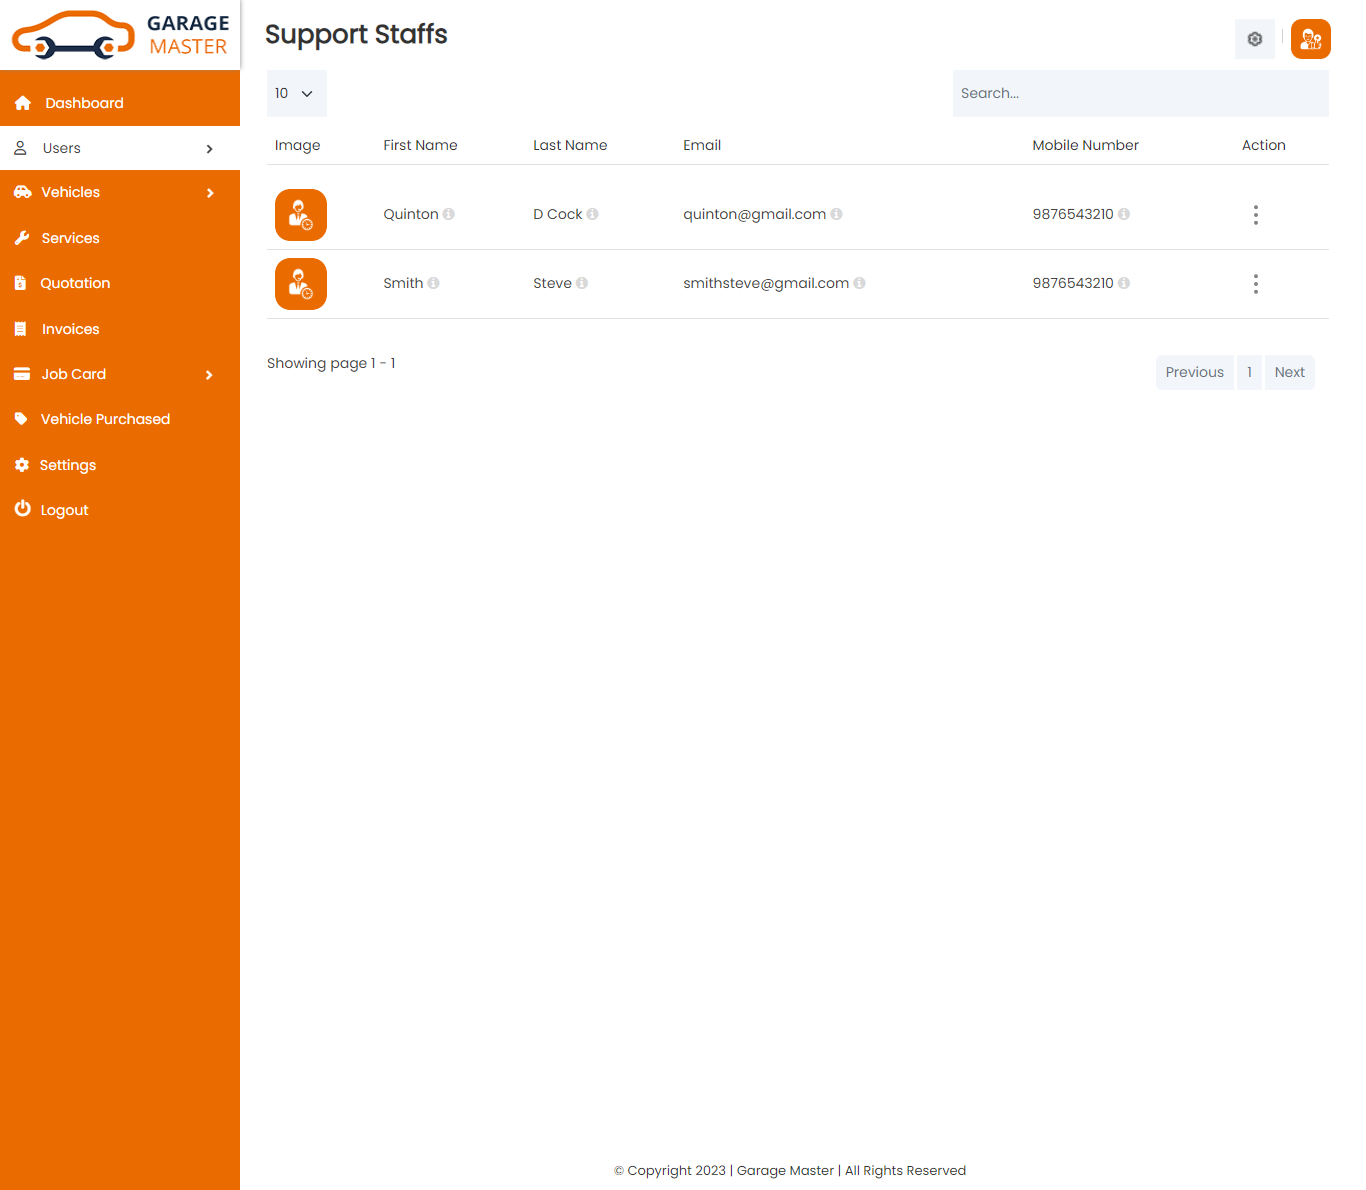
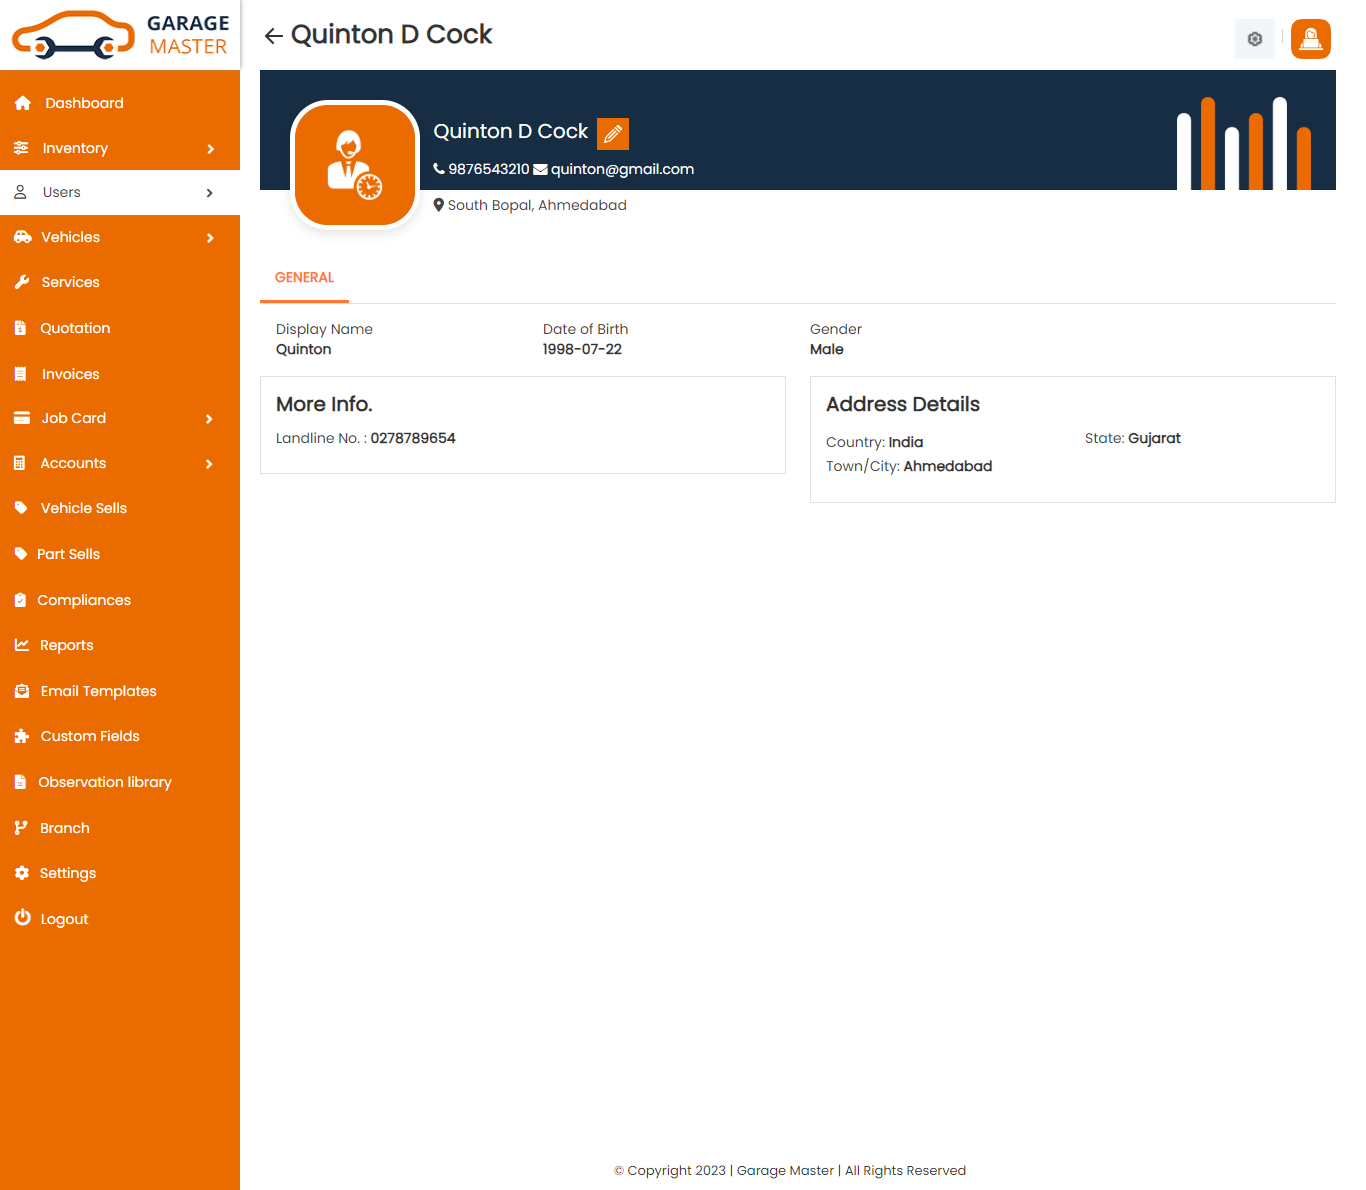
SupportStaff View: Customer can view more details of the Support Staff.
D) Accountant
Accountant List: Customer can see a list of the accountant.
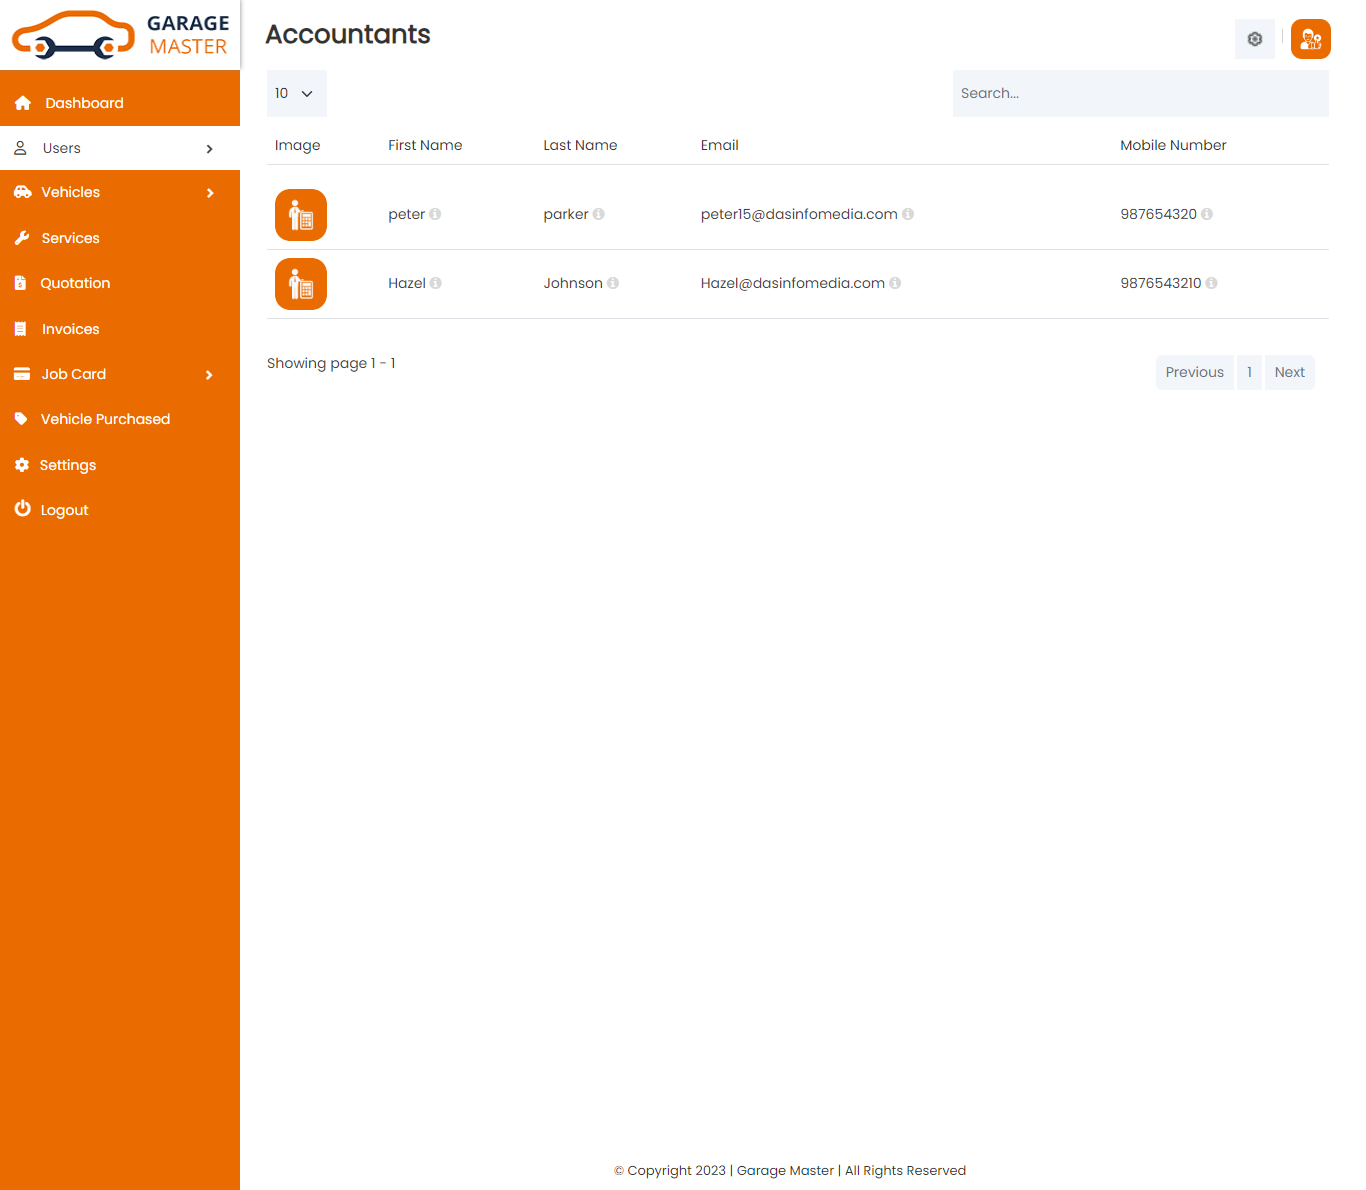
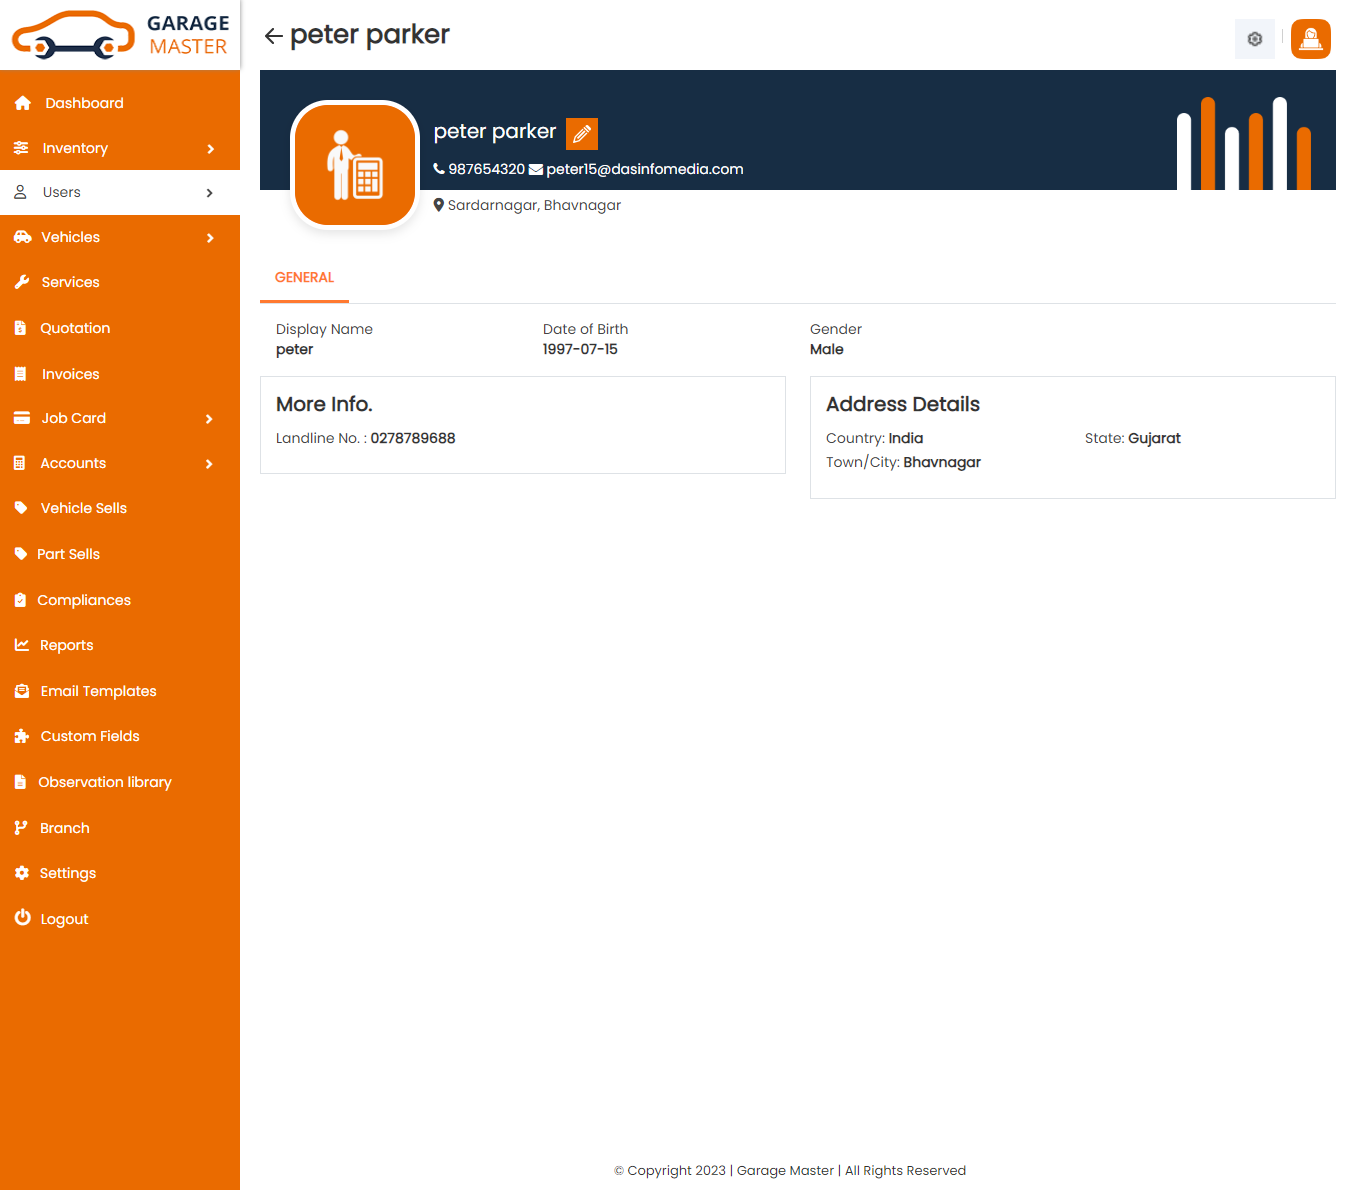
Accountant View: Customer can view more details of the accountant.
4)Vehicle
Vehicle
Vehicle List: Customer can see a list of the vehicle.
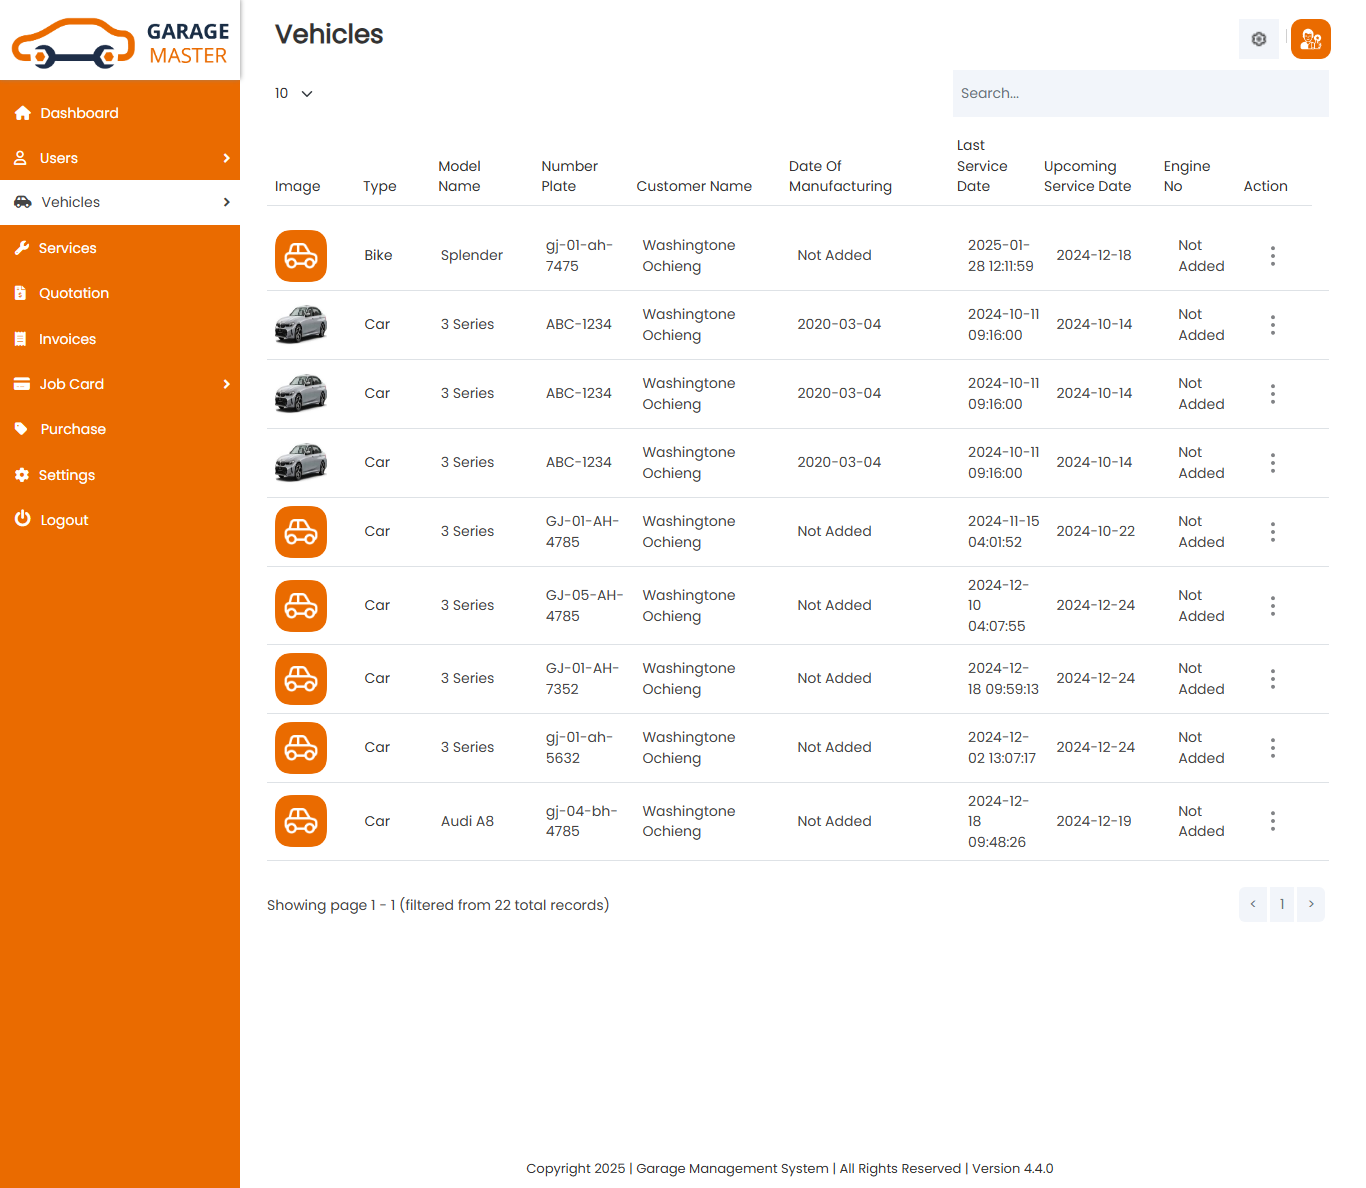
View Vehicle: Customer can only show own vehicle details by clicking on view detail button. This will open up details.

5)Service
Service
Service List: Customer can see the only list of Service.
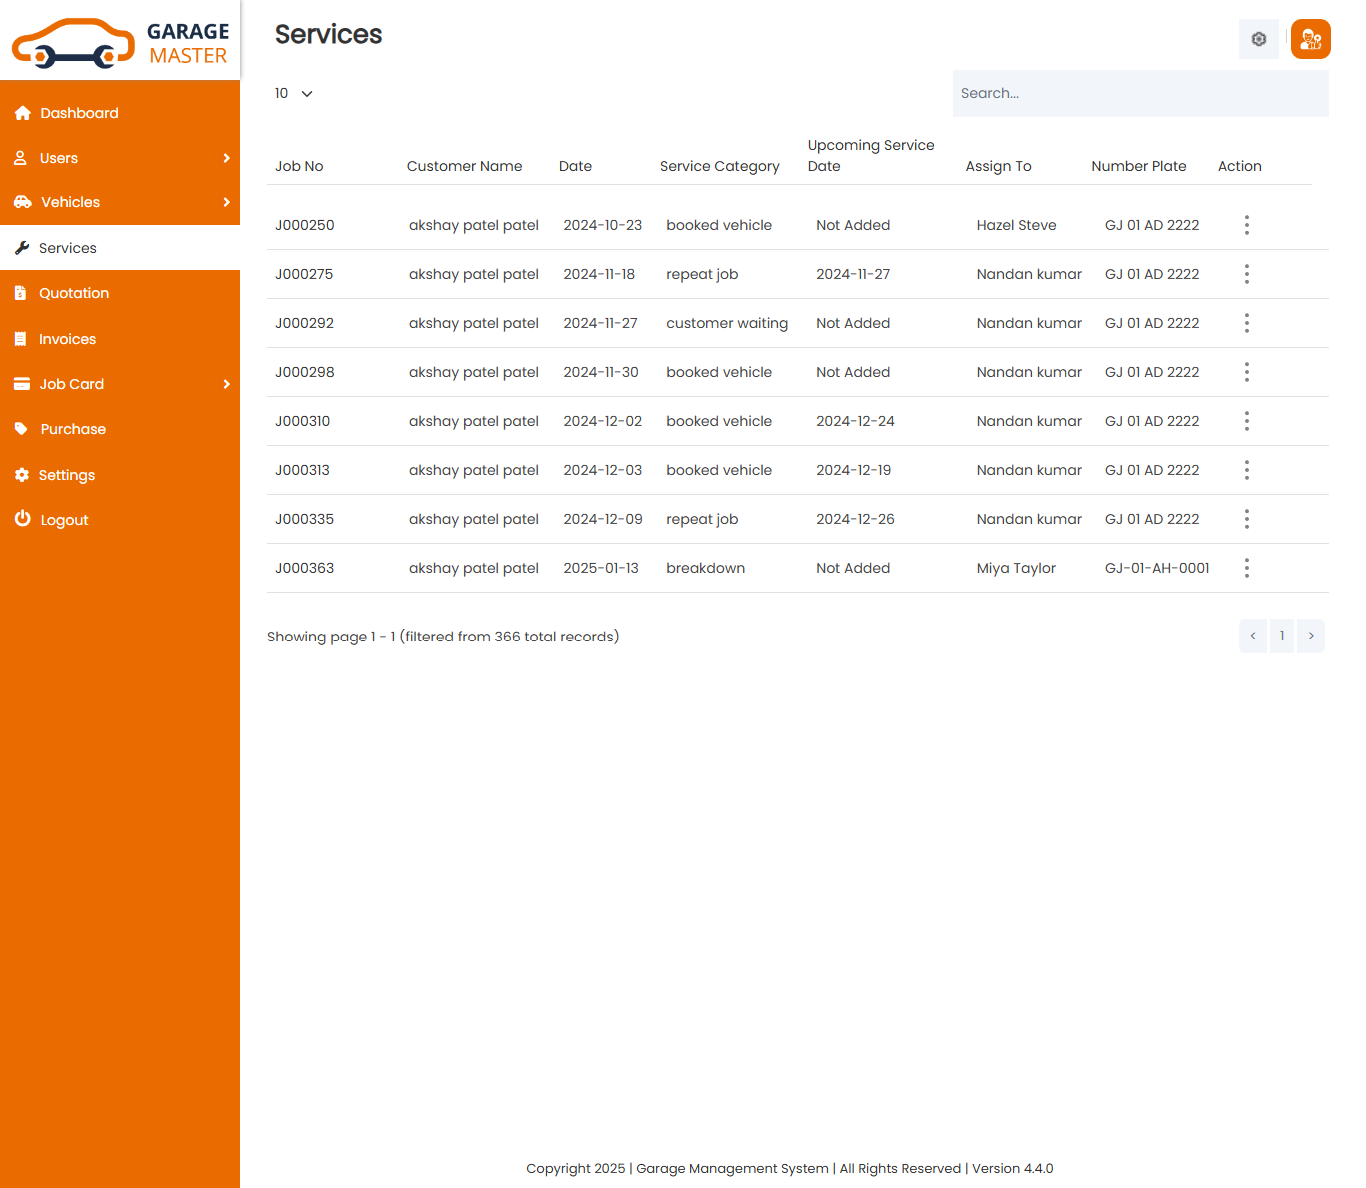
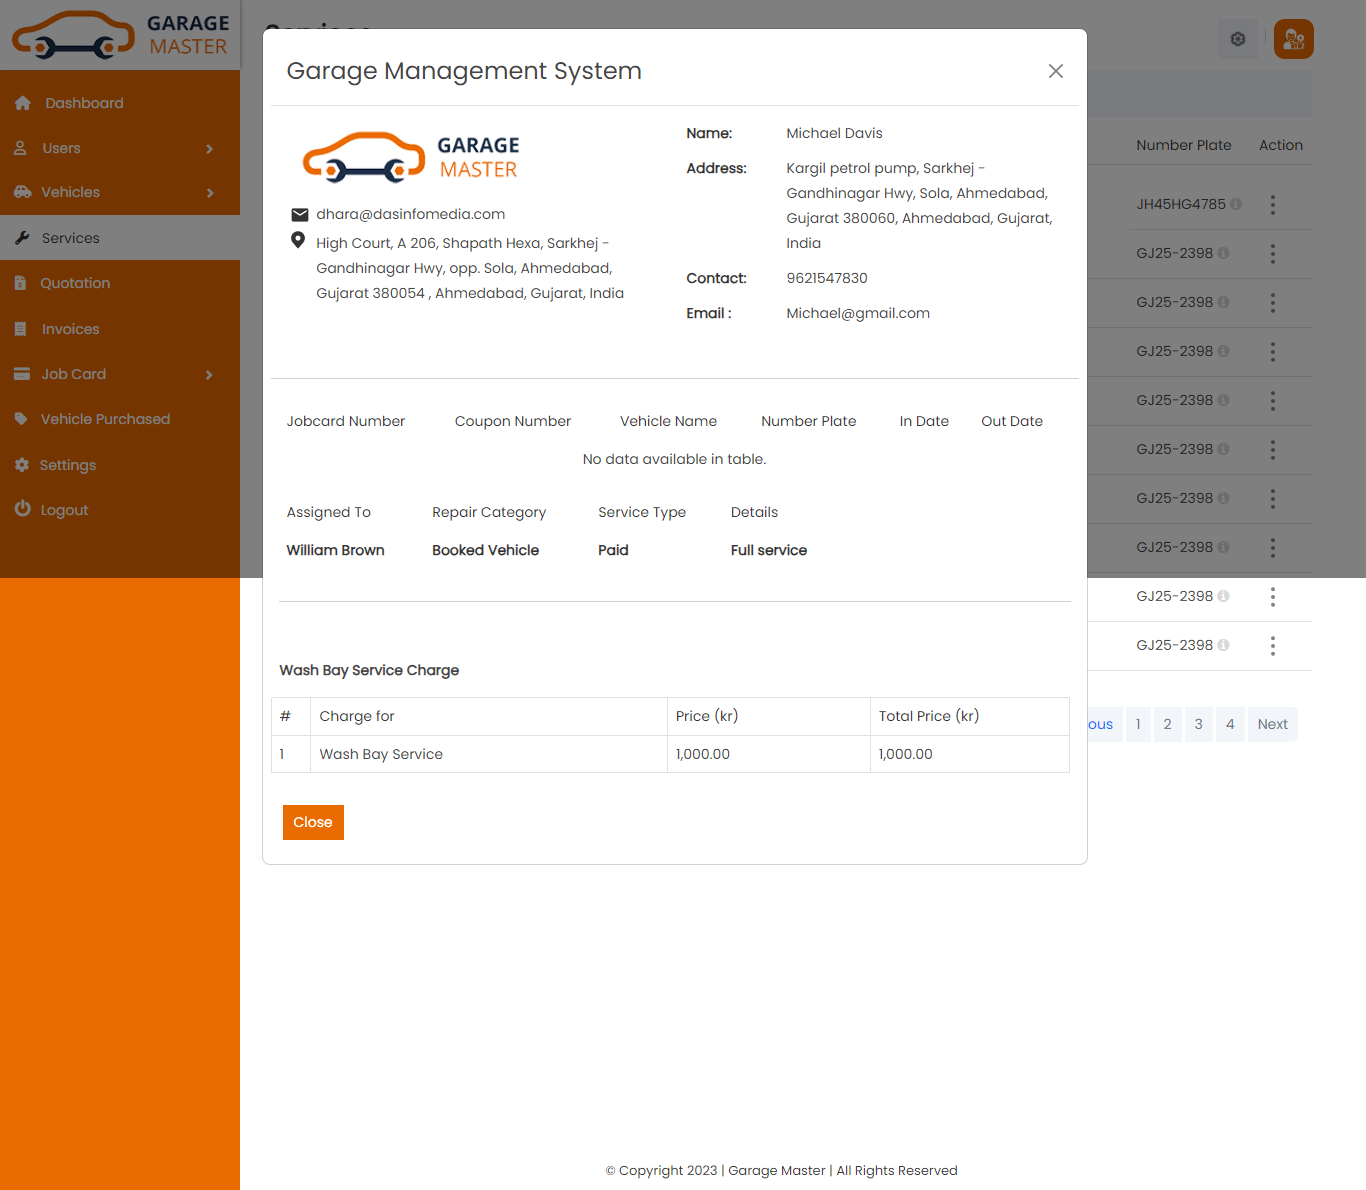
View Service: Customer can view only Service details.
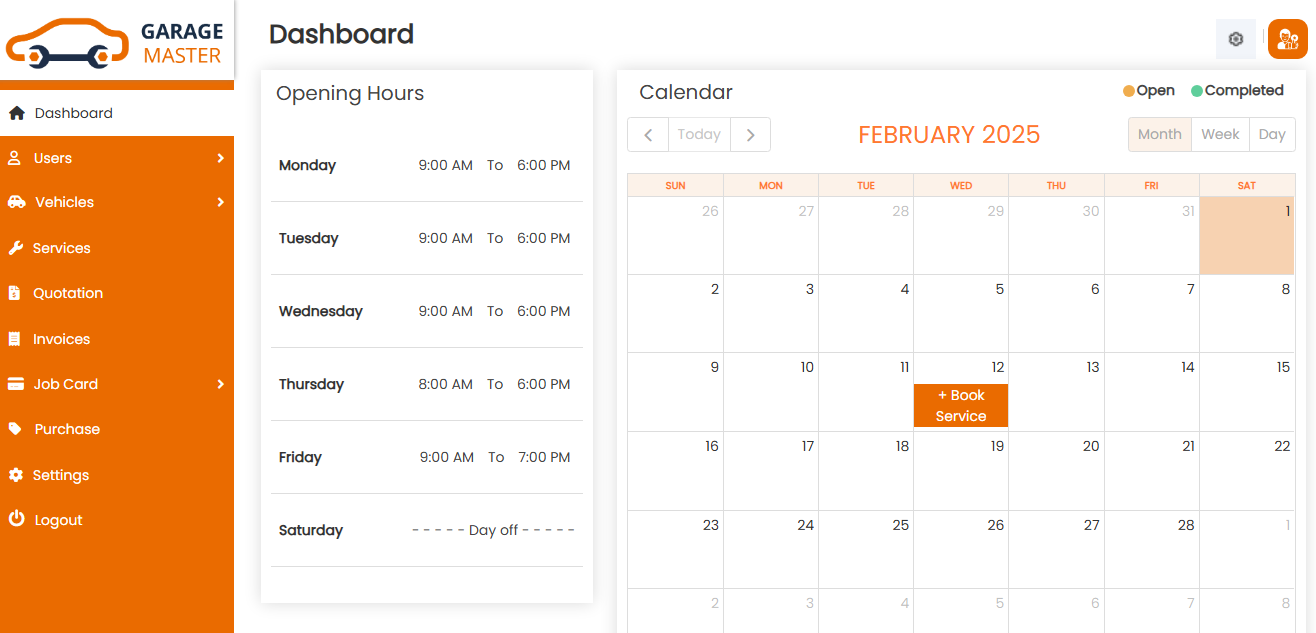
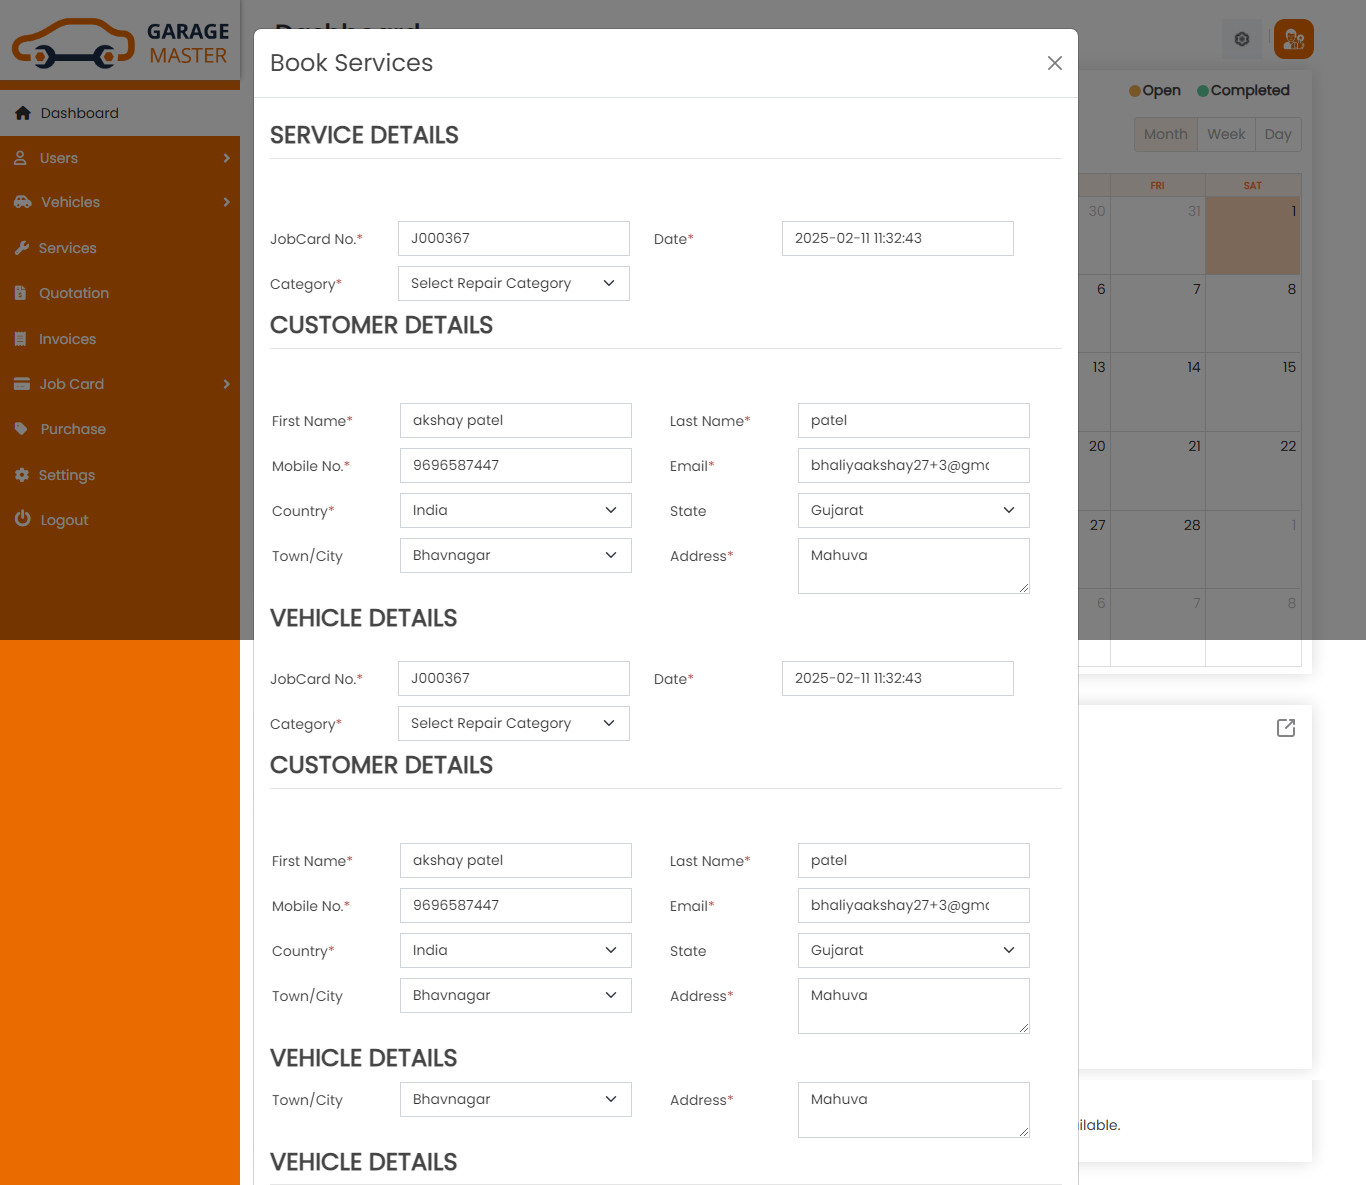
View Service: Customer can Book service in Dashboard
6)Invoice
Invoice
Invoice List: Customer can see the only list of invoice.
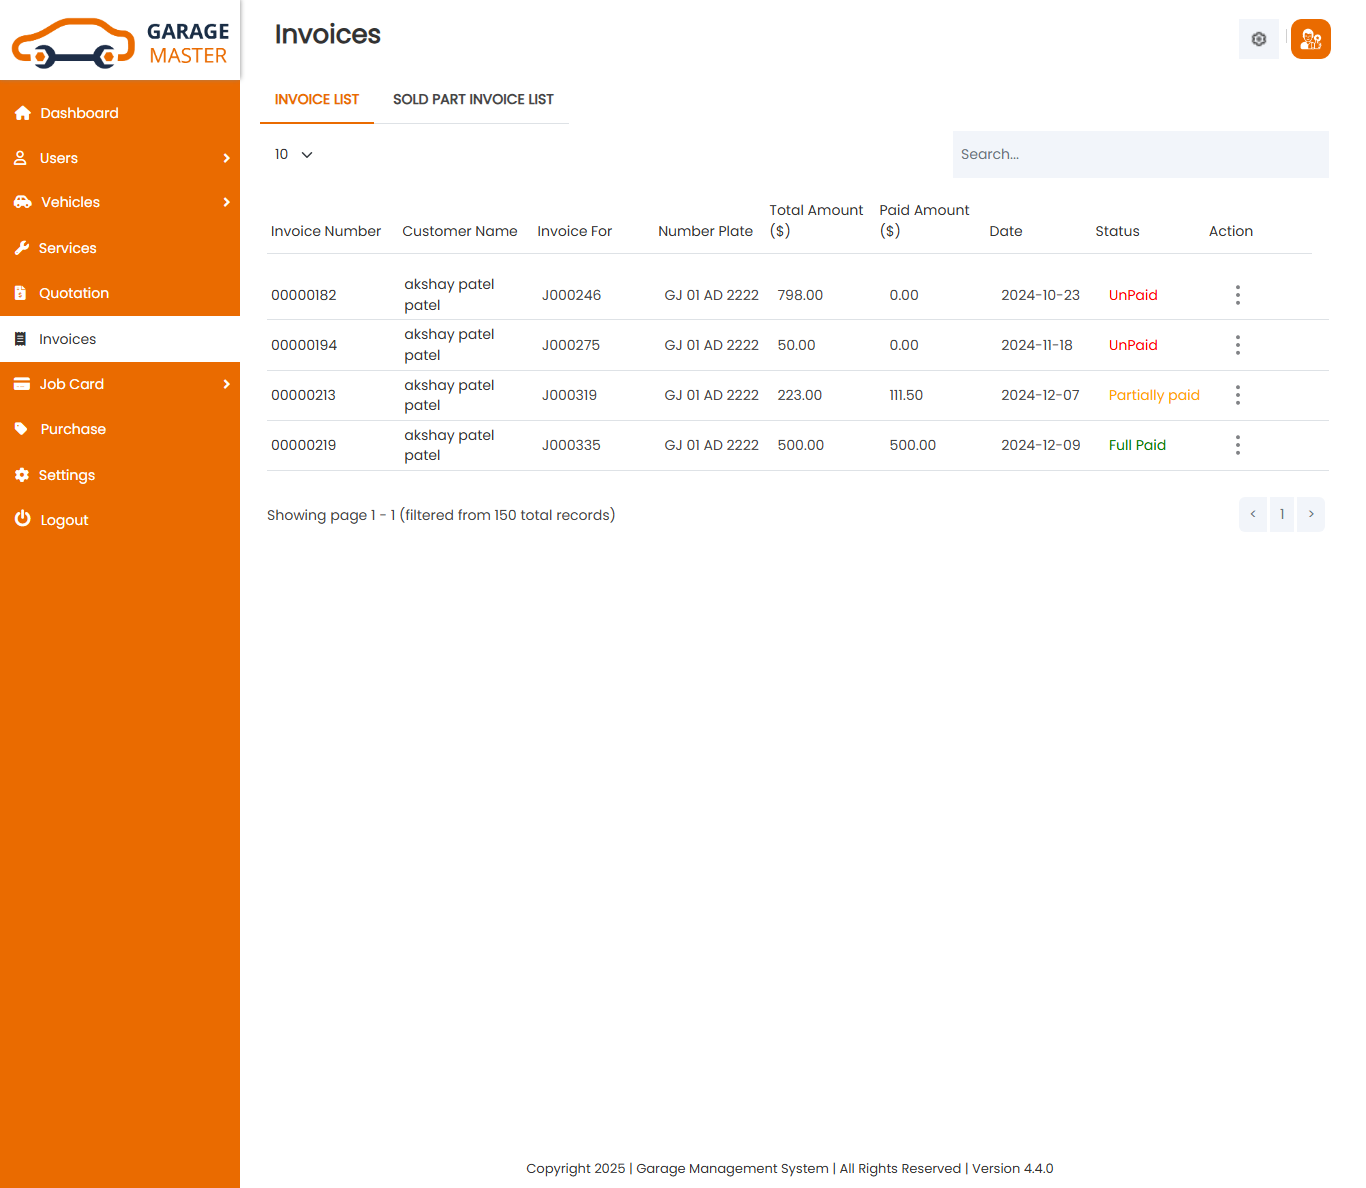
View invoice: Customer can view only invoice details.From here Customer can also Print Out view invoice.

Payment History: Customer can view a complete list and Payment History of particular invoice by clicking on Payment History detail button. This will open up details.

7)Job card
A)job card
Job card List: Customer can see the only list of job card
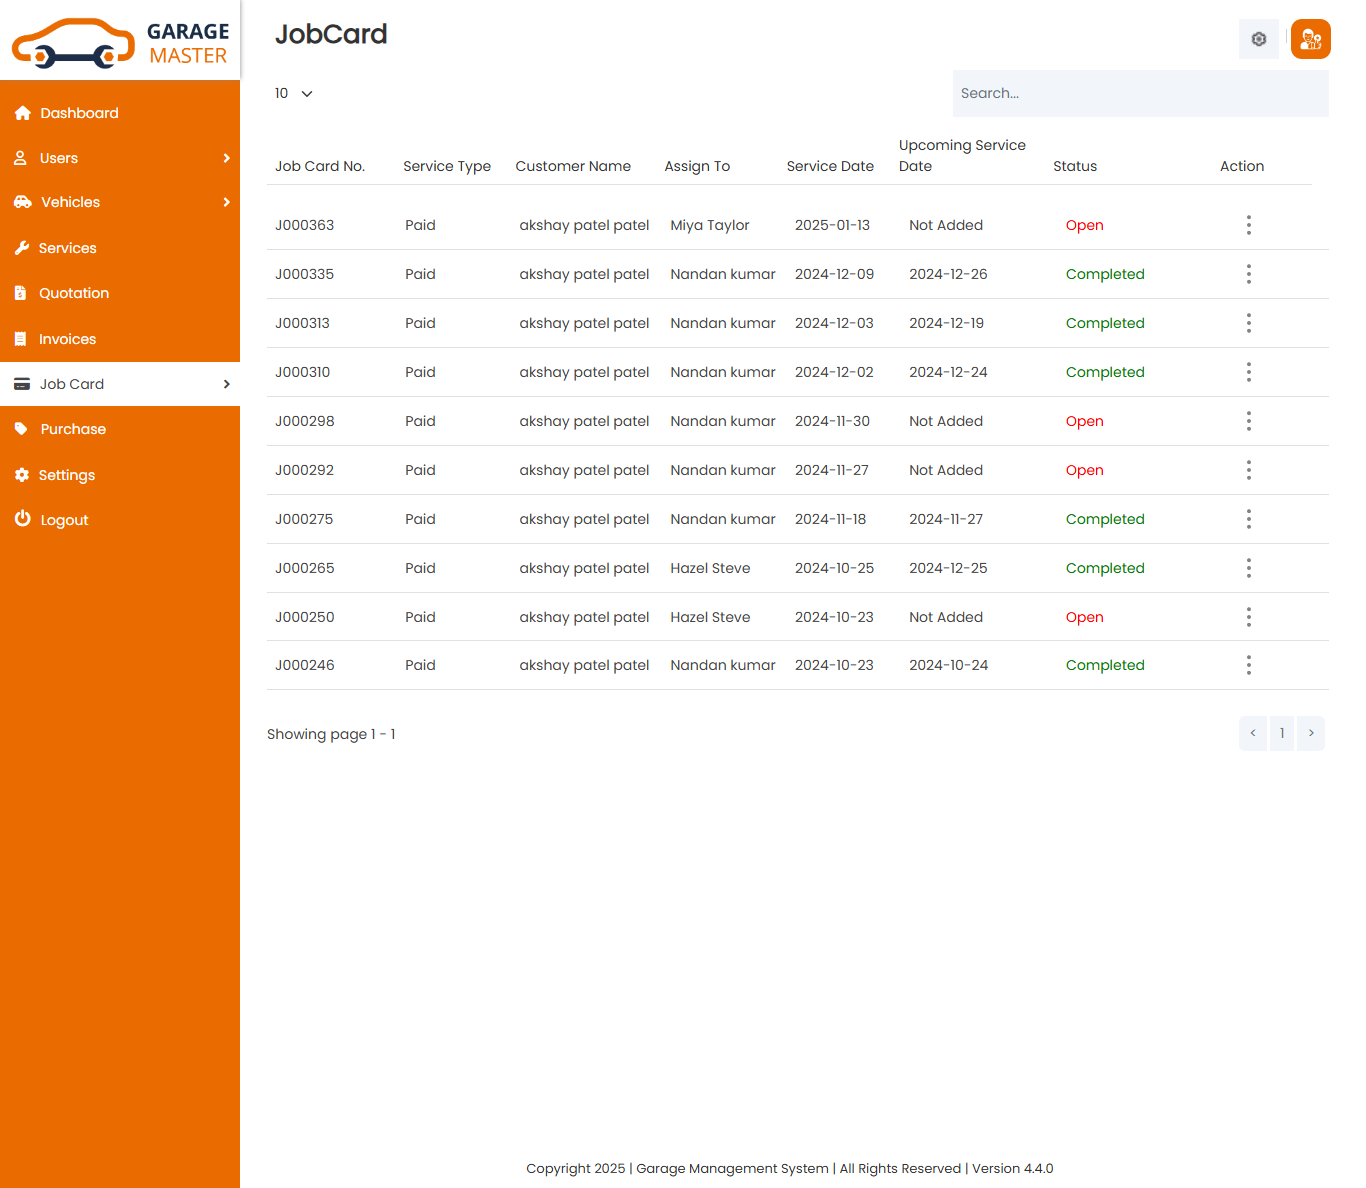
View invoice: Customer can view only invoice details.From here Customer can also Print Out view invoice.

B)Gate Pass
GatePass List: Customer can see the only list of gate pass

Gate Receipt: Customer can view only Gate Receipt details.From here Customer can also Print Out view Gate Receipt.

8)Purchase
Purchase
List Purchase: Customer can see the only list of Purchase.
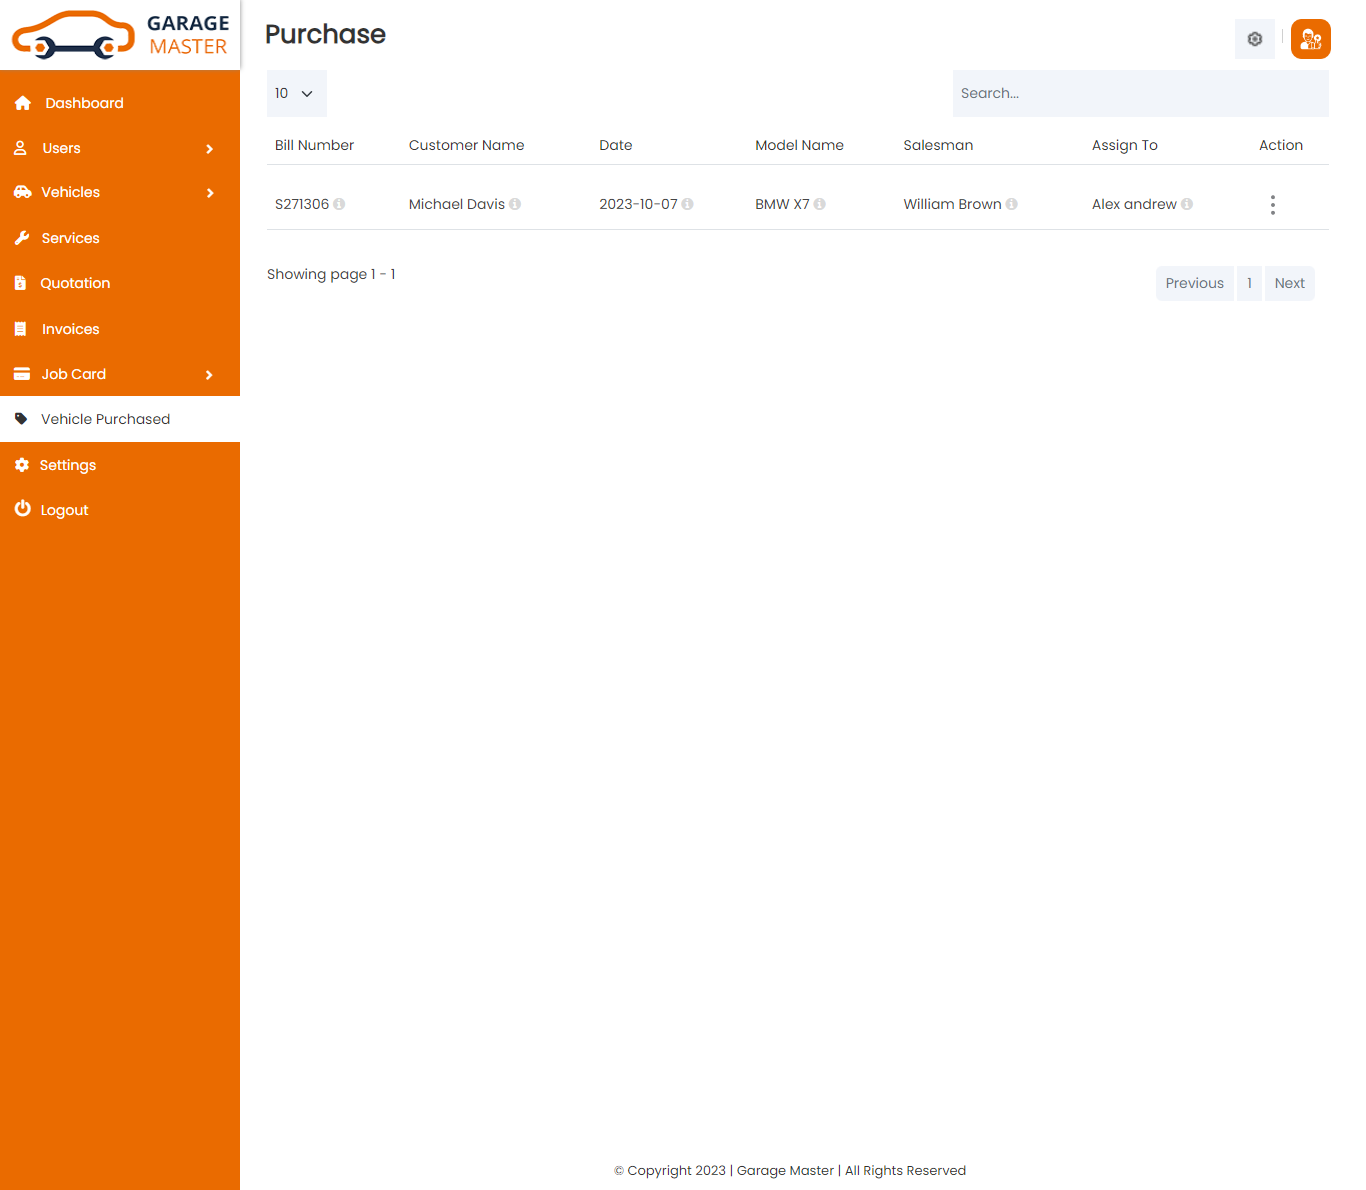
View Invoice: Customer can view only Purchase details.

9)Quotation
Quotation
List Quotation: Customer can see the only list of Quotation.

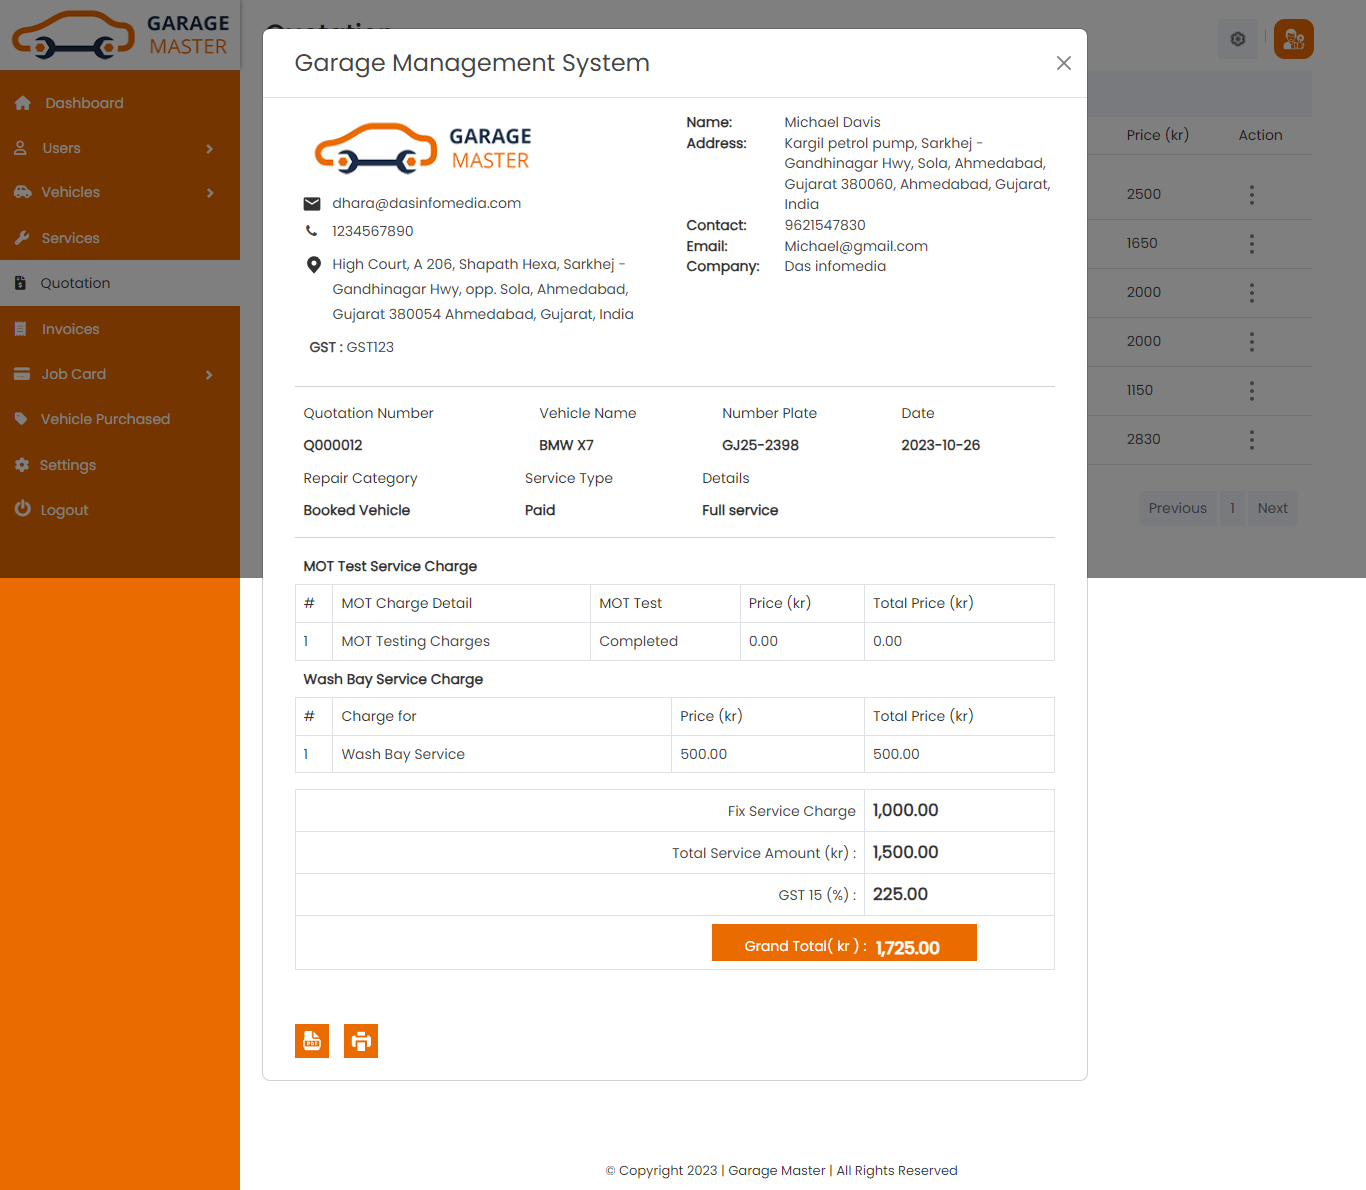
View Quotation: Customer can view only Quotation details.
G) Employee View:
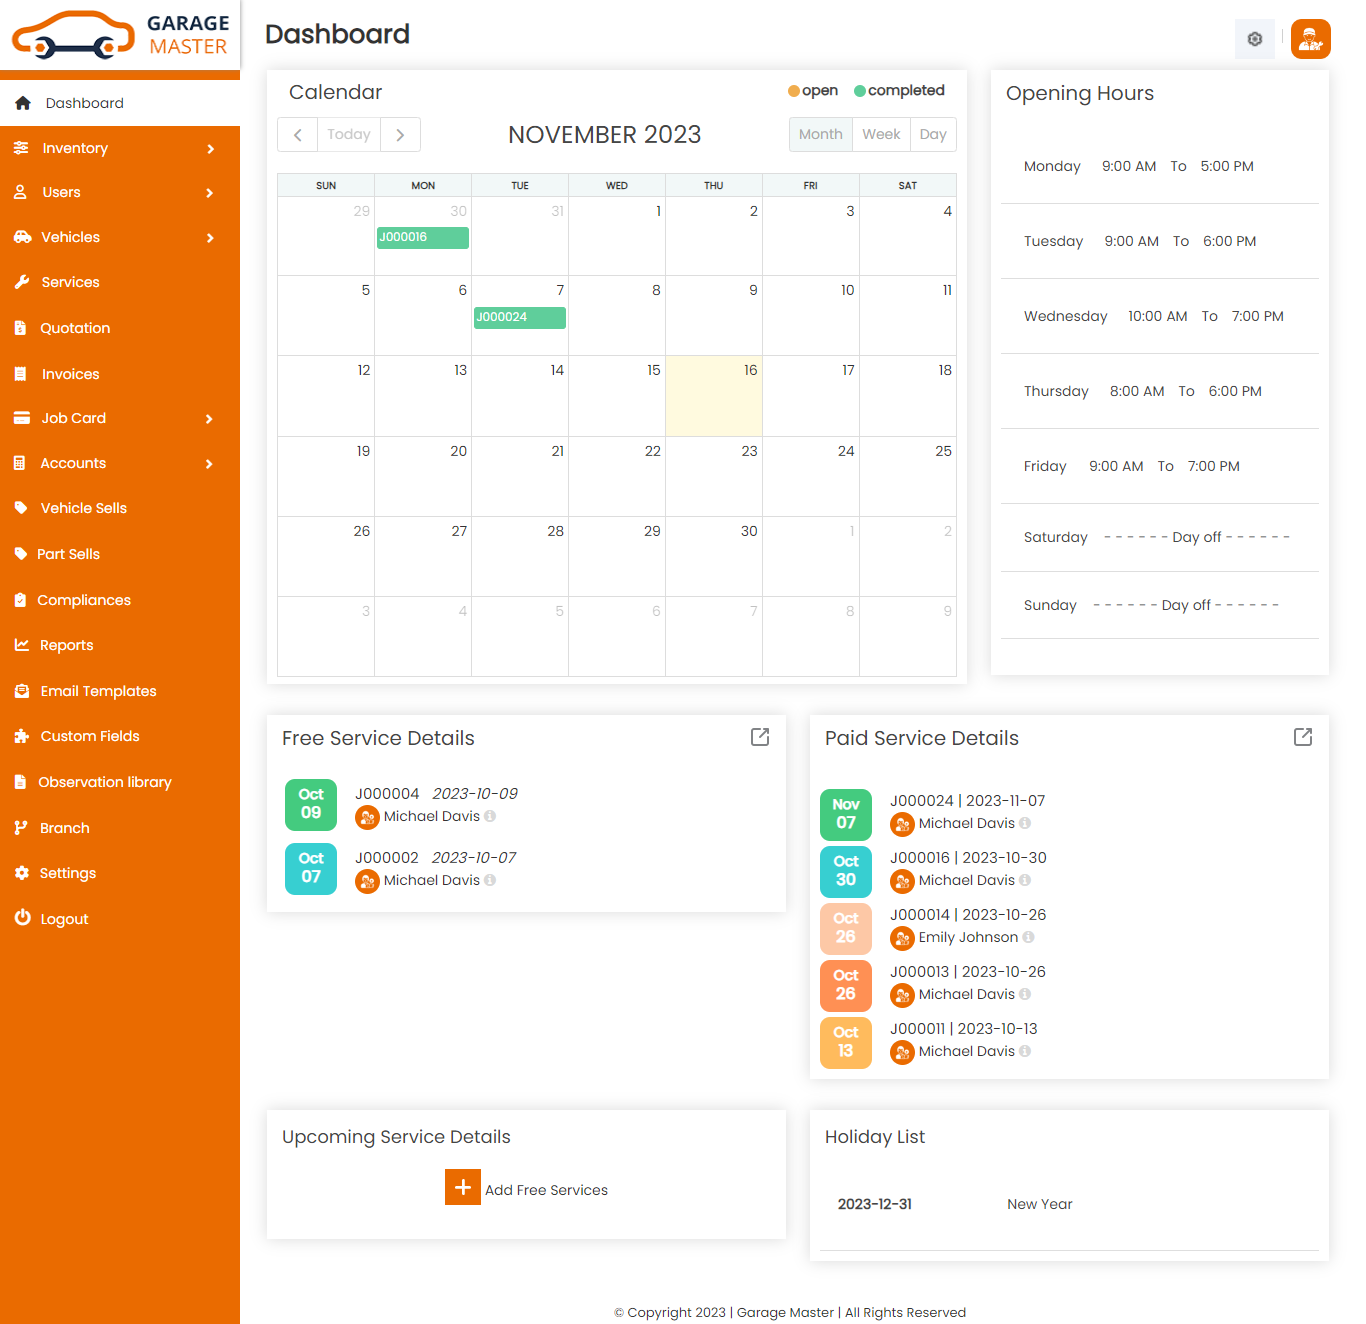
1)Dashboard:
Employee side dashboard view.
2)Settings
Other Settings
Click on Setting inside Click on Other Setting to start setting up the system. You are advised to fill all fields of Other settings as these details are used in a different section of the whole system. You can change these settings as per your requirement.

- Select Timezone: Select timezone for this setting.
- Select Language: Select language for this setting.
Time Zone
Language
2.1)How to Videos
How to Videos
In this menu it provide video guidance.Click on Setting inside Click on How to Videos to open this menu.

3)Inventory
A) Supplier
Supplier List: Employee can add new Supplier, manage all Supplier and view a complete list of all Supplier.

Add Supplier: Employee can add supplier details.
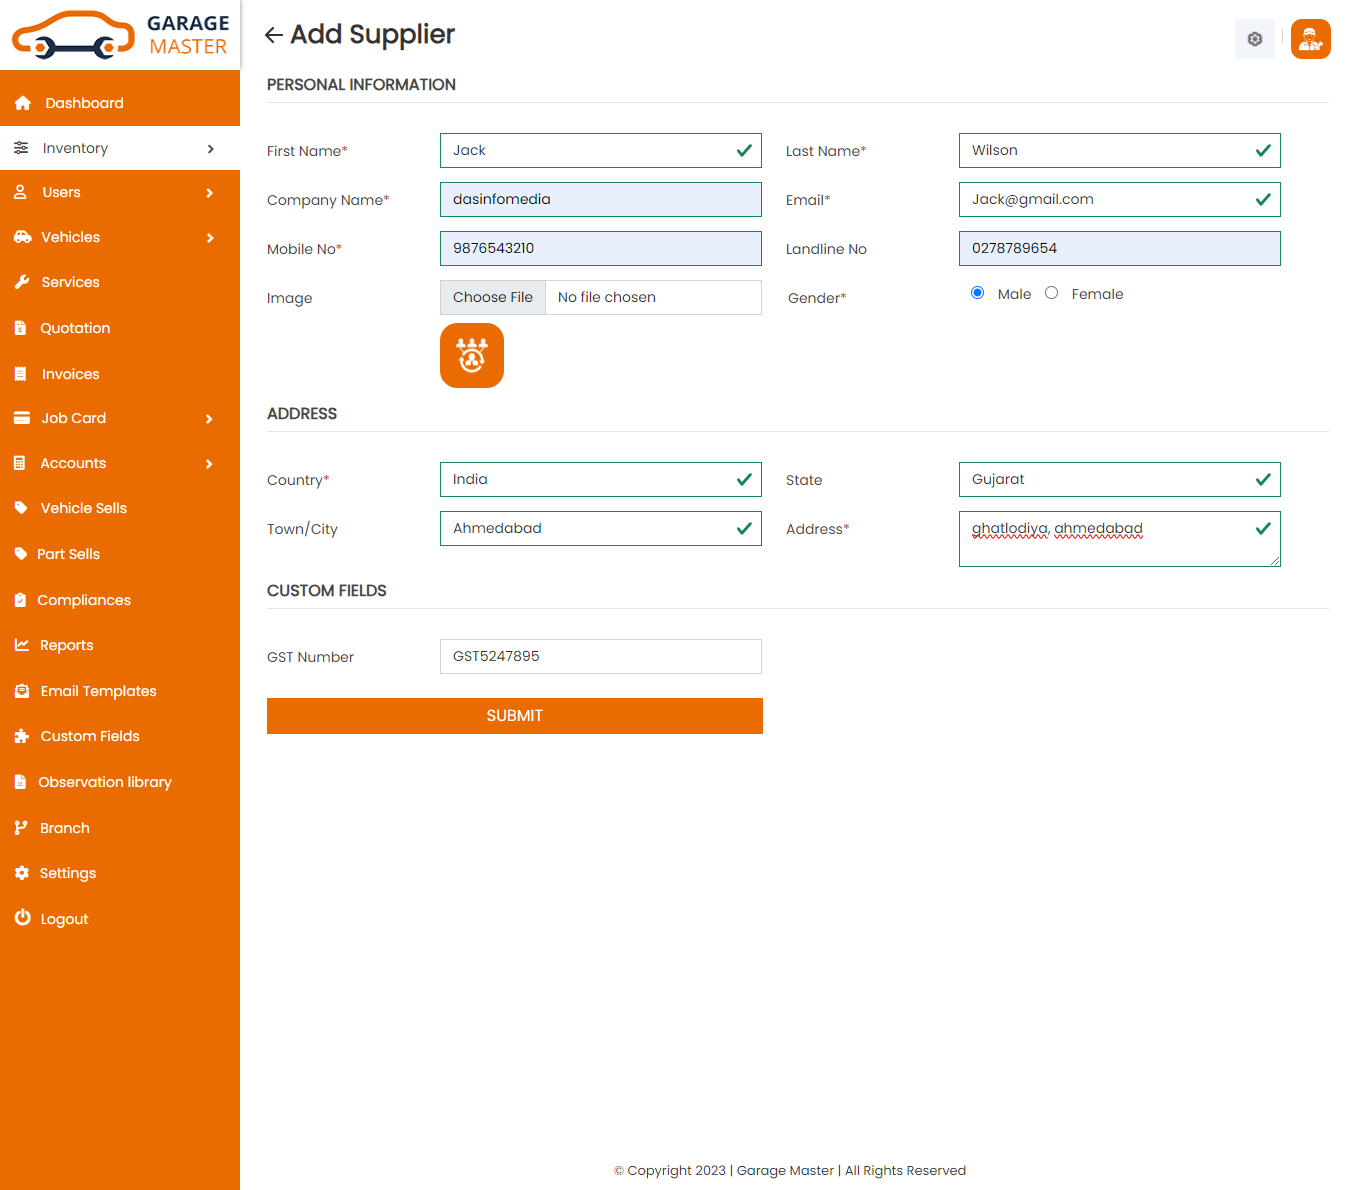
- First Name: Enter a new first name for this supplier.
- Last Name: Enter a new last name for this supplier.
- Company Name: Enter a new company name for this supplier.
- Gender: Select gender for this supplier.
- Date of Birth: Enter a new date of birth for this supplier.
- Contact Person: Enter a new contact person for this supplier.
- Email: Enter a new email for this supplier.
- Mobile No: Enter a new mobile number for this supplier.
- Landline No: Enter a new landlines number for this supplier.
- Image: Upload image for this supplier.
- Country: Select country for this supplier.
- State: Select state for this supplier.
- City: Select city for this supplier.
- Address: Enter a new address for this supplier.
- Add new custom field in go to custom Fields module in add custom field then select form name in supplier and add custom field for this supplier.
- Add notes in supplier.
Personal Information
Address
CustomField
Notes
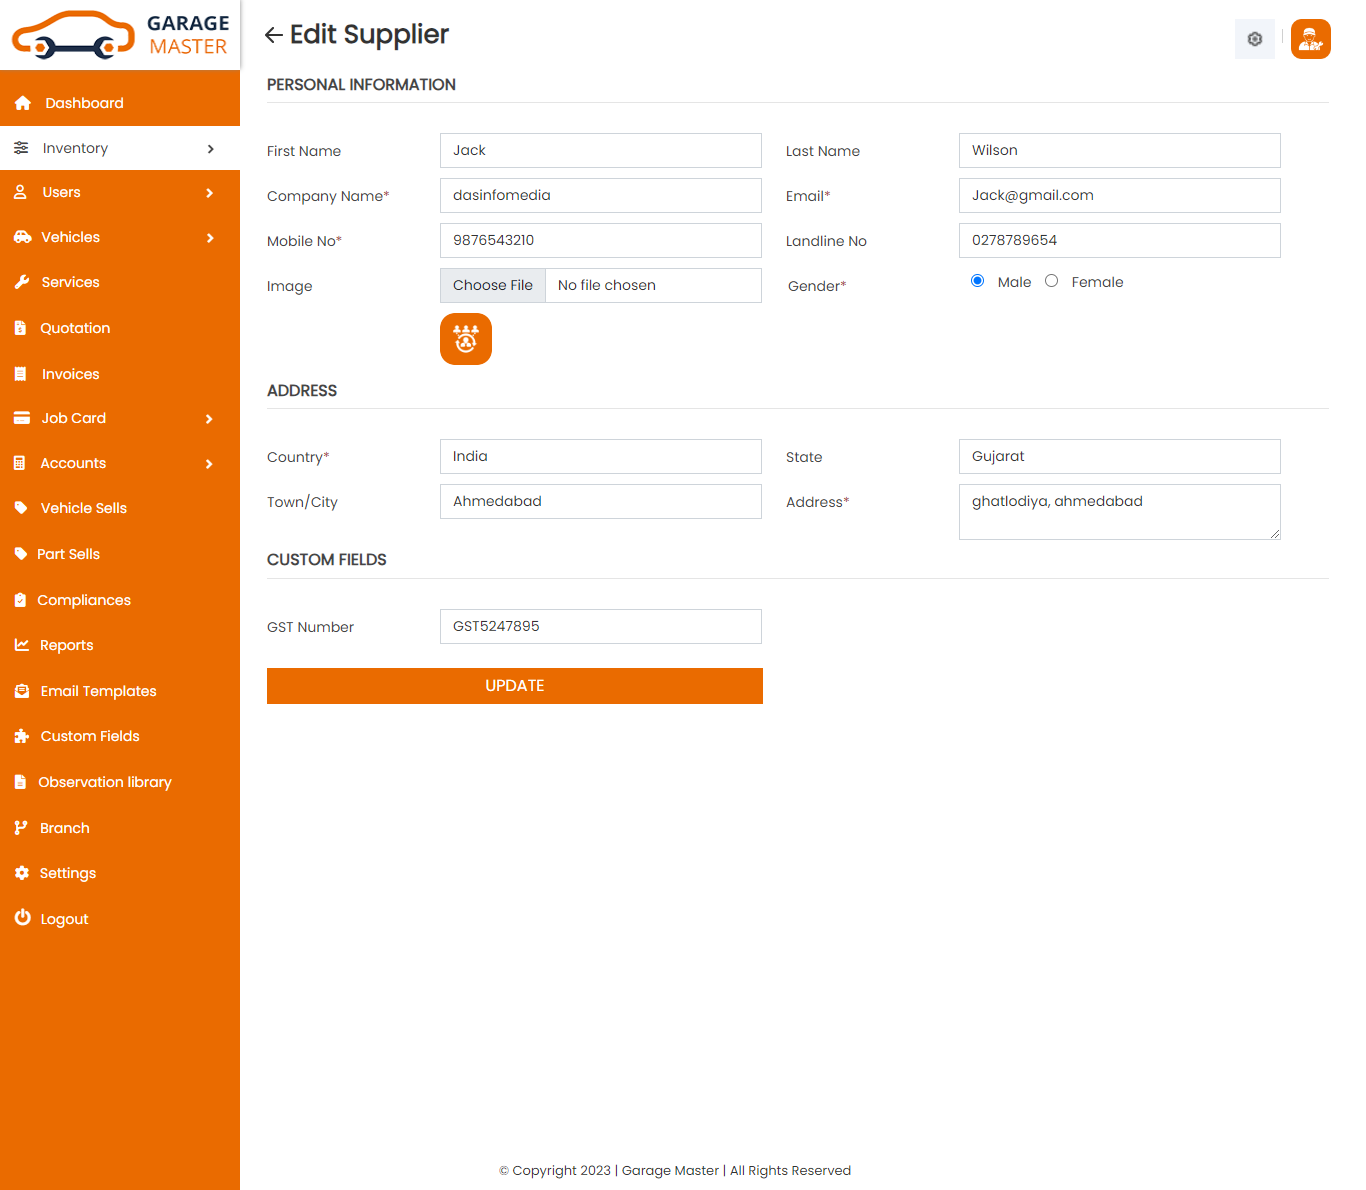
Edit Supplier: Employee can Edit detail of particular Supplier by clicking on Edit detail button. This will open up details. From here Employee can Change Supplier Details.
View Supplier: Employee can view a complete list of all Supplier and view detail of particular Supplier by clicking on view detail button. This will open up details.
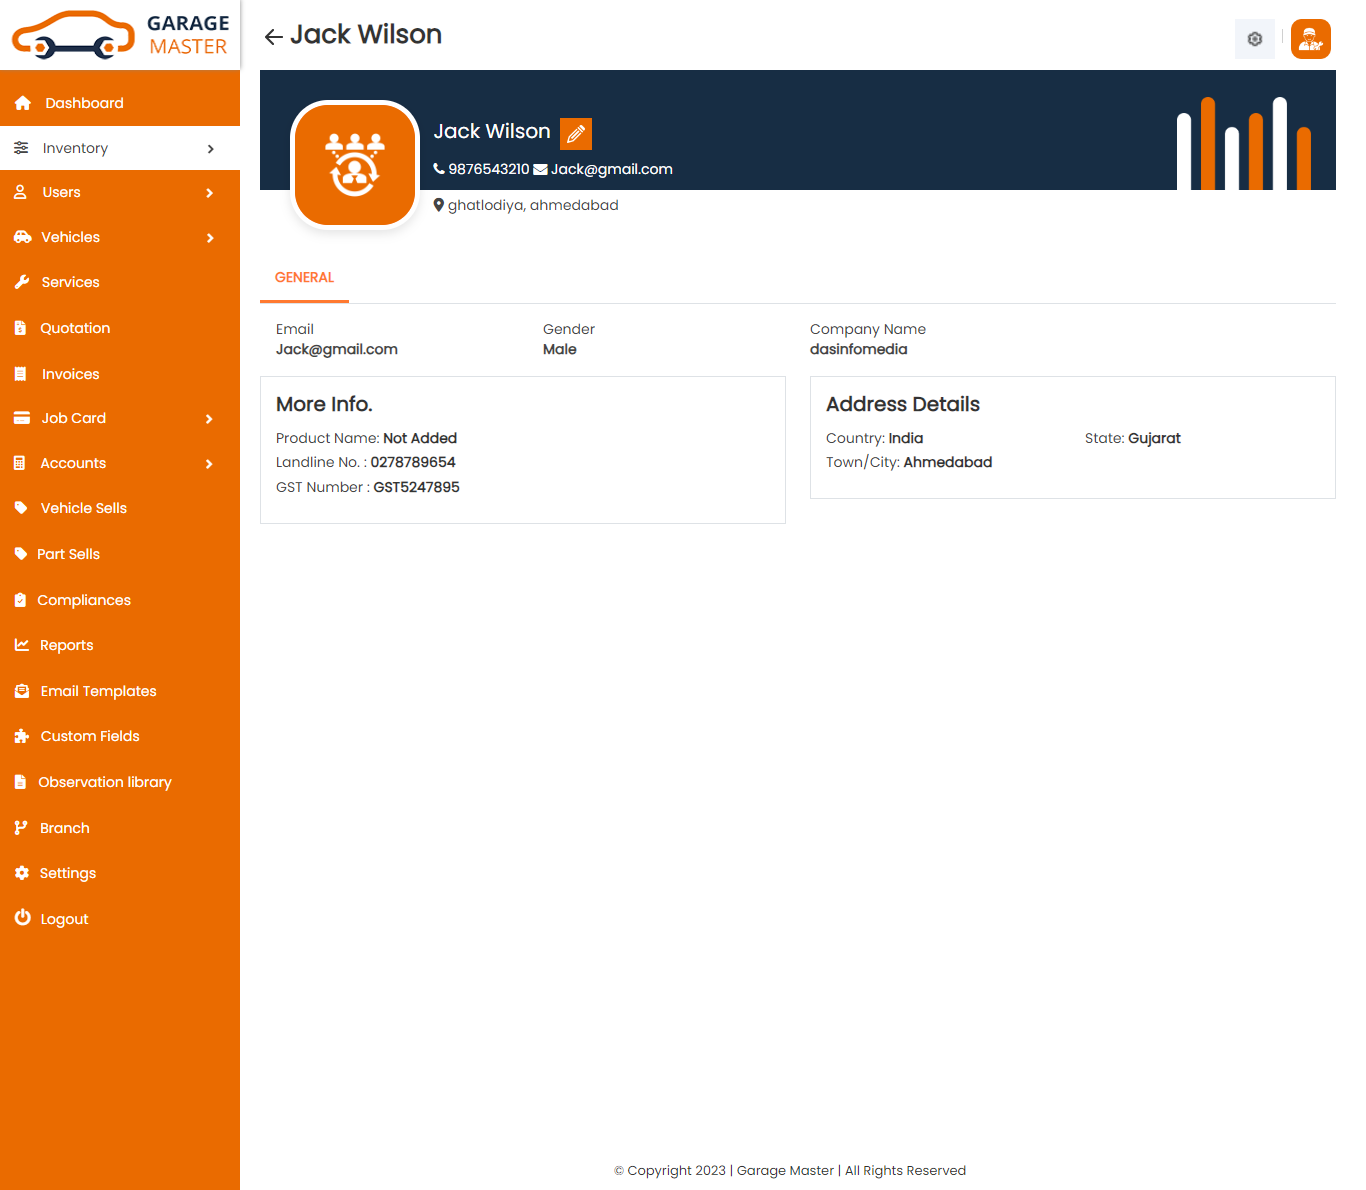
Delete Supplier: Employee can delete a complete list of all Supplier and delete detail of particular Supplier by clicking on delete detail button. This will delete details.
B)Product
Product List: Employee can add new Product and manage all types of Product as well as view a complete list of all Product.

Add Product: Employee can add product details
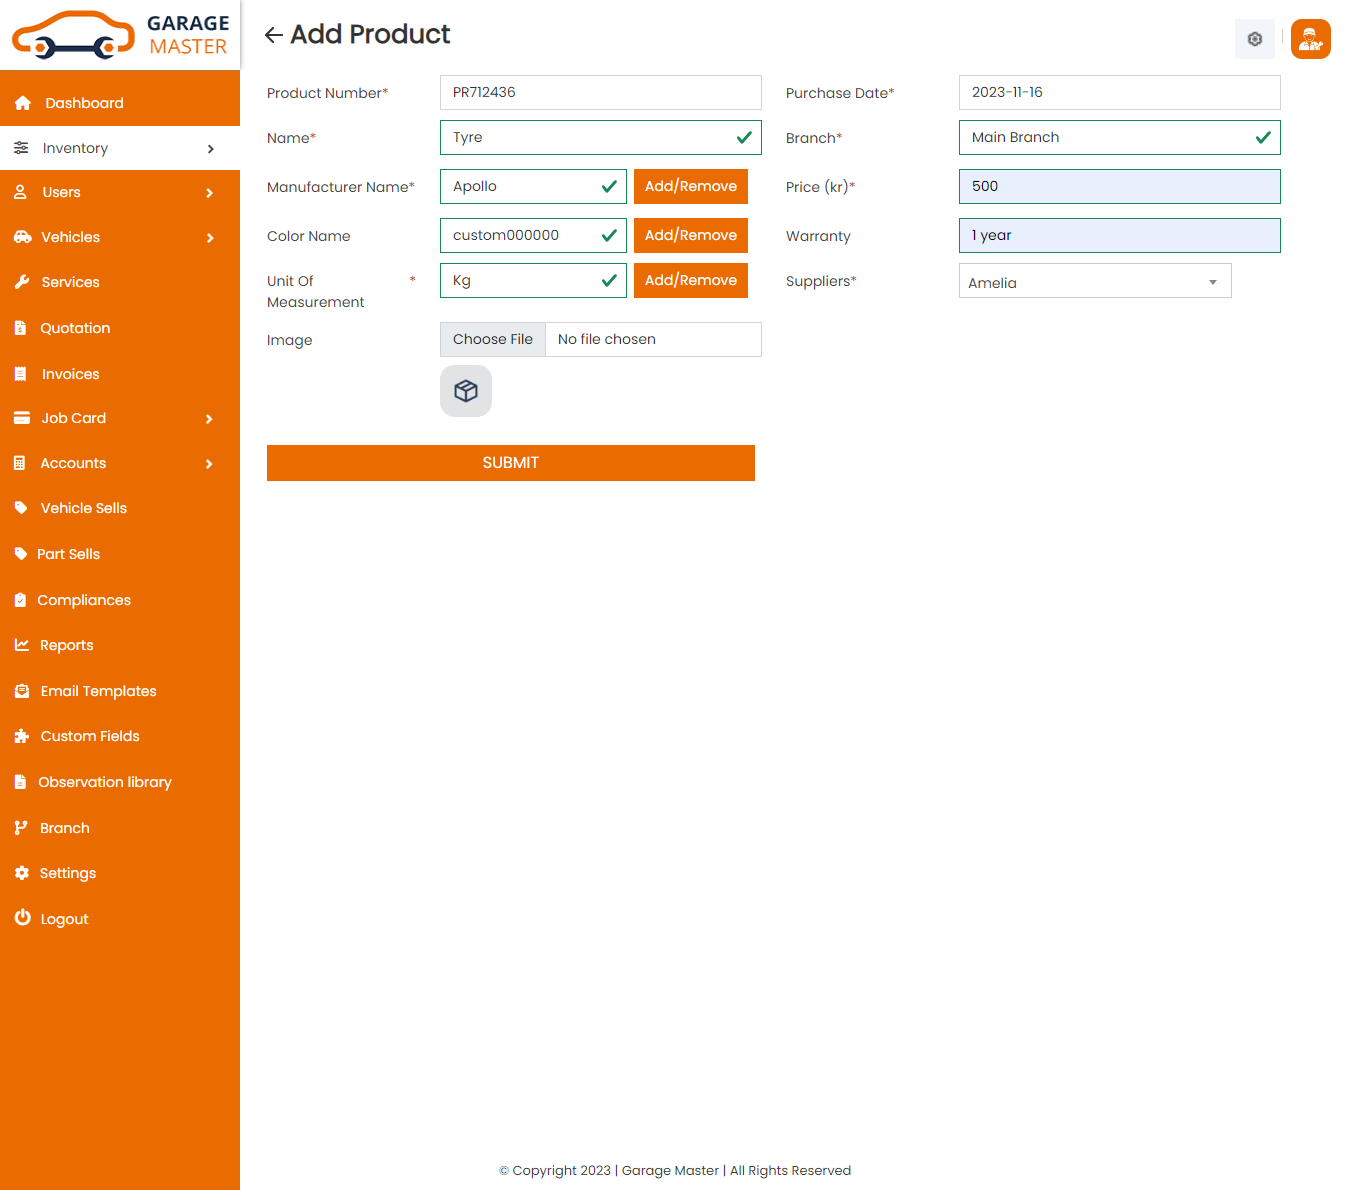
- Product Number: Product number auto generated.
- Product Date: Enter a new product date for this product.
- Product Image: Upload image for this product.
- Name: Enter a new name for this product.
- Manufacturer Name: Select manufacturer name for this product.
- Add Or Remove: If desired manufacturer name is not available in a list then click on Add Or Remove button. you can add new manufacturer name from here.
- Price: Enter a new price for this product.
- Color: Select color for this product.
- Add Or Remove: If the desired color is not available in a list then click on Add Or Remove button. You can add new color from here.
- Warranty: Enter a new warranty for this product.
- Supplier: Select supplier for this product.
- Quantity: Enter a new quantity for this product.
- Unit of Measurement: Select unit of measurement for this product.
- Add Or Remove: If the desired unit of measurement is not available in a list then click on Add Or Remove button. You can add new unit of measurement from here.


Edit Product: Employee can Edit detail of particular Product by clicking on Edit detail button. This will open up details. From here Employee can Change Product Details.
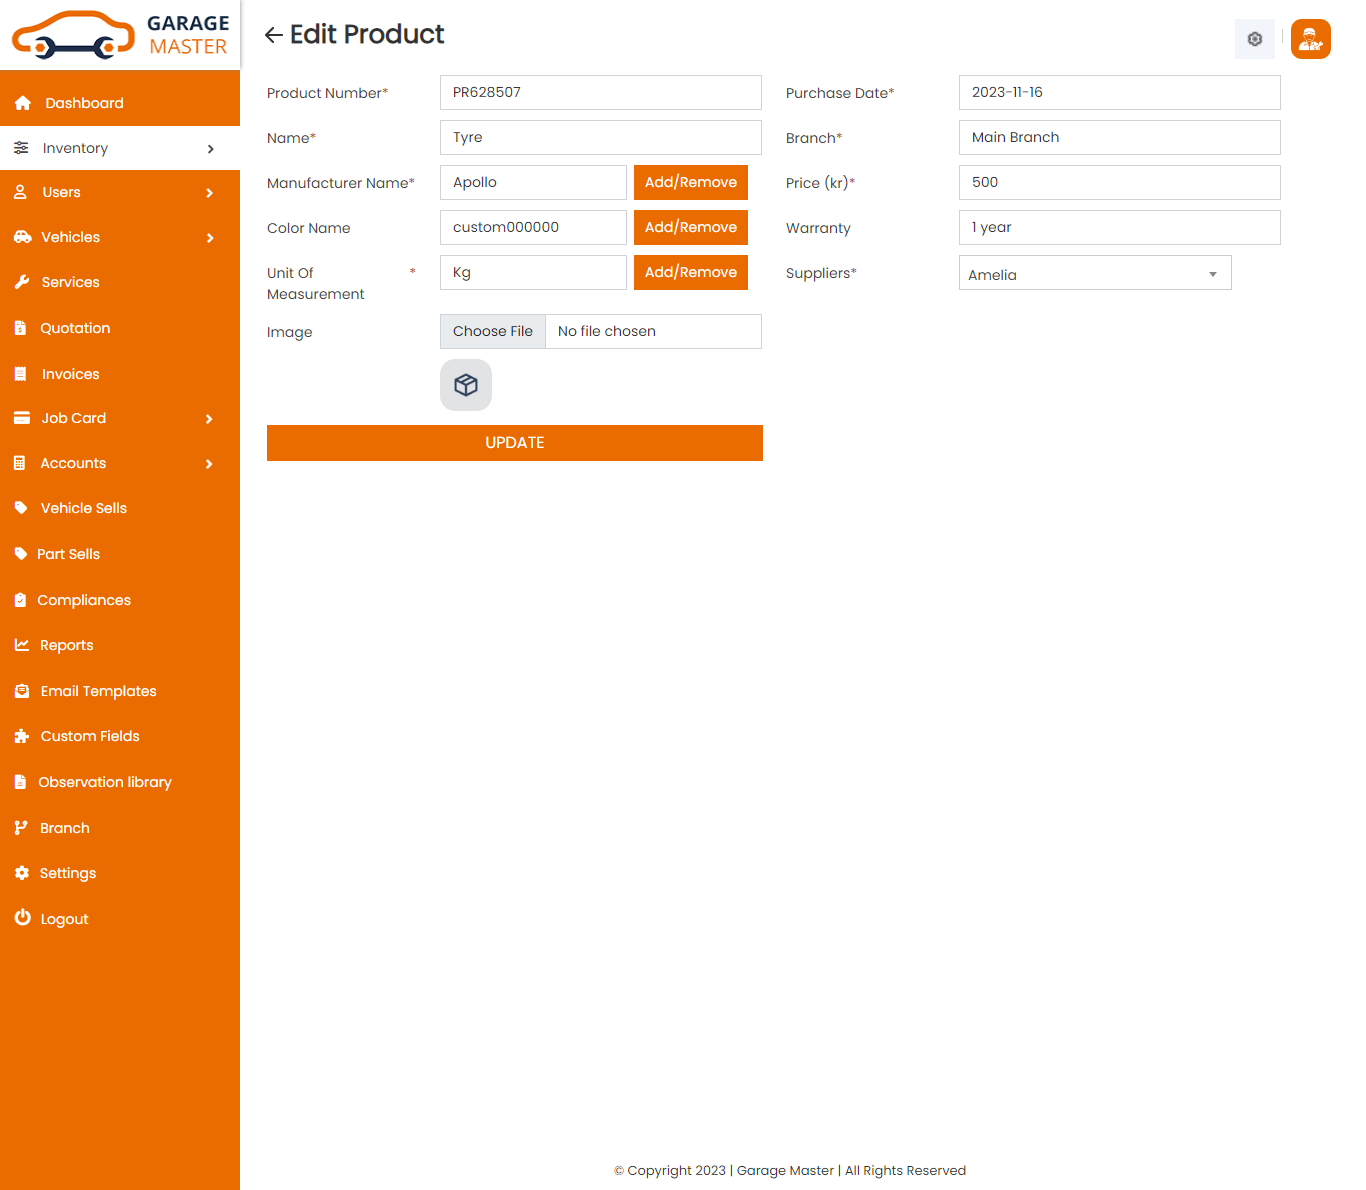
Delete Product: Employee can delete a complete list of all Product and delete detail of particular Product by clicking on delete detail button. This will delete details.
C)Purchase
Purchase List: You can add new Purchase, manage all Purchase and view a complete list of all Purchase.

Add Purchase: You can add purchase details.

- Purchase No: Purchase number auto generated.
- Purchase Date: Select purchase date for this purchase.
- Supplier Name: Select supplier name for this purchase.
- Mobile Number: Select supplier and auto generated mobile.
- Email: Select supplier and auto generated email.
- Billing Address: Select supplier and auto generated address.
- Add New: Add new product for this purchase.
- Manufacturer Name: Select manufacturer name for this purchase.
- Product: Select product for this purchase.
- Quantity: Enter a new quantity for this purchase.
- Price: Select product and auto generated price
- Amount: Select product and quantity and auto generated amount.
- Action: Delete product for this purchase
- Add notes in Purchase.
Purchase Details
Notes
View Purchase: Employee can view detail of particular Purchase by clicking on view detail button. This will open up details.

Edit Purchase: Employee can Edit detail of particular Purchase by clicking on Edit detail button. This will open up details. From here Employee can Change Purchase Details.

Delete Purchase: Employee can delete a complete list of all Purchase and delete detail of particular Purchase by clicking on delete detail button. This will delete details.
D)Stock
Stock List: Employee can view a complete list of all stock and view detail of particular stock by clicking on view detail button. This will open up details. From here Employee can also Print Out view Stock.

Add Stock: You can add stock details.

- Purchase No: Purchase number auto generated.
- Purchase Date: Select purchase date for this purchase.
- Supplier Name: Select supplier name for this purchase.
- Mobile Number: Select supplier and auto generated mobile.
- Email: Select supplier and auto generated email.
- Billing Address: Select supplier and auto generated address.
- Add New: Add new product for this purchase.
- Manufacturer Name: Select manufacturer name for this purchase.
- Product: Select product for this purchase.
- Quantity: Enter a new quantity for this purchase.
- Price: Select product and auto generated price
- Amount: Select product and quantity and auto generated amount.
- Action: Delete product for this purchase
Purchase Details
View Stock: Employee can view the particular stock details.

Manage Stock: Employee can manage the quantity of a particular stock.

4)Users
A) Customer
Customer List: Employee can see a list of Customer.

View Customer: Employee can see view Customer details.

B) Employee
Employee List: Employee can see a list of all Employee.

Edit Employee: Employee can see the only Edit detail button. This will open up details. From here Employee can Change Employee Details.

View employee: Employee can see view Employee details.

C) Support Staff
SupportStaff List: Employee can see a list of all Support Staff.

View SupportStaff: Employee can see view Support Staff details.

D) Accountant
Accountant List: Employee can see a list of all accountant.

View Accountant: Employee can see view Accountant details

5)Vehicle
A)Vehicle
Vehicle List: Employee can see a list of the vehicle.

Add Vehicle: Employee can add Vehicle details

- Vehicle Type: Select vehicle type for this vehicle.
- Add Or Remove: If desired vehicle type is not available in a list then click on Add Or Remove button. You can add new vehicle type from here.
- Chasis No: Enter a new chasis number for this vehicle.
- Vehicle Brand: Select vehicle brand for this vehicle.
- Add Or Remove: If desired vehicle brand is not available in a list then click on Add Or Remove button. You can add new vehicle brand from here.
- Model Year: Enter a new model year for this vehicle.
- Fuel Type: Select fuel type for this vehicle.
- Add Or Remove: If desired fuel type is not available in a list then click on Add Or Remove button. You can add new fuel type from here.
- No of Gear: Enter a new number of gear for this vehicle.
- Model Name: Select model name for this vehicle.
- Add Or Remove: If the desired model name is not available in a list then click on Add Or Remove button. You can add a new model name from here.
- Price: Enter a new price for this vehicle.
- Odometer Reading: Enter a new odometer reading for this vehicle.
- Date of Manufacturing: Enter a new date of manufacturing for this vehicle.
- Gearbox: Enter a new gearbox for this vehicle.
- Gearbox No: Enter a new gearbox for this vehicle.
- Engine No: Enter a new engine number for this vehicle.
- Engine Size: Enter a new engine size for this vehicle.
- Key No: Enter a new key number for this vehicle.
- Engine: Enter a new engine for this vehicle.
- Vehicle Image: Select multiple images for this vehicle.
- Add New: Add new color for this vehicle.
- Color: Select color for this vehicle.
- Add New: Add new description for this vehicle.
- Description: Enter a new description of this vehicle.


Edit Vehicle: Employee can Edit detail of particular Vehicle by clicking on Edit detail button. This will open up details. From here admin can Change Vehicle Details.

View Vehicle: Employee can only show own vehicle details by clicking on view detail button. This will open up details.

Delete Vehicle: Employee can delete a complete list of all Vehicle and delete detail of particular Vehicle by clicking on delete detail button. This will delete details.
B)Vehicle Type
Vehicle Type List: Employee can add new Vehicle Type and manage all Vehicle of Vehicle Type as well as view a complete list of all Vehicle Type.

Add Vehicle Type: Employee can add Vehicle Type details

- Vehicle Type: Enter a new vehicle type for this vehicle type.
Edit Vehicle Type: Employee can Edit detail of particular Vehicle Type by clicking on Edit detail button. This will open up details. From here Employee can Change Vehicle Type Details.

Delete Vehicle Type: Employee can delete a complete list of all Vehicle Type and delete detail of particular Vehicle Type by clicking on delete detail button. This will delete details.
C)Vehicle Brand
Vehicle Brand List: Employee can add new Vehicle Brand and manage all Vehicle of Vehicle Brand as well as view a complete list of all Vehicle Brand.

Add Vehicle Brand: Employee can add Vehicle Brand details

- Vehicle Type: Select vehicle type for this vehicle brand.
- Vehicle Brand: Enter a new vehicle brand for this vehicle brand.
Edit Vehicle Brand: Employee can Edit detail of particular Vehicle Brand by clicking on Edit detail button. This will open up details. From here Employee can Change Vehicle Brand Details.

Delete Vehicle Brand: Employee can delete a complete list of all Vehicle Brand and delete detail of particular Vehicle Brand by clicking on delete detail button. This will delete details.
D)Color
Color List: Employee can add a new color, color all color and view a complete list of all color

Add Color: Employee can add color details

- Color Name: Enter a new color name for this color.
Edit Color: Employee can Edit detail of particular color by clicking on Edit detail button. This will open up details. From here Employee can Change color Details.

Delete Color: Employee can delete a complete list of all color and delete detail of particular color by clicking on delete detail button. This will delete details.
6)Service
Service
Service List: Employee can see the only list of Service.

View Service: Employee can view only Service details.

10)Quotation
Quotation
Quotation List: Employee can add new Quotation, and view a complete list of all Quotations and process them.

Add Quotation: Employee can add Quotation

Add Items In Quotation: Employee can add Quotation items in the quotation details and then he can make quotation as final done by checking final process checkbox. And once quotation is final submited that quotation comes in jobcard list for the further process

7)Invoice
Invoice
Invoice List: Employee can see the only list of invoice.

View invoice: Employee can view only invoice details.From here Employee can also Print Out view invoice.
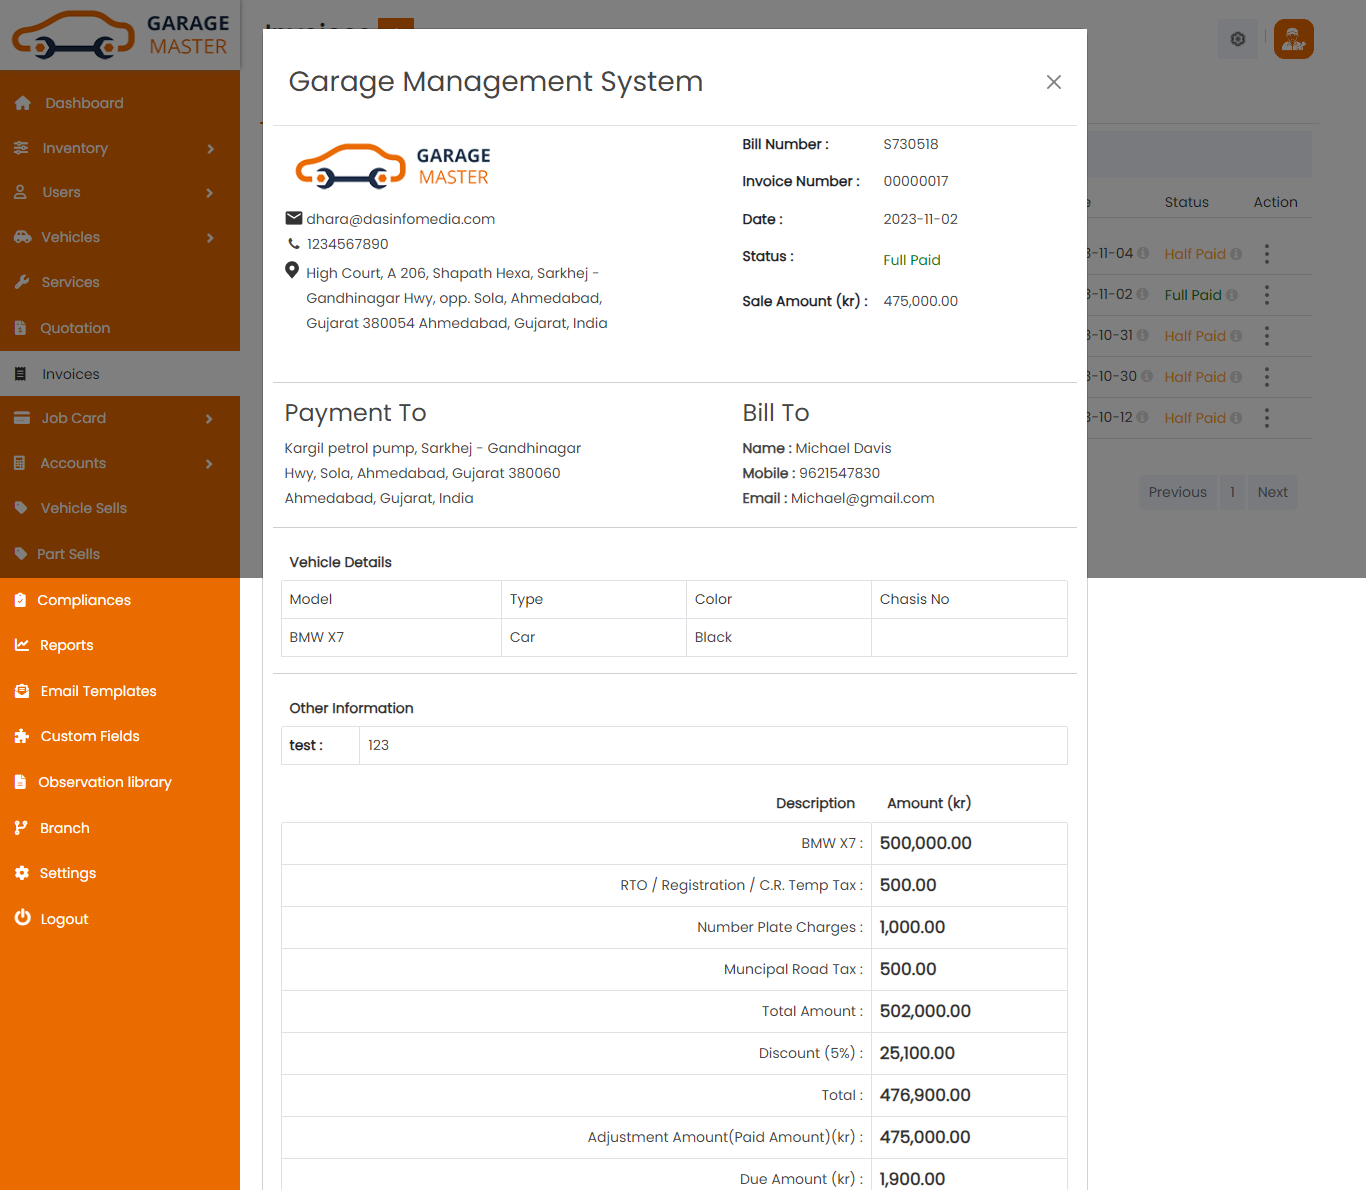
8)Job card
A)job card
Job card List: Employee can see the only list of job card

Process Job: Employee can add and edit Process job detail of particular job card by clicking on process job detail button. This will open up details. From here Employee can add and edit process job Details.
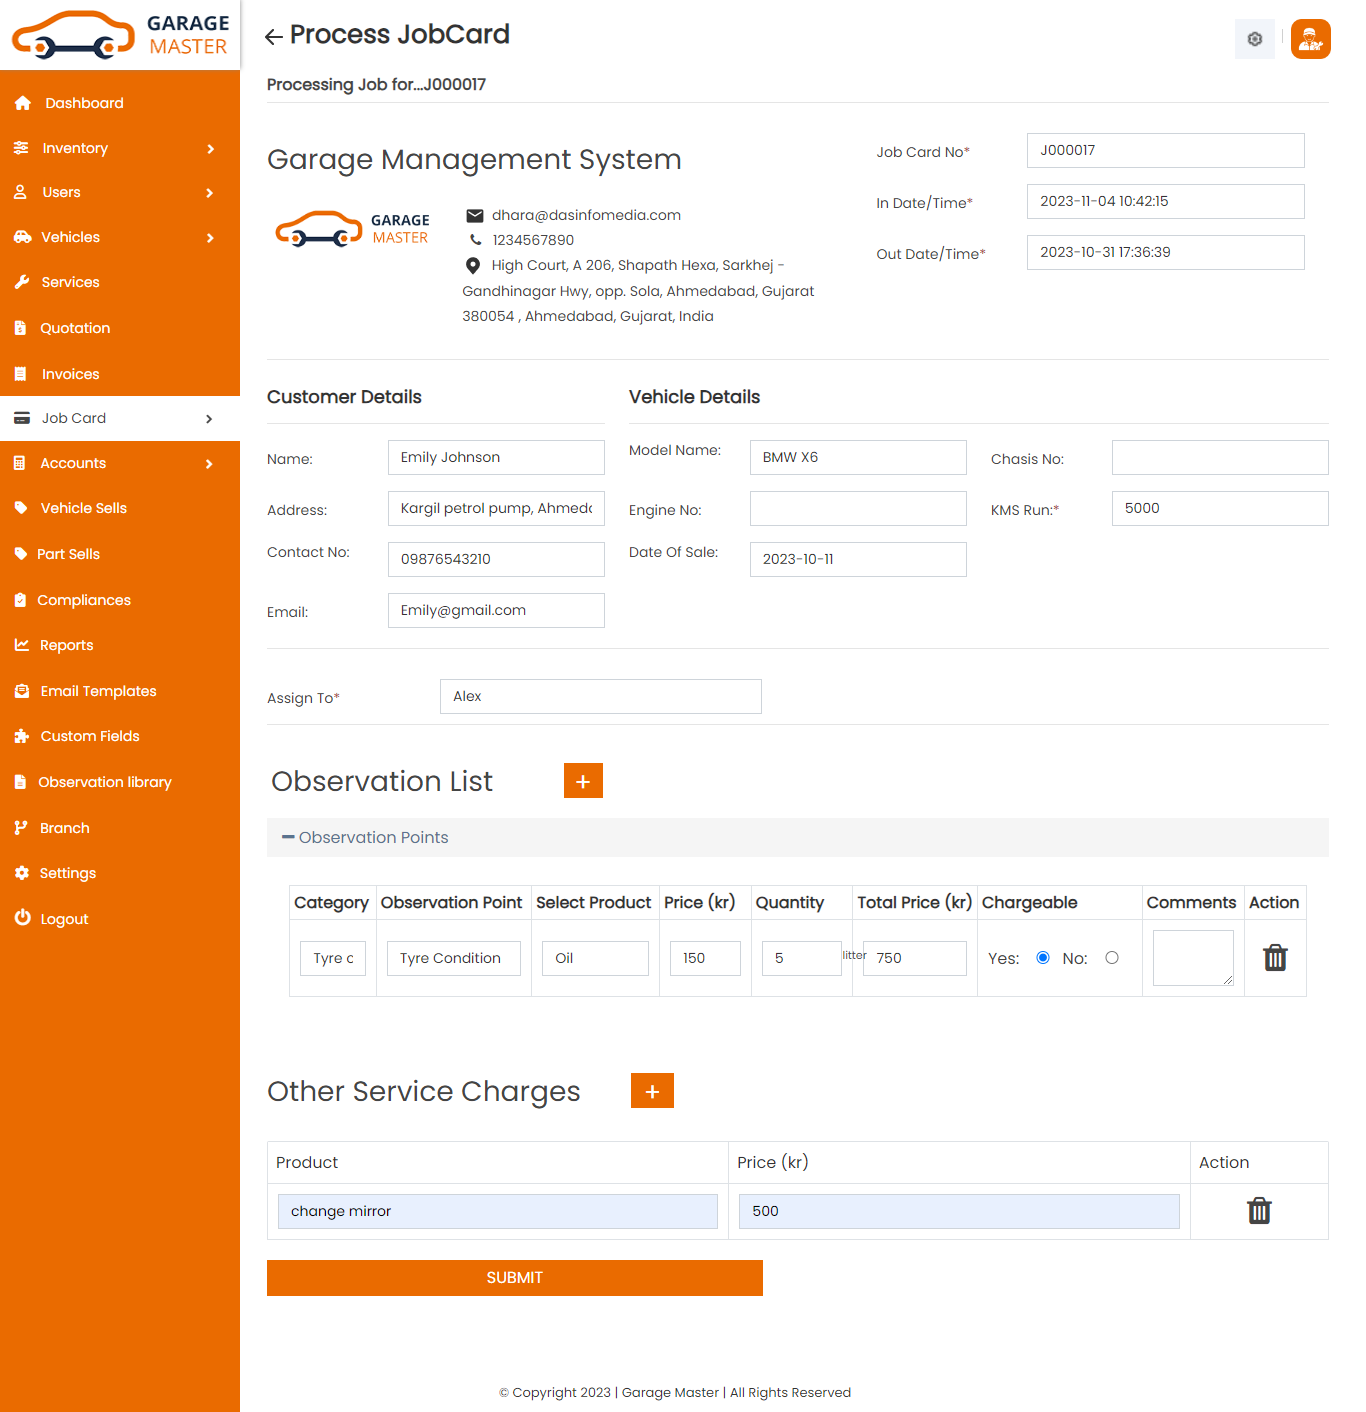
- Job card Number: Job card number auto fields.
- In Date/Time: In date/time auto fields.
- Expected out date/time: Enter a new expected out date/time for this service.
- Name: Name auto fields.
- Address: Address auto fields.
- Contact Number: Contact number auto fields.
- Email: Email auto fields.
- Model Name: Model name auto fields.
- Chassis Number: Chassis number auto fields.
- Engine Number: Engine number auto fields.
- KMS Run: Enter a new KMS run for this service.
- Date of Sales: Date of sales auto fields.
- Color: Color auto fields.
- Add New: Add new observation point for this service.
- Observation Point: List of the observation point.
- Category: Category auto field.
- observation point: Observation point auto field.
- Product: Select product for this job card.
- Price: Select product and auto generated price
- Quantity: Enter a new quantity for this job card.
- Amount: Select product and quantity and auto generated total price.
- Chargeable: Select chargeable for this service.
- Comment: Enter a new comment for this service.
- Action: Delete product for this job card.
- Add New: Add new other service charges for this service.
- Product: Enter a new product for this service.
- Price: Enter a new price for this service.
- action: Delete other service charges for this service.
Processing job for particular job card
Customer Details
Vehicle Details
Observation List
Other Service Charges
View invoice: Employee can view only invoice details.From here Employee can also Print Out view invoice.
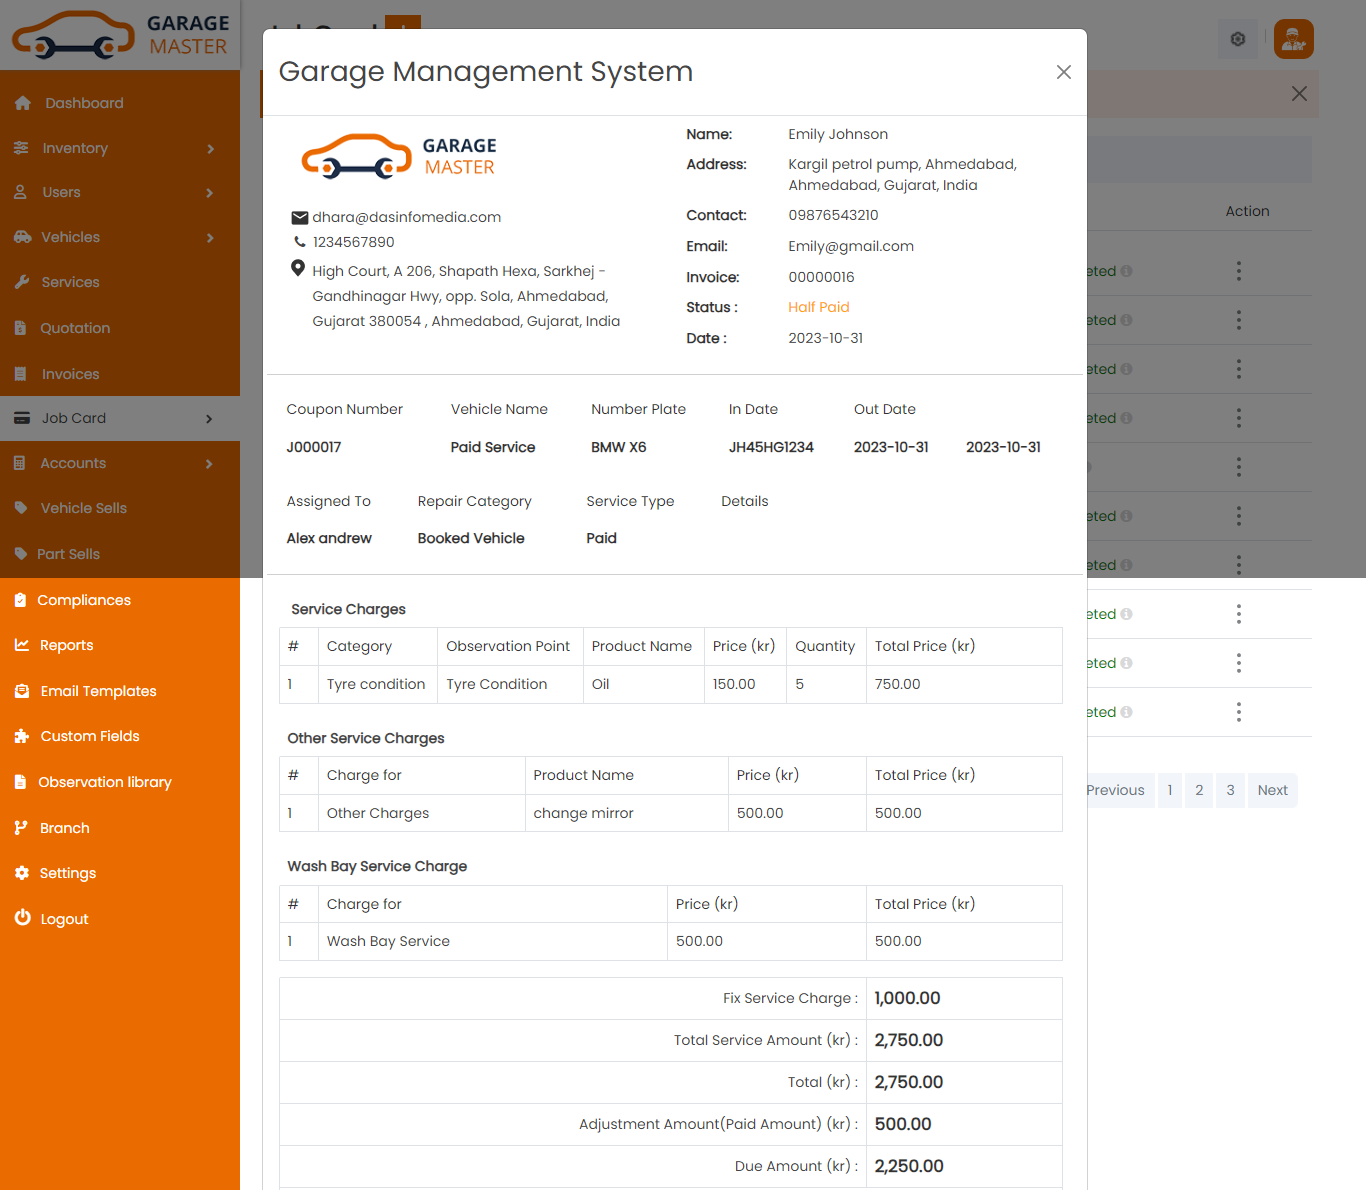
B)Gate Pass
GatePass List: Employee can see the only list of gate pass
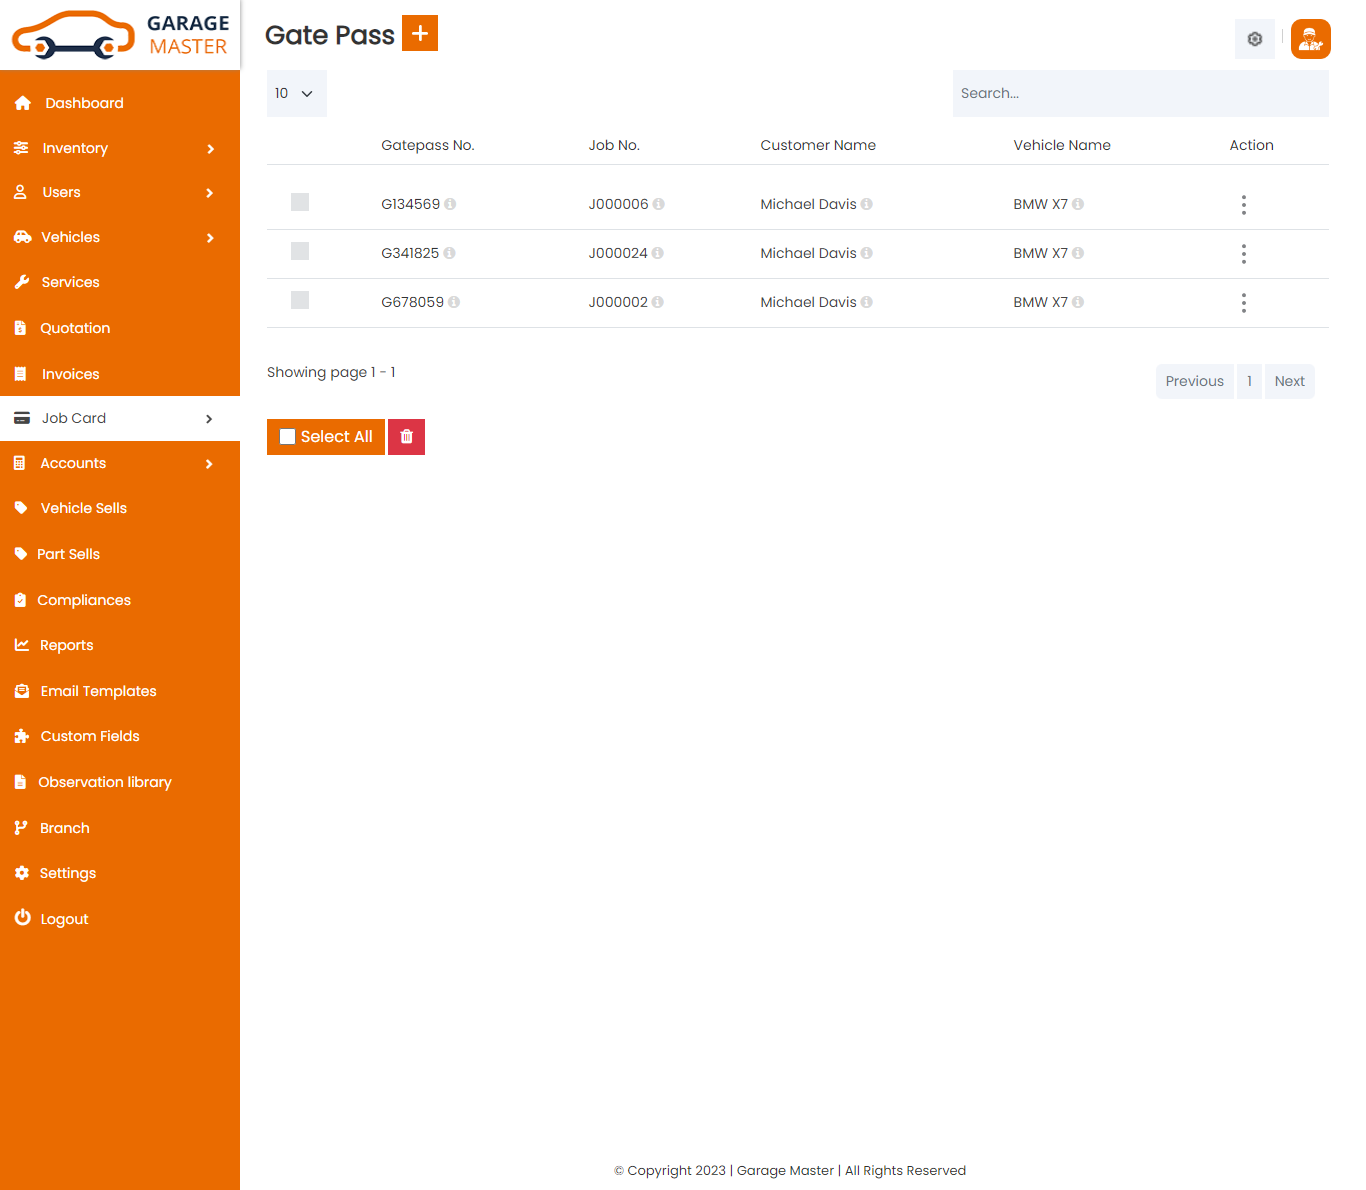
View Gate pass: Employee can view only Gate Receipt details.From here Employee can also Print Out view Gate Receipt.

9)Sells
Part Sells: Employee can see the only list of Part Sells.

View Invoice: Employee can view only Sells details.

H) Support Staff View:
1)Dashboard:
Support Staff side dashboard view.
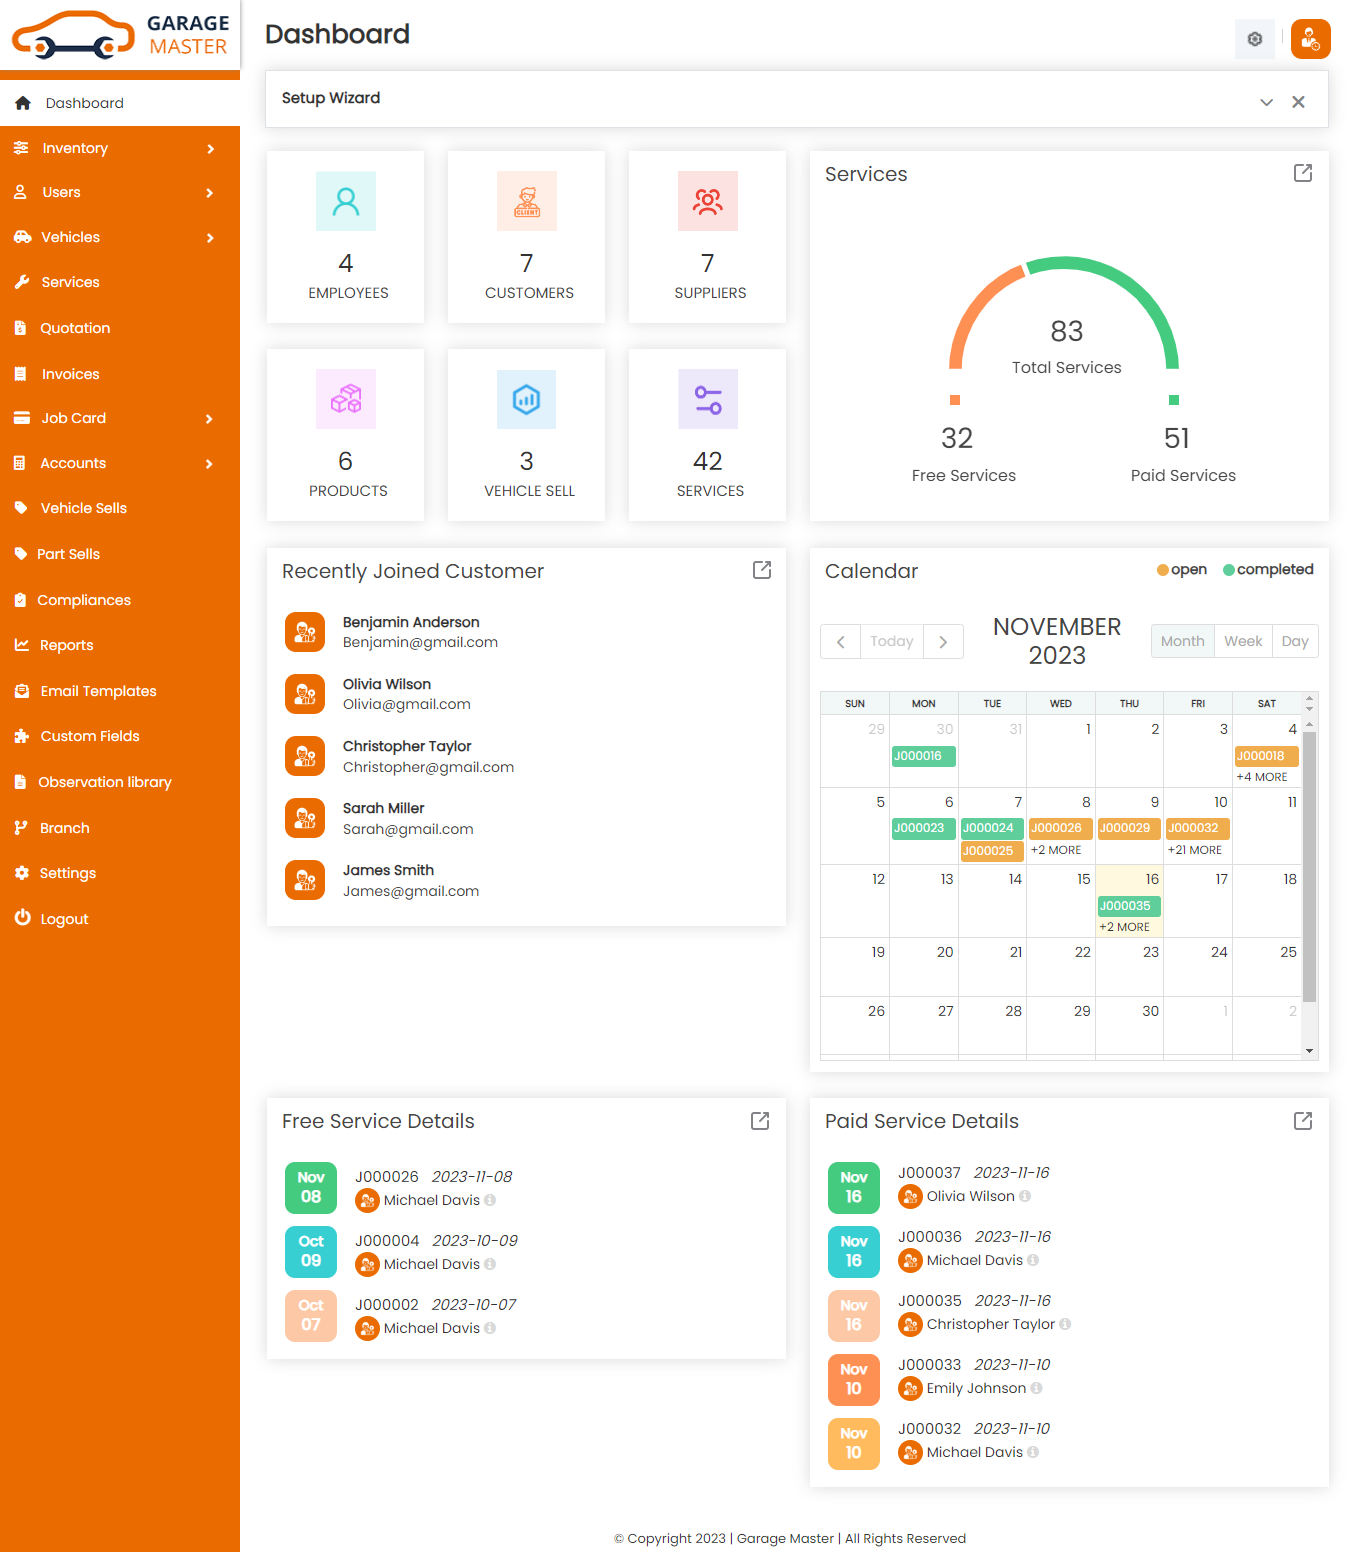
2)Settings
Other Settings
Click on Setting inside Click on Other Setting to start setting up the system. You are advised to fill all fields of Other settings as these details are used in a different section of the whole system. You can change these settings as per your requirement.

- Select Timezone: Select timezone for this setting.
- Select Language: Select language for this setting.
Time Zone
Language
2.1)How to Videos
How to Videos
In this menu it provide video guidance.Click on Setting inside Click on How to Videos to open this menu.

3)Inventory
A) Supplier
Supplier List: Support Staff can add new Supplier, manage all Supplier and view a complete list of all Supplier.

Add Supplier: Support Staff can add supplier details.

- First Name: Enter a new first name for this supplier.
- Last Name: Enter a new last name for this supplier.
- Company Name: Enter a new company name for this supplier.
- Gender: Select gender for this supplier.
- Date of Birth: Enter a new date of birth for this supplier.
- Contact Person: Enter a new contact person for this supplier.
- Email: Enter a new email from this supplier.
- Mobile No: Enter a new mobile number for this supplier.
- Landline No: Enter a new landlines number for this supplier.
- Image: Upload image for this supplier.
- Country: Select country for this supplier.
- State: Select state for this supplier.
- City: Select city for this supplier.
- Address: Enter a new address for this supplier.
- Add new custom field in go to custom Fields module in add custom field then select form name in supplier and add custom field for this supplier.
Personal Information
Address
CustomField
Edit Supplier: Support Staff can Edit detail of particular Supplier by clicking on Edit detail button. This will open up details. From here Support Staff can Change Supplier Details.

View Supplier: Support Staff can view a complete list of all Supplier and view detail of particular Supplier by clicking on view detail button. This will open up details.

Delete Supplier: Support Staff can delete a complete list of all Supplier and delete detail of particular Supplier by clicking on delete detail button. This will delete details.
B)Product
Product List: Support Staff can add new Product and manage all types of Product as well as view a complete list of all Product.

Add Product: Support Staff can add product details

- Product Number: Product number auto generated.
- Product Date: Enter a new product date for this product.
- Product Image: Upload image for this product.
- Name: Enter a new name for this product.
- Manufacturer Name: Select manufacturer name for this product.
- Add Or Remove: If desired manufacturer name is not available in a list then click on Add Or Remove button. You can add new manufacturer name from here.
- Price: Enter a new price for this product.
- Color: Select color for this product.
- Add Or Remove: If the desired color is not available in a list then click on Add Or Remove button. You can add new color from here.
- Warranty: Enter a new warranty for this product.
- Supplier: Select supplier for this product.
- Quantity: Enter a new quantity for this product.
- Unit of Measurement: Select unit of measurment for this product.
- Add Or Remove: If the desired unit of measurement is not available in a list then click on Add Or Remove button. You can add new unit of measurement from here.


Edit Product: Support Staff can Edit detail of particular Product by clicking on Edit detail button. This will open up details. From here Support Staff can Change Product Details.

Delete Product: Support Staff can delete a complete list of all Product and delete detail of particular Product by clicking on delete detail button. This will delete details.
C)Purchase
Purchase List: You can add new Purchase, manage all Purchase and view a complete list of all Purchase.

Add Purchase: You can add purchase details.

- Purchase No: Purchase number auto generated.
- Purchase Date: Enter a new purchase date for this purchase.
- Supplier Name: Select supplier name for this purchase.
- Mobile Number: Select supplier and auto generated mobile.
- Email: Select supplier and auto generated email.
- Billing Address: Select supplier and auto generated address.
- Add New: Add new product for this purchase.
- Manufacturer Name: Select manufacturer name for this purchase.
- Product: Select product for this purchase.
- Quantity: Enter a new quantity for this purchase.
- Price: Select product and auto generated price
- Amount: Select product and quantity and auto generated amount.
- Action: Delete product for this purchase
Purchase Details
View Purchase: Support Staff can view detail of particular Purchase by clicking on view detail button. This will open up details.

Edit Purchase: Support Staff can Edit detail of particular Purchase by clicking on Edit detail button. This will open up details. From here Support Staff can Change Purchase Details.

Delete Purchase: Support Staff can delete a complete list of all Purchase and delete detail of particular Purchase by clicking on delete detail button. This will delete details.
D)Stock
Stock List: Support Staff can view a complete list of all stock and view detail of particular stock by clicking on view detail button. This will open up details. From here Support Staff can also Print Out view Stock.

Add stock: You can add stock details.

- Purchase No: Purchase number auto generated.
- Purchase Date: Enter a new purchase date for this purchase.
- Supplier Name: Select supplier name for this purchase.
- Mobile Number: Select supplier and auto generated mobile.
- Email: Select supplier and auto generated email.
- Billing Address: Select supplier and auto generated address.
- Add New: Add New product for this purchase.
- Manufacturer Name: Select manufacturer name for this purchase.
- Product: Select product for this purchase.
- Quantity: Enter quantity for this purchase.
- Price: Select product and auto generated price
- Amount: Select product and quantity and auto generated amount.
- Action: Delete product for this purchase
Purchase Details
View Stock: Support Staff can view the particular stock details.

Manage Stock: Support Staff can manage the quantity of a particular stock.

4)Users
A) Customer
Customer List: Support Staff can add new Customer, manage all Customer and view a complete list of all Customer.

Add Customer: Support Staff can add Customer details.

- First Name: Enter a new first name for this customer.
- Last Name: Enter a new last name for this customer.
- Display Name: Enter a new display name for this customer.
- Gender: Select gender for this customer.
- Date of Birth: Enter a new date of birth for this customer.
- Email: Enter a new email for this customer.
- Password: Enter a new password for this customer.
- Confirm Password: Enter a new confirm password for this customer.
- Mobile No: Enter a new mobile number for this customer.
- Landline No: Enter a new landline number for this customer.
- Image: Upload image for this customer.
- Country: Select country for this customer.
- State: Select state for this customer.
- City: Select city for this customer.
- Address: Enter a new address for this customer.
- Add new custom field in go to custom Fields module in add custom field then select form name in customer and add custom field for this customer.
Personal Information
Address
CustomField
Edit Customer: Support Staff can Edit detail of particular customer by clicking on Edit detail button. This will open up details. From here Support Staff can Change customer Details.

View Customer: Support Staff can view a complete list of all Customer and view detail of particular Customer by clicking on view detail button. This will open up details.

Delete Customer: Support Staff can delete a complete list of all Customer and delete detail of particular Customer by clicking on delete detail button. This will delete details.
B) Employee
Employee List: Support Staff can add new Employee, manage all Employee and view a complete list of all Employee.

Add Employee: Support Staff can add Employee details.

- First Name: Enter a new first name for this employee.
- Last Name: Enter a new last name for this employee.
- Display Name: Enter a new display name for this employee.
- Gender: Select gender for this employee.
- Date of Birth: Enter a new date of birth for this employee.
- Email: Enter a new email for this employee.
- Password: Enter a new password for this employee.
- Confirm Password: Enter a new confirm password for this employee.
- Mobile No: Enter a new mobile number for this employee.
- Landline No: Enter a new landline number for this employee.
- Join Date: Enter a new join date for this employee.
- Left Date: Enter a new left date for this employee.
- Designation: Enter designation for this employee.
- Image: Upload image for this employee.
- Country: Select country for this employee.
- State: Select state for this employee.
- City: Select city for this employee.
- Address: Enter a new address for this employee.
- Add new custom field in go to custom Fields module in add custom field then select form name in employee and add custom field for this employee.
Personal Information
Address
CustomField
Edit Employee: Support Staff can Edit detail of particular employee by clicking on Edit detail button. This will open up details. From here Support Staff can Change employee Details.

View employee: Support Staff can view a complete list of all employee and view detail of particular employee by clicking on view detail button. This will open up details.

Delete Employee: Support Staff can delete a complete list of all Employee and delete detail of particular Employee by clicking on delete detail button. This will delete details.
C) Support Staff
SupportStaff List: Support Staff can add new SupportStaff, manage all SupportStaff and view a complete list of all Support Staff.

Add SupportStaff: Support Staff can add SupportStaff details.

- First Name: Enter a new first name for this support staff.
- Last Name: Enter a new last name for this support staff.
- Display Name: Enter a new display name for this support staff.
- Gender: Select gender for this support staff.
- Date of Birth: Enter a new date of birth for this support staff.
- Email: Enter a new email for this support staff.
- Password: Enter a new password for this support staff.
- Confirm Password: Enter a new confirm password for this support staff.
- Mobile No: Enter a new mobile number for this support staff.
- Landline No: Enter a new landline number for this support staff.
- Image: Upload image for this support staff.
- Country: Select country for this support staff.
- State: Select state for this support staff.
- City: Select city for this support staff.
- Address: Enter a new address for this support staff.
Personal Information
Address
Edit SupportStaff: Support Staff can Edit detail of particular support Staff by clicking on Edit detail button. This will open up details. From here Support Staff can Change support Staff Details.

View SupportStaff: Support Staff can view a complete list of all support Staff and view detail of particular support Staff by clicking on view detail button. This will open up details.

Delete SupportStaff: Support Staff can delete a complete list of all support Staff and delete detail of particular support Staff by clicking on delete detail button. This will delete details.
D) Accountant
Accountant List: Support Staff can add new accountant, manage all accountant and view a complete list of all accountant.

Add Accountant: Support Staff can add accountant details.

- First Name: Enter a new first name for this accountant.
- Last Name: Enter a new last name for this accountant.
- Display Name: Enter a new display name for this accountant.
- Gender: Select gender for this accountant.
- Date of Birth: Enter a new date of birth for this accountant.
- Email: Enter a new email for this accountant.
- Password: Enter a new password for this accountant.
- Confirm Password: Enter a new confirm password for this accountant.
- Mobile No: Enter a new mobile number for this accountant.
- Landline No: Enter a new landline number for this accountant.
- Image: Upload image for this accountant.
- Country: Select country for this accountant.
- State: Select state for this accountant.
- City: Select city for this accountant.
- Address: Enter a new address for this accountant.
Personal Information
Address
Edit Accountant: Support Staff can Edit detail of particular accountant by clicking on Edit detail button. This will open up details. From here Support Staff can Change accountant Details.

View Accountant: Support Staff can view a complete list of all accountant and view detail of particular accountant by clicking on view detail button. This will open up details.

Delete Accountant: Support Staff can delete a complete list of all accountant and delete detail of particular accountant by clicking on delete detail button. This will delete details.
5)Vehicle
A)Vehicle
Vehicle List: Support Staff can add new Vehicle and manage all Vehicle of Vehicle as well as view a complete list of all Vehicle.

Add Vehicle: Support Staff can add Vehicle details

- Vehicle Type: Select vehicle type for this vehicle.
- Add Or Remove: If desired vehicle type is not available in a list then click on Add Or Remove button. You can add new vehicle type from here.
- Chasis No: Enter a new chasis number for this vehicle.
- Vehicle Brand: Select vehicle brand for this vehicle.
- Add Or Remove: If desired vehicle brand is not available in a list then click on Add Or Remove button. You can add new vehicle brand from here.
- Model Year: Enter a new model year for this vehicle.
- Fuel Type: Select fuel type for this vehicle.
- Add Or Remove: If desired fuel type is not available in a list then click on Add Or Remove button. You can add new fuel type from here.
- No of Gear: Enter a new number of gear for this vehicle.
- Model Name: Select model name for this vehicle.
- Add Or Remove: If the desired model name is not available in a list then click on Add Or Remove button. You can add a new model name from here.
- Price: Enter a new price for this vehicle.
- Odometer Reading: Enter a new odometer reading for this vehicle.
- Date of Manufacturing: Enter a new date of manufacturing for this vehicle.
- Gearbox: Enter a new gearbox for this vehicle.
- Gearbox No: Enter a new gearbox for this vehicle.
- Engine No: Enter a new engine number for this vehicle.
- Engine Size: Enter a new engine size for this vehicle.
- Key No: Enter a new key number for this vehicle.
- Engine: Enter a new engine for this vehicle.
- Vehicle Image: Select multiple images for this vehicle.
- Add New: Add new color for this vehicle.
- Color: Select color for this vehicle.
- Add New: Add new description for this vehicle.
- Description: Enter a new description for this vehicle.


Edit Vehicle: Support Staff can Edit detail of particular Vehicle by clicking on Edit detail button. This will open up details. From here Support Staff can Change Vehicle Details.

View Vehicle: Support Staff can view a complete list of all Vehicle and view detail of particular Vehicle by clicking on view detail button. This will open up details.

Delete Vehicle: Support Staff can delete a complete list of all Vehicle and delete detail of particular Vehicle by clicking on delete detail button. This will delete details.
B)Vehicle Type
Vehicle Type List: Support Staff can add new Vehicle Type and manage all Vehicle of Vehicle Type as well as view a complete list of all Vehicle Type.
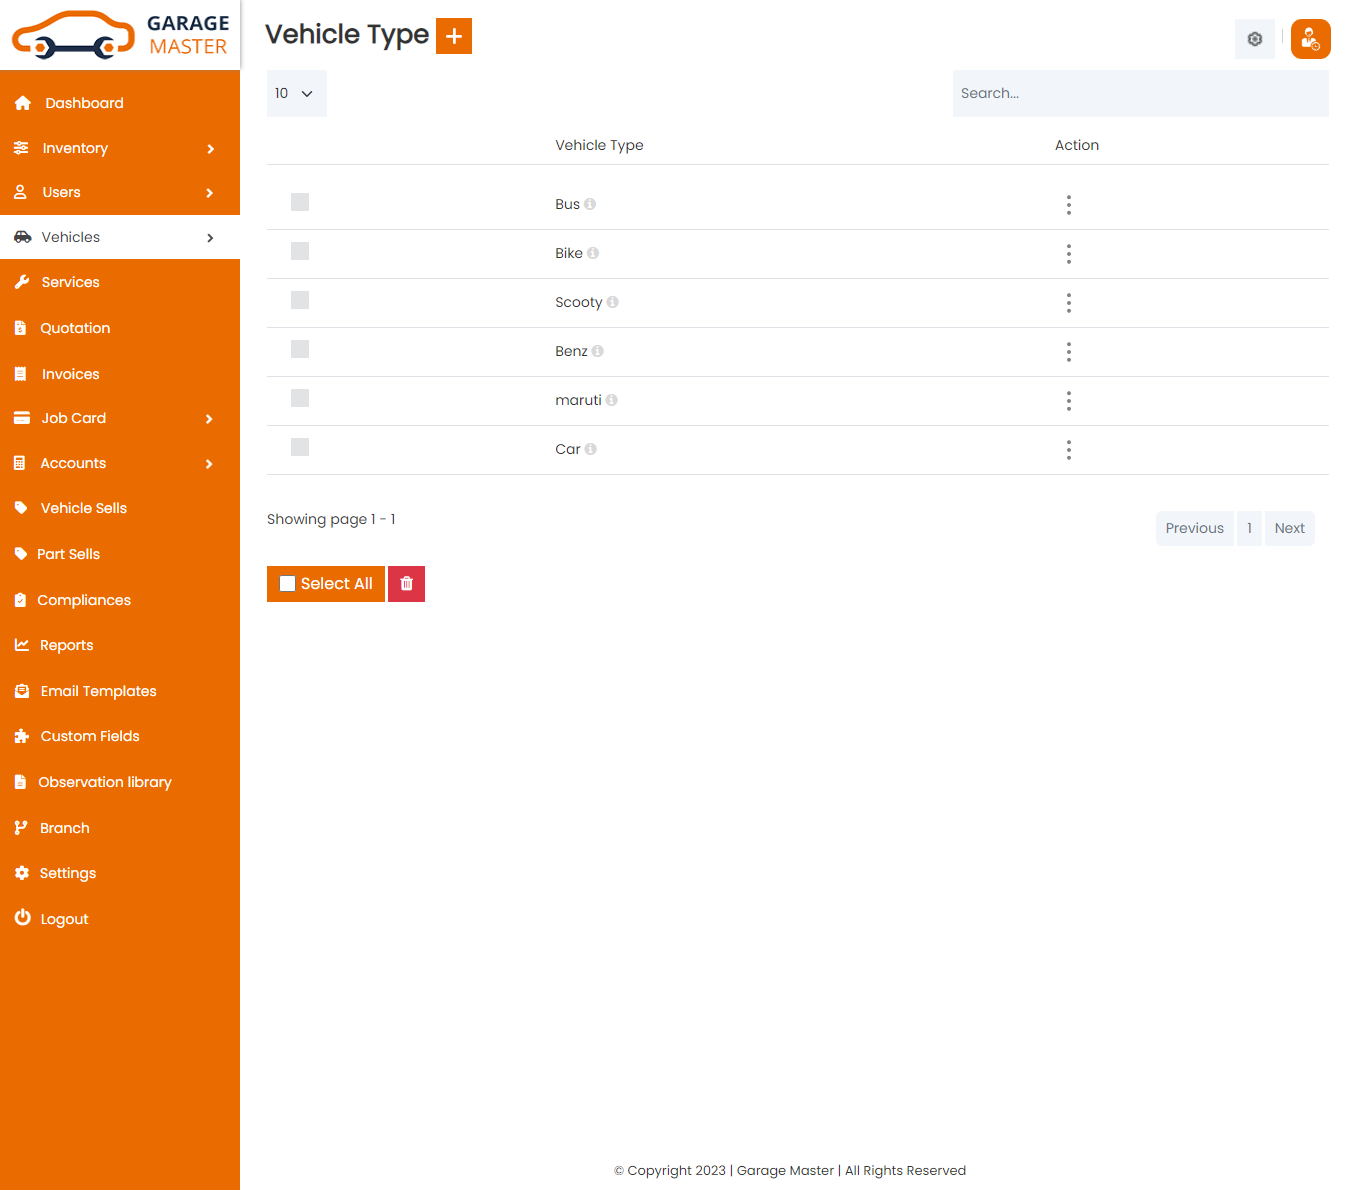
Add Vehicle Type: Support Staff can add Vehicle Type details
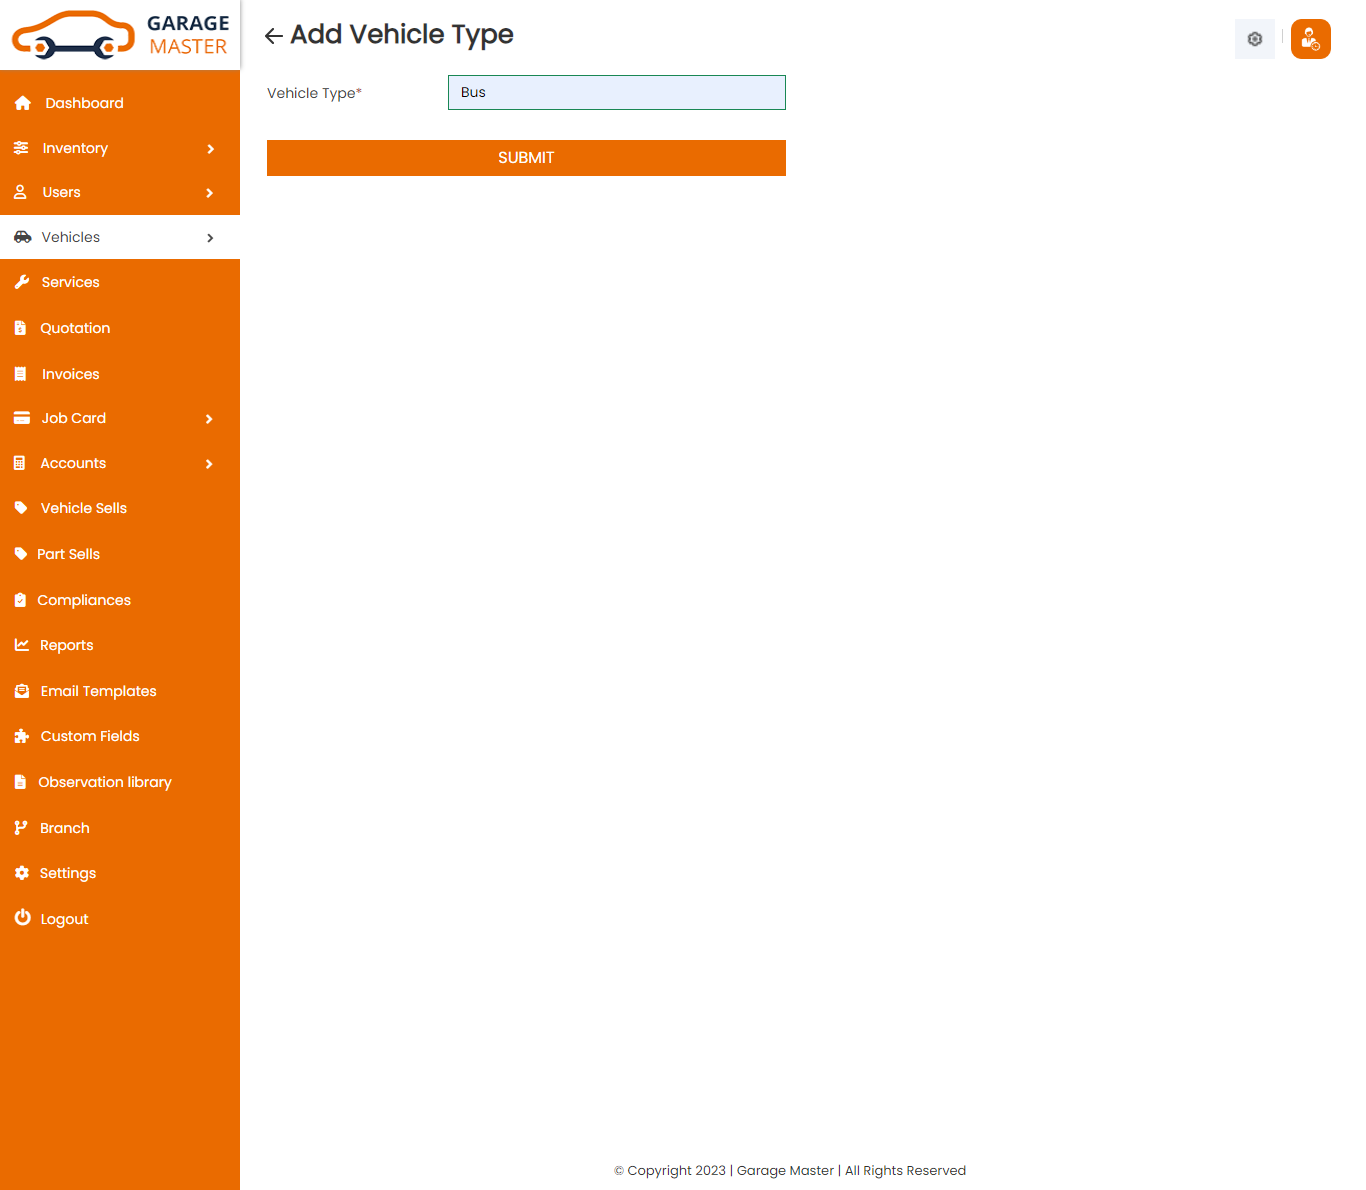
- Vehicle Type: Enter a new vehicle type for this vehicle type.
Edit Vehicle Type: Support Staff can Edit detail of particular Vehicle Type by clicking on Edit detail button. This will open up details. From here Support Staff can Change Vehicle Type Details.
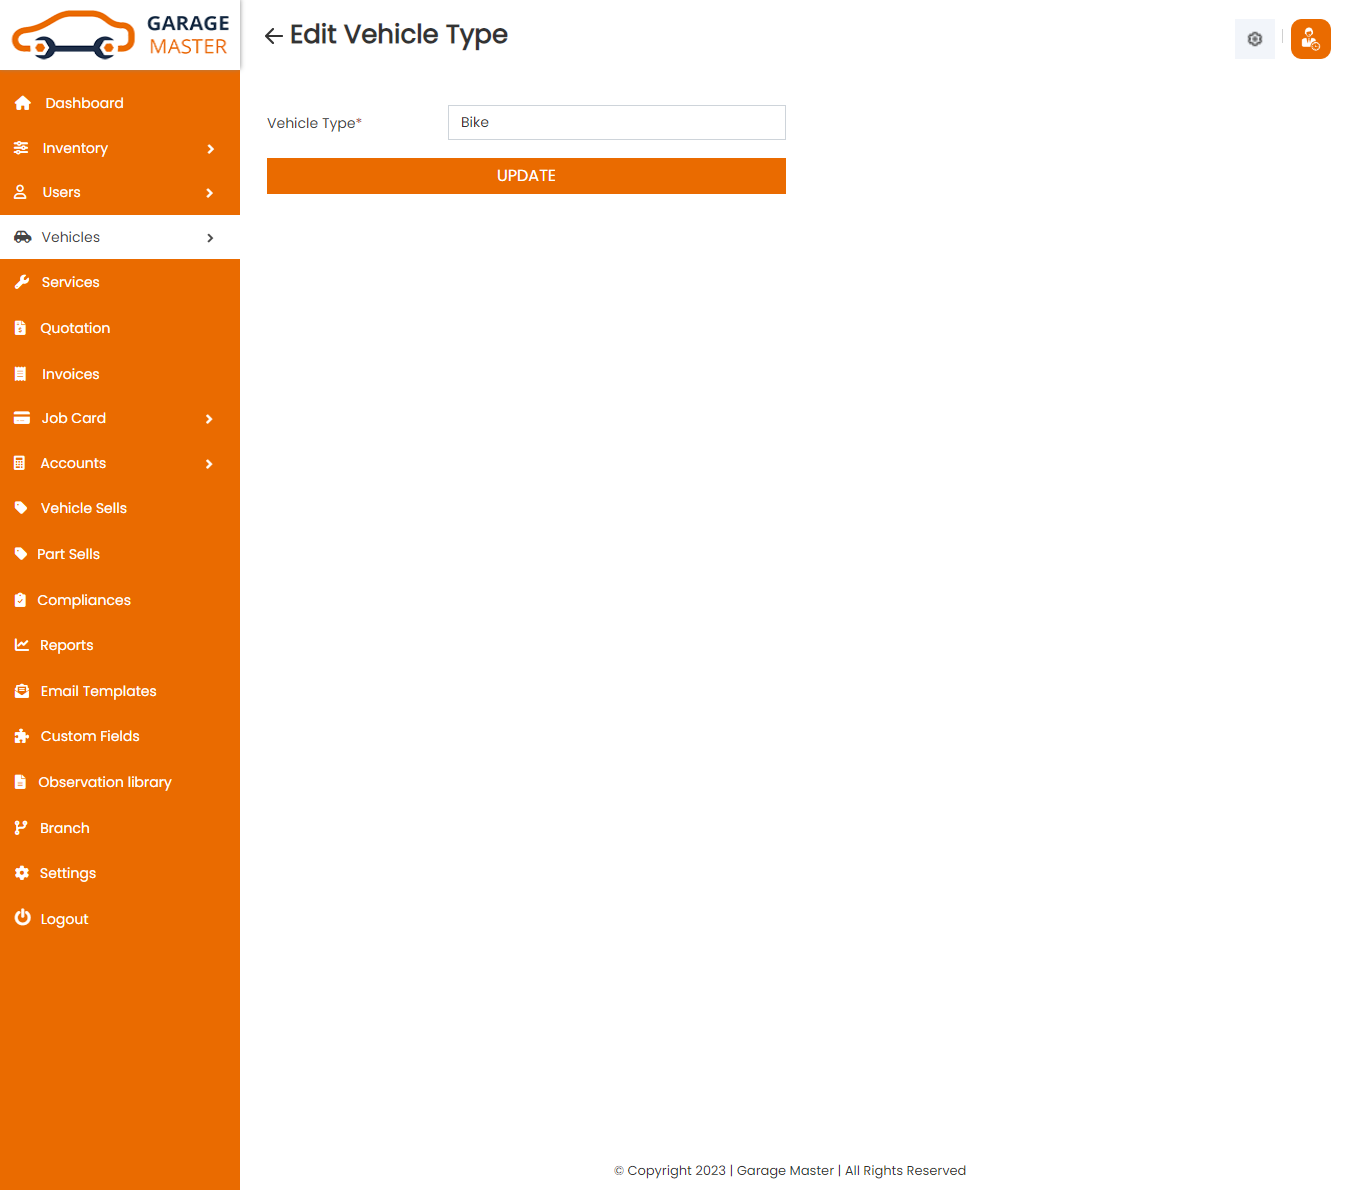
Delete Vehicle Type: Support Staff can delete a complete list of all Vehicle Type and delete detail of particular Vehicle Type by clicking on delete detail button. This will delete details.
C)Vehicle Brand
Vehicle Brand List: Support Staff can add new Vehicle Brand and manage all Vehicle of Vehicle Brand as well as view a complete list of all Vehicle Brand.
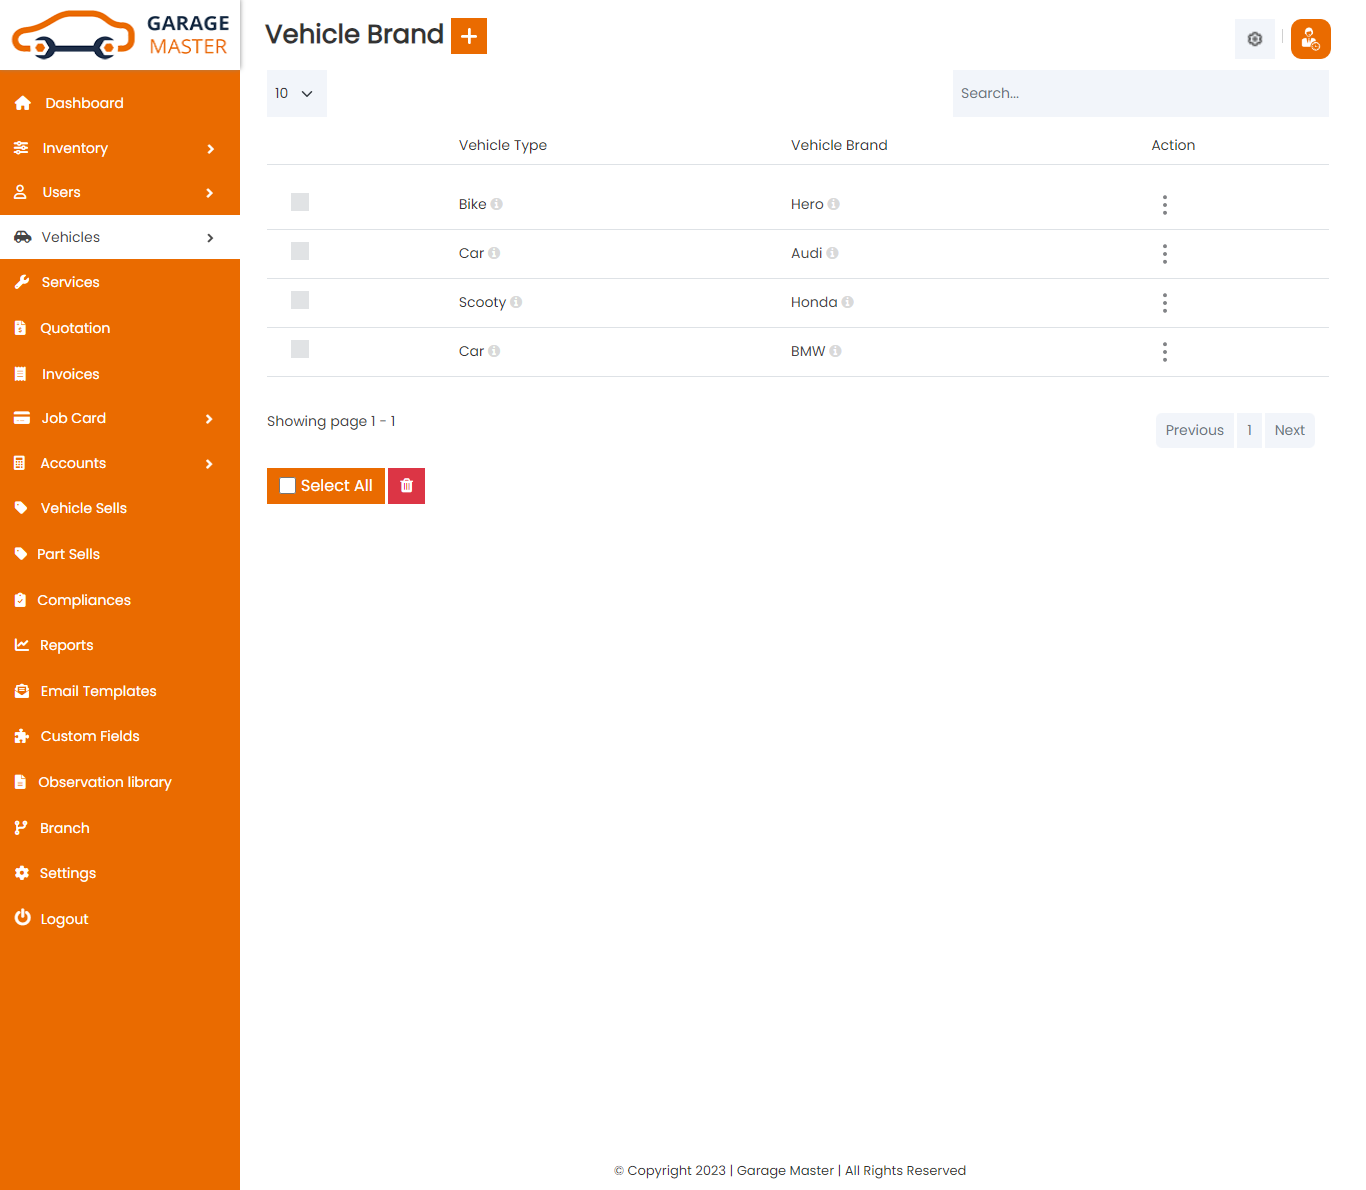
Add Vehicle Brand: Support Staff can add Vehicle Brand details
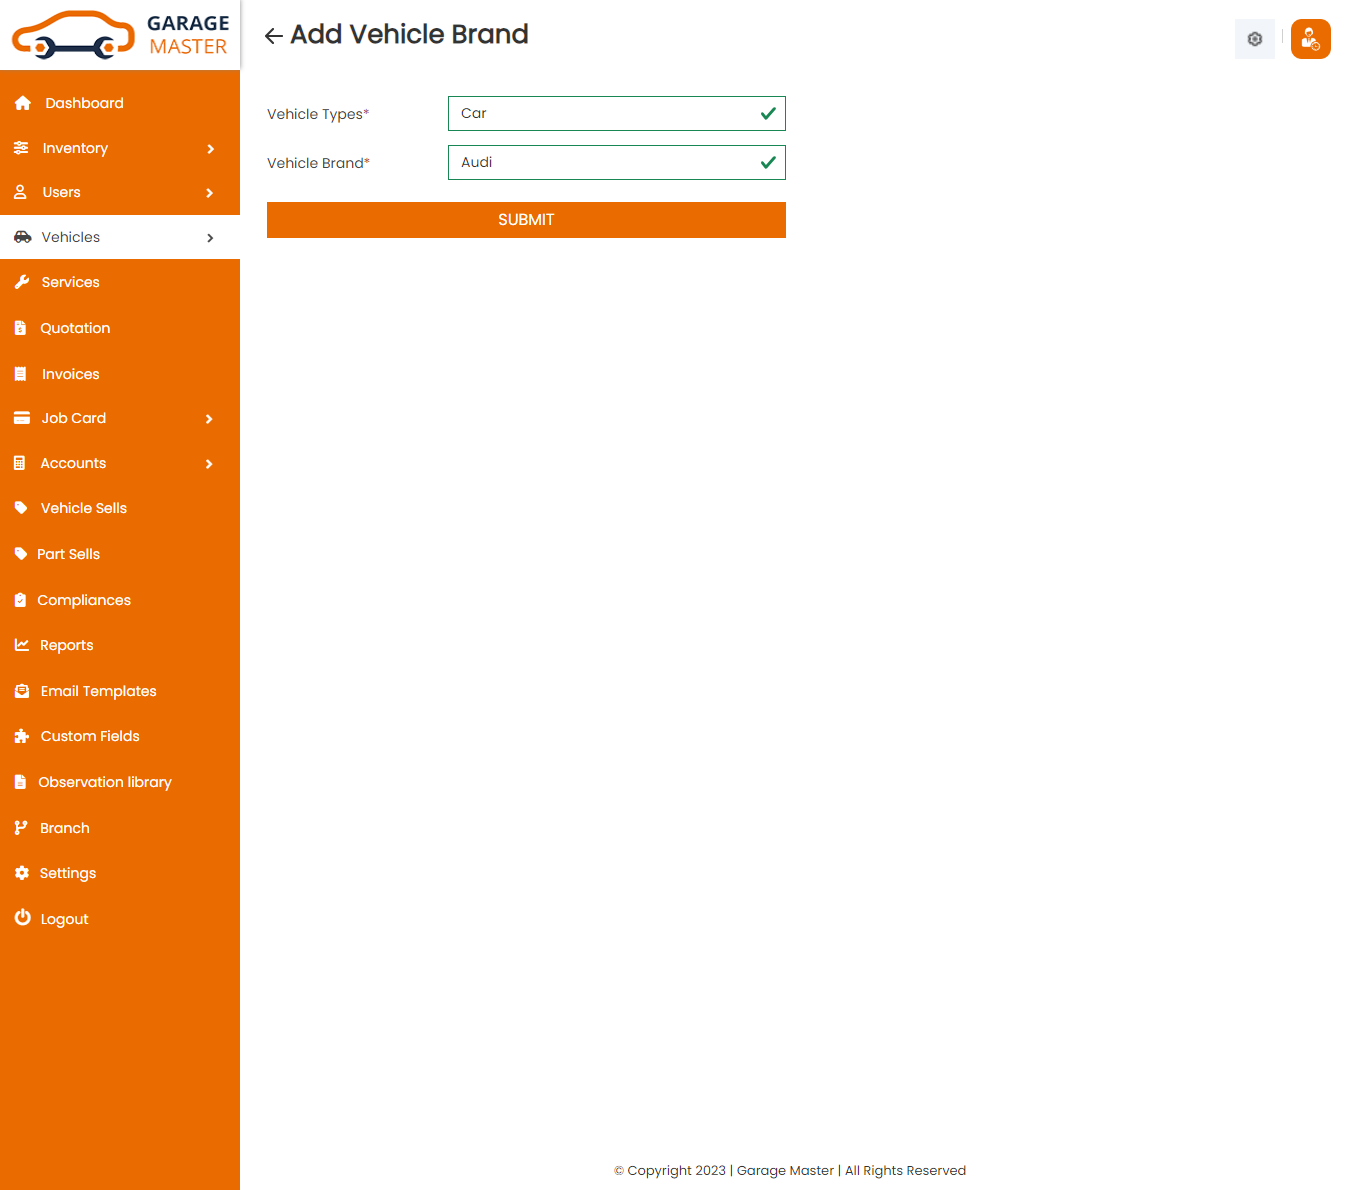
- Vehicle Type: Select vehicle type for this vehicle brand.
- Vehicle Brand: Enter a new vehicle brand for this vehicle brand.
Edit Vehicle Brand: Support Staff can Edit detail of particular Vehicle Brand by clicking on Edit detail button. This will open up details. From here Support Staff can Change Vehicle Brand Details.
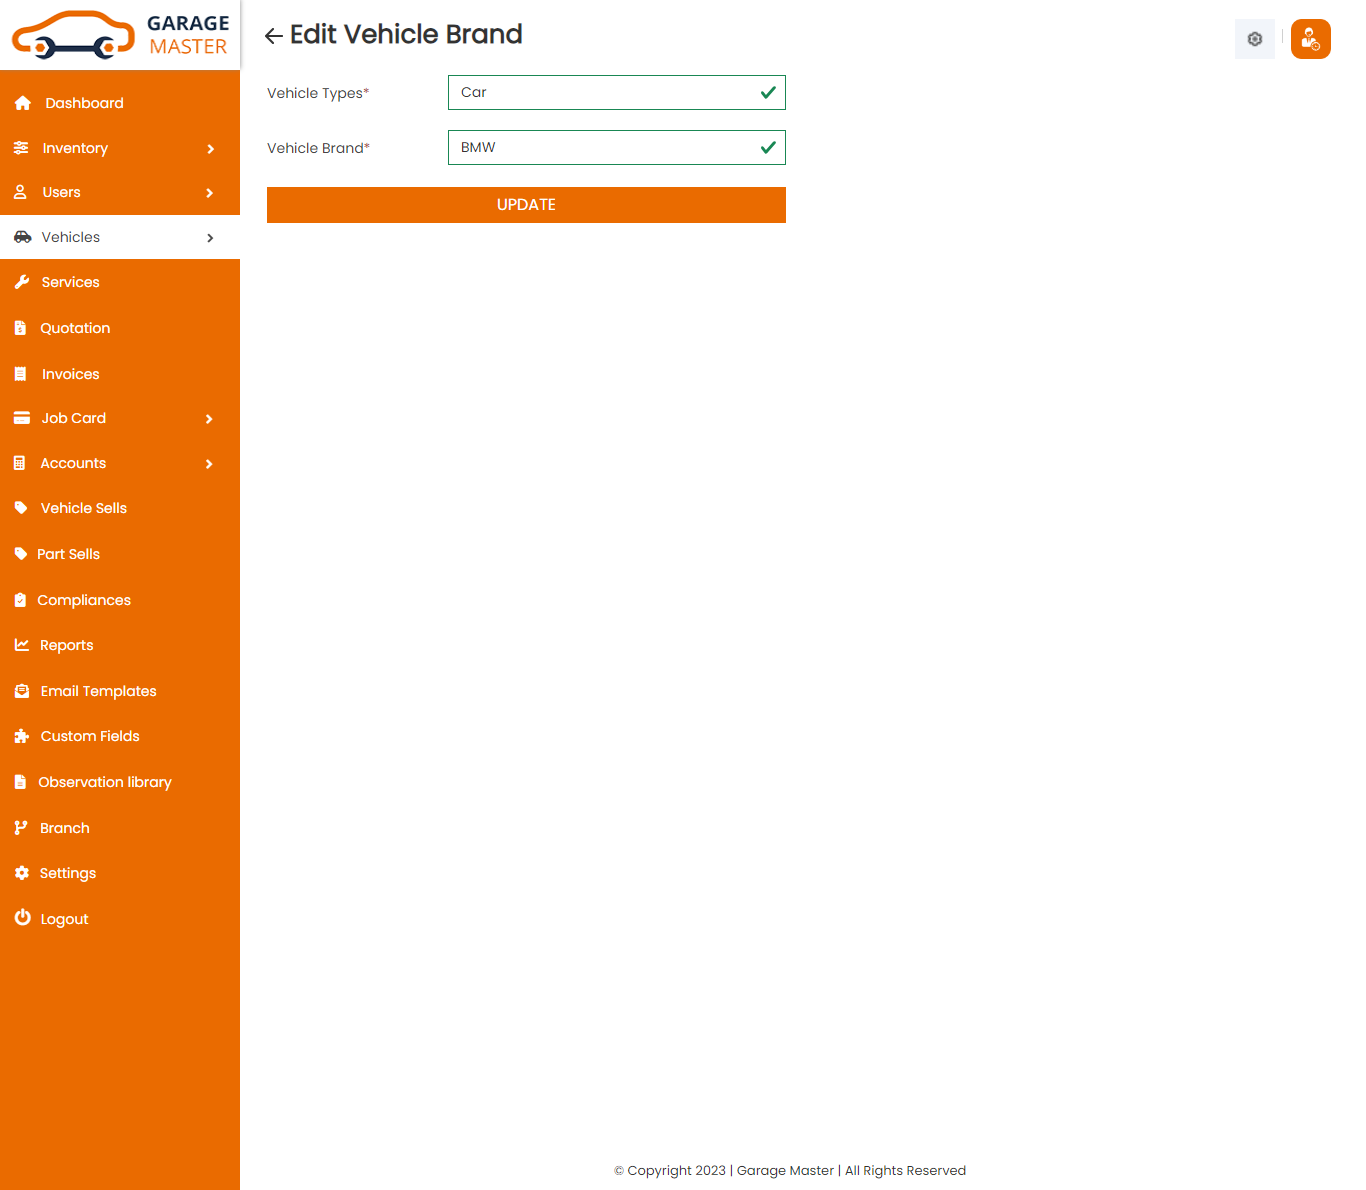
Delete Vehicle Brand: Support Staff can delete a complete list of all Vehicle Brand and delete detail of particular Vehicle Brand by clicking on delete detail button. This will delete details.
D)Color
Color List: Support Staff can add a new color, color all color and view a complete list of all color
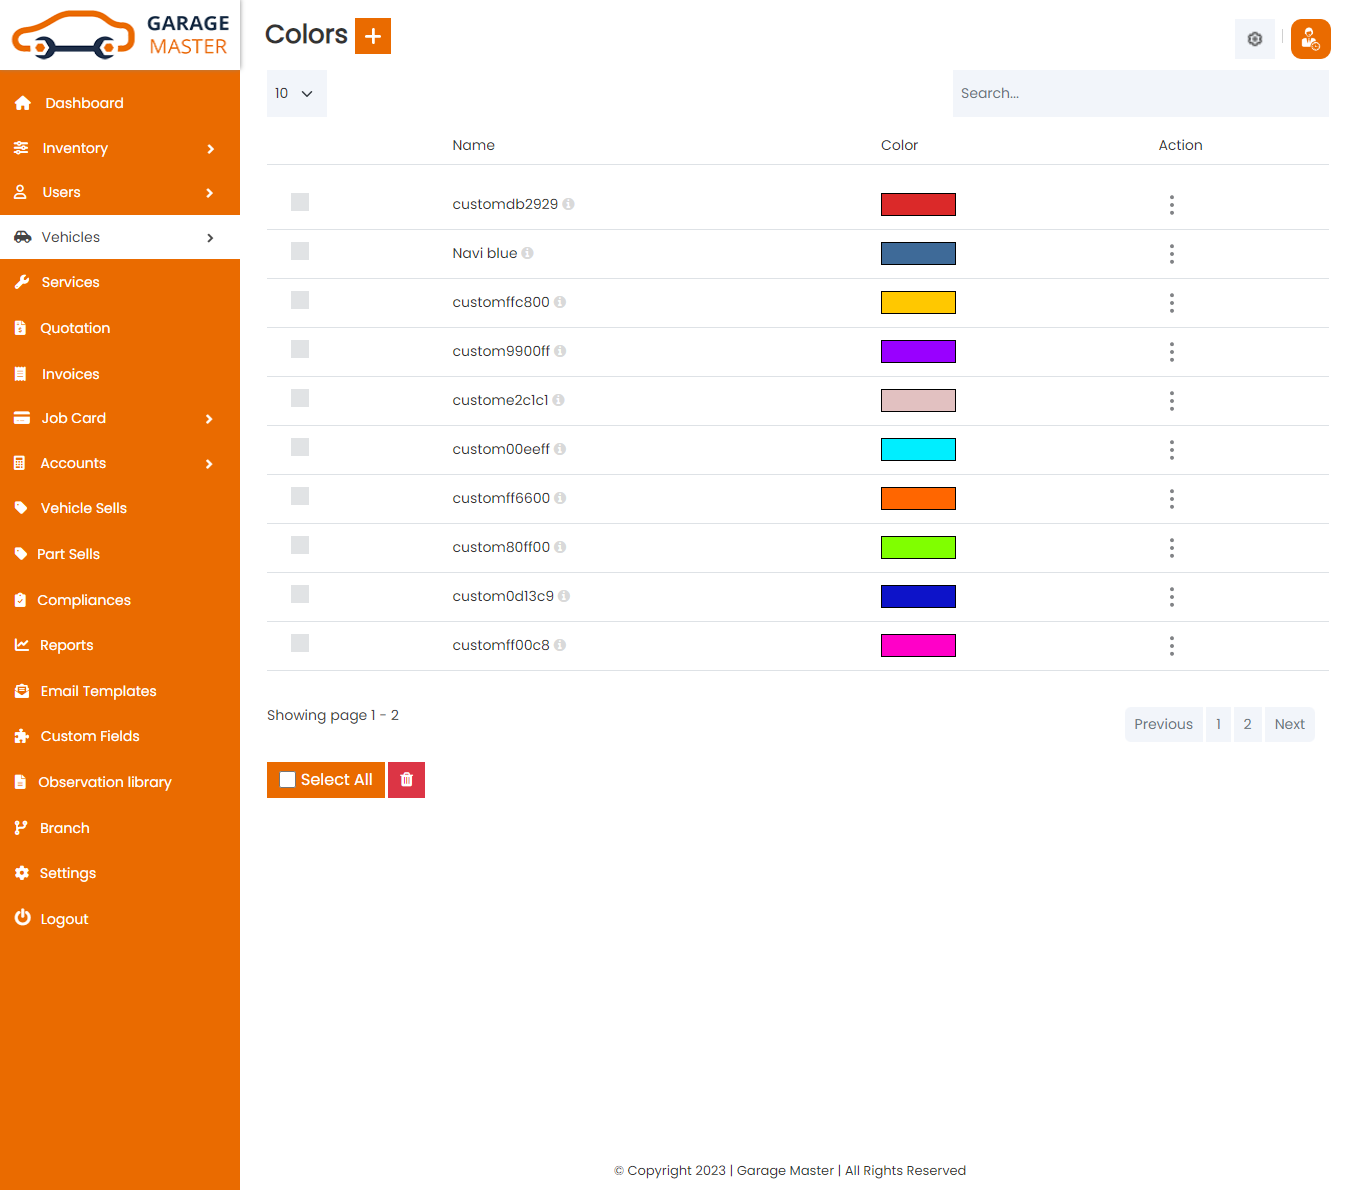
Add Color: Support Staff can add color details
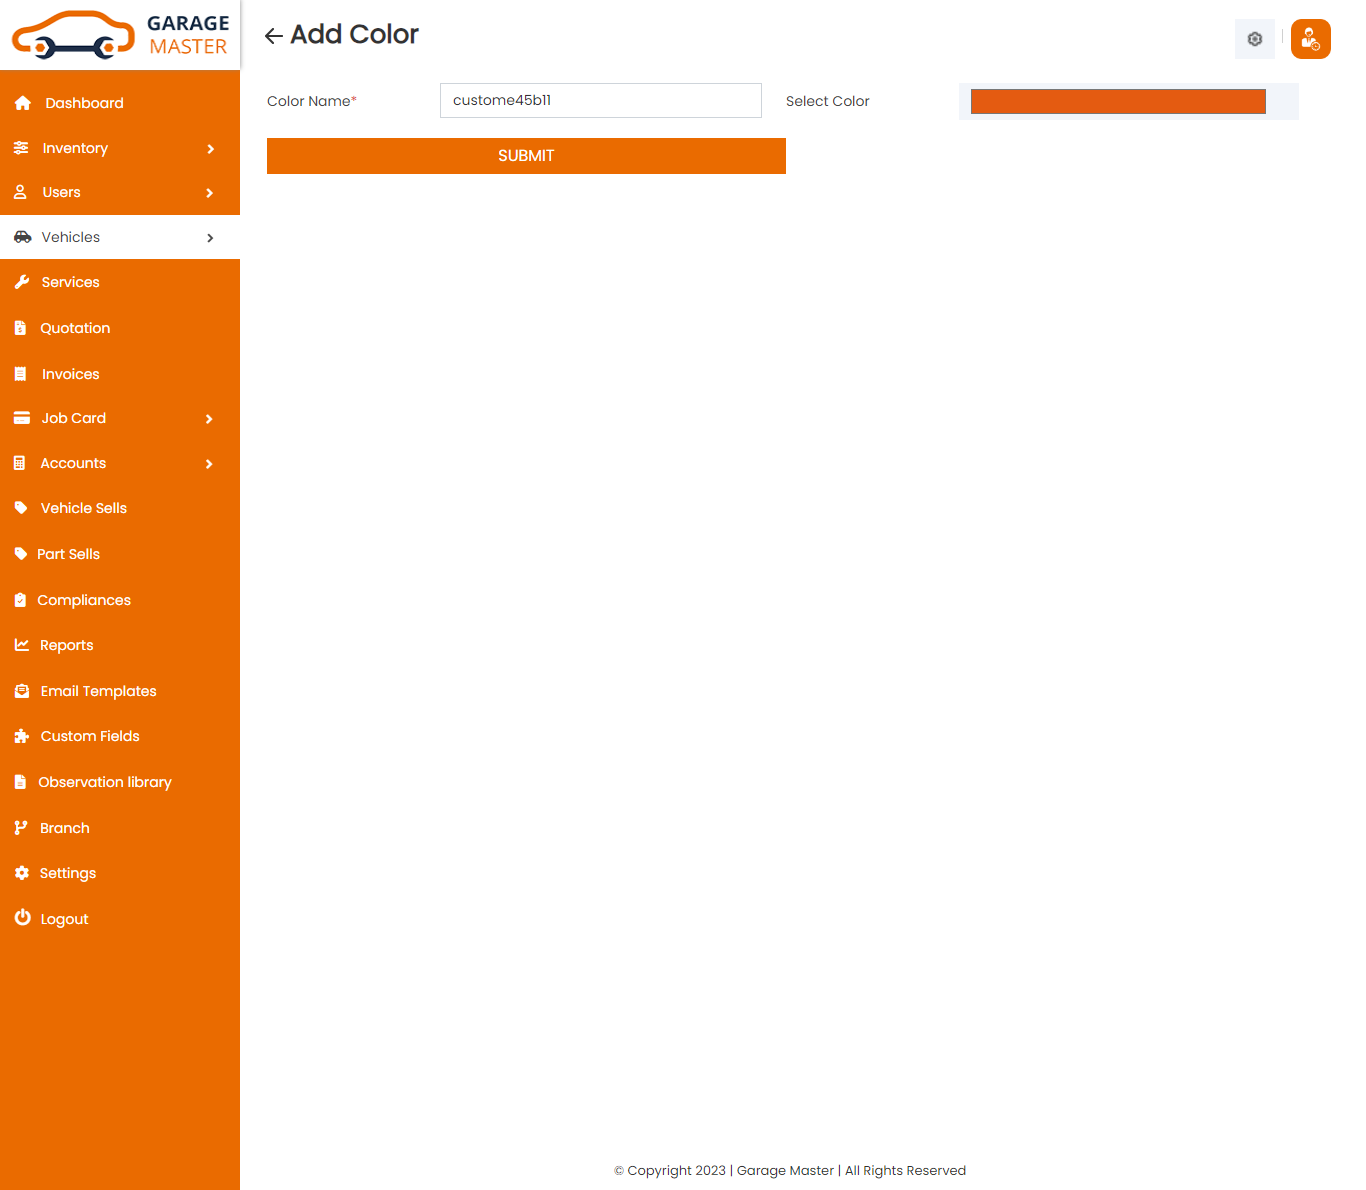
- Color Name: Enter a new color name for this color.
Edit Color: Support Staff can Edit detail of particular color by clicking on Edit detail button. This will open up details. From here Support Staff can Change color Details.

Delete Color: Support Staff can delete a complete list of all color and delete detail of particular color by clicking on delete detail button. This will delete details.
6)Service
Service
Service List: Support Staff can add new Service, manage all Service and view a complete list of all Service.

Add Service: Support Staff can add Service details

- Jobcard Number: Job card number auto generated.
- Customer Name: Select customer name for this service.
- Vehicle Name: Select vehicle name for this service.
- Date: Enter a new date for this service.
- Title: Enter a new title for this service.
- AssignTo: Select assign to for this service.
- Repair Category: Select repair category for this service.
- Service Type: Select service type for this service.
- Details: Enter a new details for this service.
- Fix Service Charge : Enter a new fix service charge for this service.
- Registration number: Enter a new registration number for this service.
- Car Damage Marker: Add Car damage marker in given image
- Pre-Inspection checklist: Add Pre-Inspection checklist details based on damage marker
- MOT Test: Tick this check box for vehicle MOT testing.
- Job card Number: Job card number auto fields.
- In Date/Time: In date/time auto fields.
- Expected out date/time: Enter a new expected out date/time for this jobcard.
- Name: Name auto fields.
- Address: Address auto fields.
- Contact Number: Contact number auto fields.
- Email: Email auto fields.
- Model Name: Model name auto fields.
- Chassis Number: Chassis number auto fields.
- Engine Number: Engine number auto fields.
- KMS Run: Enter a new KMS run for this jobcard.
- Date of Sales: Date of sales auto fields.
- Color: Color auto fields.
- Add New:Select and Add new observation point for this jobcard in given dropdown.
- Observation Point:Selected observation points
- MOT Test View: Show details for MOT
testing.
Step 1: Fill MOT Details : Here fill MOT testing details for vehicle.
Step 2: Show Filled MOT Details : Now show here filled MOT testing details, which one is filled.
Step-1: Add Service Details.
Step-2: Add Job card Details.

Customer Details
Vehicle Details
Observation List
MOT Test
Edit Service: Support Staff can Edit detail of particular Service by clicking on Edit detail button. This will open up details. From here Support Staff can Change Service Details.

View Service: Support Staff can view a complete list of all Service and view detail of particular Service by clicking on view detail button. This will open up details.
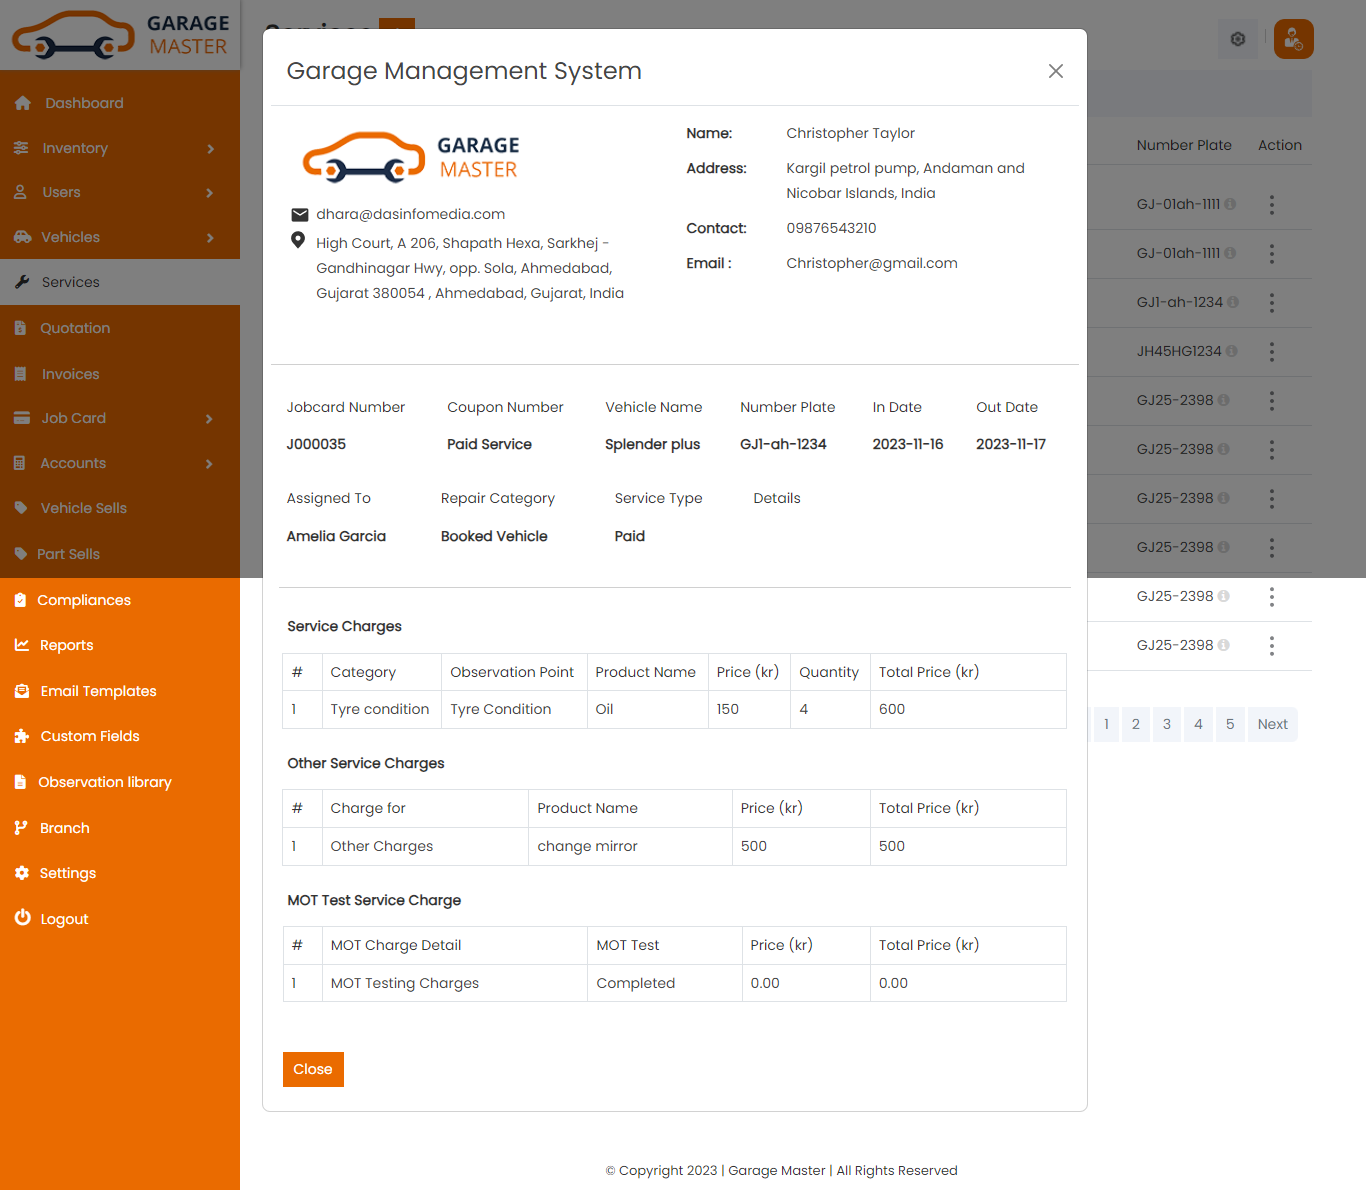
Delete Service: Support Staff can delete a complete list of all Service and delete detail of particular Service by clicking on delete detail button. This will delete details.
Quotation
Quotation List: Support Staff can add new Quotation, and view a complete list of all Quotations and process them.

Add Quotation: Support Staff can add Quotation

Add Items In Quotation: Support Staff can add Quotation items in the quotation details and then he can make quotation as final done by checking final process checkbox. And once quotation is final submited that quotation comes in jobcard list for the further process

7)Invoice
Invoice
Invoice List: Support Staff can add a new invoice, invoice all invoice and view a complete list of all invoice.

Add Invoice: Support Staff can add invoice details
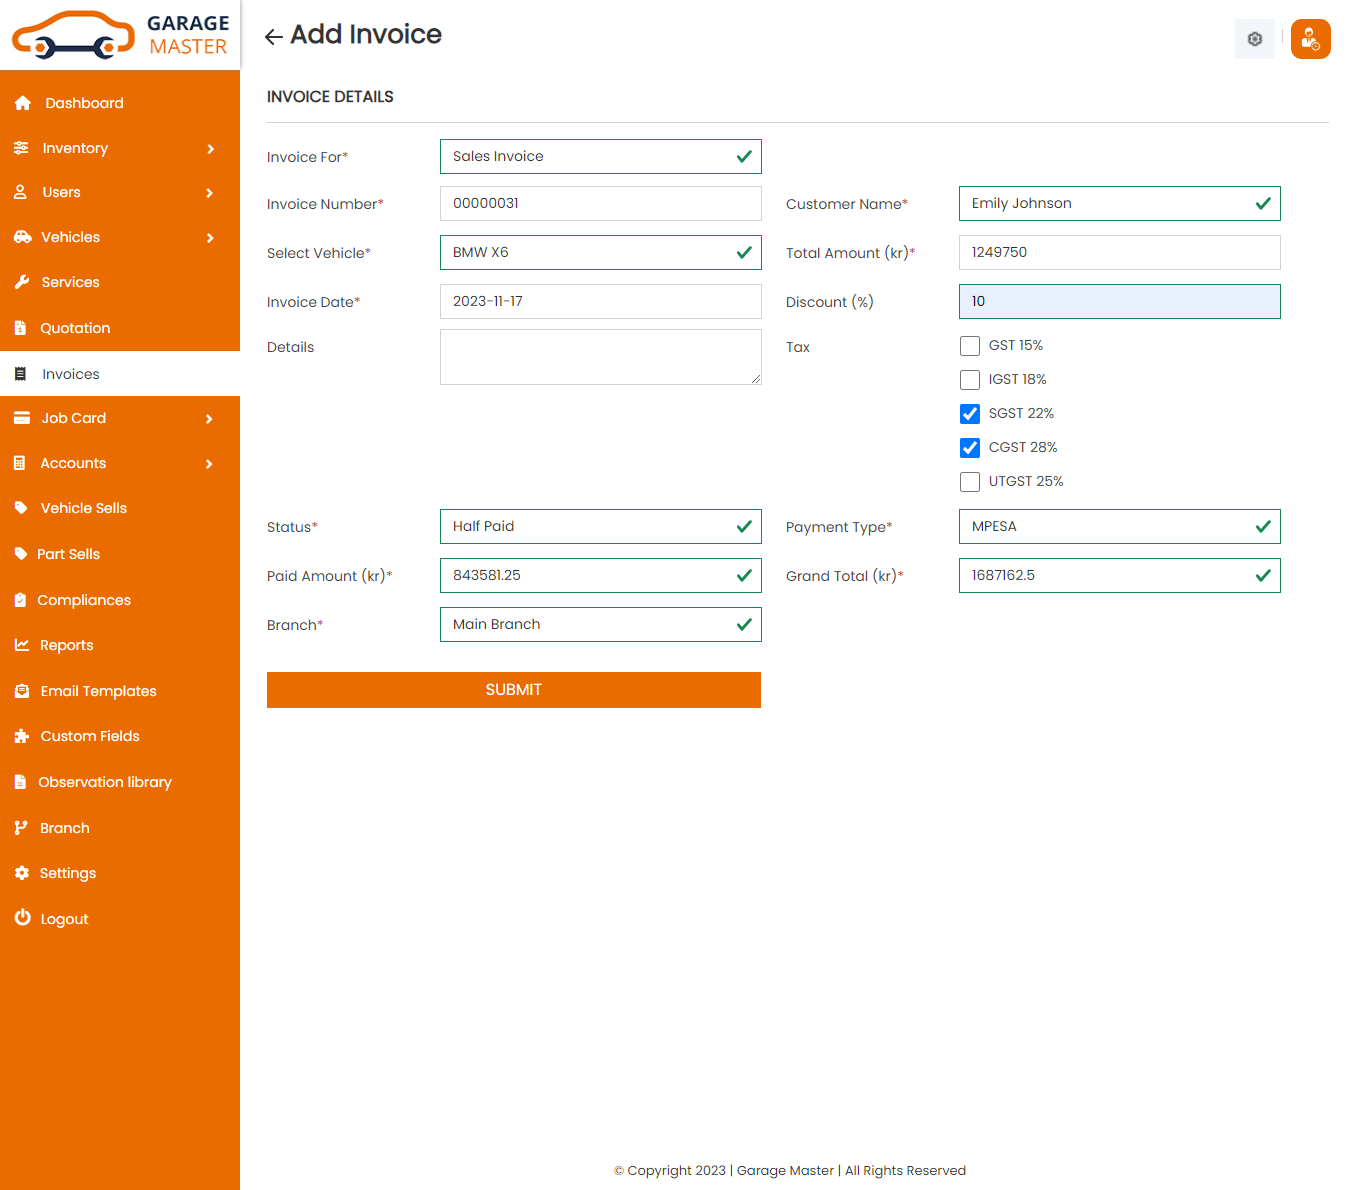
- Invoice for: Select invoice type for this invoice.
- Invoice Number: Invoice number auto generated.
- Customer Name: Select customer name for this invoice.
- Job card Number: Select job card number for this invoice.
- Date: Enter a new date for this invoice.
- Total Amount: Select job card and auto generated total amount.
- Payment Type: Select payment type for this invoice.
- Status: Select status for this invoice.
- Discount(%): Enter a new discount for this invoice.
- Details: Enter a new details for this invoice.
- Tax: Select tax for this invoice.
- Paid Amount: Enter a new paid amount for this invoice.
- Grand Total: Select customer name and job card in auto generated grand total.
Edit invoice: Support Staff can Edit detail of particular invoice by clicking on Edit detail button. This will open up details. From here Support Staff can Change invoice Details.
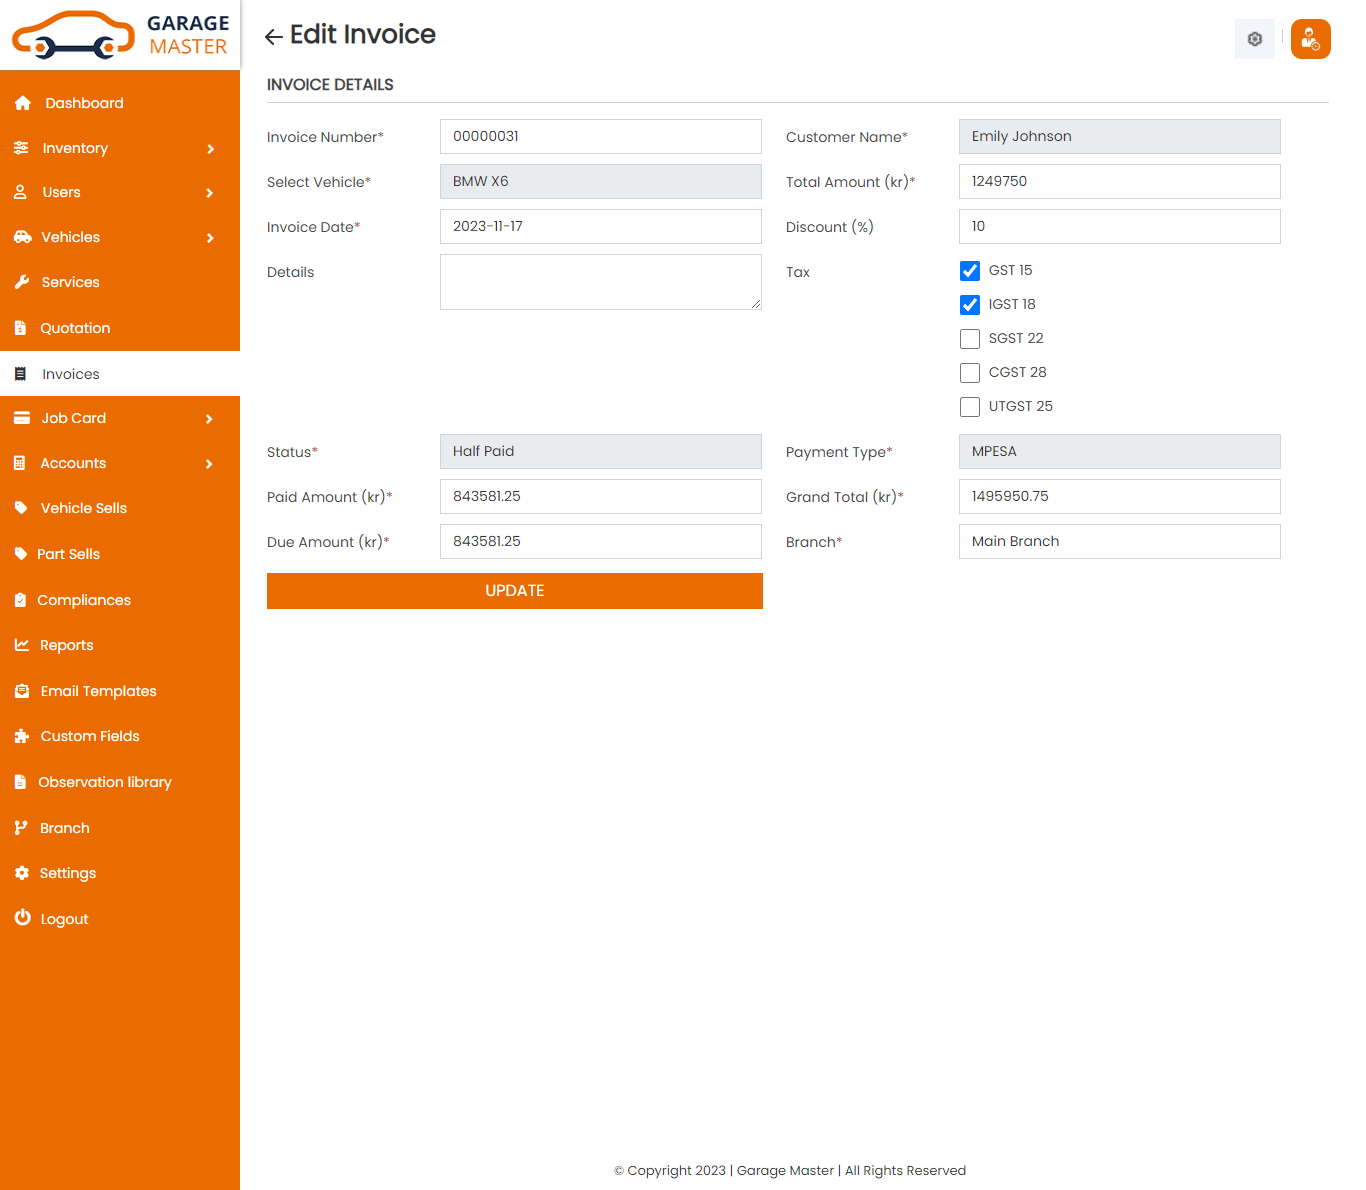
View invoice: Support Staff can view a complete list of all invoice and view detail of particular invoice by clicking on view detail button. This will open up details.From here Support Staff can also Print Out view invoice.

Delete invoice: Support Staff can delete a complete list of all invoice and delete detail of particular invoice by clicking on delete detail button. This will delete details.
Pay Invoice: Support Staff can pay invoice details
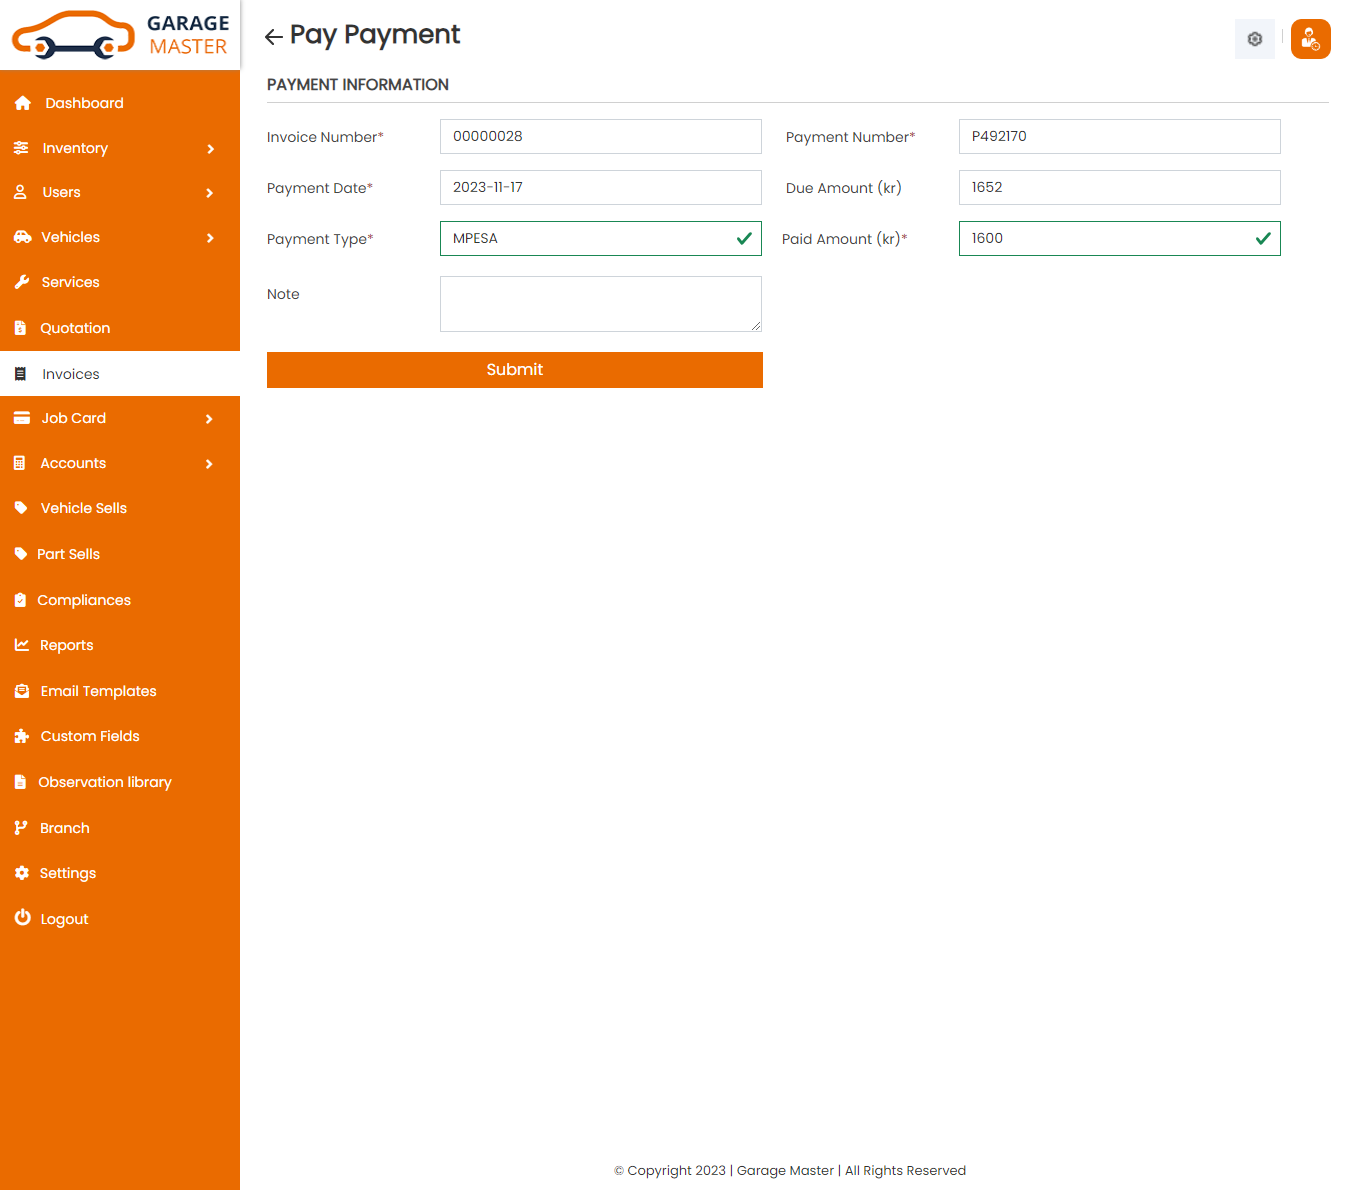
- Invoice Number: Invoice number auto generated.
- Payment Number: Payment number auto generated.
- Payment Date: Enter a new payment date for this pay invoice.
- Amount Due : Amount due auto generated.
- Payment Type: Select payment type for this pay invoice.
- Amount Received: Enter a new amount received for this pay invoice.
- Note:Enter a new note for this pay invoice.
Payment Information
Payment History: Support Staff can view a complete list of all invoice and Payment History of particular invoice by clicking on Payment History detail button. This will open up details.
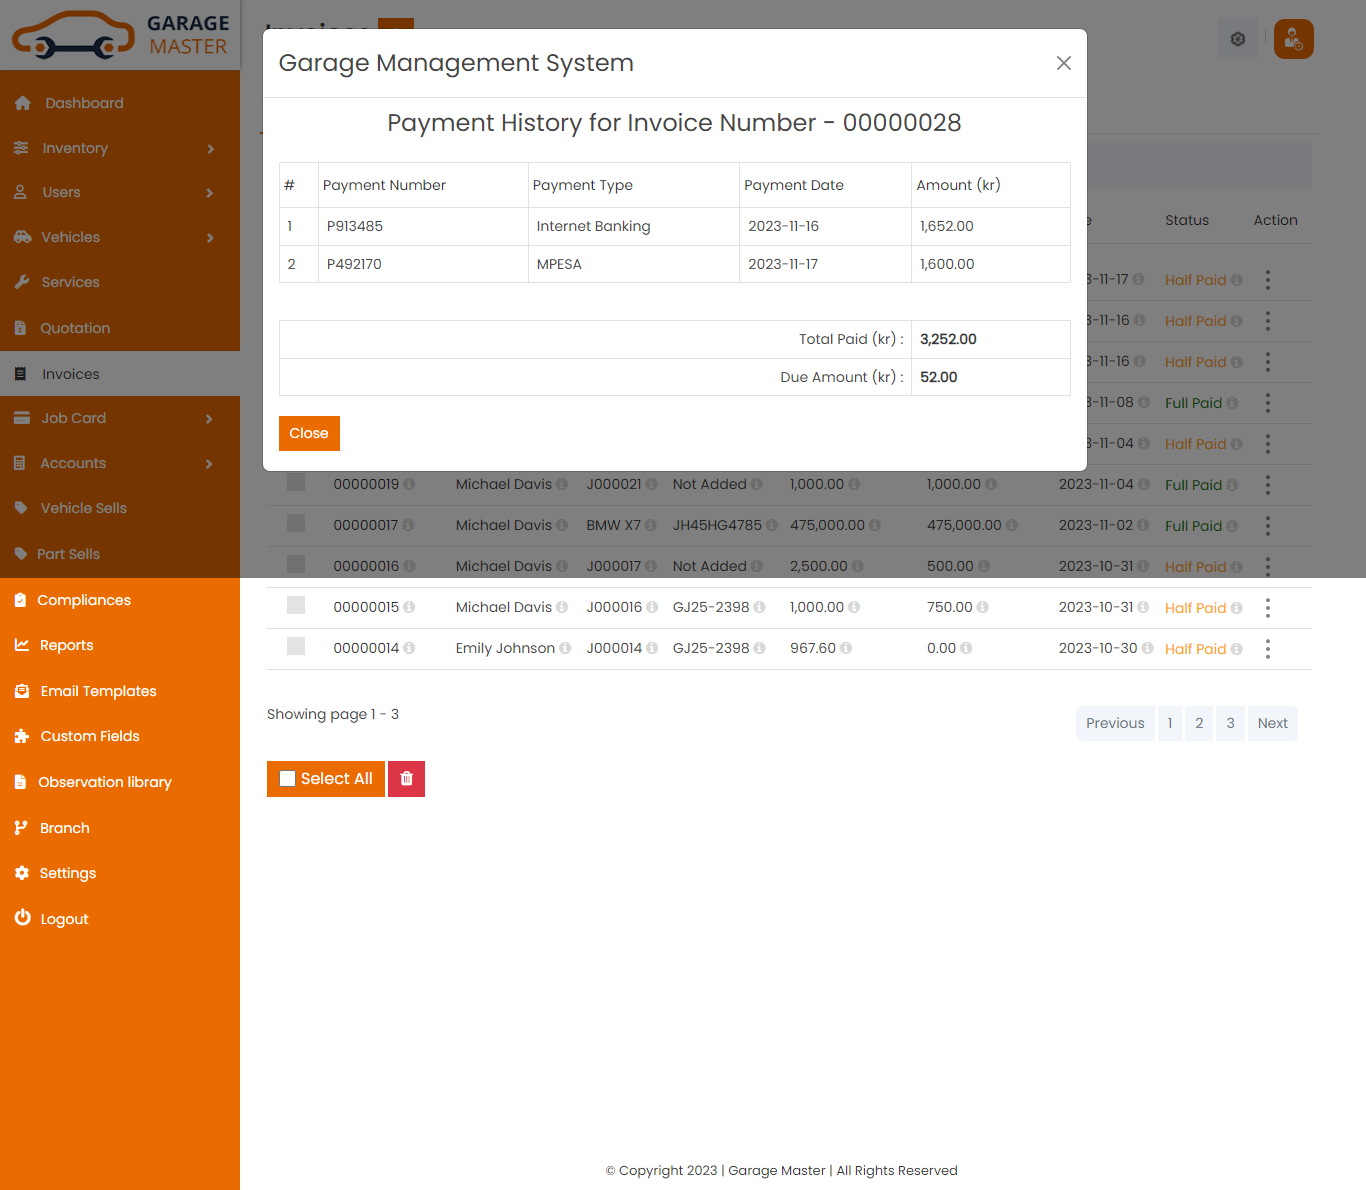
8)Job card
A)job card
Jobcard List: Support Staff can add new job card, manage all job card and view a complete list of all job card

Add job card: Support Staff can add job card details

Step-1: Add Service Details.
- Job card Number: Job card number auto generated.
- Customer Name: Select customer name for this service.
- Vehicle Name: Select vehicle name for this service.
- Date: Enter a new date for this service.
- Title: Enter a new title for this service.
- AssignTo: Select assignto for this service.
- Repair Category: Select repair category for this service.
- Service Type: Select service type for this service.
- Details: Enter a new details for this service.
- Fix Service Charge : Enter a new fix service charge for this service.
- Registration number: Enter a new registration number for this service.
- Car Damage Marker: Add car damage marker on given image.
- Pre-Inspection Checklist: Add Pre-Inspection checklist points based on damage marker
- Job card Number: Job card number auto fields.
- In Date/Time: In date/time auto fields.
- Expected out date/time: Enter a new expected out date/time for this service.
- Name: Name auto fields.
- Address: Address auto fields.
- Contact Number: Contact number auto fields.
- Email: Email auto fields.
- Model Name: Model name auto fields.
- Chassis Number: Chassis number auto fields.
- Engine Number: Engine number auto fields.
- KMS Run: Enter a new KMS run for this service.
- Date of Sales: Date of sales auto fields.
- Color: Color auto fields.
- AssignTo: Select assign to for this service.
- Add New: Select and Add new observation point for this service in given dropdown.
- Observation Point: Selected observation point L
Step-2: Add Job card Details.

Customer Details
Vehicle Details
Observation List
Process Job: Support Staff can add and edit Process job detail of particular job card by clicking on process job detail button. This will open up details. From here Support Staff can add and edit process job Details.

- Job card Number: Job card number auto fields.
- In Date/Time: In date/time auto fields.
- Expected out date/time: Enter a new expected out date/time for this service.
- Name: Name auto fields.
- Address: Address auto fields.
- Contact Number: Contact number auto fields.
- Email: Email auto fields.
- Model Name: Model name auto fields.
- Chassis Number: Chassis number auto fields.
- Engine Number: Engine number auto fields.
- KMS Run: Enter a new KMS run for this service.
- Date of Sales: Date of sales auto fields.
- Color: Color auto fields.
- Add New: Add new observation point for this service.
- Observation Point: List of the observation point.
- Category: Category auto field.
- observation point: Observation point auto field.
- Product: Select product for this job card.
- Price: Select product and auto generated price
- Quantity: Enter a new quantity for this job card.
- Amount: Select product and quantity and auto generated total price.
- Chargeable: Select chargeable for this service.
- Action: Delete product for this service.
- Add New: Add new other service charges for this service.
- Product: Enter a new product for this service.
- Price: Enter a new price for this service.
- action: Delete other service charges for this service.
Processing job for particular job card
Customer Details
Vehicle Details
Observation List
Other Service Charges
Create Invoice: Support Staff can create invoice details

- Invoice for: Select invoice type for this invoice.
- Invoice Number: Invoice number auto generated.
- Customer Name: Select customer name for this invoice.
- Job card Number: Select job card number for this invoice.
- Date: Enter a new date for this invoice.
- Total Amount: Select job card and auto generated total amount.
- Payment Type: Select payment type for this invoice.
- Status: Select status for this invoice.
- Discount(%): Enter a new discount for this invoice.
- Details: Enter a new details for this invoice.
- Tax: Select tax for this invoice.
- Paid Amount: Enter a new paid amount for this invoice.
- Grand Total: Select customer name and job card in auto generated grand total.
View invoice: Support Staff can view a complete list of all job card and view detail of particular invoice by clicking on view invoice detail button. This will open up details.From here Support Staff can also Print Out view invoice.
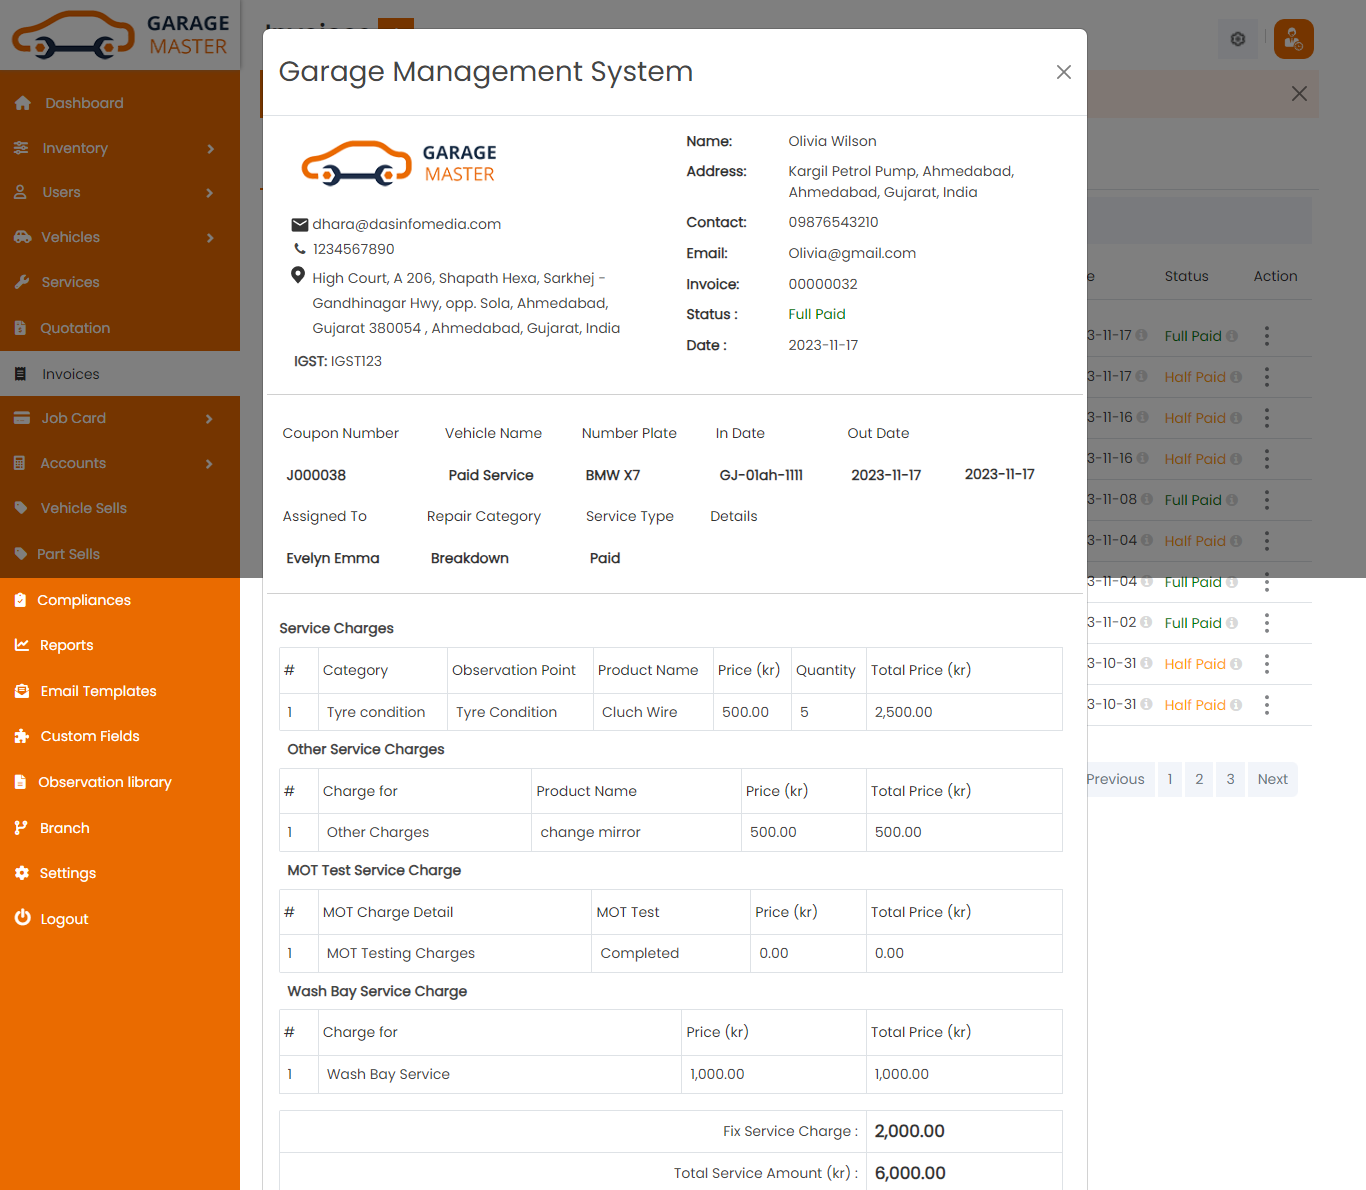
Gate Pass: Support Staff can add gate pass details
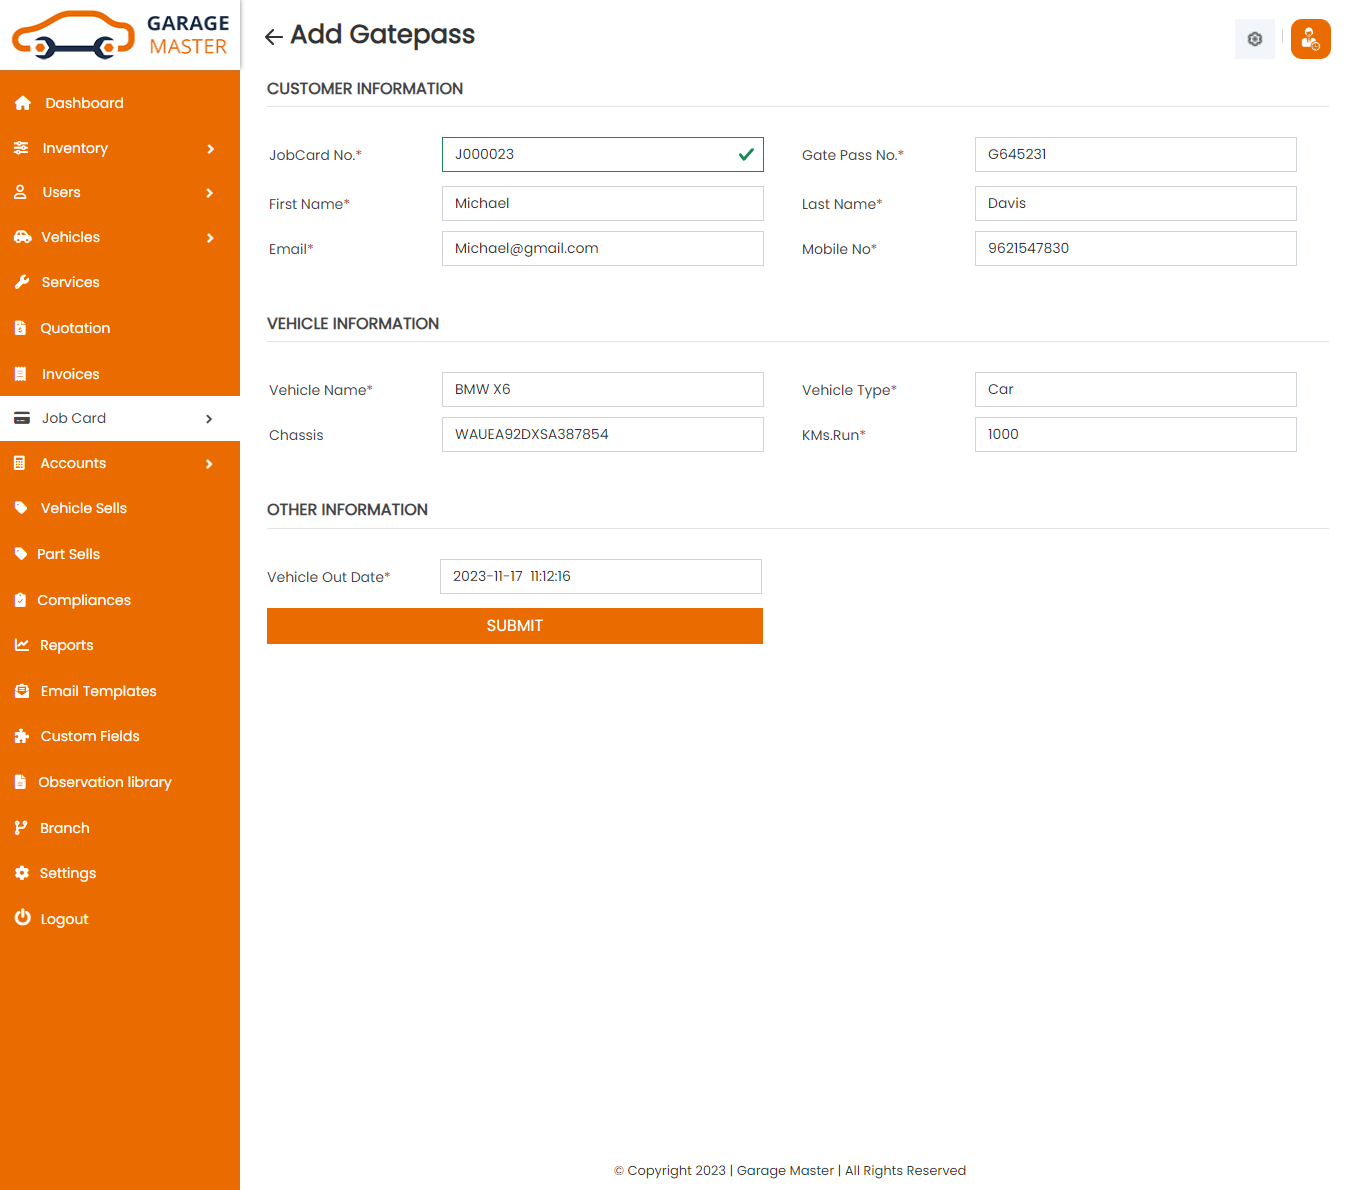
- Job card Number: Job card number auto field.
- Gate Pass Number : Gate pass number auto generated.
- First Name: First name auto field.
- last Name: last name auto field.
- Email: Email auto field.
- Mobile number: Mobile number auto field.
- Model Name: Model name auto fields.
- Vehicle Type: Vehicle type auto fields.
- Chassis Number: Chassis number auto fields.
- KMS Run: Enter a new KMS run for this gate pass.
- Service Out Date: Enter a new service out date for this gate pass.
Customer Information
Vehicle Information
Other Information
Gate Receipt: Support Staff can view a complete list of all Gate Receipt and view detail of particular Gate Receipt by clicking on Gate Receipt detail button. This will open up details.From here Support Staff can also Print Out Gate Receipt.

B)Gate Pass
GatePass List: Support Staff can add new gate pass, manage all gate pass and view a complete list of all gate pass

Add GatePass: Support Staff can add gate pass details
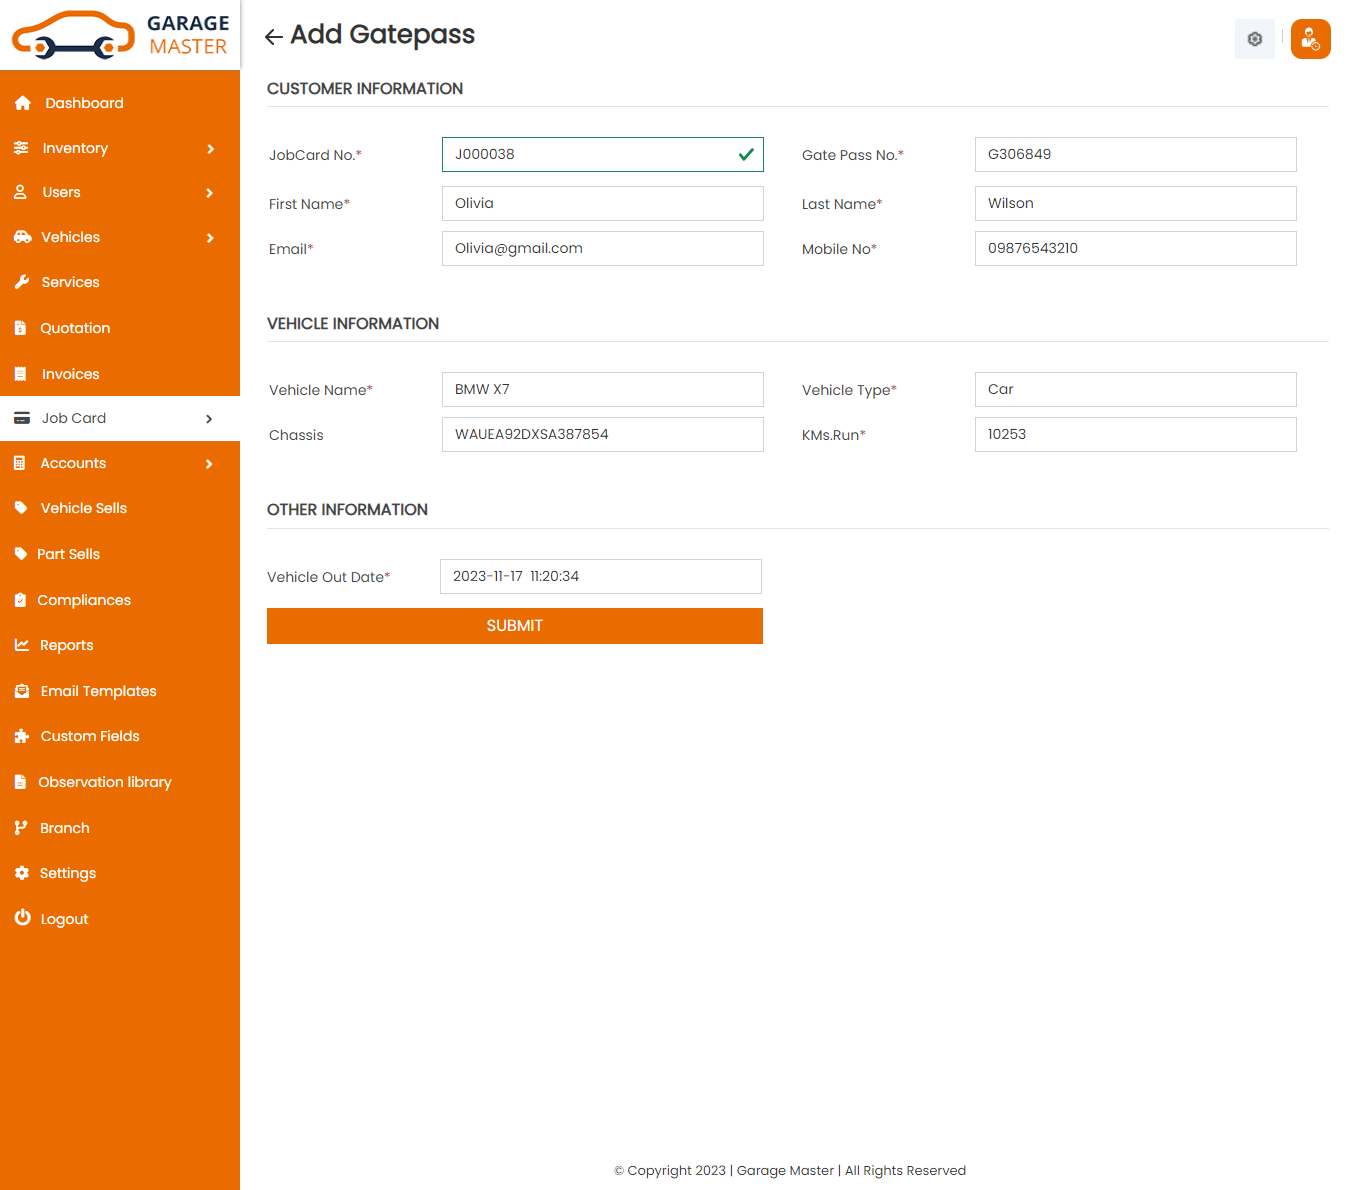
- Job card Number: Select job card for this gate pass.
- Gate Pass Number: Gate pass number auto generated.
- First Name: First name auto field.
- last Name: last name auto field.
- Email: Email auto field.
- Mobile number: Mobile number auto field.
- Vehicle Name: Model name auto fields.
- Vehicle Type: Vehicle type auto fields.
- Chassis Number: Chassis number auto fields.
- KMS Run: Enter a new KMS run for this gate pass.
- Vehicle Out Date: Enter a new vehicle out date for this gate pass.
Customer Information
Vehicle Information
Other Information
Edit Gate pass: Support Staff can Edit detail of particular gate pass by clicking on Edit detail button. This will open up details. From here Support Staff can Change gate pass Details.
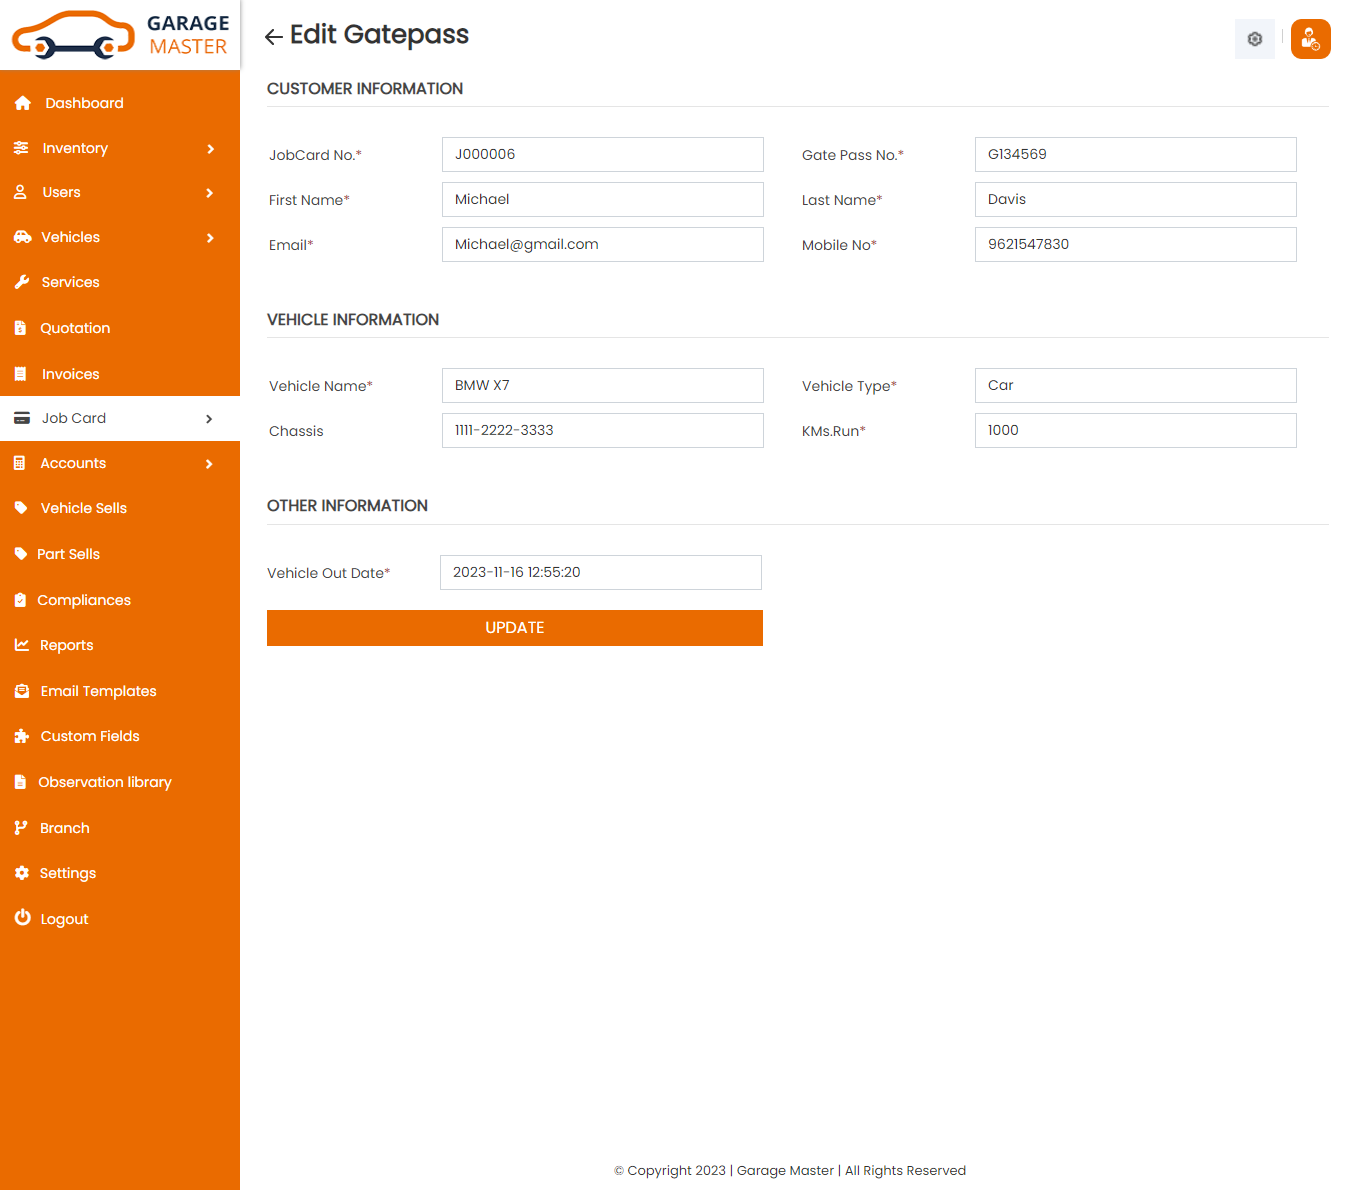
Gate Receipt: Support Staff can view a complete list of all Gate Receipt and view detail of particular Gate Receipt by clicking on Gate Receipt detail button. This will open up details.From here Support Staff can also Print Out Gate Receipt.

Delete Gate pass: Support Staff can delete a complete list of all gate pass and delete detail of particular gate pass by clicking on delete detail button. This will delete details.
9)Accounts & Tax Rates
A)Tax Rates
List Account Tax: Support Staff can add new account tax, account tax all account tax and view a complete list of all account tax.
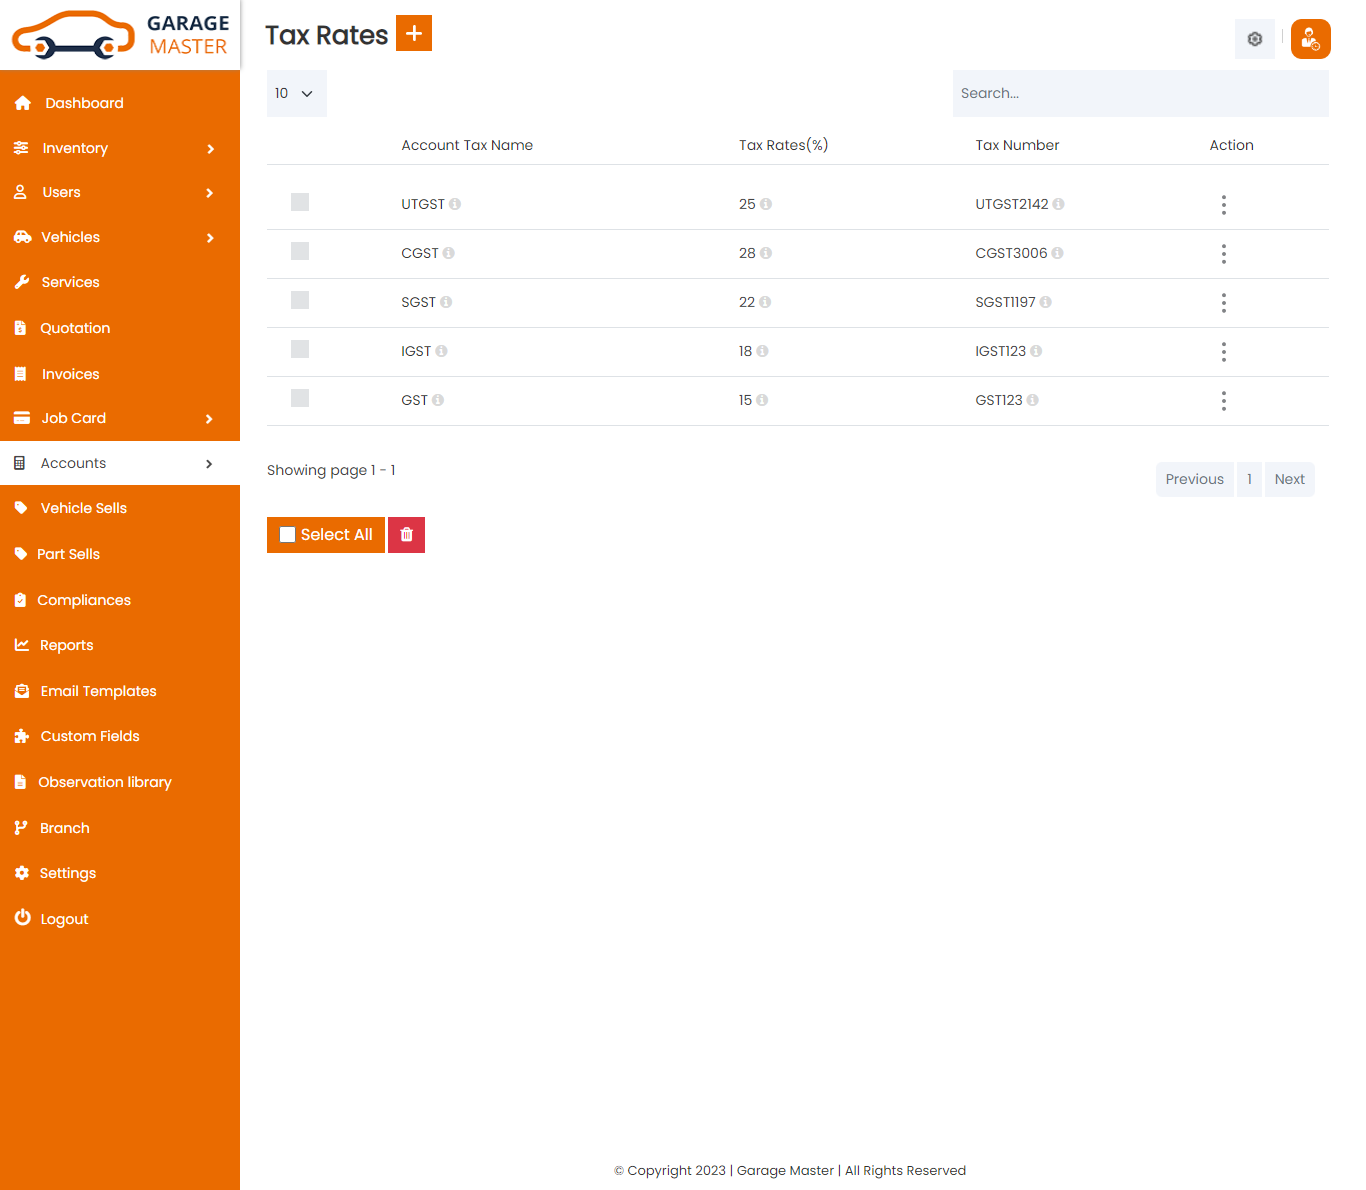
Add Account Tax: Support Staff can add Account Tax details
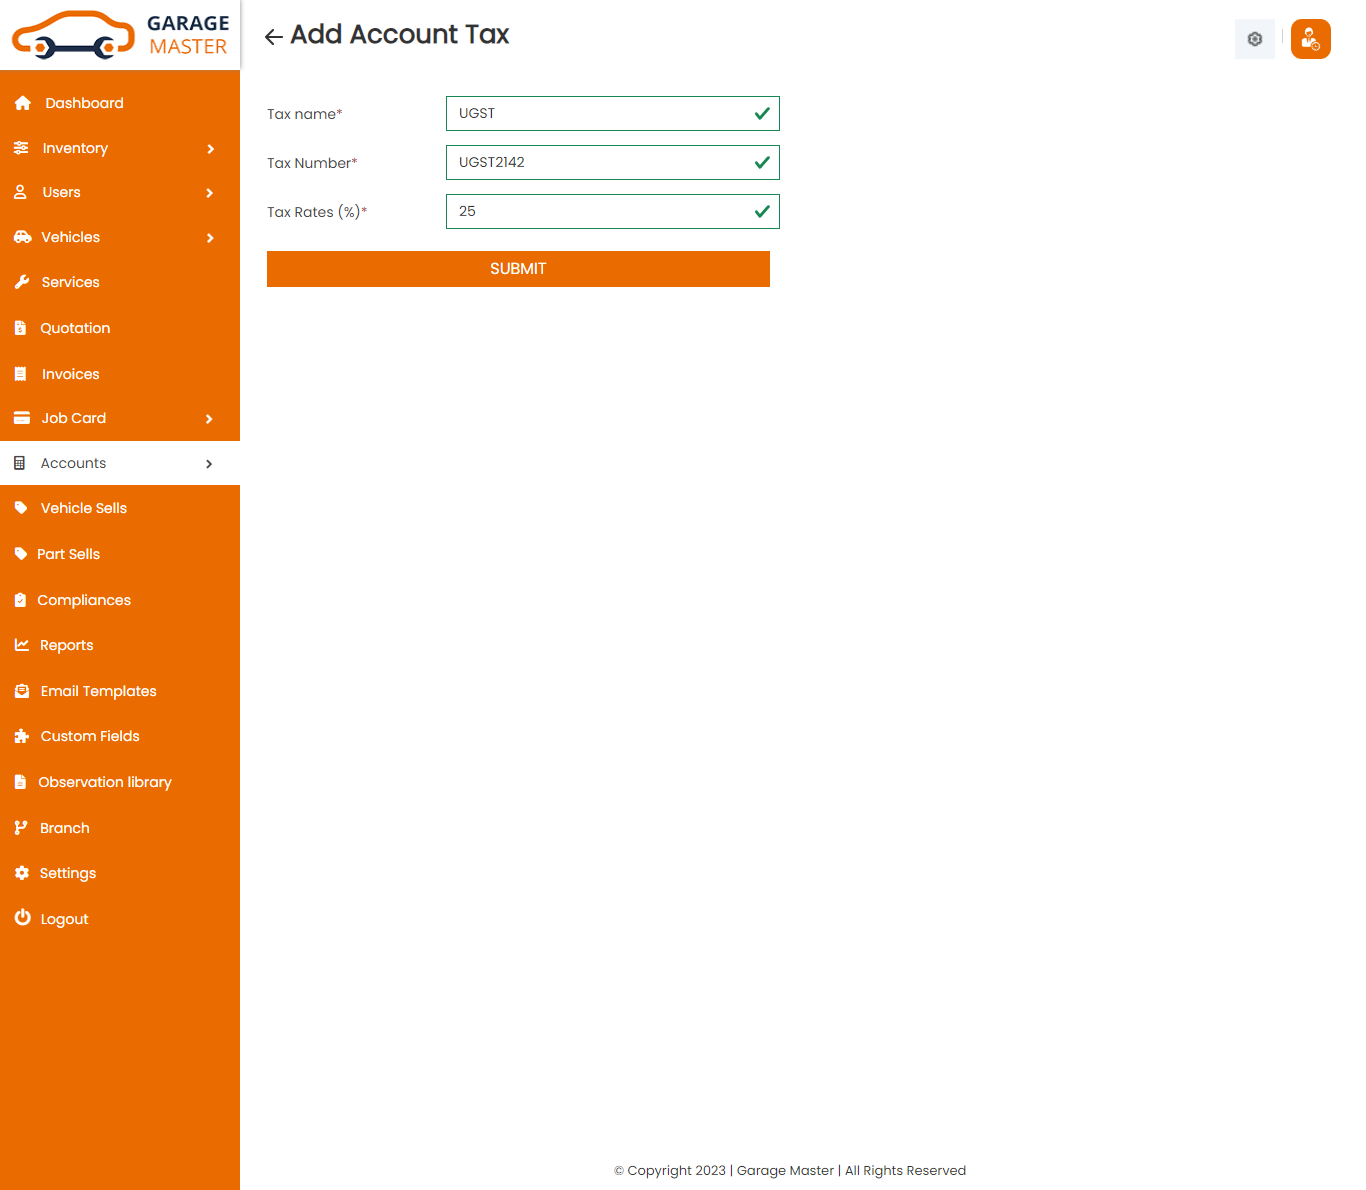
- Tax Name: Enter a new tax name for this account tax.
- Tax Rates: Enter a new tax rates for this account tax.
Edit Account Tax: Support Staff can Edit detail of particular account tax by clicking on Edit detail button. This will open up details. From here Support Staff can Change account tax Details.
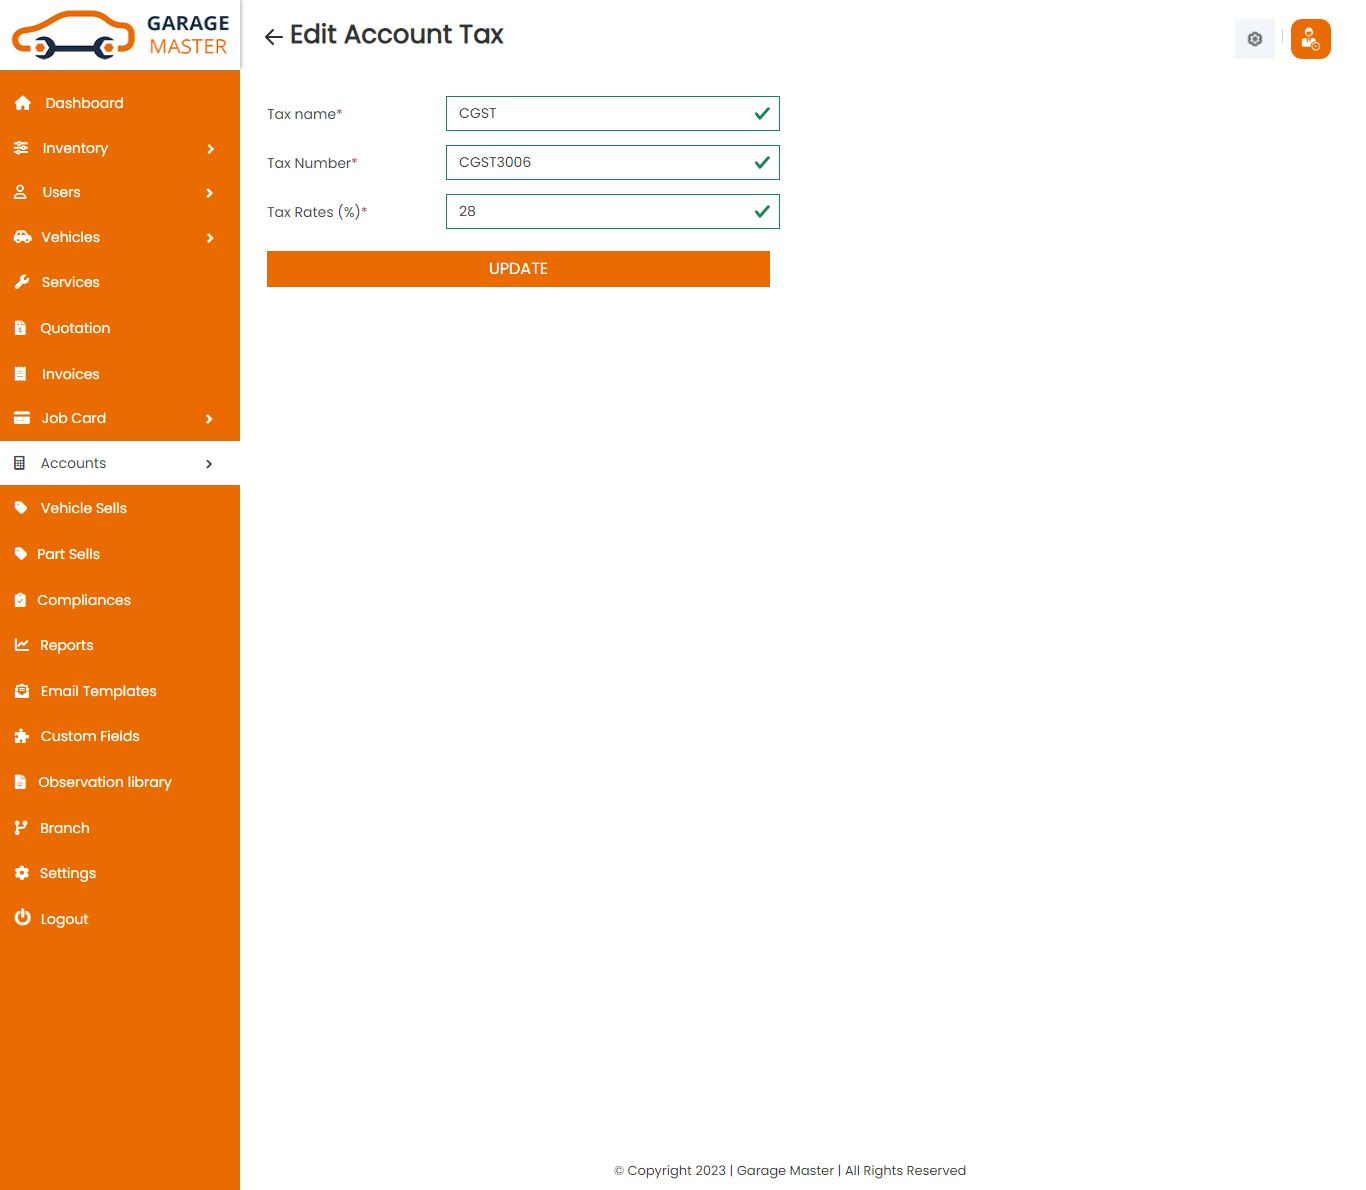
Delete Account Tax: Support Staff can delete a complete list of all account tax and delete detail of particular account tax by clicking on delete detail button. This will delete details.
B)Payment Method
List PaymentMethod: Support Staff can add new PaymentMethod, PaymentMethod all PaymentMethod and view a complete list of all PaymentMethod.

Add PaymentMethod: Support Staff can add paymentmethod details

- Payment type: Enter a new payment type for this paymentmethod.
Edit PaymentMethod: Support Staff can Edit detail of particular payment type by clicking on Edit detail button. This will open up details. From here Support Staff can Change payment type Details.

Delete PaymentMethod: Support Staff can delete a complete list of all payment type and delete detail of particular payment type by clicking on delete detail button. This will delete details.
C)Income
List Income: Support Staff can add new Income, Income all Income and view a complete list of all Income.

Add Income: Support Staff can add Income details

- Invoice Number: Select invoice number for this income.
- Outstanding Amount: Select invoice number and auto-generated outstanding amount.
- Status: Select status for this income.
- Main Label: Enter a new main label for this income.
- Date: Enter a new date for this income.
- PaymentType: Select paymenttype for this income.
- Income Entry: Enter a new income entry for this income.
- Income Label: Enter a new income label for this income.
- Add More Fields: Add new more fields click add income entry, income label for this income.
Income Details
Edit Income: Support Staff can Edit detail of particular income by clicking on Edit detail button. This will open up details. From here Support Staff can Change income Details.

Monthly Income: Support Staff can View Monthly Income details.
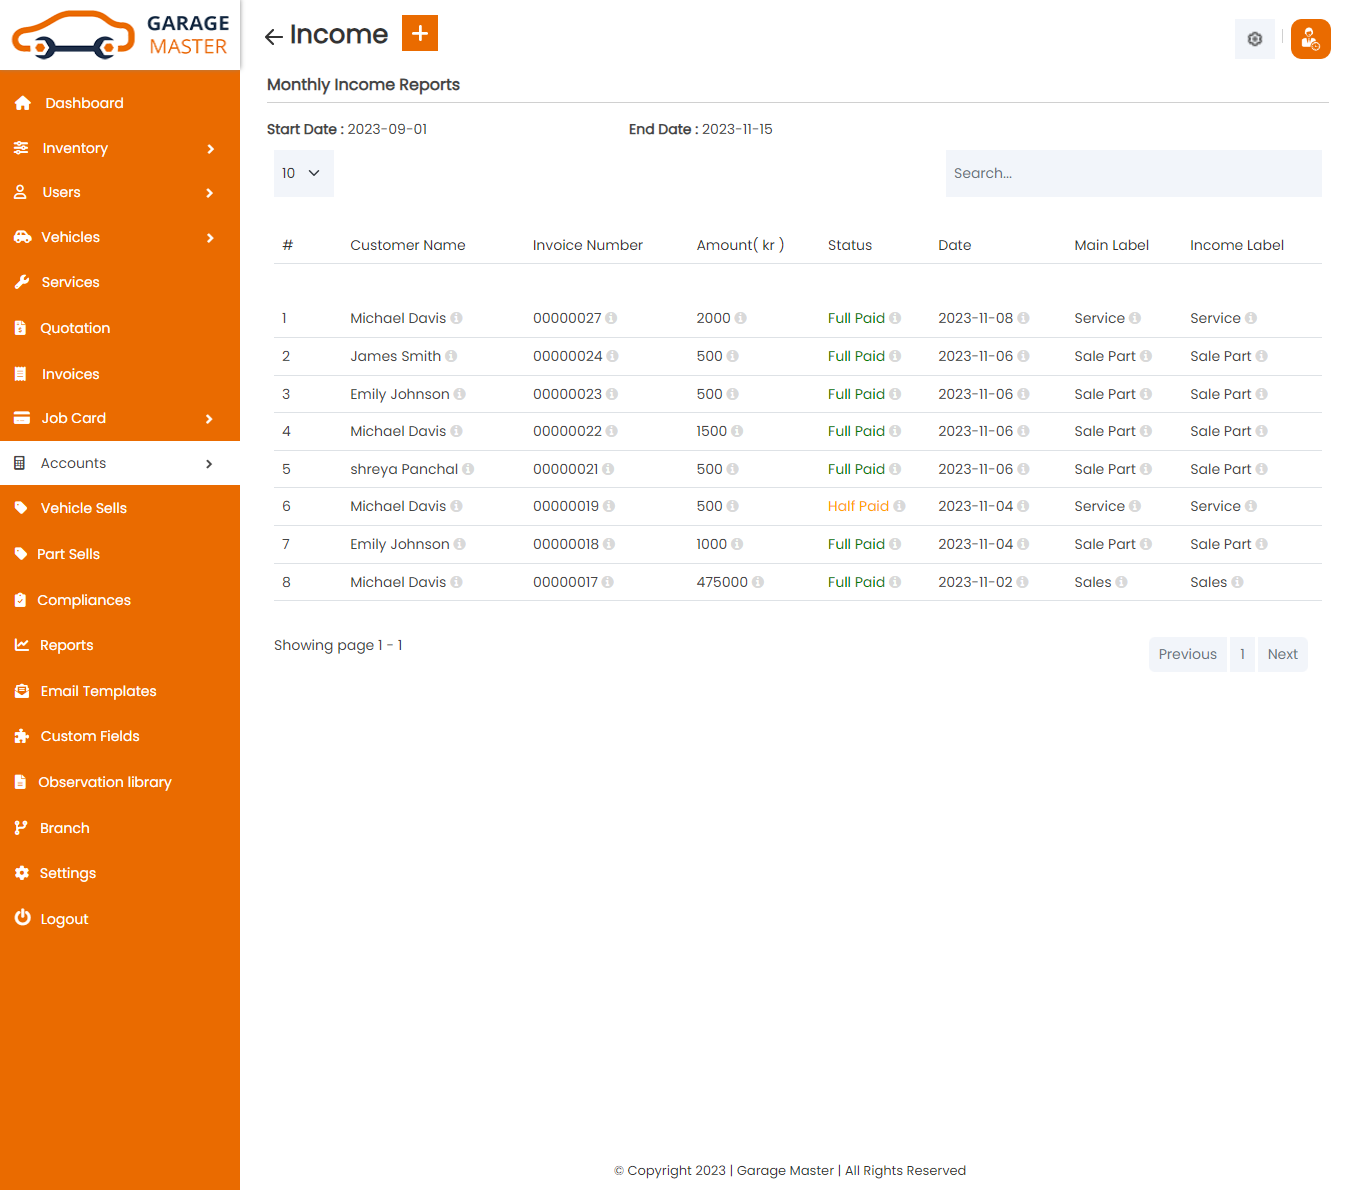
- start Date: Enter a new start date for this income.
- End Date: Enter a new end date for this income.
Income Details
Delete Income: Support Staff can delete a complete list of all Income and delete detail of particular Income by clicking on delete detail button. This will delete details.
D)Expenses
List Expenses: Support Staff can add new Expenses, Expenses all Expenses and view a complete list of all Expenses.

Add Expenses: Support Staff can add Expenses details

- Main Label: Enter a new main label for this expenses.
- Status: Select status for this expenses.
- Date: Enter a new date for this expenses.
- Expenses Entry: Enter a new expenses entry for this expenses.
- Expenses Label: Enter a new expenses label for this expenses.
- Add More Fields: Add New more fields click add expenses entry, expenses label for the expenses.
Expenses Details
Edit Expenses: Support Staff can Edit detail of particular Expenses by clicking on Edit detail button. This will open up details. From here Support Staff can Change Expenses Details.

Monthly Expenses: Support Staff can View Monthly Expenses details.
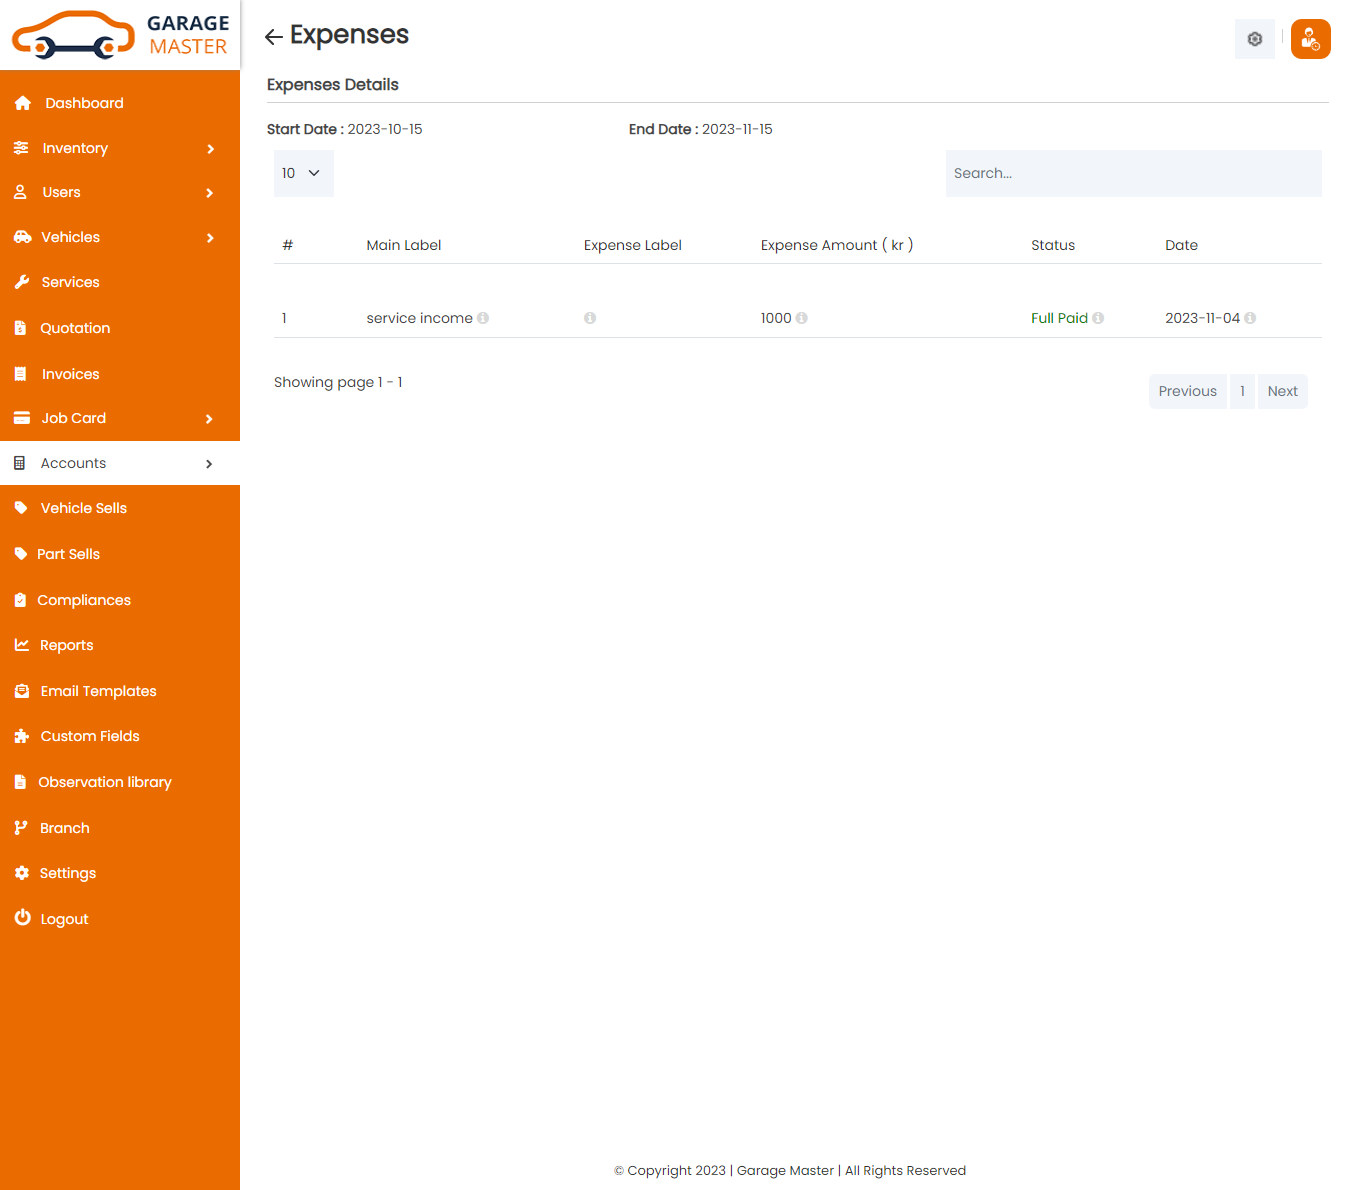
- start Date: Enter a new start date for this expenses.
- End Date: Enter a new end date for this expenses.
Expenses Details
Delete Expenses: Support Staff can delete a complete list of all Expenses and delete detail of particular Expenses by clicking on delete detail button. This will delete details.
10)Sells
Part Sells: Support Staff can add new sells, edit all sells and view a complete list of all sells.

Add Sells: Support Staff can add sells details

- Bill number: Bill number auto generated.
- Customer Name: Select customer name for this sales.
- Sales Date: Enter a new sales date for this sales.
- Quantity: Enter a new quantity for this sales.
- Price: Select product name and auto generated price.
- Total price: Select product name and quantity and auto generated total price.
- Salesman: Select salesman for this sales.
- Branch: Select branch for this sales.
Edit Sells: Support Staff can Edit detail of particular sells by clicking on Edit detail button. This will open up details. From here Support Staff can Change sells Details.

Create Invoice: Support Staff can Create invoice details

- Invoice for: Select invoice type for this invoice.
- Invoice Number: Invoice number auto generated.
- Customer Name: Select customer name for this invoice.
- Job card Number: Select job card number for this invoice.
- Date: Enter a new date for this invoice.
- Total Amount: Select job card and auto generated total amount.
- Payment Type: Select paymenttype for this invoice.
- Status: Select status for this invoice.
- Discount(%): Enter a new discount for this invoice.
- Details: Enter a new details for this invoice.
- Tax: Select tax for this invoice.
- Paid Amount: Enter a new paid amount for this invoice.
- Grand Total: Select customer name and job card in auto generated grand total.
View Invoice: Support Staff can view a complete list of all sells and view detail of particular sells by clicking on view detail button. This will open up details.

Delete Sales: Support Staff can delete a complete list of all sells and delete detail of particular sells by clicking on delete detail button. This will delete details.
11)Compliance Management
Compliance Management
List Of RTO Taxes: Support Staff can add new RTO Taxes, RTO Taxes all RTO Taxes and view a complete list of all RTO Taxes.

Add RTO Taxes: Support Staff can add RTO Taxes details

- Select Vehicle: Select vehicle for this RTO taxes.
- RTO/Registration C.R Temp Tax: Enter a new RTO/registration C.R temp tax for this RTO taxes.
- Number Plate Charge: Enter a new number plate charge for this RTO taxes.
- Municipal Road Tax: Enter a new municipal road tax for this RTO taxes.
Edit RTO Taxes: Support Staff can Edit detail of particular RTO Taxes by clicking on Edit detail button. This will open up details. From here Support Staff can Change RTO Taxes Details.

Delete RTO Taxes: Support Staff can delete a complete list of all RTO Taxes and delete detail of particular RTO Taxes type by clicking on delete detail button. This will delete details.
12)Report
A)Service Report
You can start date and end date of view Service report.

- Start Date: Enter a new start date for this service report.
- End Date: Enter a new end date for this service report.
- Select Service: Select service for this service report.
When clicking on GO button. This will open Start Date and End date Between In Service Report and Service list.
You can easily download pdf and print these report.
B)Product Stock
You can Manufacturer Name and Product Name of view Product stock report.

- Select Manufacturer Name: Select manufacturer name for this product stock.
- Select Product Name: Select product name for this product stock.
When clicking on GO button. This will open In Product stock list.
You can easily download pdf and print these report.
C)Product Usage
You can start date and end date of view Product Usage report.

- Start Date: Enter a new start date for this product usage report.
- End Date: Enter a new end date for this product usage report.
- Select Manufacturer Name: Select manufacturer name for this product usage report.
- Select Product Name: Select product name for this product usage report.
When clicking on GO button. This will open Start Date and End date Between In Product Usage list.
View Product Usage: Accountant can view a complete list of all Product Usage and view detail of particular Product Usage by clicking on view detail button. This will open up details.
You can easily download pdf and print these report.
D)Employee Service Report
You can start date and end date of view Employee Service report.

- Start Date: Enter a new start date for this employee service report.
- End Date: Enter a new end date for this employee service report.
- Select Employee: Select employee for this employee service report.
When clicking on GO button. This will open Start Date and End date Between In Employee service Report and employee service list.
E)Upcoming Service Report
You can start date and end date of view Upcoming Service report.

- Start Date: Enter a new start date for this upcoming service report.
- End Date: Enter a new end date for this upcoming service report.
When clicking on GO button. This will open Start Date and End date Between In Upcoming service Report and Upcoming service list.
You can easily download pdf and print these report.
F)Email Sent Report
You can start date and end date of the view Email Sent report.

- Start Date: Enter a new start date for this Email Sent report.
- End Date: Enter a new end date for this Email sent report.
When clicking on GO button. This will open Start Date and End date Between In Email Sent Report and Email sent report list.
You can easily download pdf and print these report.
13)Email Template
EmailTemplate
Support Staff can set Email Template using this details.

14)Custom Field
Custom Field
List Custom Field: Support Staff can add new Custom Field, Custom Field all Custom Field and view a complete list of all Custom Field.

Add Custom Field: Support Staff can add Custom Field details.

- Form Name: Select form name for this custom field.
- Label: Enter a new label for this custom field.
- Type: Select type for this custom field.
- Required: Select required for this custom field.
- Always visible : Select always visible for this custom field.
Edit Custom Field: Support Staff can Edit detail of particular Custom Field by clicking on Edit detail button. This will open up details. From here Support Staff can Change Custom Field Details.

Delete Custom Field: Support Staff can delete a complete list of all Custom Field and delete detail of particular Custom Field by clicking on delete detail button. This will delete details.
15)Observation Library
Observation
Observation List: Support Staff can add new Observation, Observation all Observation and view a complete list of all Observation.

Add Observation: Support Staff can add Observation details

- Vehicle Name: Select multiple vehicles for this observation.
- Checkpoint Category: Select checkpoint category for this observation.
- Add Category: then click on add category button. you can add new add category from here.
- Checkpoint: Enter a new checkpoint for this observation.
- Add Checkpoint: then click on Add Checkpoint button. You can add new add checkpoint.
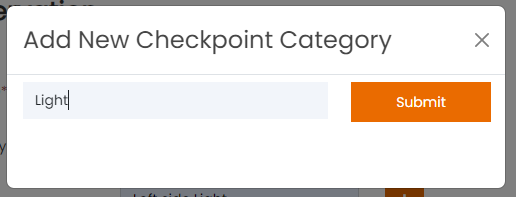
Edit Observation: Support Staff can Edit detail of particular Observation by clicking on Edit detail button. This will open up details. From here Support Staff can Change Observation Details.

Delete Observation: Support Staff can delete a complete list of all Observation and delete detail of particular Observation by clicking on delete detail button. This will delete details.
I) Accountant View:
1)Dashboard:
Accountant side dashboard view.
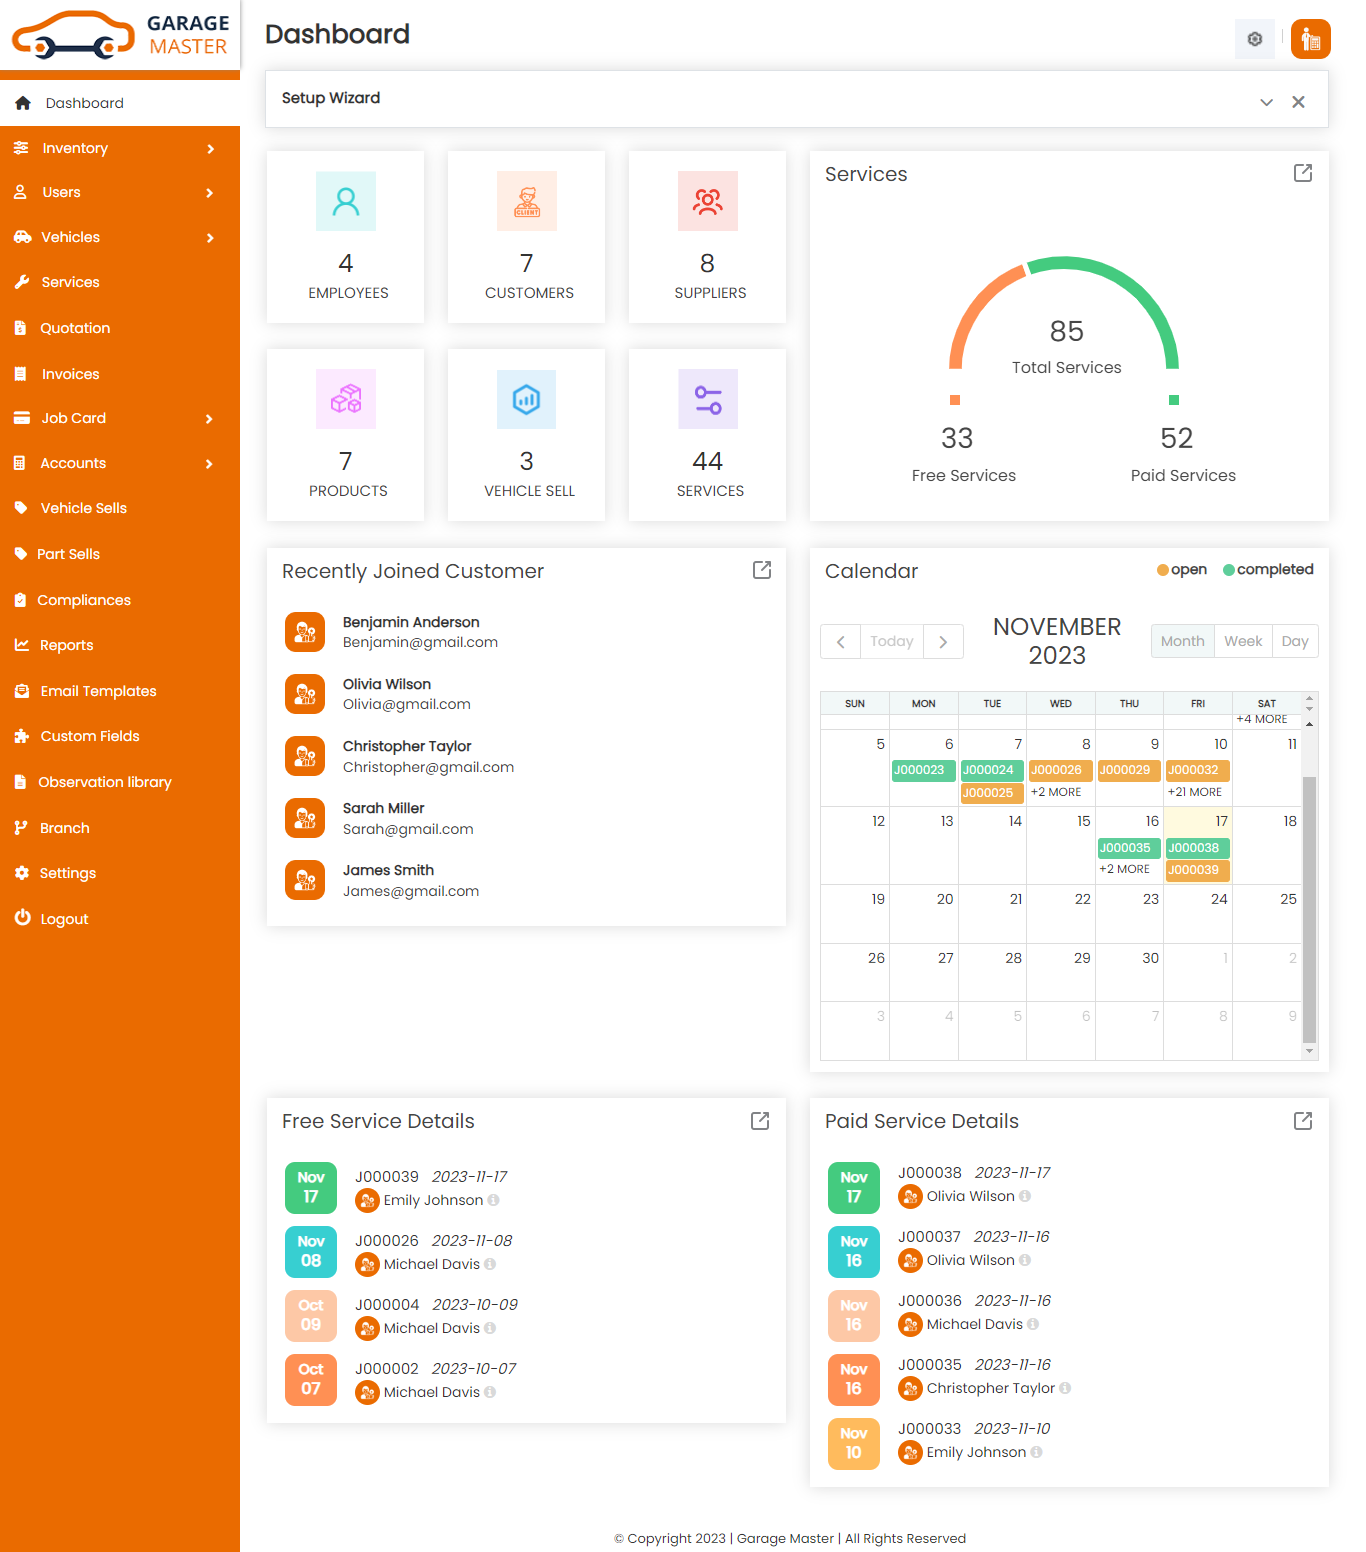
2)Settings
Other Settings
Click on Setting inside Click on Other Setting to start setting up the system. You are advised to fill all fields of Other settings as these details are used in a different section of the whole system. You can change these settings as per your requirement.

- Select Timezone: Select timezone for this setting.
- Select Language: Select language for this setting.
Time Zone
Language
2.1)How to Videos
How to Videos
In this menu it provide video guidance.Click on Setting inside Click on How to Videos to open this menu.

3)Inventory
A) Supplier
Supplier List: Accountant can add new Supplier, manage all Supplier and view a complete list of all Supplier.

Add Supplier: Accountant can add supplier details.

- First Name: Enter a new first name for this supplier.
- Last Name: Enter a new last name for this supplier.
- Company Name: Enter a new company name for this supplier.
- Gender: Select gender for this supplier.
- Date of Birth: Enter a new date of birth for this supplier.
- Contact Person: Enter a new contact person for this supplier.
- Email: Enter a new email for this supplier.
- Mobile No: Enter a new mobile number for this supplier.
- Landline No: Enter a new landlines number for this supplier.
- Image: Upload image for this supplier.
- Country: Select country for this supplier.
- State: Select state for this supplier.
- City: Select city for this supplier.
- Address: Enter a new address for this supplier.
- Add new custom field in go to custom Fields module in add custom field then select form name in supplier and add custom field for this supplier.
Personal Information
Address
CustomField
Edit Supplier: Accountant can Edit detail of particular Supplier by clicking on Edit detail button. This will open up details. From here Accountant can Change Supplier Details.

View Supplier: Accountant can view a complete list of all Supplier and view detail of particular Supplier by clicking on view detail button. This will open up details.

Delete Supplier: Accountant can delete a complete list of all Supplier and delete detail of particular Supplier by clicking on delete detail button. This will delete details.
B)Product
Product List: Accountant can add new Product and manage all types of Product as well as view a complete list of all Product.

Add Product: Accountant can add product details

- Product Number: Product number auto generated.
- Product Date: Enter a new product date for this product.
- Product Image: Upload image for this product.
- Name: Enter a new name for this product.
- Manufacturer Name: Select manufacturer name for this product.
- Add Or Remove: If desired manufacturer name is not available in a list then click on Add Or Remove button. You can add new manufacturer name from here.
- Price: Enter a new price for this product.
- Color: Select color for this product.
- Add Or Remove: If the desired color is not available in a list then click on Add Or Remove button. You can add new color from here.
- Warranty: Enter a new warranty for this product.
- Supplier: Select supplier for this product.
- Quantity: Enter a new quantity for this product.
- Unit of Measurement: Select unit of measurement for this product.
- Add Or Remove: If the desired unit of measurement is not available in a list then click on Add Or Remove button. You can add new unit of measurement from here.


Edit Product: Accountant can Edit detail of particular Product by clicking on Edit detail button. This will open up details. From here Accountant can Change Product Details.

Delete Product: Accountant can delete a complete list of all Product and delete detail of particular Product by clicking on delete detail button. This will delete details.
C)Purchase
Purchase List: You can add new Purchase, manage all Purchase and view a complete list of all Purchase.

Add Purchase: You can add purchase details.

- Purchase No: Purchase number auto generated.
- Purchase Date: Enter a new purchase date for this purchase.
- Supplier Name: Select supplier name for this purchase.
- Mobile Number: Select supplier and auto generated mobile.
- Email: Select supplier and auto generated email.
- Billing Address: Select supplier and auto generated address.
- Add New: Add new product for this purchase.
- Manufacturer Name: Select manufacturer name for this purchase.
- Product: Select product for this purchase.
- Quantity: Enter a new quantity for this purchase.
- Price: Select product and auto generated price
- Amount: Select product and quantity and auto generated amount.
- Action: Delete product for this purchase
Purchase Details
View Purchase: Accountant can view detail of particular Purchase by clicking on view detail button. This will open up details.

Edit Purchase: Accountant can Edit detail of particular Purchase by clicking on Edit detail button. This will open up details. From here Accountant can Change Purchase Details.

Delete Purchase: Accountant can delete a complete list of all Purchase and delete detail of particular Purchase by clicking on delete detail button. This will delete details.
D)Stock
Stock List: Accountant can view a complete list of all Stock and view detail of particular Stock by clicking on view detail button. This will open up details. From here Accountant can also Print Out view Stock.

Add Stock: You can add Stock details.

- Purchase No: Purchase number auto generated.
- Purchase Date: Enter a new purchase date for this purchase.
- Supplier Name: Select supplier name for this purchase.
- Mobile Number: Select supplier and auto generated mobile.
- Email: Select supplier and auto generated email.
- Billing Address: Select supplier and auto generated address.
- Add New: Add new product for this purchase.
- Manufacturer Name: Select manufacturer name for this purchase.
- Product: Select product for this purchase.
- Quantity: Enter a new quantity for this purchase.
- Price: Select product and auto generated price
- Amount: Select product and quantity and auto generated amount.
- Action: Delete product for this purchase
Purchase Details
View Stock: Accountant can view the particular stock details.

Manage Stock: Accountant can manage the quantity of a particular stock.

4)Users
A) Customer
Customer List: Accountant can add new Customer, manage all Customer and view a complete list of all Customer.

Add Customer: Accountant can add Customer details.

- First Name: Enter a new first name for this customer.
- Last Name: Enter a new last name for this customer.
- Display Name: Enter a new display name for this customer.
- Gender: Select gender for this customer.
- Date of Birth: Enter a new date of birth for this customer.
- Email: Enter a new email for this customer.
- Password: Enter a new password for this customer.
- Confirm Password: Enter a new confirm password for this customer.
- Mobile No: Enter a new mobile number for this customer.
- Landline No: Enter a new landline number for this customer.
- Image: Upload image for this customer.
- Country: Select country for this customer.
- State: Select state for this customer.
- City: Select city for this customer.
- Address: Enter a new address for this customer.
- Add new custom field in go to custom Fields module in add custom field then select form name in customer and add custom field for this customer.
Personal Information
Address
CustomField
Edit Customer: Accountant can Edit detail of particular customer by clicking on Edit detail button. This will open up details. From here Accountant can Change customer Details.

View Customer: Accountant can view a complete list of all Customer and view detail of particular Customer by clicking on view detail button. This will open up details.

Delete Customer: Accountant can delete a complete list of all Customer and delete detail of particular Customer by clicking on delete detail button. This will delete details.
B) Employee
Employee List: Accountant can add new Employee, manage all Employee and view a complete list of all Employee.

Add Employee: Accountant can add Employee details.

- First Name: Enter a new first name for this employee.
- Last Name: Enter a new last name for this employee.
- Display Name: Enter a new display name for this employee.
- Gender: Select gender for this employee.
- Date of Birth: Enter a new date of birth for this employee.
- Email: Enter a new email for this employee.
- Password: Enter a new password for this employee.
- Confirm Password: Enter a new confirm password for this employee.
- Mobile No: Enter a new mobile number for this employee.
- Landline No: Enter a new landline number for this employee.
- Join Date: Enter a new join date for this employee.
- Left Date: Enter a new left date for this employee.
- Designation: Enter a new designation for this employee.
- Image: Upload image for this employee.
- Country: Select country for this employee.
- State: Select state for this employee.
- City: Select city for this employee.
- Address: Enter a new address for this employee.
- Add new custom field in go to custom Fields module in add custom field then select form name in employee and add custom field for this employee.
Personal Information
Address
CustomField
Edit Employee: Accountant can Edit detail of particular employee by clicking on Edit detail button. This will open up details. From here Accountant can Change employee Details.

View employee: Accountant can view a complete list of all employee and view detail of particular employee by clicking on view detail button. This will open up details.

Delete Employee: Accountant can delete a complete list of all Employee and delete detail of particular Employee by clicking on delete detail button. This will delete details.
C) Support Staff
SupportStaff List: Accountant can add new SupportStaff, manage all SupportStaff and view a complete list of all Support Staff.

Add SupportStaff: Accountant can add SupportStaff details.

- First Name: Enter a new first name for this support staff.
- Last Name: Enter a new last name for this support staff.
- Display Name: Enter a new display name for this support staff.
- Gender: Select gender for this support staff.
- Date of Birth: Enter a new date of birth for this support staff.
- Email: Enter a new email for this support staff.
- Password: Enter a new password for this support staff.
- Confirm Password: Enter a new confirm password for this support staff.
- Mobile No: Enter a new mobile number for this support staff.
- Landline No: Enter a new landline number for this support staff.
- Image: Upload image for this support staff.
- Country: Select country for this support staff.
- State: Select state for this support staff.
- City: Select city for this support staff.
- Address: Enter a new address for this support staff.
Personal Information
Address
Edit SupportStaff: Accountant can Edit detail of particular support Staff by clicking on Edit detail button. This will open up details. From here Accountant can Change support Staff Details.

View SupportStaff: Accountant can view a complete list of all support Staff and view detail of particular support Staff by clicking on view detail button. This will open up details.
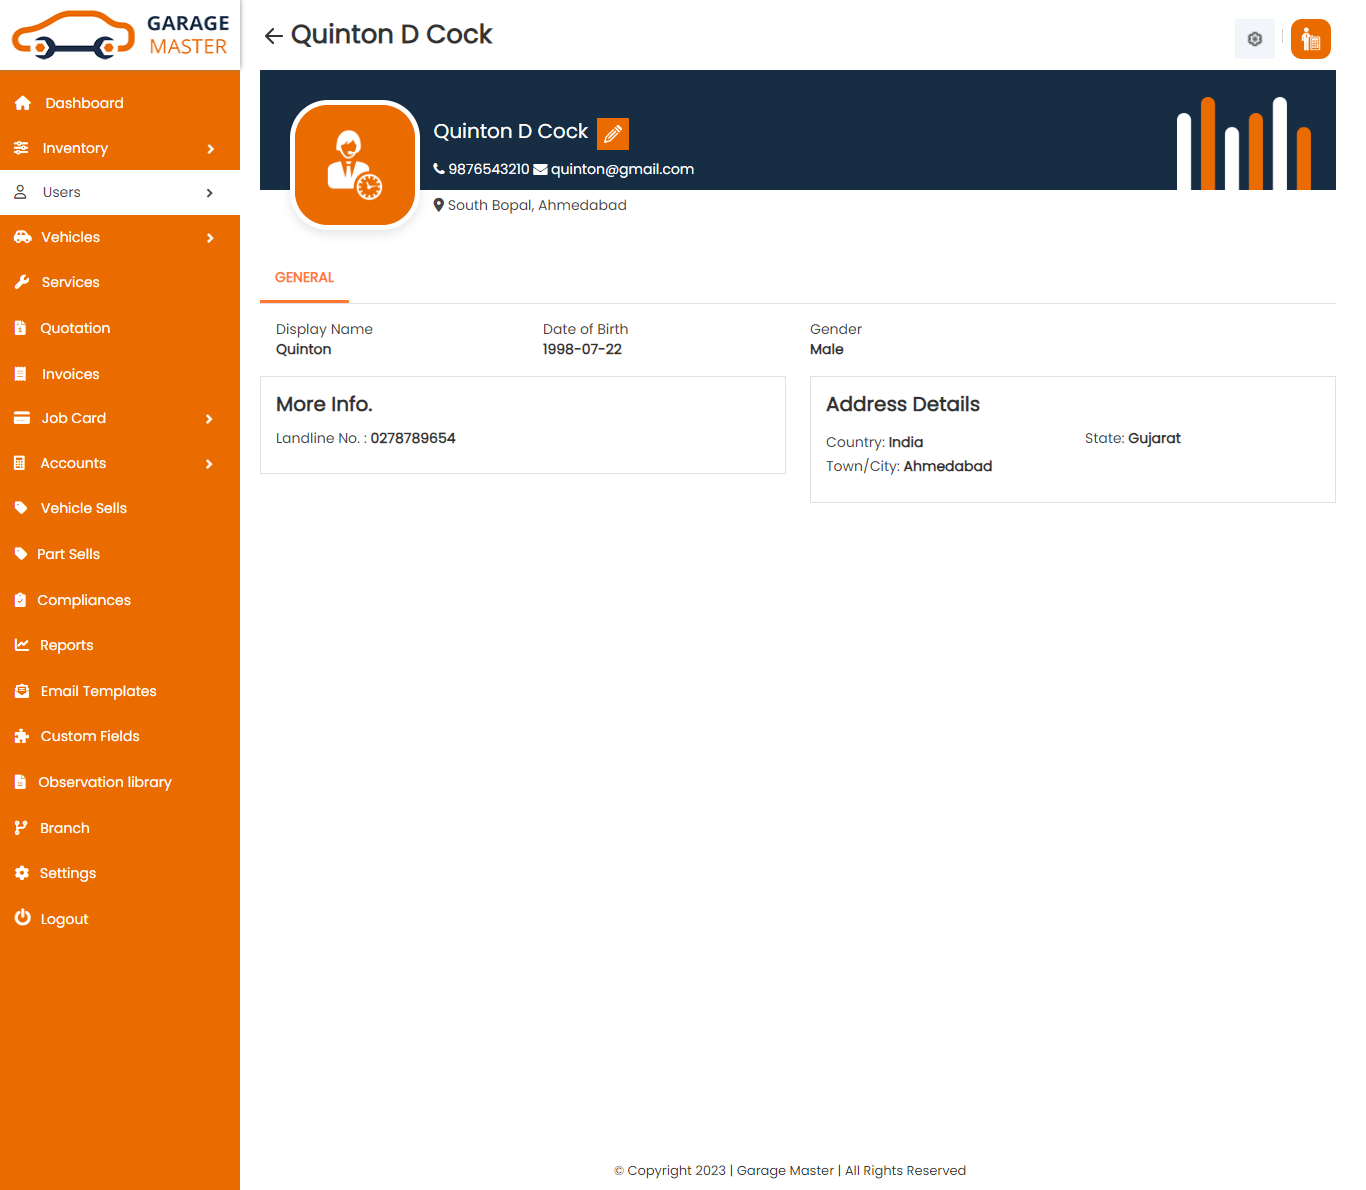
Delete SupportStaff: Accountant can delete a complete list of all support Staff and delete detail of particular support Staff by clicking on delete detail button. This will delete details.
D) Accountant
Accountant List: Accountant can add new accountant, manage all accountant and view a complete list of all accountant.

Add Accountant: Accountant can add accountant details.

- First Name: Enter a new first name for this accountant.
- Last Name: Enter a new last name for this accountant.
- Display Name: Enter a new display name for this accountant.
- Gender: Select gender for this accountant.
- Date of Birth: Enter a new date of birth for this accountant.
- Email: Enter a new email for this accountant.
- Password: Enter a new password for this accountant.
- Confirm Password: Enter a new confirm password for this accountant.
- Mobile No: Enter a new mobile number for this accountant.
- Landline No: Enter a new landline number for this accountant.
- Image: Upload image for this accountant.
- Country: Select country for this accountant.
- State: Select state for this accountant.
- City: Select city for this accountant.
- Address: Enter a new address for this accountant.
Personal Information
Address
Edit Accountant: Accountant can Edit detail of particular accountant by clicking on Edit detail button. This will open up details. From here Accountant can Change accountant Details.

View Accountant: Accountant can view a complete list of all accountant and view detail of particular accountant by clicking on view detail button. This will open up details.

Delete Accountant: Accountant can delete a complete list of all accountant and delete detail of particular accountant by clicking on delete detail button. This will delete details.
5)Vehicle
A)Vehicle
Vehicle List: Accountant can add new Vehicle and manage all Vehicle of Vehicle as well as view a complete list of all Vehicle.

Add Vehicle: Accountant can add Vehicle details

- Vehicle Type: Select vehicle type for this vehicle.
- Add Or Remove: If desired vehicle type is not available in a list then click on Add Or Remove button. You can add new vehicle type from here.
- Chasis No: Enter a new chasis number for this vehicle.
- Vehicle Brand: Select vehicle brand for this vehicle.
- Add Or Remove: If desired vehicle brand is not available in a list then click on Add Or Remove button. You can add new vehicle brand from here.
- Model Year: Enter a new model year for this vehicle.
- Fuel Type: Select fuel type for this vehicle.
- Add Or Remove: If desired fuel type is not available in a list then click on Add Or Remove button. You can add new fuel type from here.
- No of Gear: Enter a new number of gear for this vehicle.
- Model Name: Select model name for this vehicle.
- Add Or Remove: If the desired model name is not available in a list then click on Add Or Remove button. You can add a new model name from here.
- Price: Enter a new price for this vehicle.
- Odometer Reading: Enter a new odometer reading for this vehicle.
- Date of Manufacturing: Enter a new date of manufacturing for this vehicle list.
- Gearbox: Enter a new gearbox for this vehicle.
- Gearbox No: Enter a new gearbox for this vehicle.
- Engine No: Enter a new engine number for this vehicle.
- Engine Size: Enter new engine size for this vehicle.
- Key No: Enter a new key number for this vehicle.
- Engine: Enter a new engine for this vehicle.
- Vehicle Image: Select multiple images for this vehicle.
- Add New: Add new color for this vehicle.
- Color: Select color for this vehicle.
- Add New: Add new description for this vehicle.
- Description: Enter a new description of this vehicle.


Edit Vehicle: Accountant can Edit detail of particular Vehicle by clicking on Edit detail button. This will open up details. From here Accountant can Change Vehicle Details.

View Vehicle: Accountant can view a complete list of all Vehicle and view detail of particular Vehicle by clicking on view detail button. This will open up details.

Delete Vehicle: Accountant can delete a complete list of all Vehicle and delete detail of particular Vehicle by clicking on delete detail button. This will delete details.
B)Vehicle Type
Vehicle Type List: Accountant can add new Vehicle Type and manage all Vehicle of Vehicle Type as well as view a complete list of all Vehicle Type.

Add Vehicle Type: Accountant can add Vehicle Type details

- Vehicle Type: Enter a new vehicle type for this vehicle type.
Edit Vehicle Type: Accountant can Edit detail of particular Vehicle Type by clicking on Edit detail button. This will open up details. From here Accountant can Change Vehicle Type Details.

Delete Vehicle Type: Accountant can delete a complete list of all Vehicle Type and delete detail of particular Vehicle Type by clicking on delete detail button. This will delete details.
C)Vehicle Brand
Vehicle Brand List: Accountant can add new Vehicle Brand and manage all Vehicle of Vehicle Brand as well as view a complete list of all Vehicle Brand.
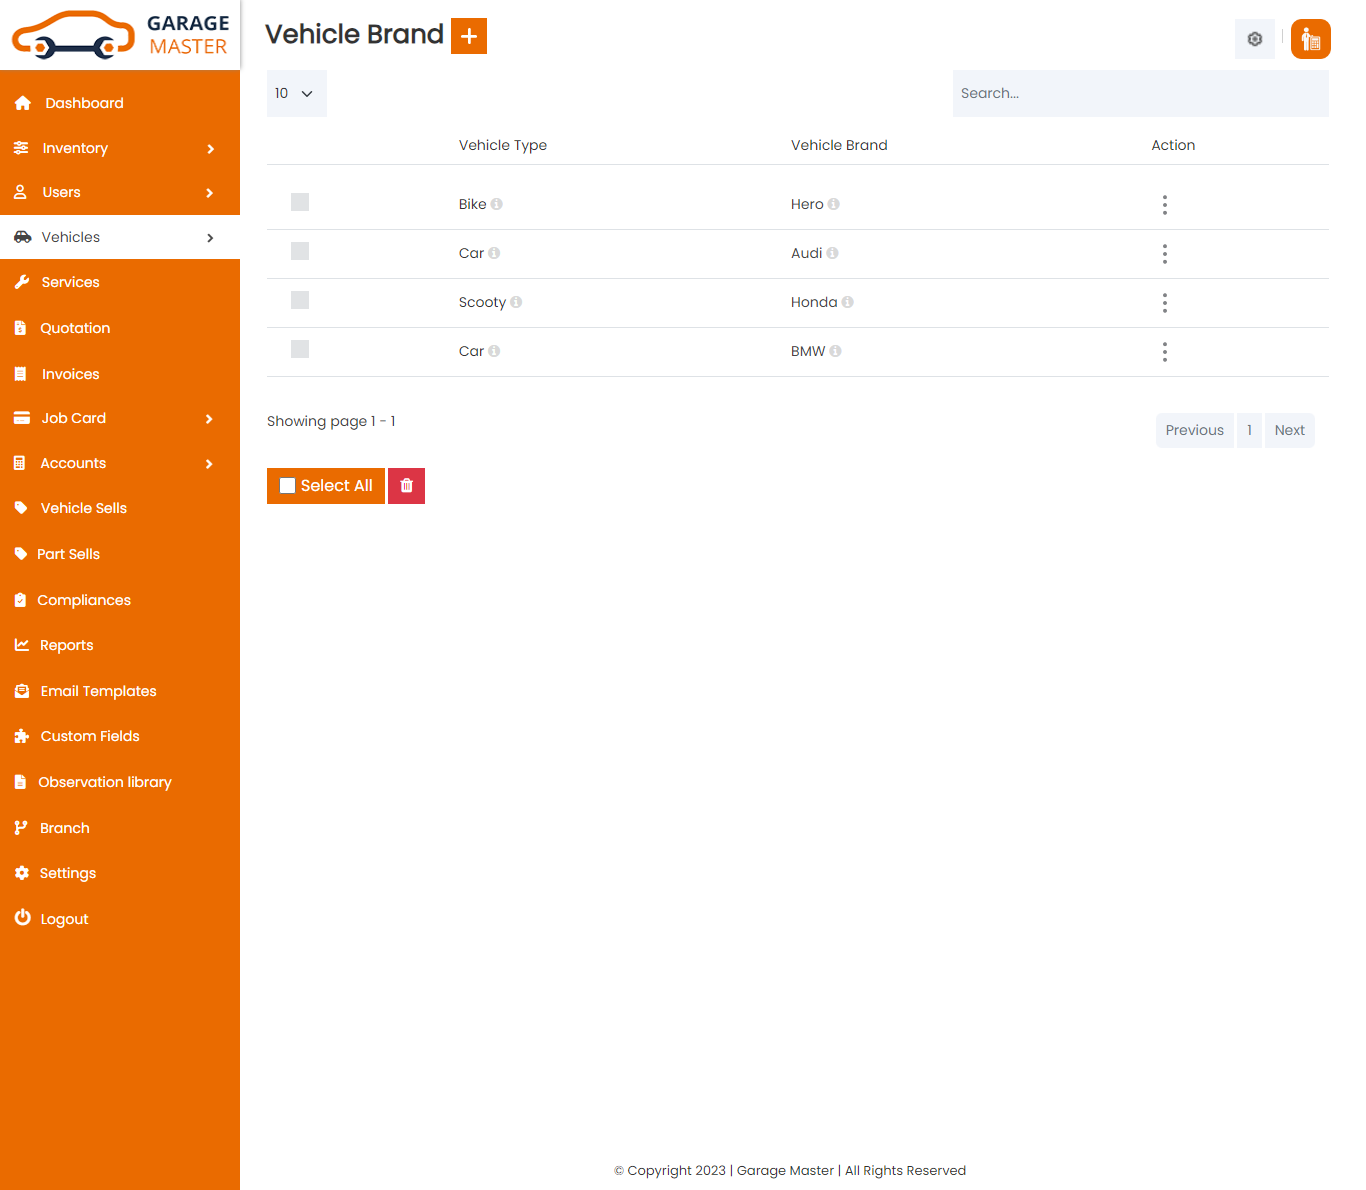
Add Vehicle Brand: Accountant can add Vehicle Brand details
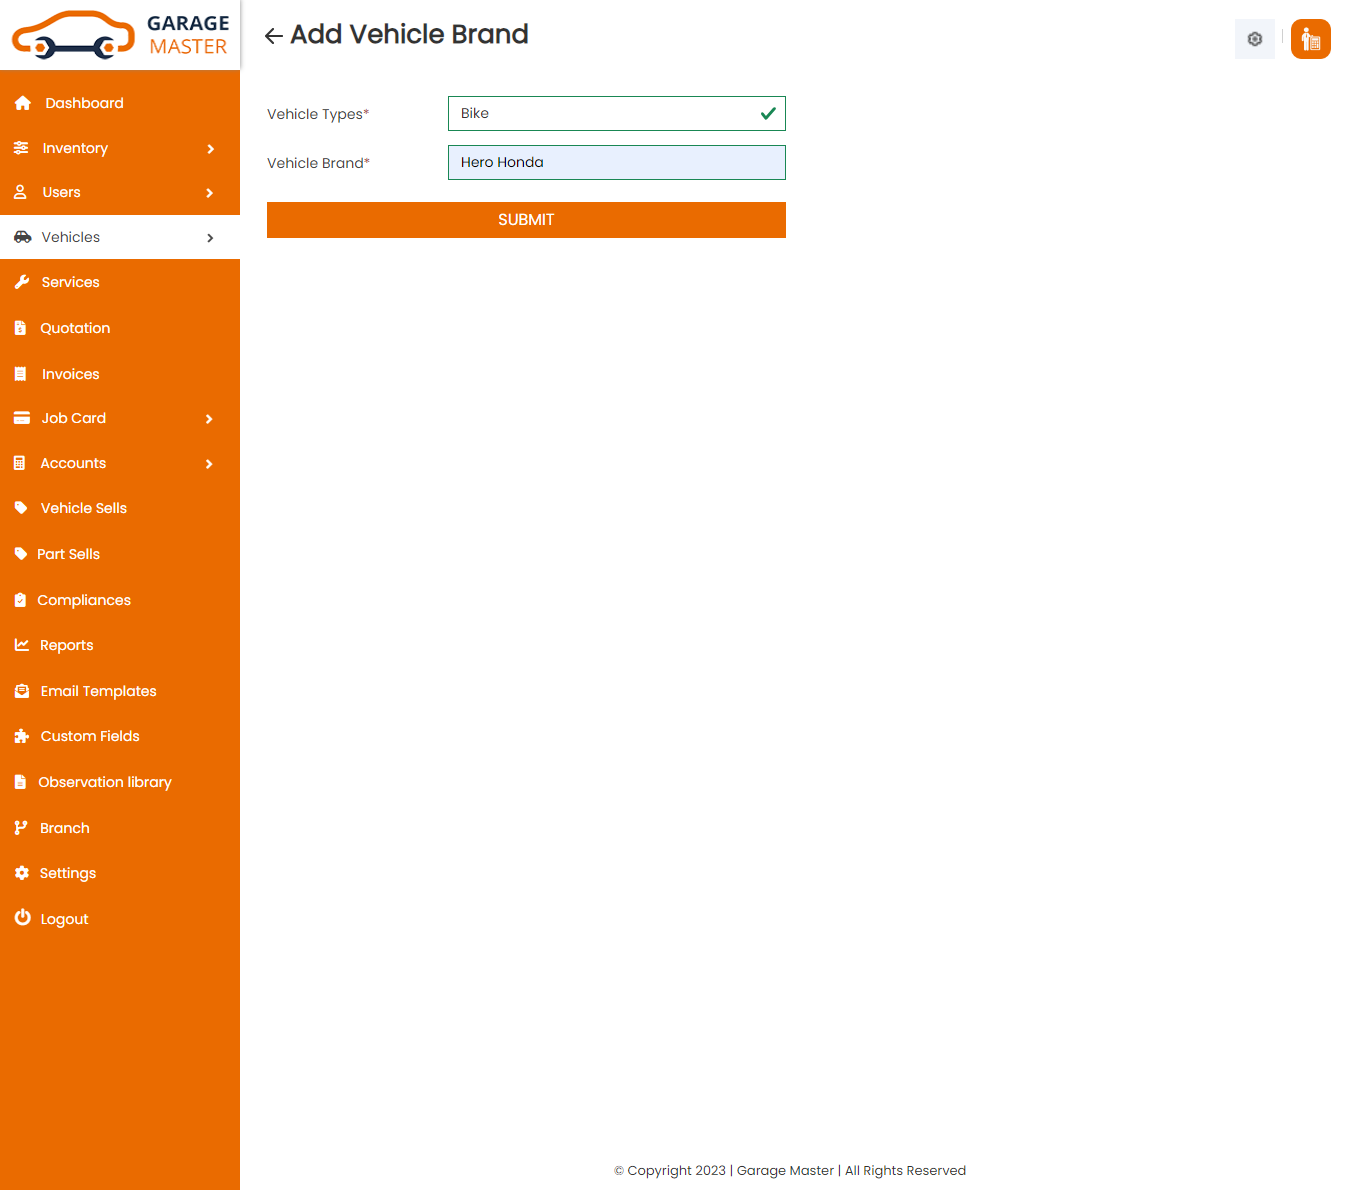
- Vehicle Type: Select vehicle type for this vehicle brand.
- Vehicle Brand: Enter a new vehicle brand for this vehicle brand.
Edit Vehicle Brand: Accountant can Edit detail of particular Vehicle Brand by clicking on Edit detail button. This will open up details. From here Accountant can Change Vehicle Brand Details.
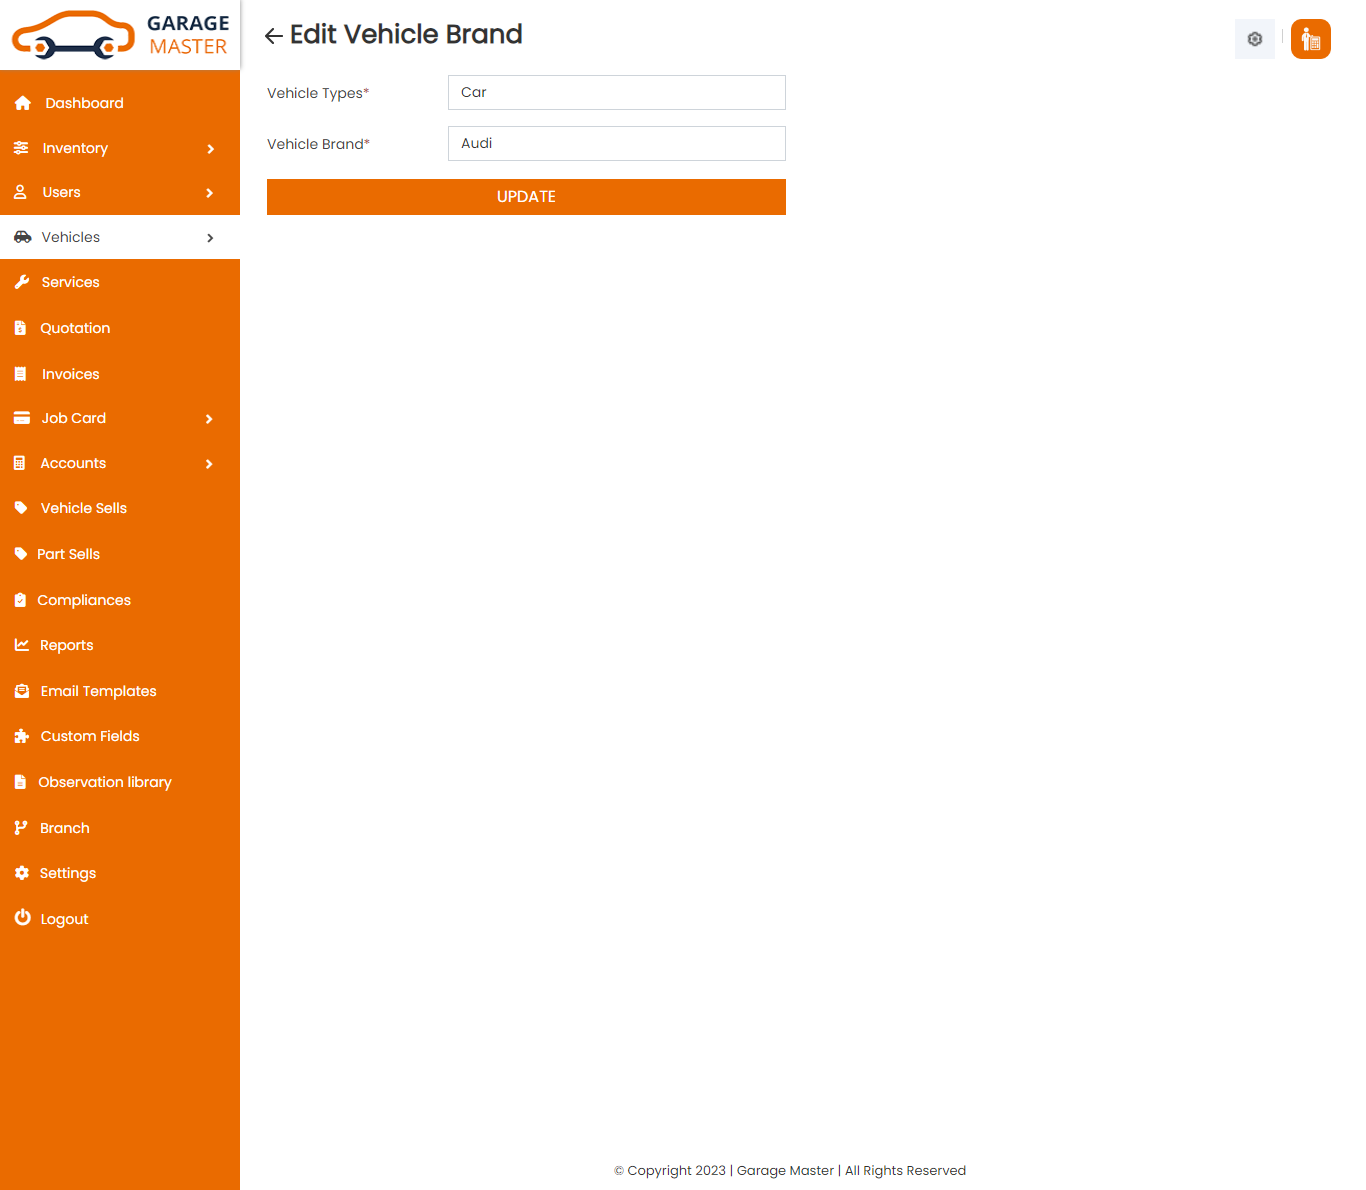
Delete Vehicle Brand: Accountant can delete a complete list of all Vehicle Brand and delete detail of particular Vehicle Brand by clicking on delete detail button. This will delete details.
D)Color
Color List: Accountant can add a new color, color all color and view a complete list of all color

Add Color: Accountant can add color details

- Color Name: Enter a new color name for this color.
Edit Color: Accountant can Edit detail of particular color by clicking on Edit detail button. This will open up details. From here Accountant can Change color Details.
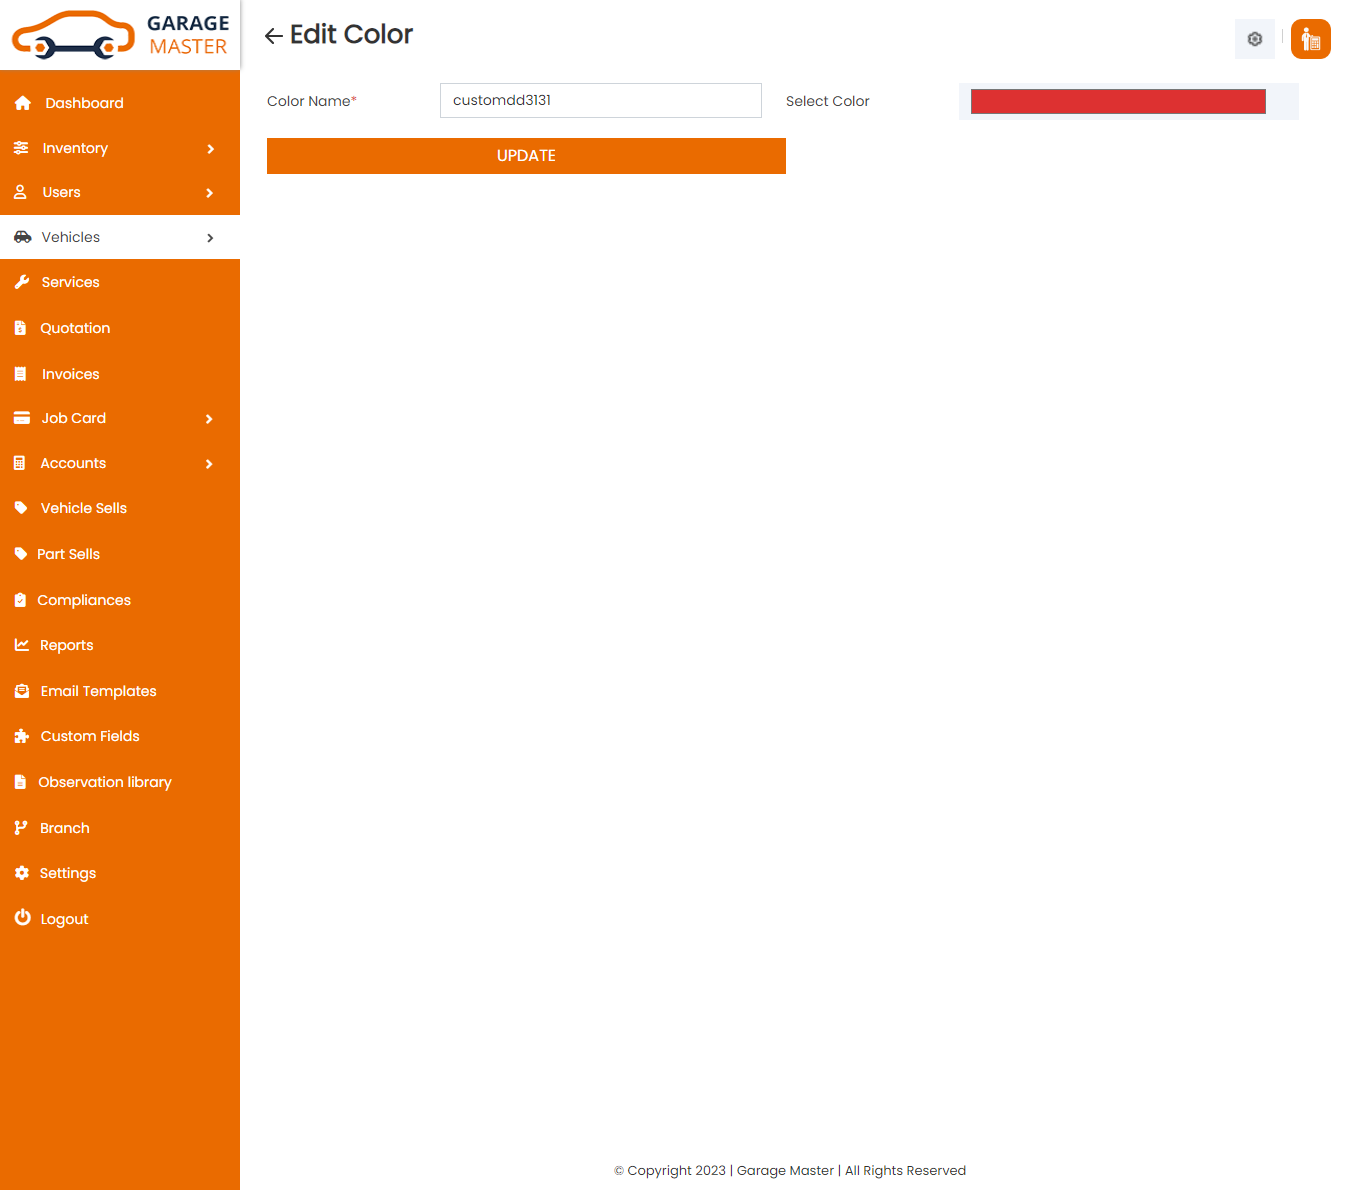
Delete Color: Accountant can delete a complete list of all color and delete detail of particular color by clicking on delete detail button. This will delete details.
6)Service
Service
Service List: Accountant can add new Service, manage all Service and view a complete list of all Service.

Add Service: Accountant can add Service details

- Jobcard Number: Job card number auto generated.
- Customer Name: Select customer name for this service.
- Vehicle Name: Select vehicle name for this service.
- Date: Enter a new date for this service.
- Title: Enter a new title for this service.
- AssignTo: Select assignto for this service.
- Repair Category: Select repair category for this service.
- Service Type: Select service type for this service.
- Fix Service Charge : Enter a new fix service charge for this service.
- Details: Enter a new details for this service.
- Registration number: Enter a new registration number for this service.
- Car Damage Marker: Add Car damage marker in given image.
- Add Pre-Inspection Checklist: Add Pre-Inspection checklist point based on car damage marker
- MOT Test: Tick this check box for vehicle MOT testing.
- Job card Number: Job card number auto fields.
- In Date/Time: In date/time auto fields.
- Expected out date/time: Enter a new expected out date/time for this service.
- Name: Name auto fields.
- Address: Address auto fields.
- Contact Number: Contact number auto fields.
- Email: Email auto fields.
- Model Name: Model name auto fields.
- Chassis Number: Chassis number auto fields.
- Engine Number: Engine number auto fields.
- KMS Run: Enter a new KMS run for this service.
- Date of Sales: Date of sales auto fields.
- Color: Color auto fields.
- Add New:Select and Add new observation point for this service in given dropdown.
- Observation Point: Selected observation points list.
- MOT Test View: Show details for MOT
testing.
Step 1: Fill MOT Details : Here fill MOT testing details for vehicle.
Step 2: Show Filled MOT Details : Now show here filled MOT testing details, which one is filled.
Step-1: Add Service Details.
Step-2: Add Job card Details.
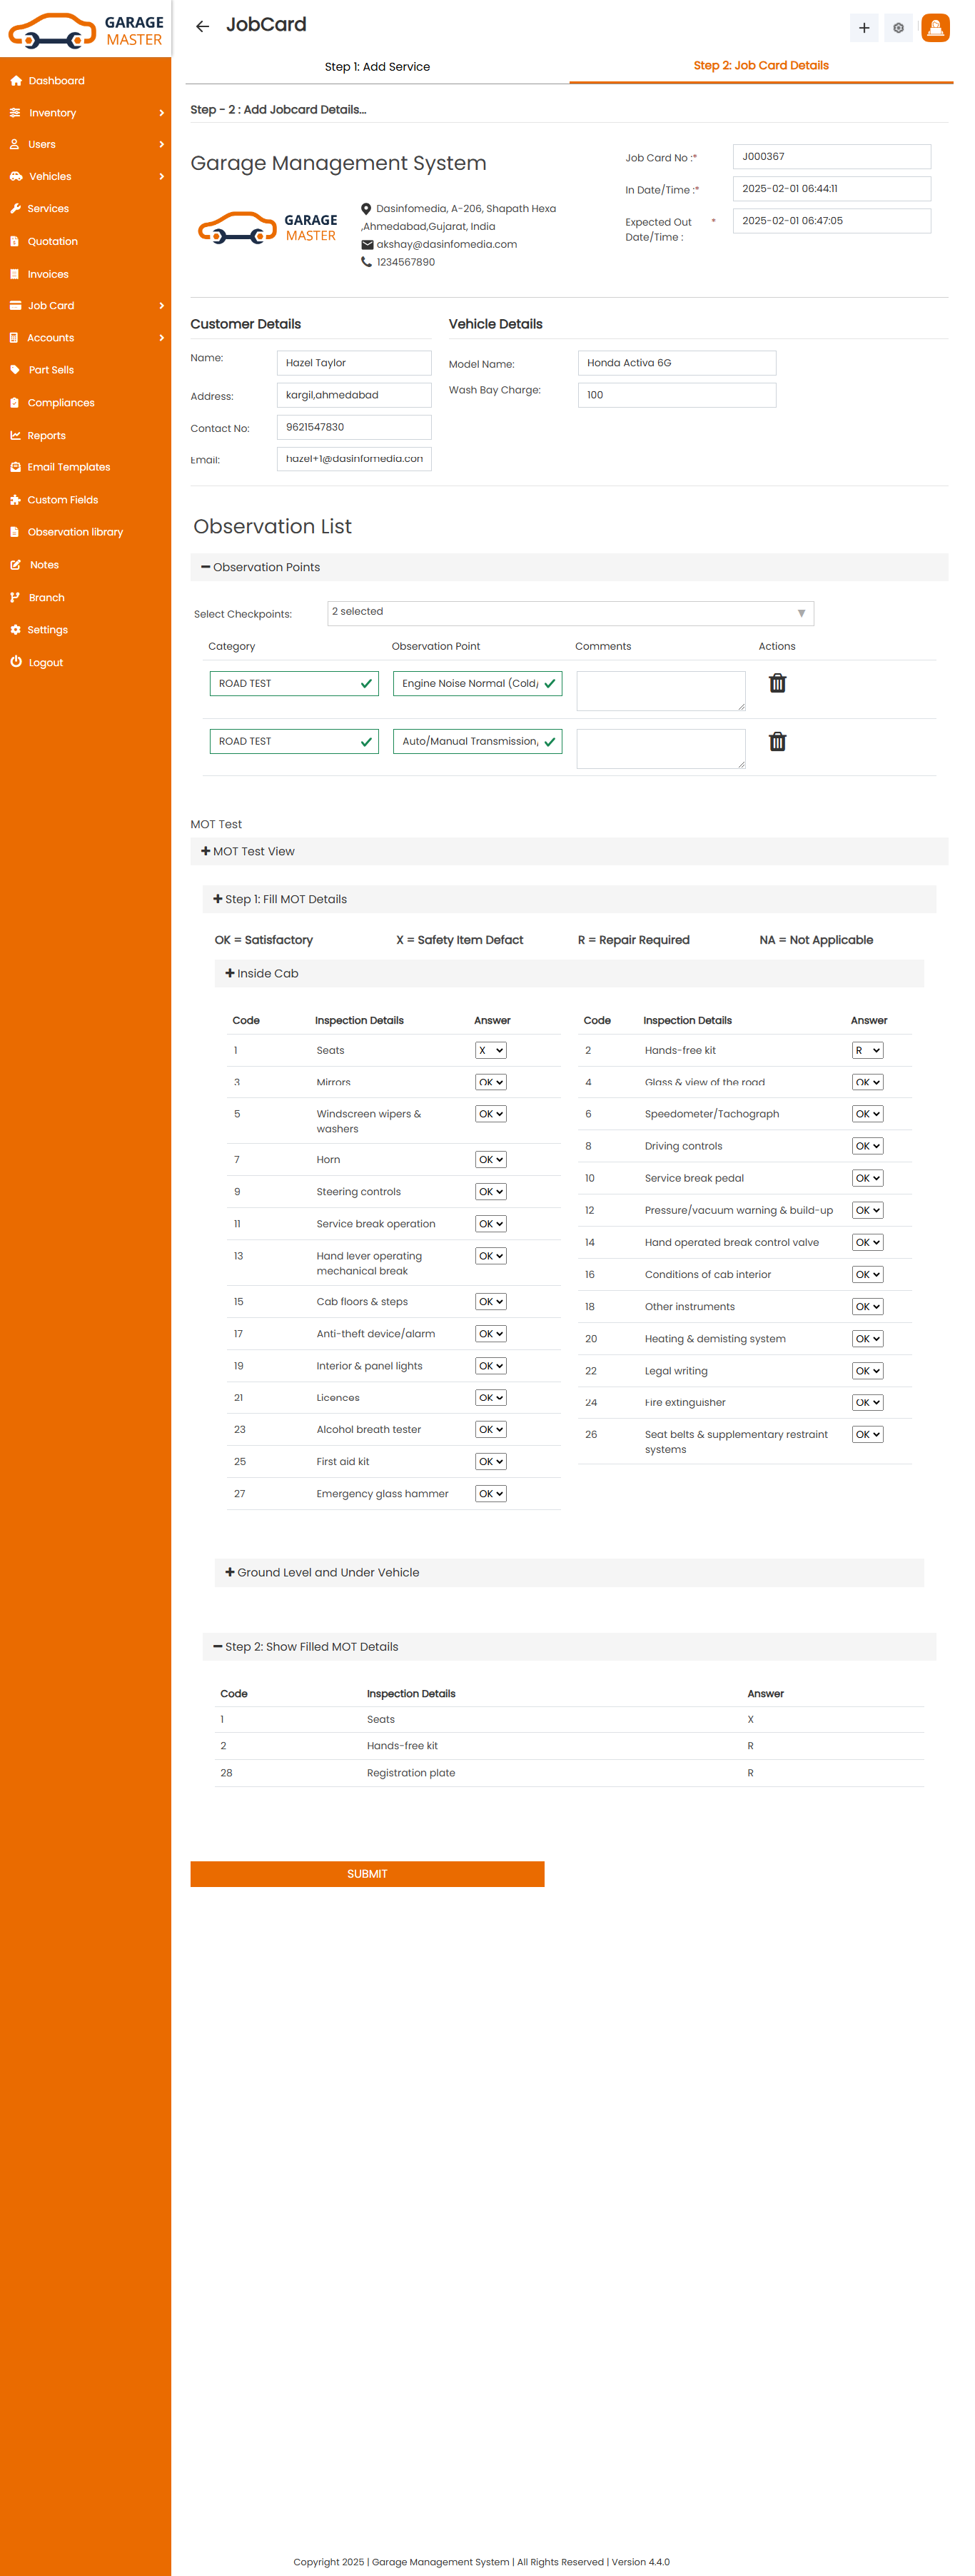
Customer Details
Vehicle Details
Observation List
MOT Test
Edit Service: Accountant can Edit detail of particular Service by clicking on Edit detail button. This will open up details. From here Accountant can Change Service Details.

View Service: Accountant can view a complete list of all Service and view detail of particular Service by clicking on view detail button. This will open up details.
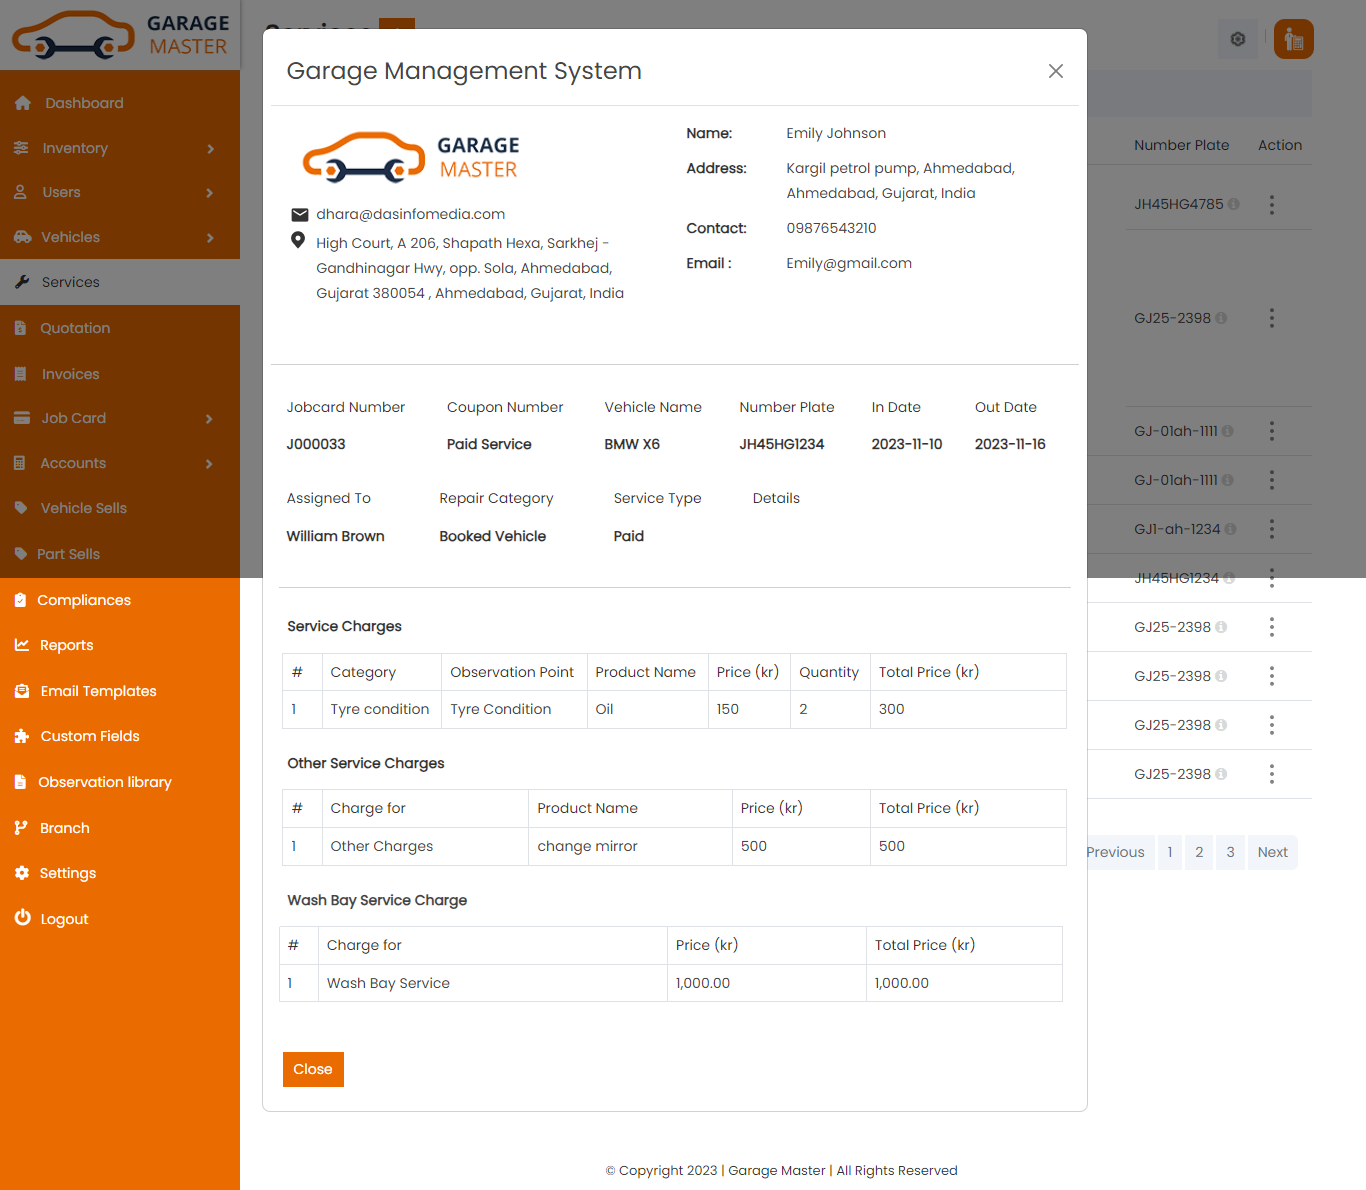
Delete Service: Accountant can delete a complete list of all Service and delete detail of particular Service by clicking on delete detail button. This will delete details.
7)Invoice
Invoice
Invoice List: Accountant can add a new invoice, invoice all invoice and view a complete list of all invoice.

Add Invoice: Accountant can add invoice details

- Invoice for: Select invoice type for this invoice.
- Invoice Number: Invoice number auto generated.
- Customer Name: Select customer name for this invoice.
- Job card Number: Select job card number for this invoice.
- Date: Enter a new date for this invoice.
- Total Amount: Select job card and auto generated total amount.
- Payment Type: Select payment type for this invoice.
- Status: Select status for this invoice.
- Discount(%): Enter a new discount for this invoice.
- Details: Enter a new details for this invoice.
- Tax: Select tax for this invoice.
- Paid Amount: Enter a new paid amount for this invoice.
- Grand Total: Select customer name and job card in auto generated grand total.
Edit invoice: Accountant can Edit detail of particular invoice by clicking on Edit detail button. This will open up details. From here Accountant can Change invoice Details.

View invoice: Accountant can view a complete list of all invoice and view detail of particular invoice by clicking on view detail button. This will open up details.From here Accountant can also Print Out view invoice.

Delete invoice: Accountant can delete a complete list of all invoice and delete detail of particular invoice by clicking on delete detail button. This will delete details.
Pay Invoice: Accountant can pay invoice details

- Invoice Number: Invoice number auto generated.
- Payment Number: Payment number auto generated.
- Payment Date: Enter a new payment date for this pay invoice.
- Amount Due : Amount due auto generated.
- Payment Type: Select payment type for this pay invoice.
- Amount Received: Enter a new amount received for this pay invoice.
- Note:Enter a new note for this pay invoice.
Payment Information
Payment History: Accountant can view a complete list of all invoice and Payment History of particular invoice by clicking on Payment History detail button. This will open up details.

8)Job card
A)job card
Job card List: Accountant can add new job card, manage all job card and view a complete list of all job card

Add job card: Accountant can add job card details

Step-1: Add Service Details.
- Jobcard Number: Job card number auto generated.
- Customer Name: Select customer name for this service.
- Vehicle Name: Select vehicle name for this service.
- Date: Enter a new date for this service.
- Title: Enter a new title for this service.
- AssignTo: Select assignto for this service.
- Repair Category: Select repair category for this service.
- Service Type: Select service type for this service.
- Details: Enter a new details for this service.
- Fix Service Charge : Enter a new fix service charge for this service.
- Registration number: Enter a new registration number for this service.
- Car Damage Marker: Add Car damage marker on given image.
- Add Pre-Inspection Checklist: Add Pre-Inspection checklist points based on car damage marker.
- Job card Number: Job card number auto fields.
- In Date/Time: In date/time auto fields.
- Expected out date/time: Enter a new expected out date/time for this service.
- Name: Name auto fields.
- Address: Address auto fields.
- Contact Number: Contact number auto fields.
- Email: Email auto fields.
- Model Name: Model name auto fields.
- Chassis Number: Chassis number auto fields.
- Engine Number: Engine number auto fields.
- KMS Run: Enter a new KMS run for this service.
- Date of Sales: Date of sales auto fields.
- Color: Color auto fields.
- Add New: Select and Add New observation point for this service in given dropdown.
- Observation Point: List of the Selected observation point.
Step-2: Add Job card Details.

Customer Details
Vehicle Details
Observation List
Process Job: Accountant can add and edit Process job detail of particular job card by clicking on process job detail button. This will open up details. From here Accountant can add and edit process job Details.

- Job card Number: Job card number auto fields.
- In Date/Time: In date/time auto fields.
- Expected out date/time: Enter a new expected out date/time for this service.
- Name: Name auto fields.
- Address: Address auto fields.
- Contact Number: Contact number auto fields.
- Email: Email auto fields.
- Model Name: Model name auto fields.
- Chassis Number: Chassis number auto fields.
- Engine Number: Engine number auto fields.
- KMS Run: Enter a new KMS run for this service.
- Date of Sales: Date of sales auto fields.
- Color: Color auto fields.
- AssignTo: Select assign to for this service.
- Add New: Add new observation point for this service.
- Observation Point: List of the observation point.
- Category: Category auto field.
- observation point: Observation point auto field.
- Product: Select product for this job card.
- Price: Select product and auto generated price
- Quantity: Enter a new quantity for this job card.
- Amount: Select product and quantity and auto generated total price.
- Chargeable: Select chargeable for the service.
- Comment: Enter a new comment for this service.
- Action: Delete product for this service.
- Add New: Add new other service charges for this service.
- Product: Enter a new product for this service.
- Price: Enter a new price for this service.
- action: Delete other service charges for this service.
Processing job for particular job card
Customer Details
Vehicle Details
Observation List
Other Service Charges
Create Invoice: Accountant can Create invoice details

- Invoice for: Select invoice type for this invoice.
- Invoice Number: Invoice number auto generated.
- Customer Name: Select customer name for this invoice.
- Job card Number: Select job card number for this invoice.
- Date: Enter a new date for this invoice.
- Total Amount: Select job card and auto generated total amount.
- Payment Type: Select payment type for this invoice.
- Status: Select status for this invoice.
- Discount(%): Enter a new discount for this invoice.
- Details: Enter a new details for this invoice.
- Tax: Select tax for this invoice.
- Paid Amount: Enter a new paid amount for this invoice.
- Grand Total: Select customer name and job card in auto generated grand total.
View invoice: Accountant can view a complete list of all job card and view detail of particular invoice by clicking on view invoice detail button. This will open up details.From here Accountant can also Print Out view invoice.

Gate Pass: Accountant can add gate pass details
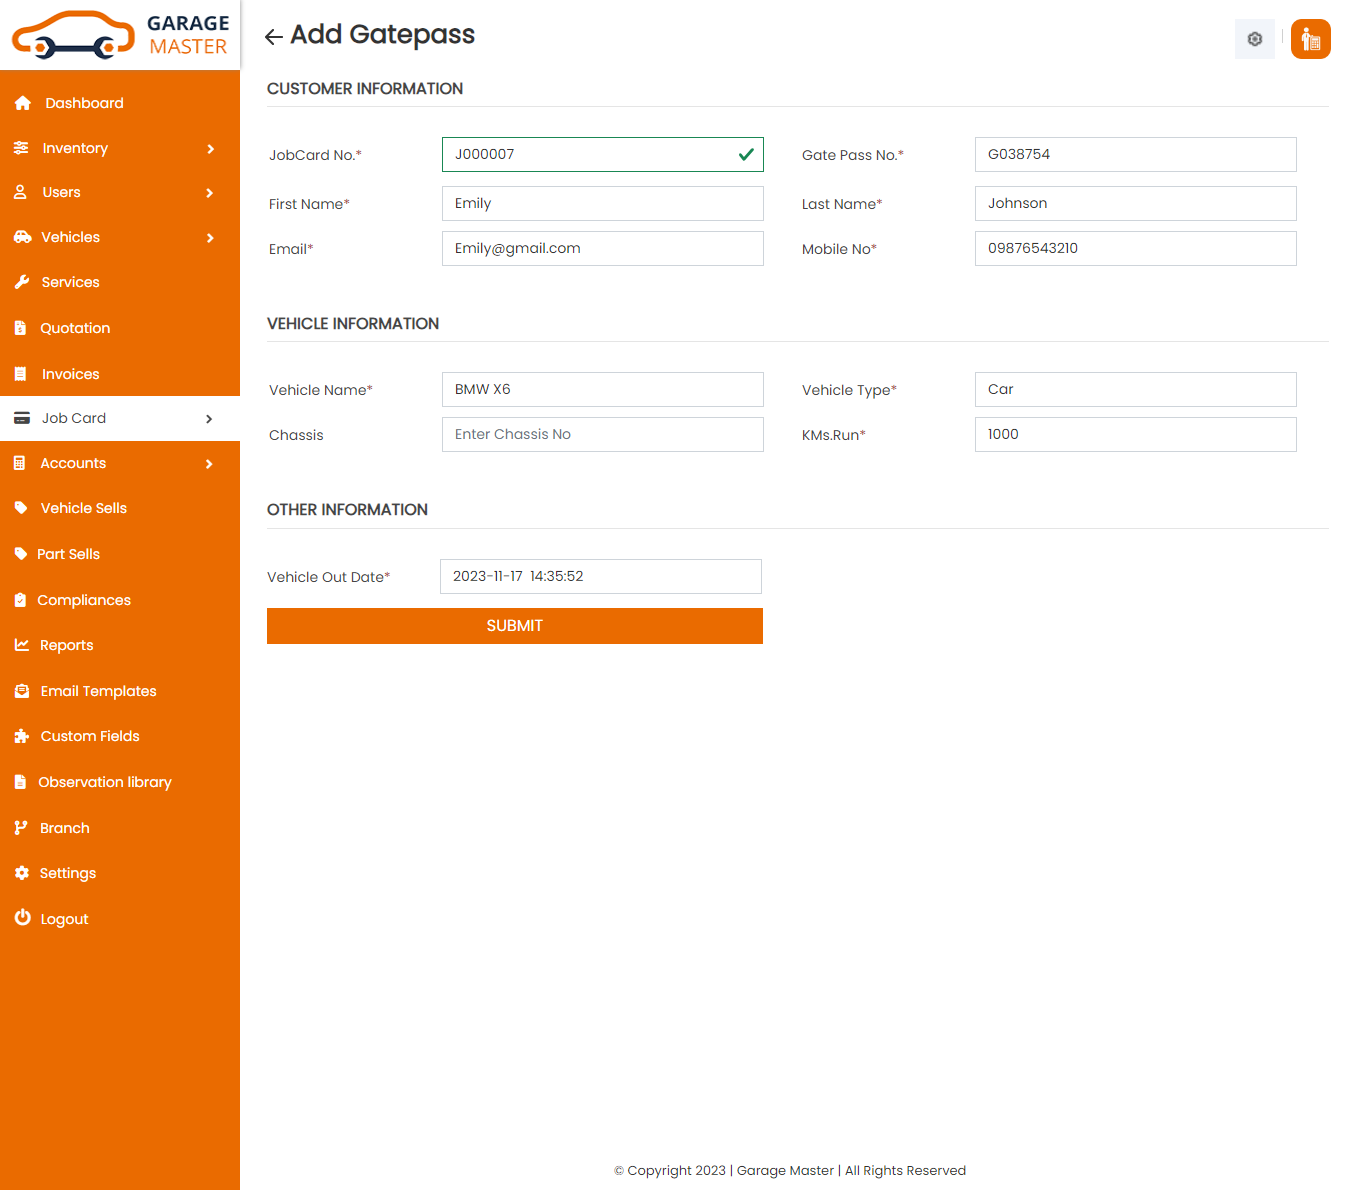
- Job card Number: Job card number auto field.
- Gate Pass Number : Gate pass number auto generated.
- First Name: First name auto field.
- last Name: last name auto field.
- Email: Email auto field.
- Mobile number: Mobile number auto field.
- Model Name: Model name auto fields.
- Vehicle Type: Vehicle type auto fields.
- Chassis Number: Chassis number auto fields.
- KMS Run: Enter a new KMS run for this gate pass.
- Service Out Date: Enter a new service out date for this gate pass.
Customer Information
Vehicle Information
Other Information
Gate Receipt: Accountant can view a complete list of all Gate Receipt and view detail of particular Gate Receipt by clicking on Gate Receipt detail button. This will open up details.From here Accountant can also Print Out Gate Receipt.

B)Gate Pass
GatePass List: Accountant can add new gate pass, manage all gate pass and view a complete list of all gate pass

Add GatePass: Accountant can add gate pass details

- Job card Number: Select job card for this gate pass.
- Gate Pass Number: Gate pass number auto generated.
- First Name: First name auto field.
- last Name: last name auto field.
- Email: Email auto field.
- Mobile number: Mobile number auto field.
- Vehicle Name: Model name auto fields.
- Vehicle Type: Vehicle type auto fields.
- Chassis Number: Chassis number auto fields.
- KMS Run: Enter a new KMS run for this gate pass.
- Vehicle Out Date: Enter a new vehicle out date for this gate pass.
Customer Information
Vehicle Information
Other Information
Edit Gate pass: Accountant can Edit detail of particular gate pass by clicking on Edit detail button. This will open up details. From here Accountant can Change gate pass Details.

Gate Receipt: Accountant can view a complete list of all Gate Receipt and view detail of particular Gate Receipt by clicking on Gate Receipt detail button. This will open up details.From here Accountant can also Print Out Gate Receipt.

Delete Gate pass: Accountant can delete a complete list of all gate pass and delete detail of particular gate pass by clicking on delete detail button. This will delete details.
9)Account & Tax Rates
A)Tax Rates
List Account Tax: Accountant can add new account tax, account tax all account tax and view a complete list of all account tax.

Add Account Tax: Accountant can add Account Tax details

- Tax Name: Enter a new tax name for this account tax.
- Tax Rates: Enter a new tax rates for this account tax.
Edit Account Tax: Accountant can Edit detail of particular account tax by clicking on Edit detail button. This will open up details. From here Accountant can Change account tax Details.

Delete Account Tax: Accountant can delete a complete list of all account tax and delete detail of particular account tax by clicking on delete detail button. This will delete details.
B)Payment Method
List PaymentMethod: Accountant can add new PaymentMethod, PaymentMethod all PaymentMethod and view a complete list of all PaymentMethod.

Add PaymentMethod: Accountant can add PaymentMethod details

- Payment type: Enter a new payment type for this paymentmethod.
Edit PaymentMethod: Accountant can Edit detail of particular payment type by clicking on Edit detail button. This will open up details. From here Accountant can change payment type details.

Delete Payment type: Accountant can delete a complete list of all payment type and delete detail of particular payment type by clicking on delete detail button. This will delete details.
C)Income
List Income: Accountant can add new Income, Income all Income and view a complete list of all Income.

Add Income: Accountant can add Income details

- Invoice Number: Select invoice number for this income.
- Outstanding Amount: Select invoice number and auto-generated outstanding amount.
- Status: Select status for this income.
- Main Label: Enter a new main label for this income.
- Date: Enter a new date for this income.
- PaymentType: Select paymenttype for this income.
- Income Entry: Enter a new income entry for this income.
- Income Label: Enter a new income label for this income.
- Add More Fields: Add new more fields click add income entry, income label for the income.
Income Details
Edit Income: Accountant can Edit detail of particular income by clicking on Edit detail button. This will open up details. From here Accountant can Change income Details.

Monthly Income: Accountant can View Monthly Income details.

- start Date: Enter a new start date for this income.
- End Date: Enter a new end date for this income.
Income Details
Delete Income: Accountant can delete a complete list of all Income and delete detail of particular Income by clicking on delete detail button. This will delete details.
D)Expenses
List Expenses: Accountant can add new Expenses, Expenses all Expenses and view a complete list of all Expenses.

Add Expenses: Accountant can add Expenses details

- Main Label: Enter a new main label for this expenses.
- Status: Select status for this expenses.
- Date: Enter a new date for this expenses.
- Expenses Entry: Enter a new expenses entry for this expenses.
- Expenses Label: Enter a new expenses label for this expenses.
- Add More Fields: Add new more fields click add expenses entry, expenses label for this expenses.
Expenses Details
Edit Expenses: Accountant can Edit detail of particular Expenses by clicking on Edit detail button. This will open up details. From here Accountant can Change Expenses Details.

Monthly Expenses: Accountant can View Monthly Expenses details.

- start Date: Enter a new start date for this expenses.
- End Date: Enter a new end date for this expenses.
Expenses Details
Delete Expenses: Accountant can delete a complete list of all Expenses and delete detail of particular Expenses by clicking on delete detail button. This will delete details.
10)Sales
Part Sells: Accountant can add new sells, edit all sells and view a complete list of all sells.

Add Sells: Accountant can add sells details

- Bill number: Bill number auto generated.
- Customer Name: Select customer name for this sales.
- Sales Date: Enter a new sales date for this sales.
- Quantity: Enter a new quantity for this sales.
- Price: Select product name and auto generated price.
- Total price: Select product name and quantity and auto generated total price.
- Salesman: Select salesman for this sales.
- Branch: Select branch for this sales.
Edit Sells: Accountant can Edit detail of particular sells by clicking on Edit detail button. This will open up details. From here Accountant can Change sells Details.

Create Invoice: Accountant can Create invoice details

- Invoice for: Select invoice type for this invoice.
- Invoice Number: Invoice number auto generated.
- Customer Name: Select customer name for this invoice.
- Job card Number: Select job card number for this invoice.
- Date: Enter a new date for this invoice.
- Total Amount: Select job card and auto generated total amount.
- Payment Type: Select payment type for this invoice.
- Status: Select status for this invoice.
- Discount(%): Enter a new discount for this invoice.
- Details: Enter a new details for this invoice.
- Tax: Select tax for this invoice.
- Paid Amount: Enter a new paid amount for this invoice.
- Grand Total: Select customer name and job card in auto generated grand total.
View Invoice: Accountant can view a complete list of all Sales and view detail of particular Sales by clicking on view detail button. This will open up details.

Delete Sales: Accountant can delete a complete list of all Sales and delete detail of particular Sales by clicking on delete detail button. This will delete details.
11)Compliance Management
Compliance Management
List Of RTO Taxes: Accountant can add new RTO Taxes, RTO Taxes all RTO Taxes and view a complete list of all RTO Taxes.

Add RTO Taxes: Accountant can add RTO taxes details

- Select Vehicle: Select vehicle for this RTO taxes.
- RTO/Registration C.R Temp Tax: Enter a new RTO/registration C.R temp tax for this RTO taxes.
- Number Plate Charge: Enter a new number plate charge for this RTO taxes.
- Municipal Road Tax: Enter a new municipal road tax for this RTO taxes.
Edit RTO Taxes: Accountant can Edit detail of particular RTO Taxes by clicking on Edit detail button. This will open up details. From here Accountant can Change RTO Taxes Details.

Delete RTO Taxes: Accountant can delete a complete list of all RTO Taxes and delete detail of particular RTO Taxes type by clicking on delete detail button. This will delete details.
12)Report
A)Service Report
You can start date and end date of view Service report.

- Start Date: Enter a new start date for this service report.
- End Date: Enter a new end date for this service report.
- Select Service: Select service for this service report.
When clicking on GO button. This will open Start Date and End date Between In Service Report and Service list.
You can easily download pdf and print these report.
B)Product Stock
You can Manufacturer Name and Product Name of view Product stock report.

- Select Manufacturer Name: Select manufacturer name for this product stock.
- Select Product Name: Select product name for this product stock.
When clicking on GO button. This will open In Product stock list.
You can easily download pdf and print these report.
C)Product Usage
You can start date and end date of view Product Usage report.

- Start Date: Enter a new start date for this product usage report.
- End Date: Enter a new end date for this product usage report.
- Select Manufacturer Name: Select manufacturer name for this product usage report.
- Select Product Name: Select product name for this product usage report.
When clicking on GO button. This will open Start Date and End date Between In Product Usage list.
View Product Usage: Accountant can view a complete list of all Product Usage and view detail of particular Product Usage by clicking on view detail button. This will open up details.
You can easily download pdf and print these report.
D)Employee Service Report
You can start date and end date of view Employee Service report.

- Start Date: Enter a new start date for this employee service report.
- End Date: Enter a new end date for this employee service report.
- Select Employee: Select employee for this employee service report.
When clicking on GO button. This will open Start Date and End date Between In Employee service Report and employee service list.
E)Upcoming Service Report
You can start date and end date of view Upcoming Service report.

- Start Date: Enter a new start date for this upcoming service report.
- End Date: Enter a new end date for this upcoming service report.
When clicking on GO button. This will open Start Date and End date Between In Upcoming service Report and Upcoming service list.
You can easily download pdf and print these report.
F)Email Sent Report
You can start date and end date of the view Email Sent report.

- Start Date: Enter a new start date for this Email Sent report.
- End Date: Enter a new end date for this Email sent report.
When clicking on GO button. This will open Start Date and End date Between In Email Sent Report and Email sent report list.
You can easily download pdf and print these report.
13)Email Template
EmailTemplate
Accountant can set Email Template using this details.

14)Custom Field
Custom Field
List Custom Field: Accountant can add new Custom Field, Custom Field all Custom Field and view a complete list of all Custom Field.

Add Custom Field: Accountant can add Custom Field details.

- Form Name: Select form name for this custom field.
- Label: Enter a new label for this custom field.
- Type: Select type for this custom field.
- Required: Select required for this custom field.
- Always visible : Select always visible for this custom field.
Edit Custom Field: Accountant can Edit detail of particular Custom Field by clicking on Edit detail button. This will open up details. From here Accountant can Change Custom Field Details.

Delete Custom Field: Accountant can delete a complete list of all Custom Field and delete detail of particular Custom Field by clicking on delete detail button. This will delete details.
15)Observation Library
Observation
Observation List: Accountant can add new Observation, Observation all Observation and view a complete list of all Observation.

Add Observation: Accountant can add Observation details

- Vehicle Name: Select multiple vehicles for this Observation.
- Checkpoint Category: Select checkpoint category for this observation.
- Add Category: then click on Add category button. You can add new add category from here.
- Checkpoint: Enter a new checkpoint for this observation.
- Add Checkpoint: then click on Add Checkpoint button. You can add new add Checkpoint.

Edit Observation: Accountant can Edit detail of particular Observation by clicking on Edit detail button. This will open up details. From here Accountant can Change Observation Details.

Delete Observation: Accountant can delete a complete list of all Observation and delete detail of particular Observation by clicking on delete detail button. This will delete details.
J)Patch
1) Backup Your Database and Code:
Before proceeding with the update, ensure the safety of your existing database and code by creating a backup.
2) Replace the Old Garage Folder:
Locate your current garage folder and replace it with the new one using FTP.
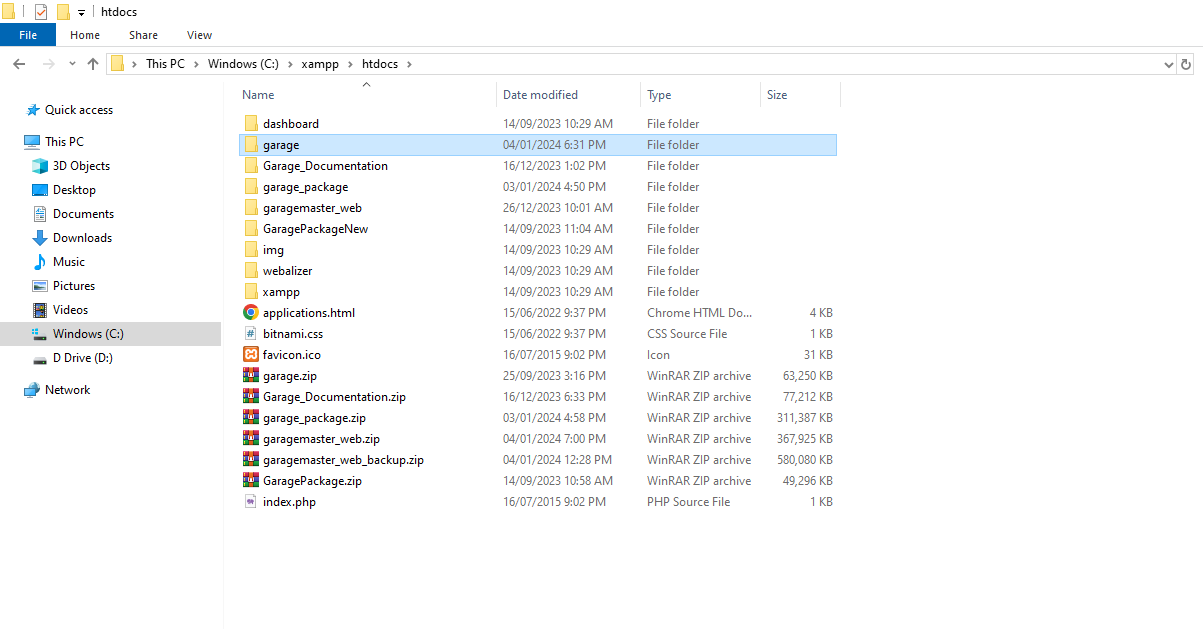
Update the new code by replacing the old `.env` and installed.txt file with your specific configurations.
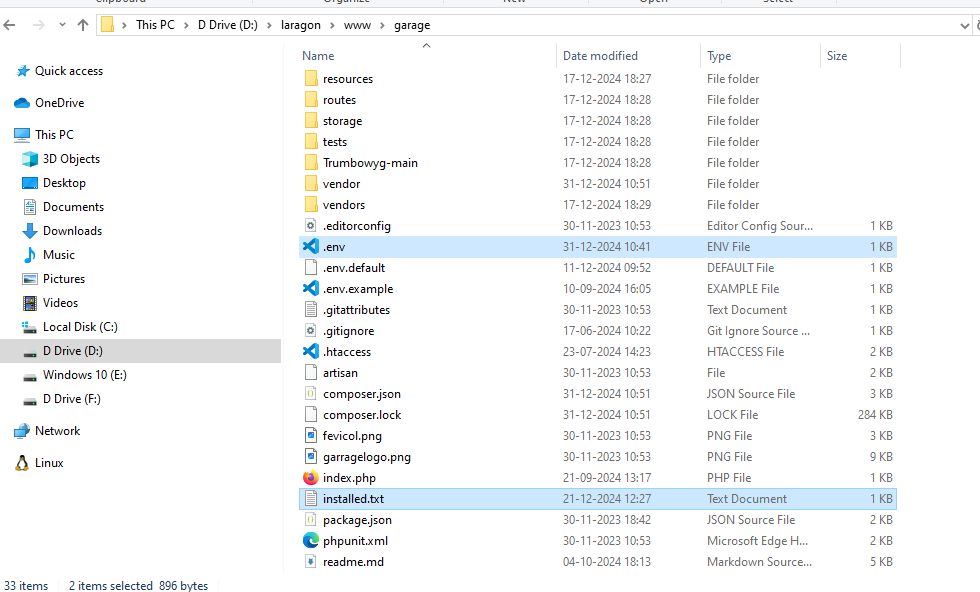
3) Log in to Your System:
Access the system using administrative credentials.
4) Read Instructions and Update:
Carefully review the provided instructions.
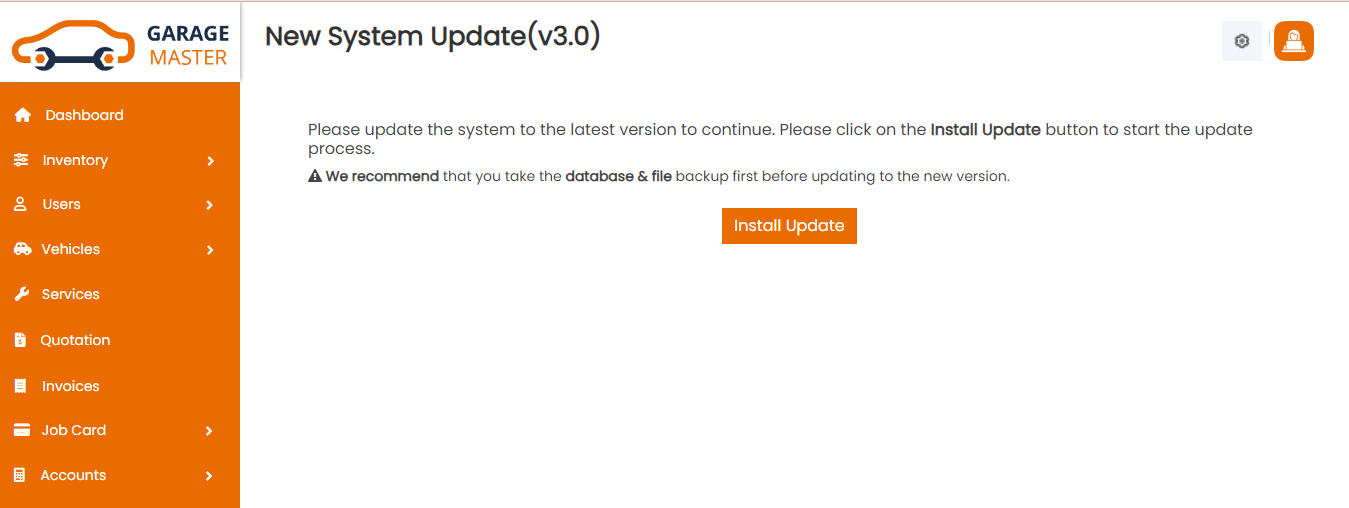
Click "Install Update" to apply the changes.
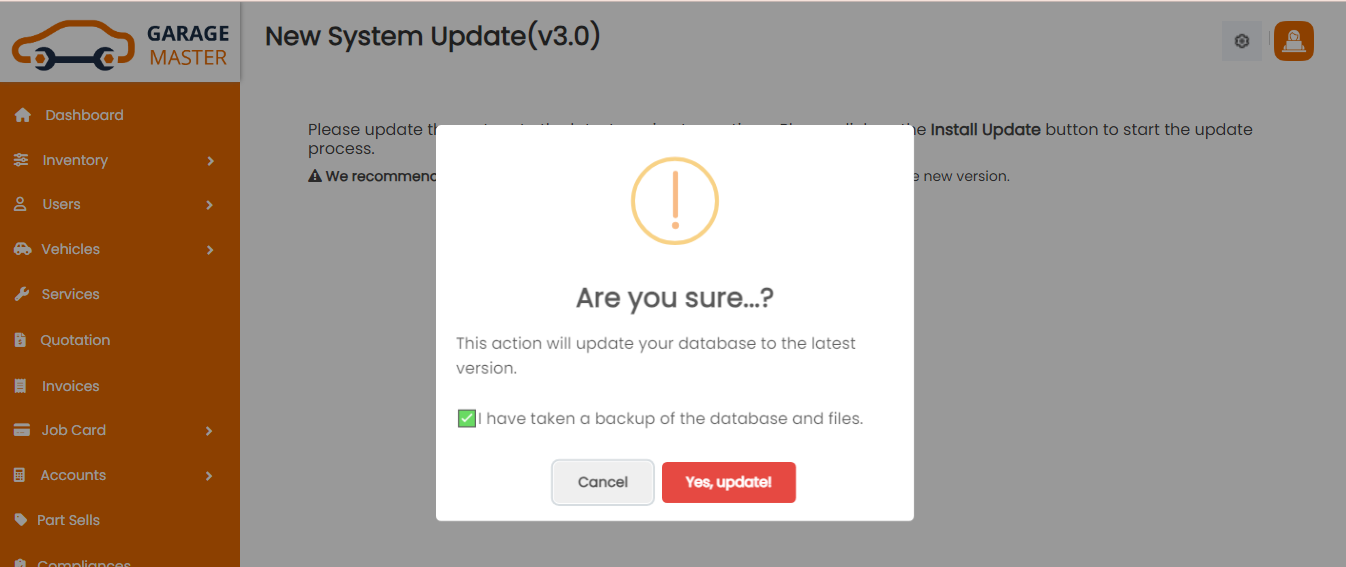
If you click "Yes, update!" it will update your database and show the popup below.
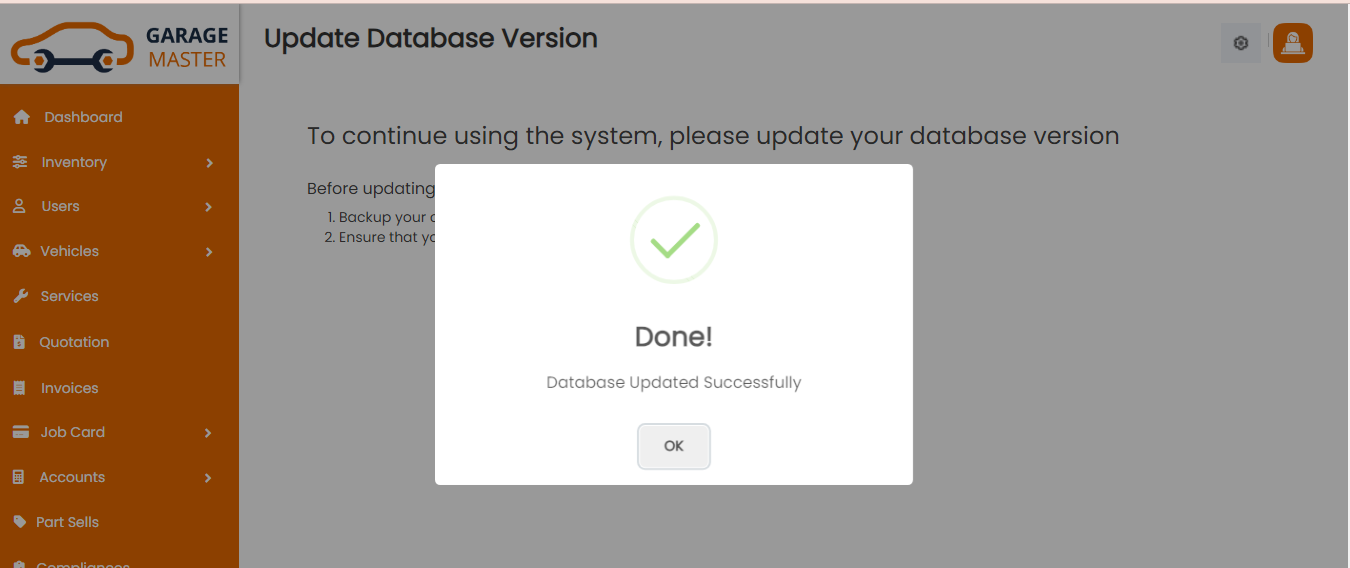
Note: Any code customizations will not be included in the new system.
K)FAQ
1) I Don't see Installer Page properly.No background image, no Next button nothing.
Make Sure you have .htaccess file on main directory[in Garage folder].Where resources,Controllers,config directory[].
If you already have .htaccess Make sure your host has a mod_rewrite module on.Basically on apache server.
If you want to have any paid customization as per your requirements, you can contact us on sales@mojoomla.com.
2)How can i resolve the 'SQLSTATE[28000][1045] access denied for user error during installation.

You need to enter the correct database credentials.
Log in to cPanel. Click here & Verify correct database credentials (host, username, password, and database name).
Ensure that the database user has the appropriate privileges to access and modify the database. At a minimum, the user should have SELECT, INSERT, UPDATE, DELETE, and CREATE privileges on the database.
3) In installation i get error integrity constraint violation:1062 Duplicate entry '1' for key 'PRIMARY'

Make Sure you have an empty database.
If you already have data in the database, take a backup of your data before making any changes to prevent data loss.
Now you need to delete all tables from the database and do the installation again.
4)After adding all the details, when you click on the Install button, you may get a 500 Internal Server Error. This usually occurs due to an incorrect or wrong database name. Please verify your database credentials and try again.
Make Sure you have an empty database.
If you already have data in the database, take a backup of your data before making any changes to prevent data loss.
Now you need to delete all tables from the database and do the installation again.
5) I am not able to install, the installation process keeps restarting without completing.
It seems that there might be an issue with the password entry.
Please ensure that your password is a combination of characters, special characters, and numbers. So enter the proper password in the installation process.
6) I am not able to login all user login says error 403|This action is unauthorized.
Please clear the browser cache once and try again.
7) I got an error when trying to install, No application encryption key has been specified.
In order to solve this issue, you will have to generate an APP KEY which is located within your .env (environment) file.
To generate the key, you can run the Laravel Artisan key generate command in your terminal. Once the command has been completed, you can try again and refresh your page to ensure that the changes have taken effect.
Laravel Artisan key generate command : php artisan key:generate
8) I found this error message composer detected issues in your platform: your composer dependencies require a PHP version ">=8.1.2" Is it not possible to use the above?
Please check your CLI(Terminal) or shell version of PHP, it must be 8.1.2 or higher.
To check php version, Goto Garage app installed folder and run command “php -v”
You can update php version from cPanel Click here or contact your host.
9) I am facing a CSS loading issue on the installer page
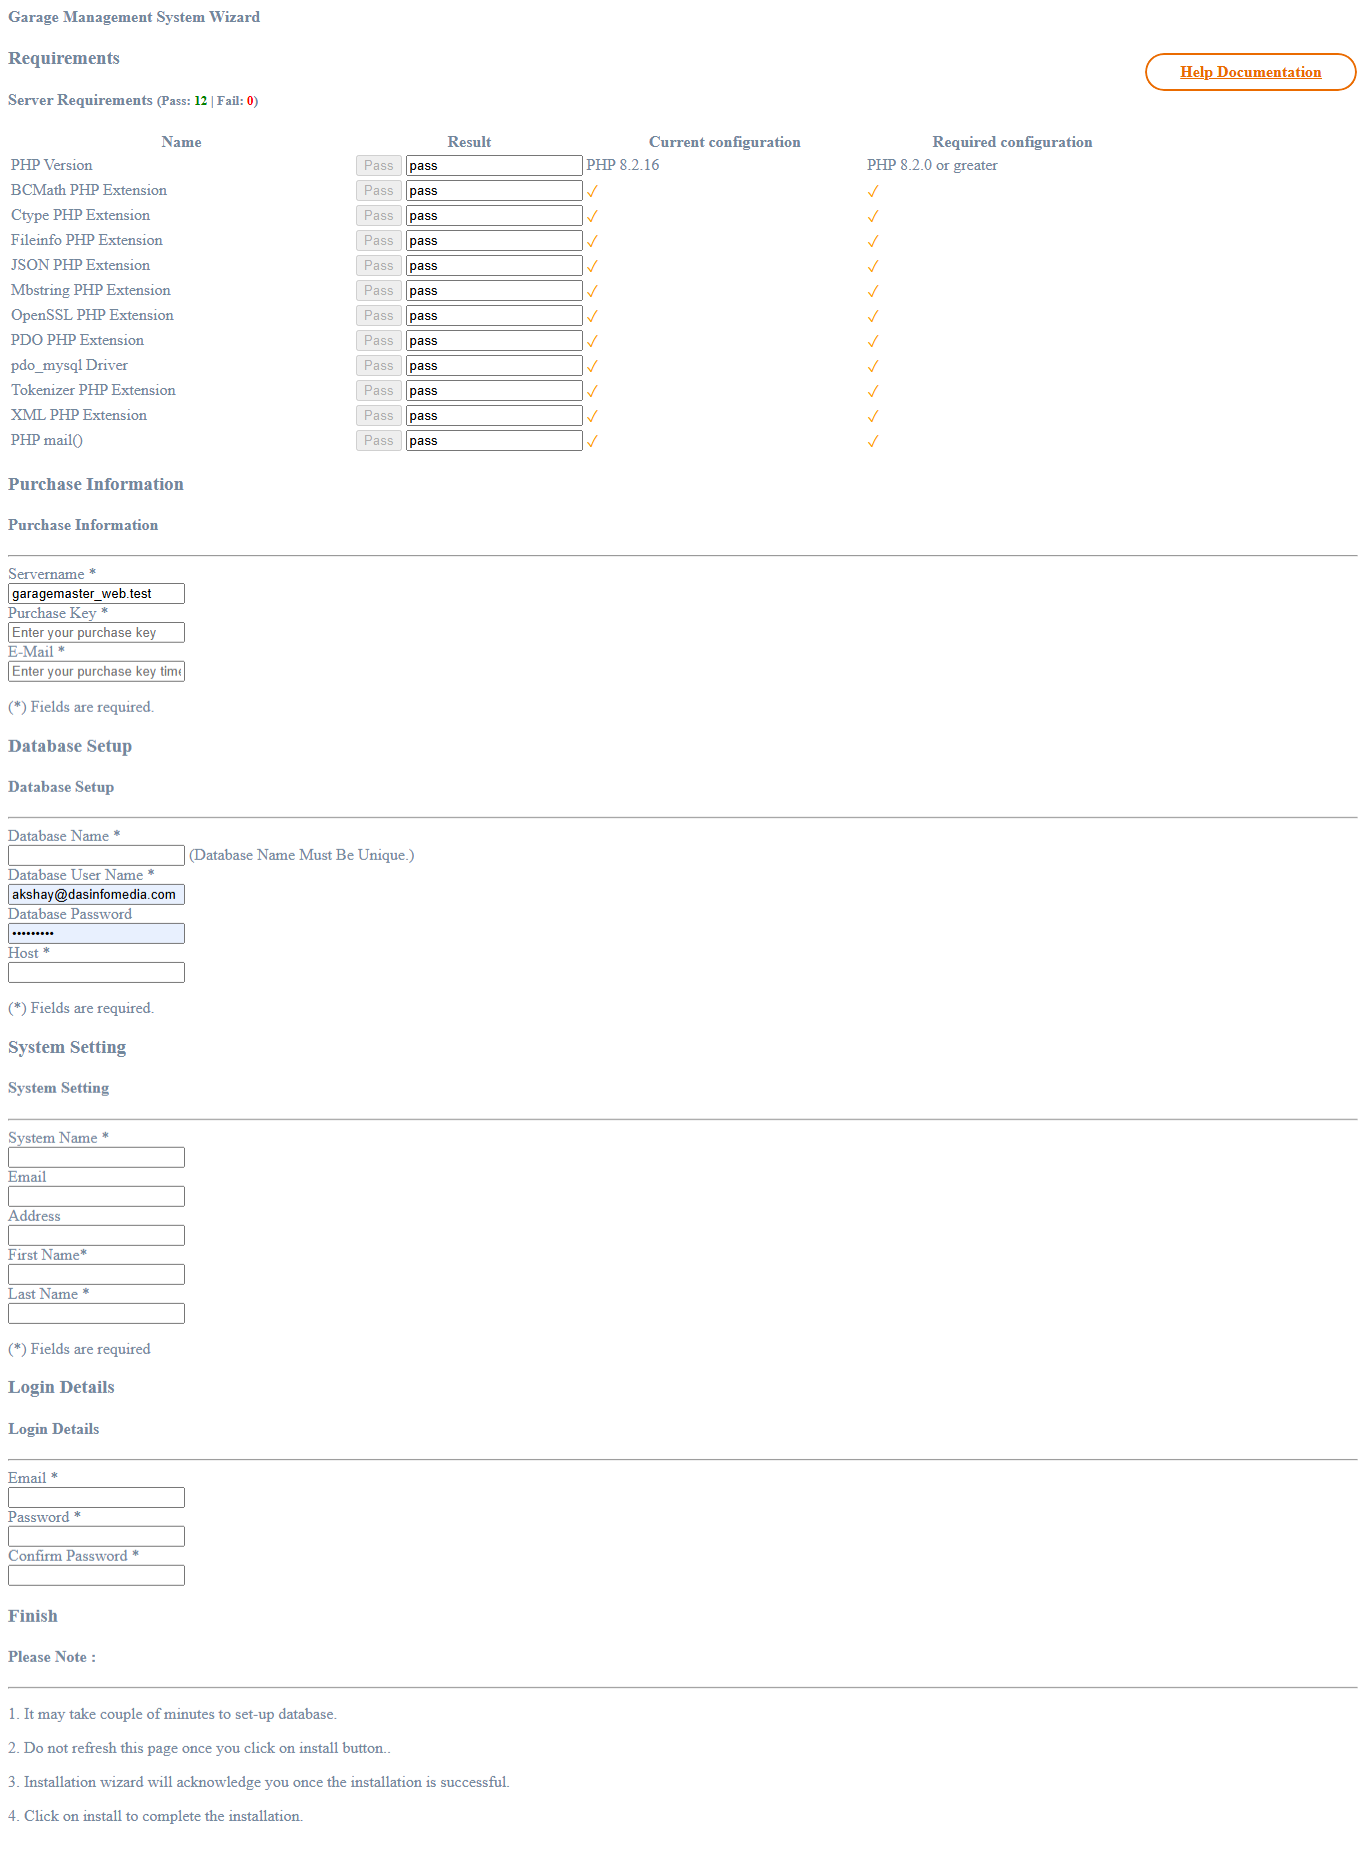
If you encounter a CSS loading issue like the one shown above, please check the following solutions:
-
Incorrect document root configuration:
Make sure your domain is pointing to the project root directory and not directly to thegarage/publicfolder. If the public folder is set as the document root, this issue may occur during installation. -
Missing CSS or build files:
Ensure that all Garage Master files have been uploaded correctly to your server. Verify that thebuildandpublicasset files exist and were not skipped during upload.
