
Introduction
Welcome to Mj School Management System Documentation
Before You Begin
This user guide covers all options the plugin provides. Read carefully — it contains answers to most questions. For anything not covered, contact us at sales@mojoomla.com
What's Included
Admissions
Online admission forms, approval workflows and student onboarding with automated email notifications.
Fee Payment
Manage fee types, invoices and recurring billing.
Exams & Marks
Create exams, manage marks, marksheets, and hall receipts.
Attendance
QR code attendance, CSV import/export, student and teacher attendance tracking.
Library
Book catalogue, issue and return tracking, category management and student book history.
Important Notes
Please read before installation or upgrading
Action Required for Existing Users
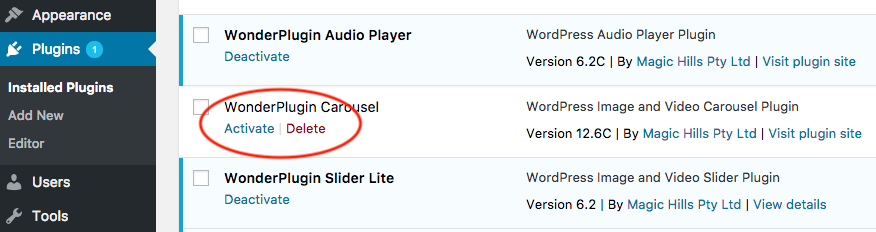
If you are upgrading from an older version, please Deactivate then Activate the plugin after uploading new files. Database table names and WordPress option names update automatically. All existing data will remain intact. Always take a full site backup before updating.
Hosting Requirement
The Plugin works best on cPanel/WHM-enabled hosting. Usage/installation on Nginx/Plesk is not recommended and we cannot provide support for those environments.
WordPress Compatibility
Compatible with WordPress 5.0+ and PHP 7.4+. Tested with all major themes. Works best with cPanel hosting and MySQL 5.7 or higher.
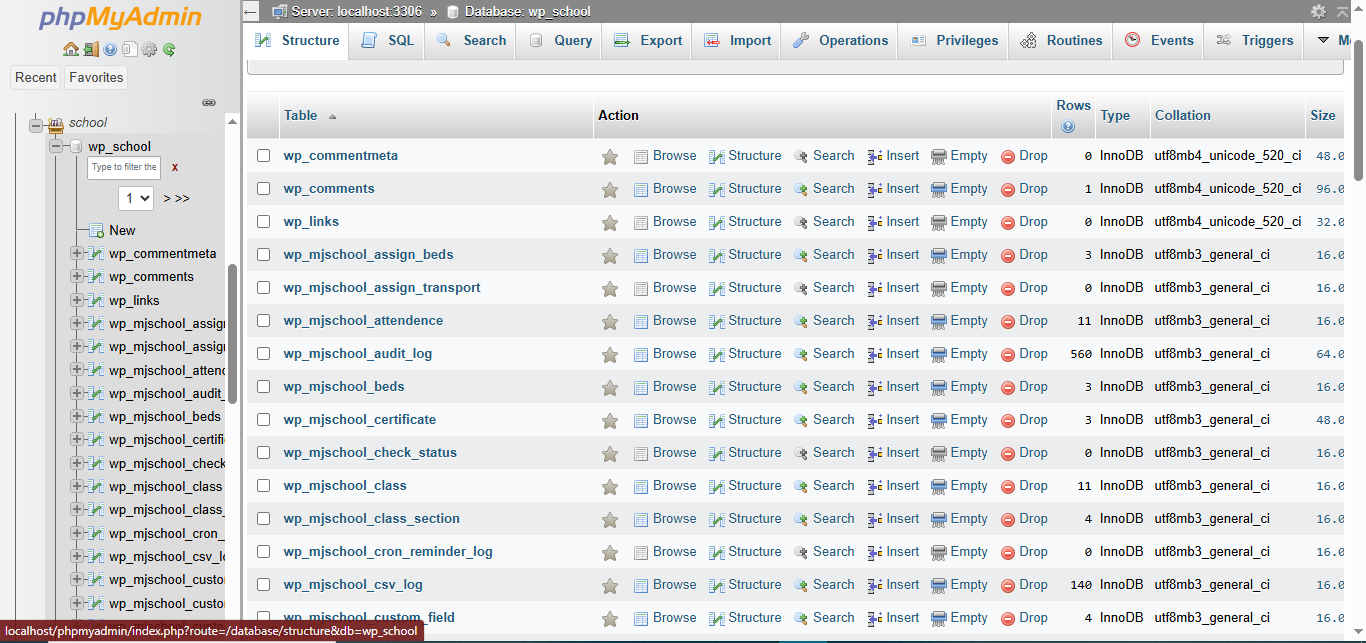
Installation Guide
Follow these steps to install the plugin on your WordPress site
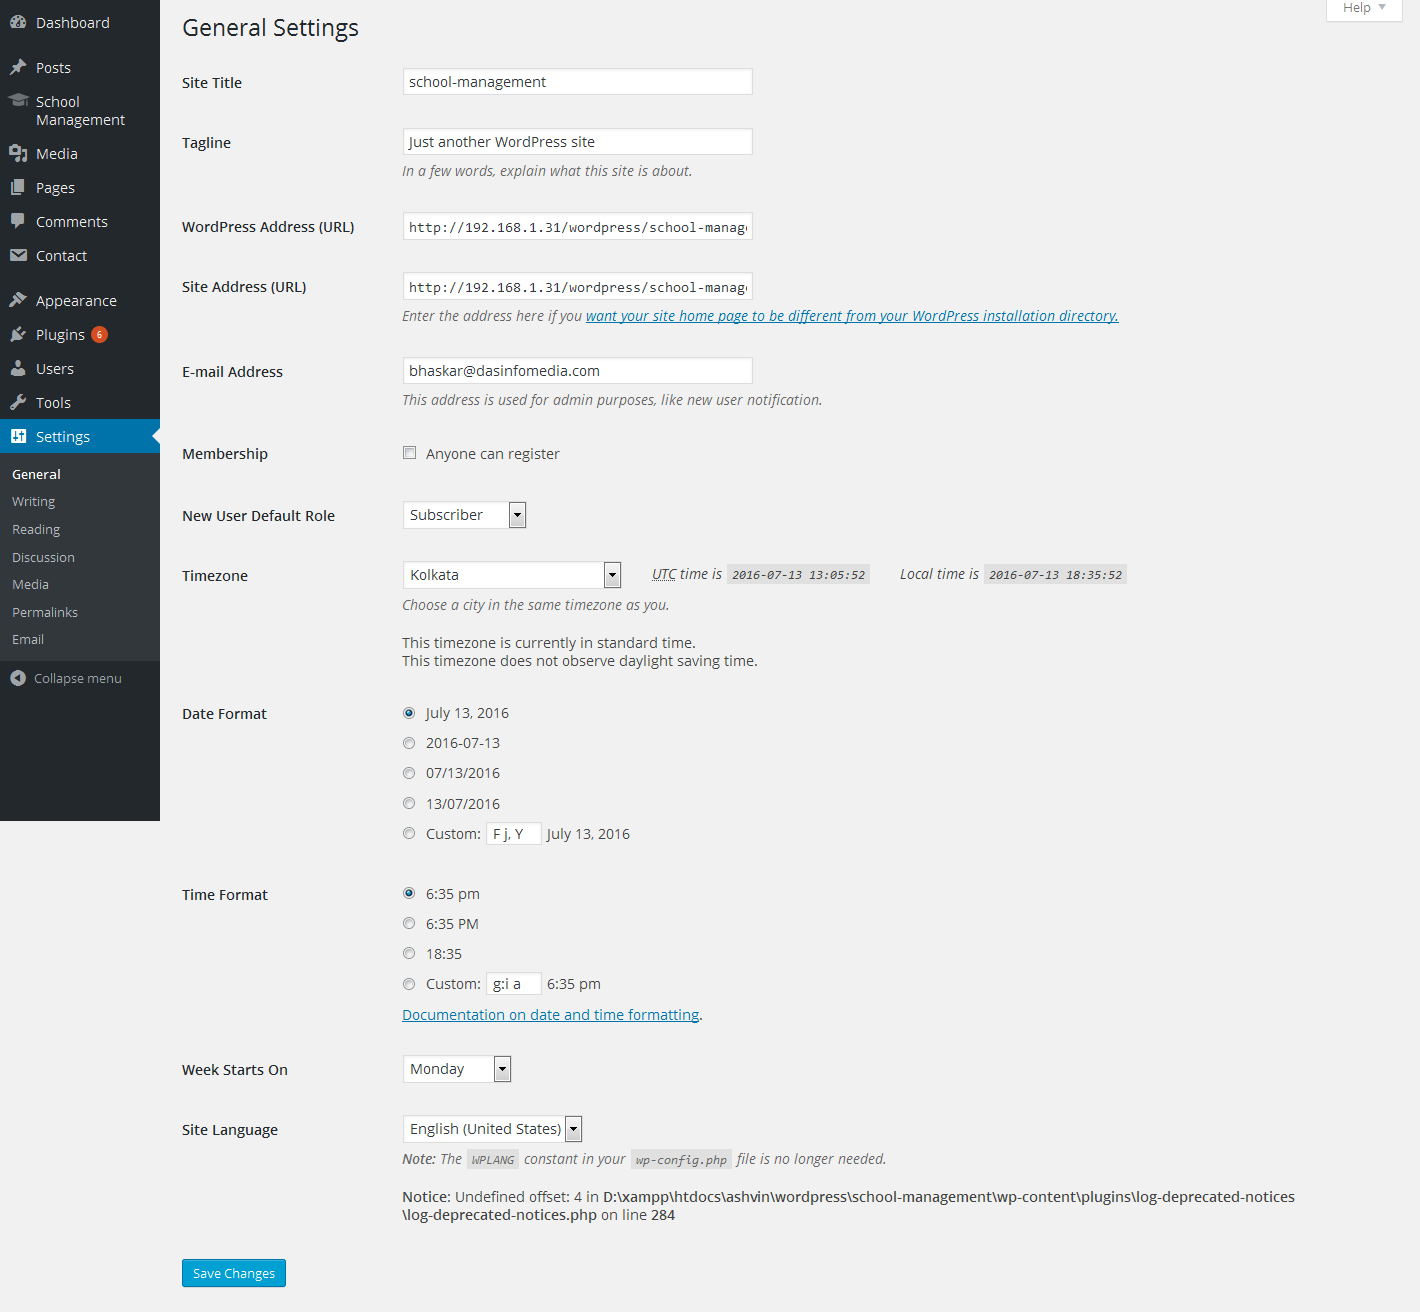
Increase WordPress Memory Limit
Method 1 (wp-config.php): define( 'WP_MEMORY_LIMIT', '256M' );
Method 2 (.htaccess): php_value upload_max_filesize 256M, php_value post_max_size 256M, php_value max_execution_time 600
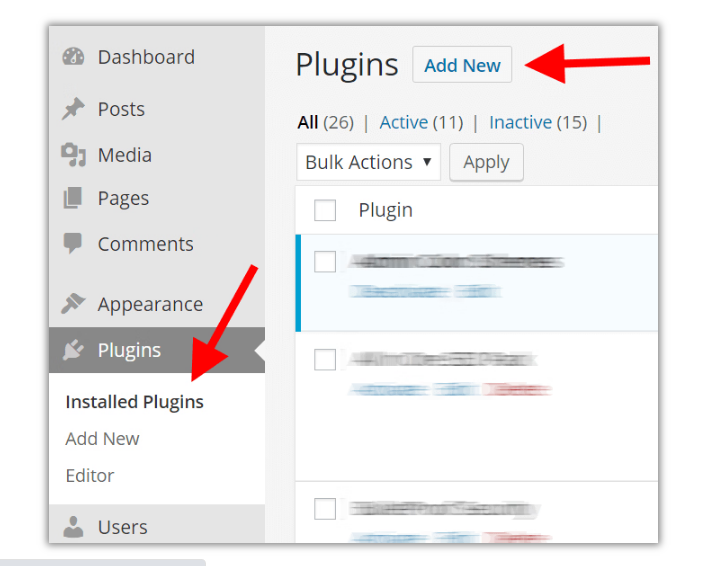
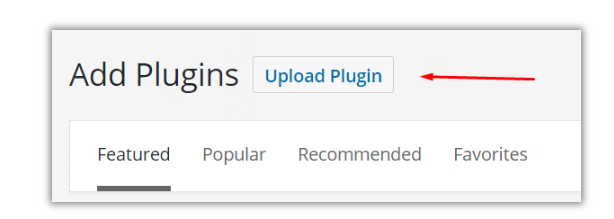
Go to Plugins → Add New
Click on "Add New" button in the Plugins section of your WordPress dashboard.
Get the Plugin Archive
Get mjschool.zip from the downloaded plugin zip file on CodeCanyon.
Upload Plugin Archive
Click "Upload Plugin" button at the top, then choose your zip file and click Install Now.
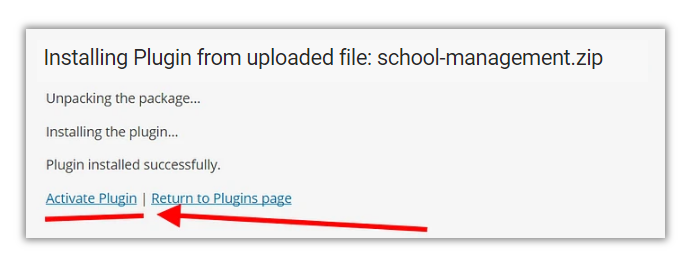
Activate the Plugin
When WordPress finishes installing, click Activate Plugin.
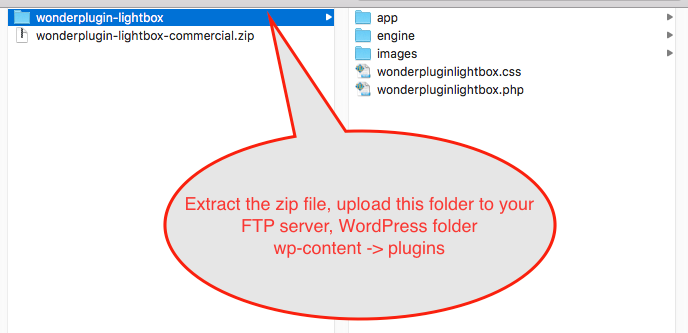
Extract the Plugin ZIP File
Extract mjschool.zip on your local computer. Upload the inner plugin folder (not a parent wrapper folder).
Upload to FTP Server
Use your FTP software to upload the extracted plugin folder to wp-content/plugins.
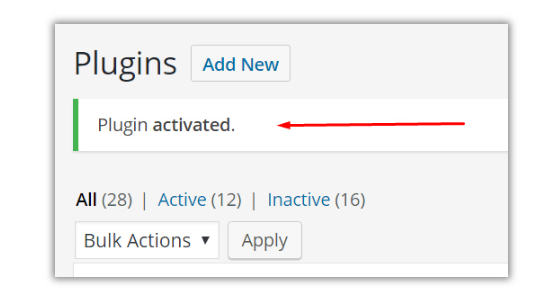
Activate the Plugin
Log into WordPress backend → Plugins → Installed Plugins, find the plugin and click Activate.

Server Requirements
WordPress
5.0 or HigherLatest WordPress recommended.
PHP
7.4 or HigherPHP 8.0+ recommended for best performance.
MySQL
5.7 or HigherMySQL 8.0 recommended.
Memory
256 MB+WordPress memory limit.
Memory Limit
Increase WordPress PHP memory for smooth plugin operation
Why Memory Limit Matters
If the plugin shows errors or doesn't load after installation, the PHP memory limit is likely too low. Set it to 256M or higher using one of the methods below.
Method 1 — wp-config.php
define( 'WP_MEMORY_LIMIT', '256M' );
Method 2 — .htaccess
php_value upload_max_filesize 256M
php_value post_max_size 256M
php_value max_execution_time 600
php_value memory_limit 256M
Add the wp-config.php line just before the /* That's all, stop editing! */ comment. For .htaccess, add the lines at the bottom of the file.
Setup Wizard
Quick start guide — get your school up and running in steps
System Settings
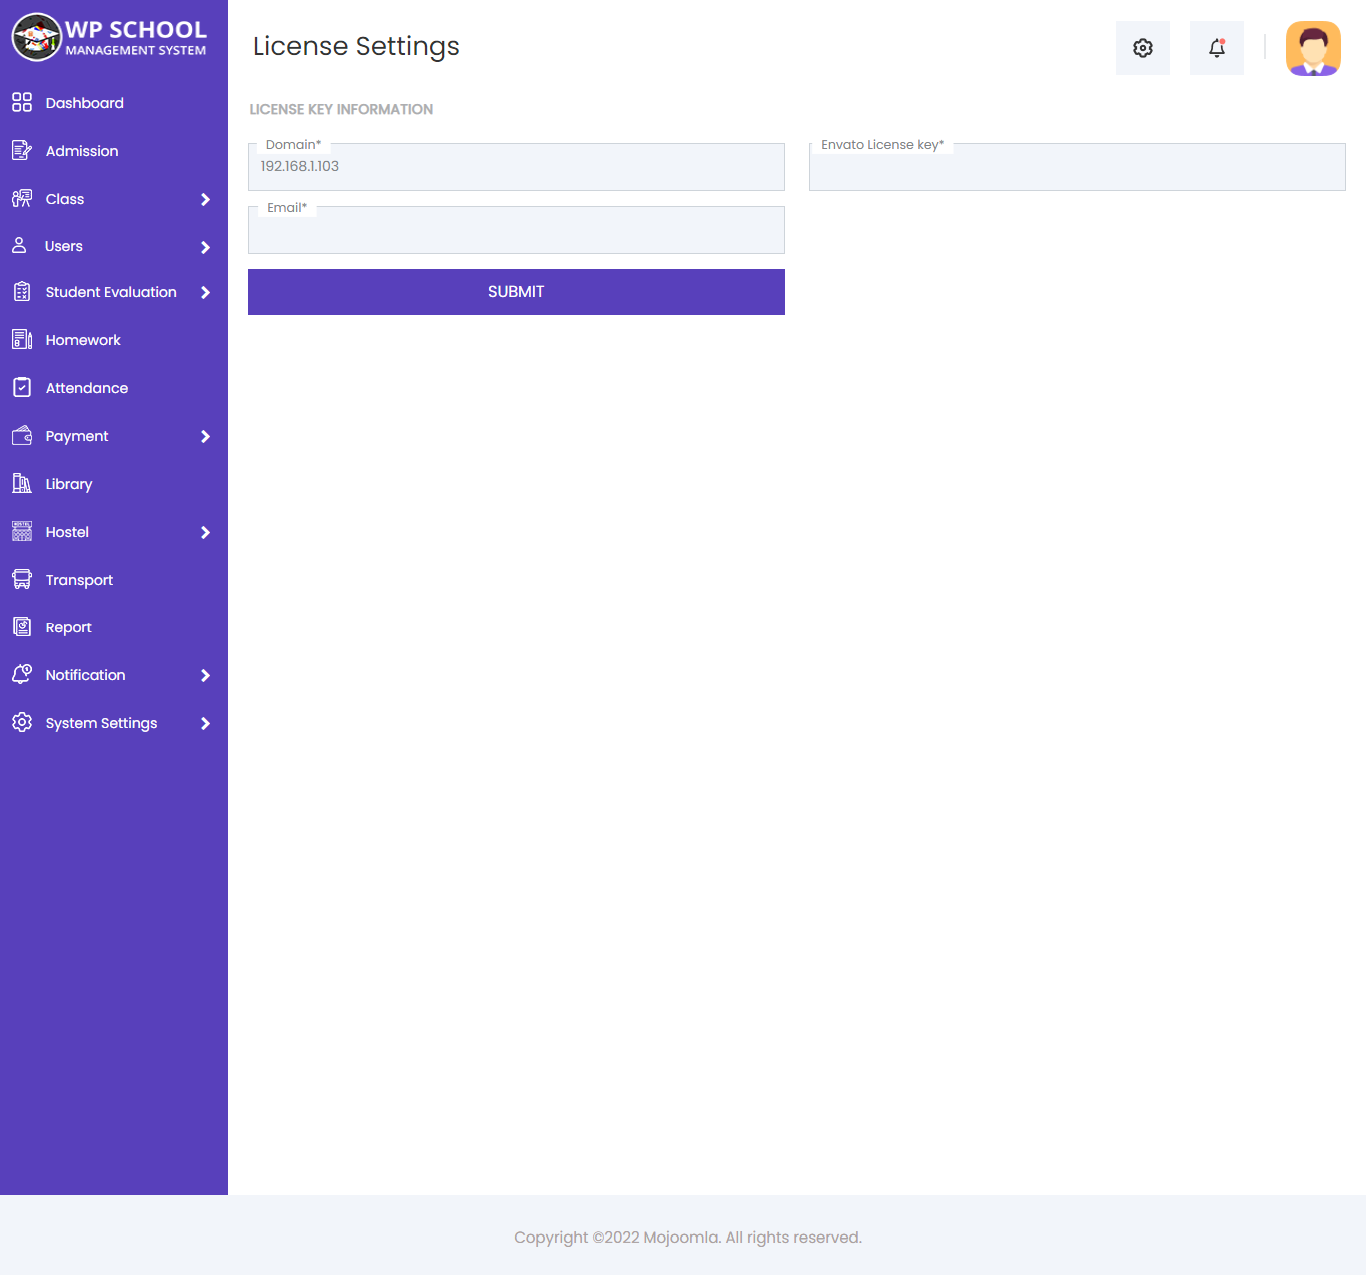
1) License Settings
Click License Settings under the School Management menu. Fill all required fields. A single licence key works only on one domain.
| Field | Description |
|---|---|
| Domain | Auto-fetched from your site URL — no manual entry needed |
| Envato License Key | Your CodeCanyon purchase key |
| Email used when purchasing the license |
Visit dasinfomedia.com — find purchase code for step-by-step instructions.
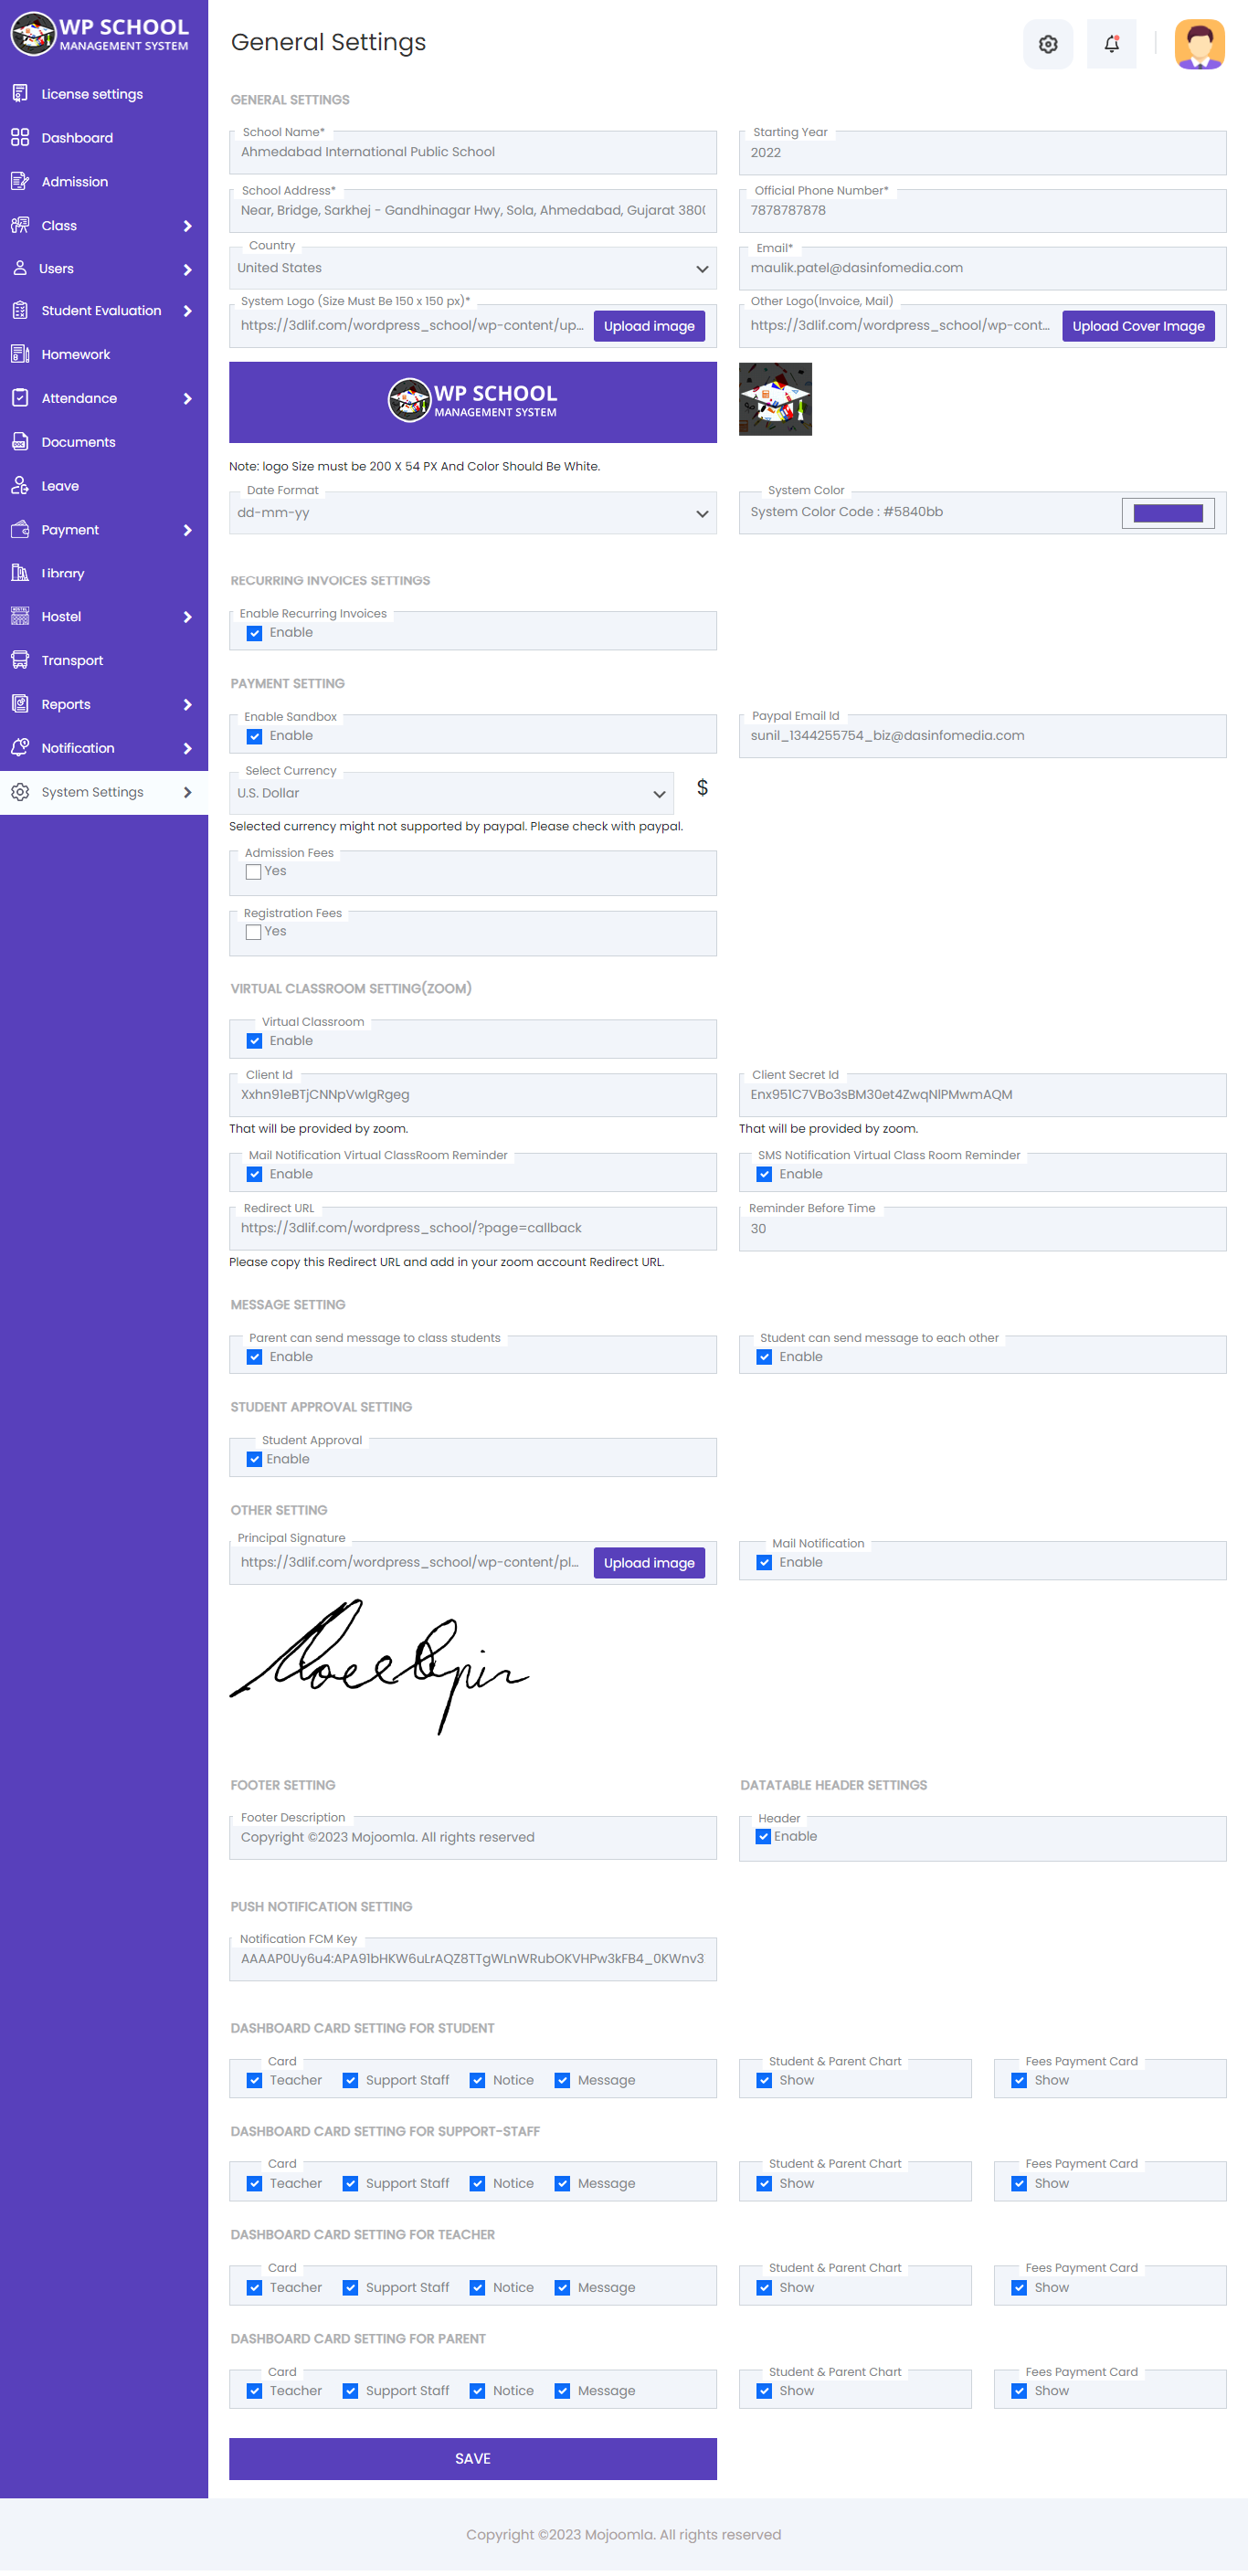
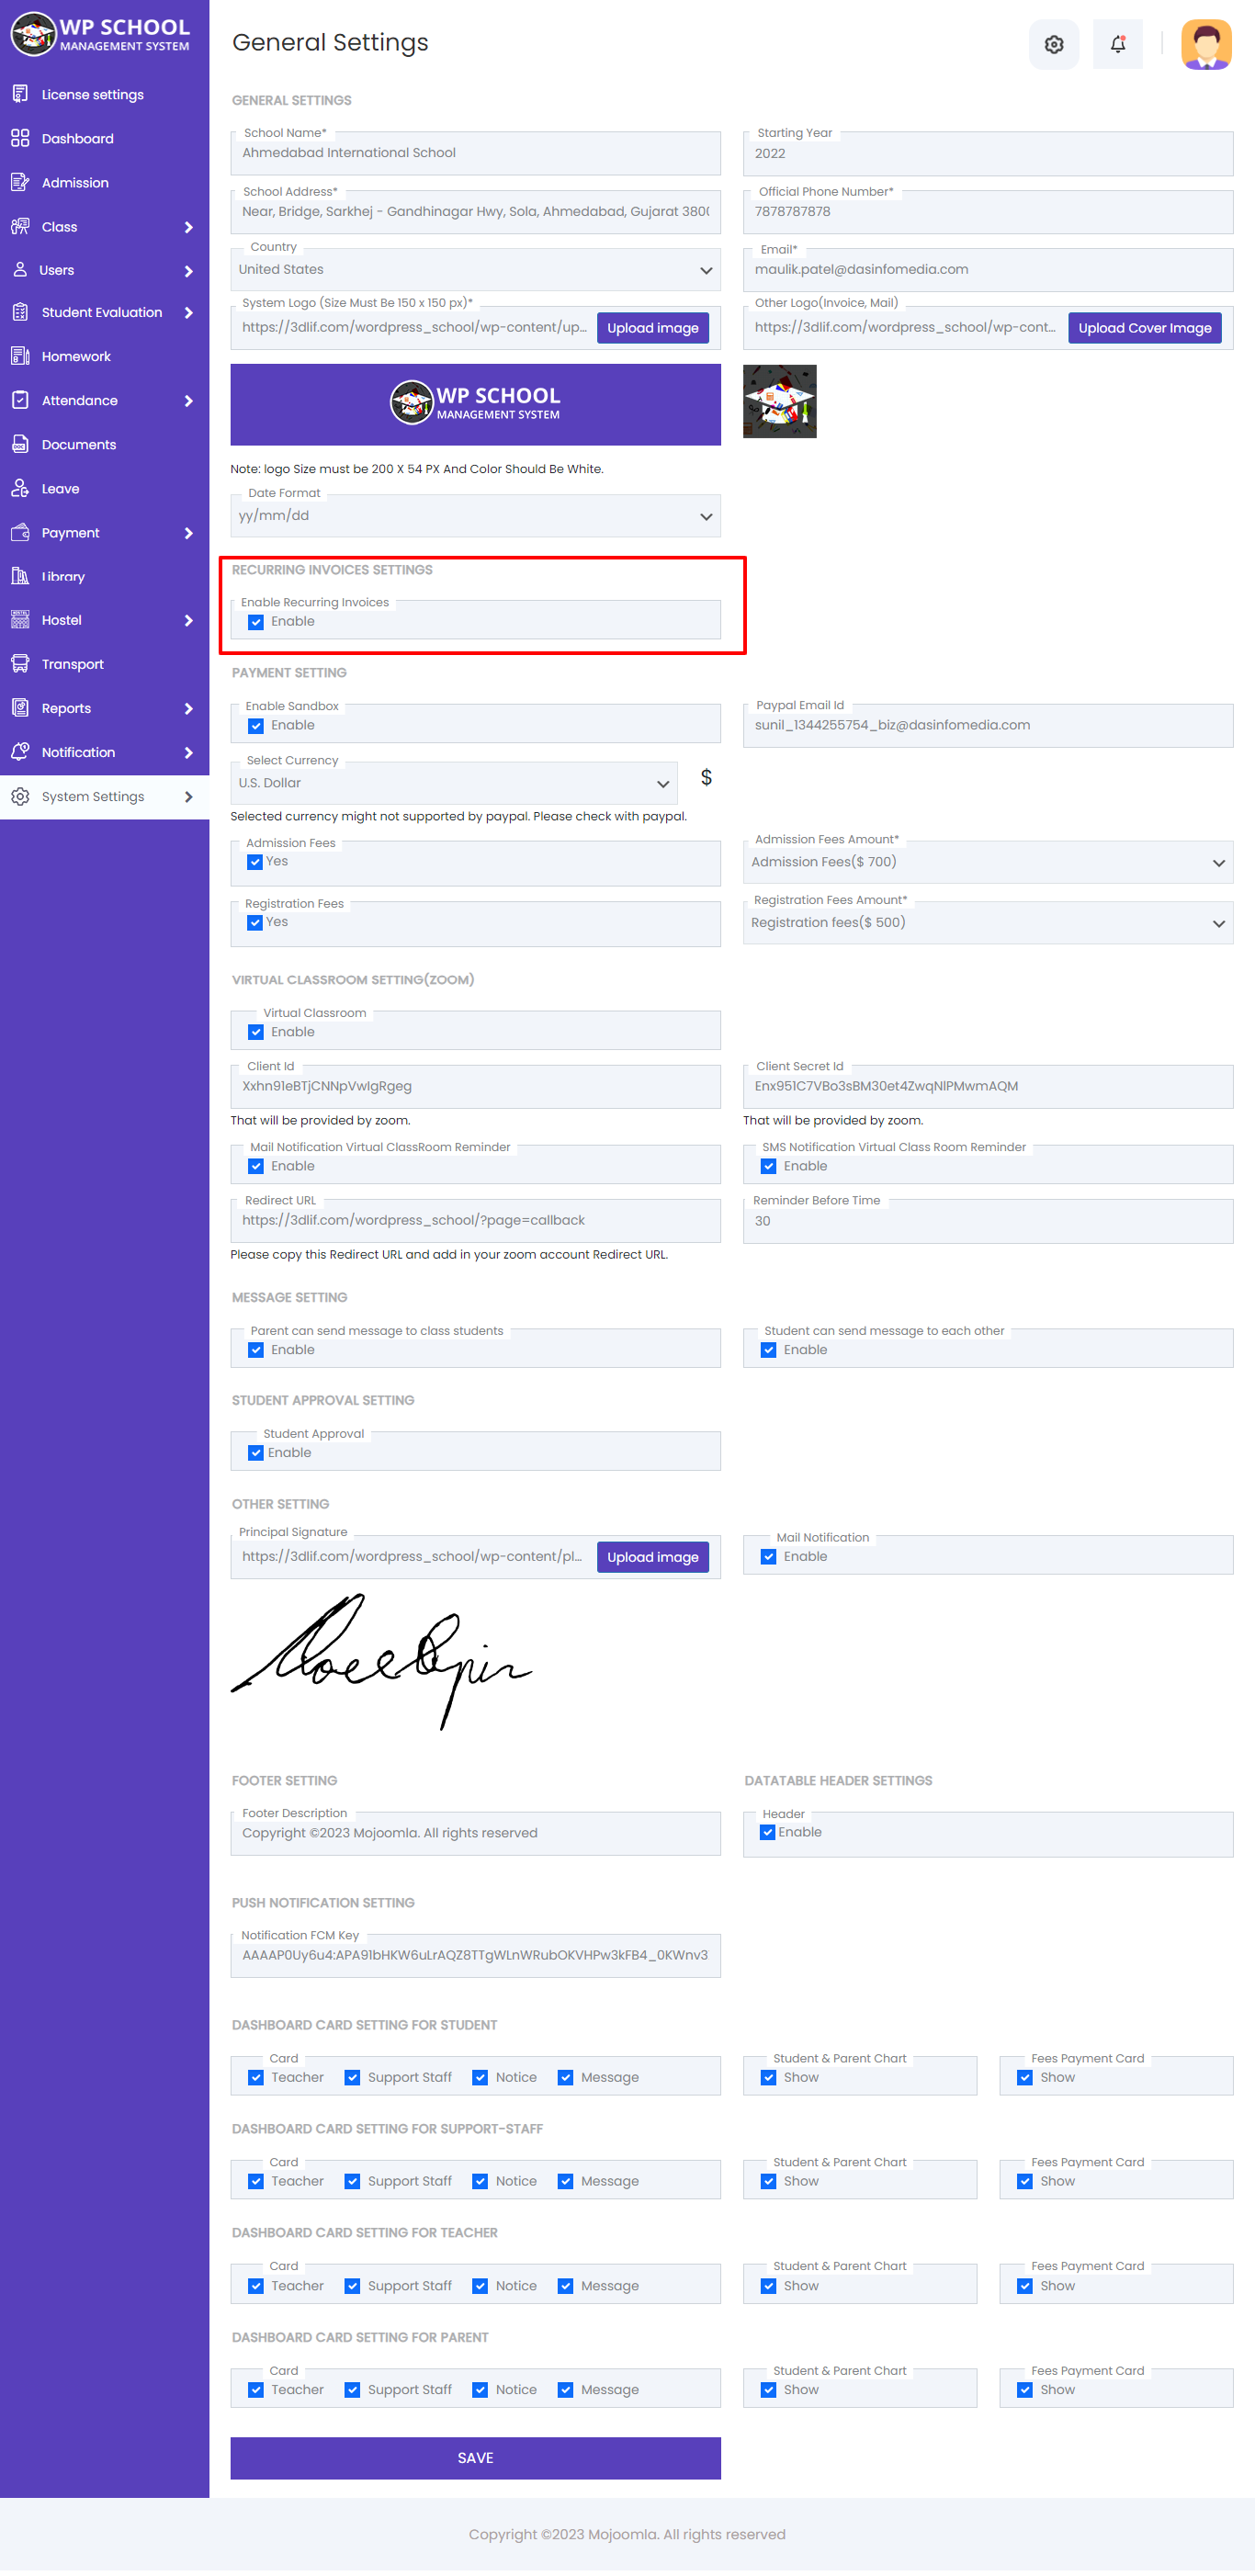
2) General Settings
Click General Setting under the school management link-list. Fill all fields — these details are used across the entire system in documents, invoices, and communications.
| # | Field | Description |
|---|---|---|
| 1 | School Name | Official name of your school |
| 2 | Starting Year | Year the school started operations |
| 3 | School Address | Full physical address |
| 4 | Official Phone | Primary contact number |
| 5 | Country / City | School location |
| 6 | Official school email address | |
| 7 | School Logo | Upload school logo image |
| 8 | Profile Cover Image | Used for profile page backgrounds |
| 0 | System Color | Customize interface color theme |
| 10 | System Prefix | Student ID prefix (e.g. STU-001) |
| 11 | Select Currency | Currency for all fees and invoices |
| 12 | Fees Reminder | Enable automatic fee payment reminders |
| 13 | Invoice Format | Display invoice in tabular format |
| 14 | Reminder Before Day | Days before due date to send reminders |
| 15 | Mail Notification | Enable email notifications to all users |
| 16 | Virtual Classroom | Enable Zoom integration |
| 17 | Zoom Client ID | Provided by Zoom developer portal |
| 18 | Zoom Client Secret | Provided by Zoom developer portal |
| 19 | Redirect URL | Copy and paste into your Zoom app settings |
| 20 | Parent Message | Allow parents to message their child's classmates |
| 21 | Student Message | Allow students to message each other in same class |
| 22 | Student Approval | If enabled, students can login without admin approval |
| 23 | Principal Signature | Upload principal's signature for documents |
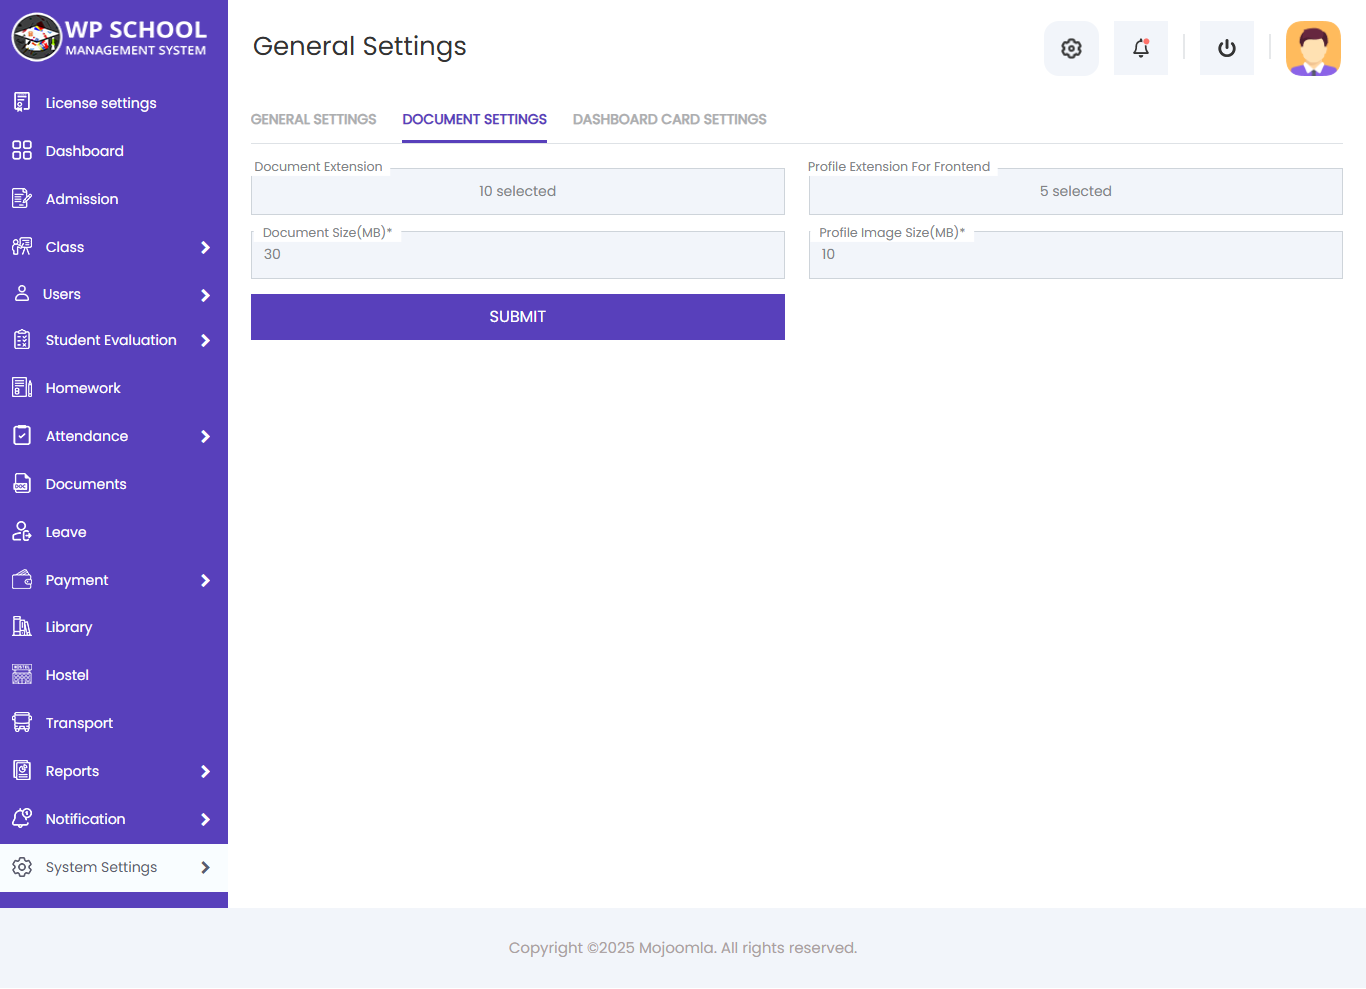
2.2) Document Settings
Configure validation rules for allowed upload file extensions: PDF, DOC, DOCX, XLS, XLSX, PPT, PPTX, GIF, PNG, JPG, JPEG, BMP, WEBP, SVG, CSV, and more.
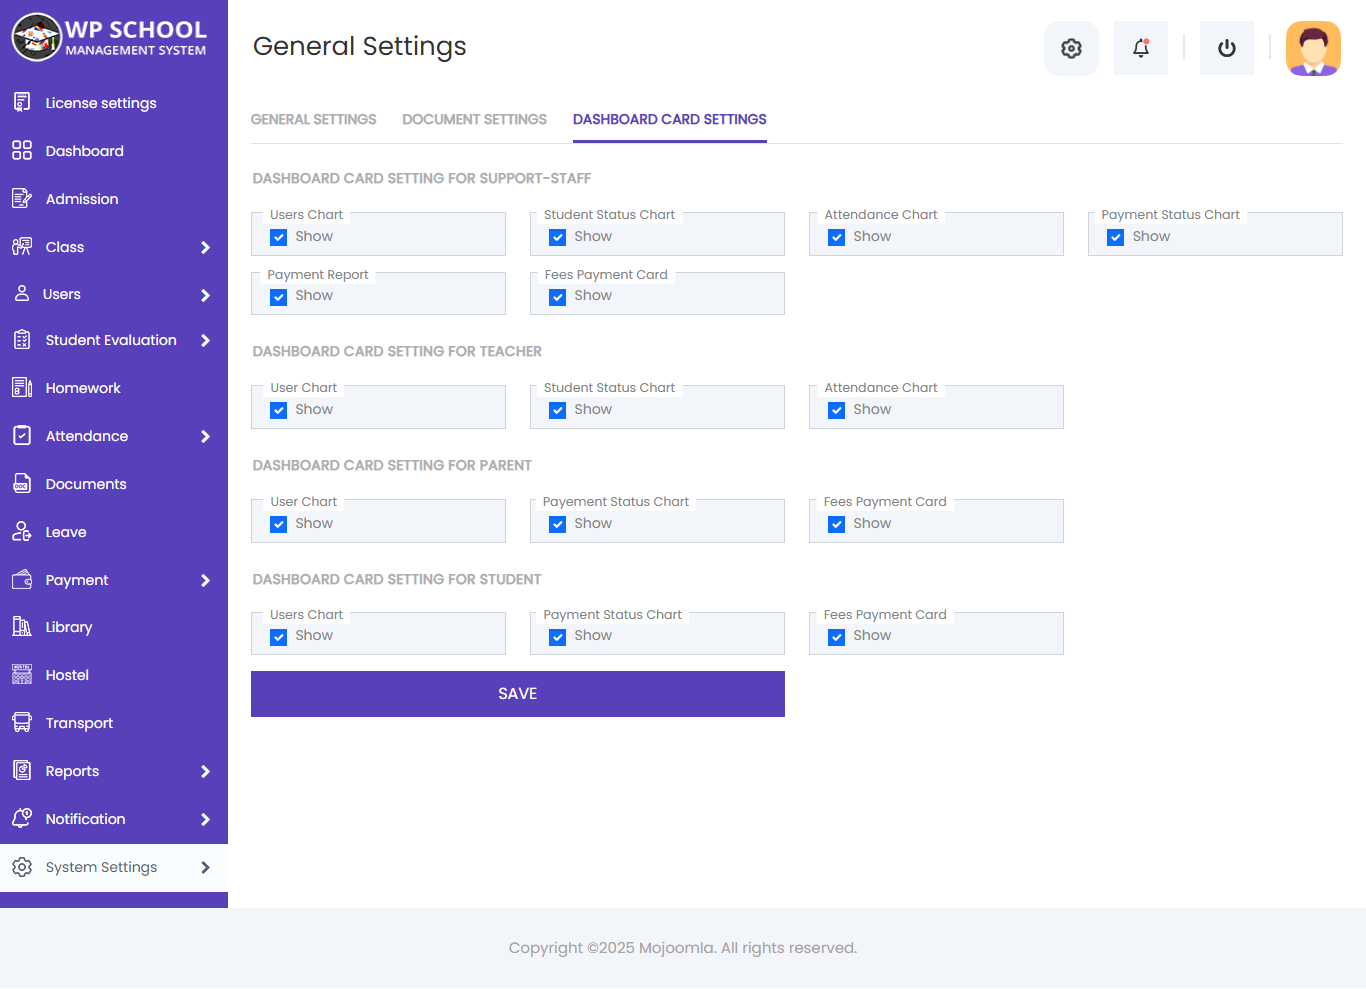
2.3) Dashboard Card Settings
Configure which metric cards are visible for each user role on their dashboard. Show only the cards relevant to each role for a cleaner interface.
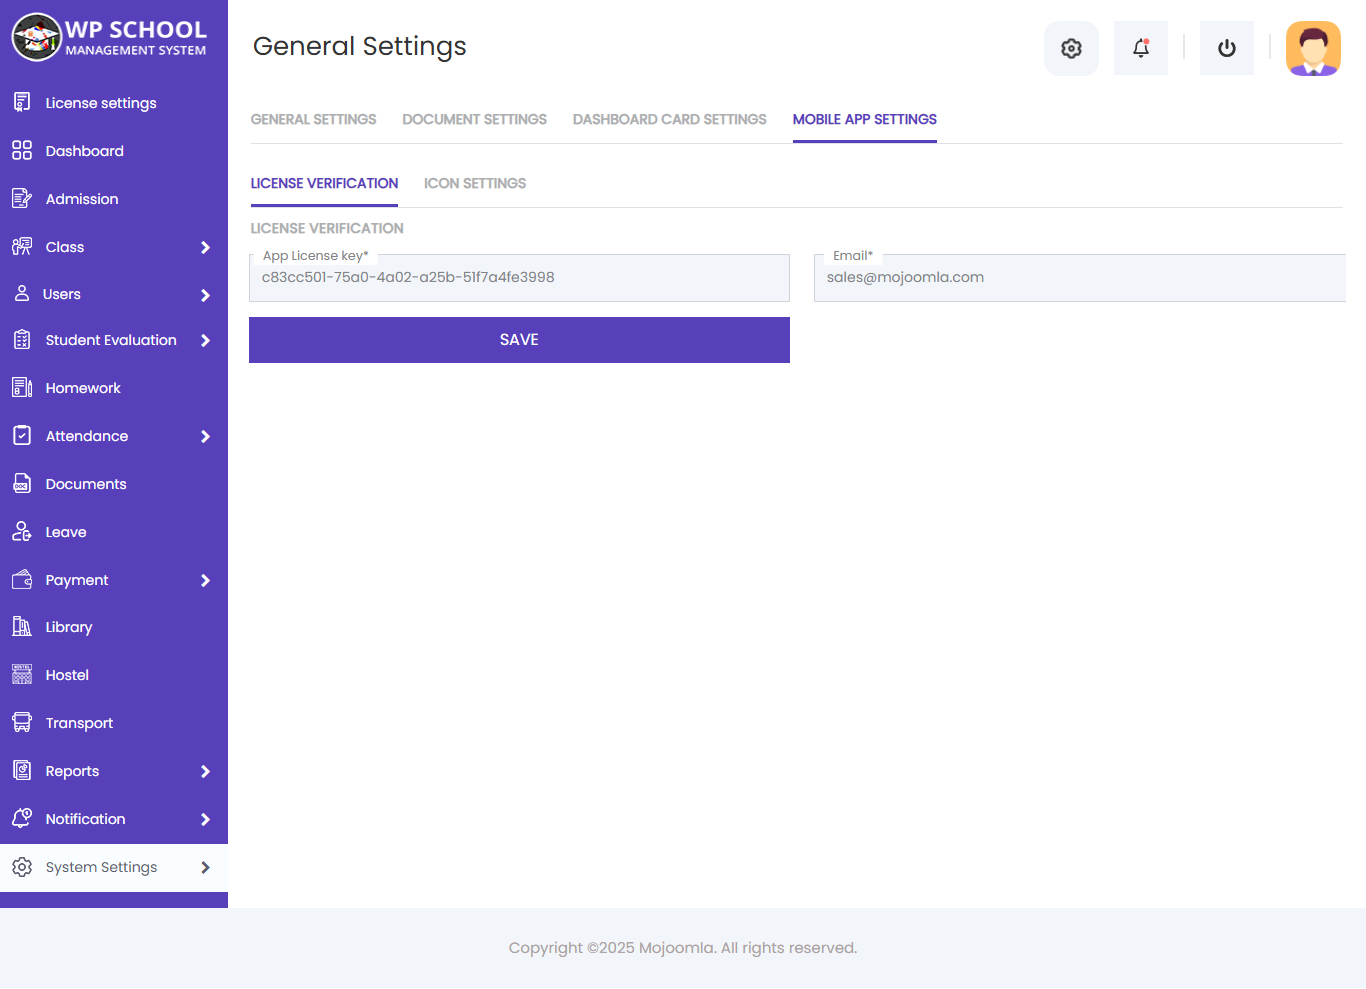
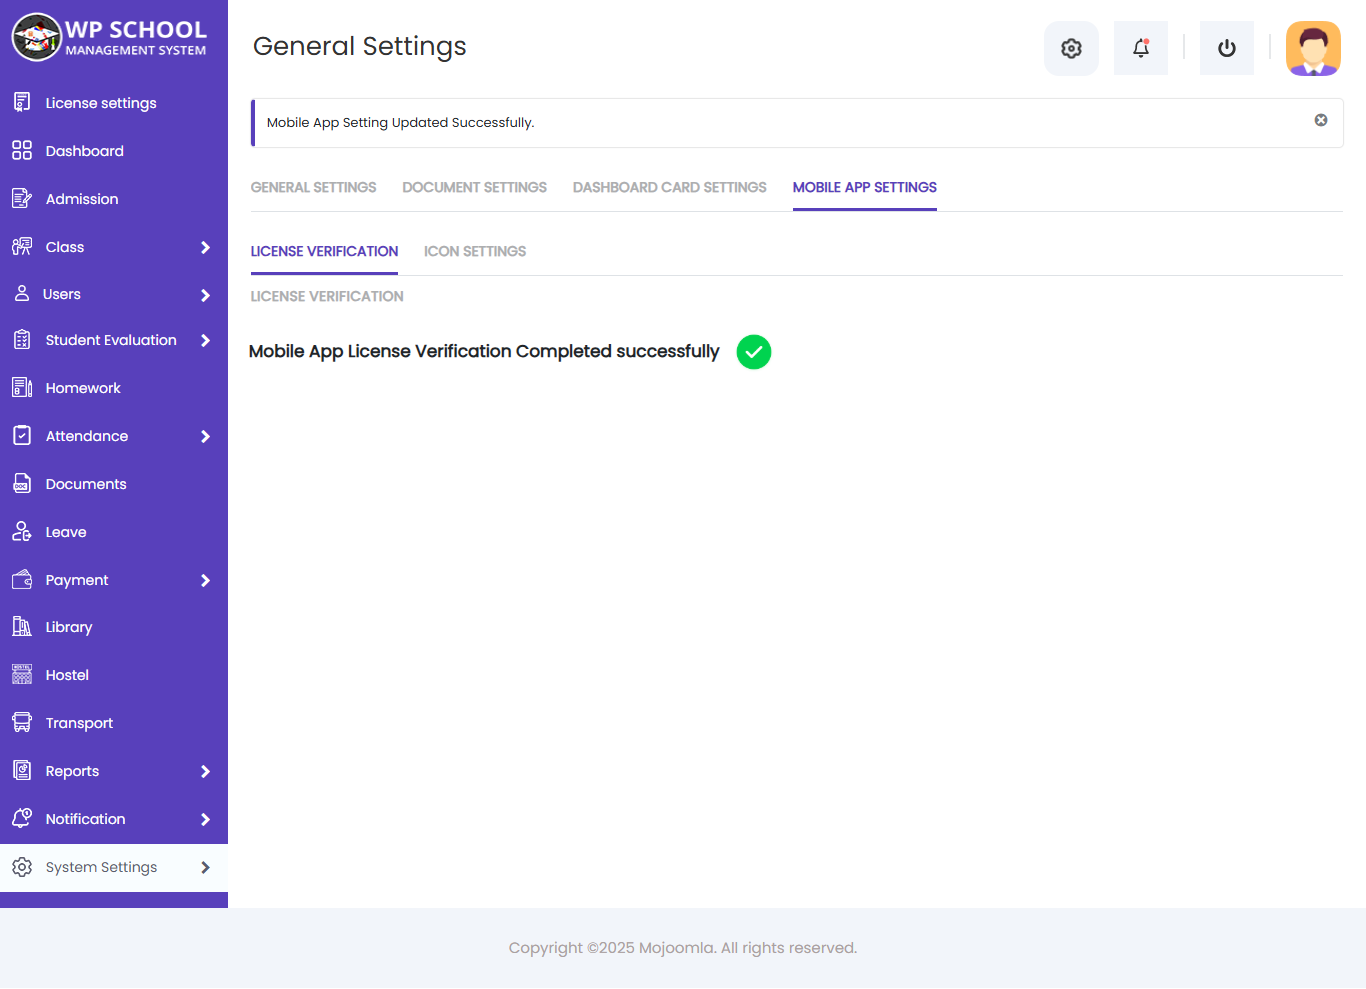
2.4) Mobile App Settings
Go to General Settings → Mobile APP Settings → License Verification to activate Mobile APP access. You can access the Mobile App only after successfully registering your Envato License key. A single license key works for one domain only.
License Verification
Enter your Envato purchase key to unlock Mobile App access. The same key used for the plugin is used here — one key per domain.
Icon Settings
Go to General Settings → Mobile APP Settings → Icon Settings to set dynamic icons for the Mobile App.
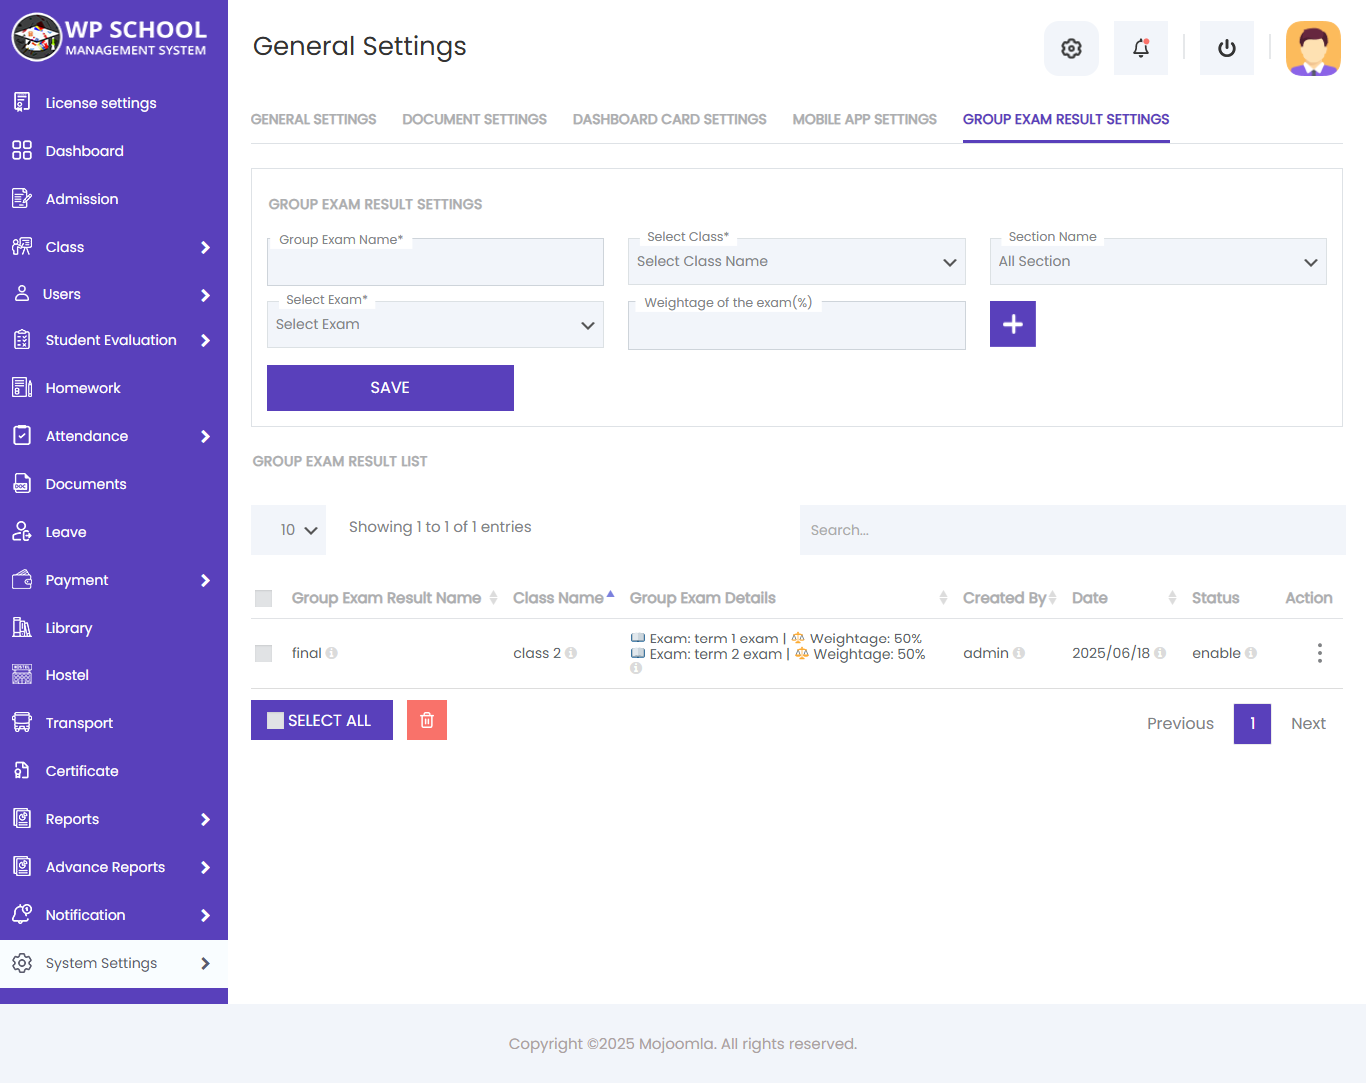
2.5) Group Exam Result Settings
Configure and manage exam result grouping for different classes and sections.
2.6) Student Onboarding Settings
The "Merge Student Admission Form with Registration Form" option allows you to combine both forms into a single streamlined process. You can set the Admission Fees and Registration Fees amounts here.
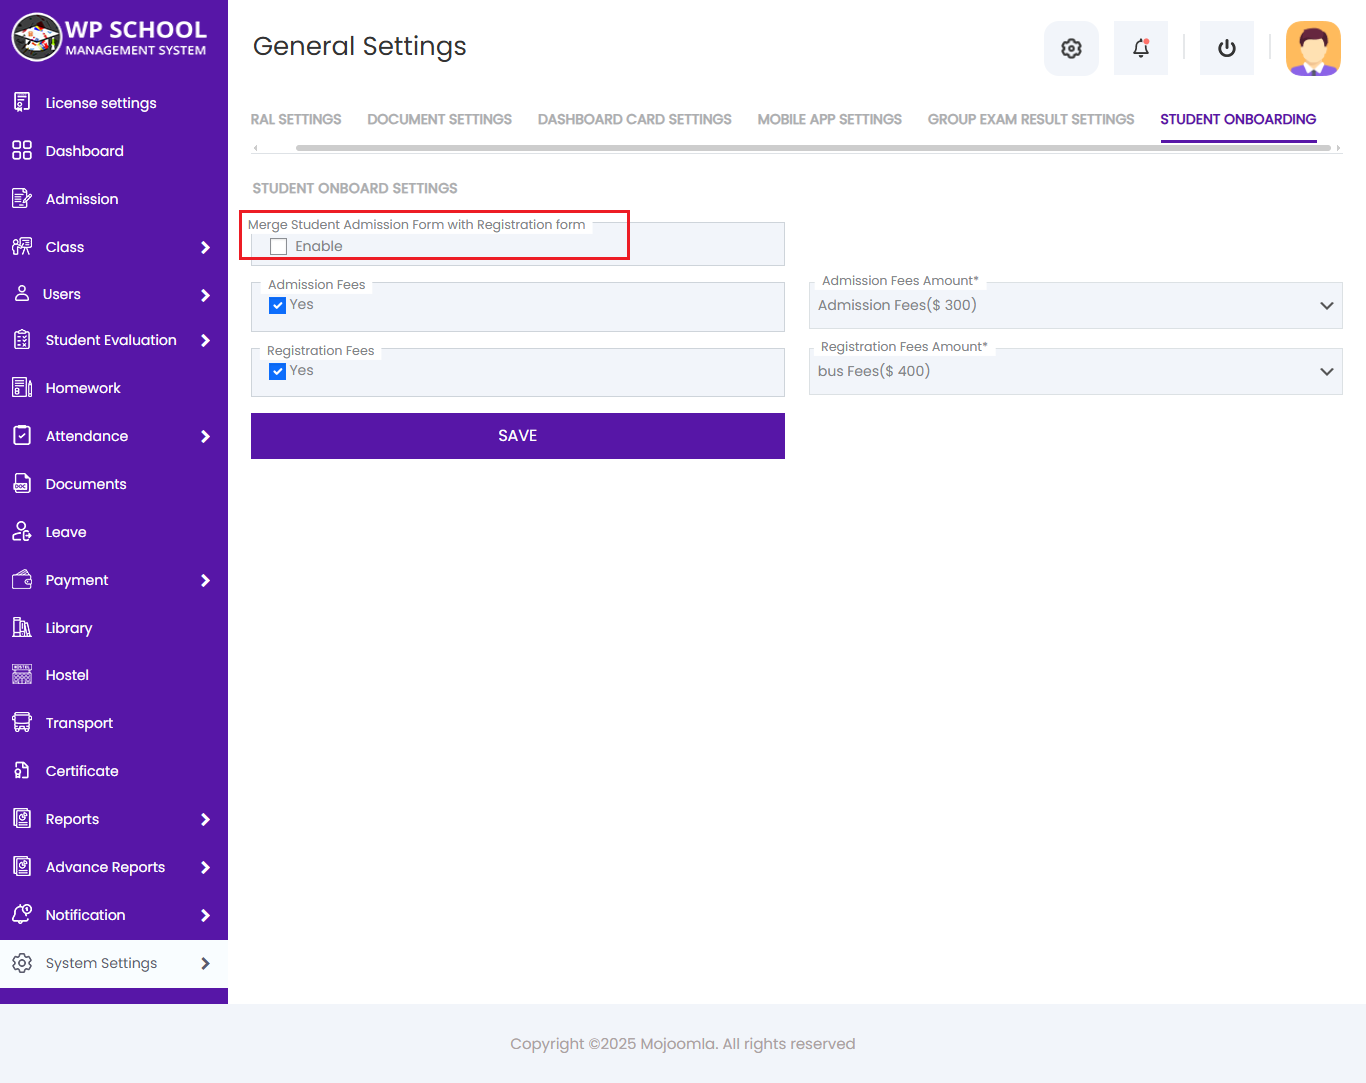
2.6.1) Combined Registration Form
When this option is enabled, both the Admission and Registration processes are combined into a single form.
2.6.2) Admission Fees at Activation
When a student is approved and activated, the system automatically generates an Unpaid Invoice for the selected Admission Fees. This unpaid invoice is emailed to both the student and their parents.
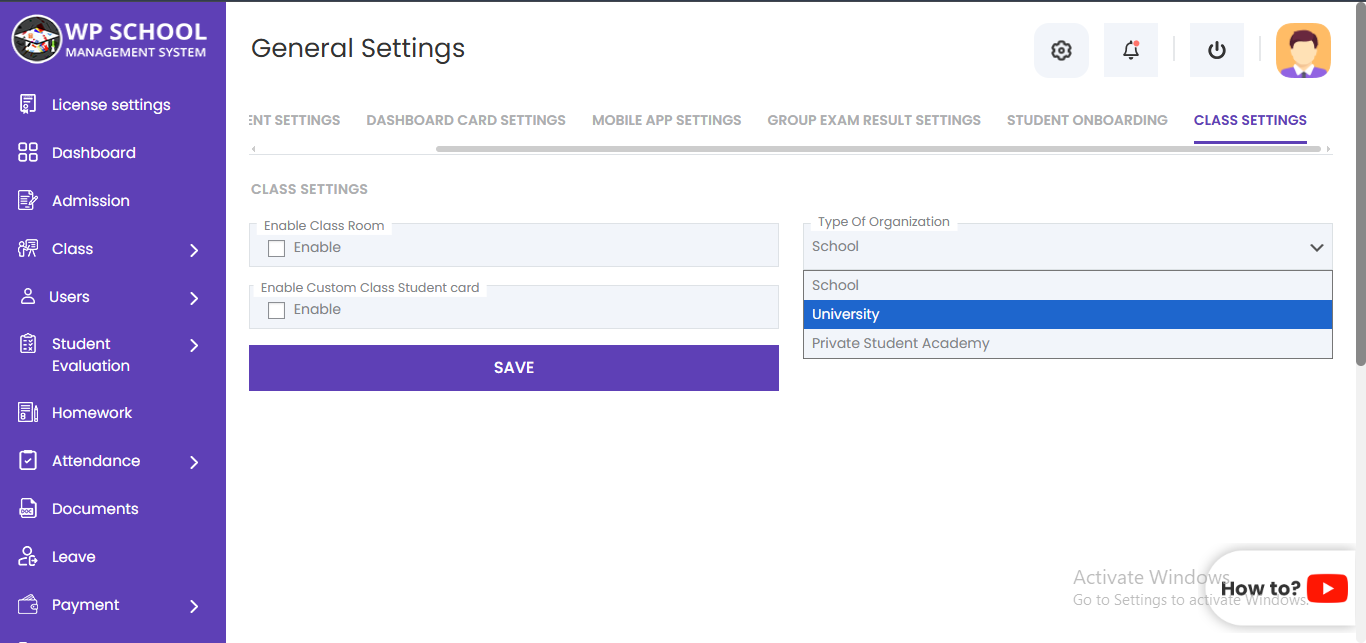
2.7) Class Setting
This setting allows you to change your system flow from School Flow to University Flow. Select the Type of Organization (School, University, or Private Student Academy) from the dropdown. When Enable Class Room is checked, a classroom option becomes visible in the class section.
3) Email Templates
Set notification email templates. Enable or disable them from General Settings. Each template supports dynamic shortcodes for personalization.
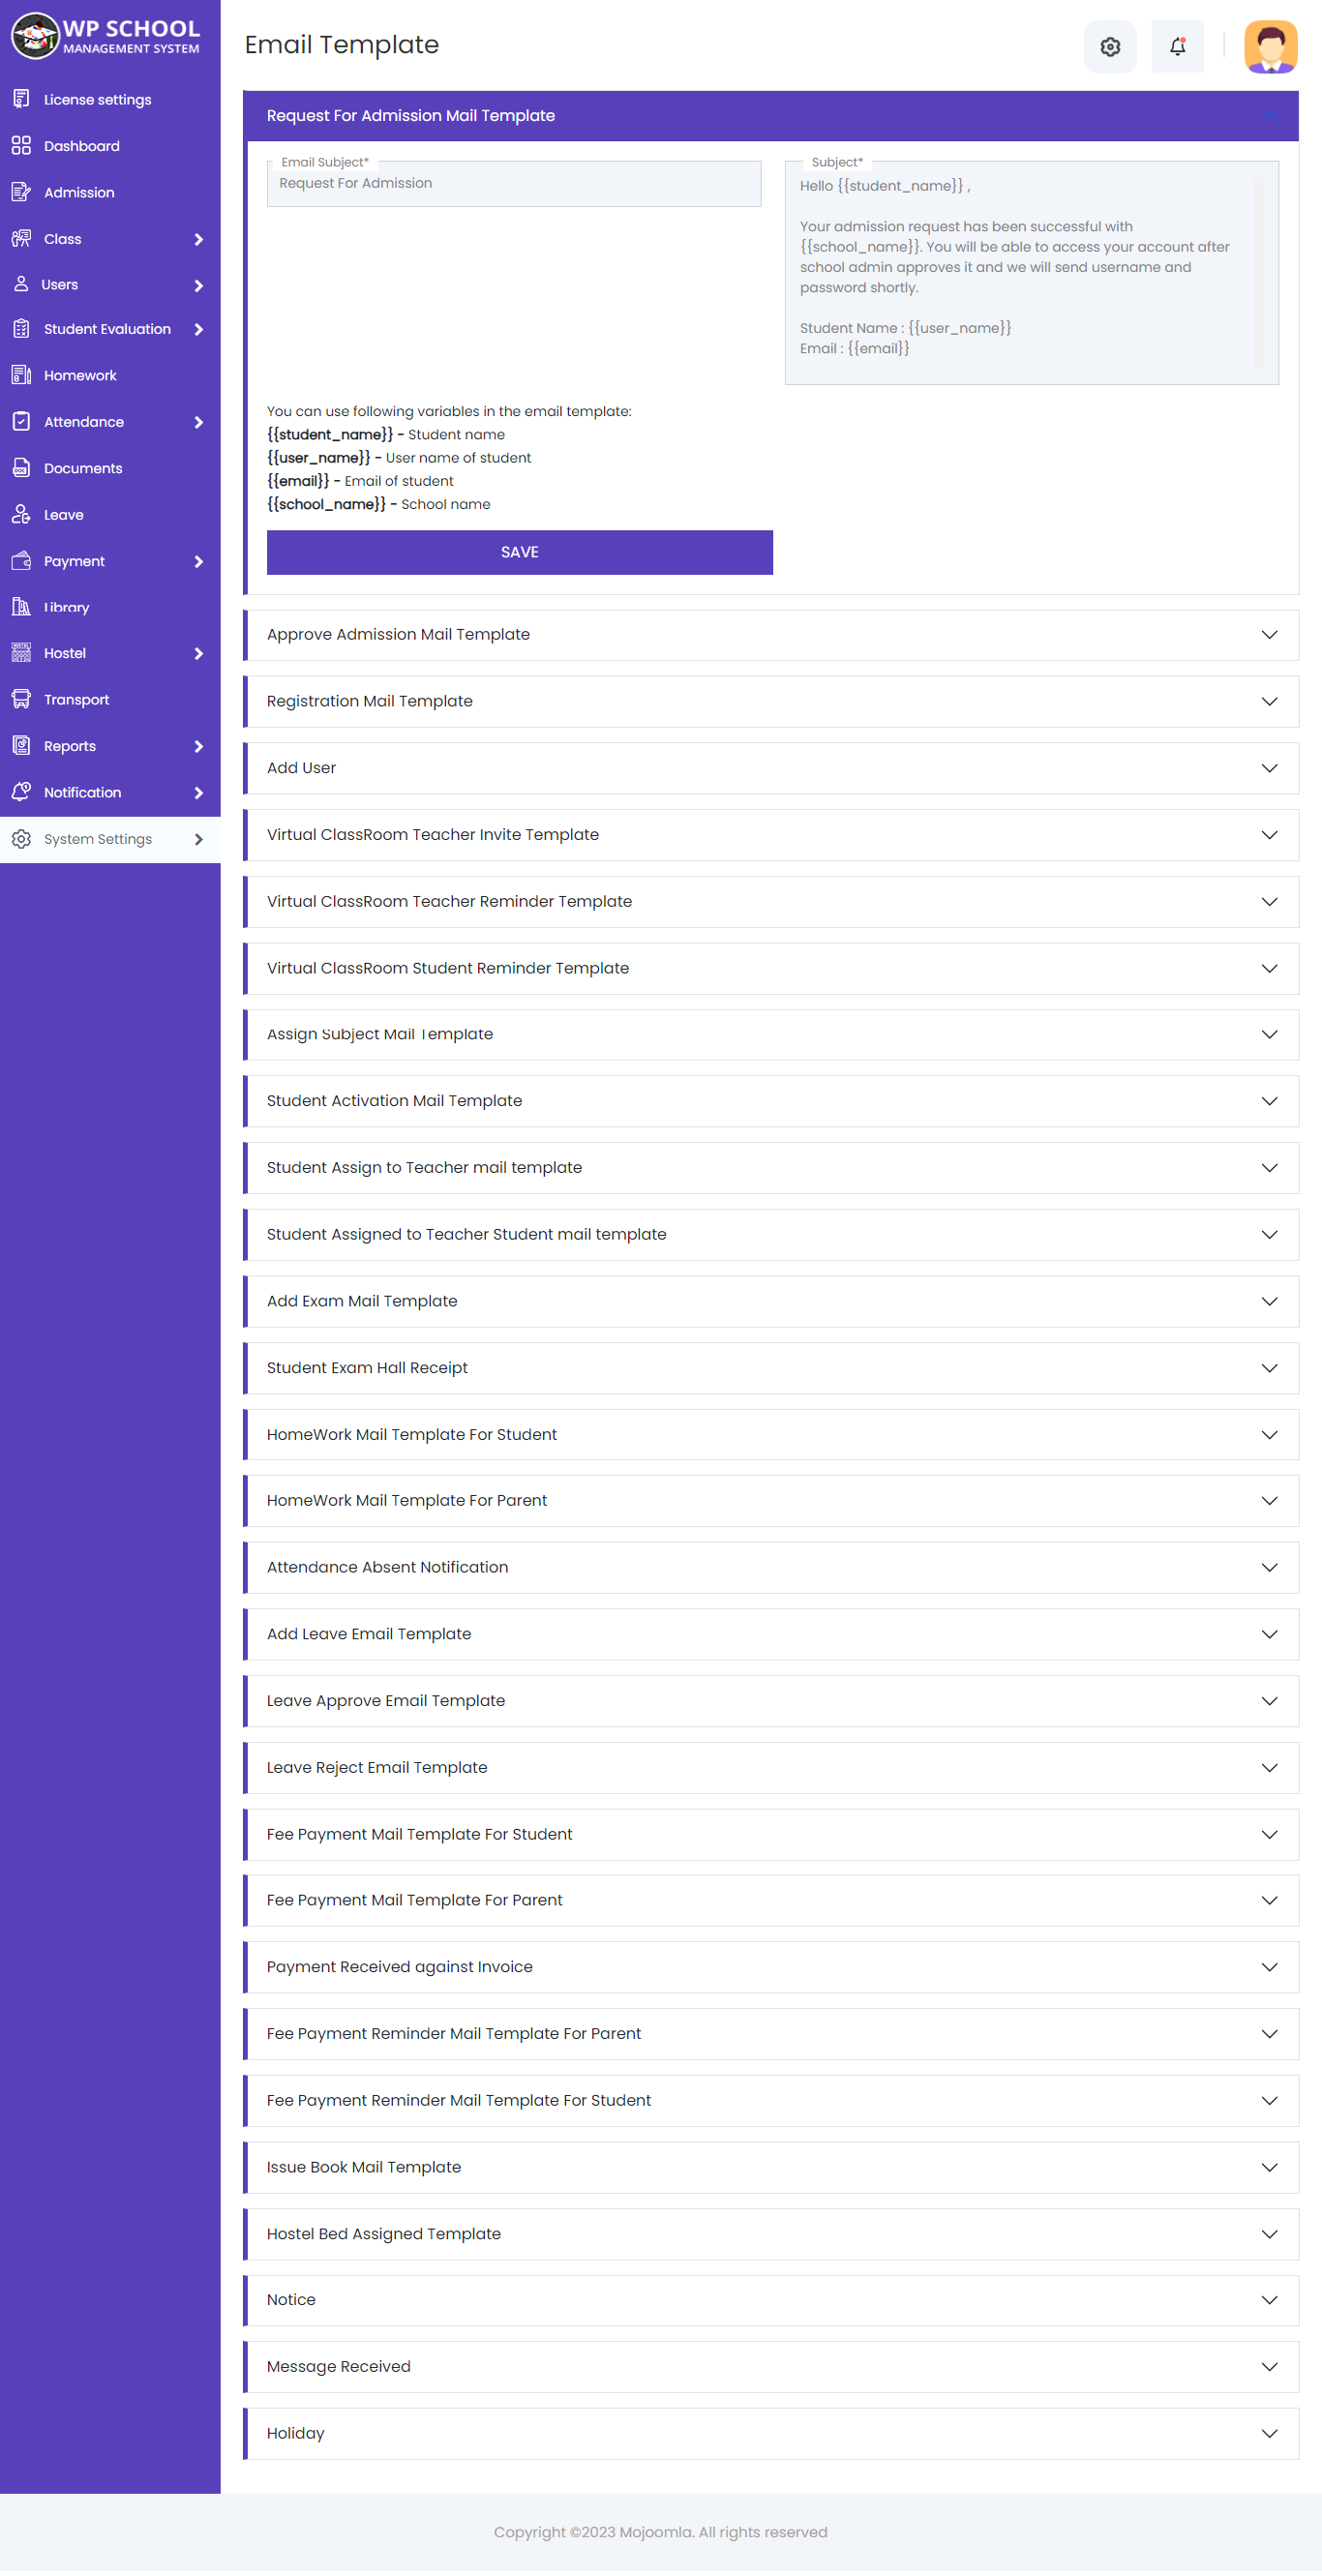
Available Shortcodes
[SMGT_SCHOOLNAME]School name[SMGT_STUDENTNAME]Student name[SMGT_PARENTNAME]Parent name[SMGT_USERNAME]Username[SMGT_CLASSNAME]Class name[SMGT_EMAIL]User email[SMGT_PASSWORD]Password[SMGT_TEACHERNAME]Teacher name[SMGT_FROM_NAME]Sender name[SMGT_RECIVER_NAME]Receiver name[SMGT_MESSAGE_CONTENT]Message content[SMGT_CHILD_NAME]Child name[SMGT_NOTICE_TITLE]Notice title[SMGT_NOTICE_DATE]Notice date[SMGT_NOTICE_FOR]Notice role[SMGT_HOLIDAY_TITLE]Holiday title[SMGT_HOLIDAY_DATE]Holiday date[SMGT_ROUTE_NAME]Transport route[SMGT_VEHICLE_IDENTIFIER]Vehicle ID[SMGT_DRIVER_NAME]Driver name[SMGT_DRIVER_PHONE_NUMBER]Driver phone
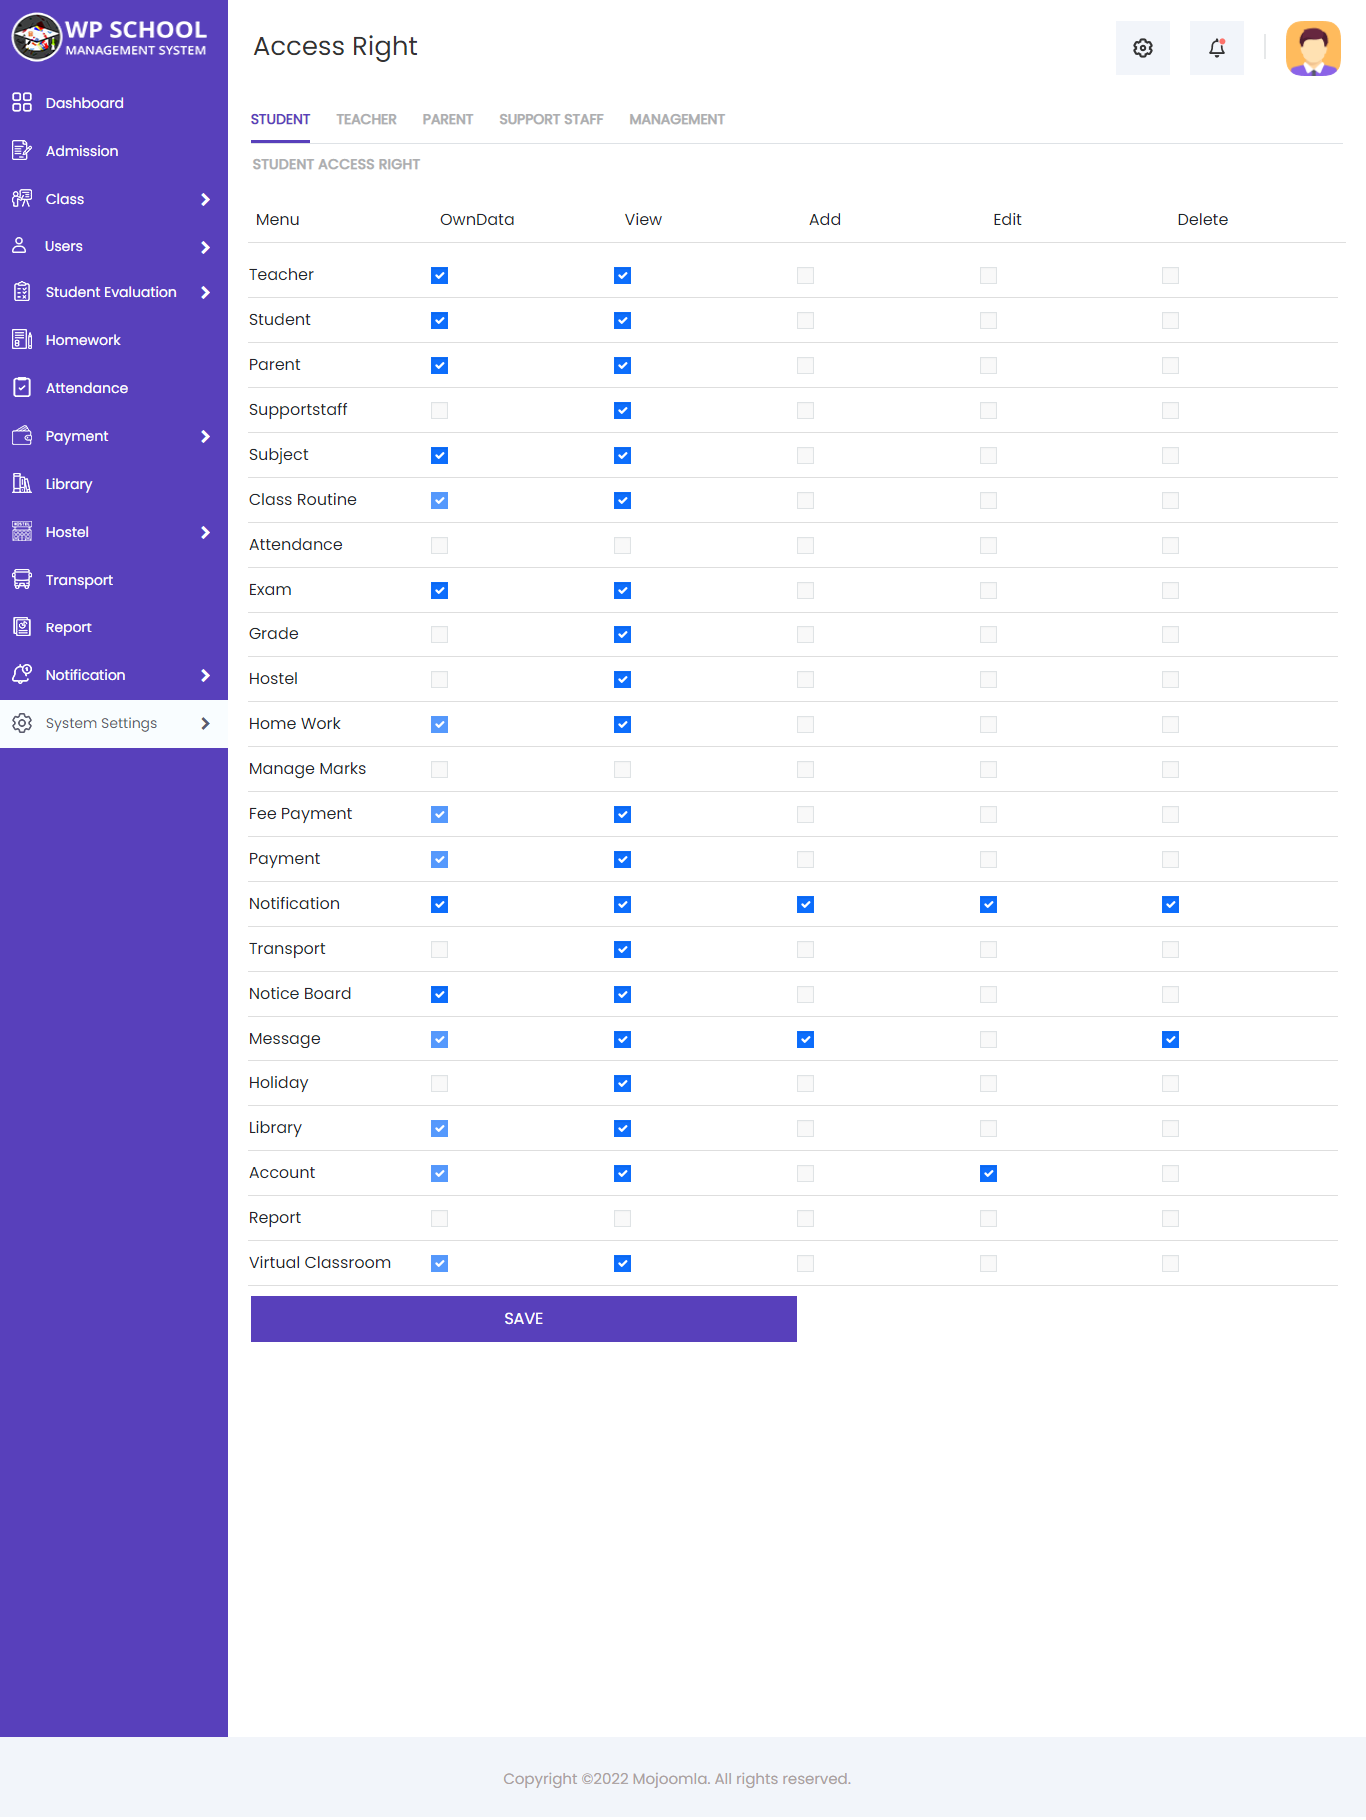
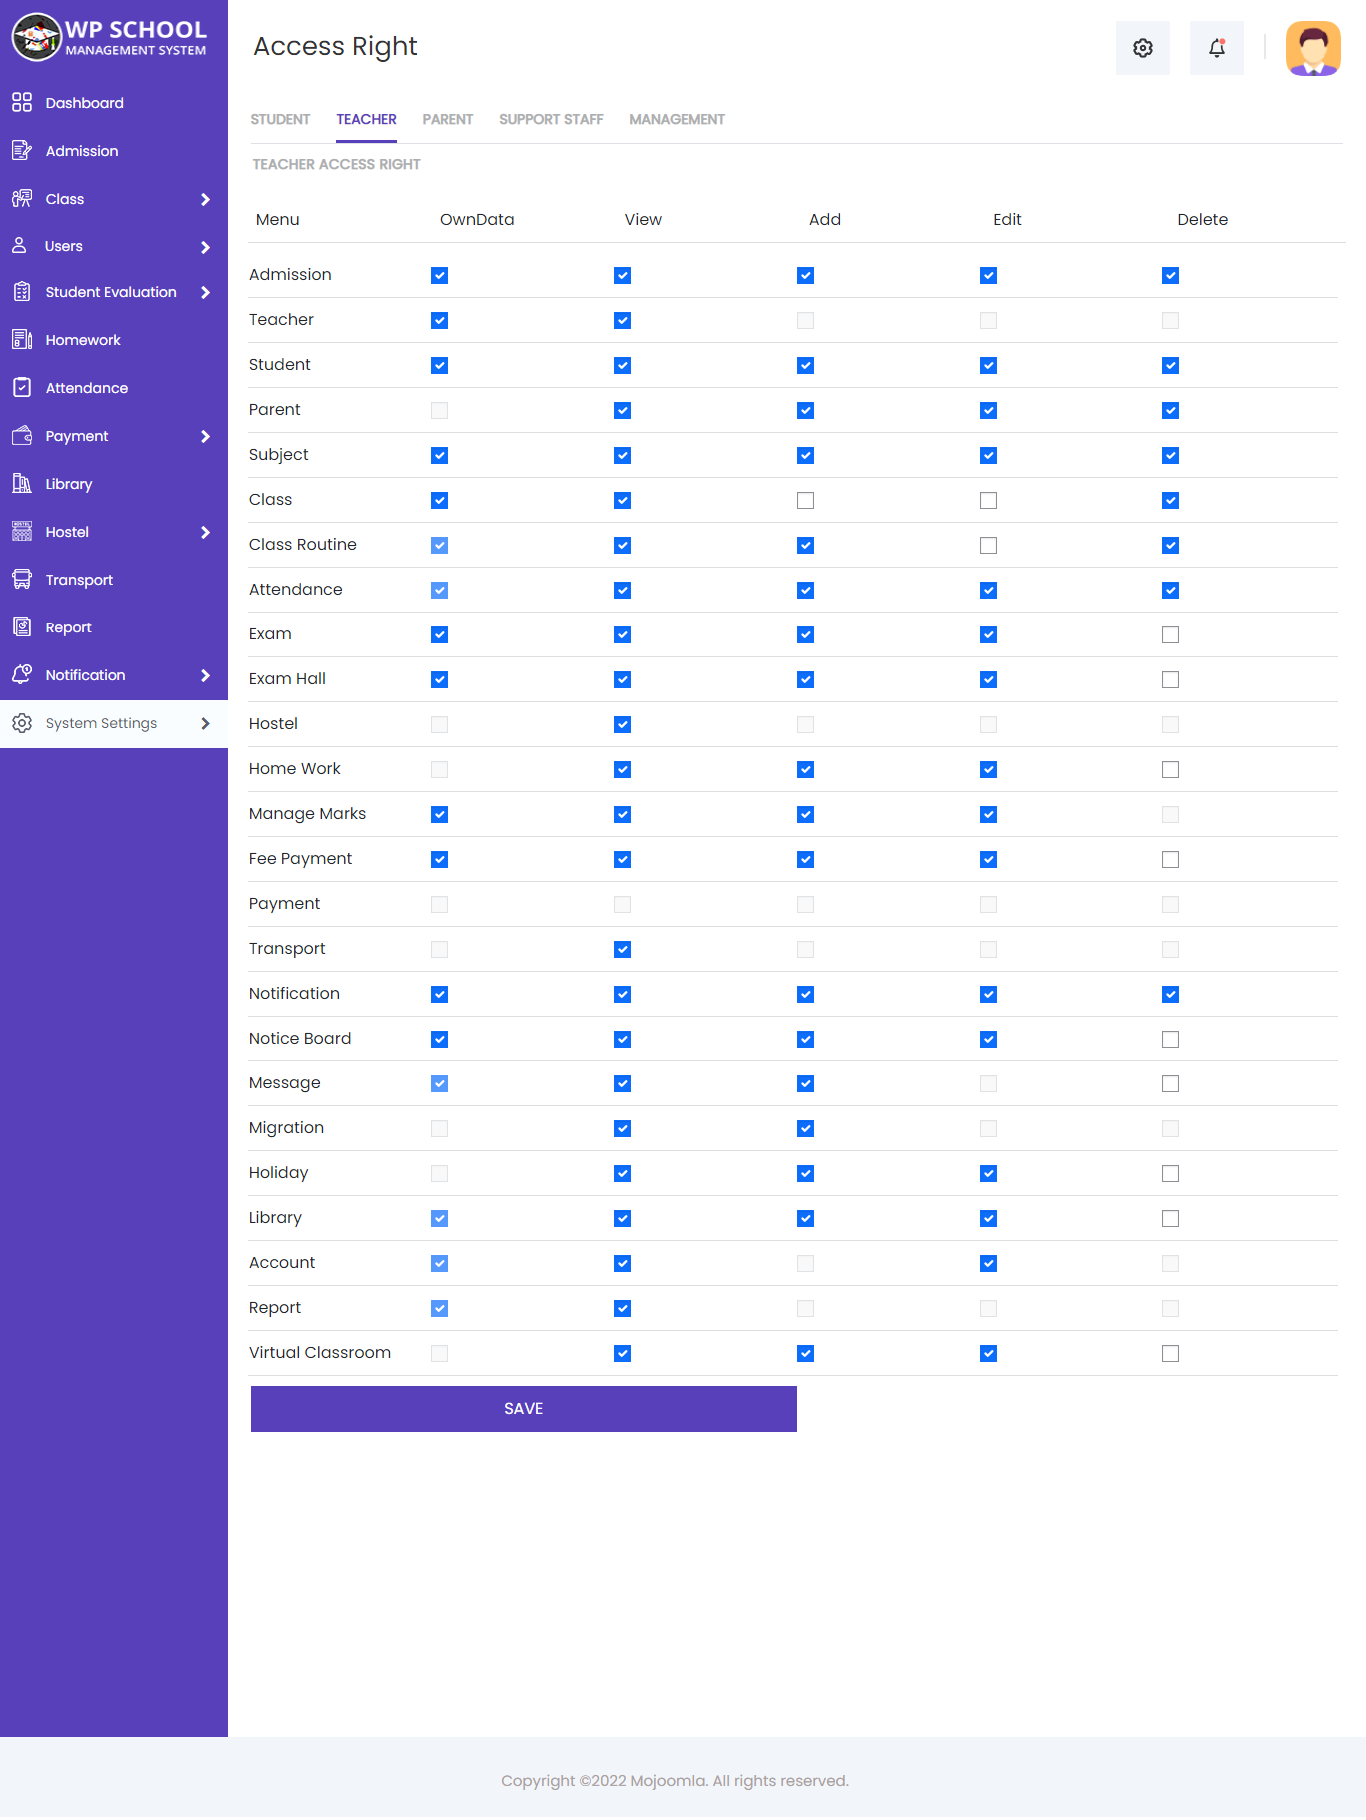
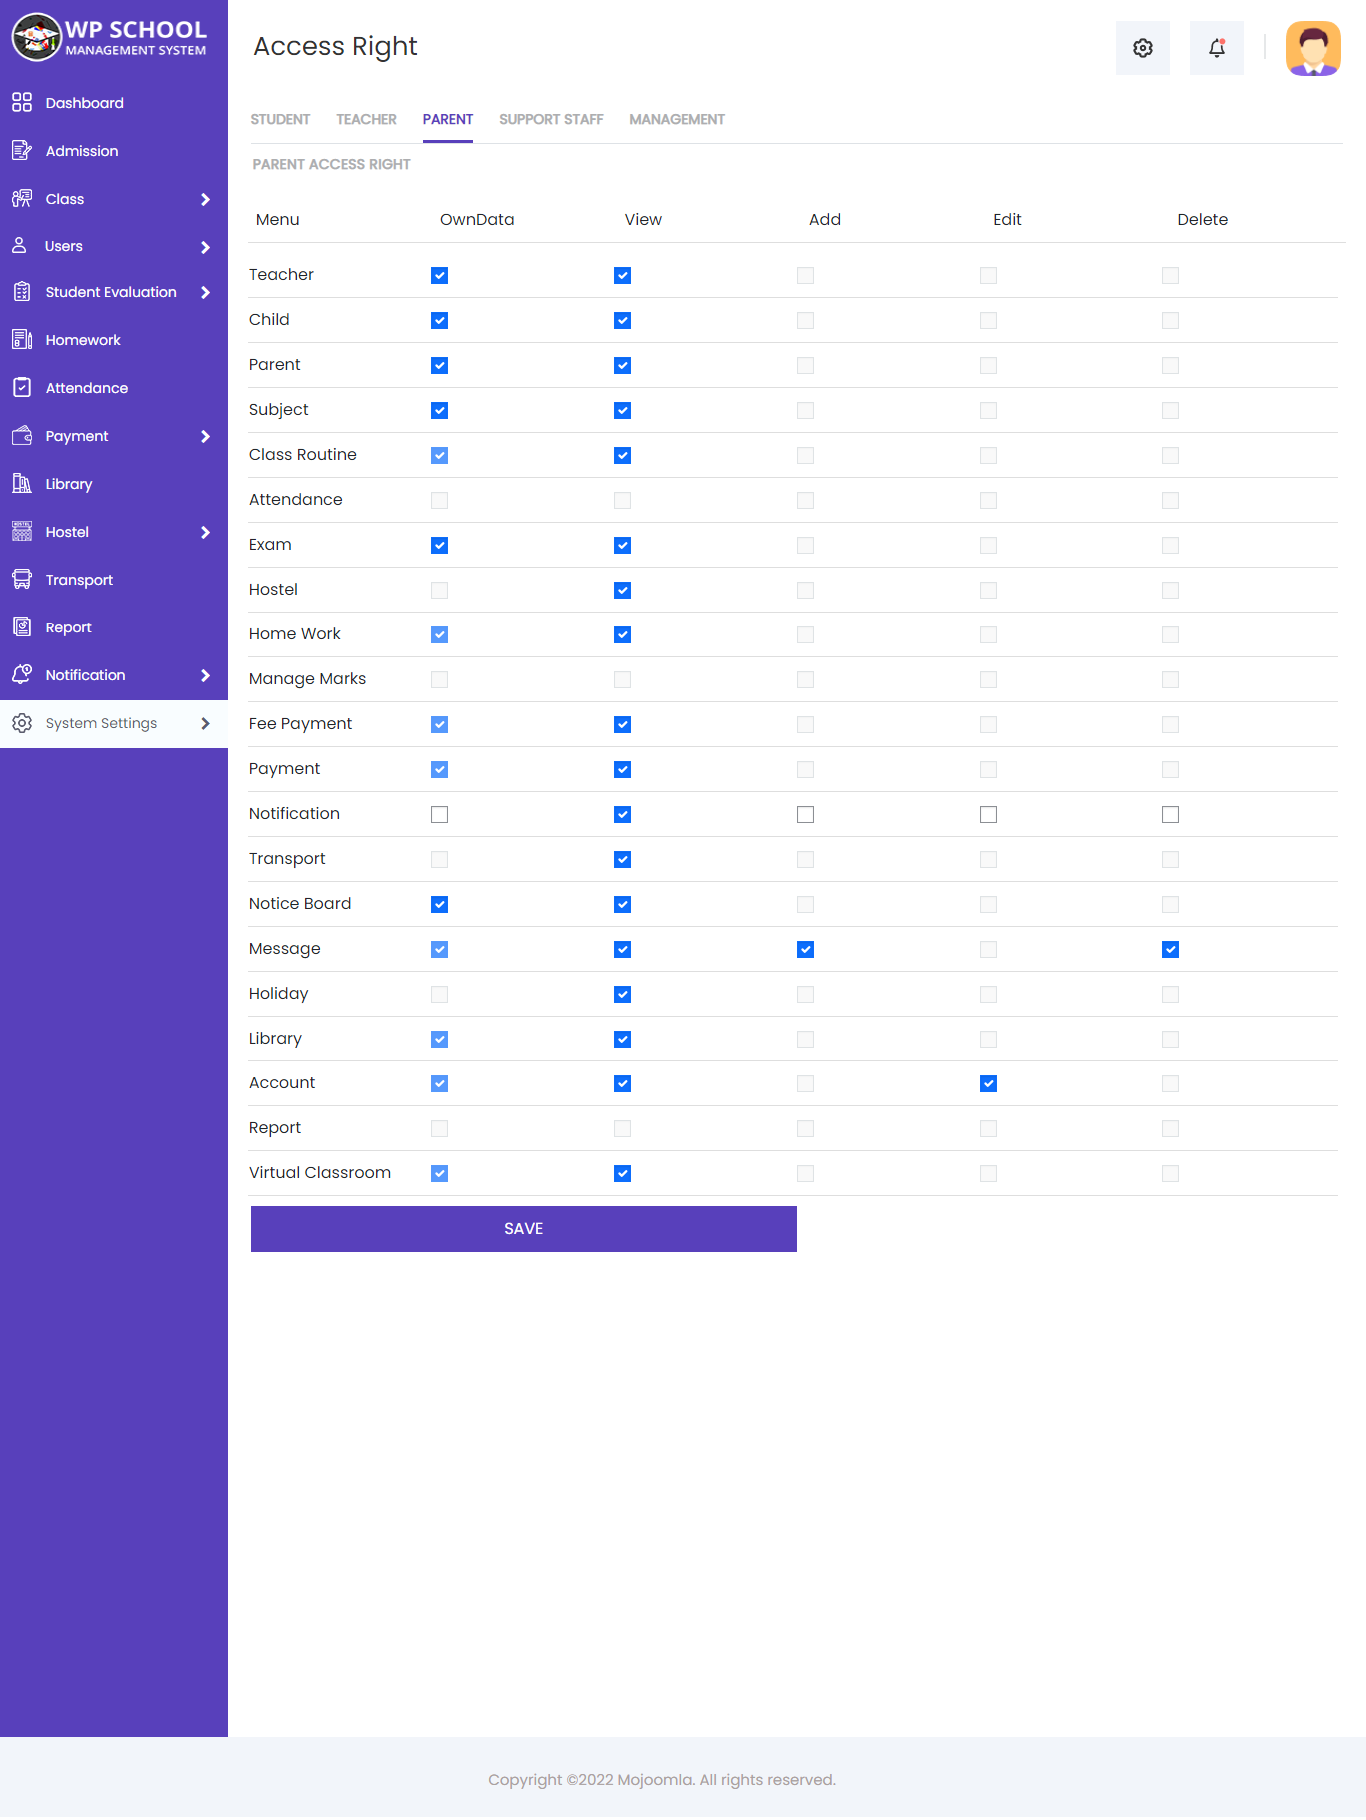
4) Access Rights
Control which frontend menus and features each user role can access. Configure permissions for Student, Teacher, Parent, Support Staff, and Management separately.
Student Access Right
Control which frontend portal sections and features are visible to students.
Teacher Access Right
Define which modules and sections teachers can access and manage.
Parent Access Right
Define parent visibility settings — which sections parents can see for their children.
Support Staff Access Right
Limit support staff access to only the modules relevant to their role.

Management Access Right
Configure management-level permissions for senior oversight roles.

Recurring Invoices
- Enable in General Settings — Turn on the Recurring Invoice option on the General Settings page.
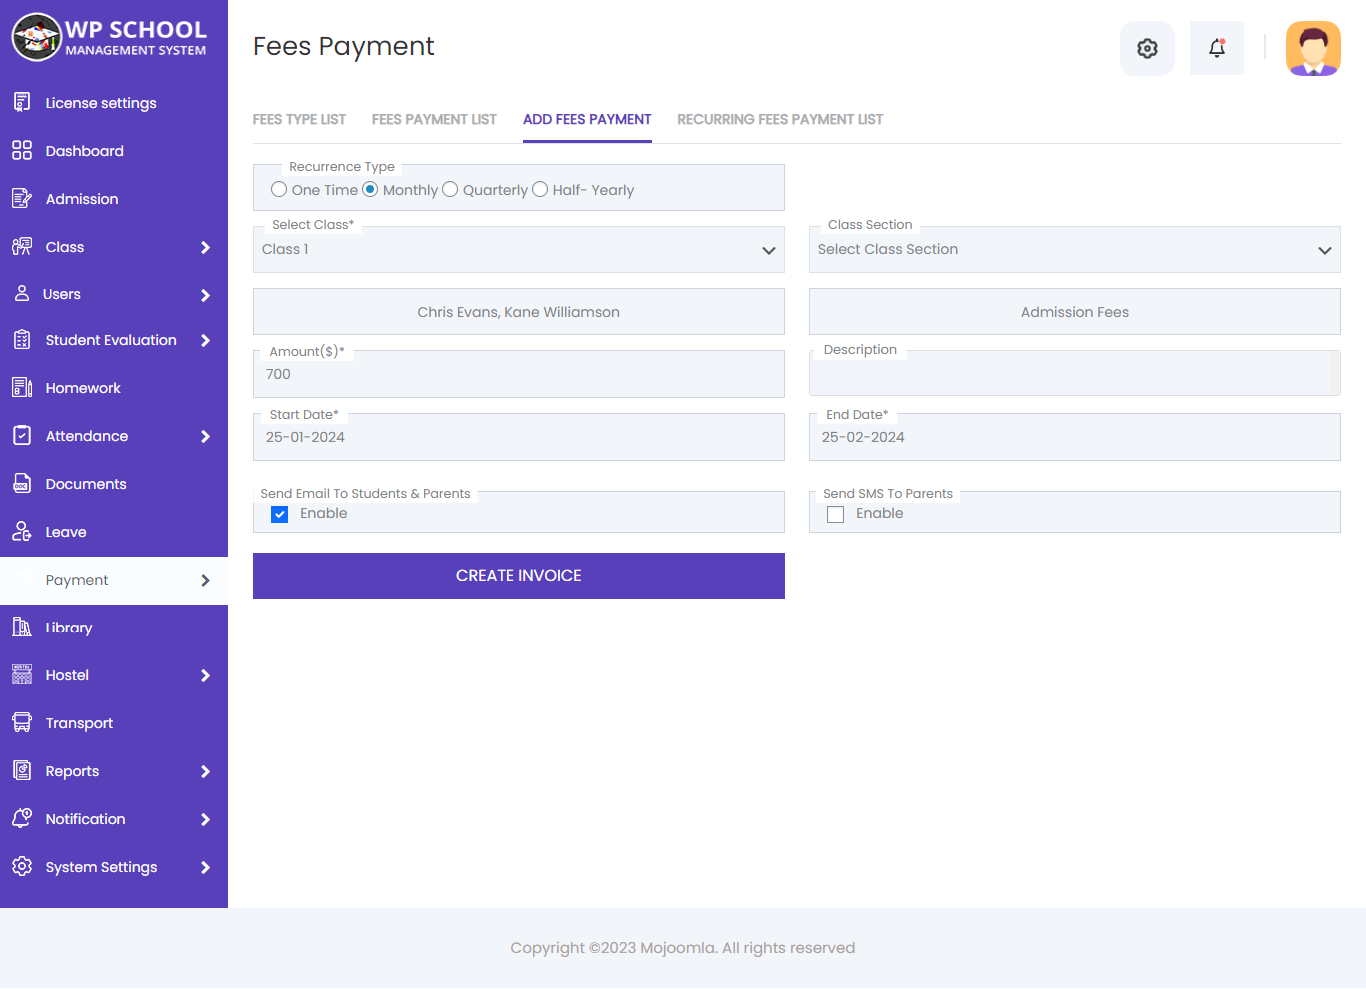
- Generate Invoice — Go to Payment → Fees Payment → Add Fees Payment. Choose one-time, monthly, quarterly, or half-yearly recurring.
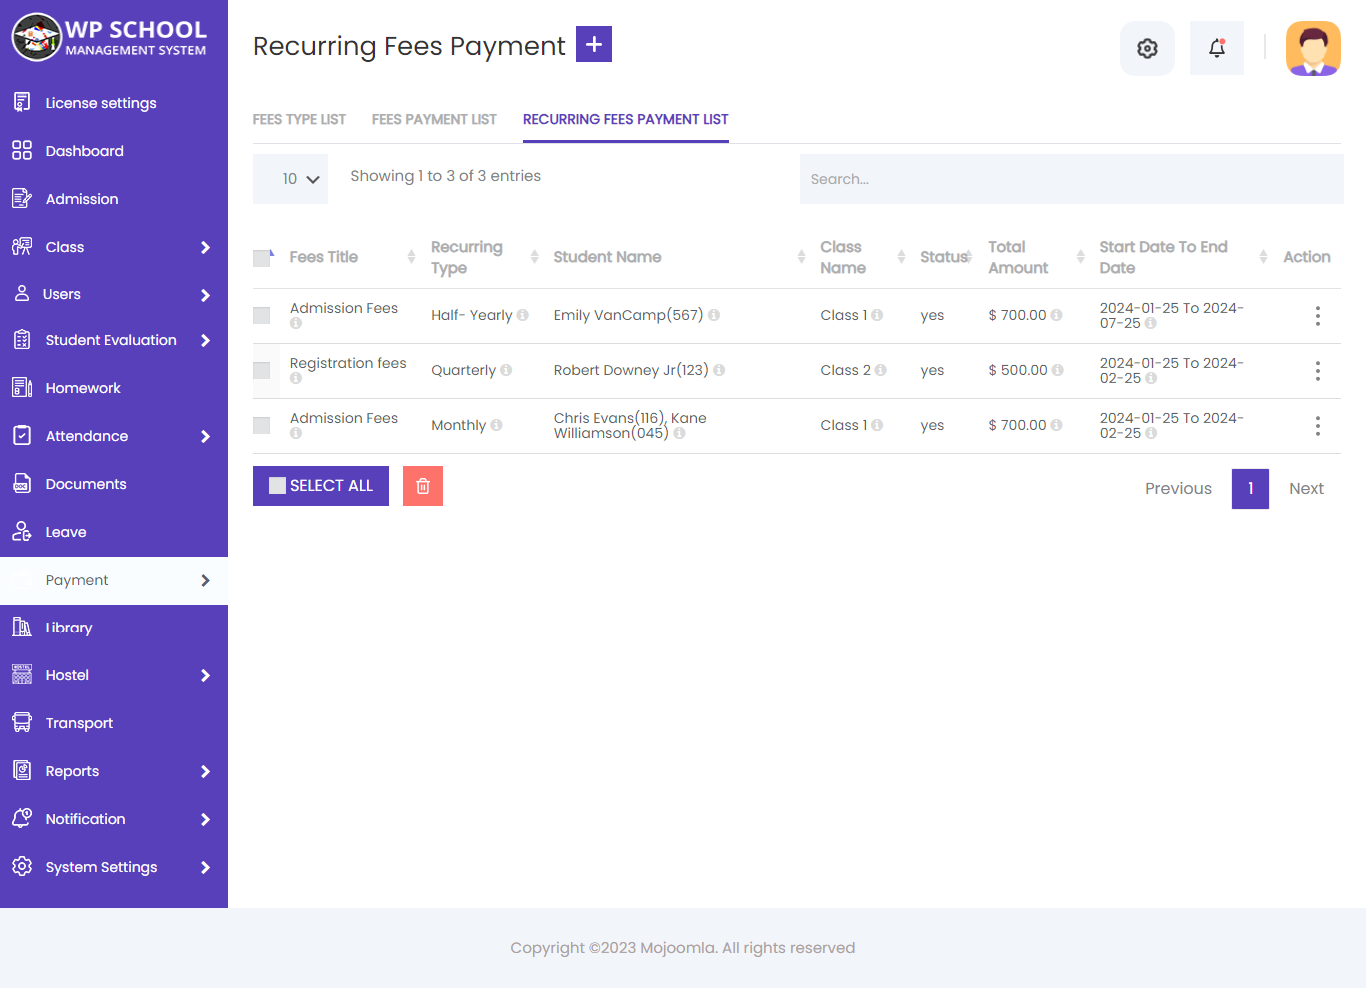
- Manage Recurring — View, edit, and delete recurring invoices. Edit to generate the next invoice for specific students.
- Set Cron Job — Configure a 24-hour server cron job to auto-process recurring invoices.
Cron Job Command
/usr/local/bin/php -q -f /home/USERNAME/public_html/wp-content/plugins/school-management/recurring_invoices.php
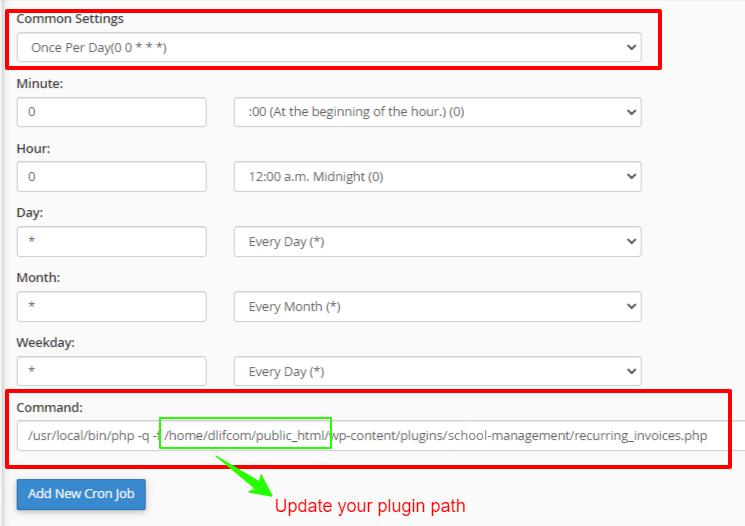
Replace /home/USERNAME/public_html/ with the actual path to your WordPress installation.
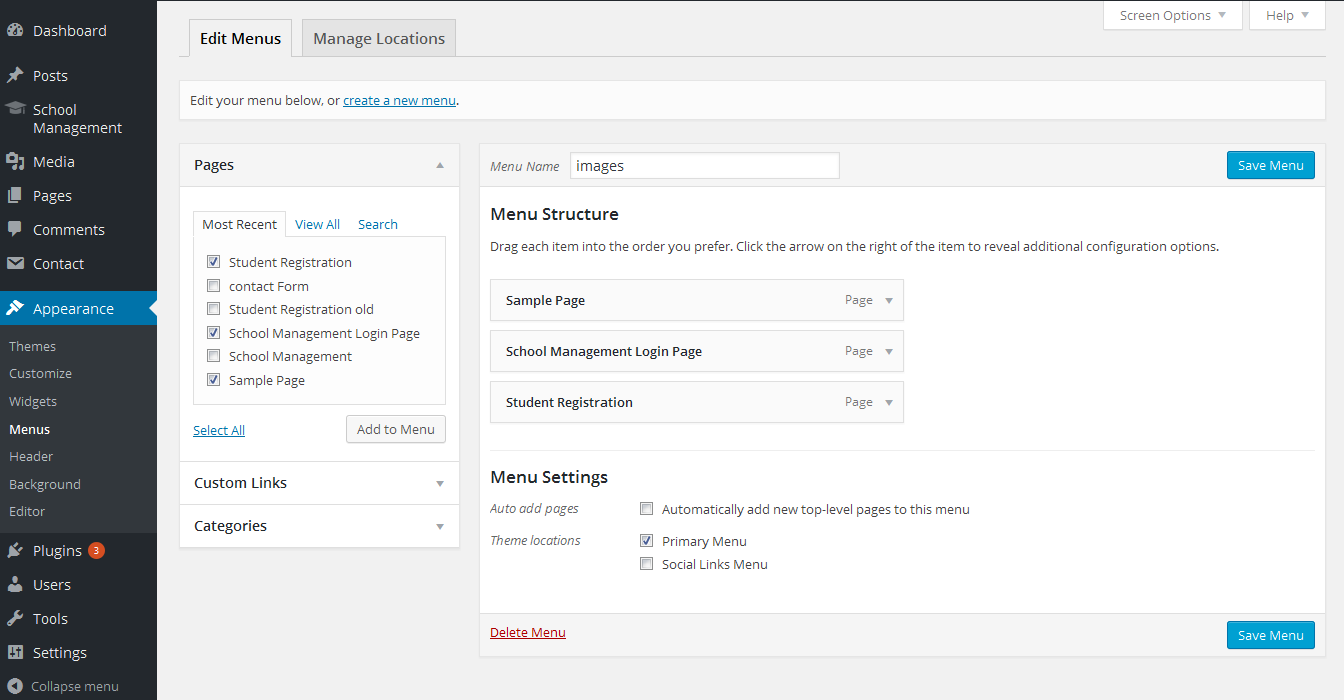
Frontend Pages Settings
After installing the plugin, it automatically creates Login, Registration, and Admission pages. Add these to your navigation menu.

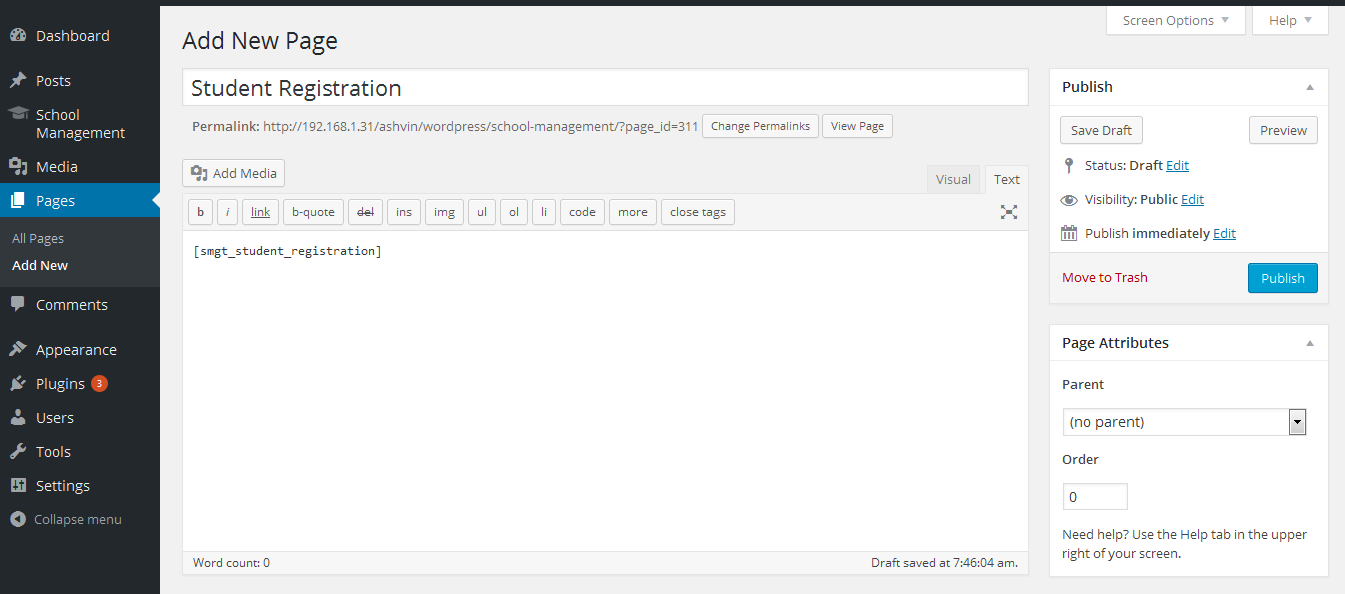
[smgt_login][smgt_student_registration][smgt_student_admission]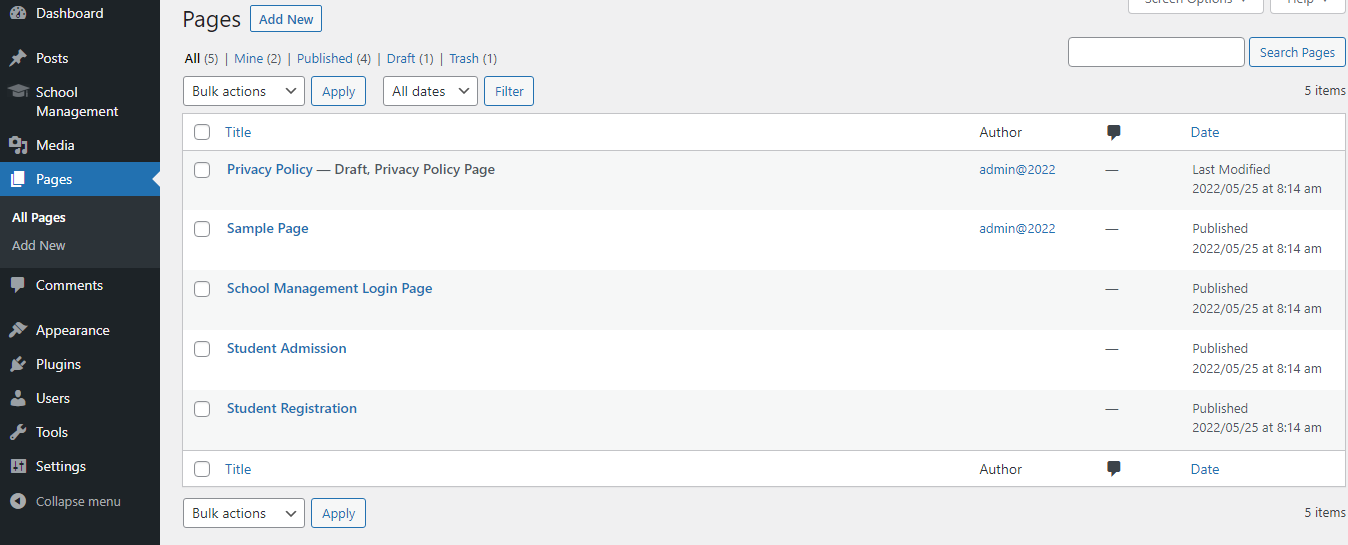
Create a new WordPress page, paste the shortcode into the content area, publish it, then add it to your navigation menu.
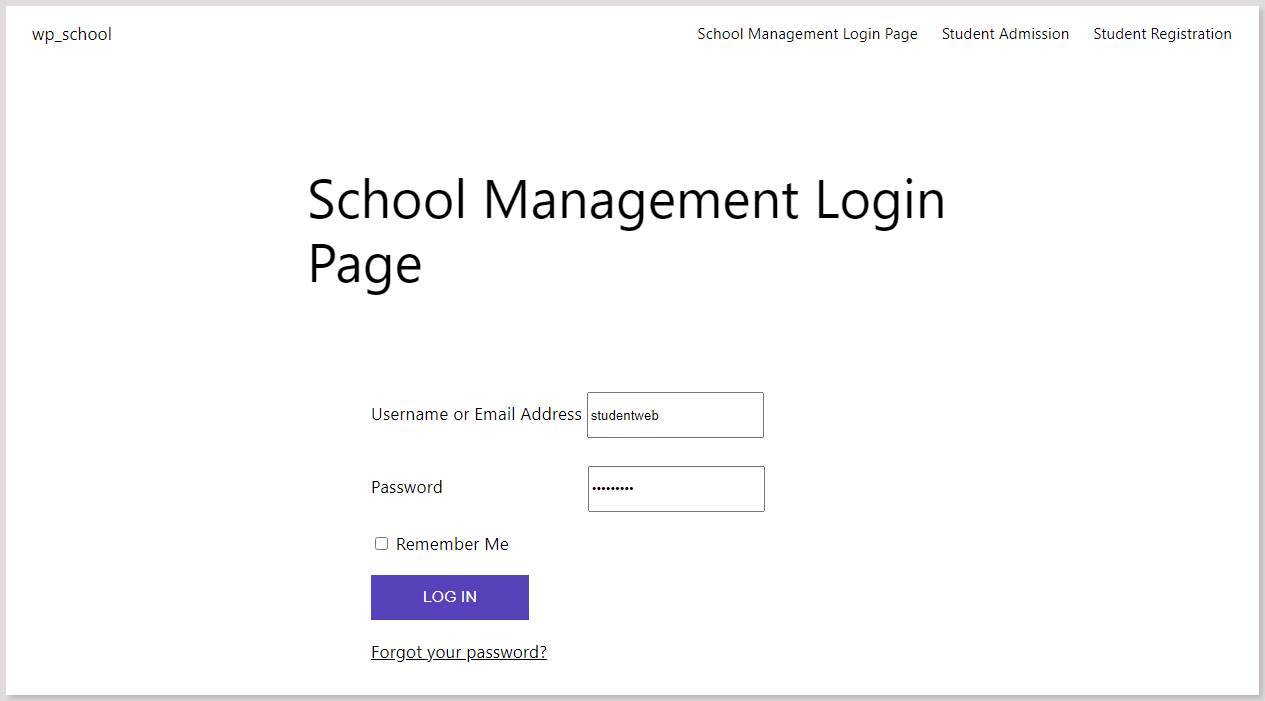
Frontend Login Page
When you install the plugin, a Login Page is created and set in the menu. This page displays on the frontend for all users to log in.
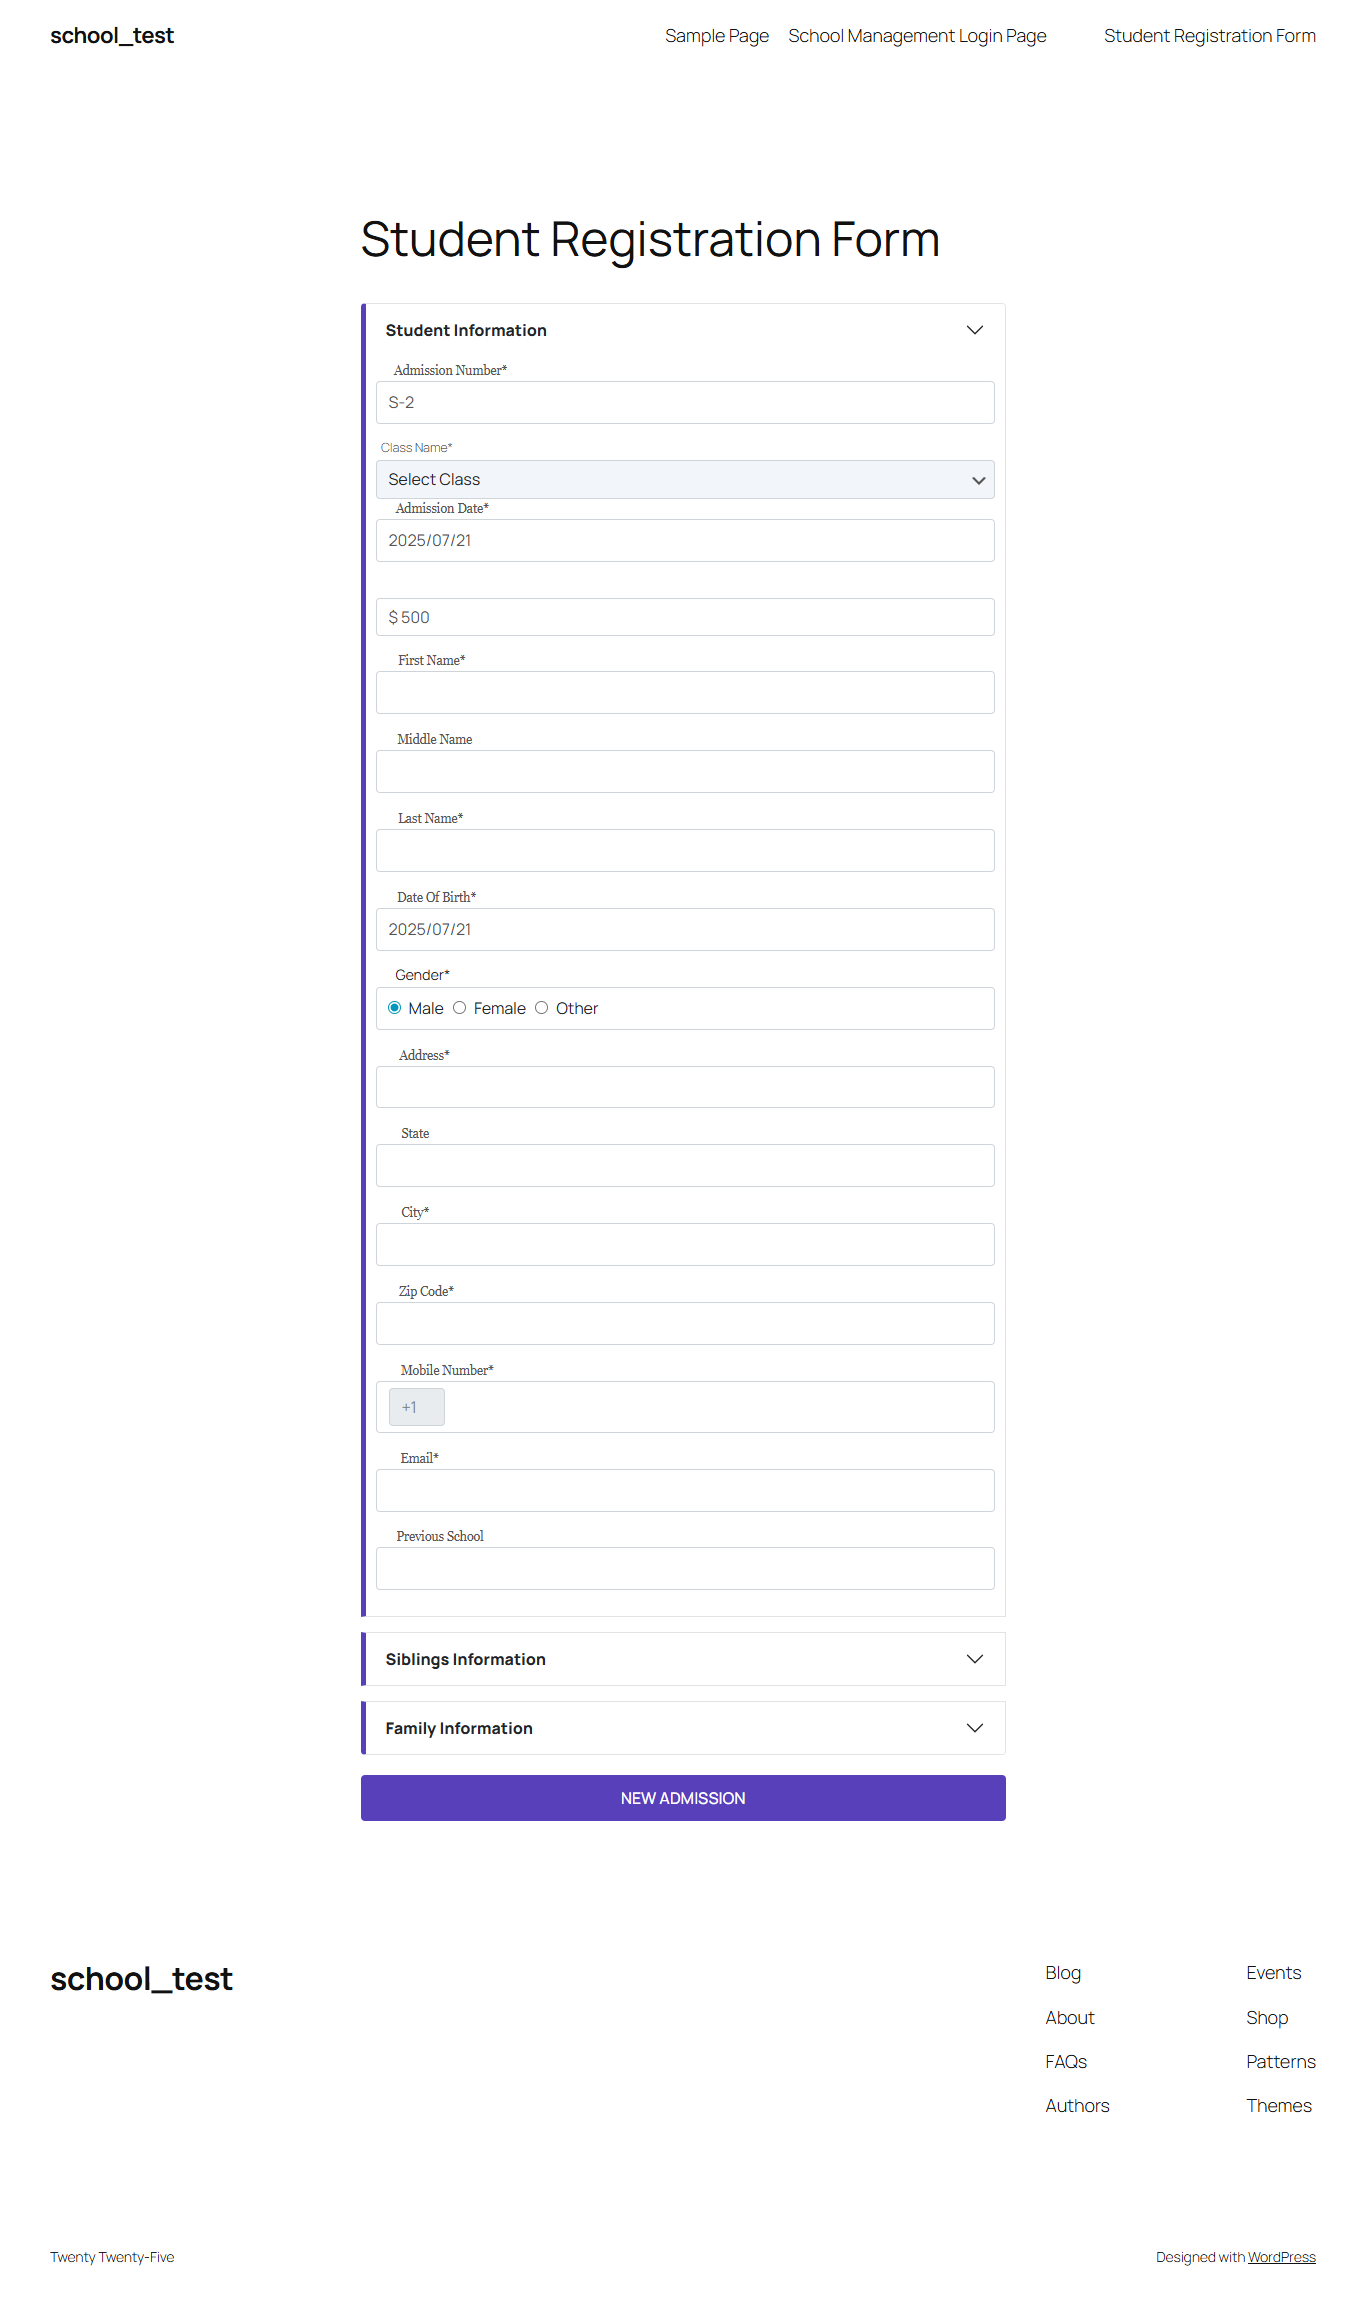
Frontend Registration Page
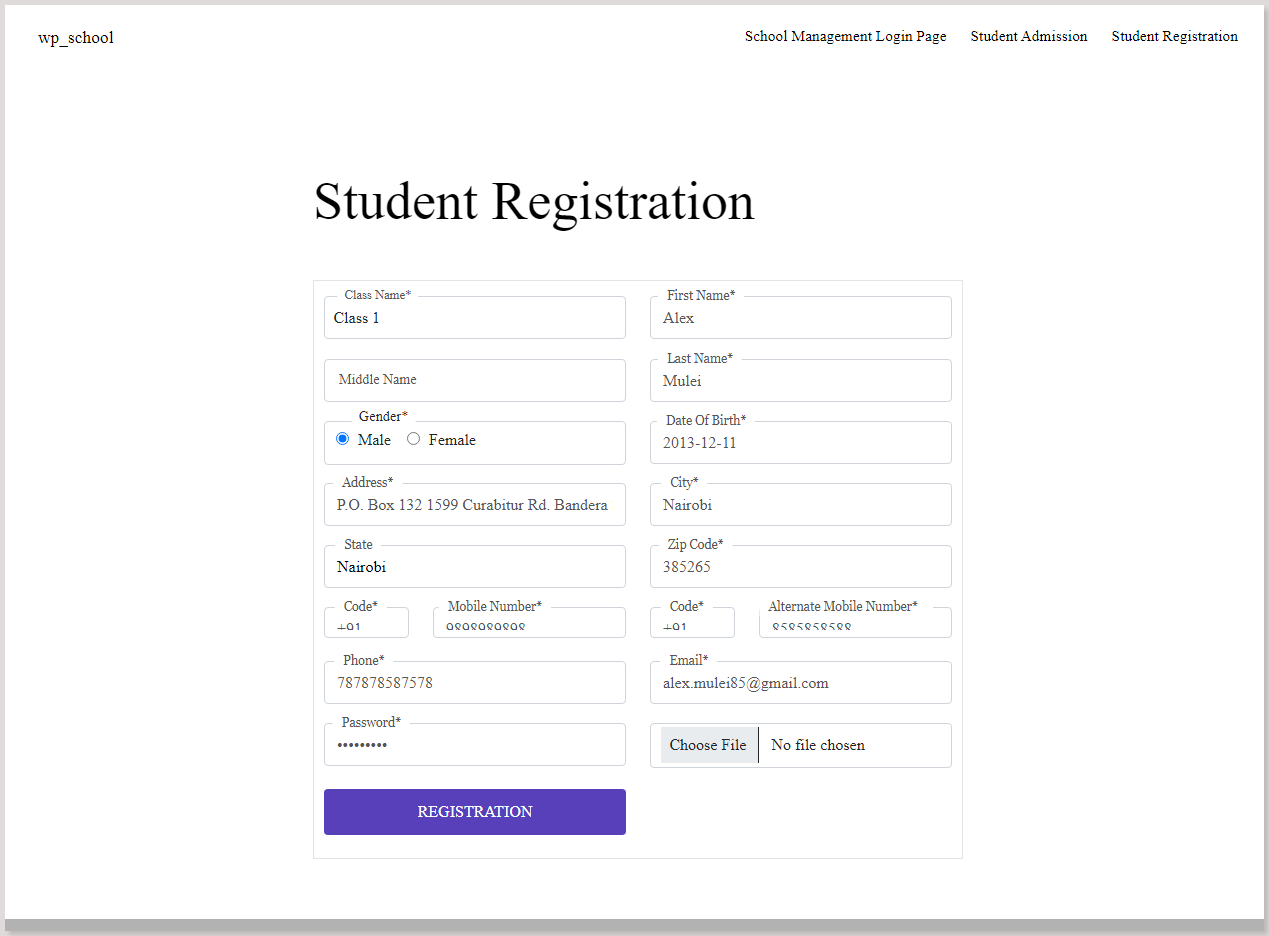
When you install the plugin, a Registration Page is created automatically. Students use this page to self-register before their admission is approved.
Frontend Admission Page
When you install the plugin, an Admission Page is created automatically. This page displays the student admission form on the frontend for new applicants.
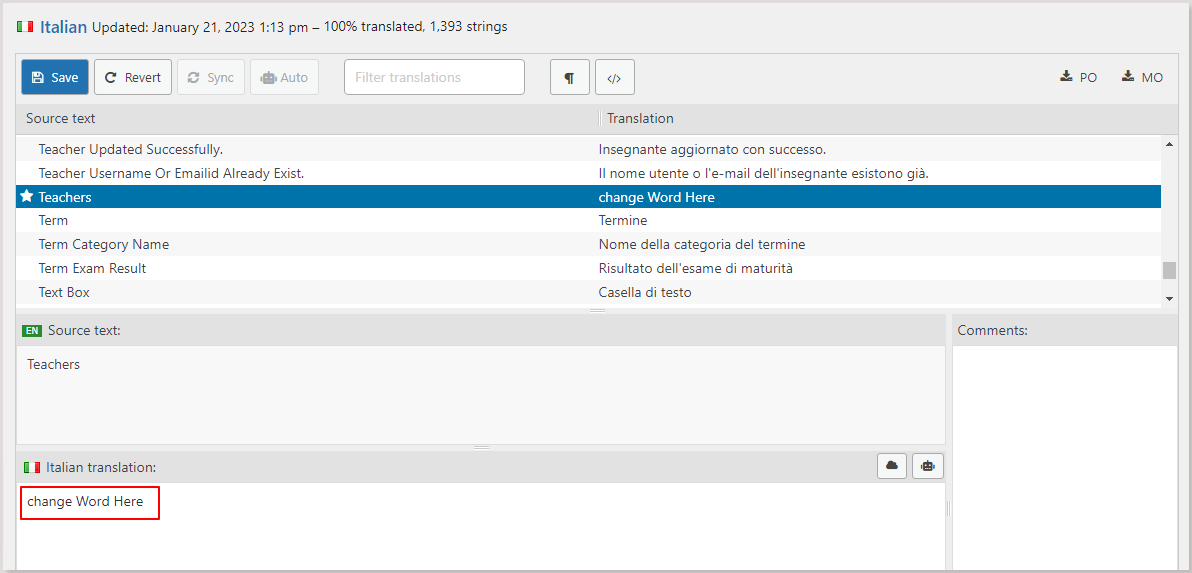
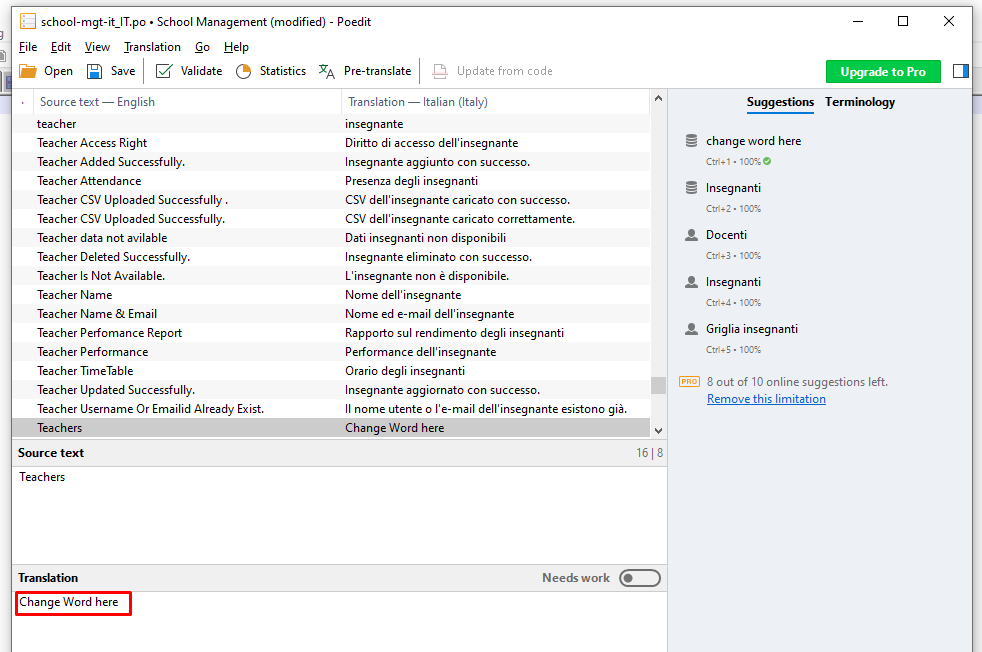
Setting Up Language
All language .PO files are included. File path: wp-content/plugins/school-management/languages/
Get your key at cloud.google.com/translate for auto-translation via Loco Translate.
University Flow Setting
Switch from School Flow to University Flow via General Settings → Class Setting.
Manage Marks — University Flow
- Select Class — Choose the desired class from the dropdown.
- Select Exam — Related exams for that class auto-load.
- Select Subject — Subjects related to the exam appear.
- Manage Marks — Click "Manage Marks" and enter marks for eligible students.
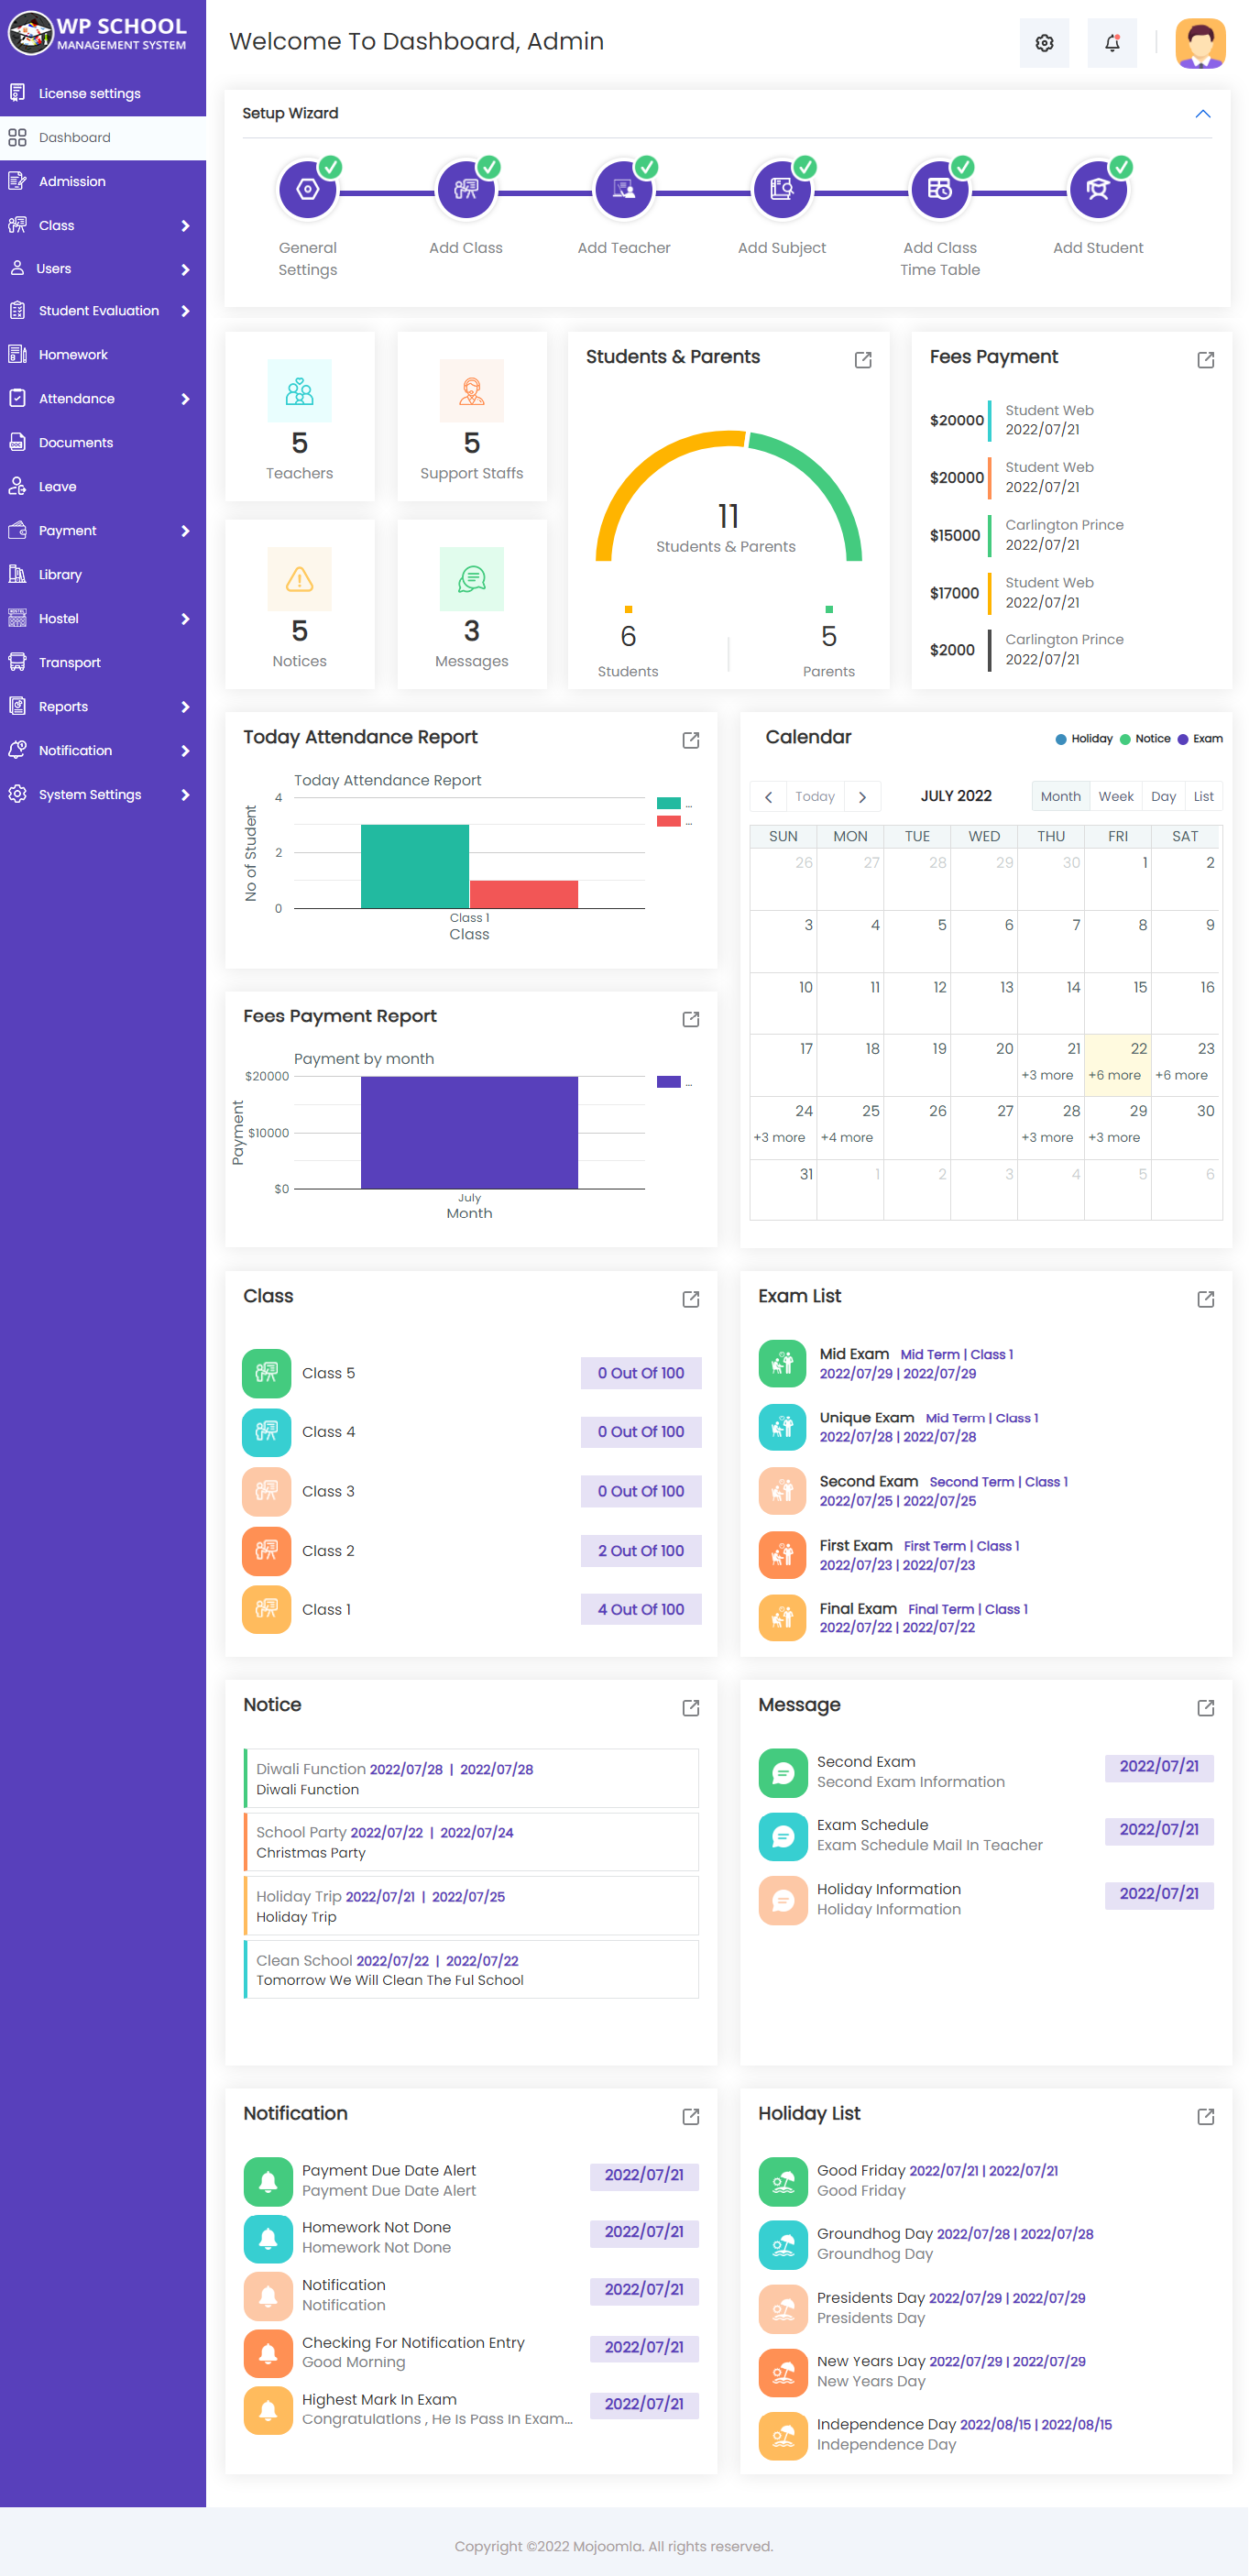
Admin Dashboard
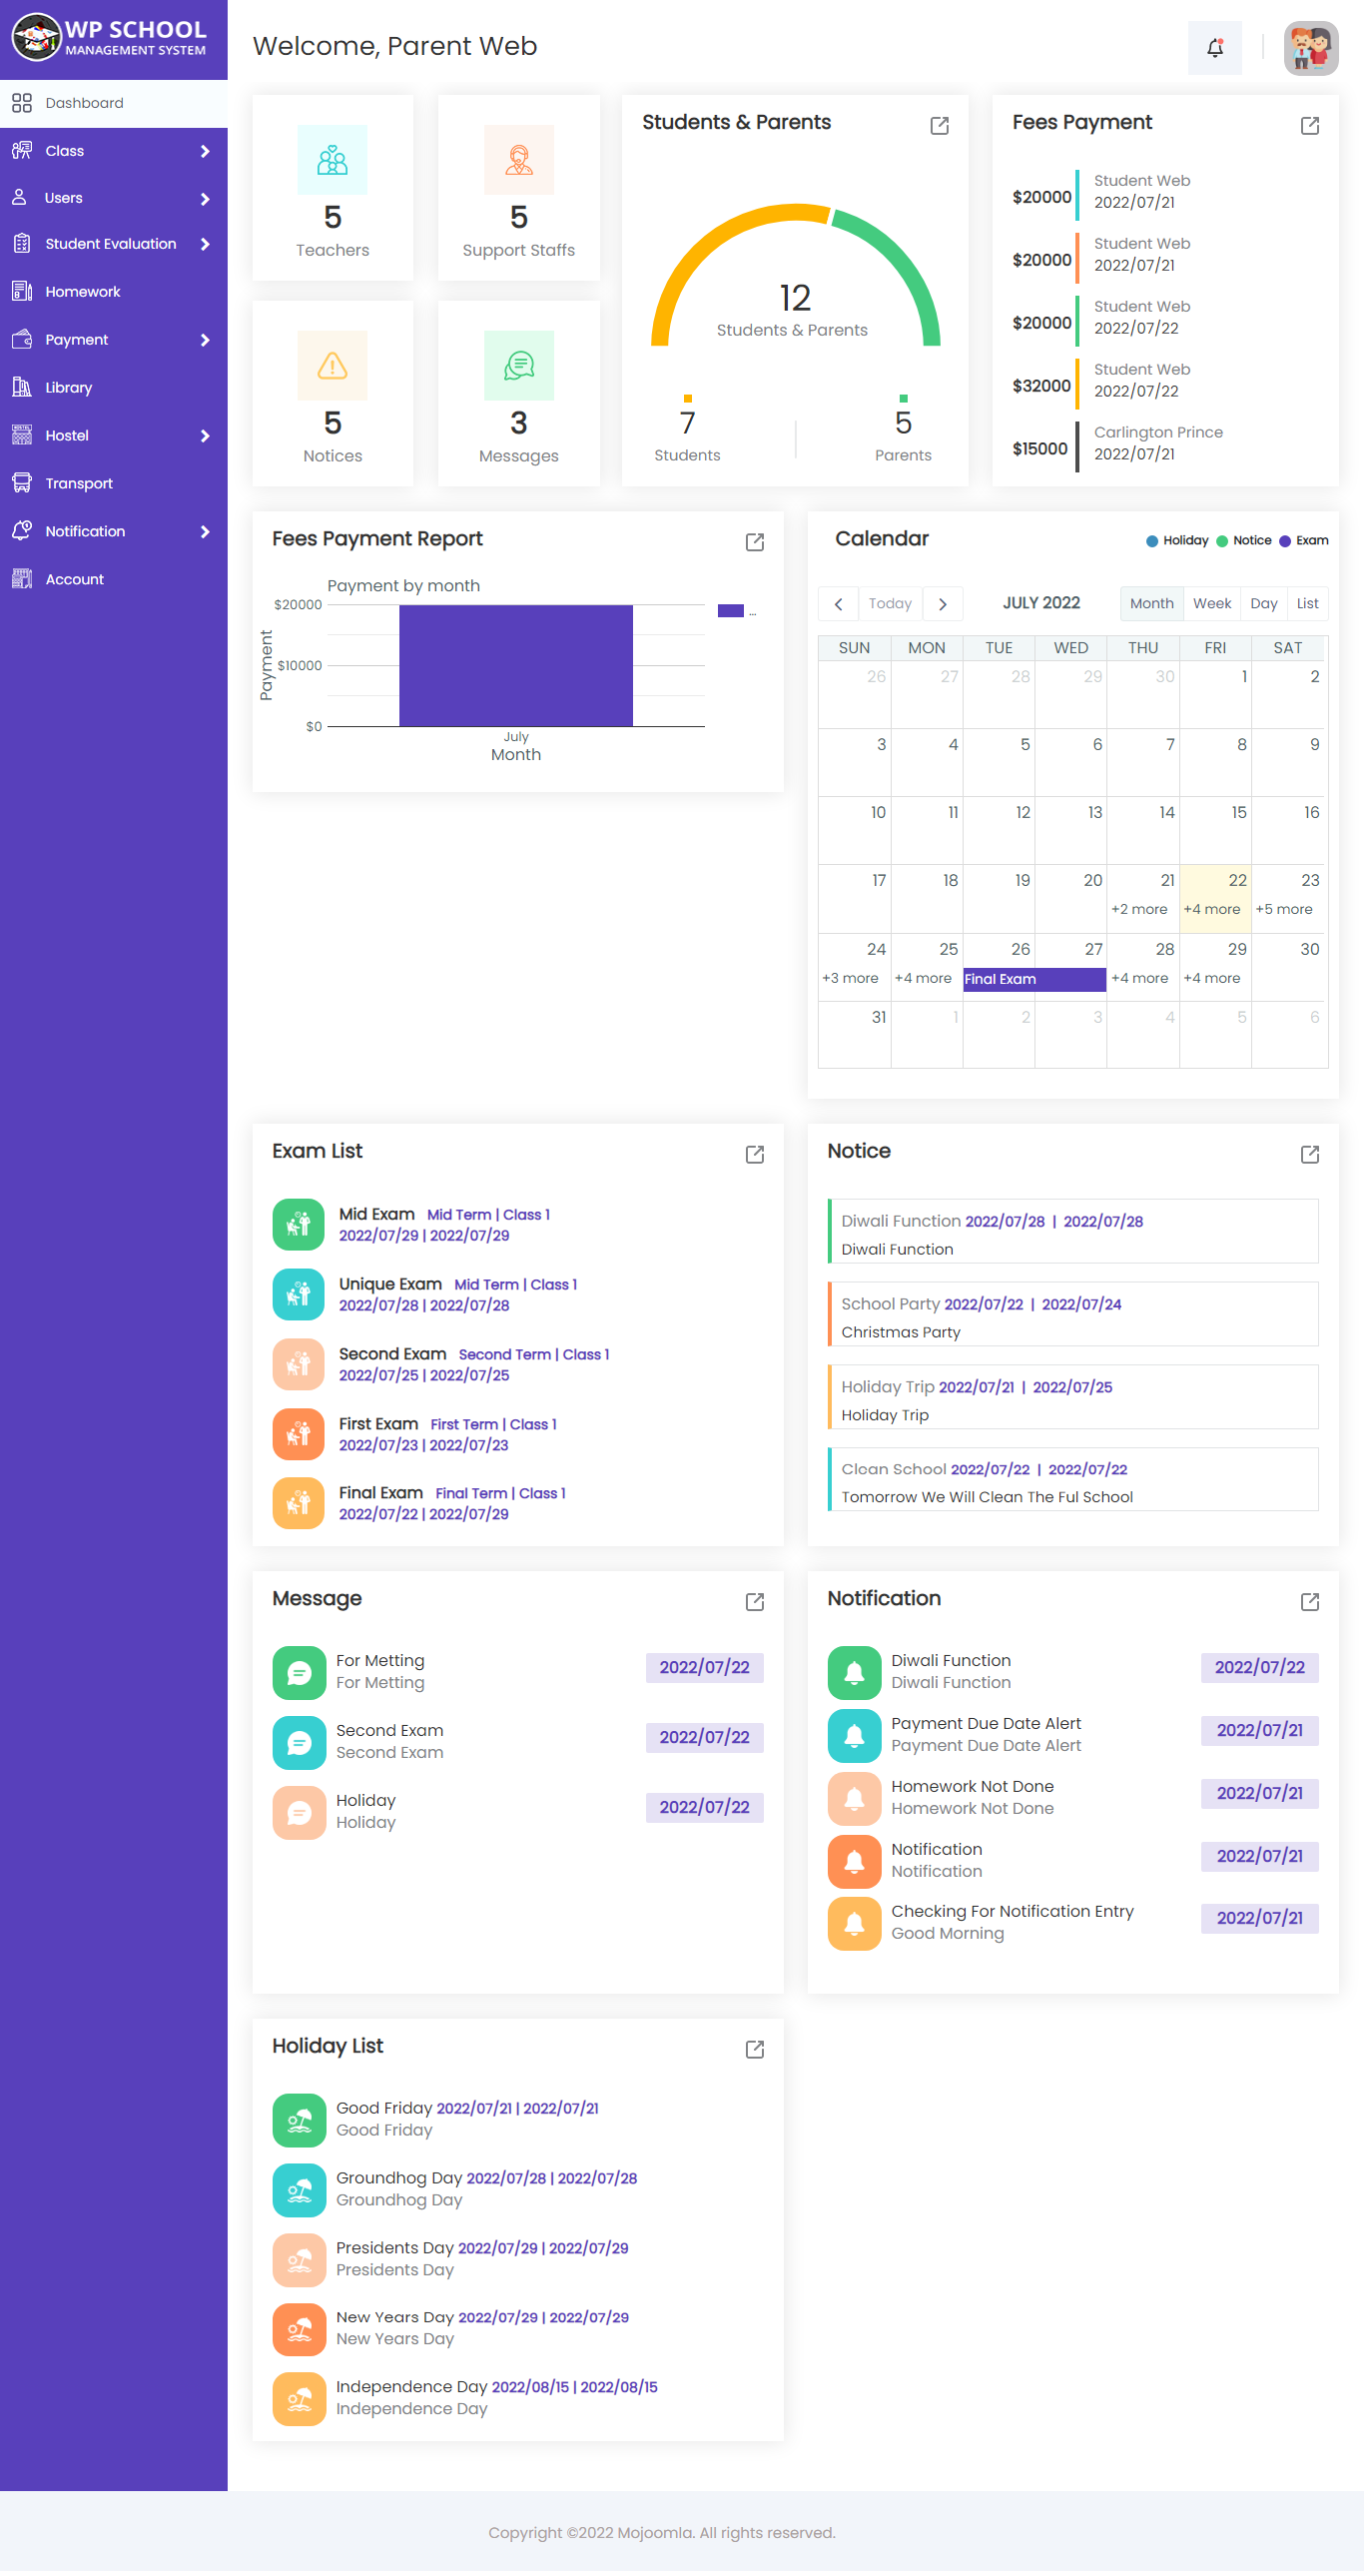
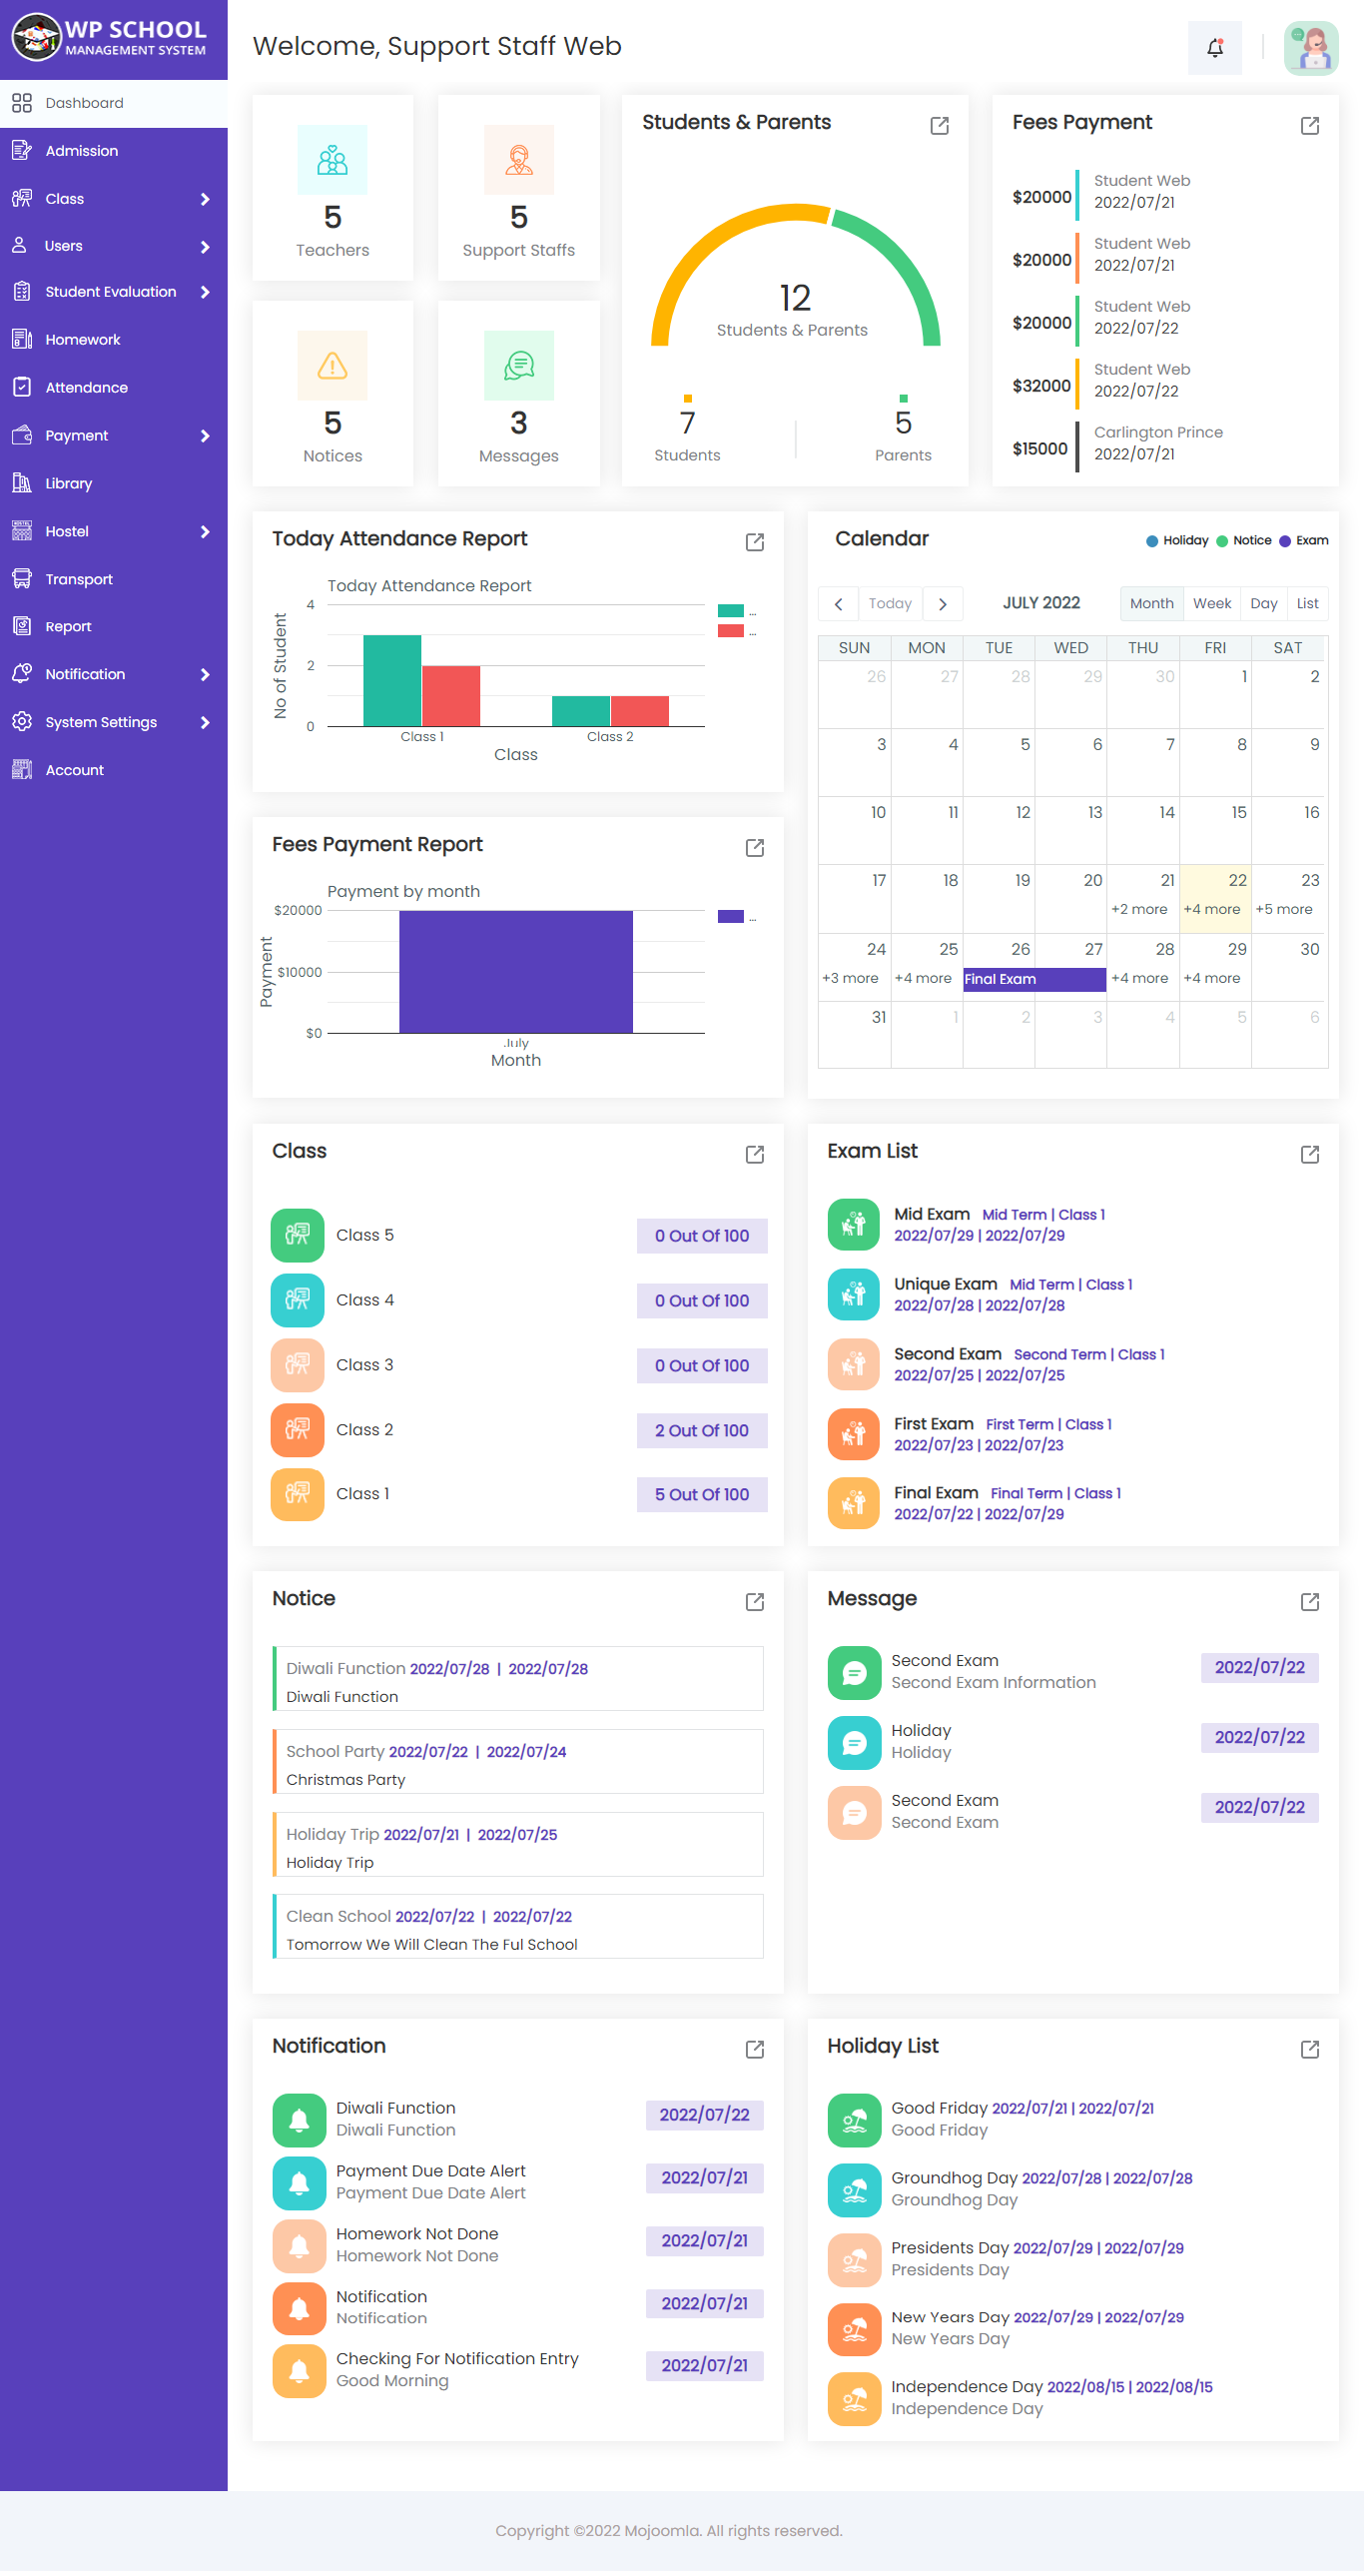
The Admin dashboard provides a full overview of school operations — students, teachers, attendance, fees, exams, and more at a glance.
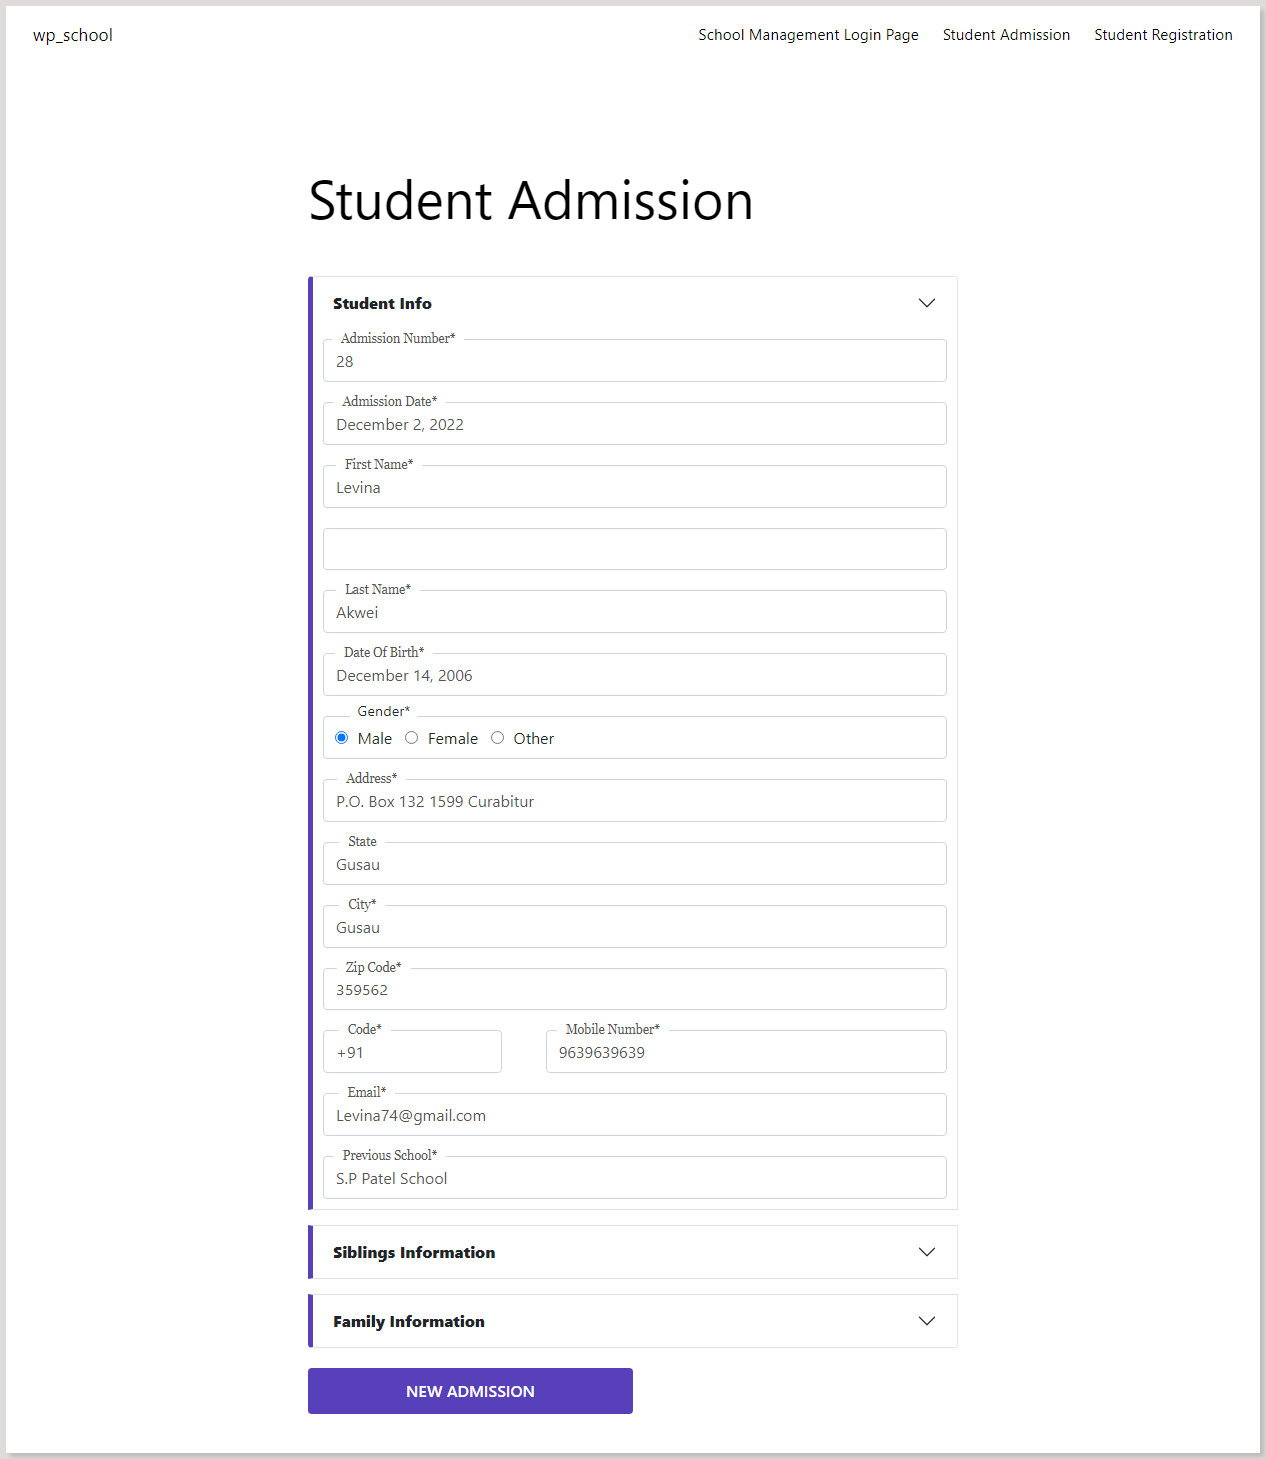
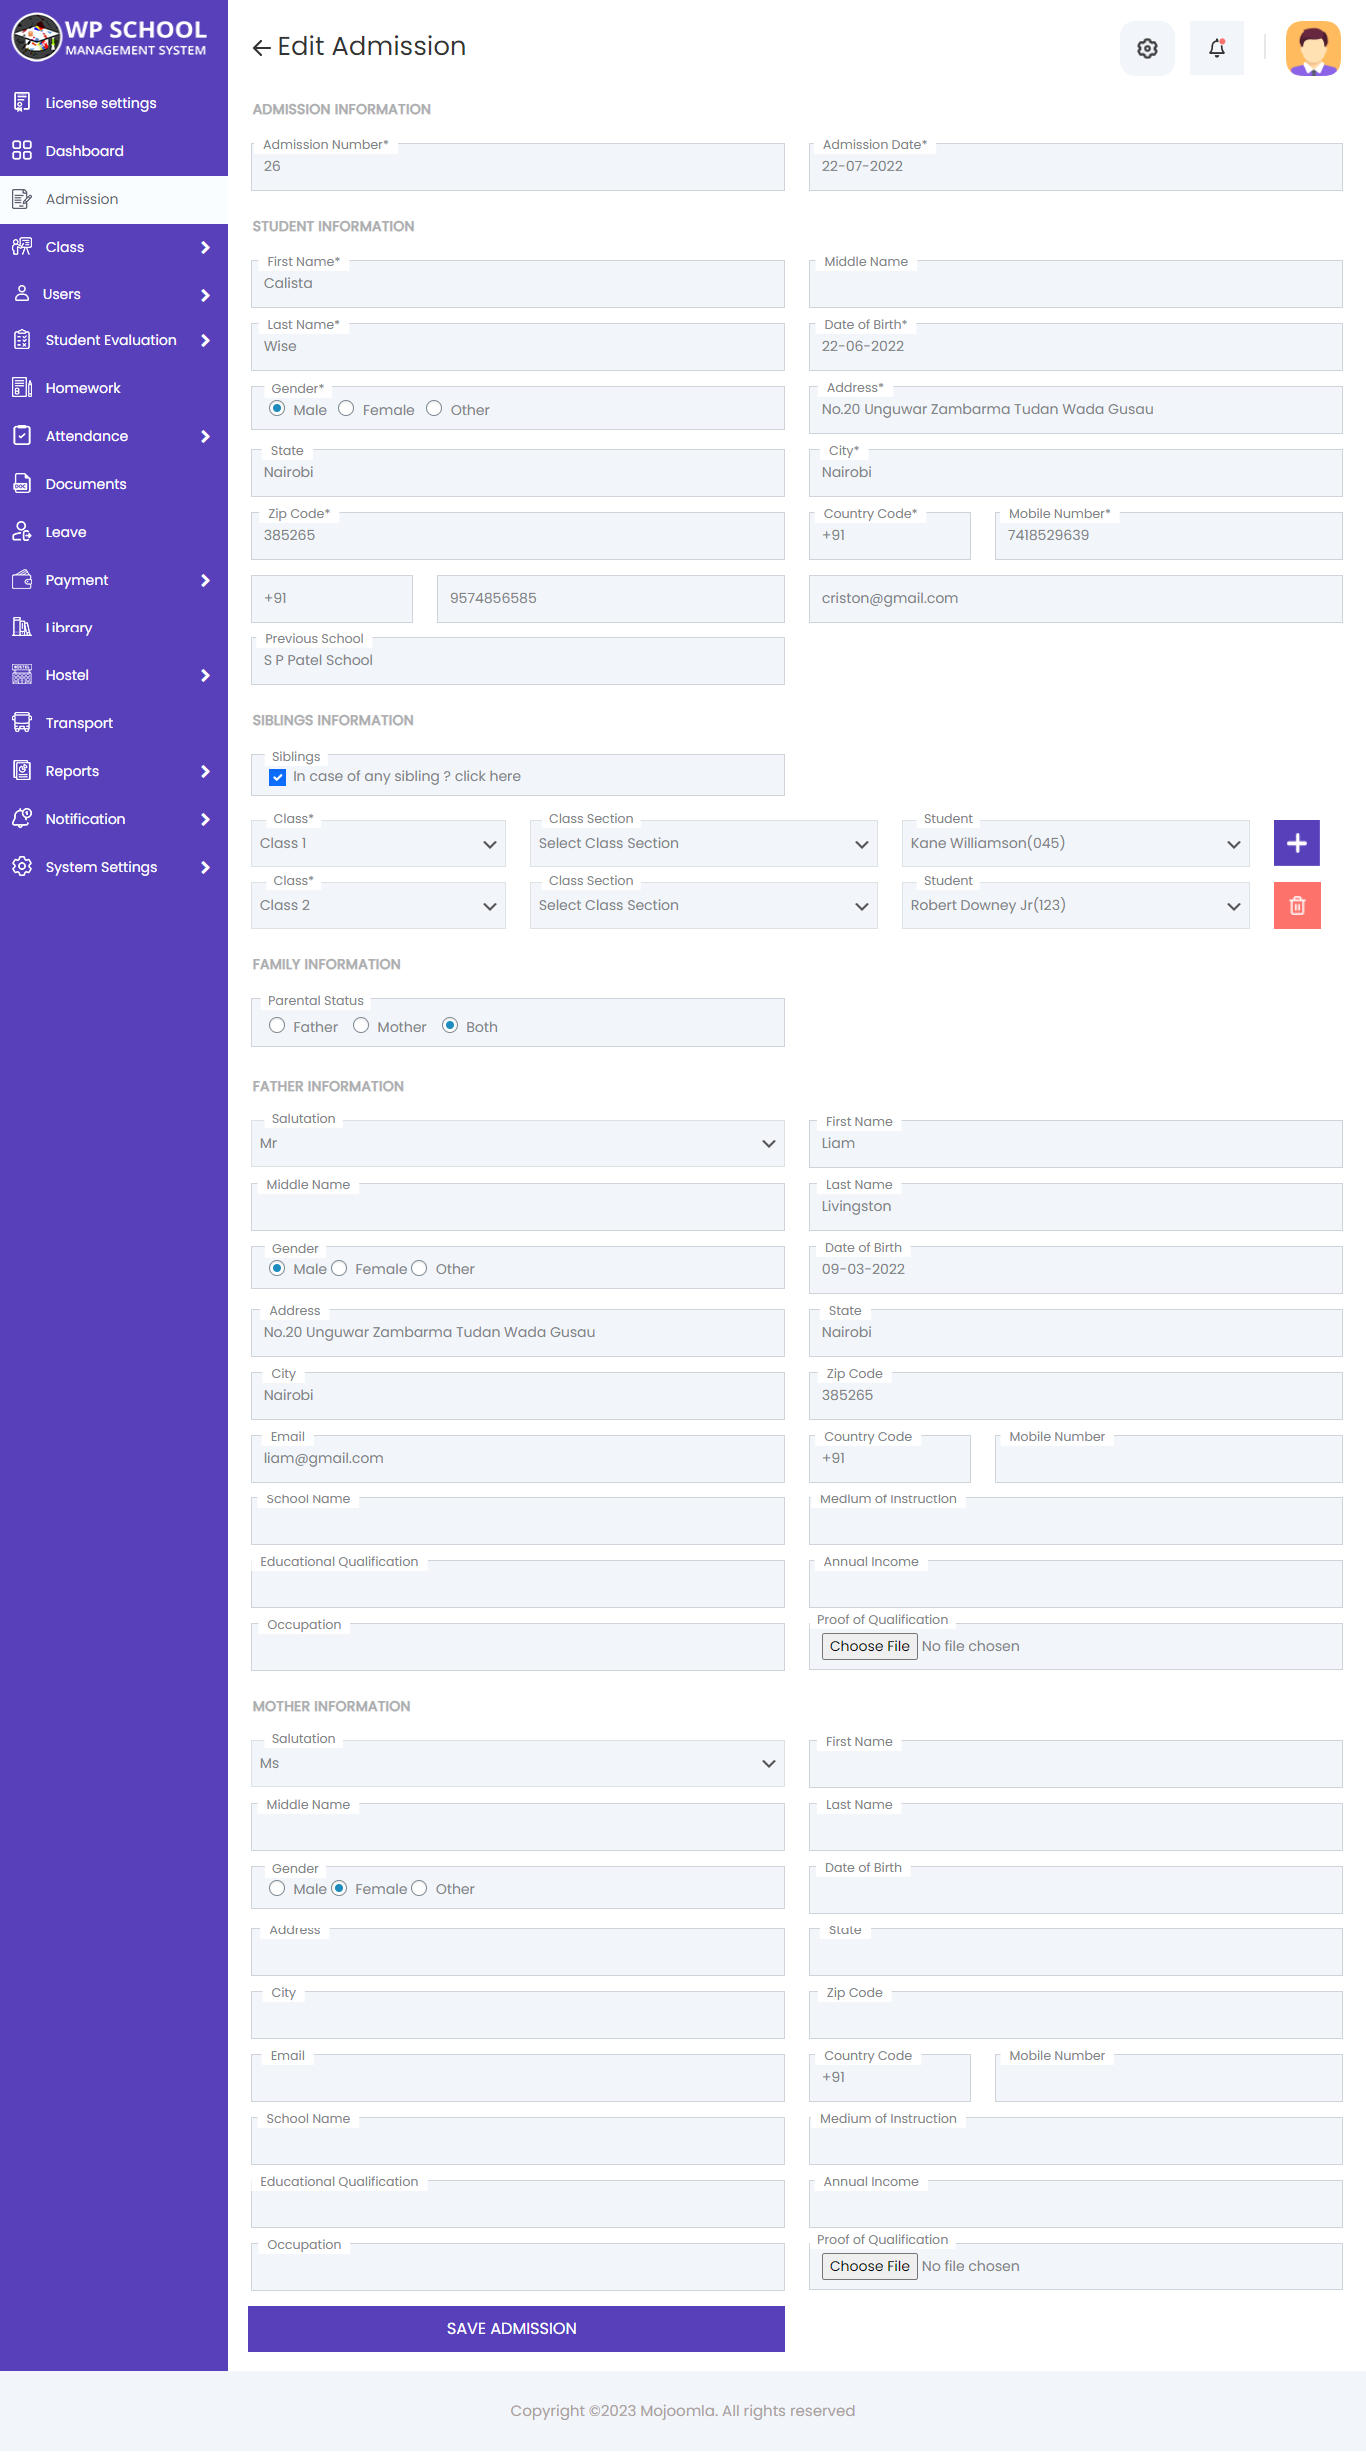
5) Admission
Manage the full student admission process — from application to approval and account activation.
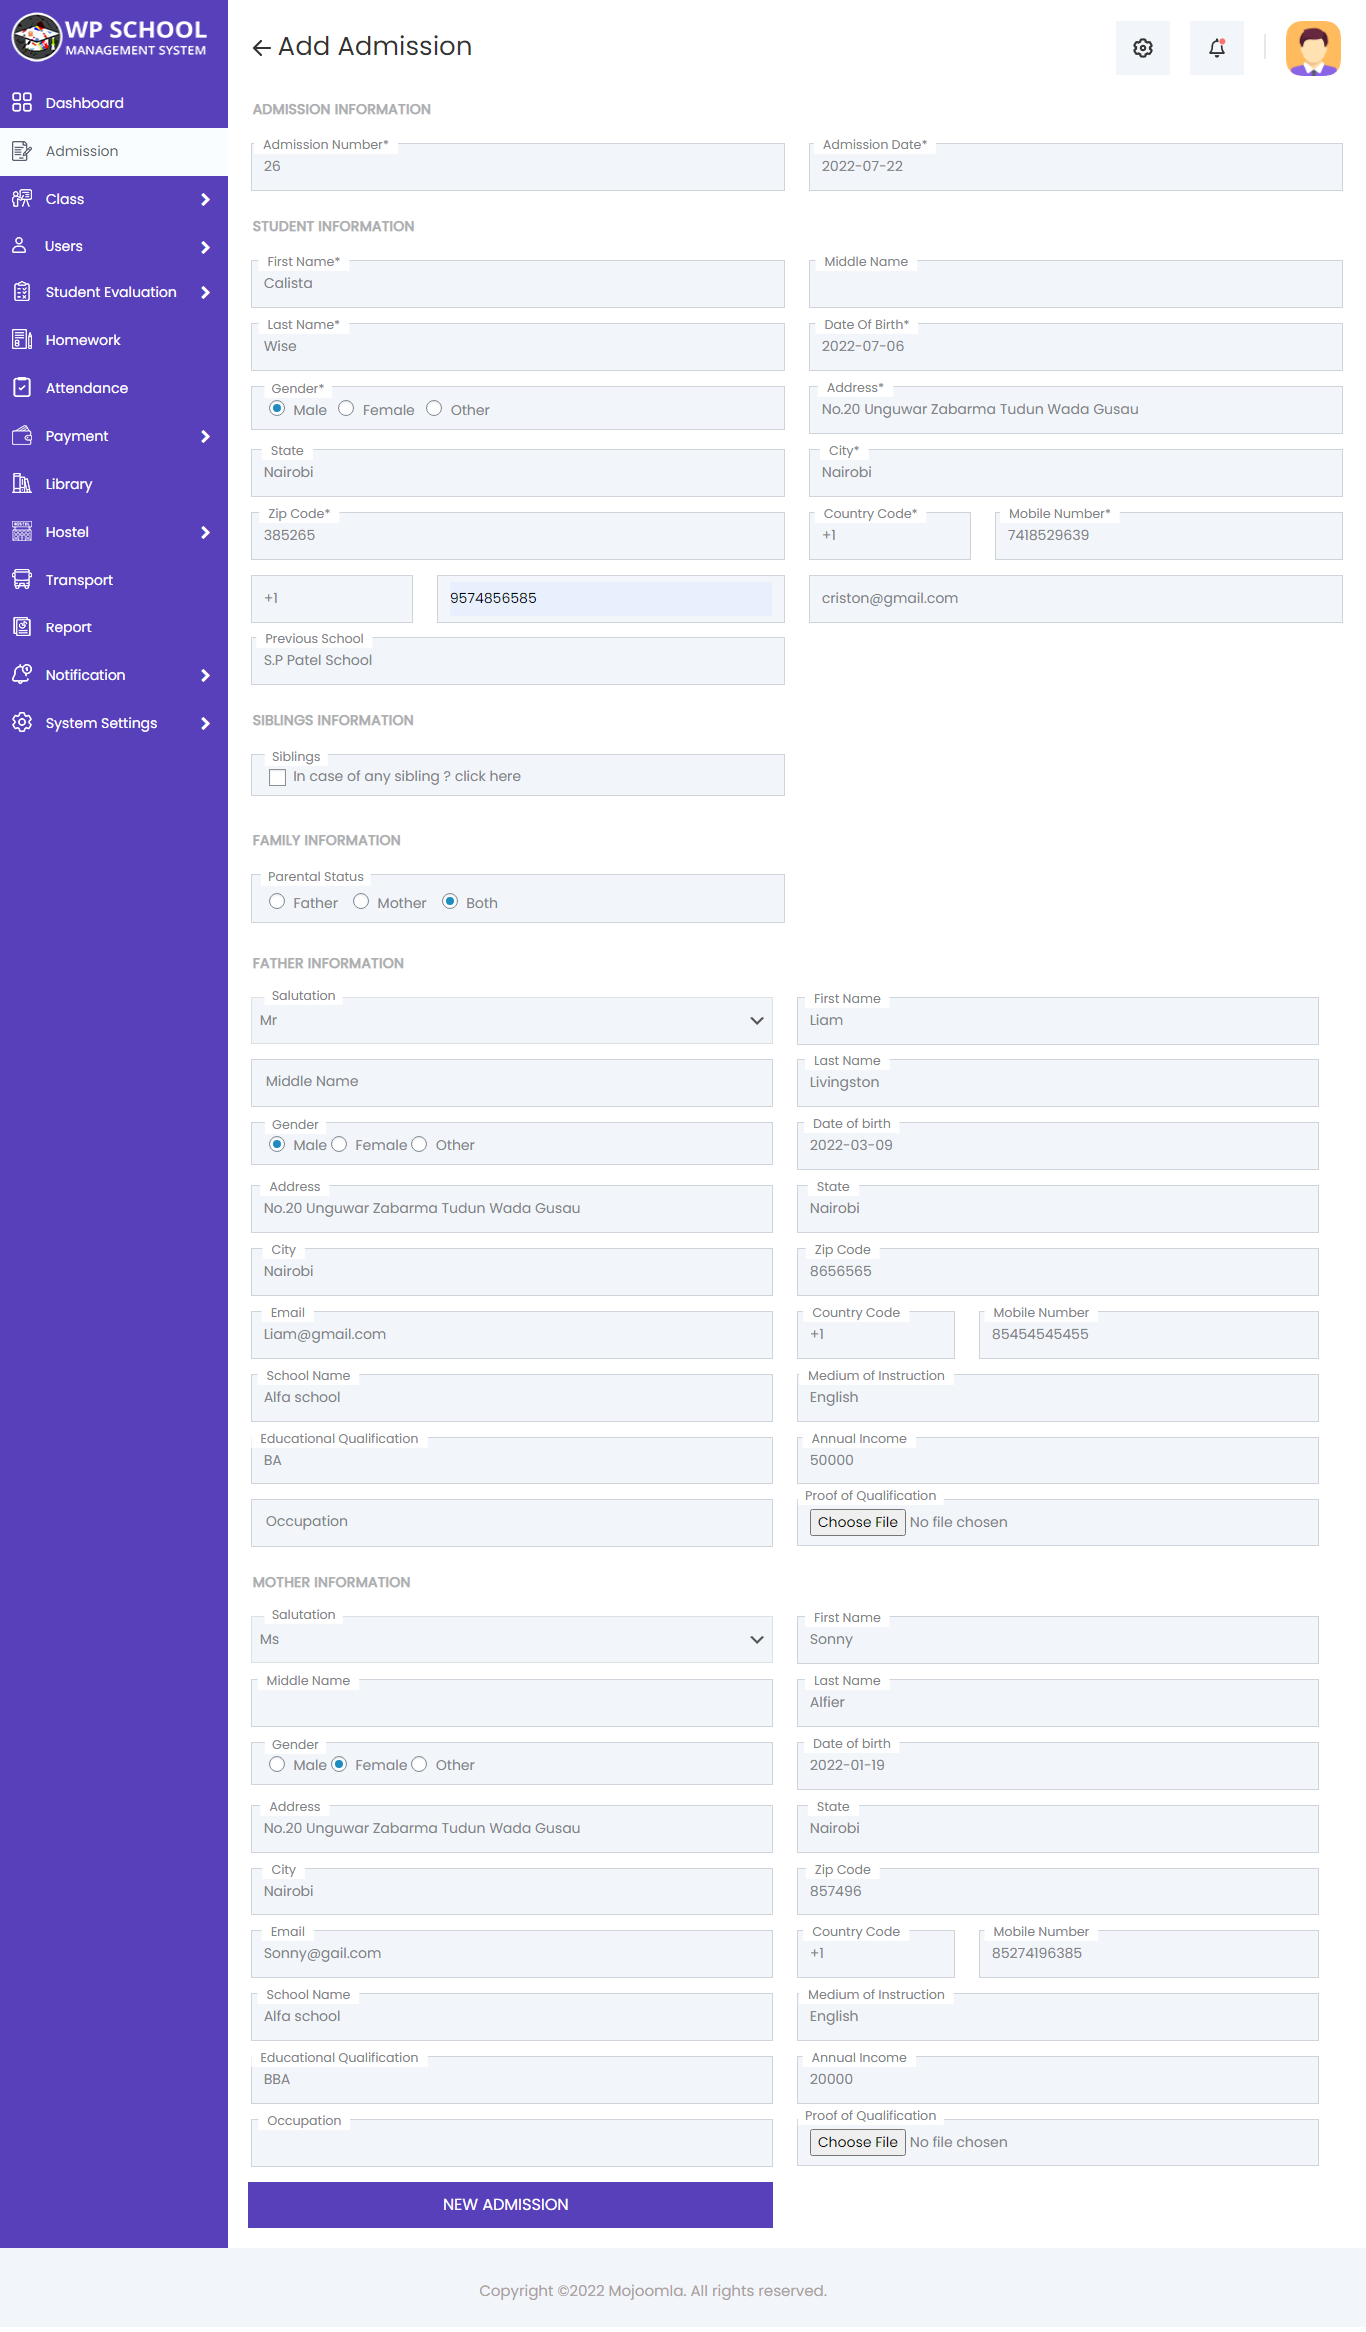
| Field | Description |
|---|---|
| Admission Number | Auto-generated unique number |
| Admission Date | Date of application |
| First / Last Name | Student's full name |
| Date of Birth | Student's DOB |
| Gender | Male / Female / Other |
| Address / City / State | Current residential address |
| Mobile Number | Student or parent contact |
| Unique email for login | |
| Previous School | Prior institution name |
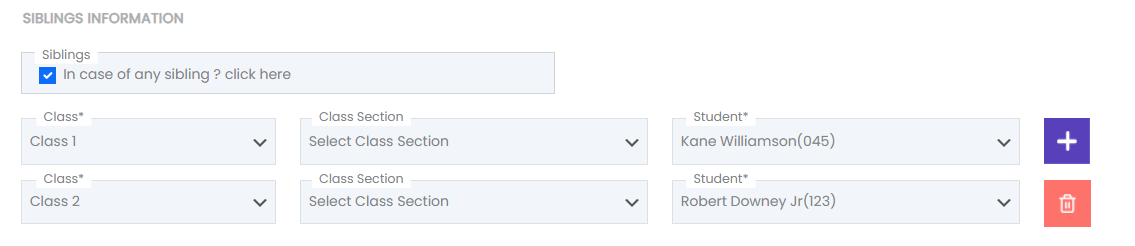
| Siblings Info | Details of siblings already enrolled |
| Family Information | Parent/guardian details, occupation, education |
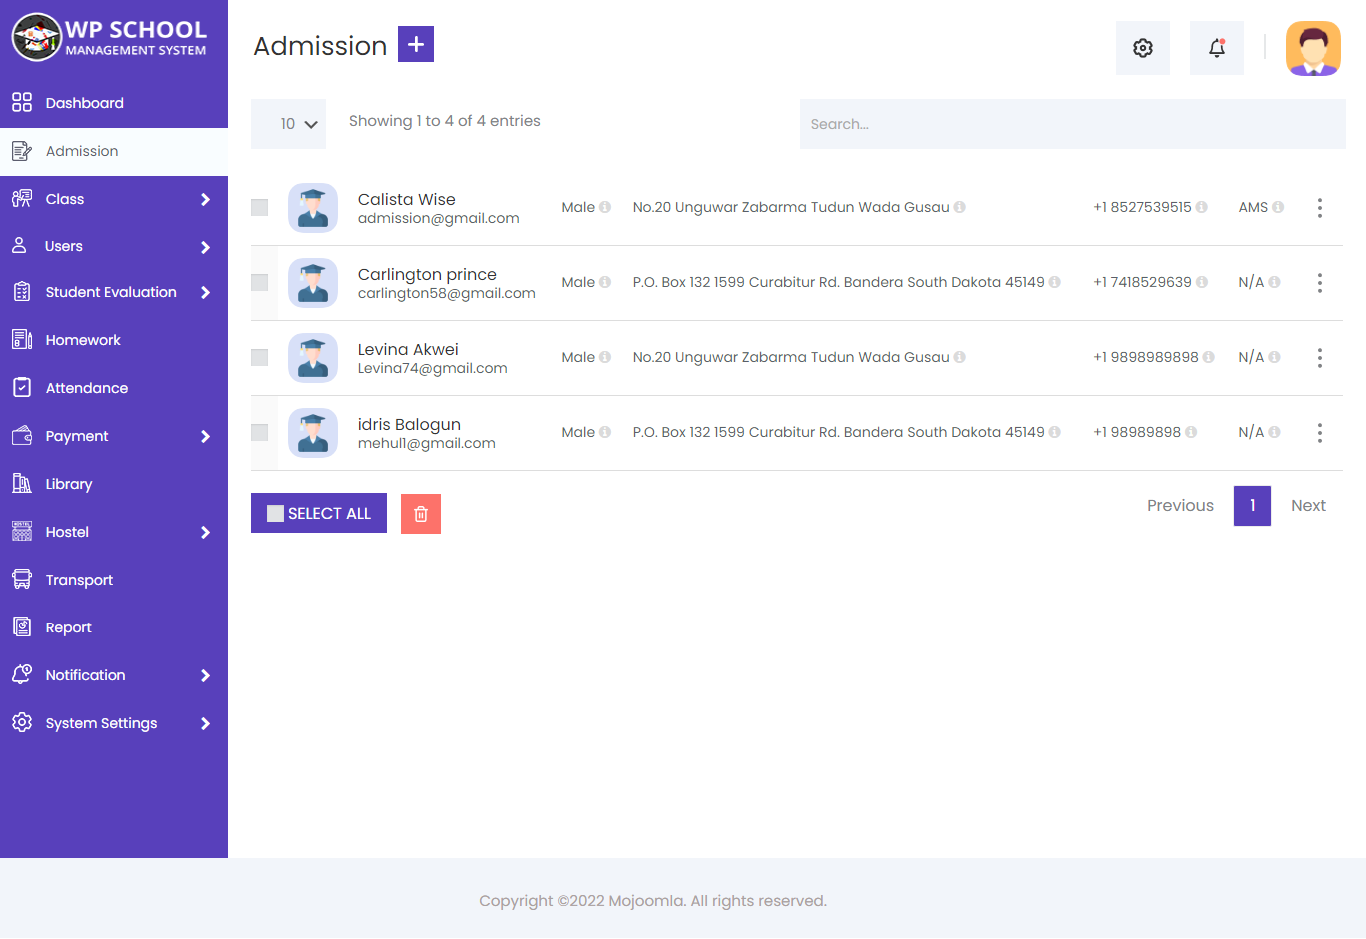
Admission List & Edit
Admin can view all admission applications submitted, edit their details, view the full admission form, and approve or reject applications from here.
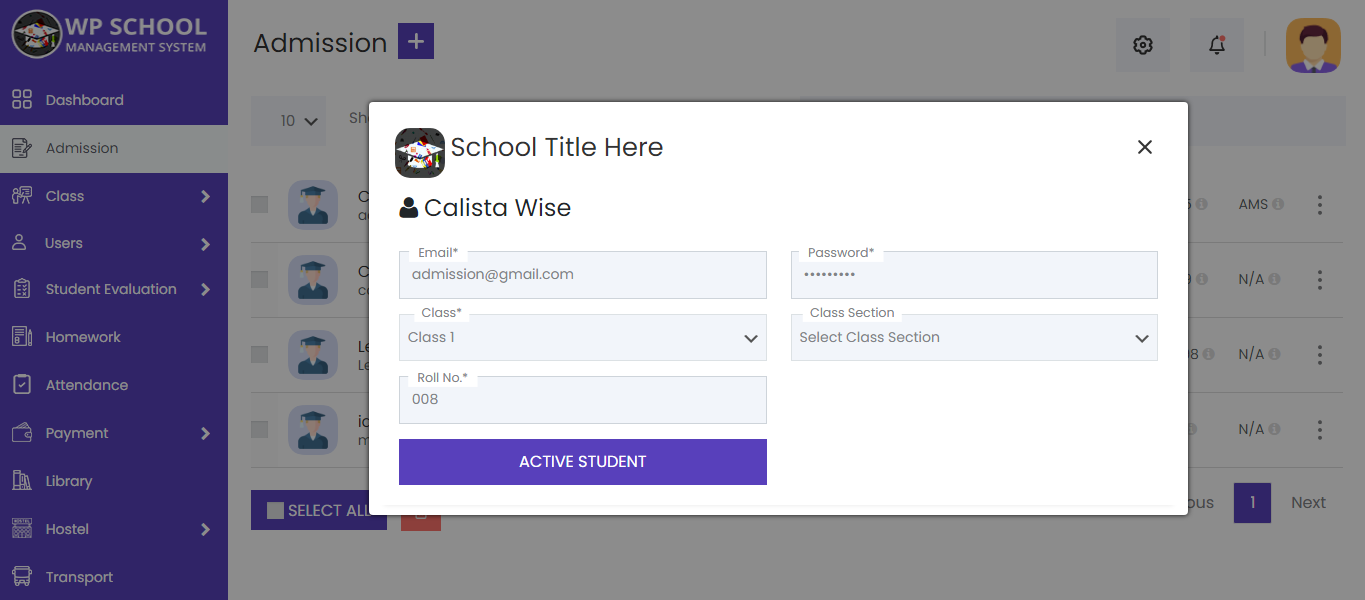
Approve Admission
Click the Approve button on a pending admission. A popup opens — enter the student's Password, Class, and Roll Number, then click Active Student. A confirmation email is sent automatically.
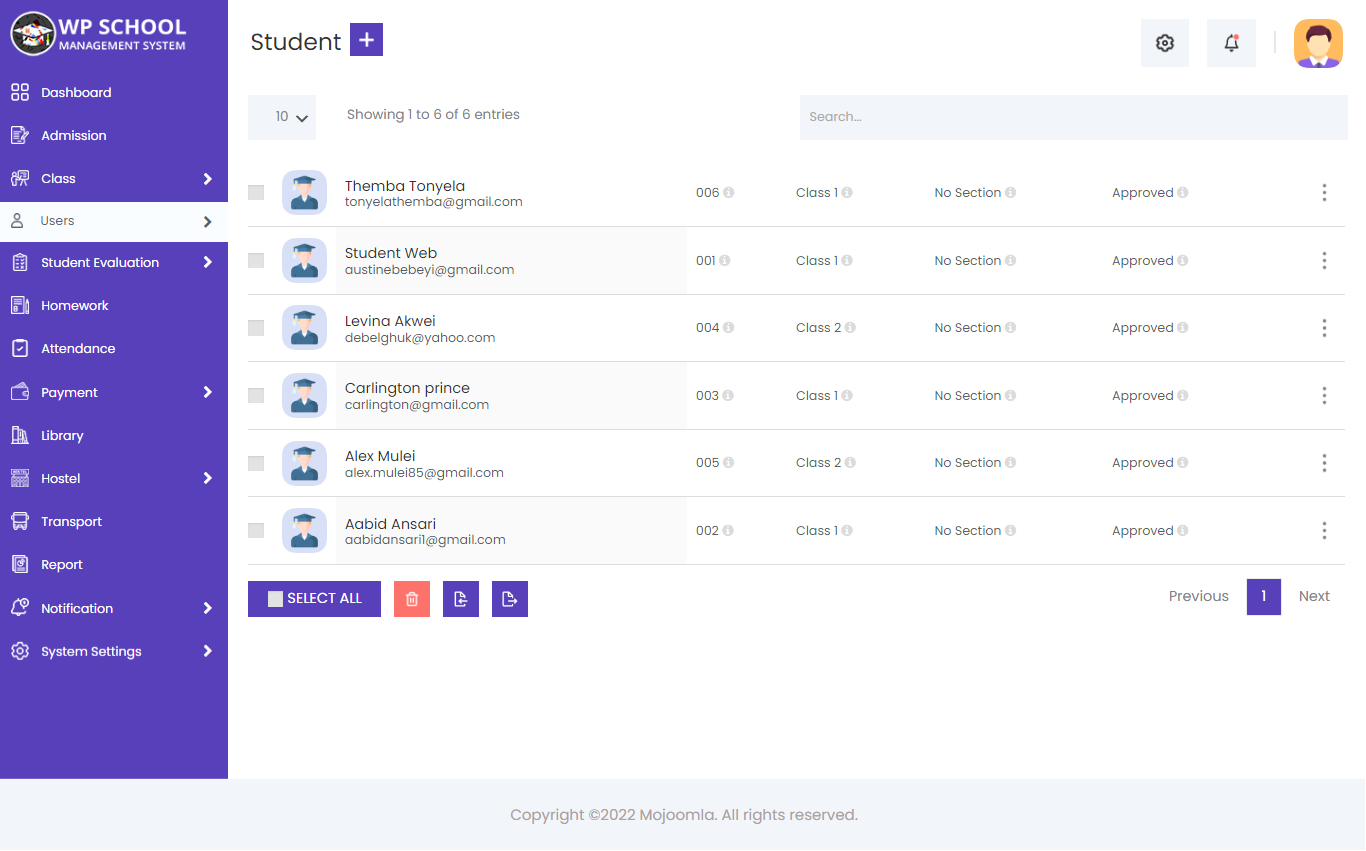
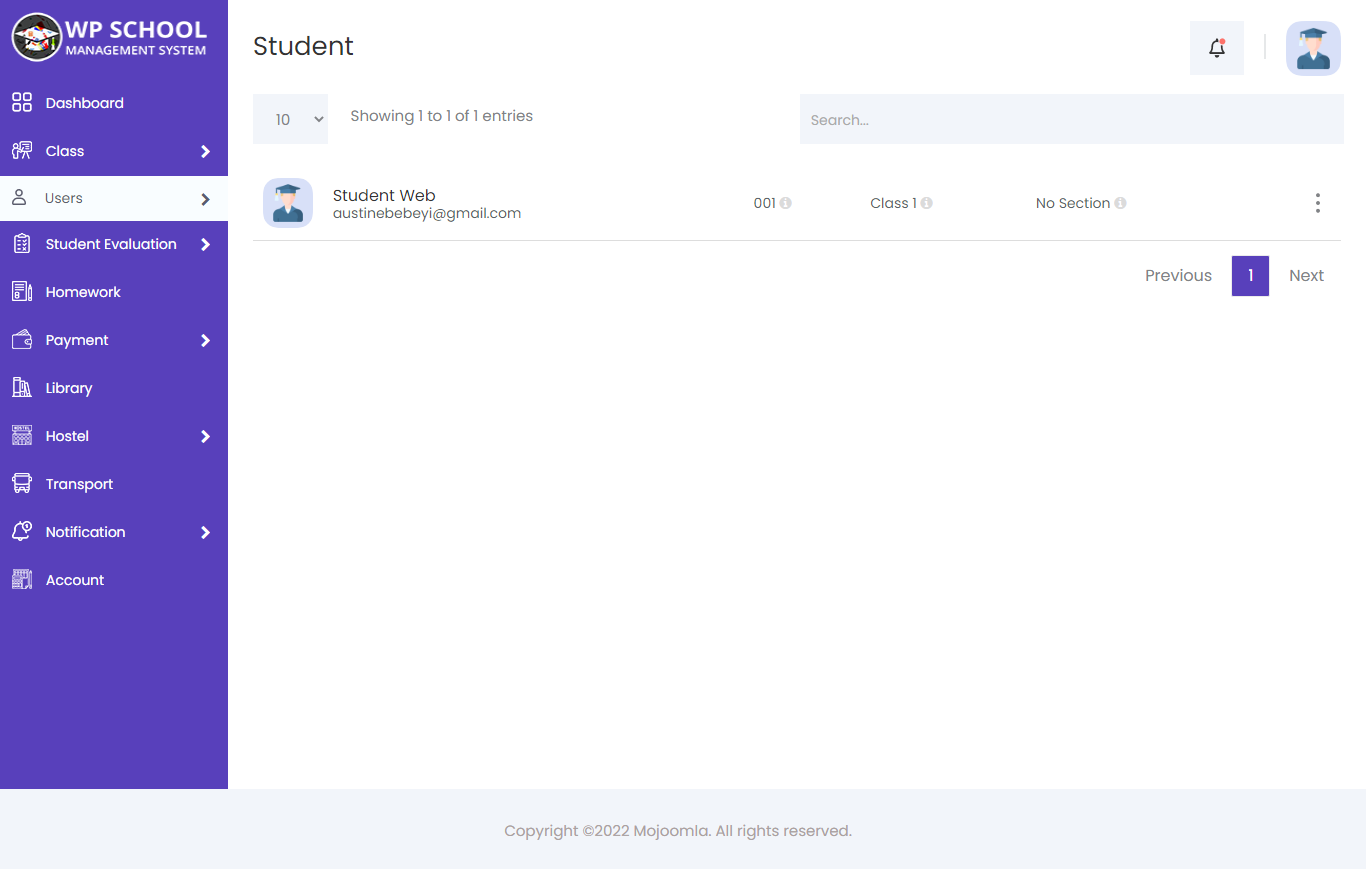
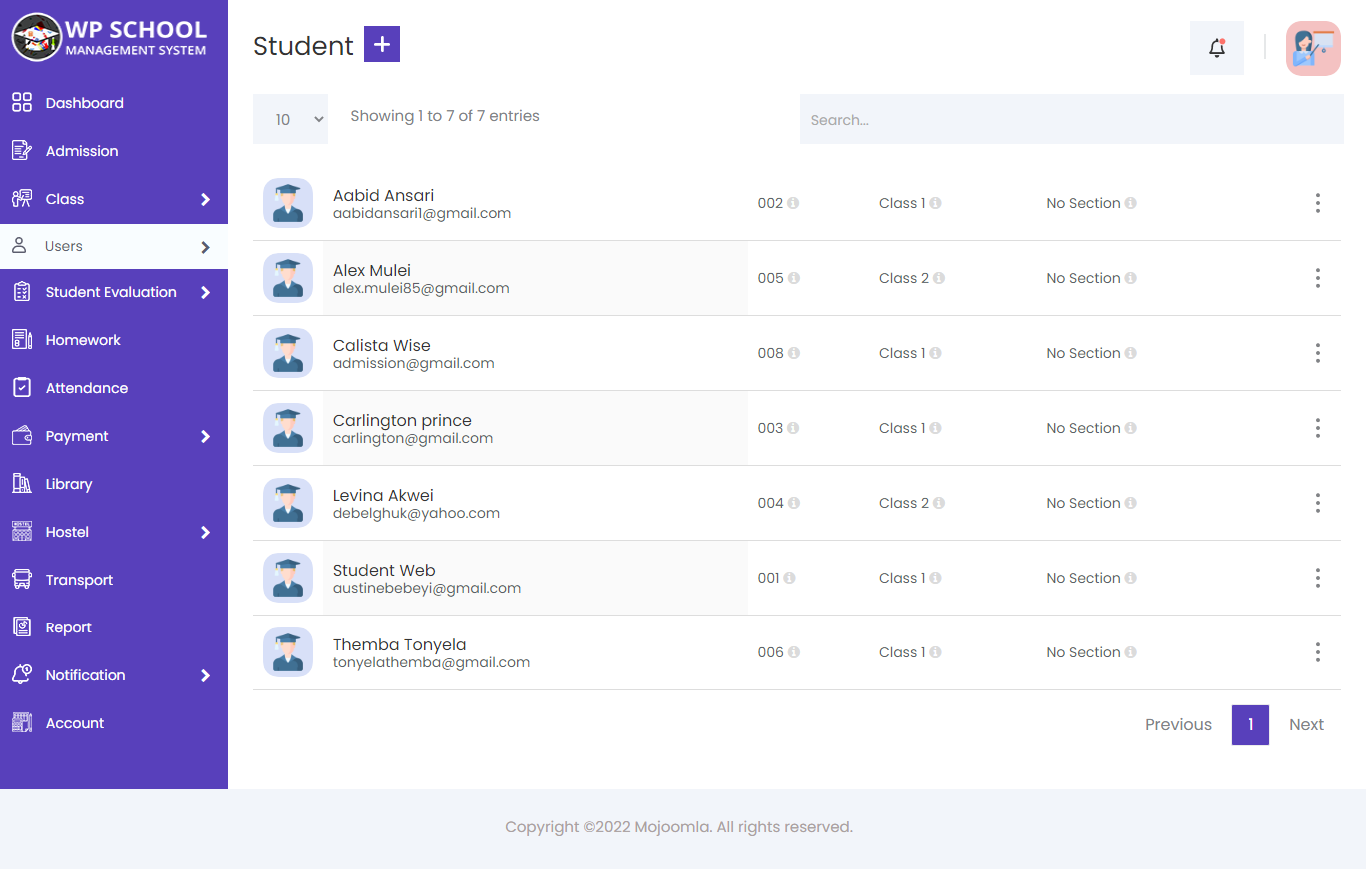
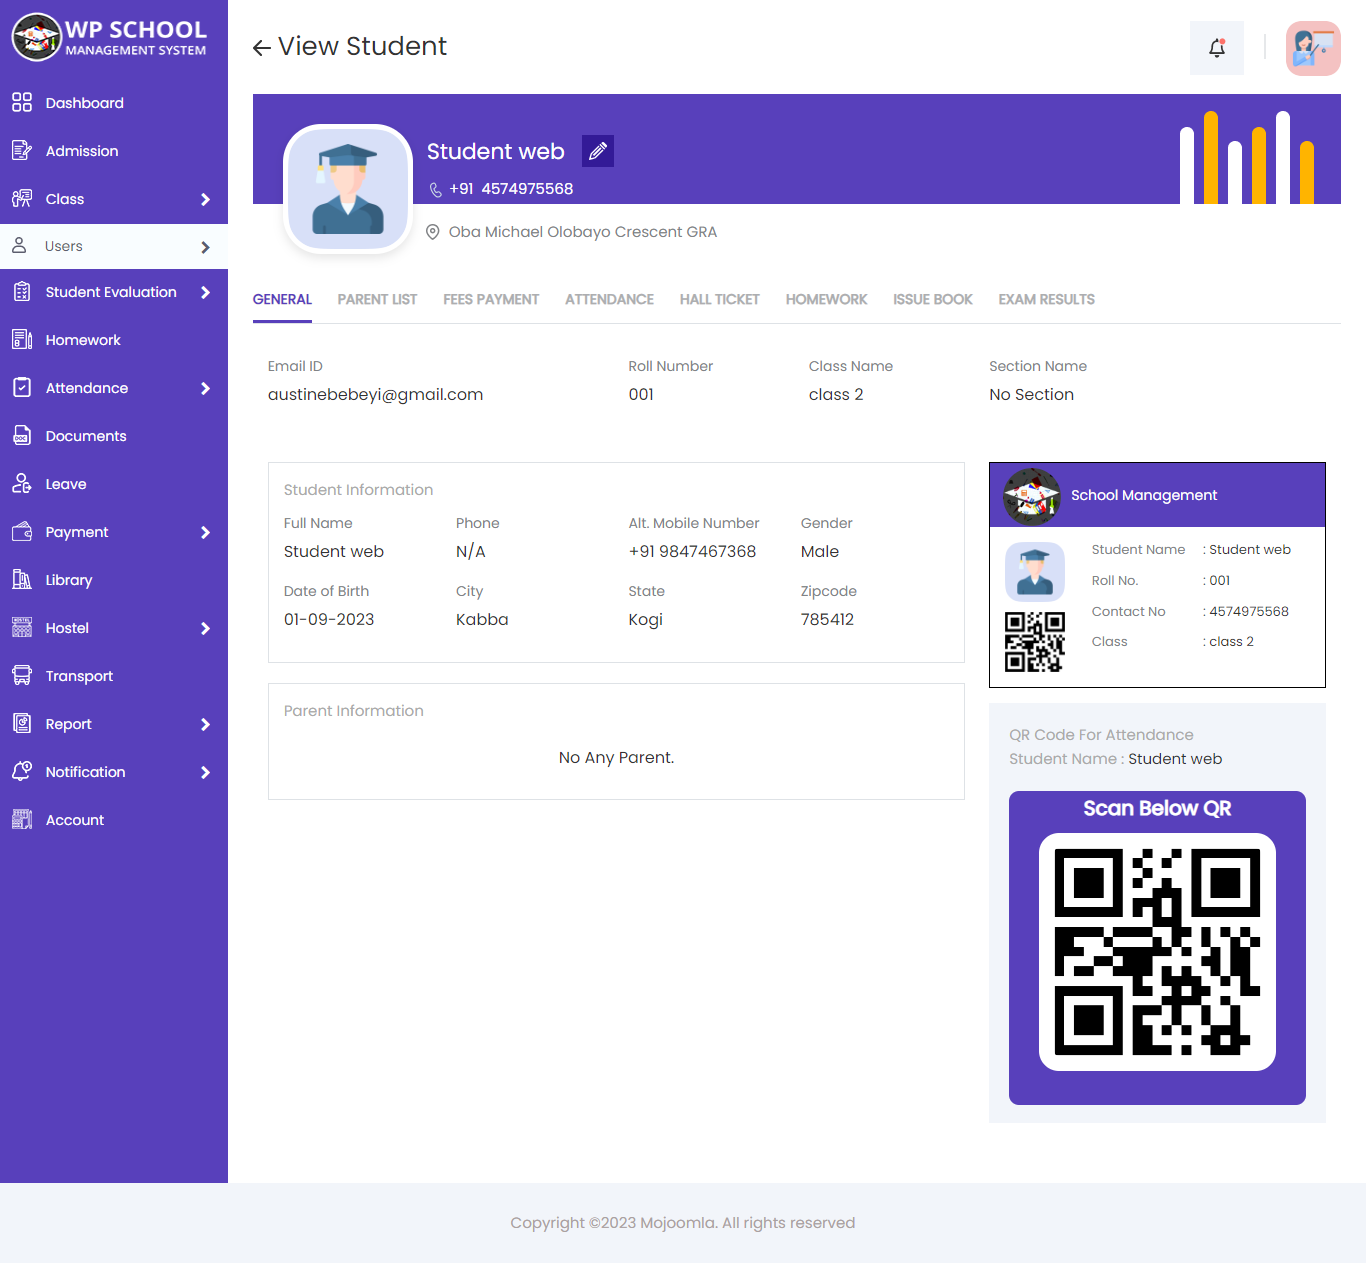
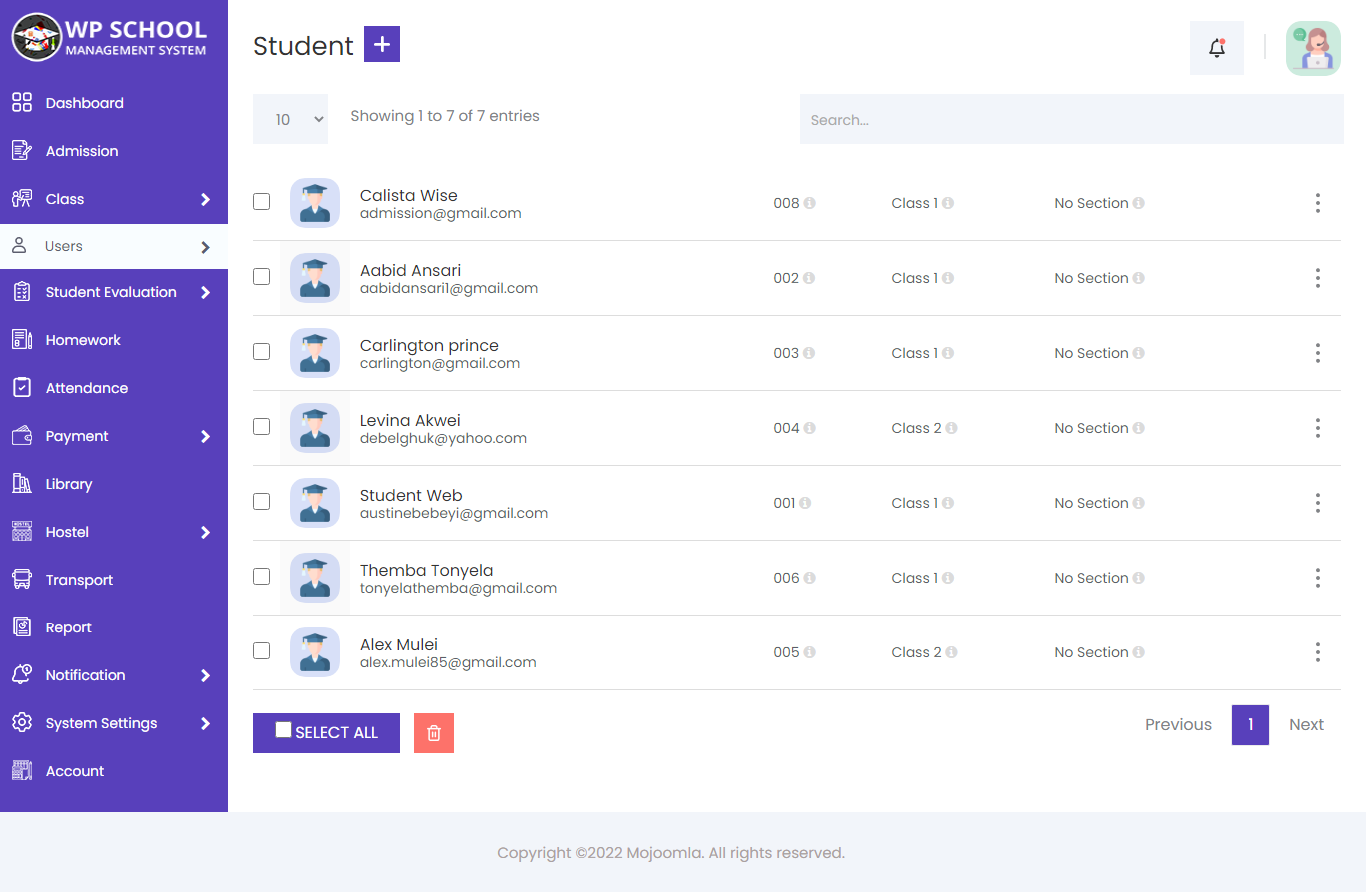
6) Students
You can manage all information about students and also view results and attendance information of students. You can also download the Exam Receipt of any student from this section.
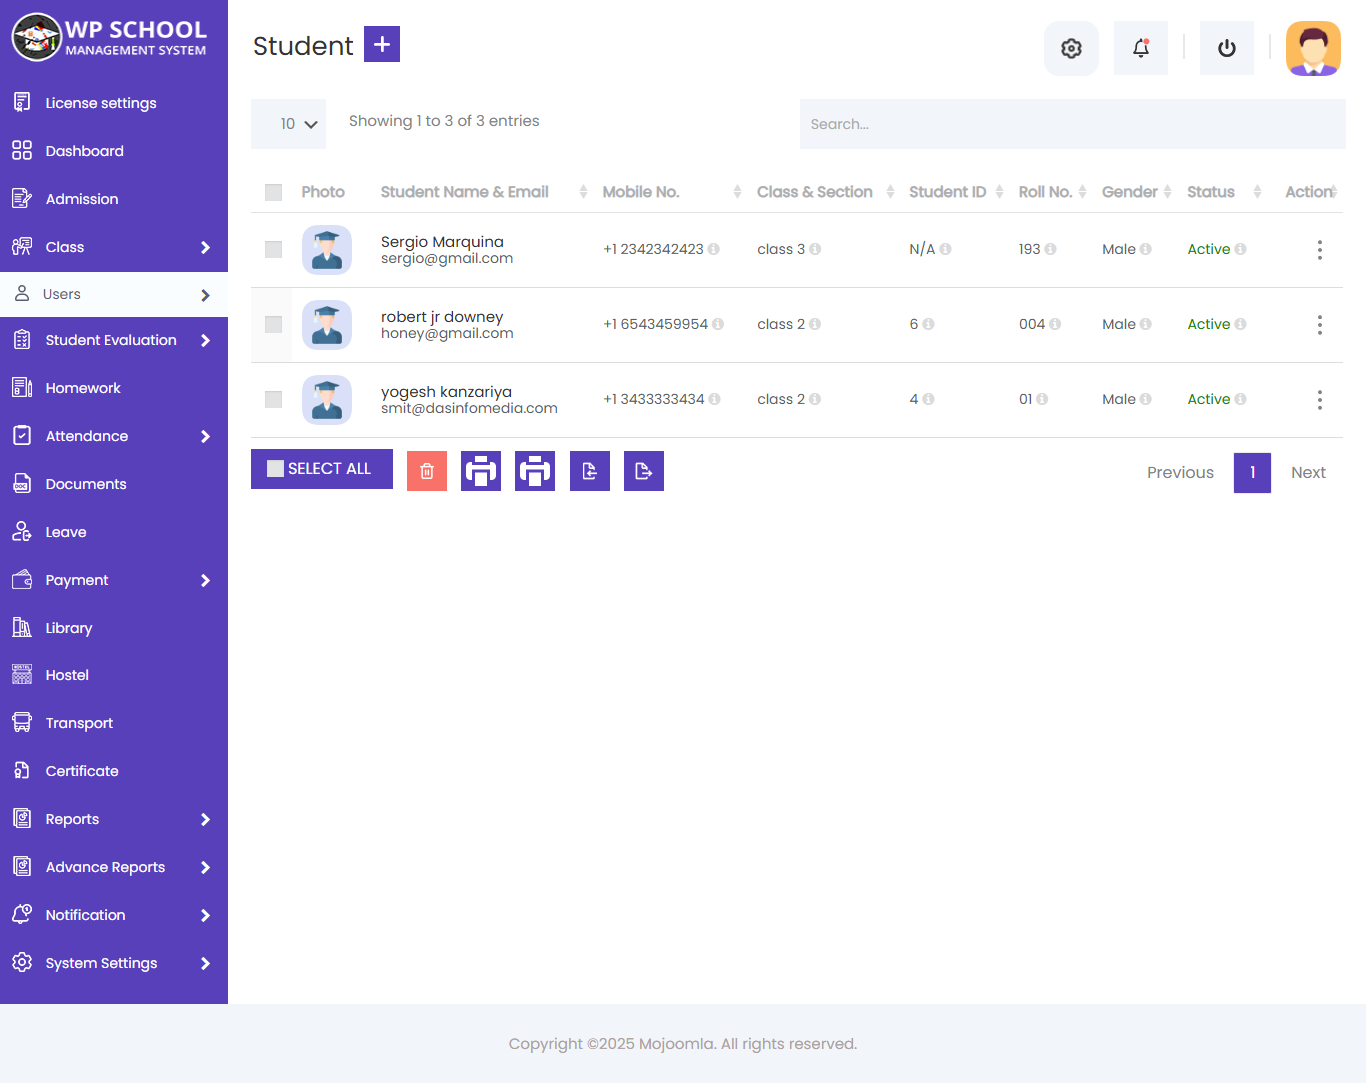
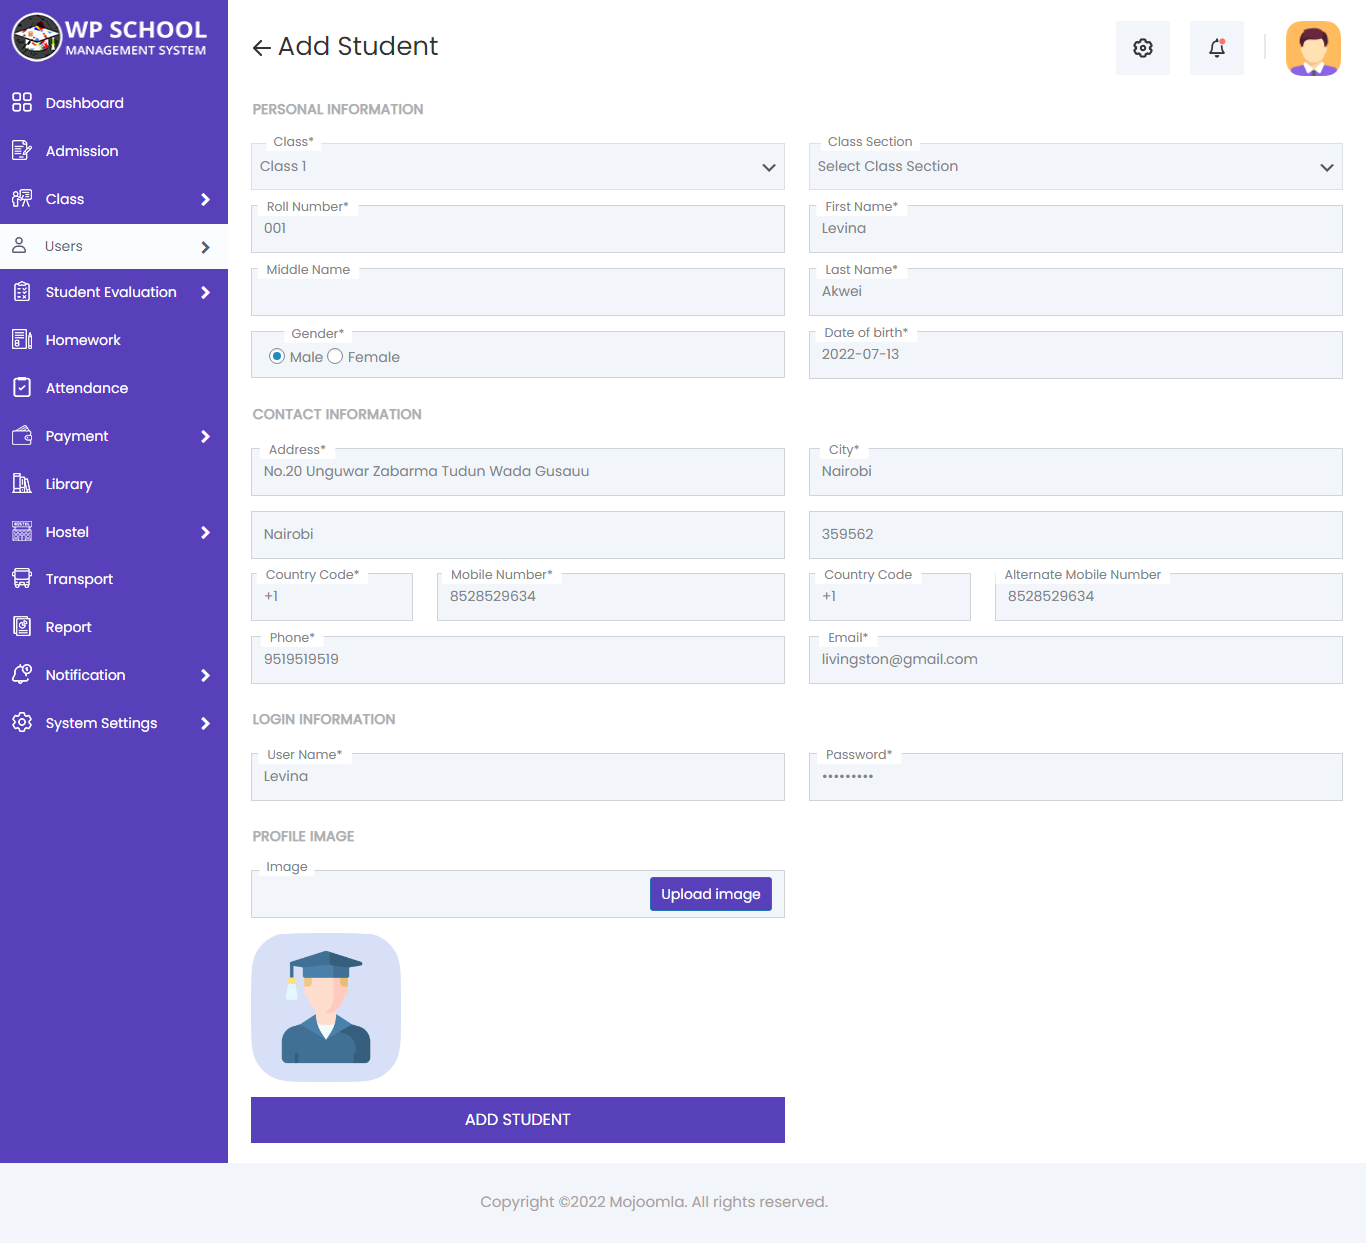
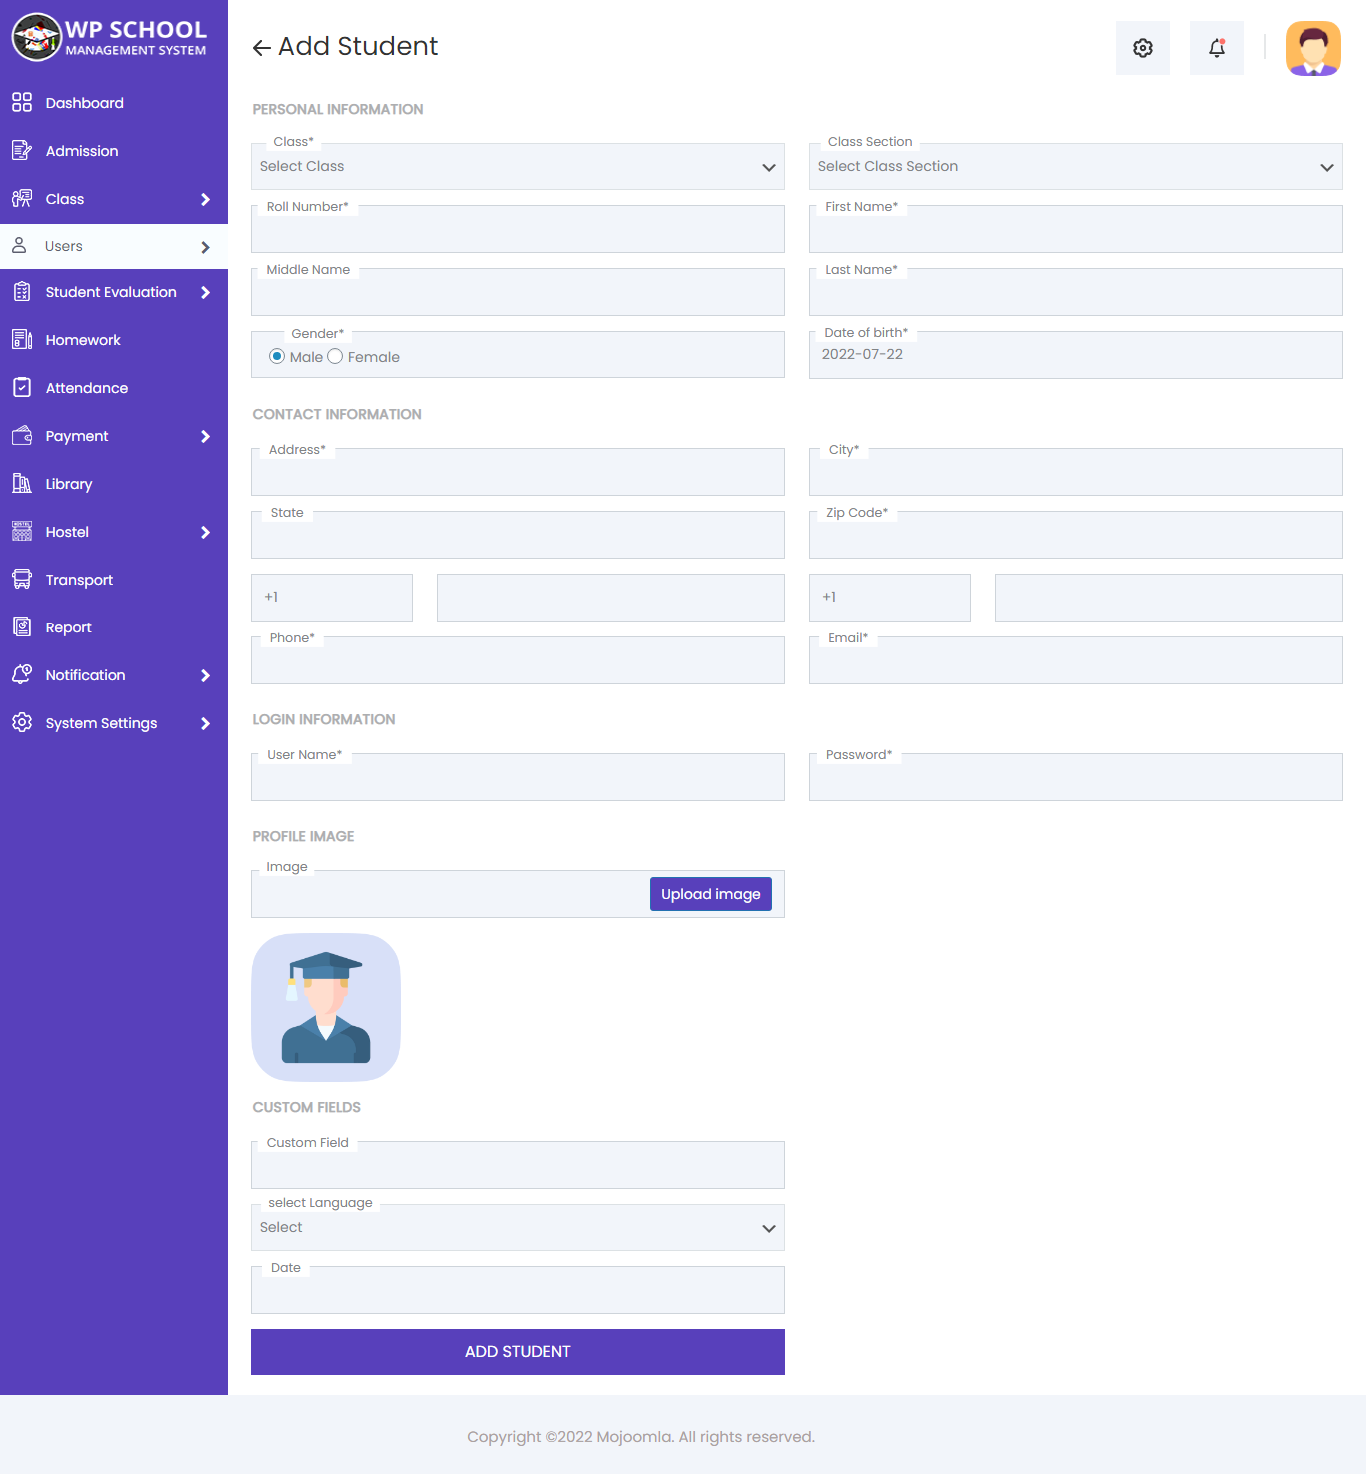
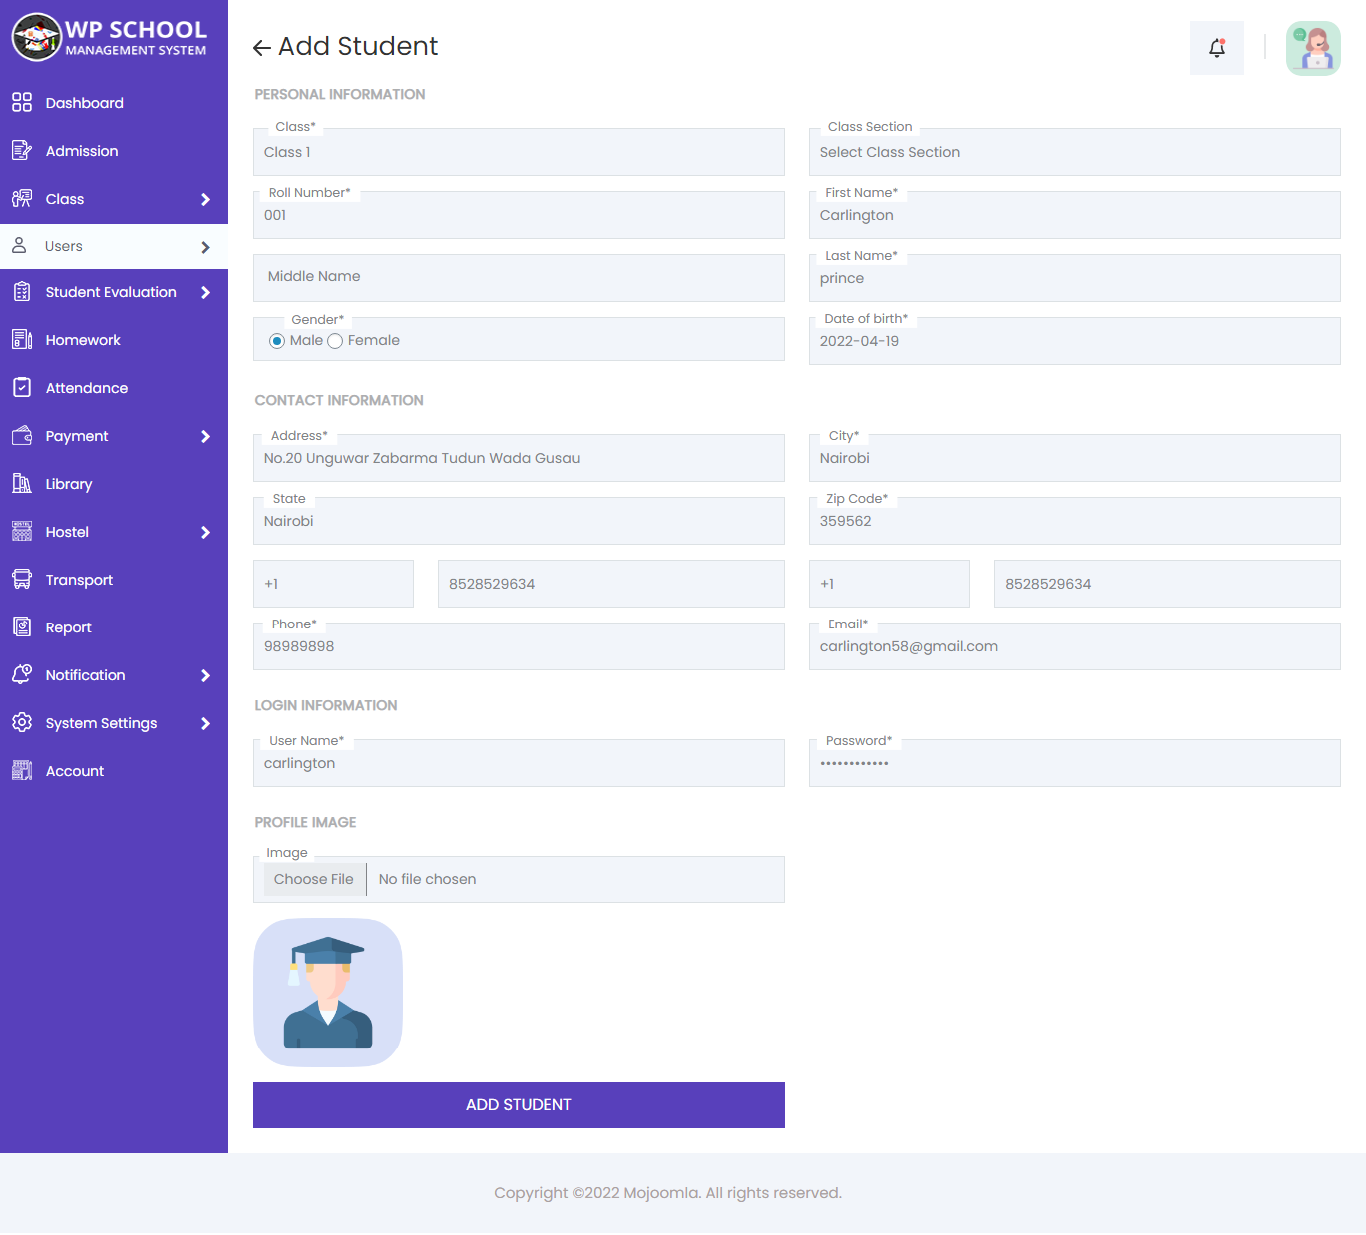
Add Student Information
Fill in all required fields to register a new student. The Student ID is assigned automatically. Each username, email, and roll number must be unique across the system.
| Field | Description |
|---|---|
| Student ID | Auto-generated unique identifier |
| Class | Select class for the student |
| Roll Number | Must be unique within the class |
| Name | Full student name |
| Address | City and state included |
| Phone | Student or parent mobile number |
| Unique email for student login | |
| Username | Unique login username |
| Password | Login password |
| Image | Profile photo upload |
| Document | Upload required student documents |
| Siblings | Add sibling students |
Edit Student
Click the Edit button on any student to update their personal information, contact details, class assignment, and parent information.

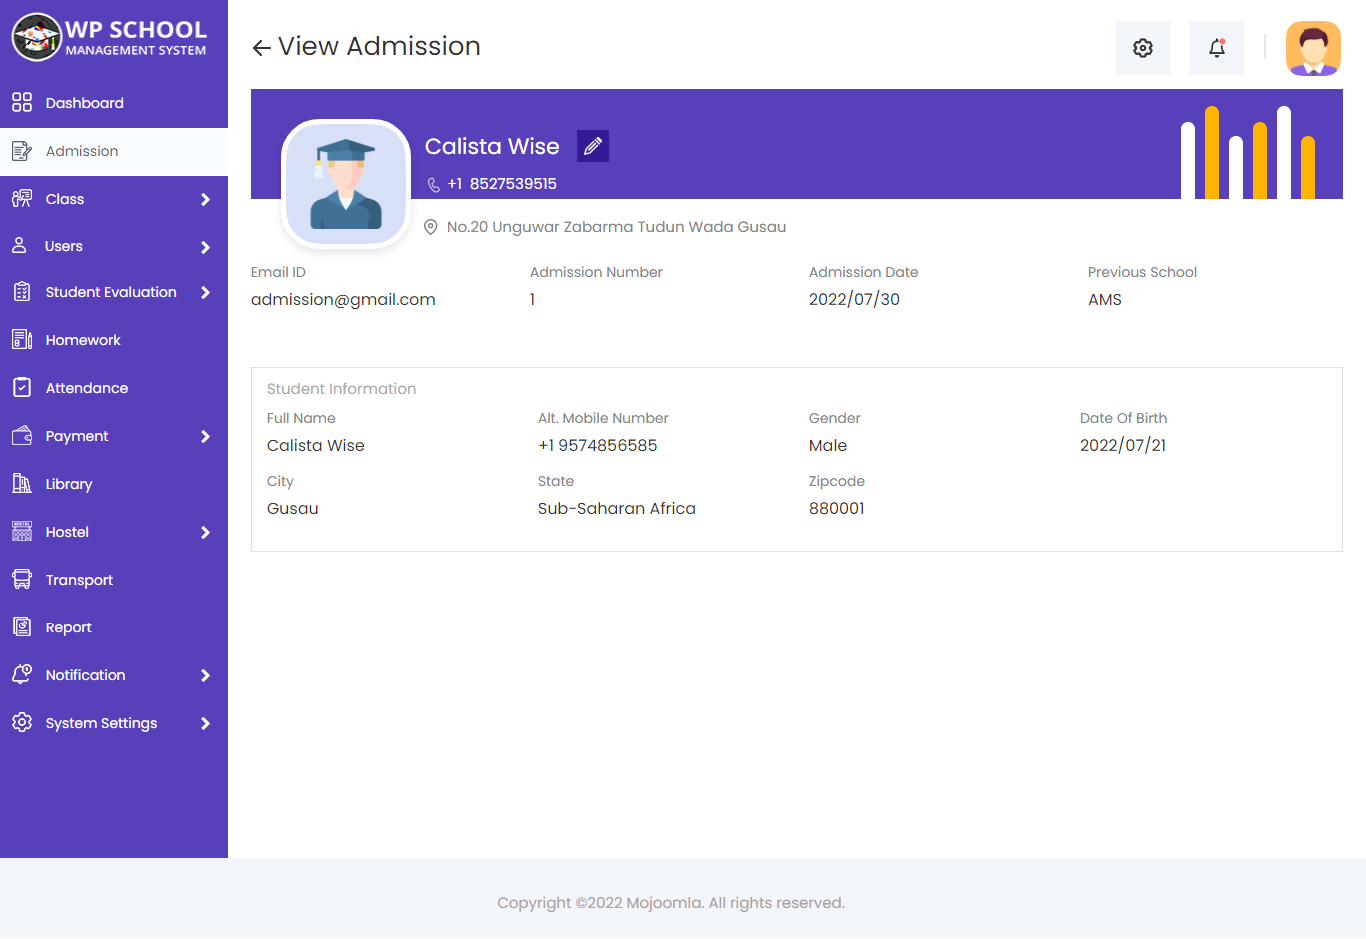
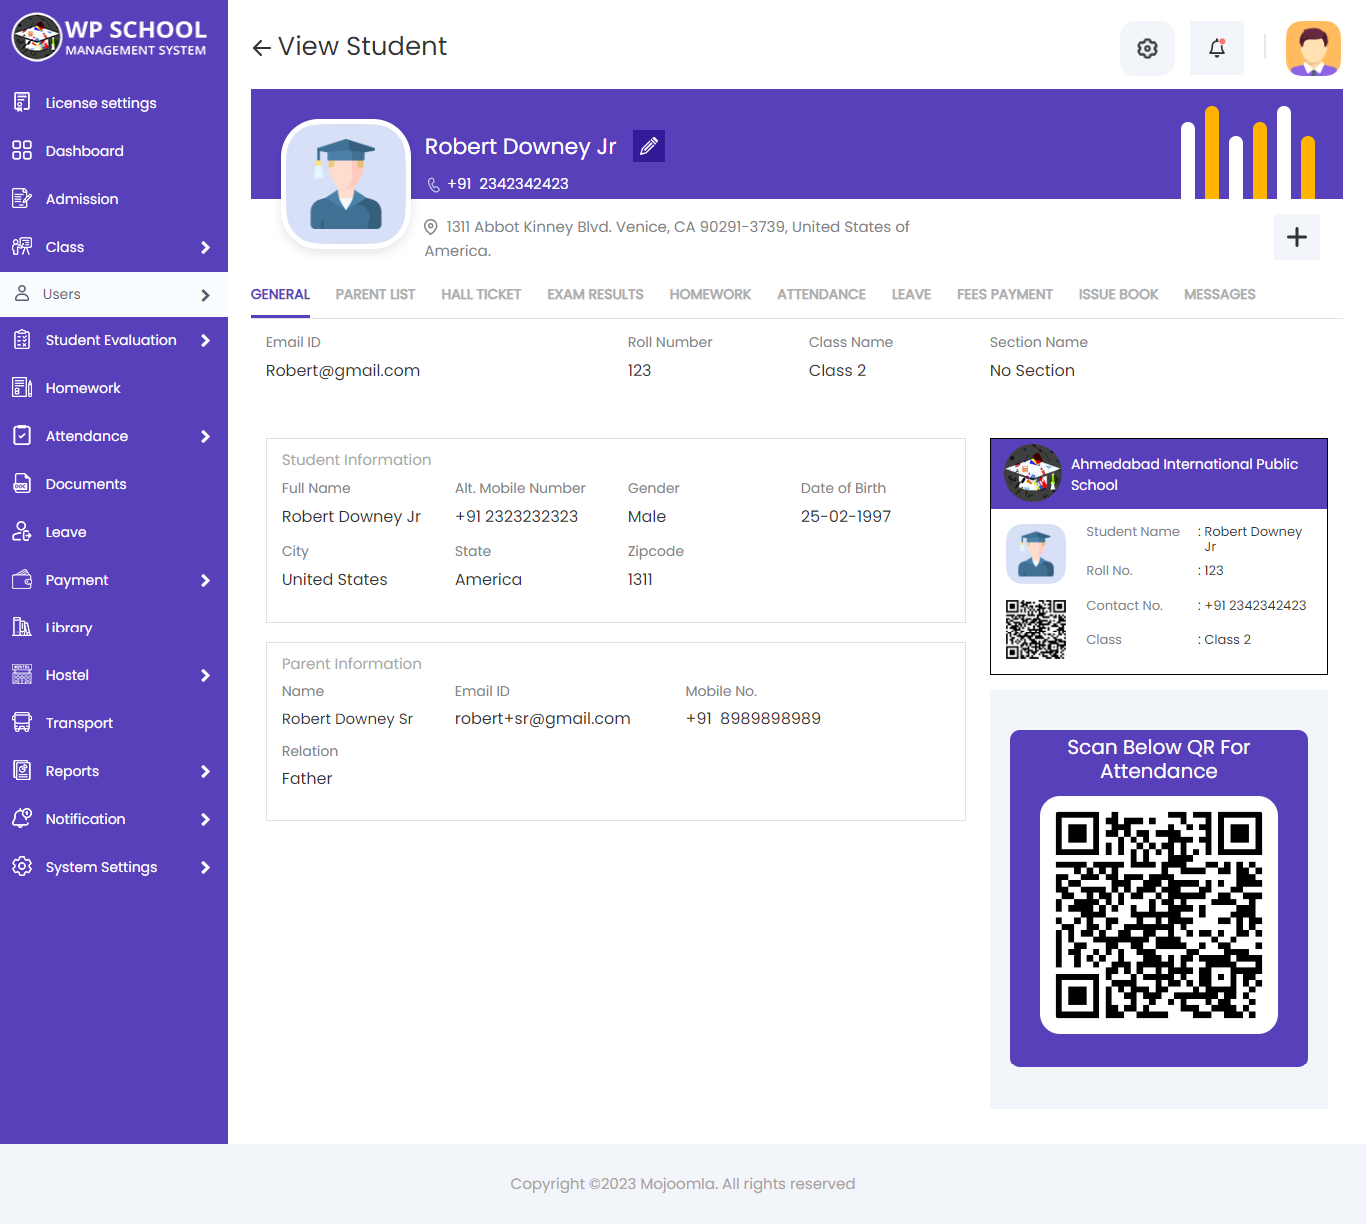
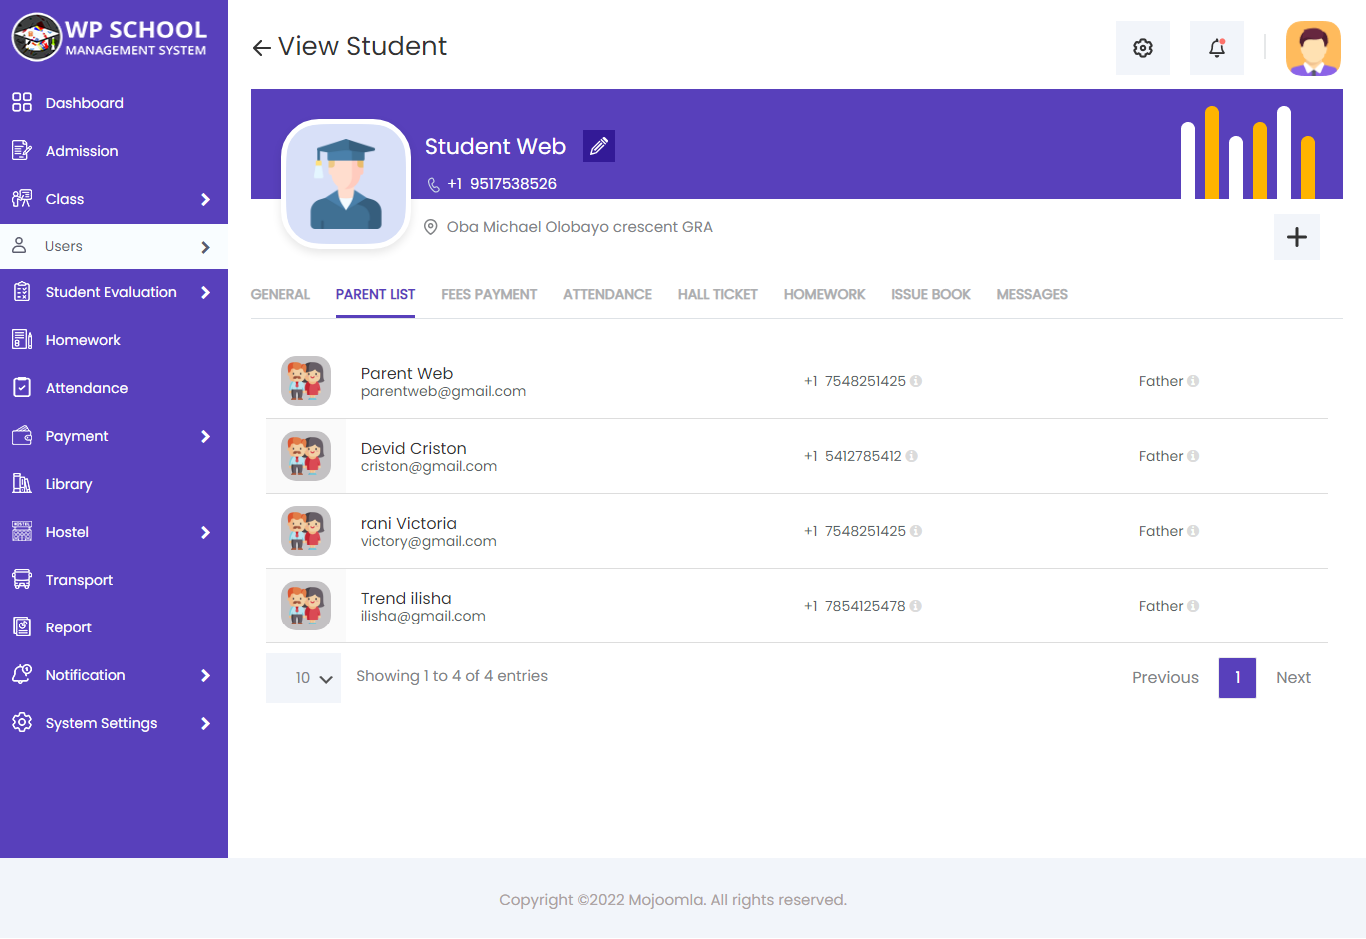
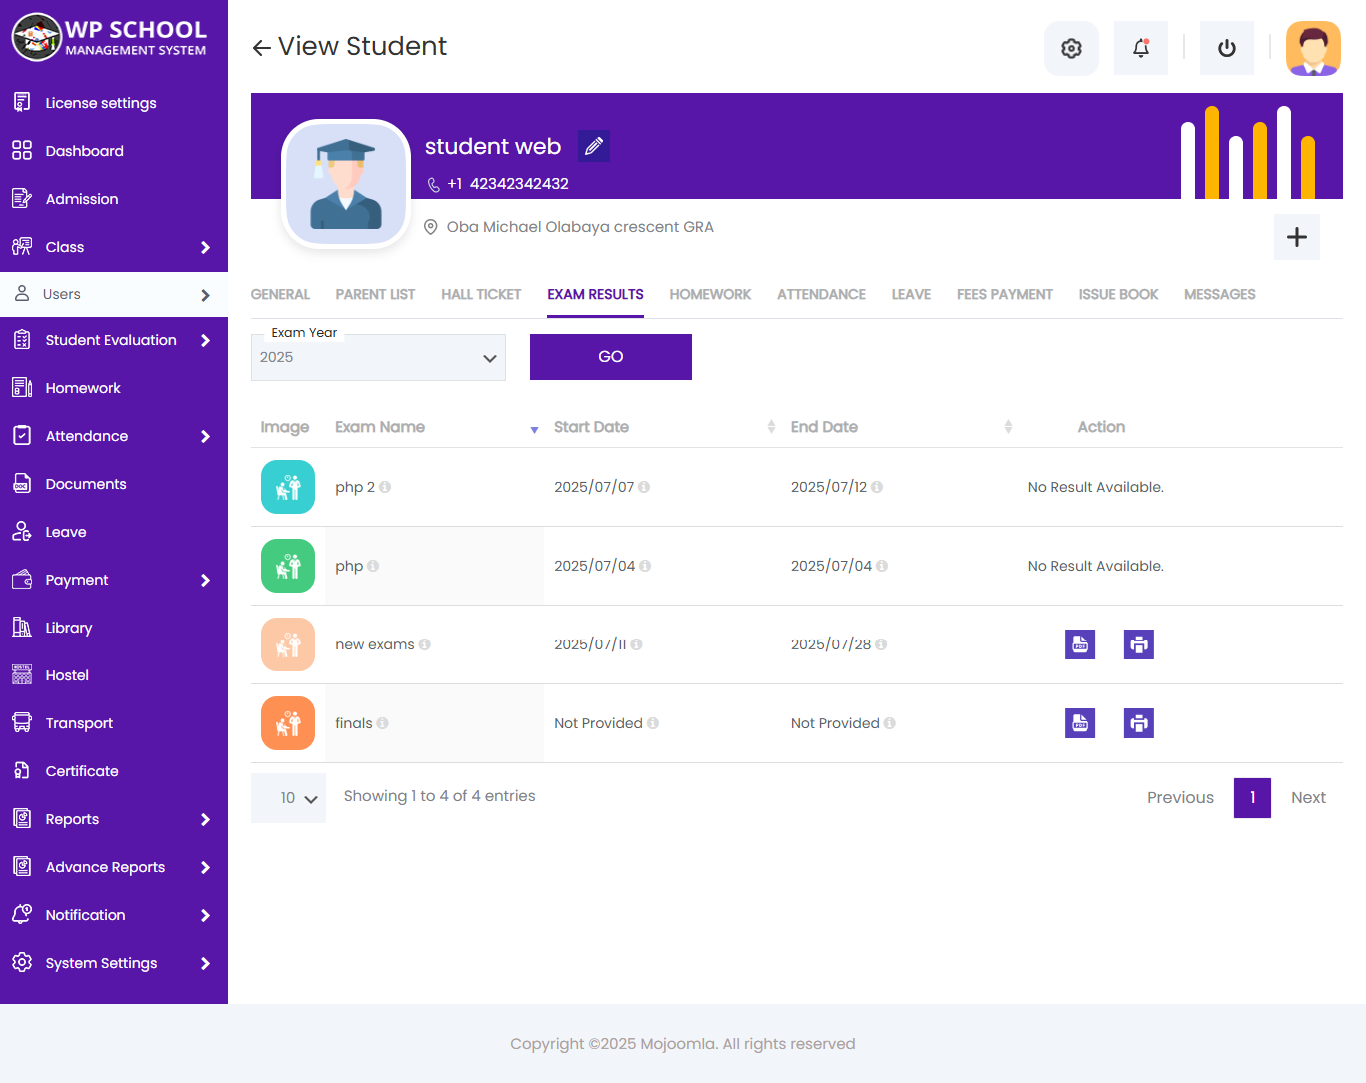
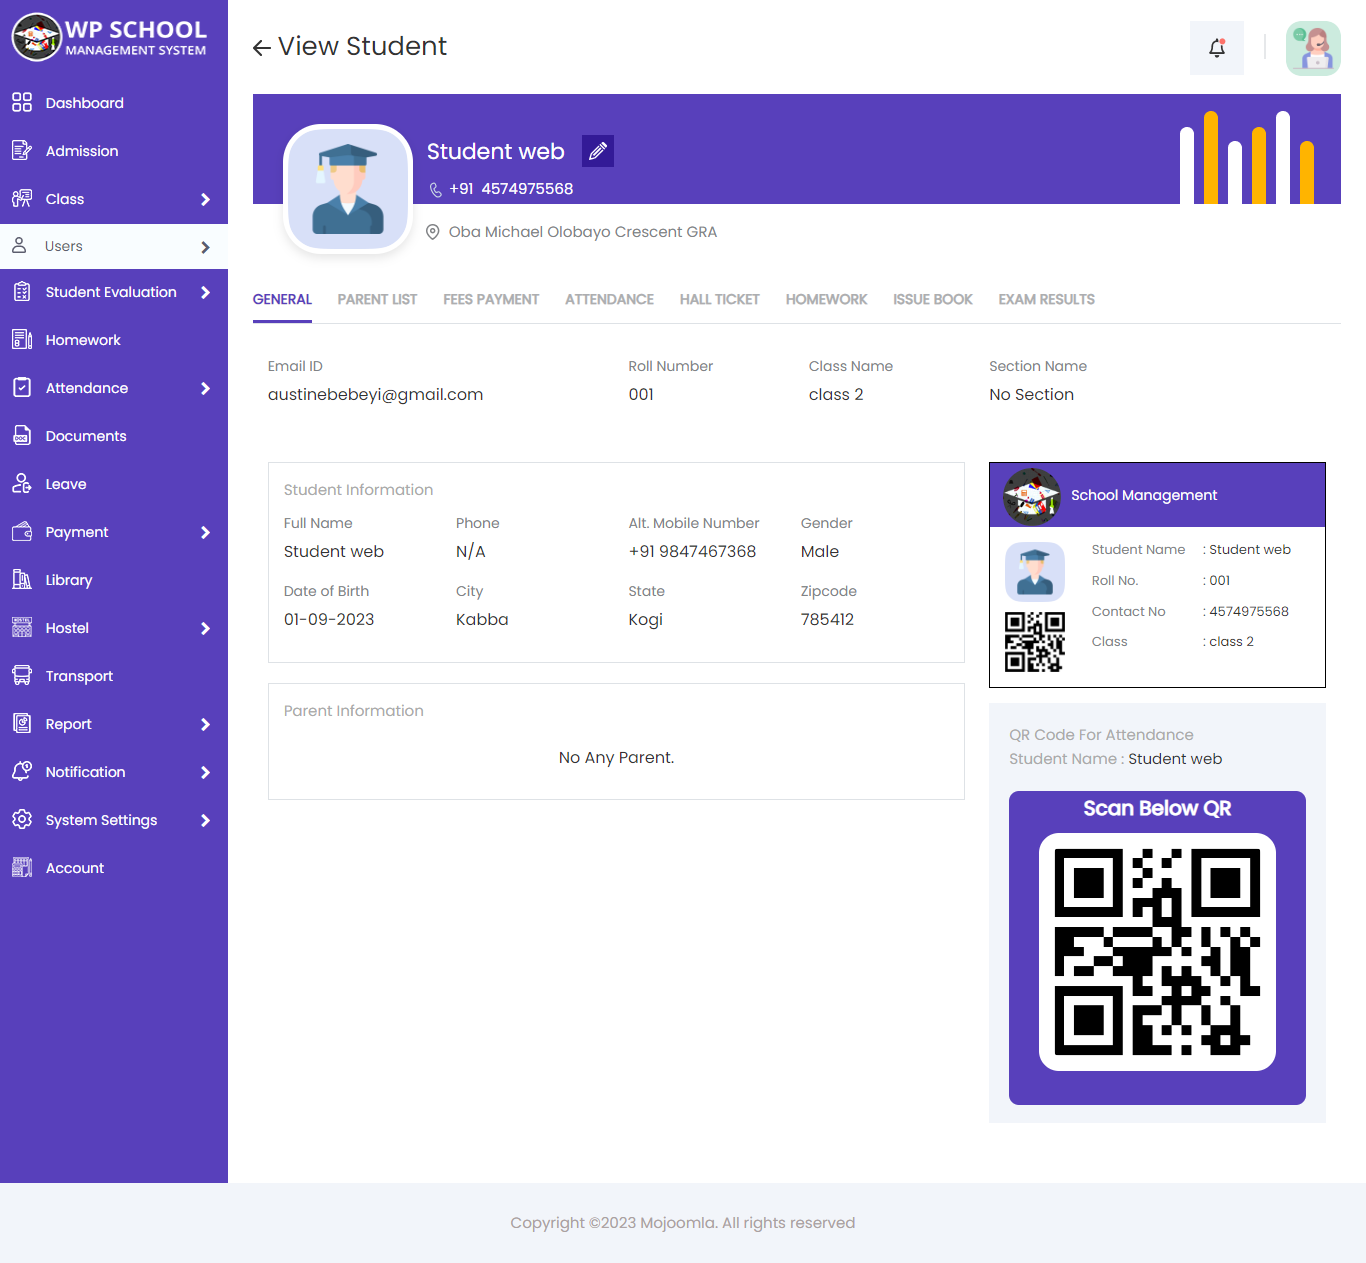
View Student
Click the View button to see a student's complete profile — personal information, contact details, and parent/guardian information.
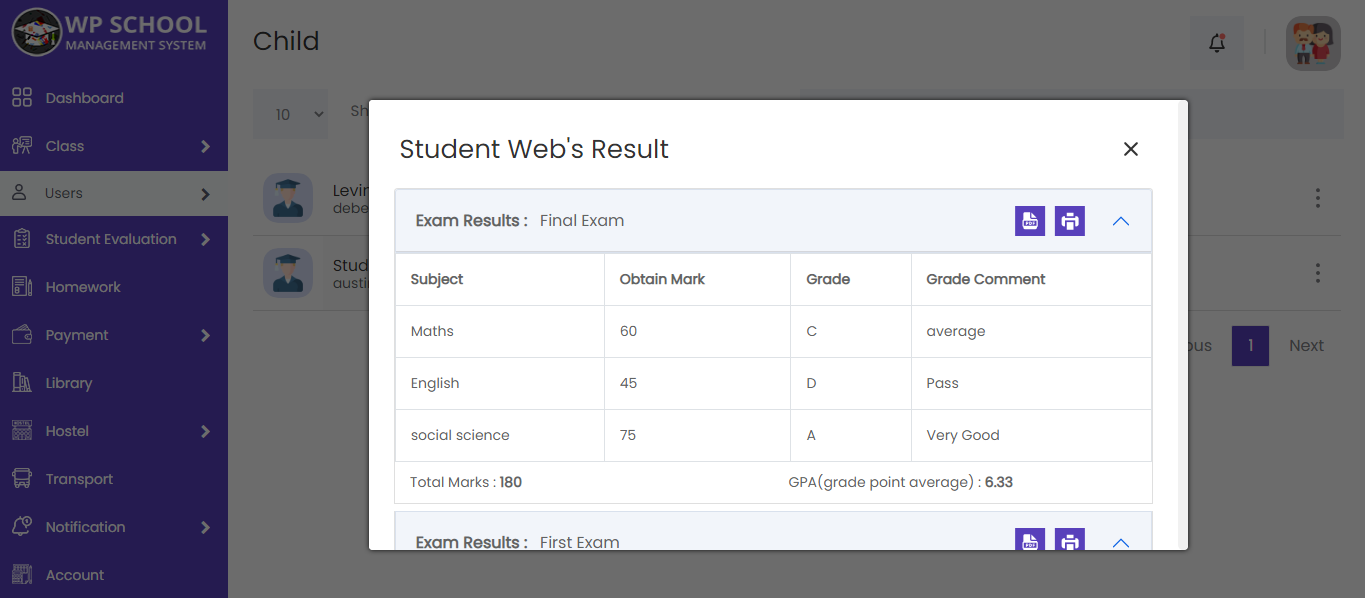
View Result & Marksheet
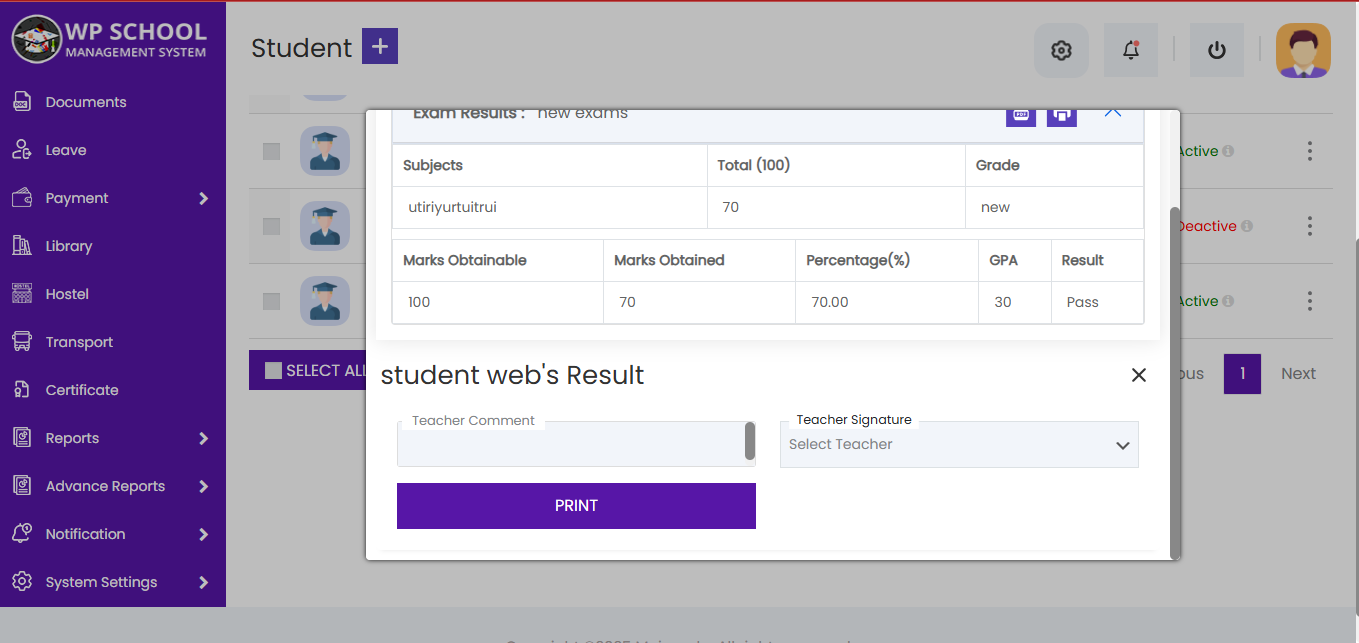
Admin can view the result of a particular student by clicking the View Result button. Results open in a popup where you can generate a PDF Marksheet or print directly.
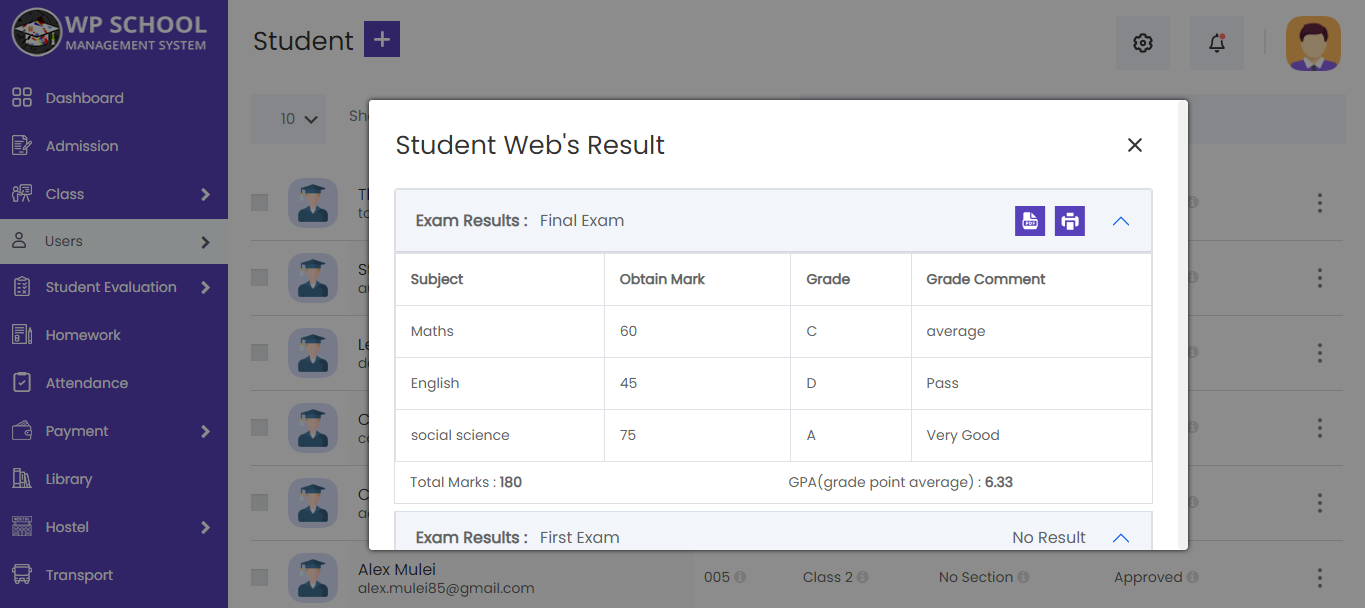
View Result Popup
The popup allows you to add a Teacher Comment and Teacher Signature before printing. Both are included in the final PDF and printed output.
Exam Results (All Years)
The Exam Results section shows every exam result the student has received across all academic years, in a single consolidated view.
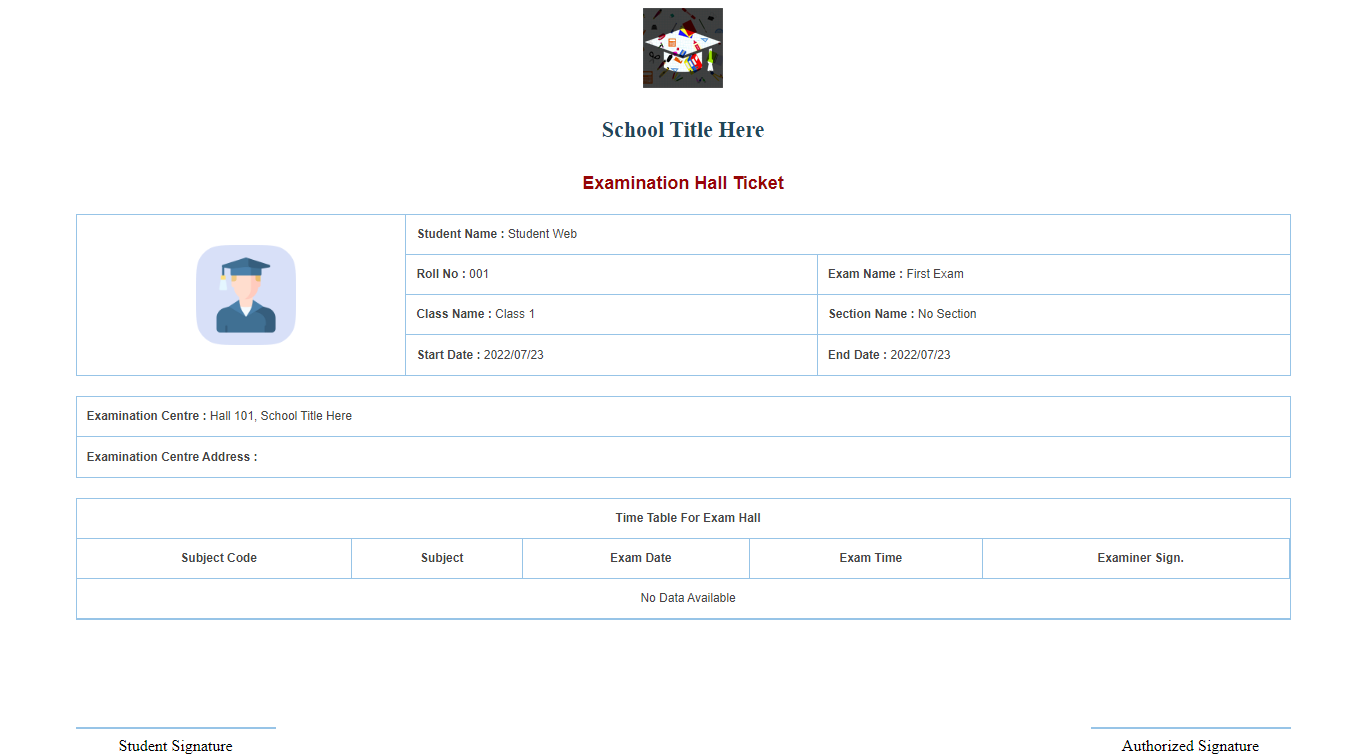
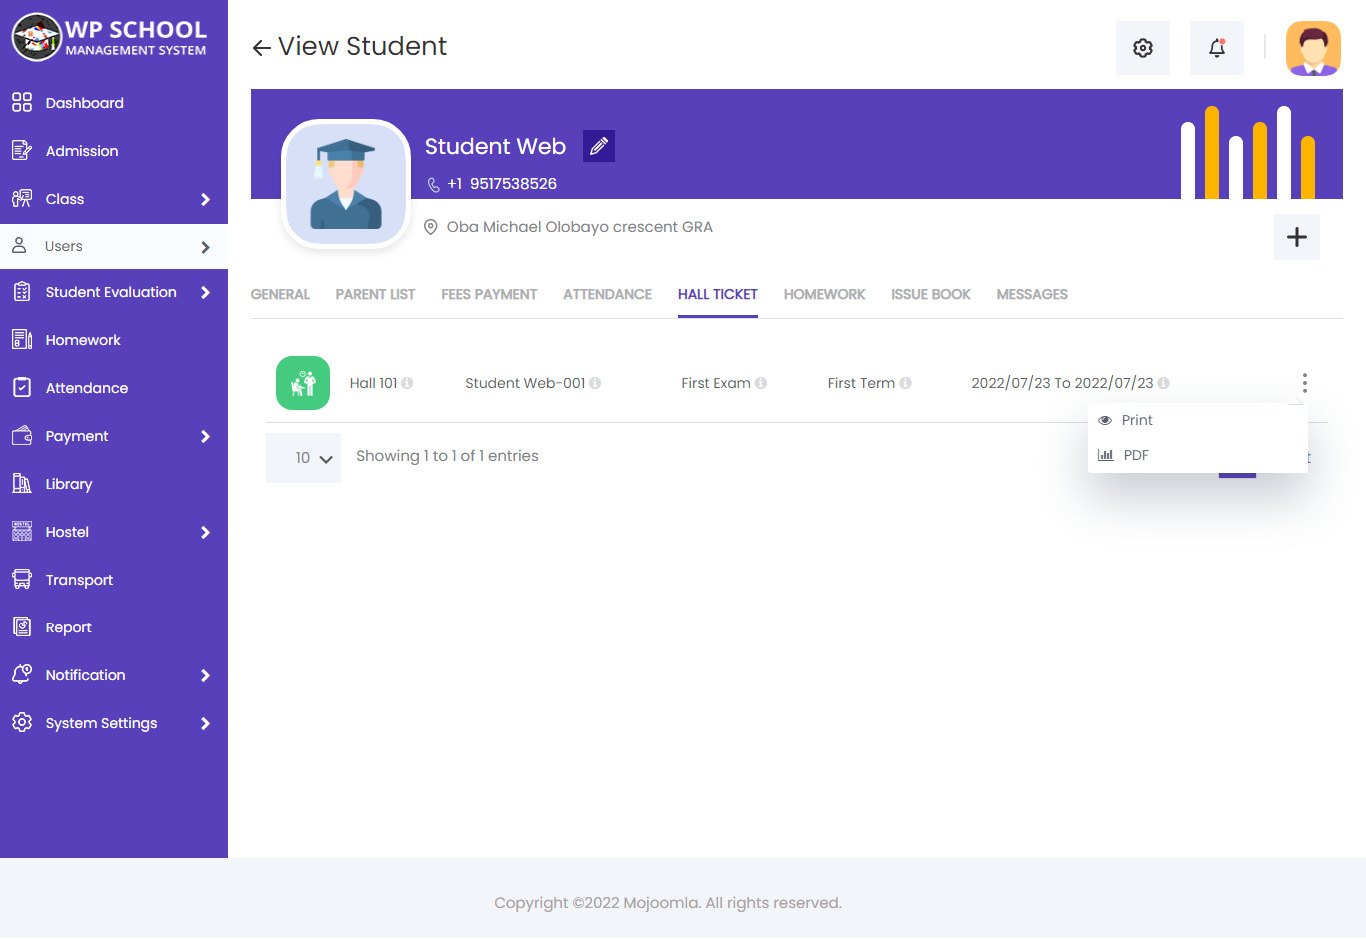
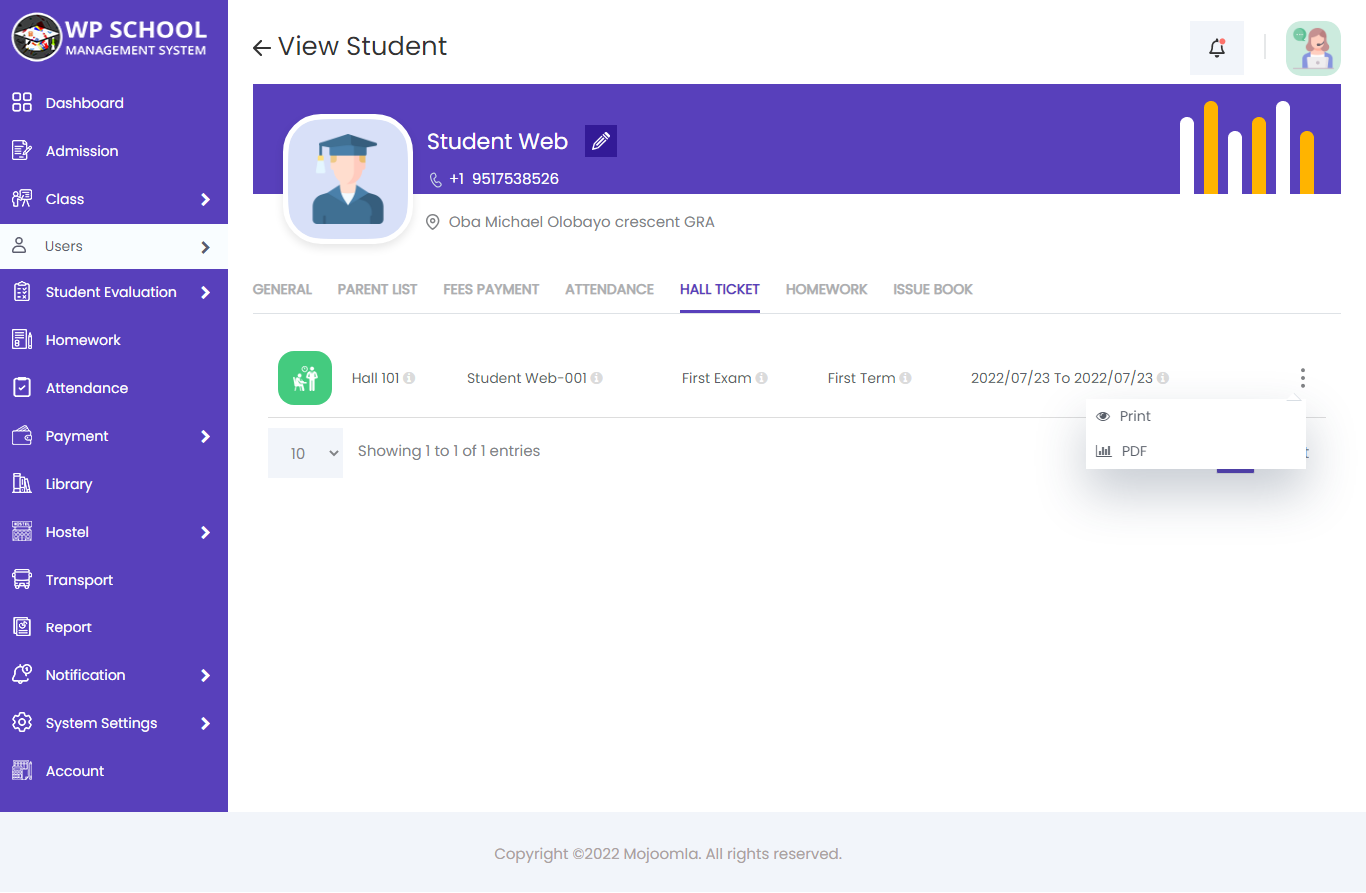
Exam Receipt (Hall Ticket)
Click Exam Receipt on a student to view their hall receipt list. Download as PDF or print directly.

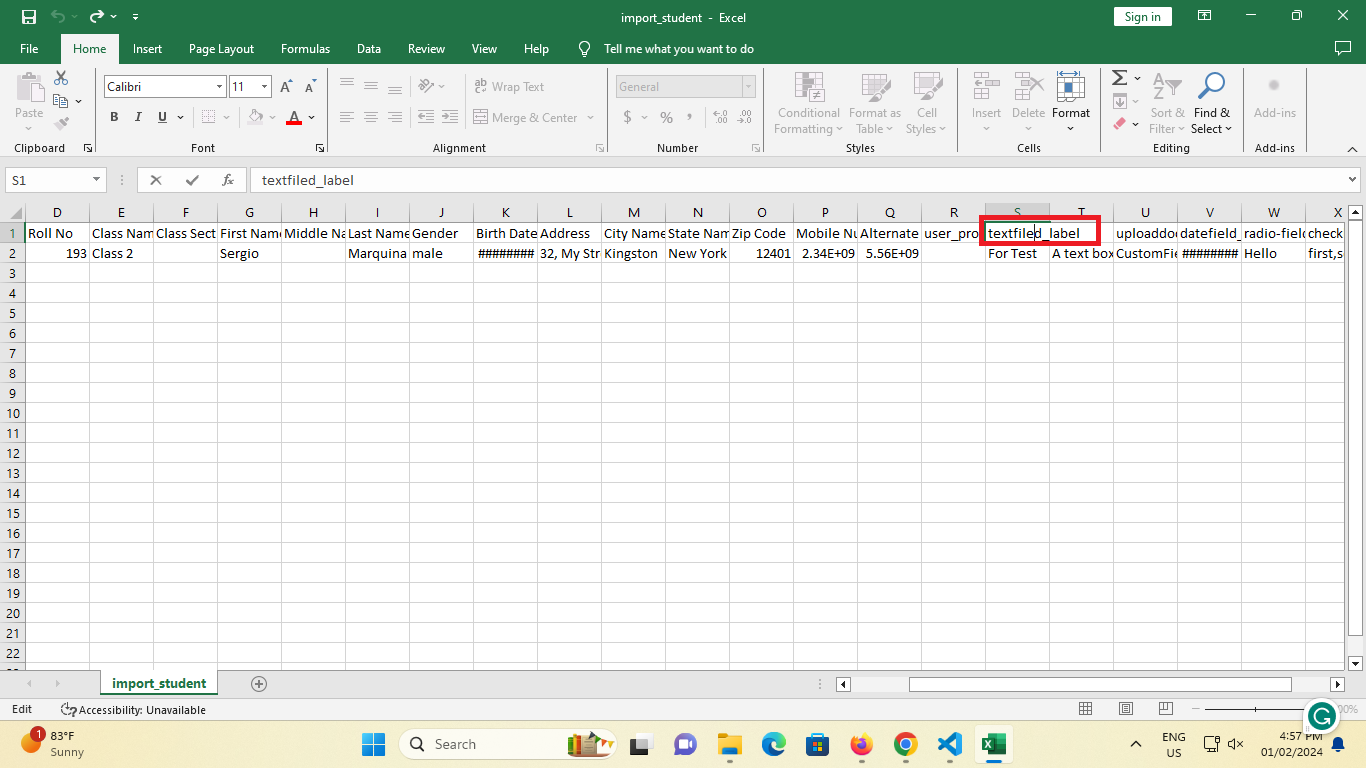
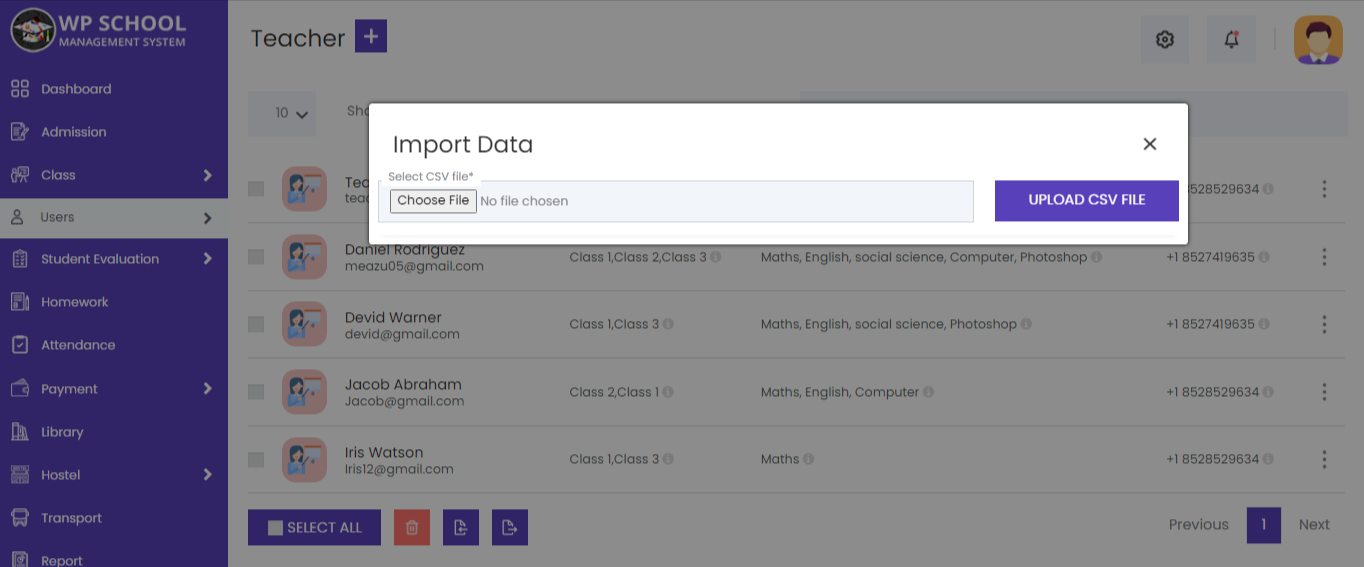
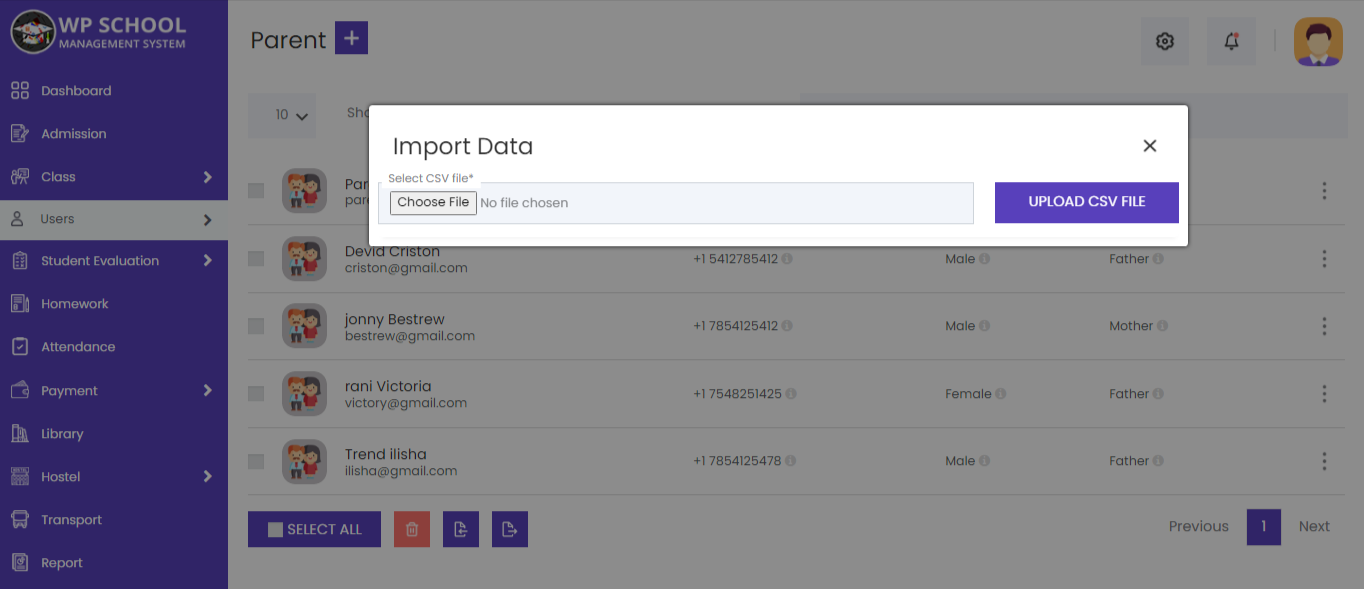
CSV Import / Export
Upload Student CSV File
You can upload bulk student data using a CSV file. A sample CSV template is provided inside the plugin package. Download it, fill in your data following the column format, and upload using the import popup.
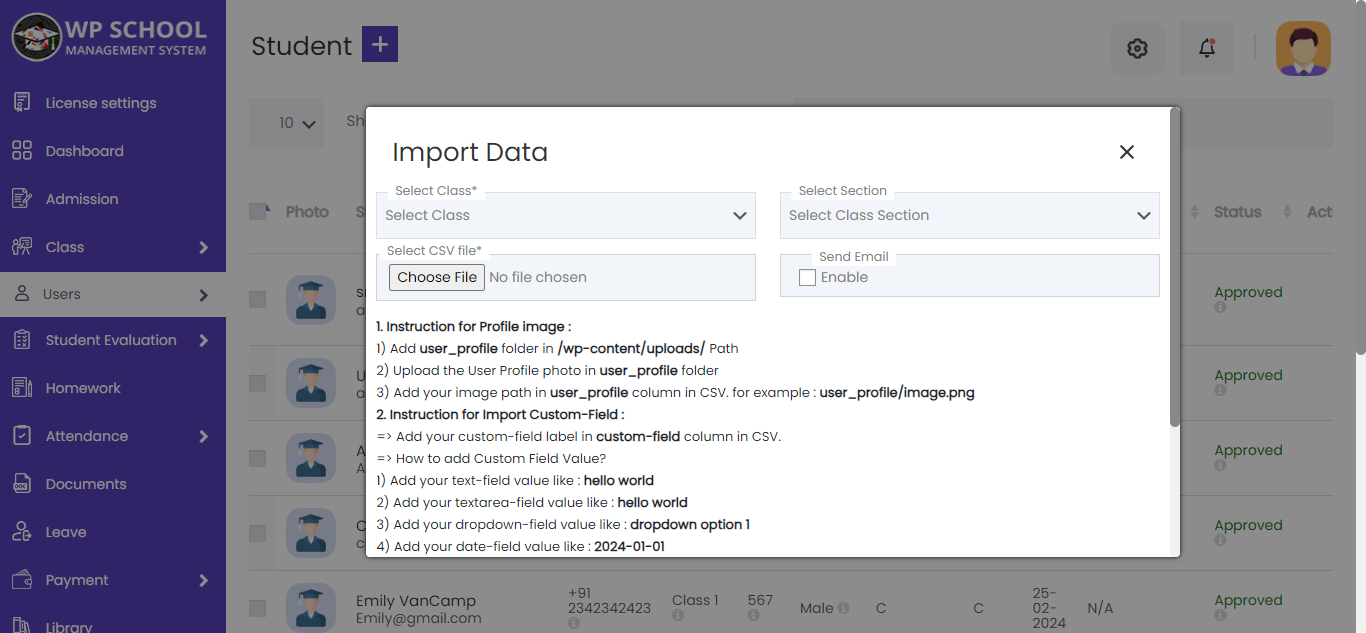
Import Custom Field Values via CSV
To import custom field data with your CSV: copy the exact Custom Field label name and use it as the column header in your CSV file. Detailed import instructions are provided inside the import popup — always read them before uploading.
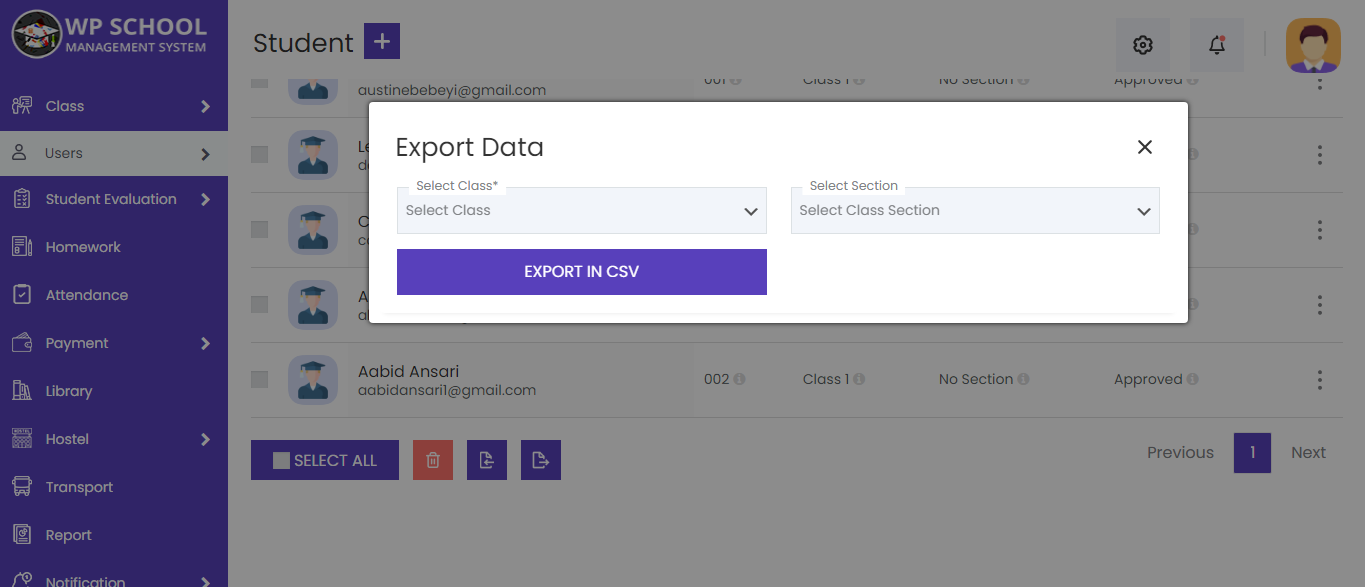
Export Student Data in CSV
You can export the full student list in CSV format by clicking the Export Selected button. Use this to back up data or work with it in a spreadsheet application.
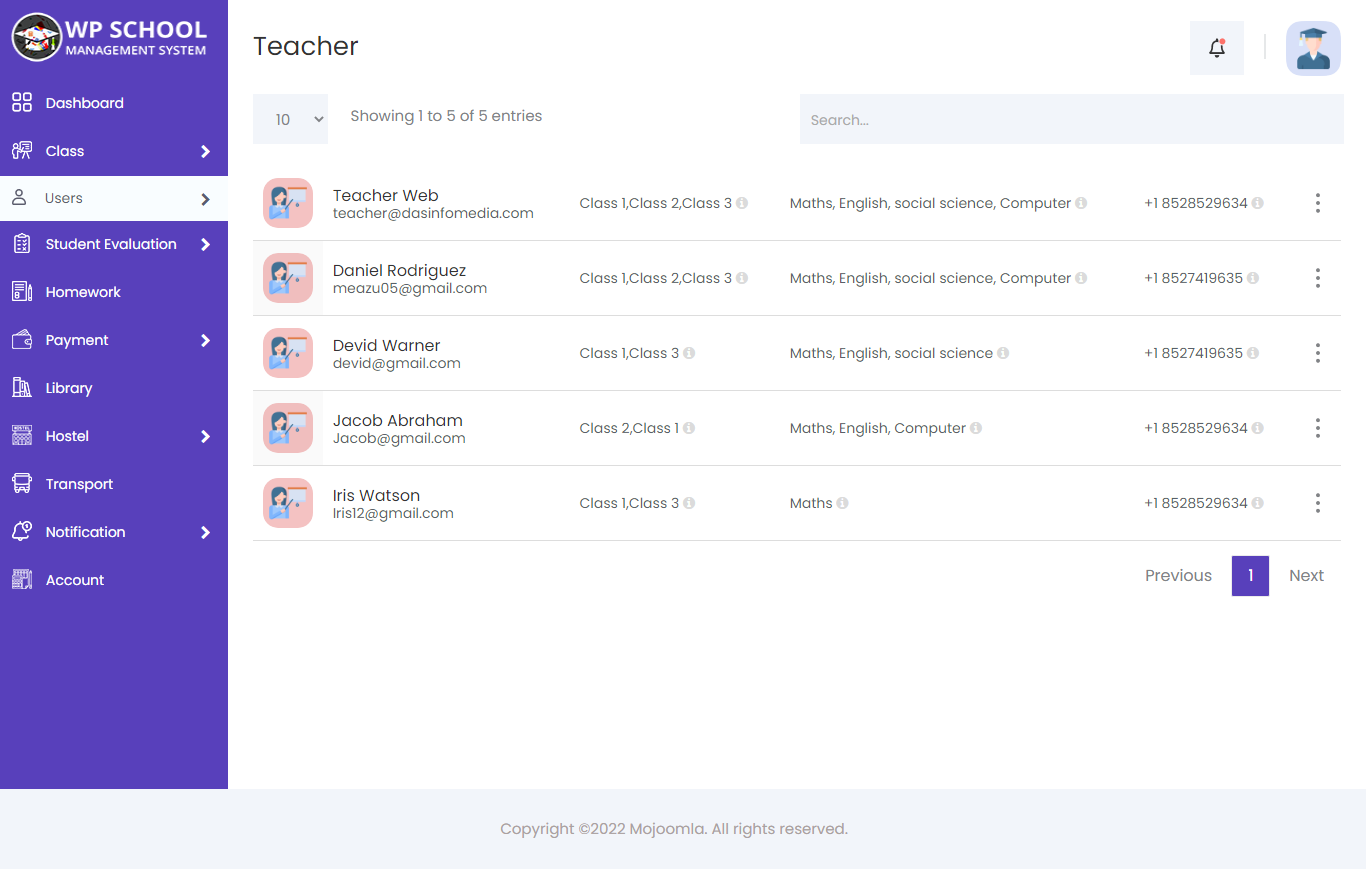
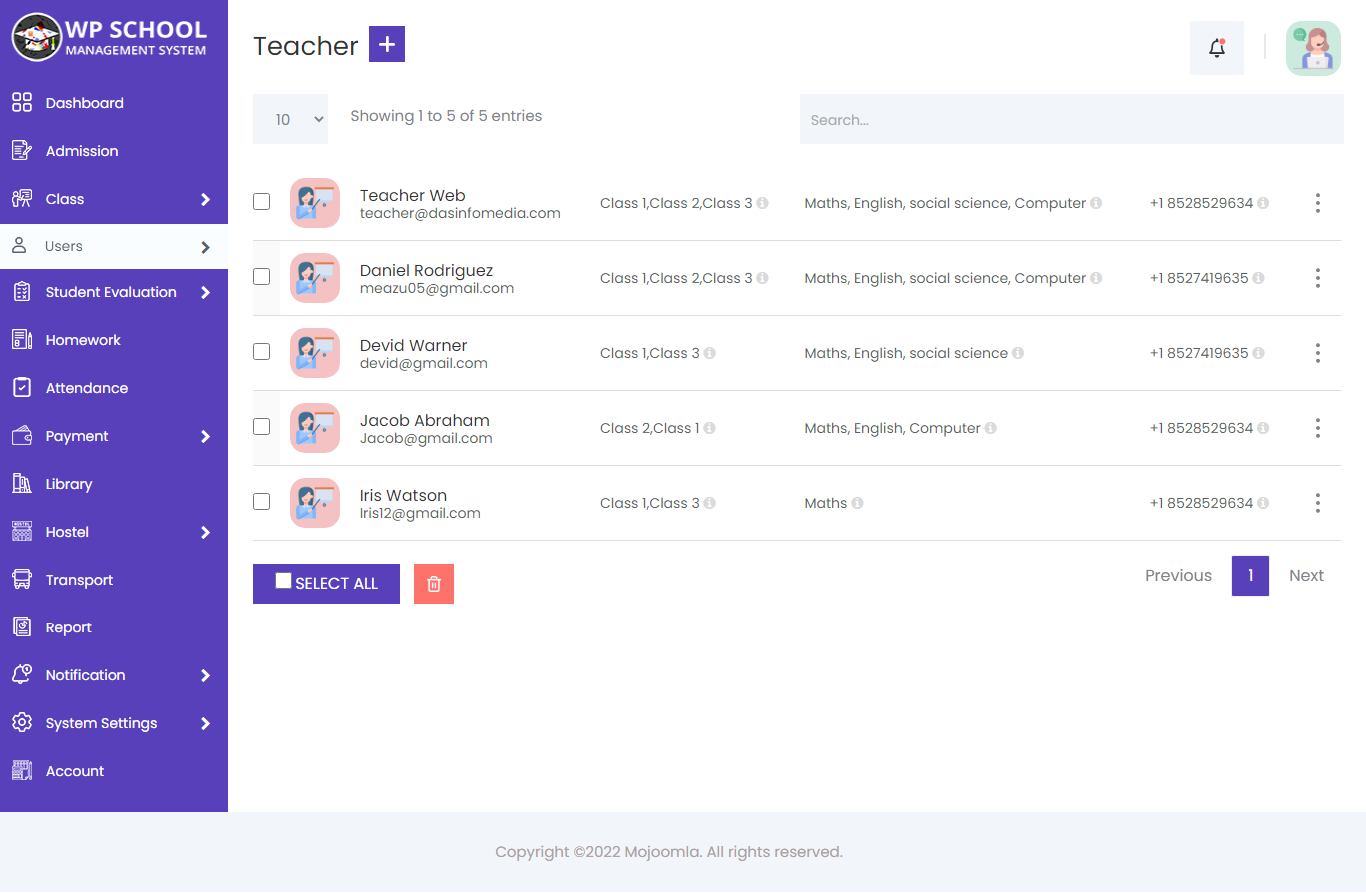
7) Teachers
You can add new teachers and manage teacher profiles, as well as view a complete list of all teachers. Assign classes and subjects to each teacher.

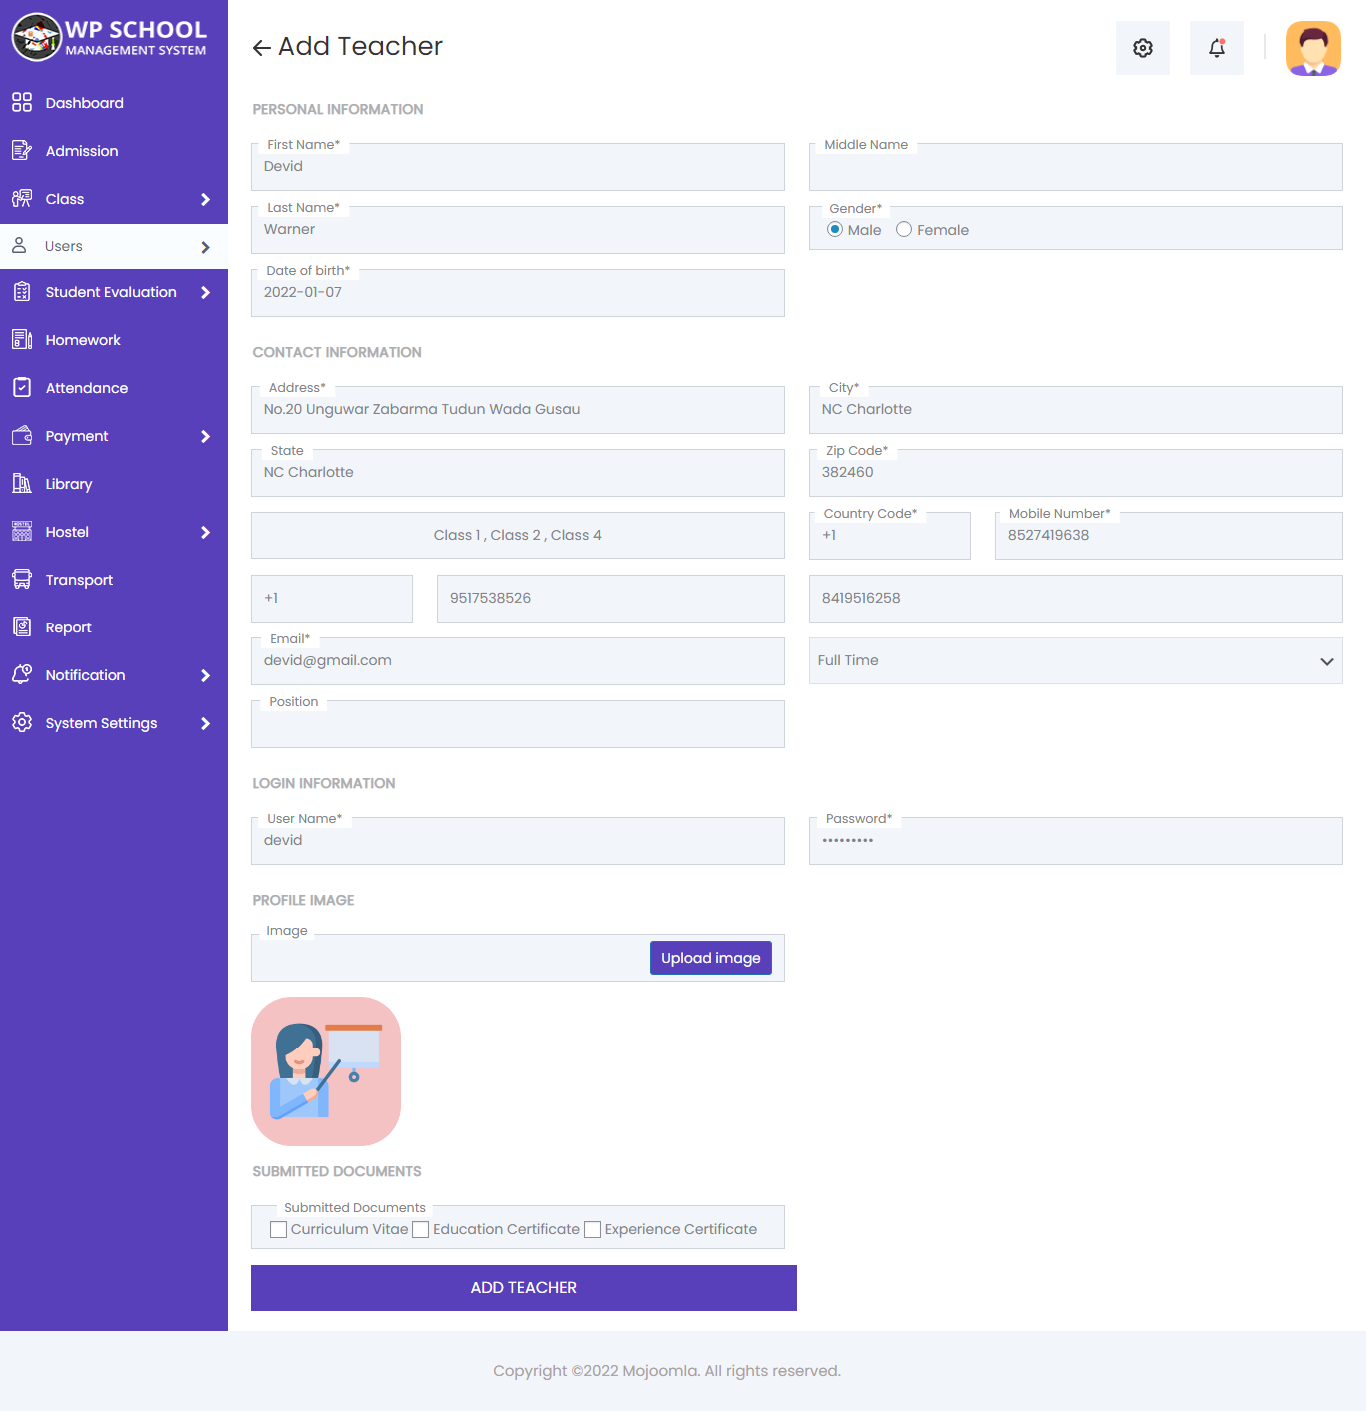
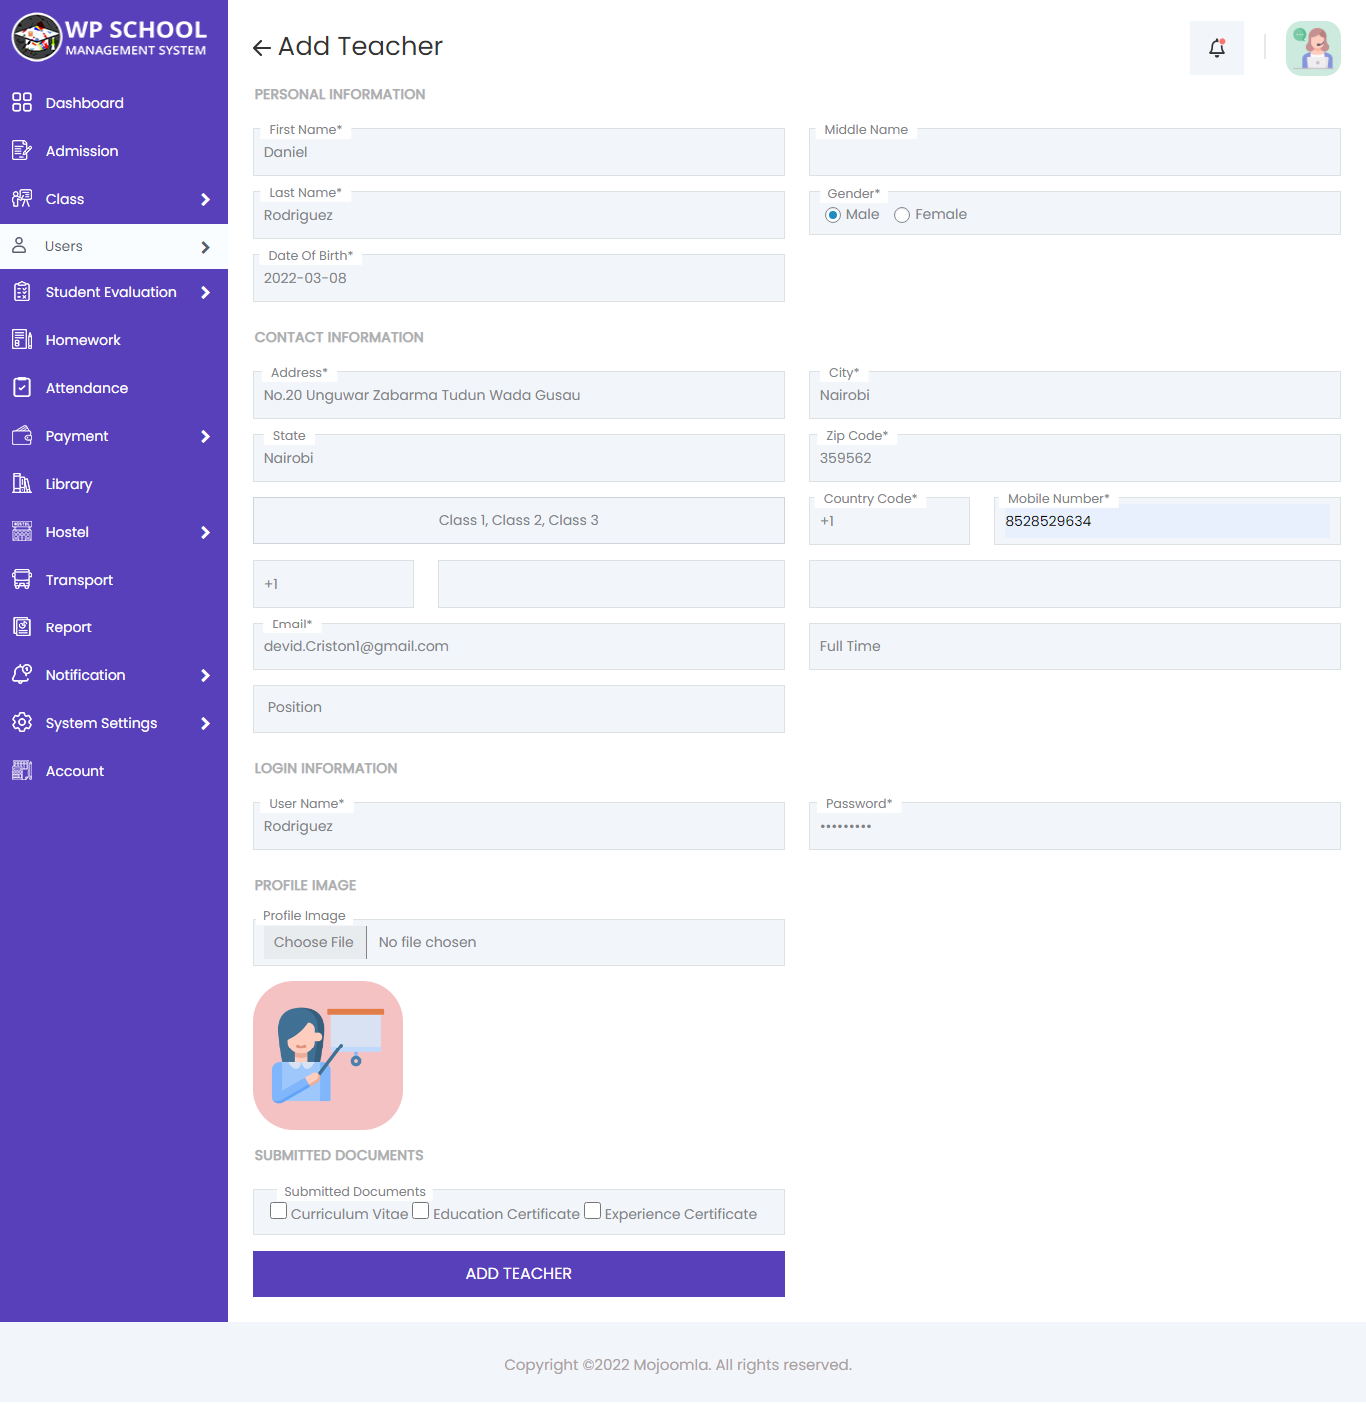
Add Teacher
Click Add Teacher to create a new teacher profile. Select the class to assign, set working hours, position/designation, and any submitted documents.
| Field | Description |
|---|---|
| Class | Class to assign this teacher |
| Working Hour | Full time or Part time |
| Position | Lecturer, Professor, etc. |
| Submitted Documents | Documents submitted to school |
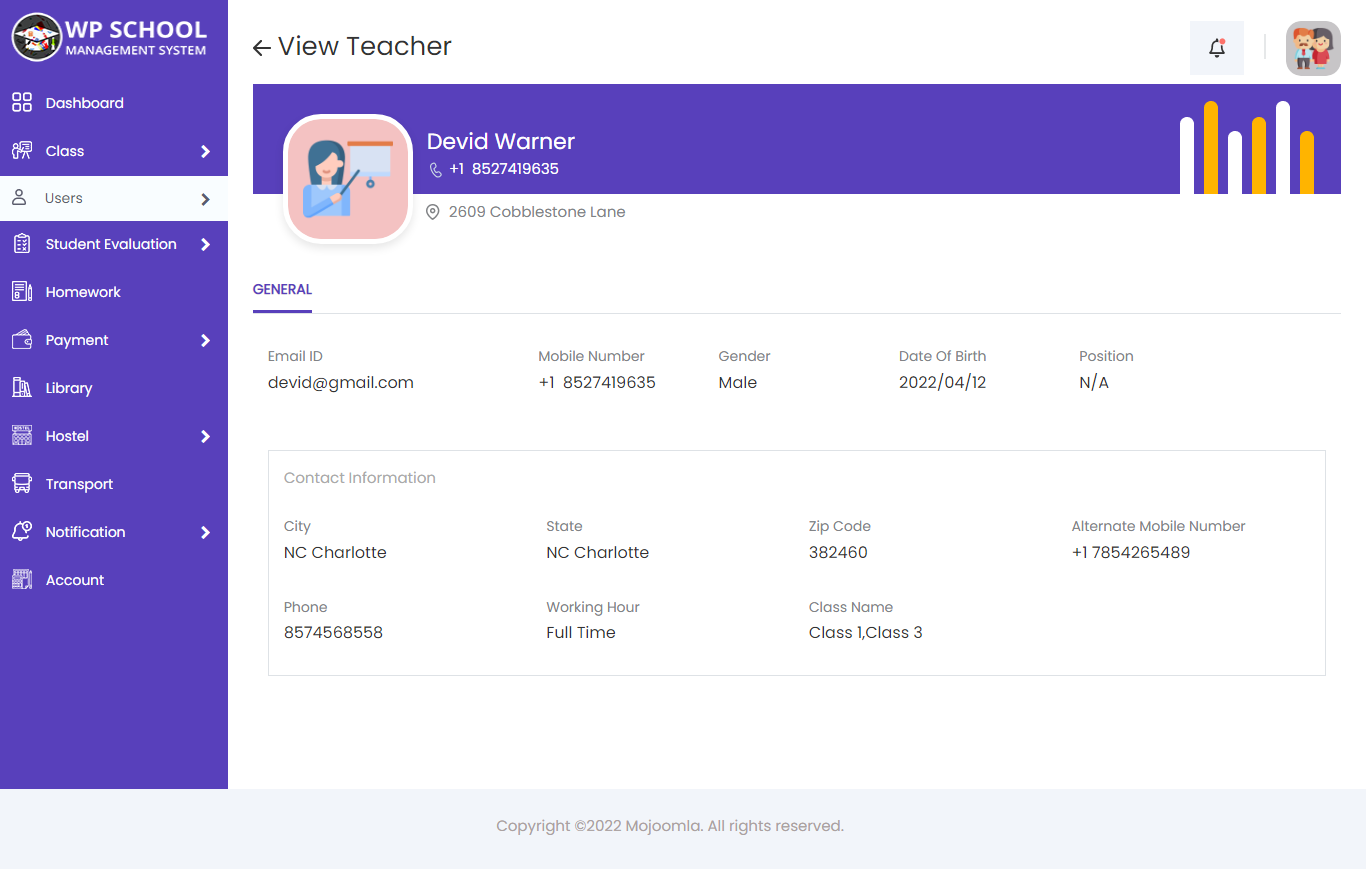
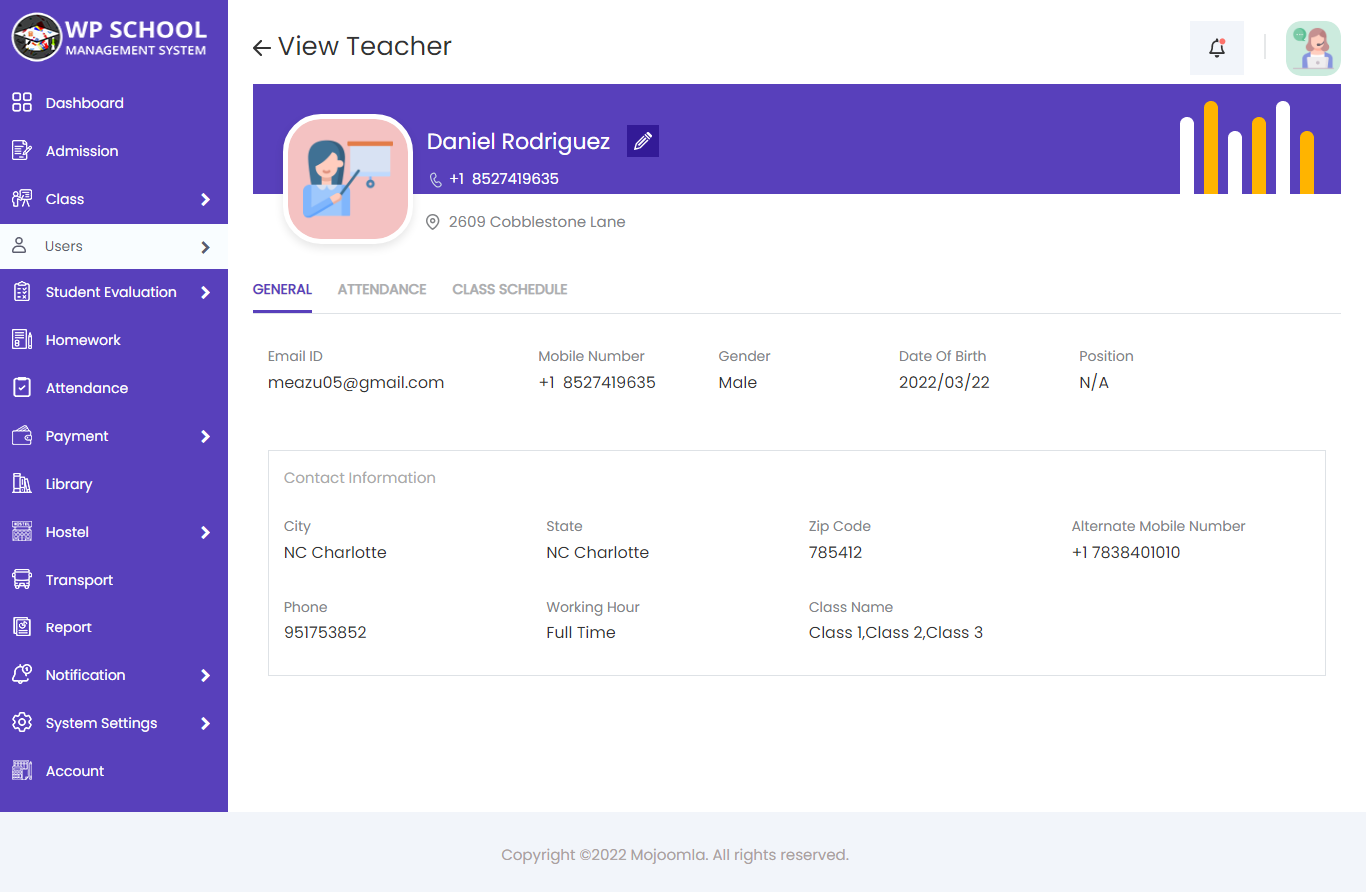
Edit Teacher
Admin can edit a teacher profile by clicking the edit button. This opens the edit teacher page showing personal information, contact information, and timetable of the particular teacher.

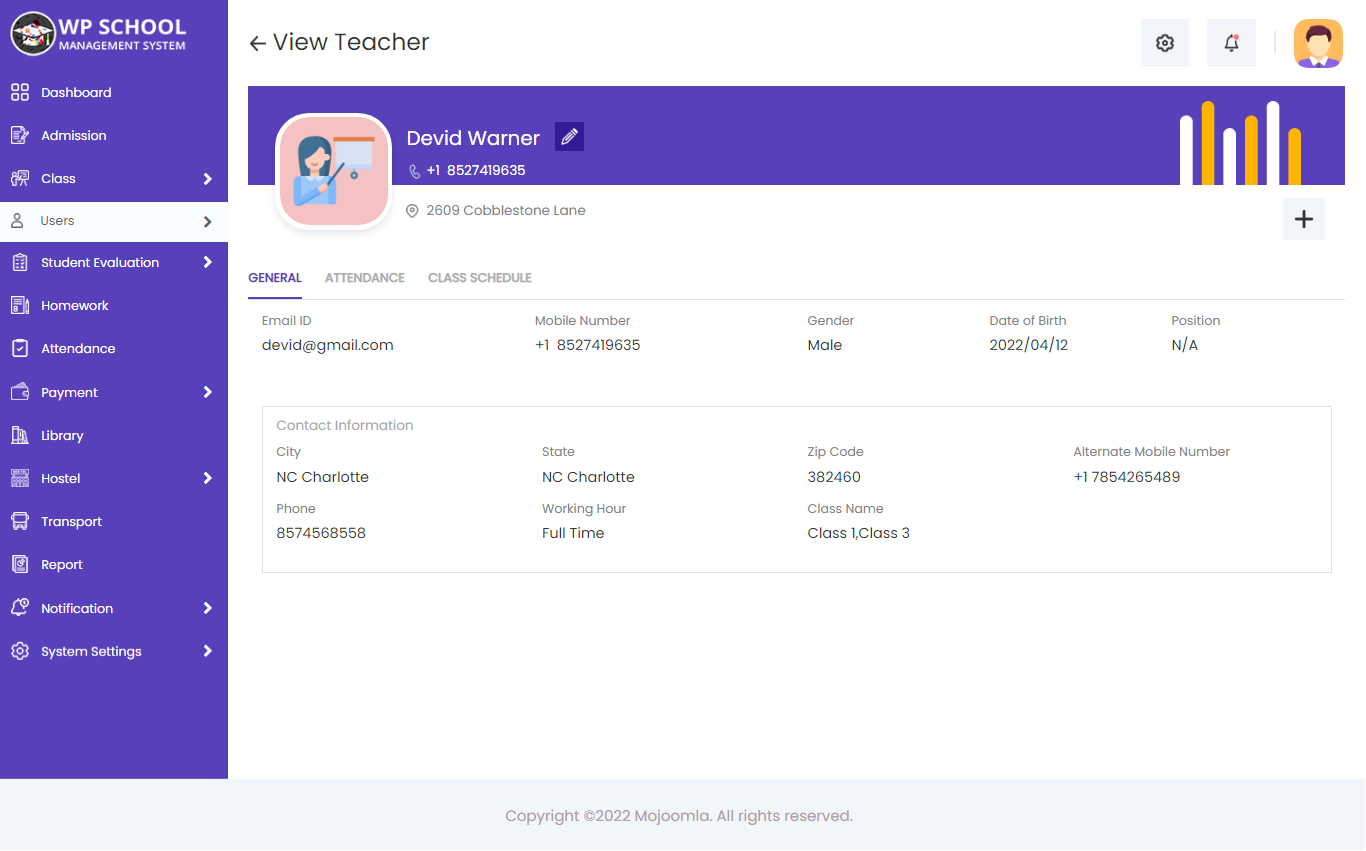
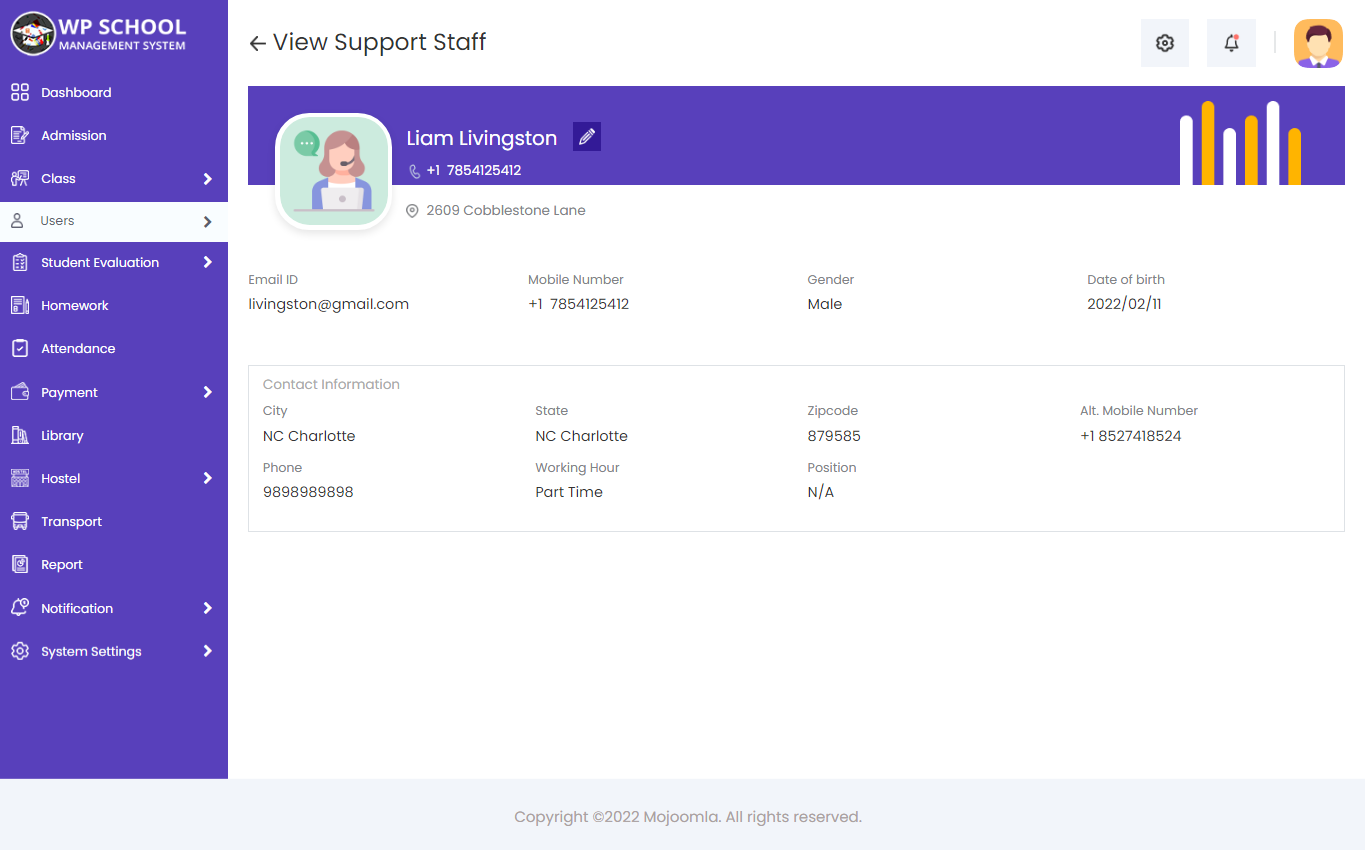
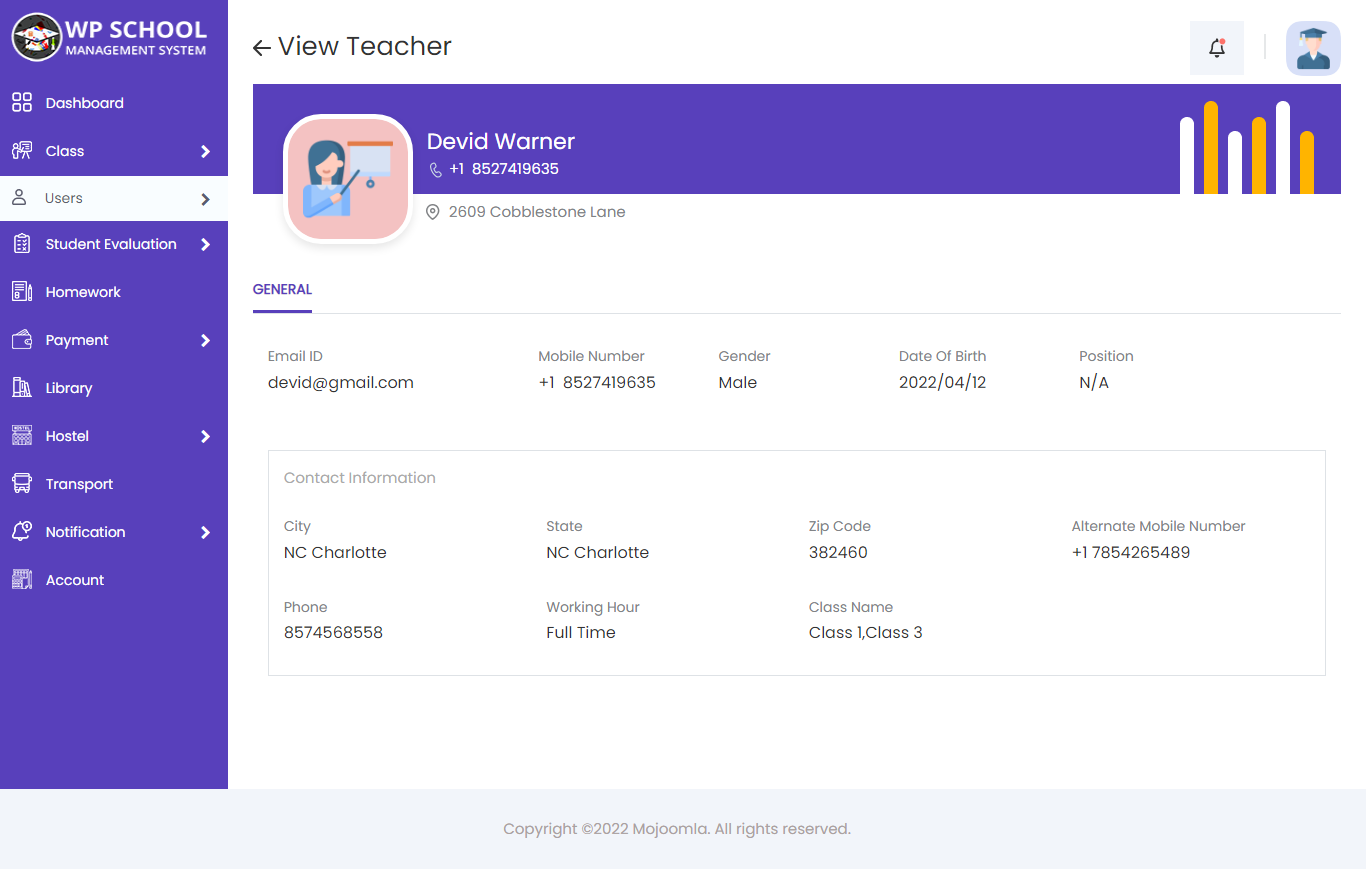
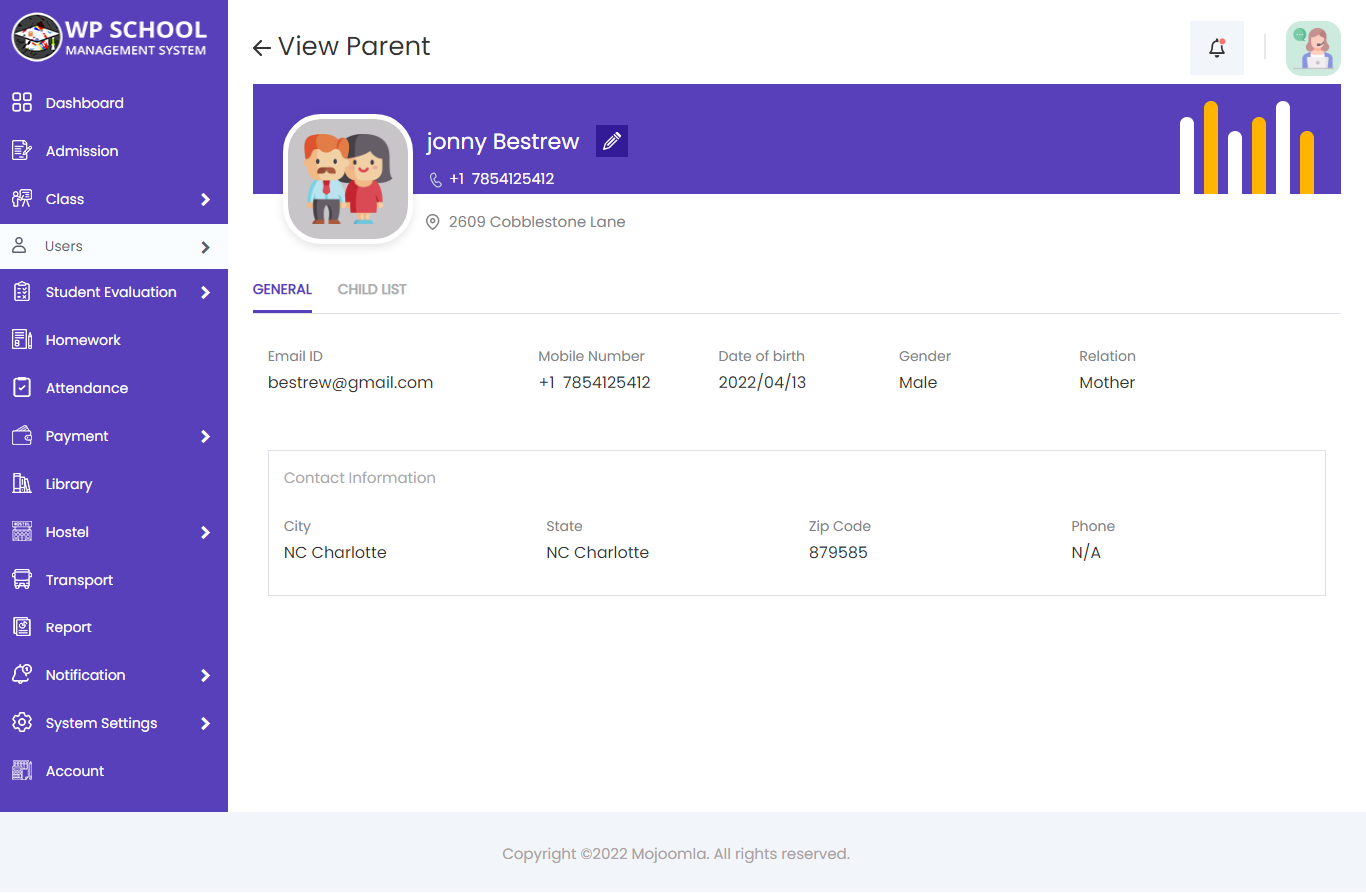
View Teacher
Admin can view teacher details by clicking the view button — personal information, contact information, and timetable.
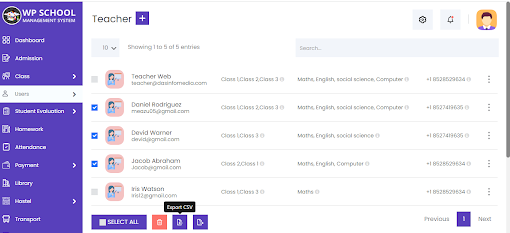
Teacher CSV Import / Export
You can bulk-upload teacher data using a CSV file. A sample file is provided in the plugin package. You can also export the teacher list to CSV by clicking Export Selected.
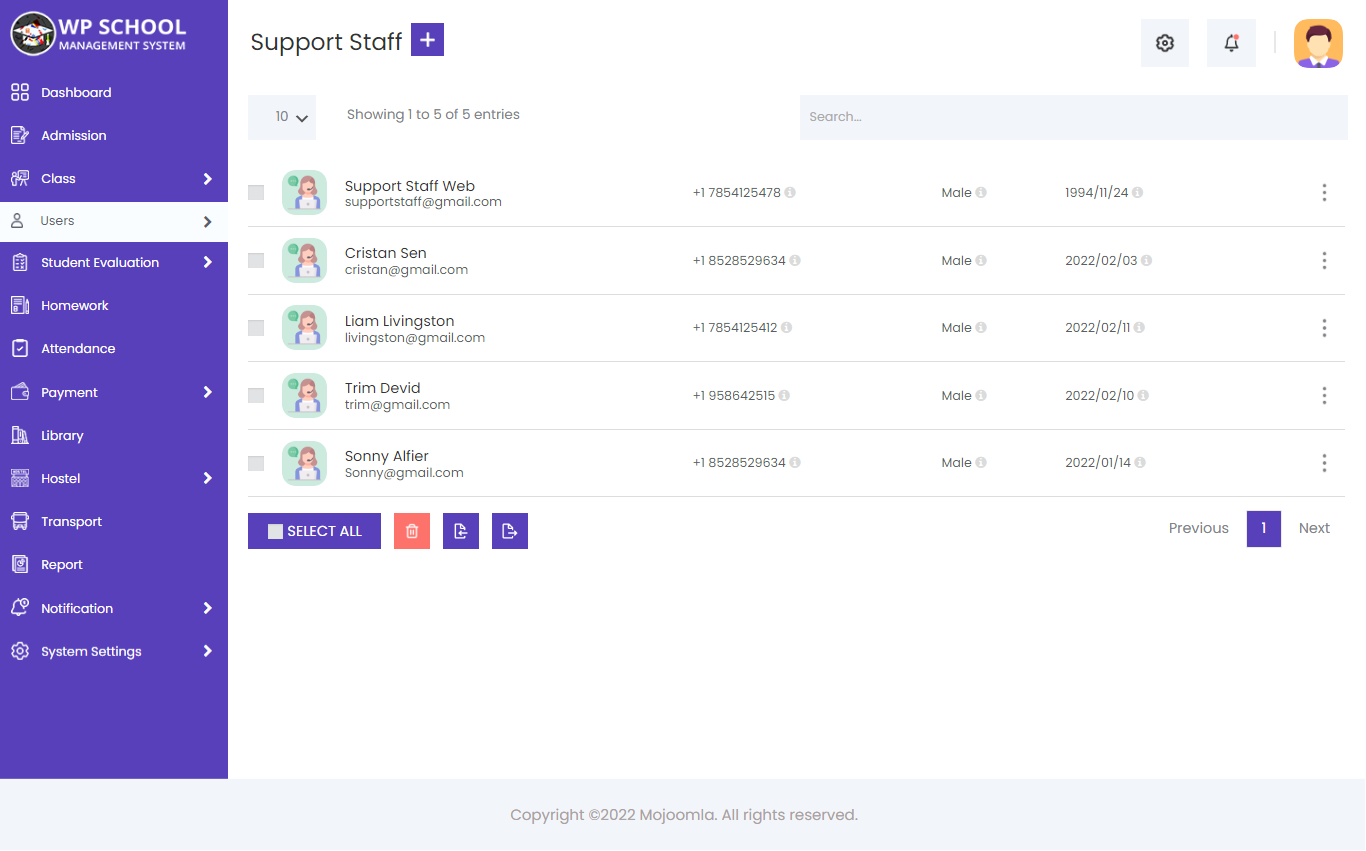
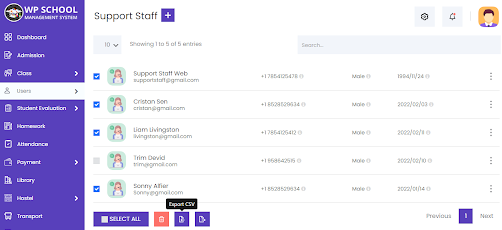
8) Support Staff
You can add new support staff and manage their profiles, as well as view a complete list of all support staff members. Assign roles and access rights from the Access Rights module.
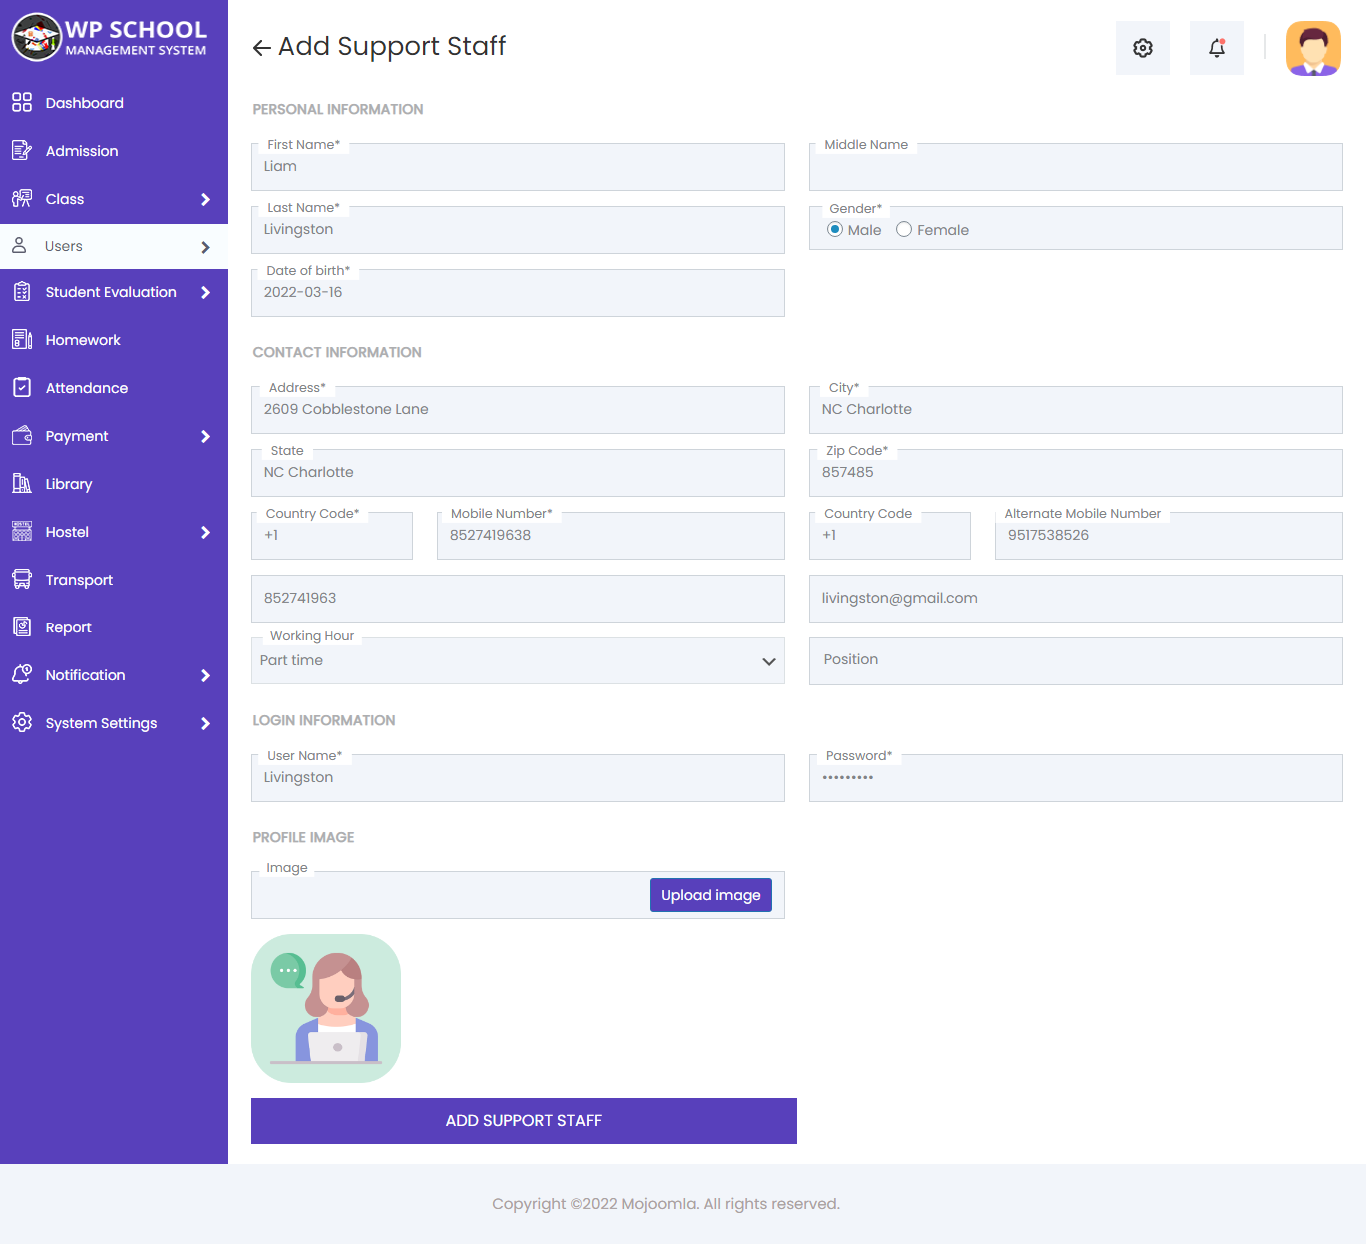
Add Support Staff
Click Add Support Staff to create a new staff member profile. Enter personal details, set working hours, position, and any submitted documents.

Admin can view support staff details by clicking the view button — personal information and role details.
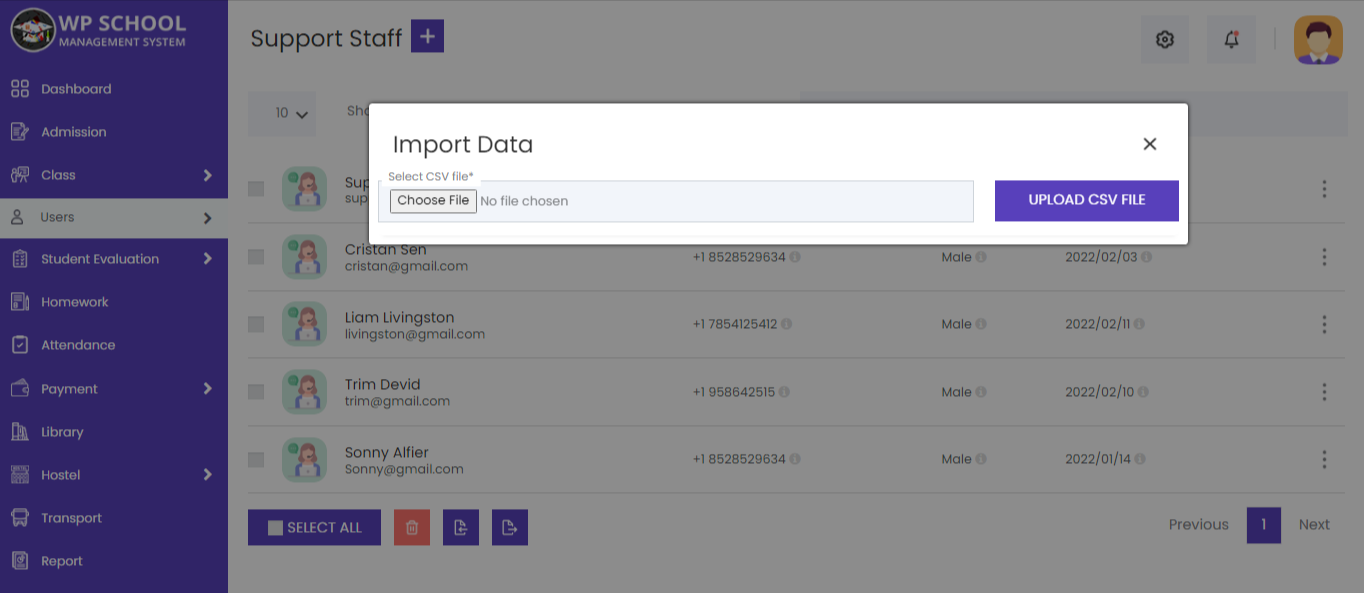
You can bulk-upload support staff data using a CSV file. Export staff data by clicking Export Selected.
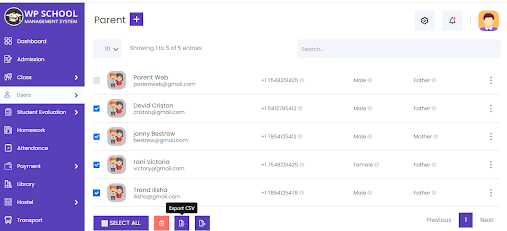
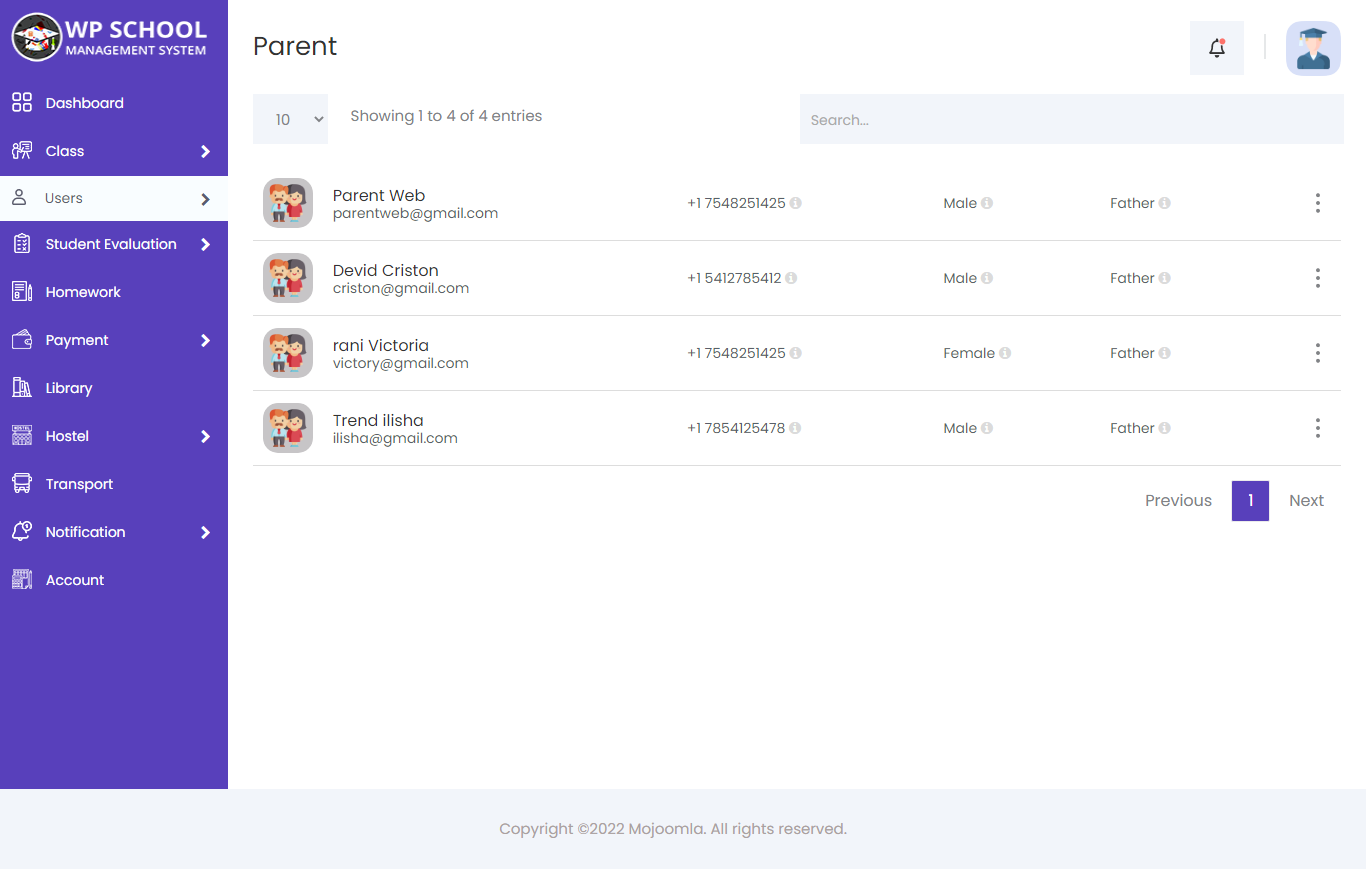
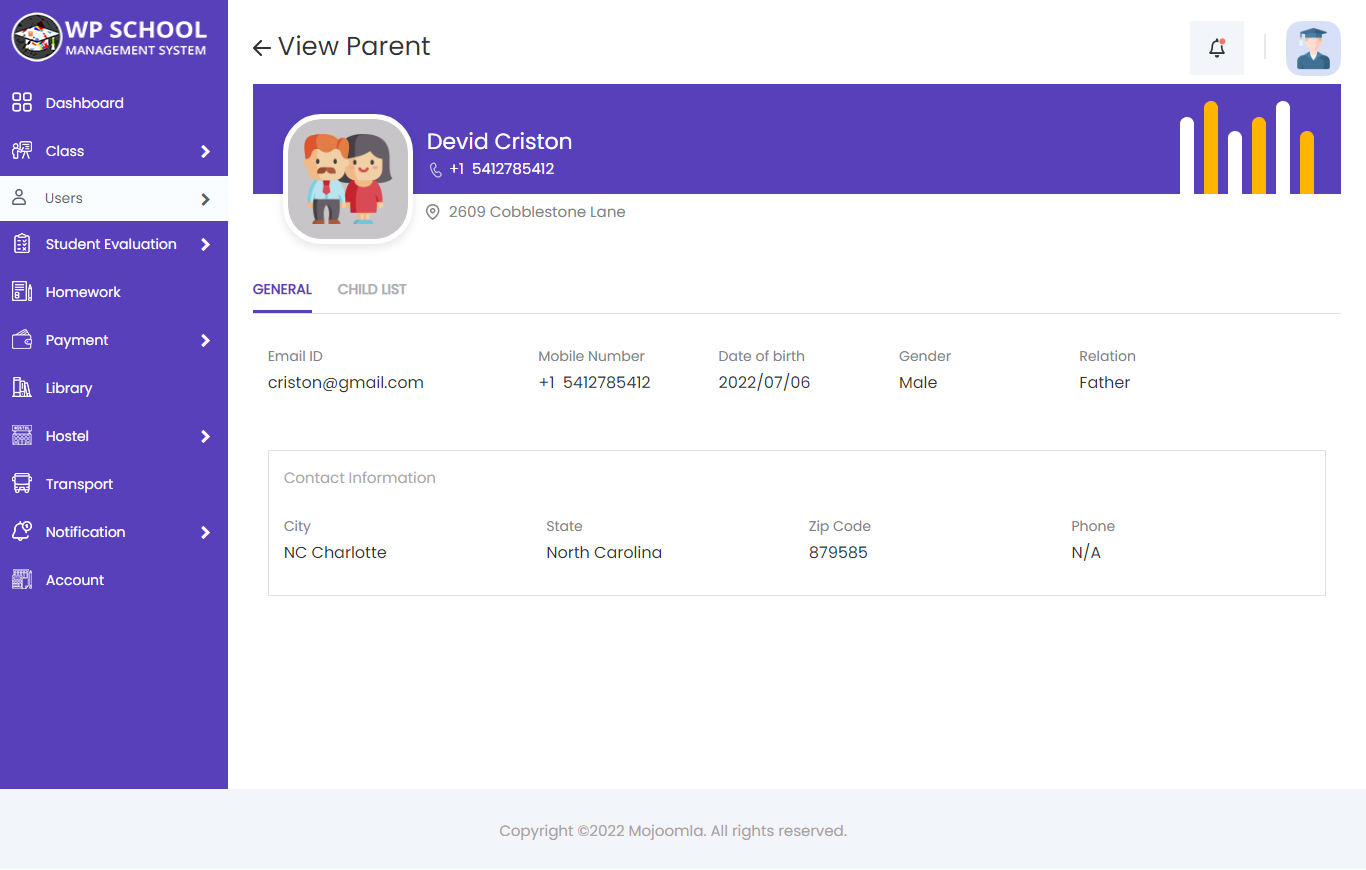
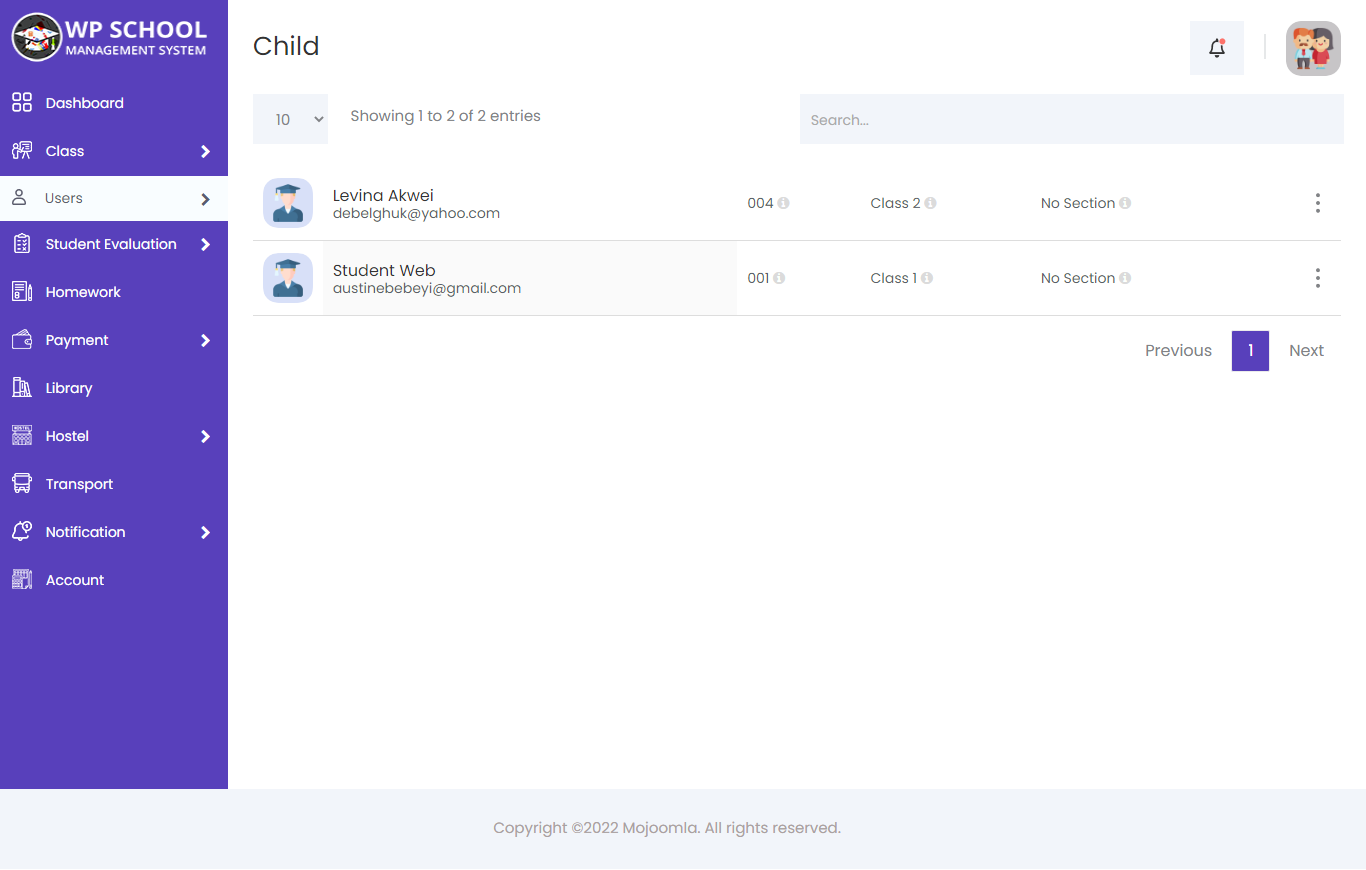
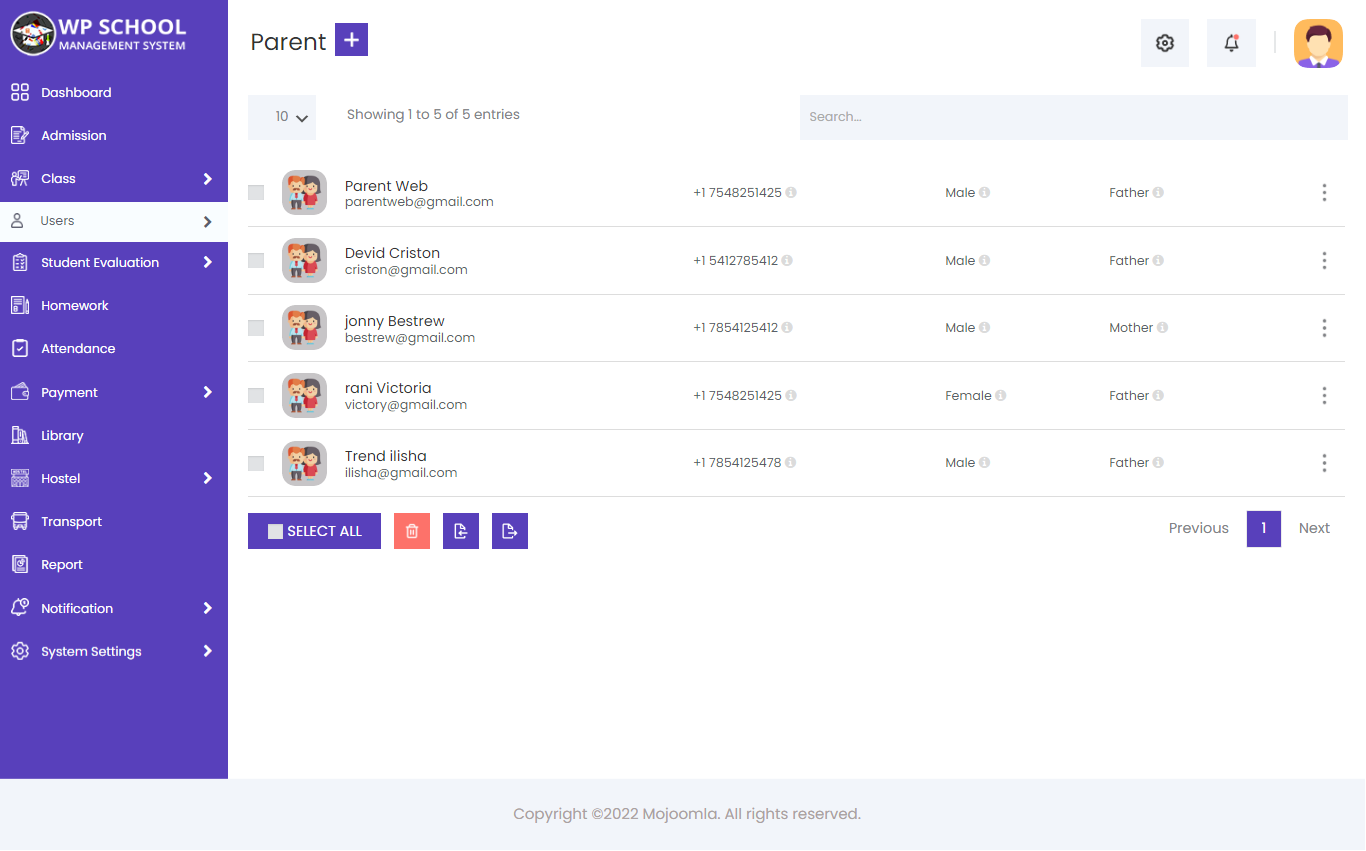
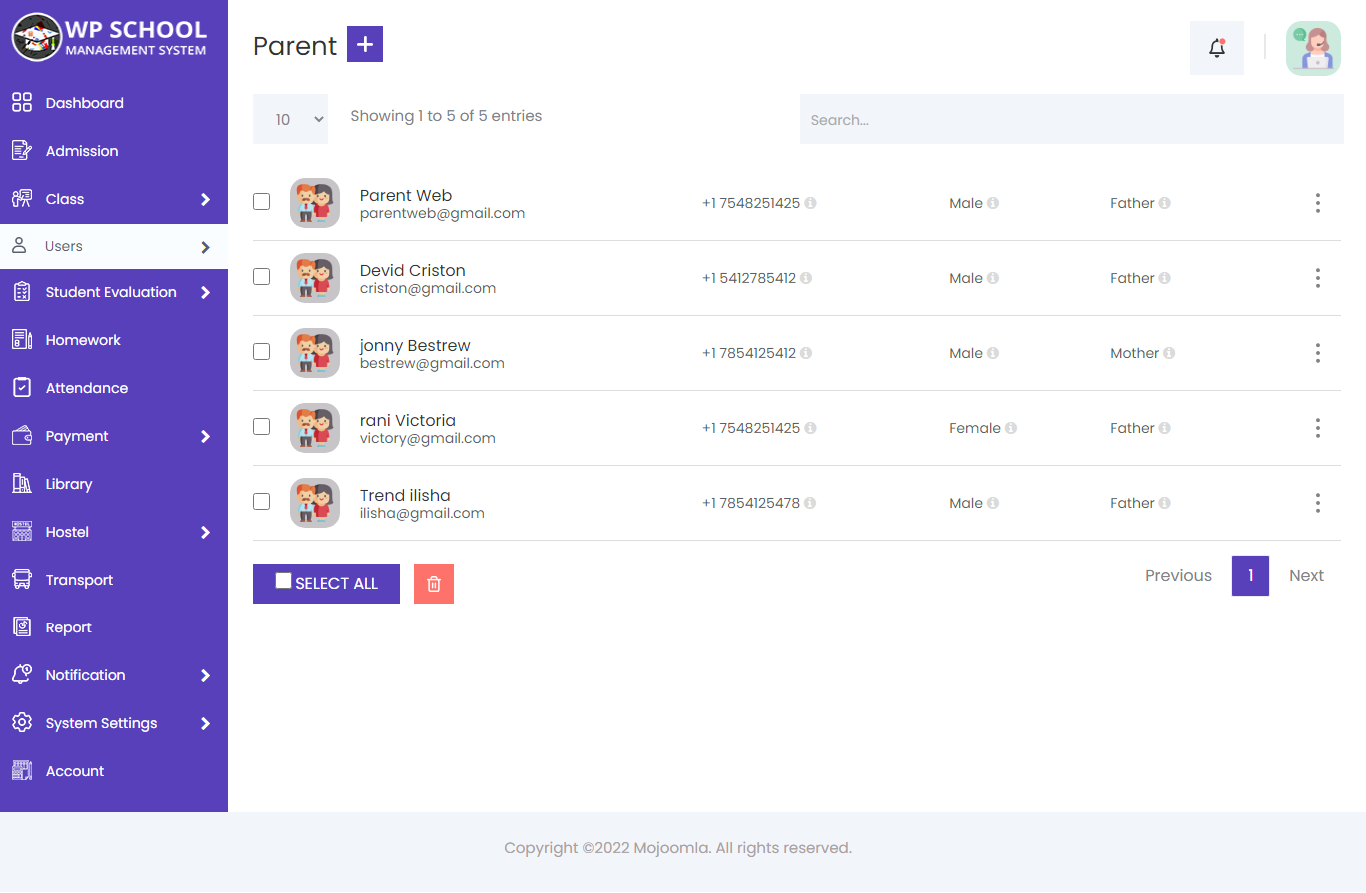
9) Parents
A parent can have multiple children in the same school — all managed from one parent account.

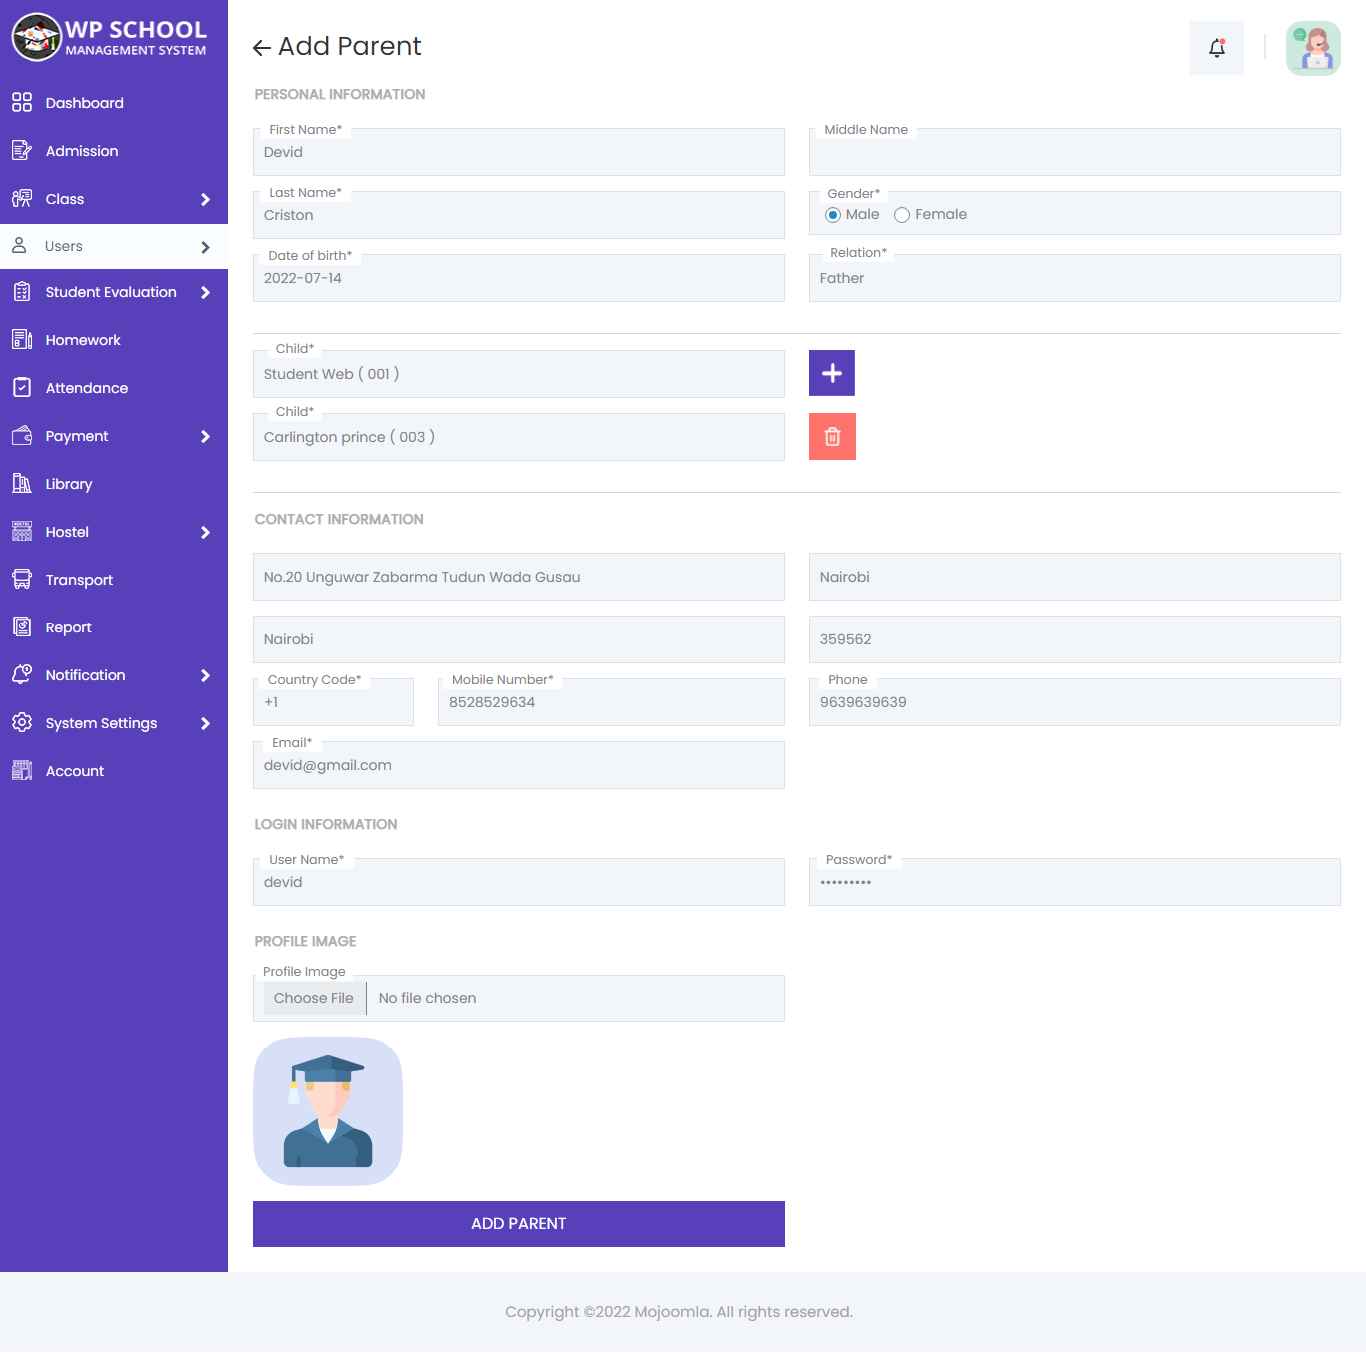
Add Parent
Click Add Parent to link a parent to their child. Select the child from the student dropdown, set the relation, and enter mobile number. Use Add Other Child for parents with multiple children.
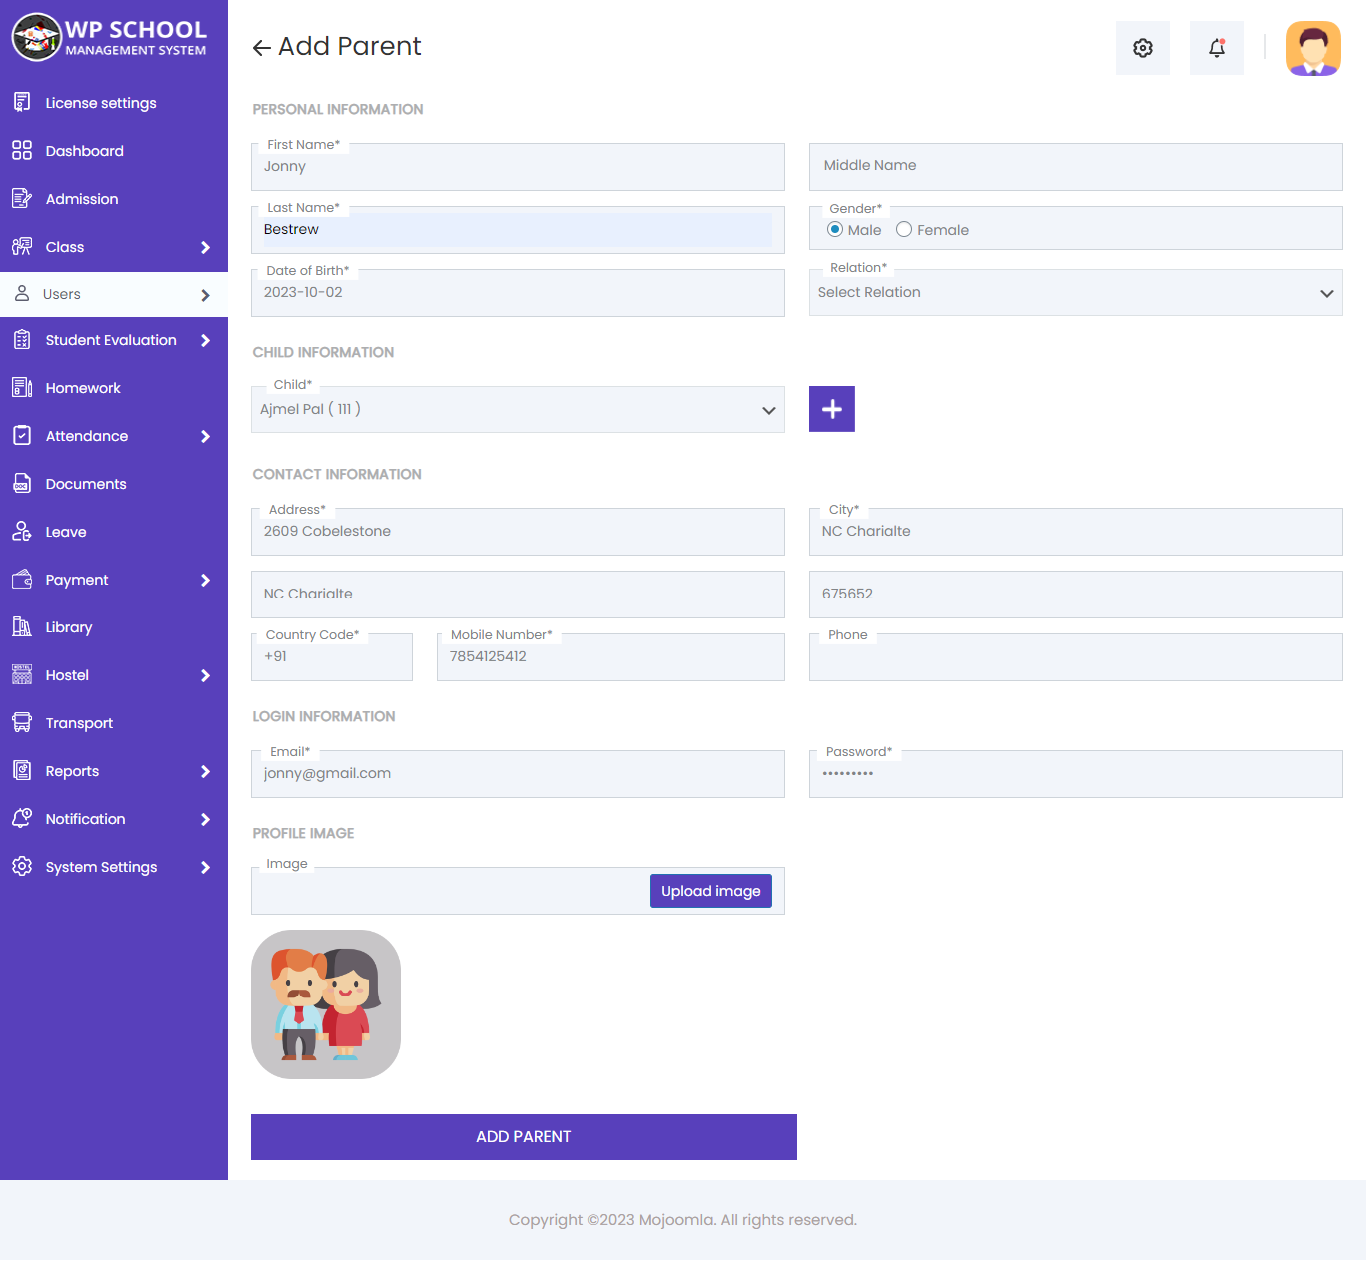
| Field | Description |
|---|---|
| Child | Select from dropdown of all students |
| Add Other Child | Link multiple children from same school |
| Relation | Parent / Guardian / other relation |
| Mobile Number | Parent's primary mobile number |
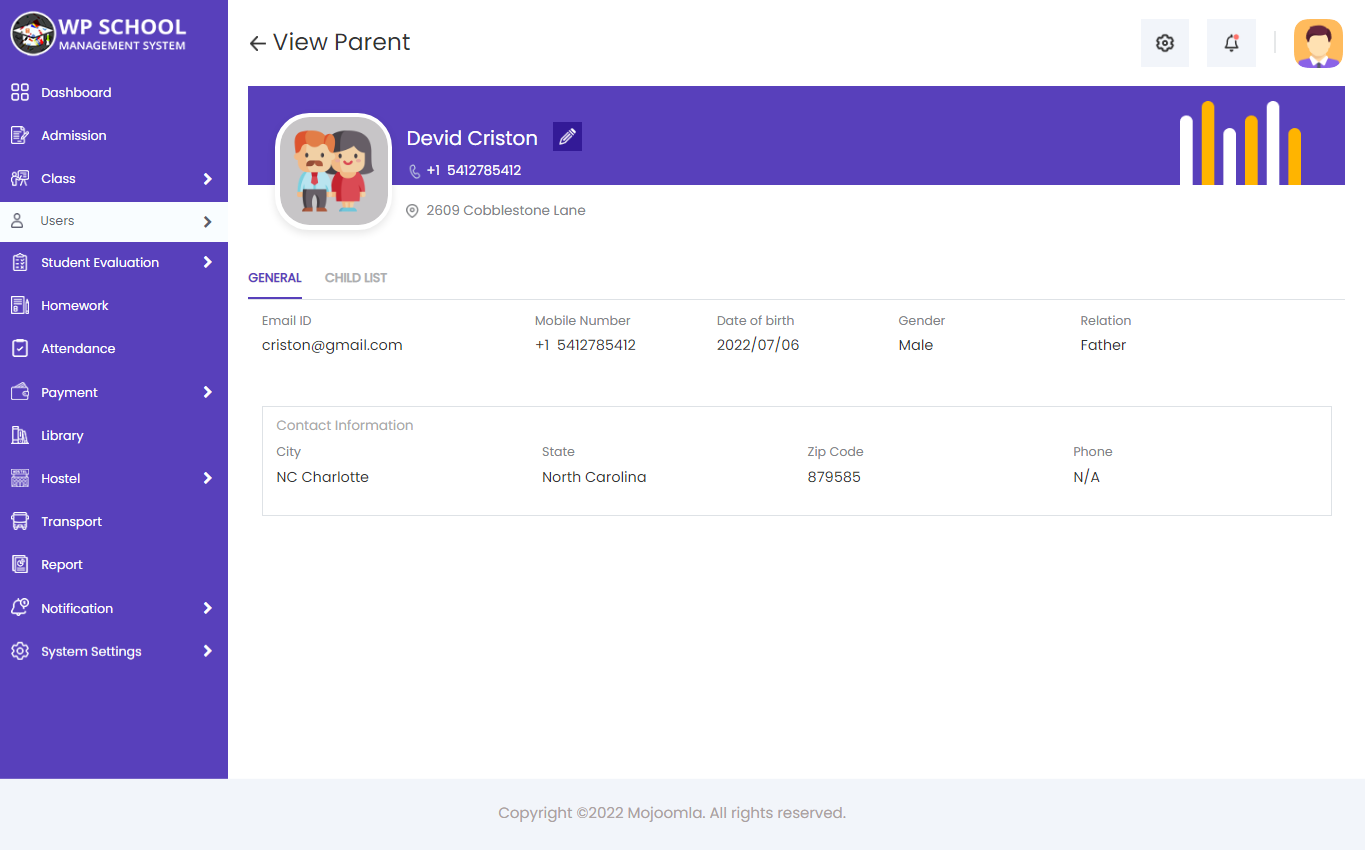
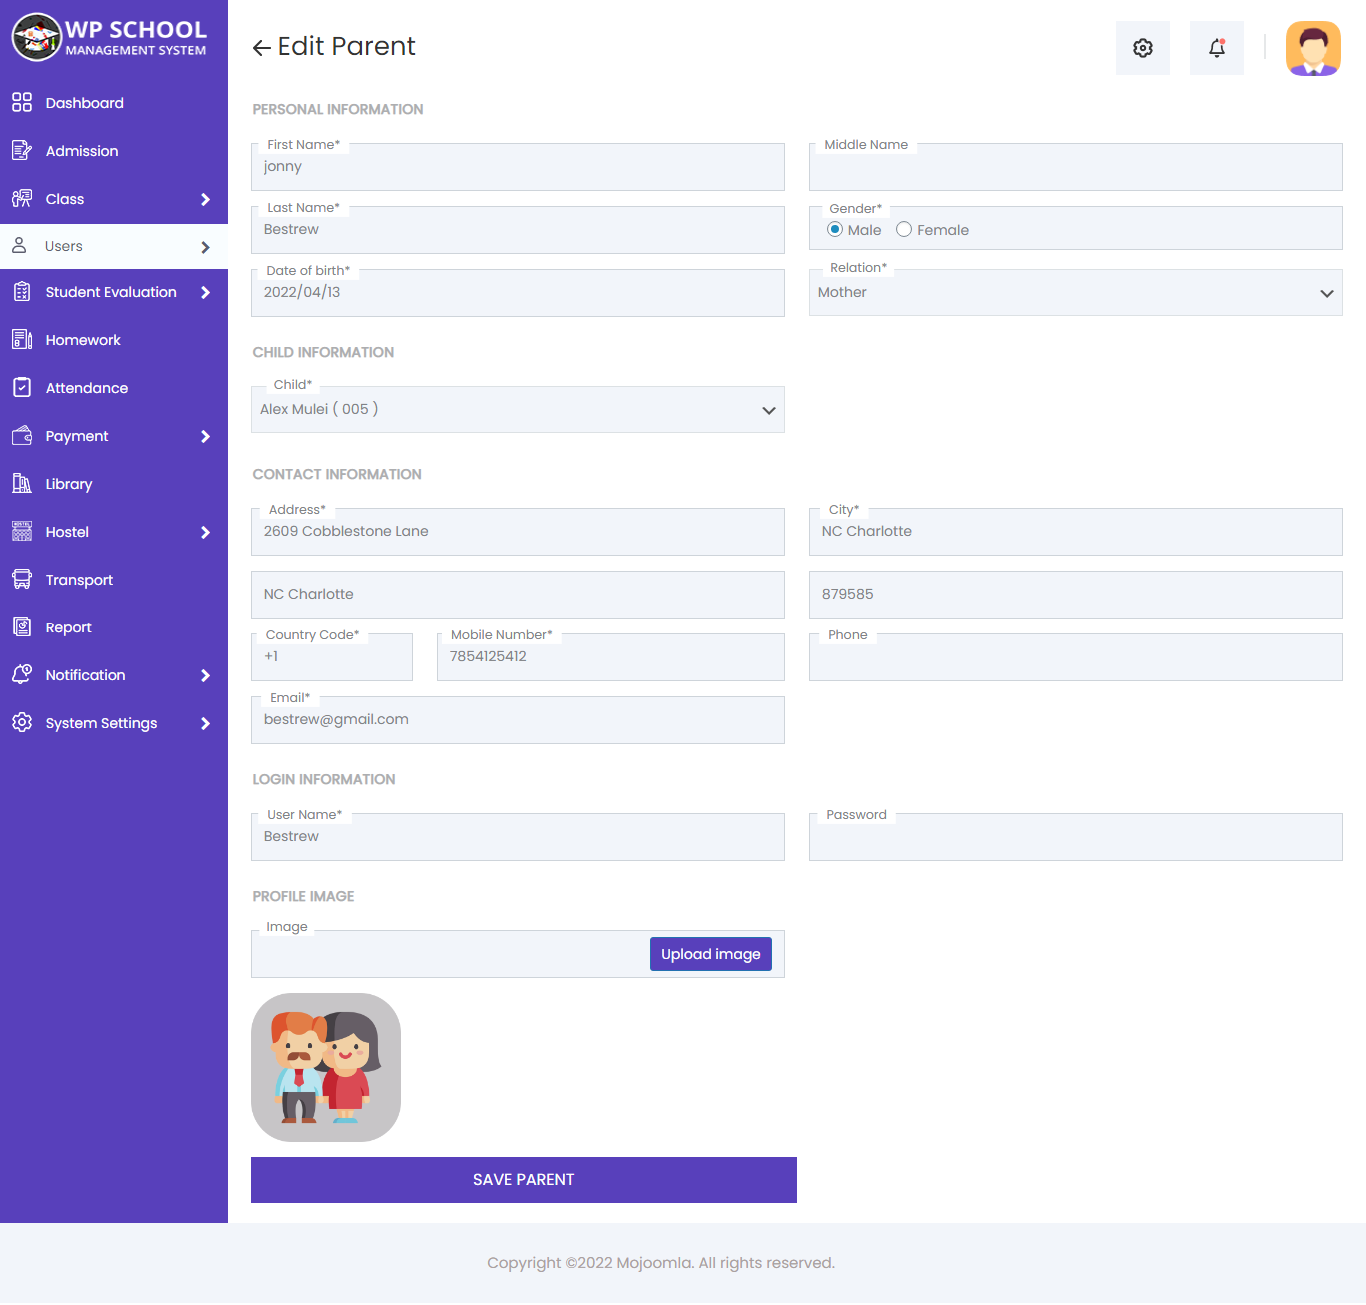
You can bulk-upload parent data using a CSV file. Export parent data by clicking Export Selected.
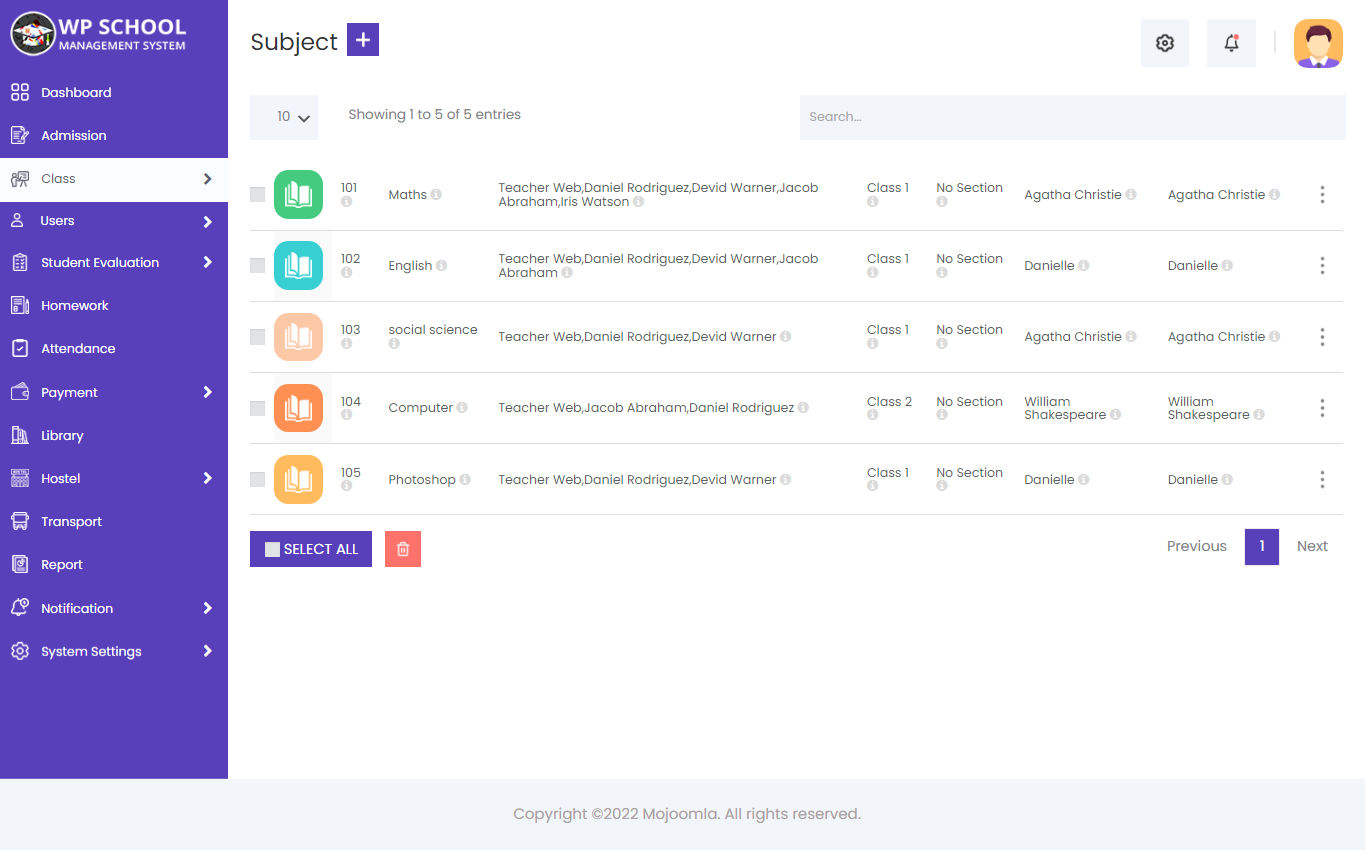
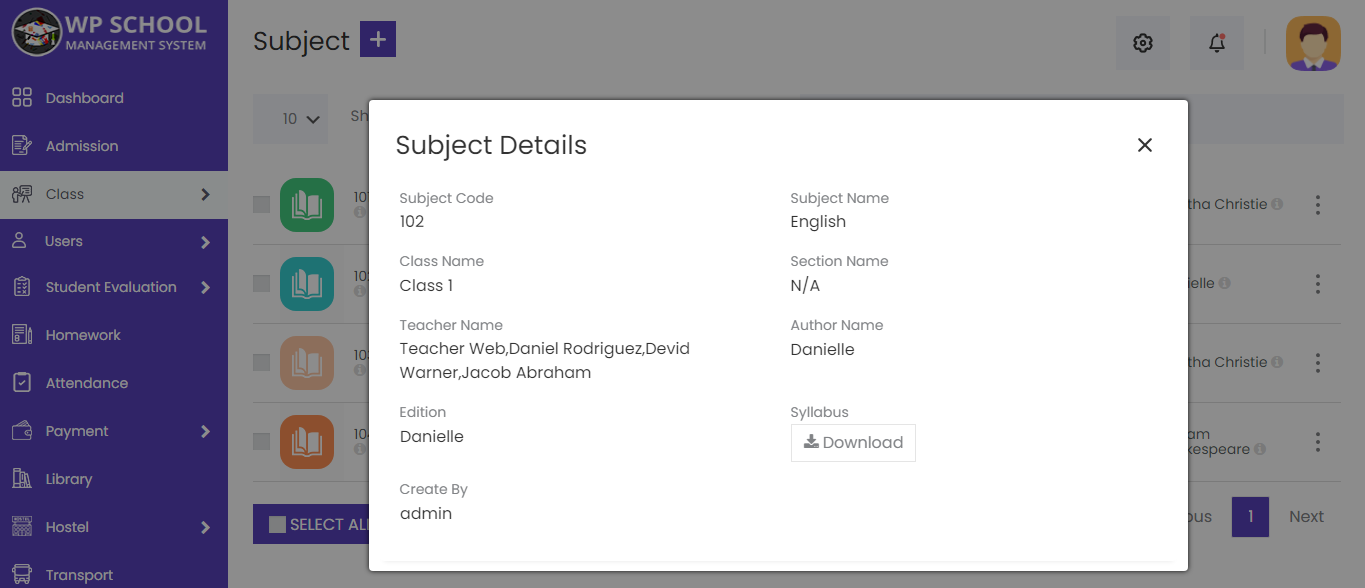
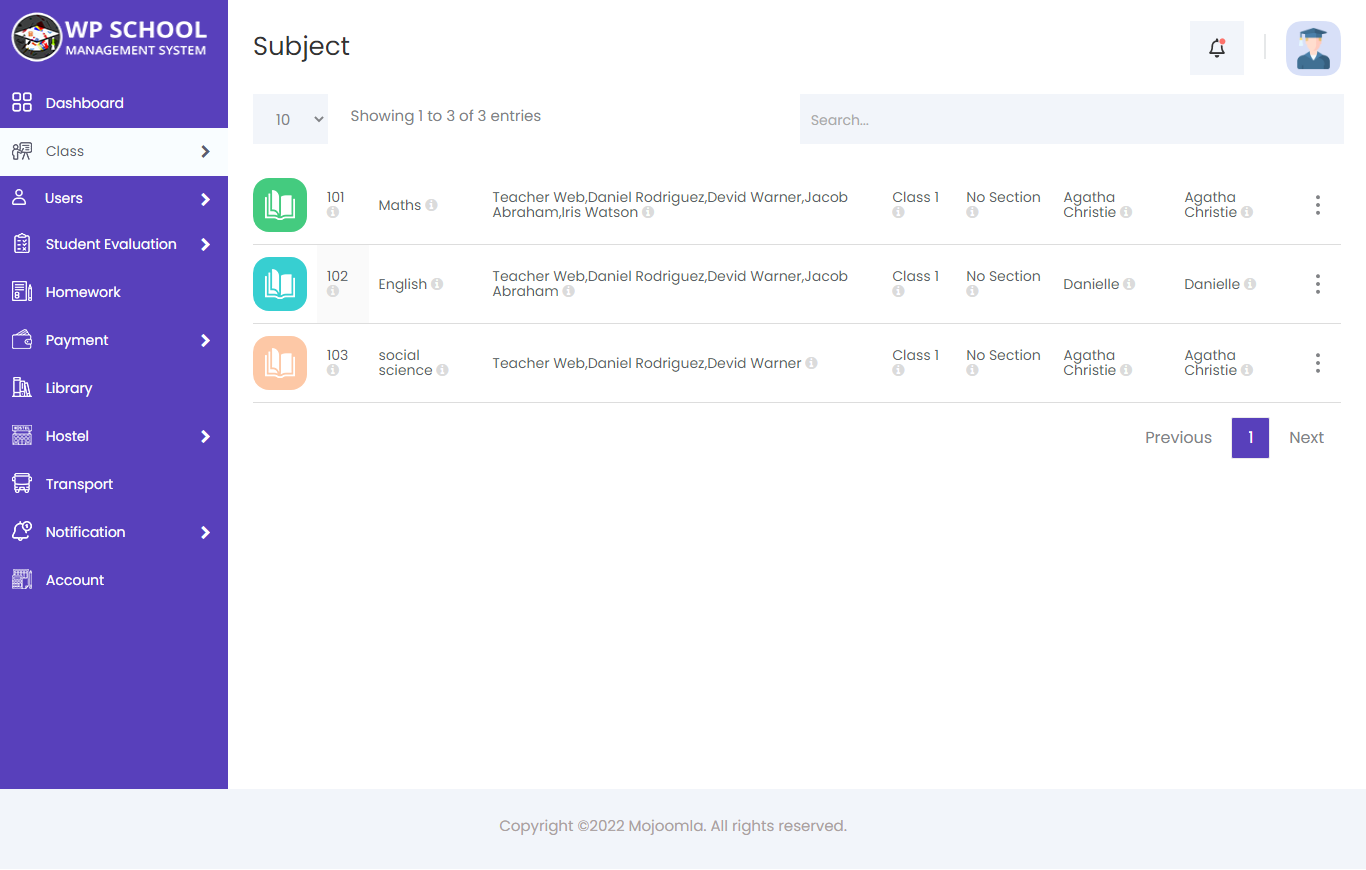
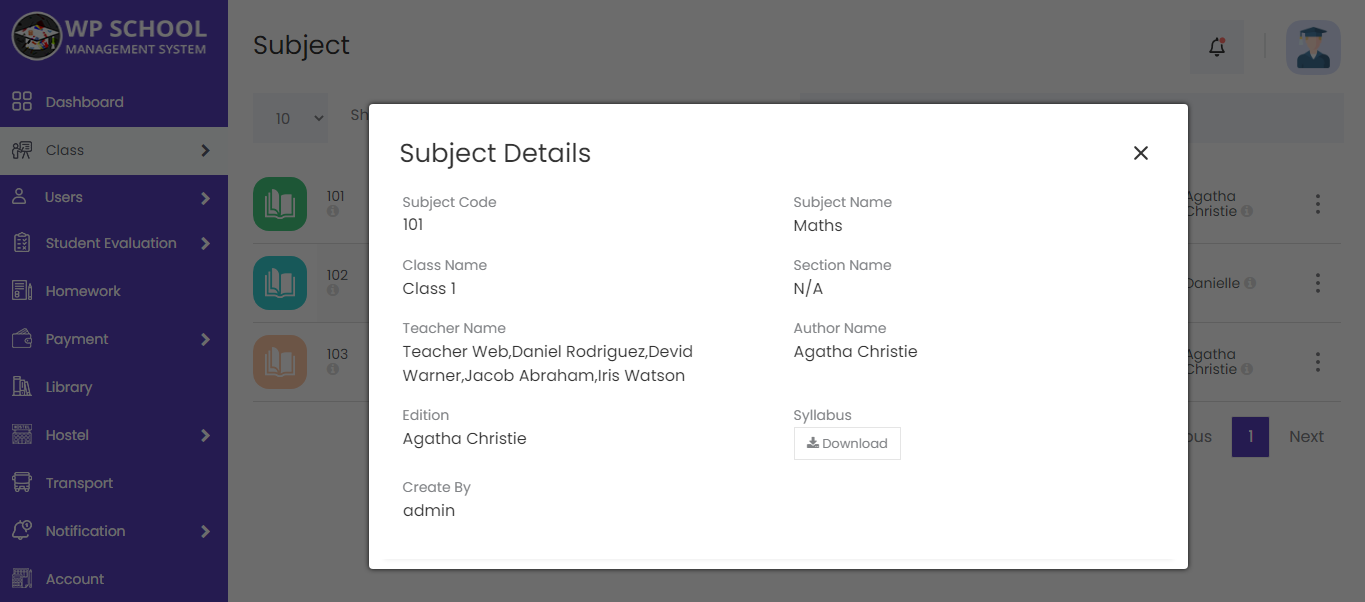
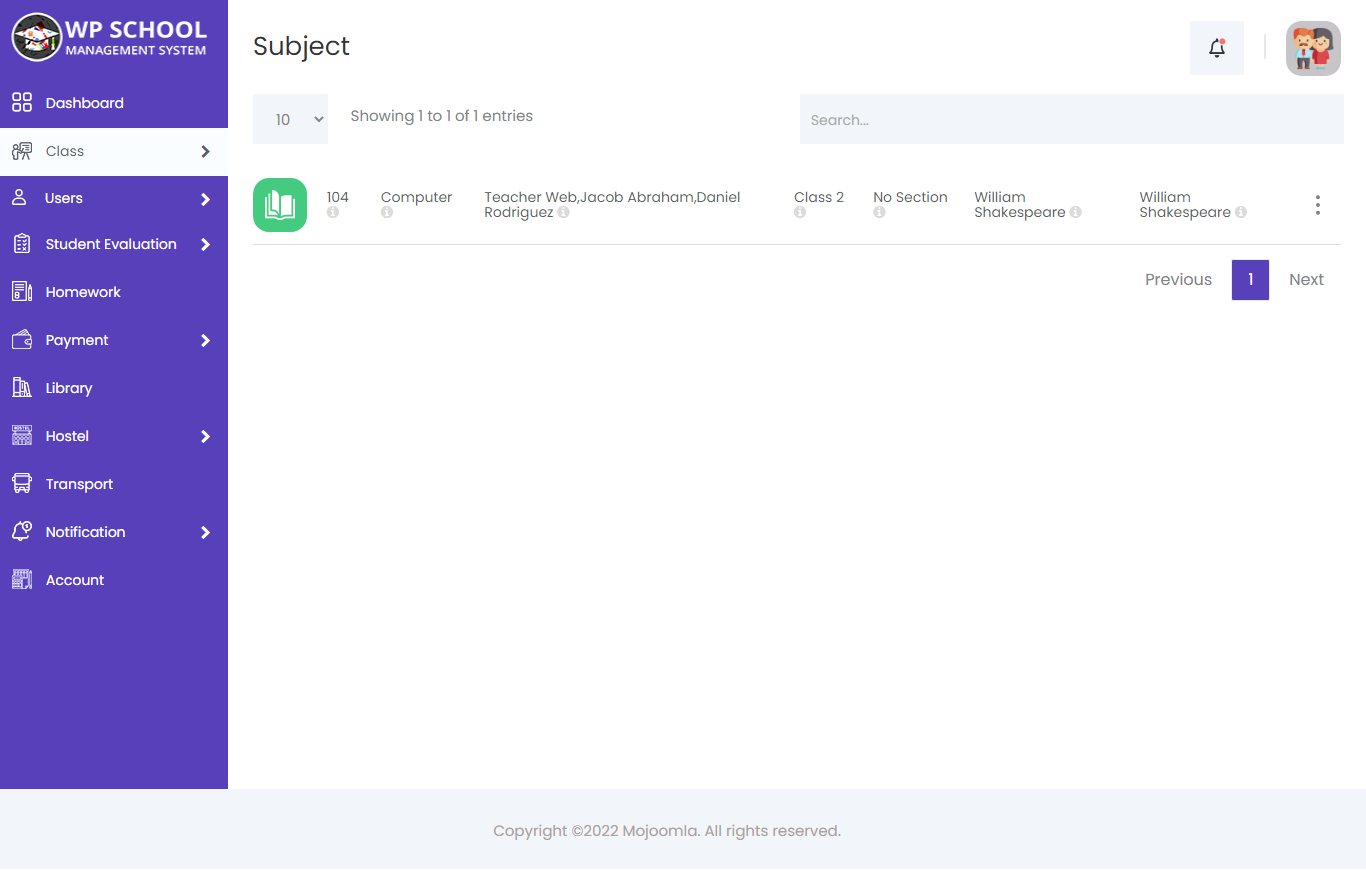
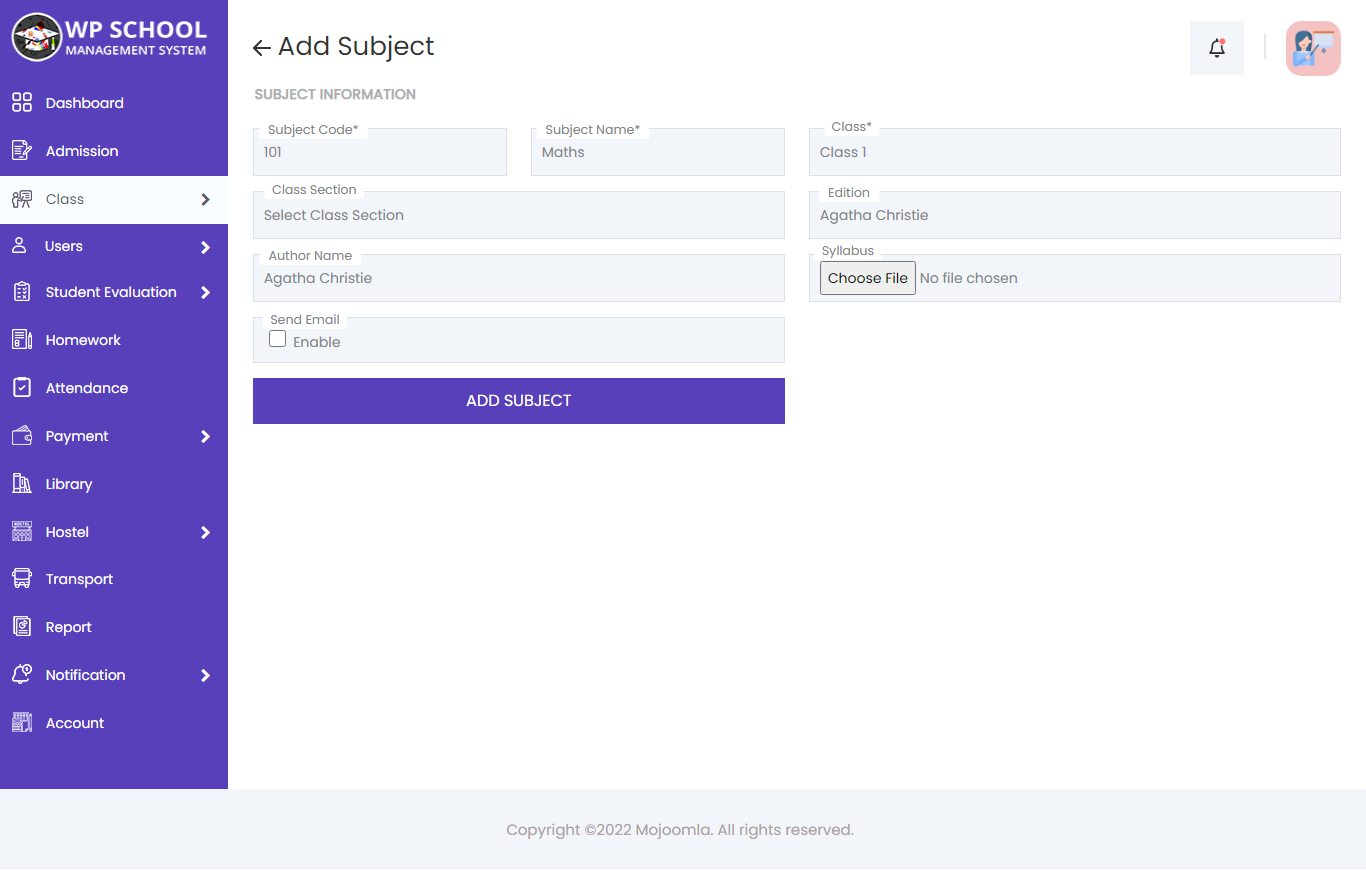
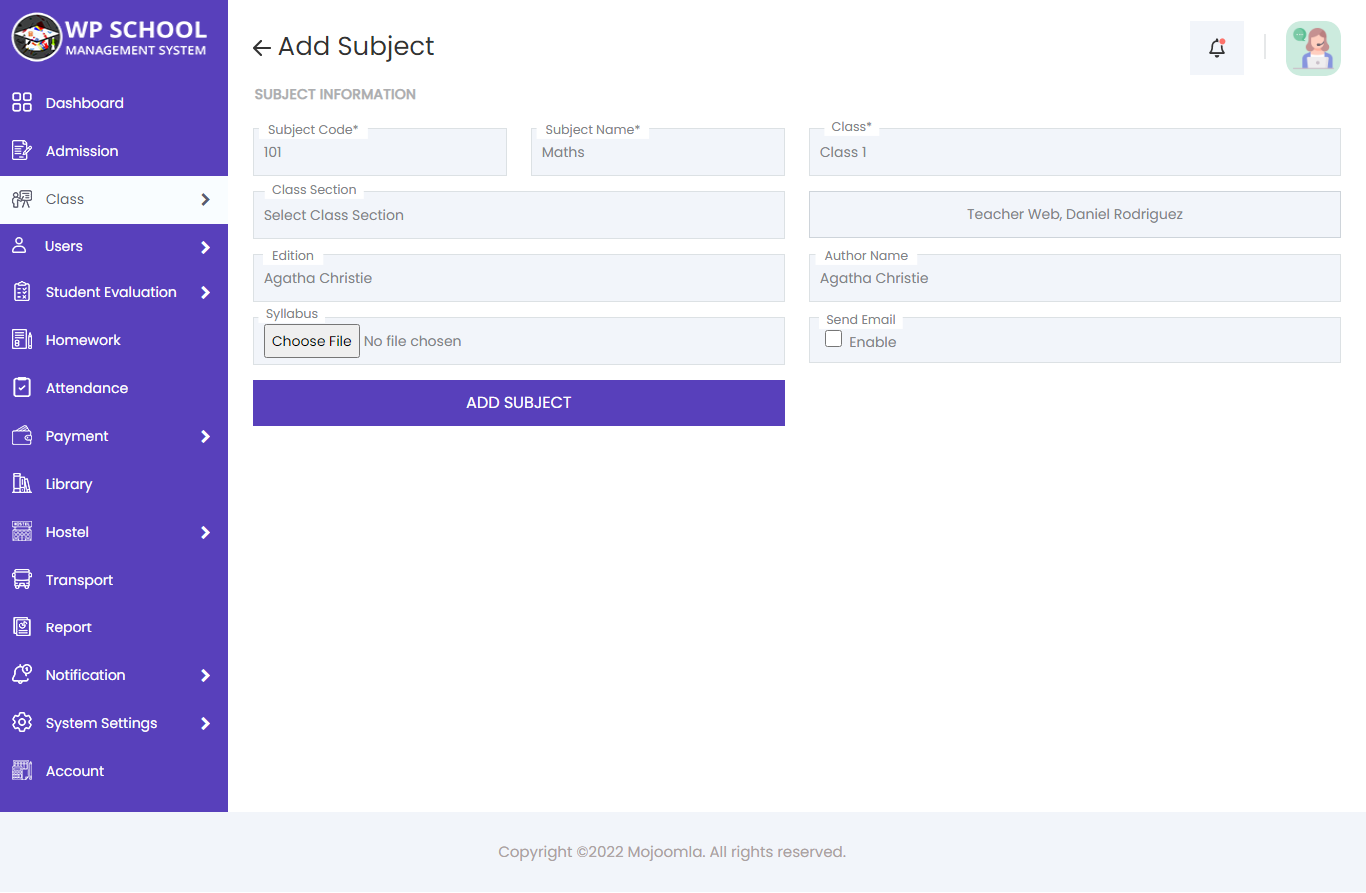
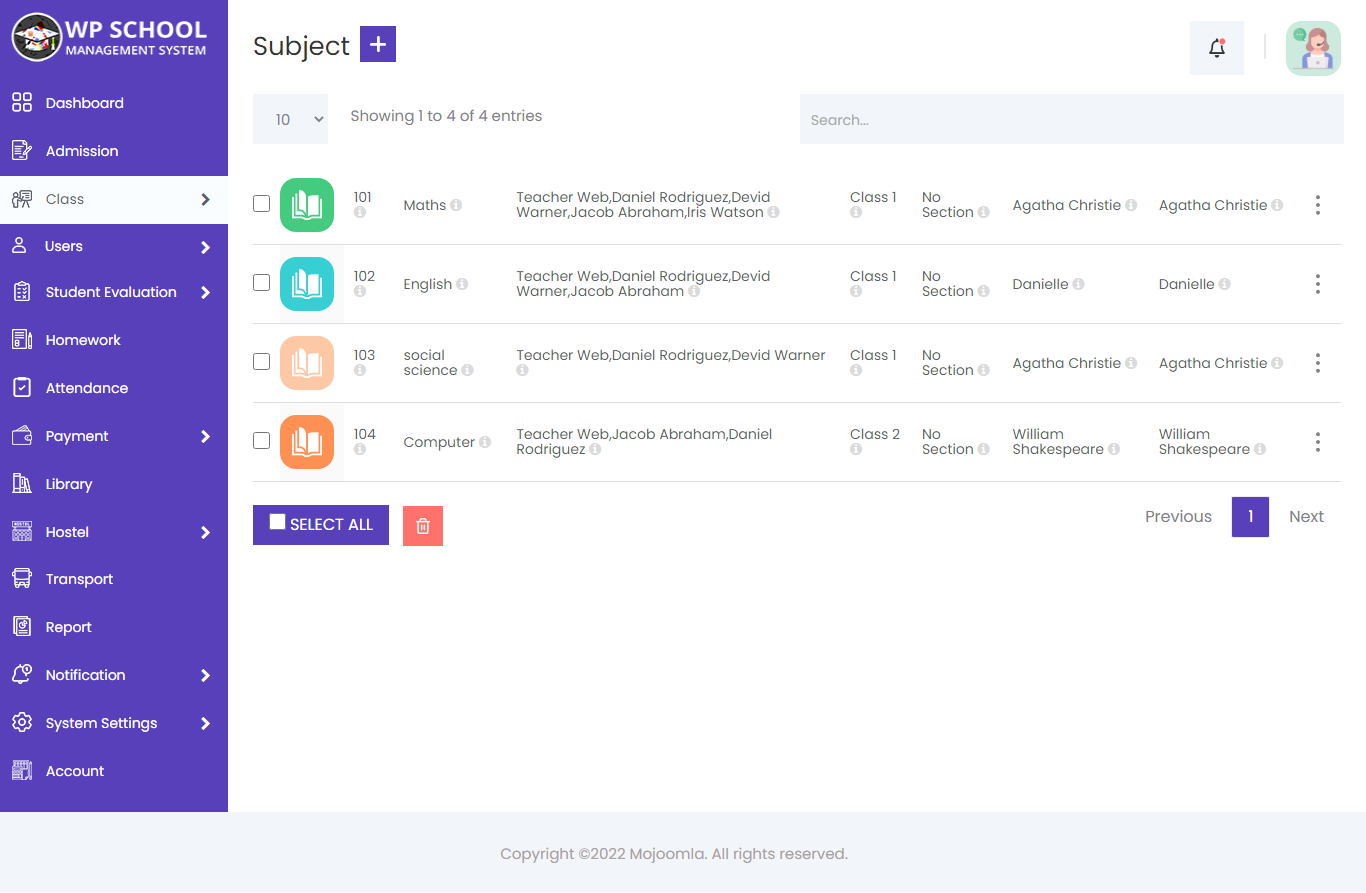
10) Subjects
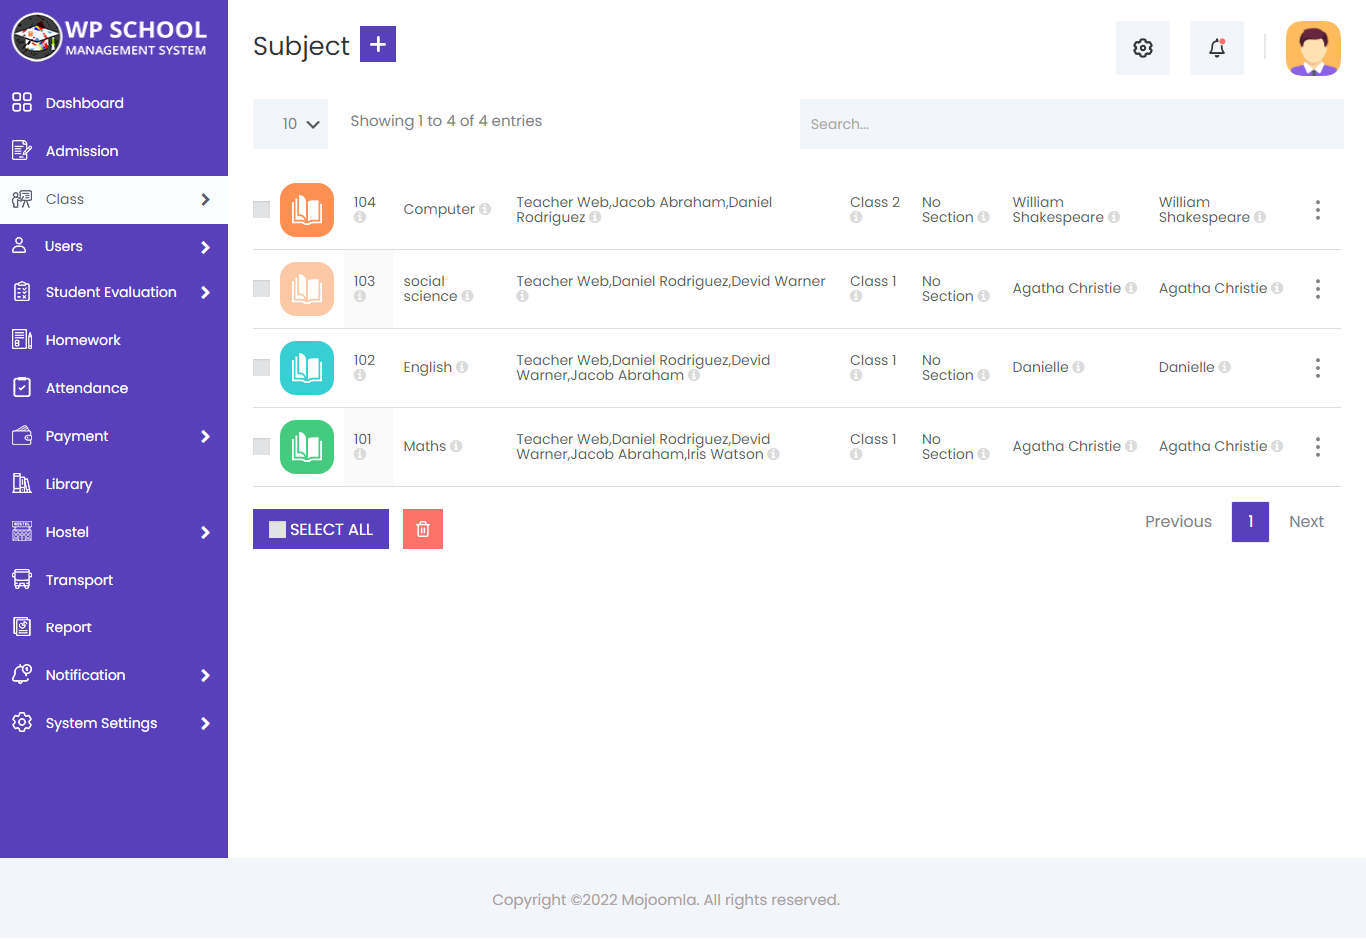
You can add subject information with subject code, teacher name, class name, author name, and edition of the book. Attach syllabus files and view the full subject list.
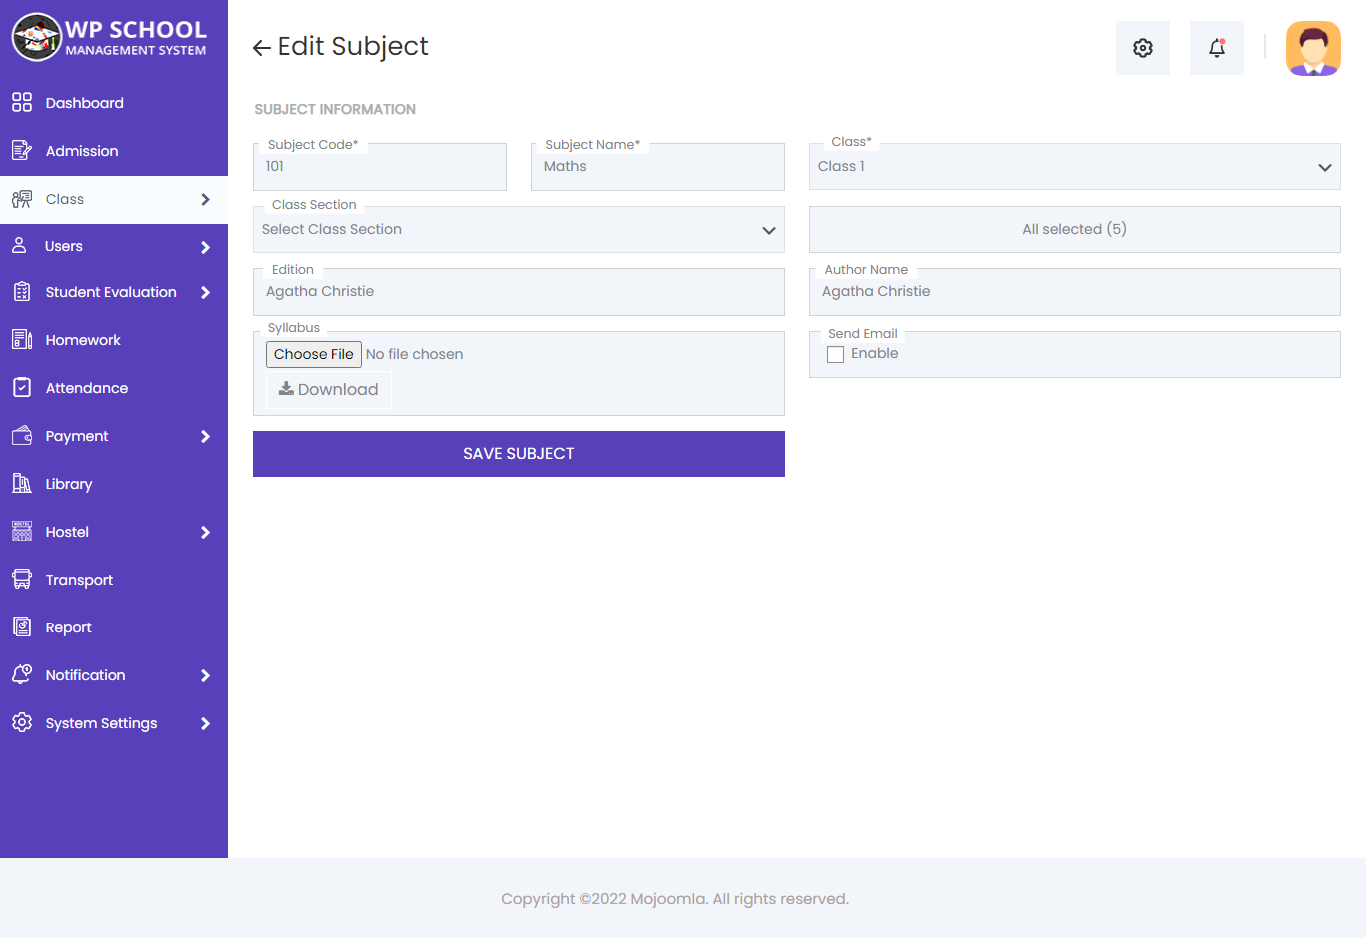
Add Subject
Click Add Subject to create a new subject. Enter the subject code (must be unique), subject name, select the class, and assign a teacher to this subject.
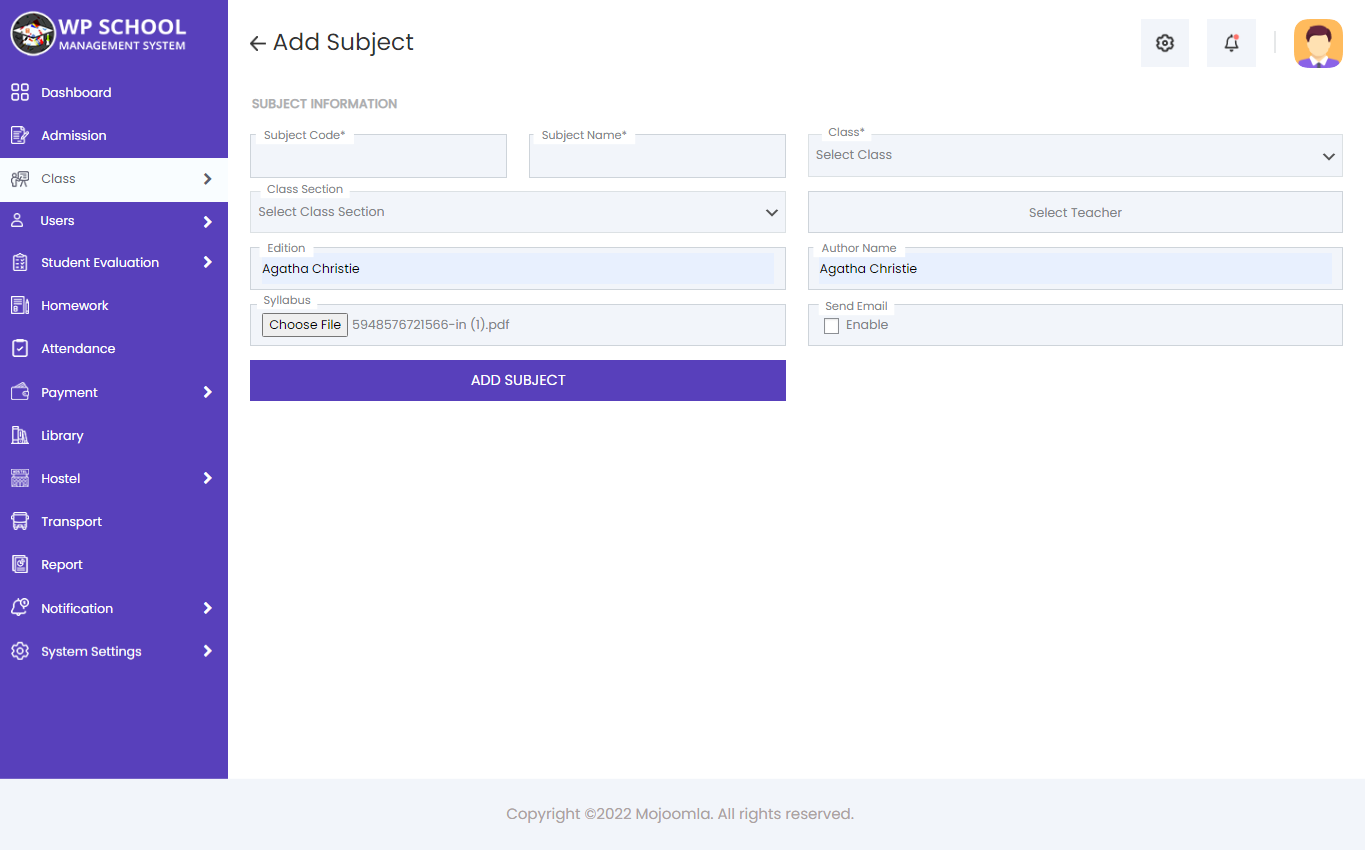
| Field | Description |
|---|---|
| Subject Code | Must be unique (e.g. MATH-101) |
| Subject Name | Full subject name |
| Class | Class this subject belongs to |
| Teacher | Assigned teacher for this subject |
View the complete subject detail including teacher, class, and syllabus information.
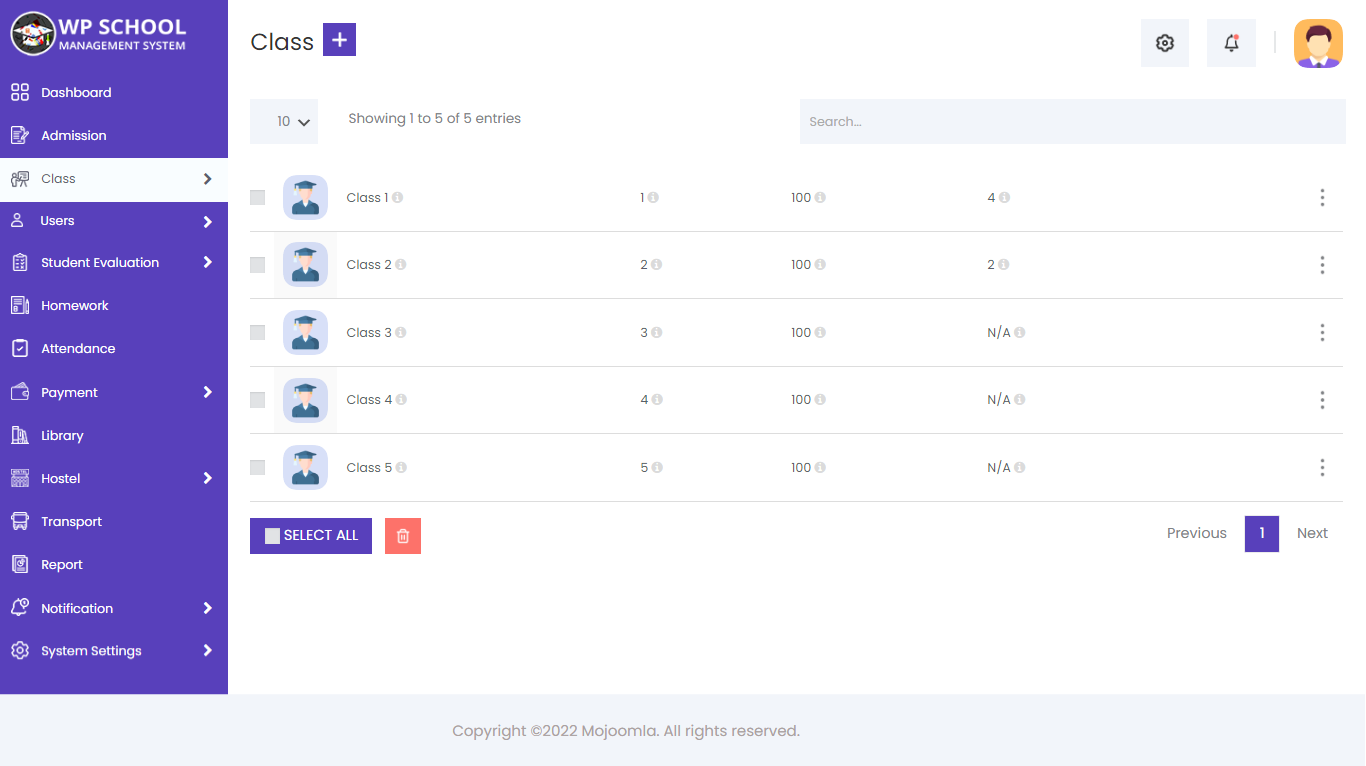
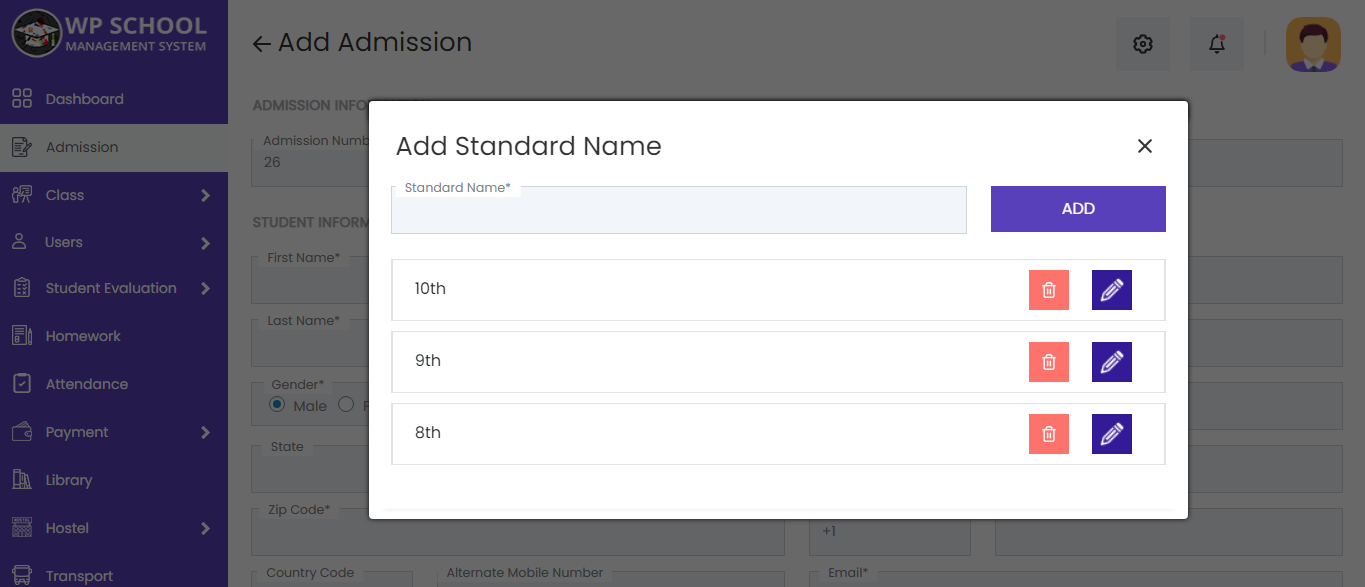
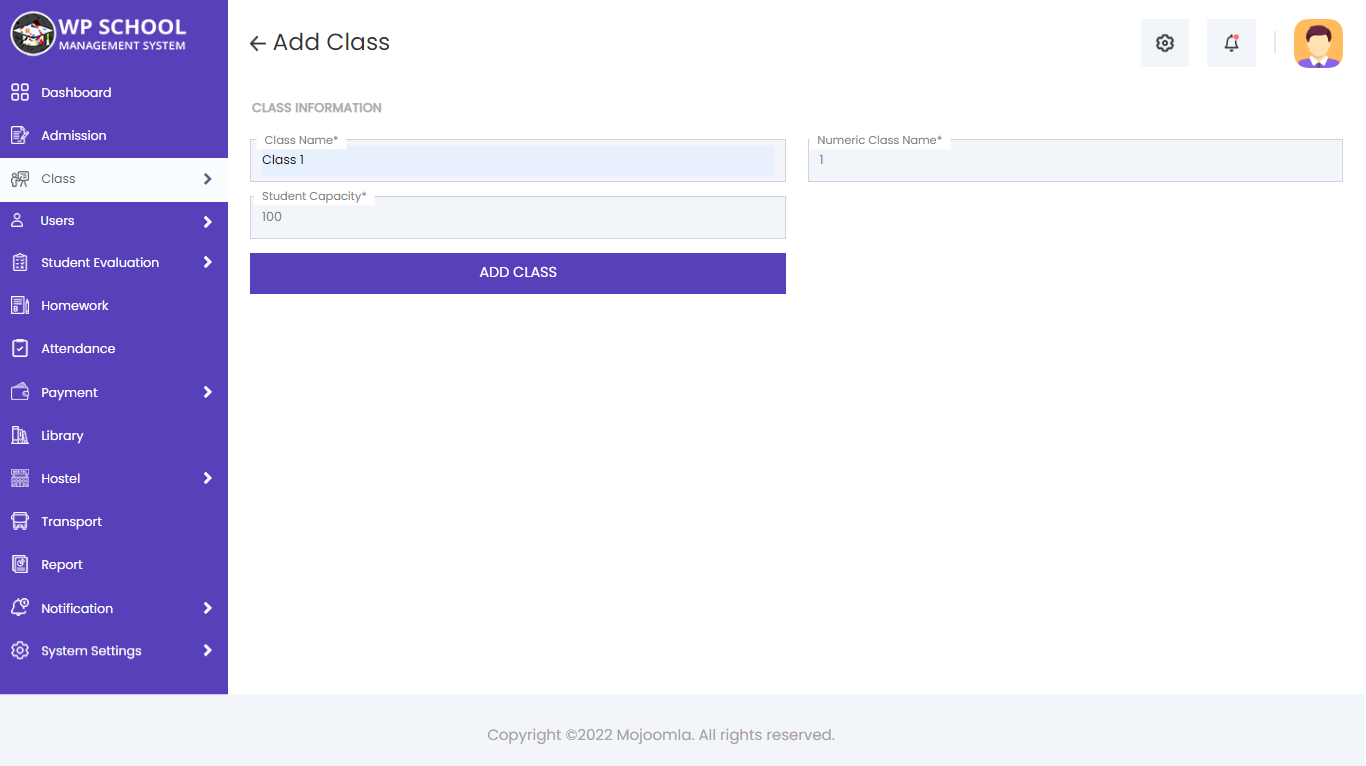
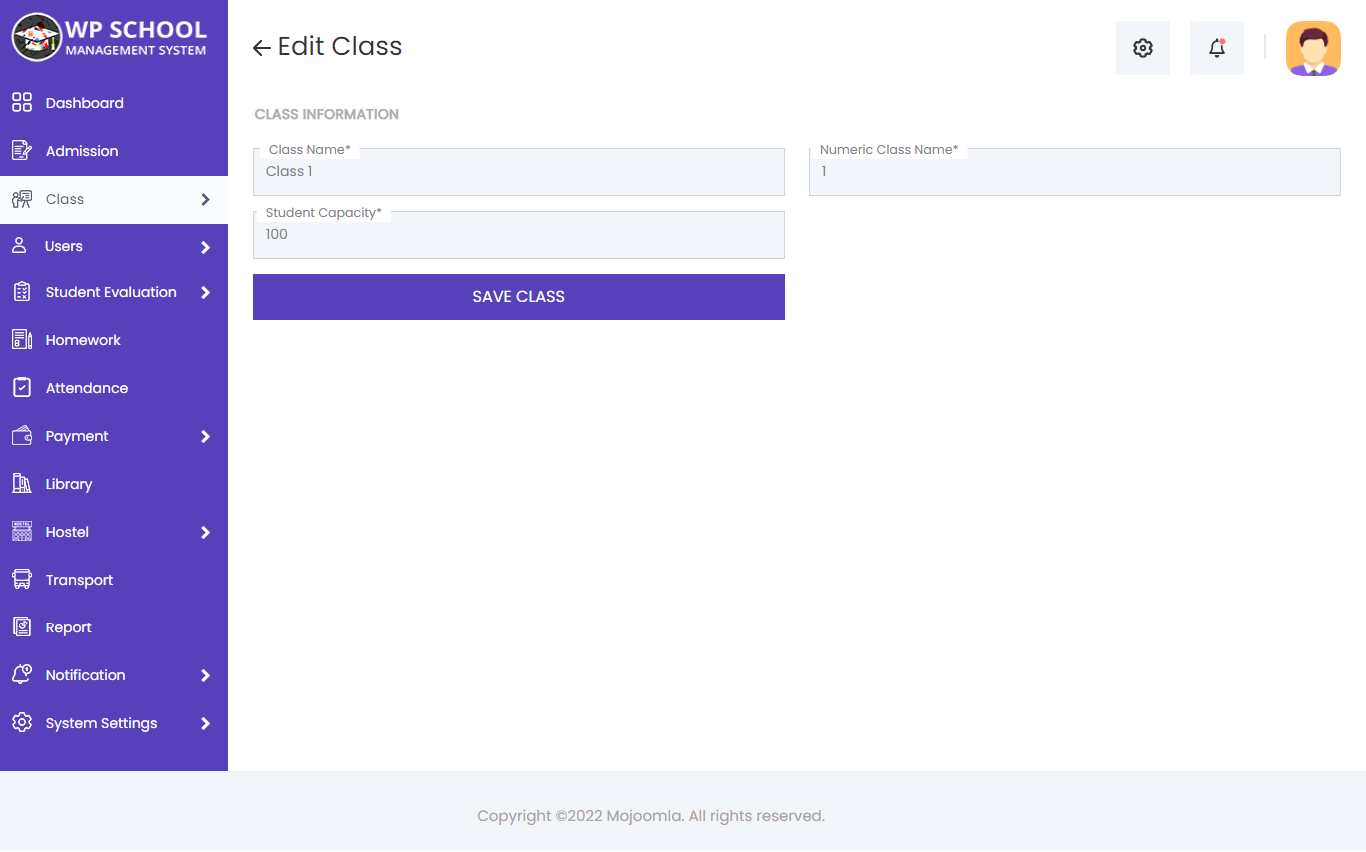
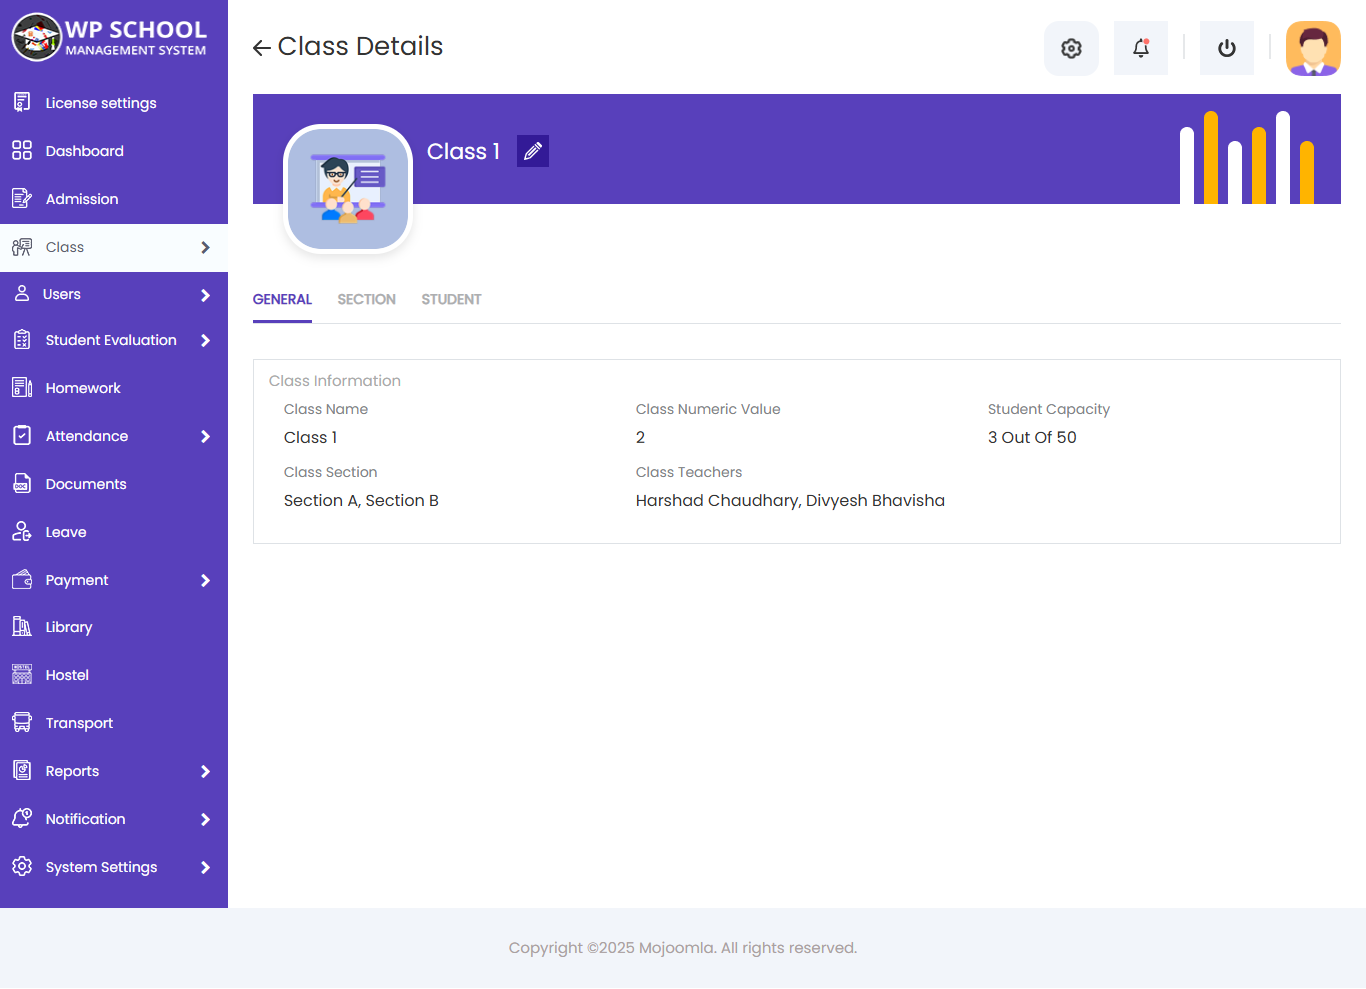
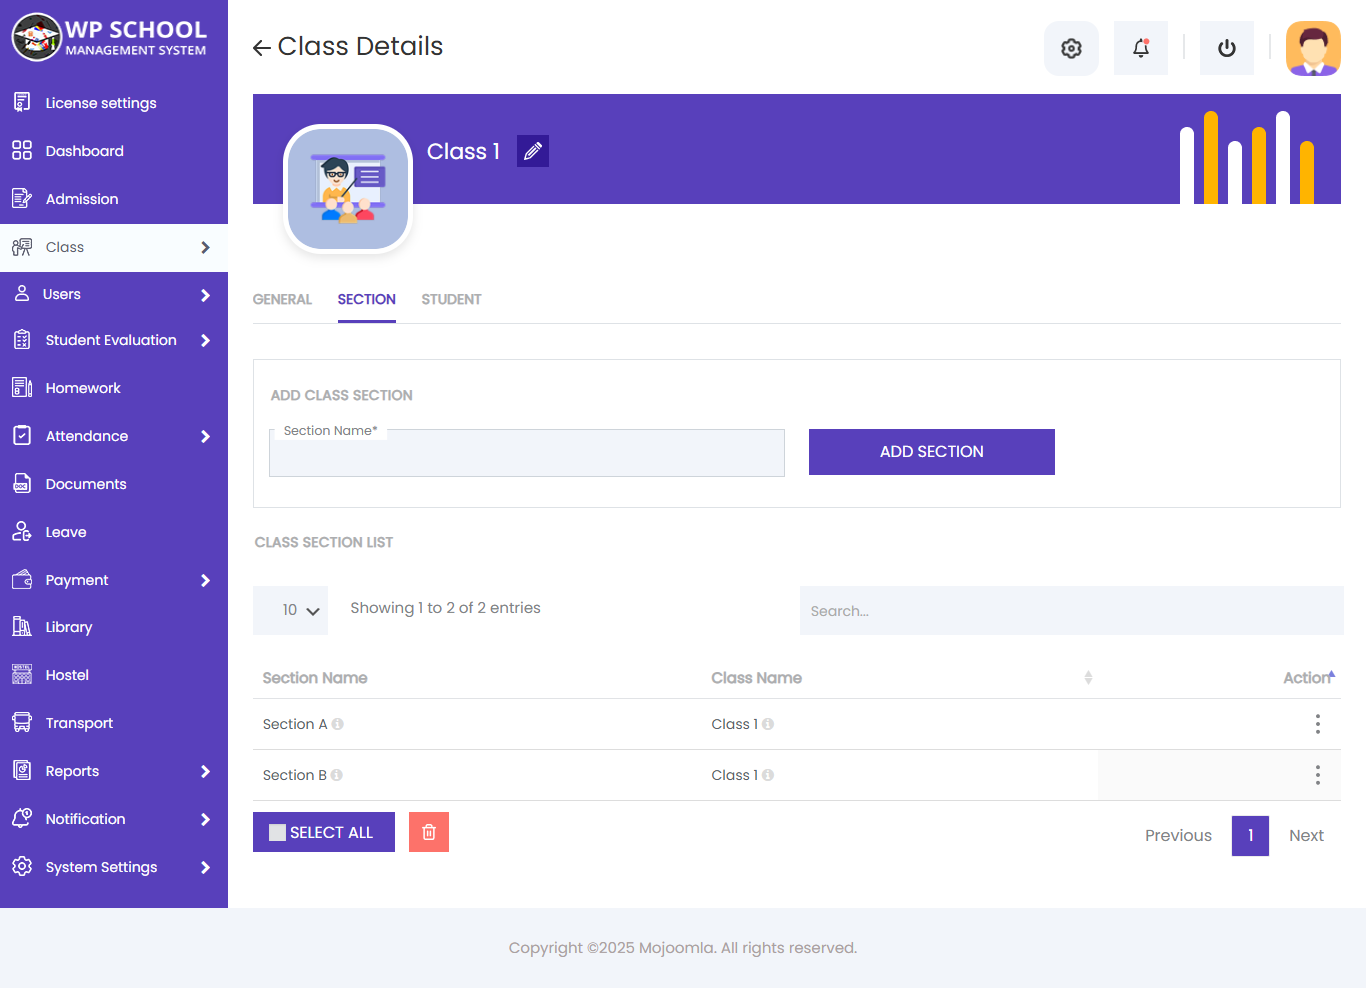
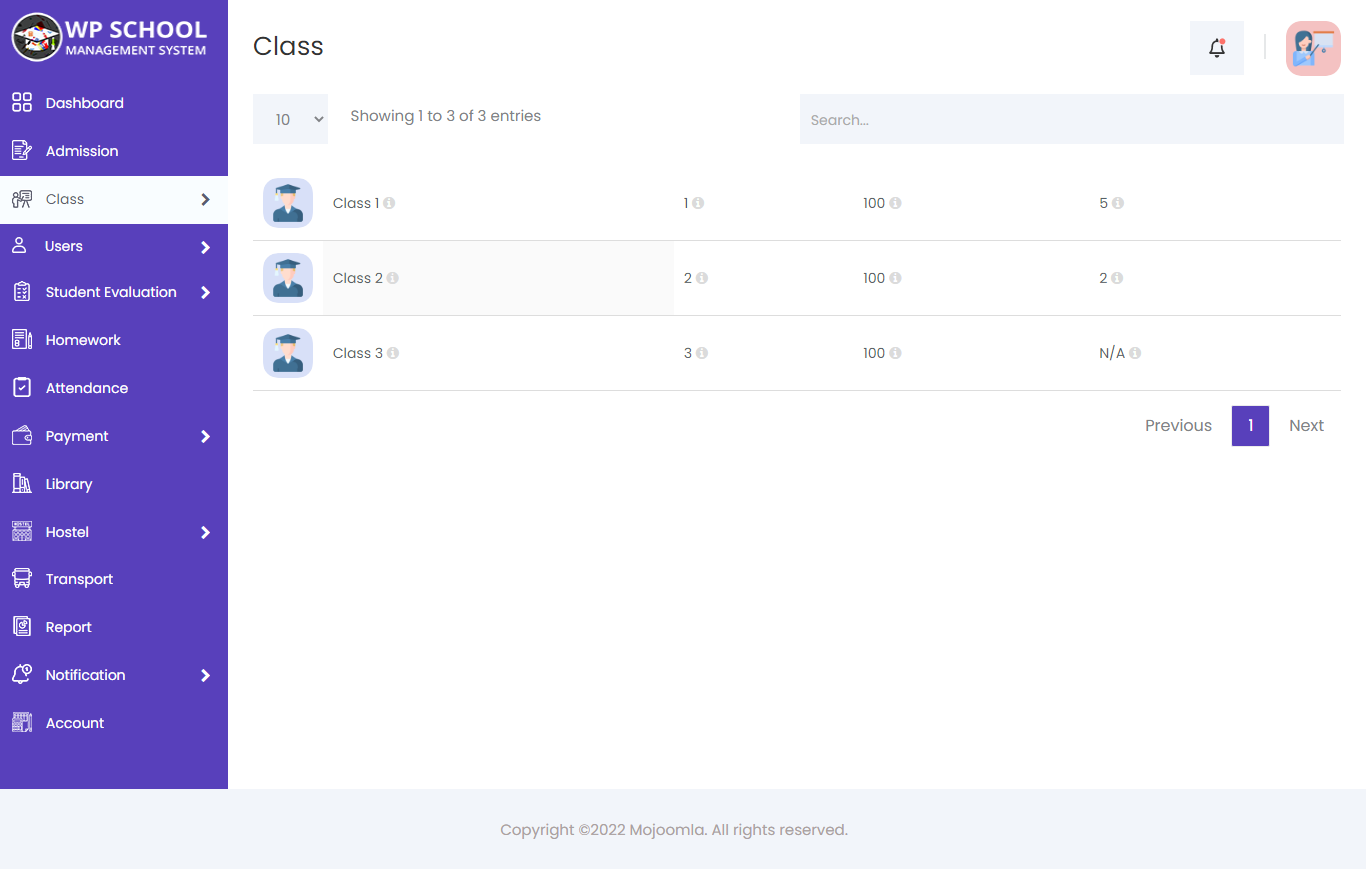
11) Classes
You can see all classes listed here with their name and capacity. Add or view sections by clicking View Or Add Section on any class.
Add Class
Click Add Class to create a new class. Enter the class name and its numeric equivalent for ordering. Extra fields are available for special requirements.
| Field | Description |
|---|---|
| Class Name | "Grade 5", "Class 10", "Year 2" |
| Numeric Class Name | Numeric equivalent for ordering |
Class Details & Sections
You can view class details here and also see the student list for the class. Add and edit sections (divisions) for each class from this page.
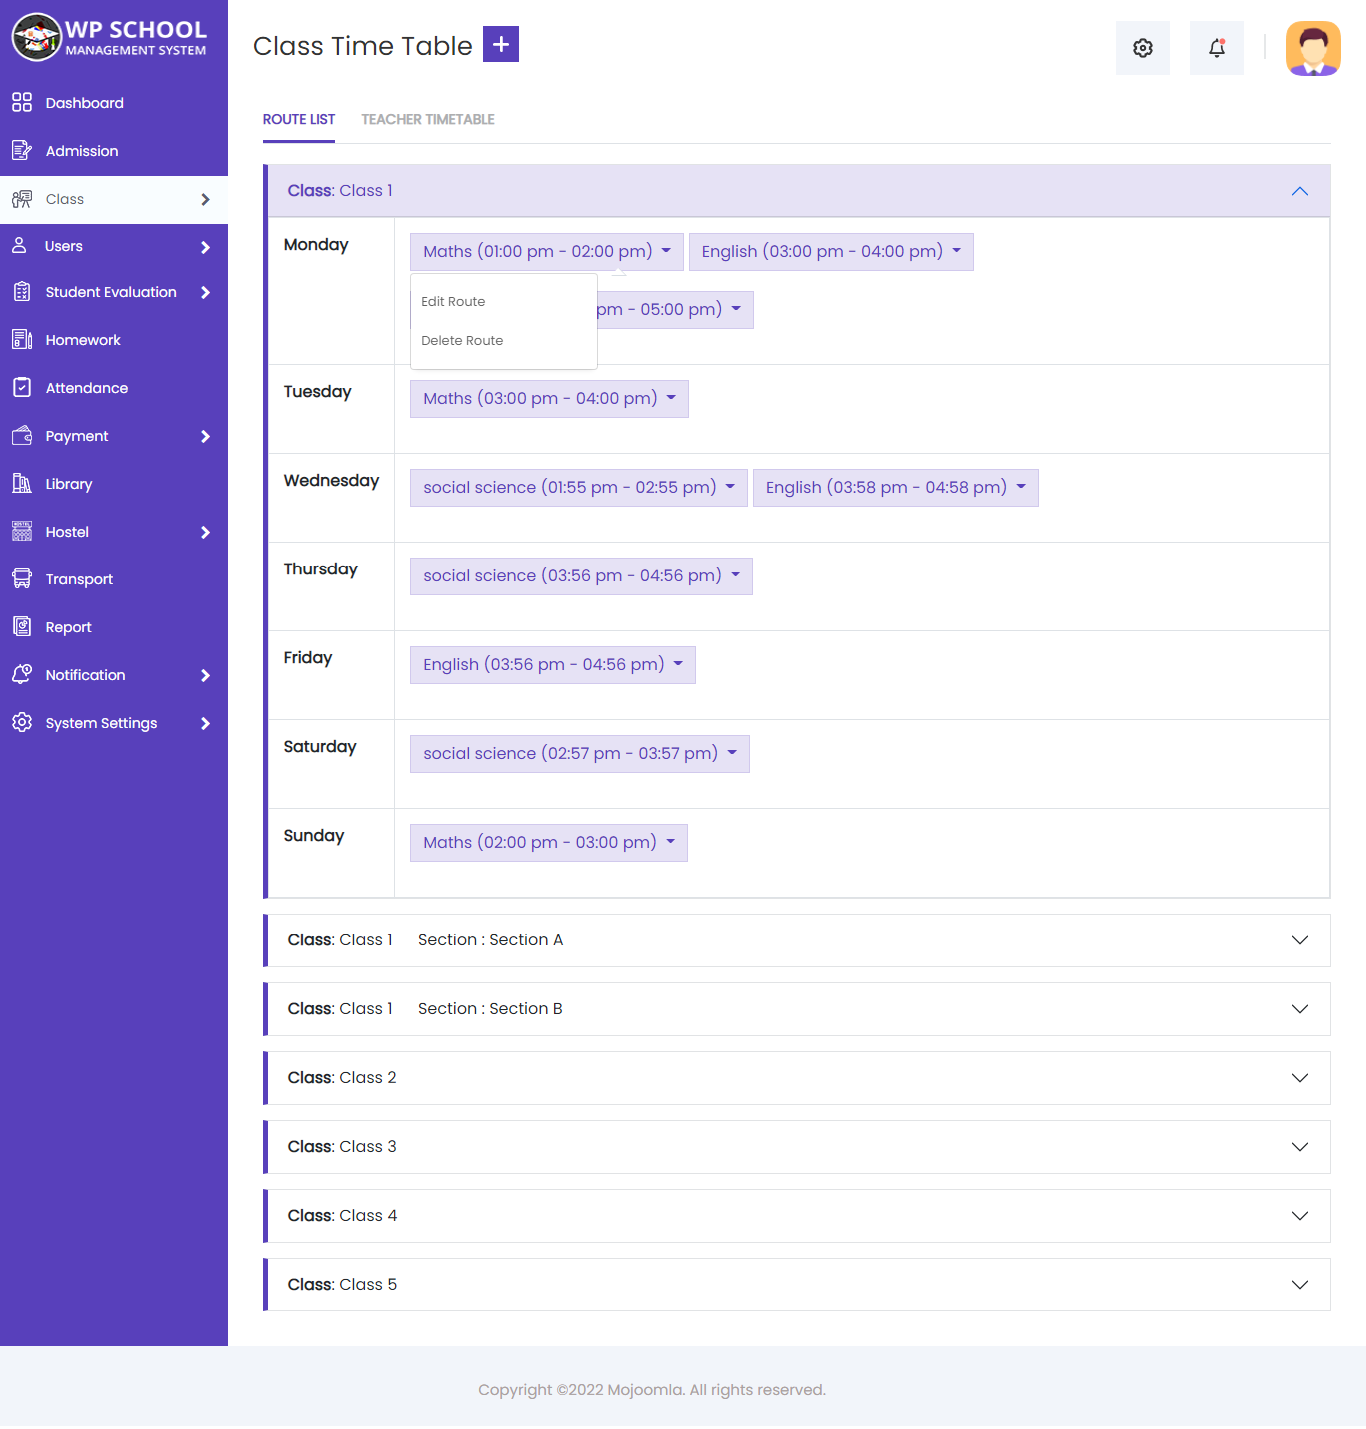
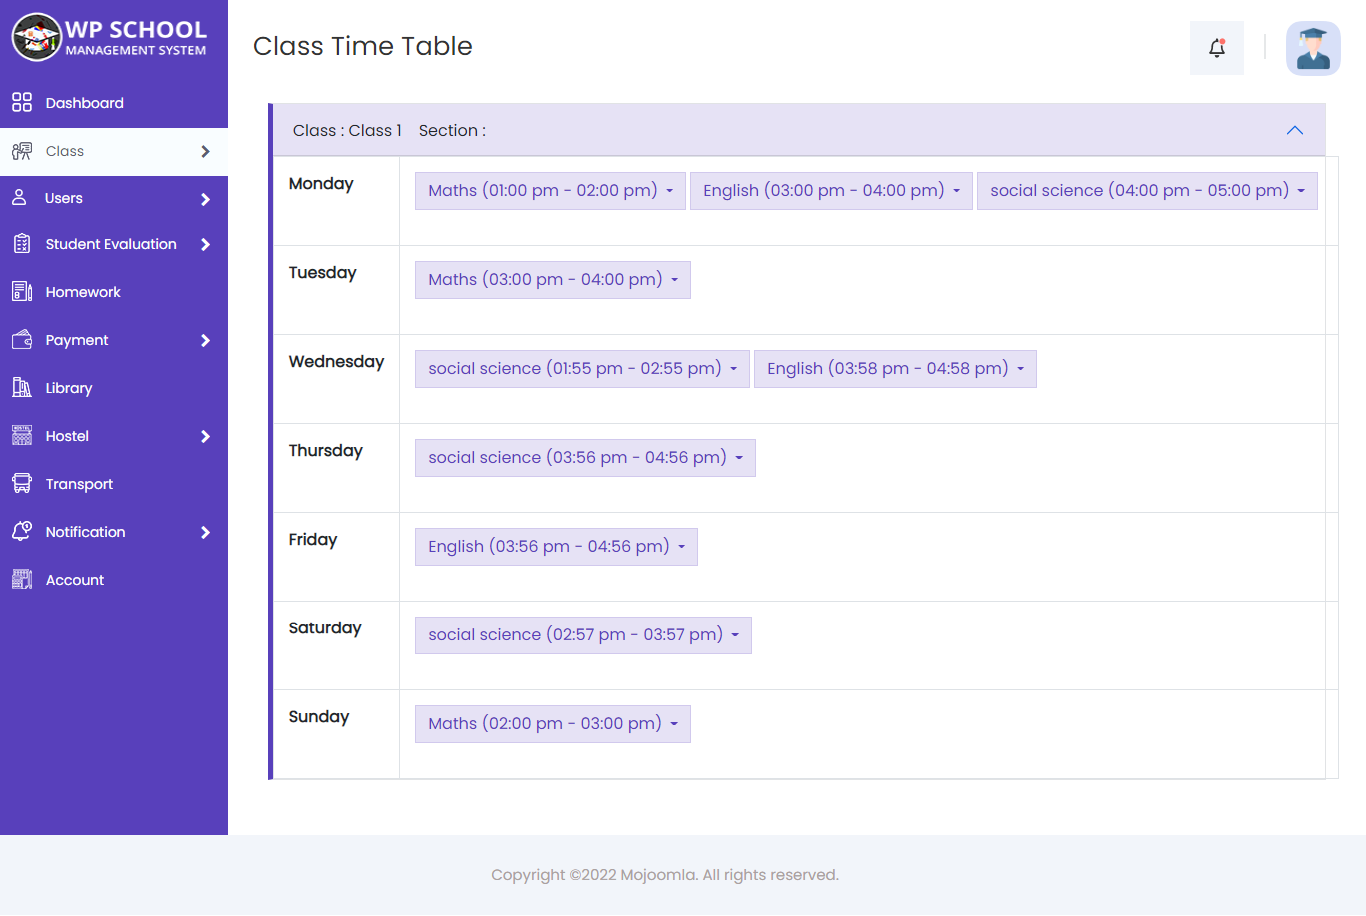
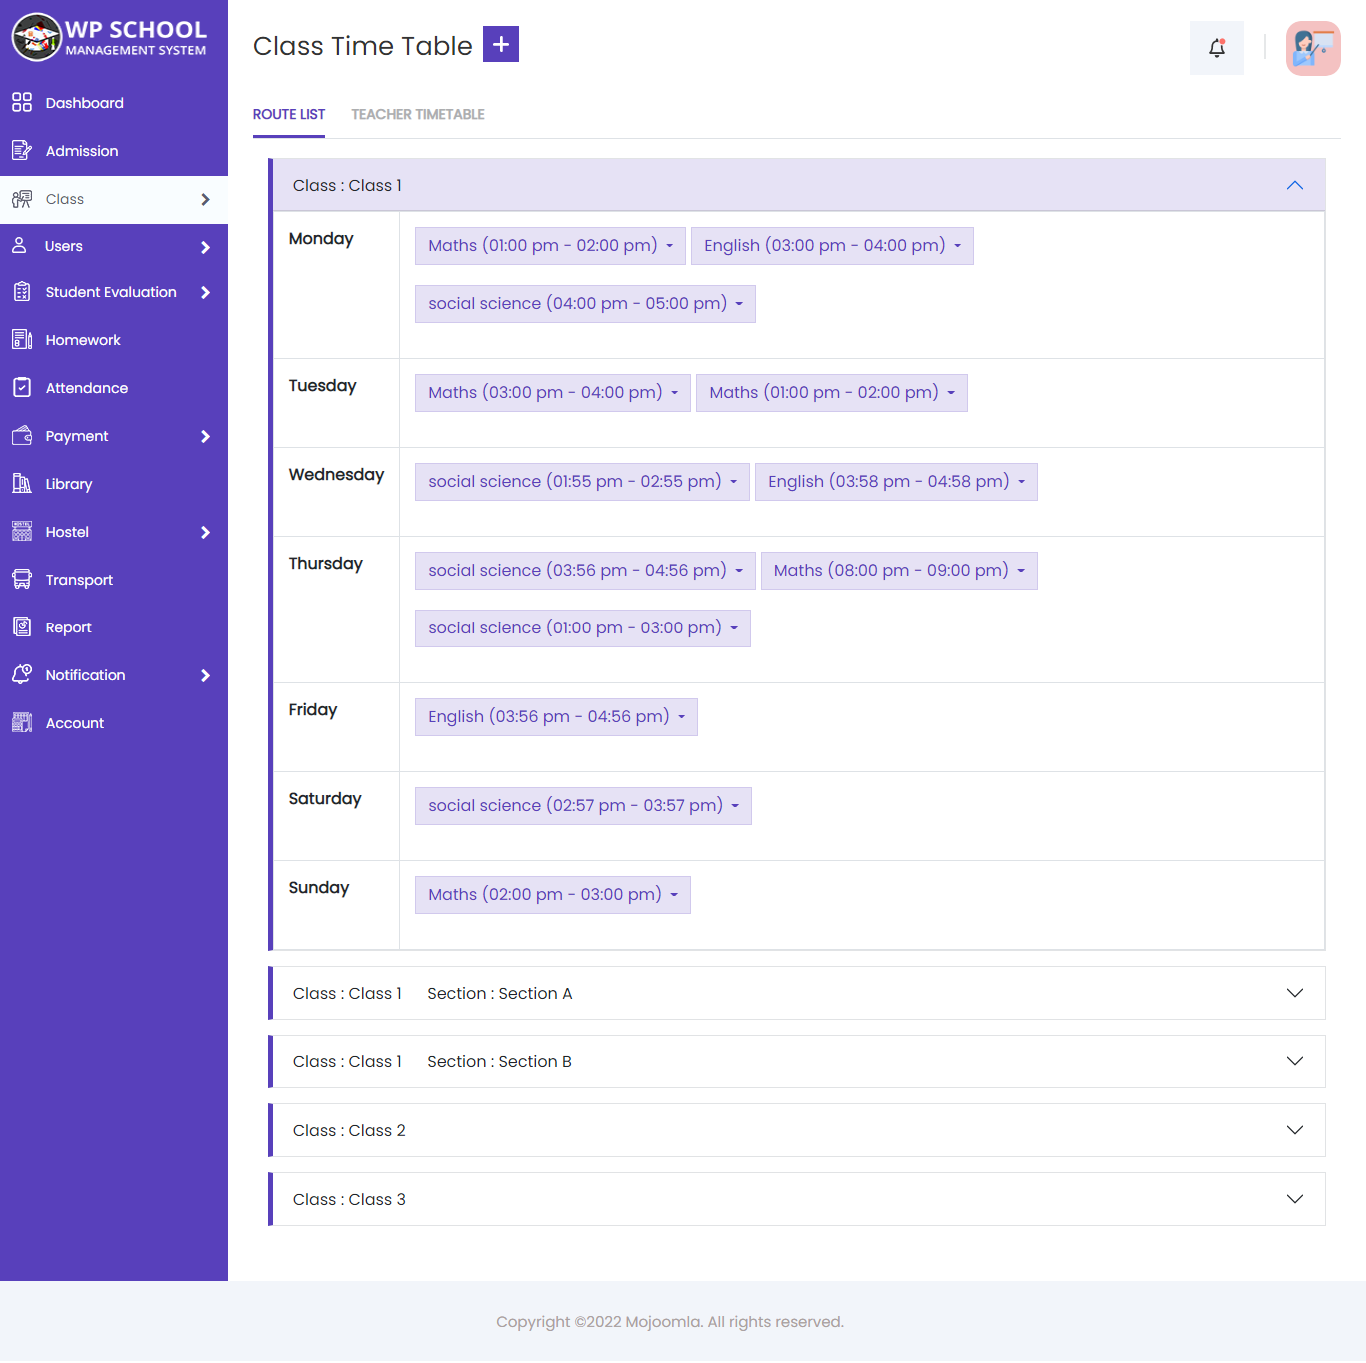
12) Class Routine (Timetable)
Here is a listing of all classes. Click on a particular class to view its weekly routine showing subjects, teachers, and time slots for each period.
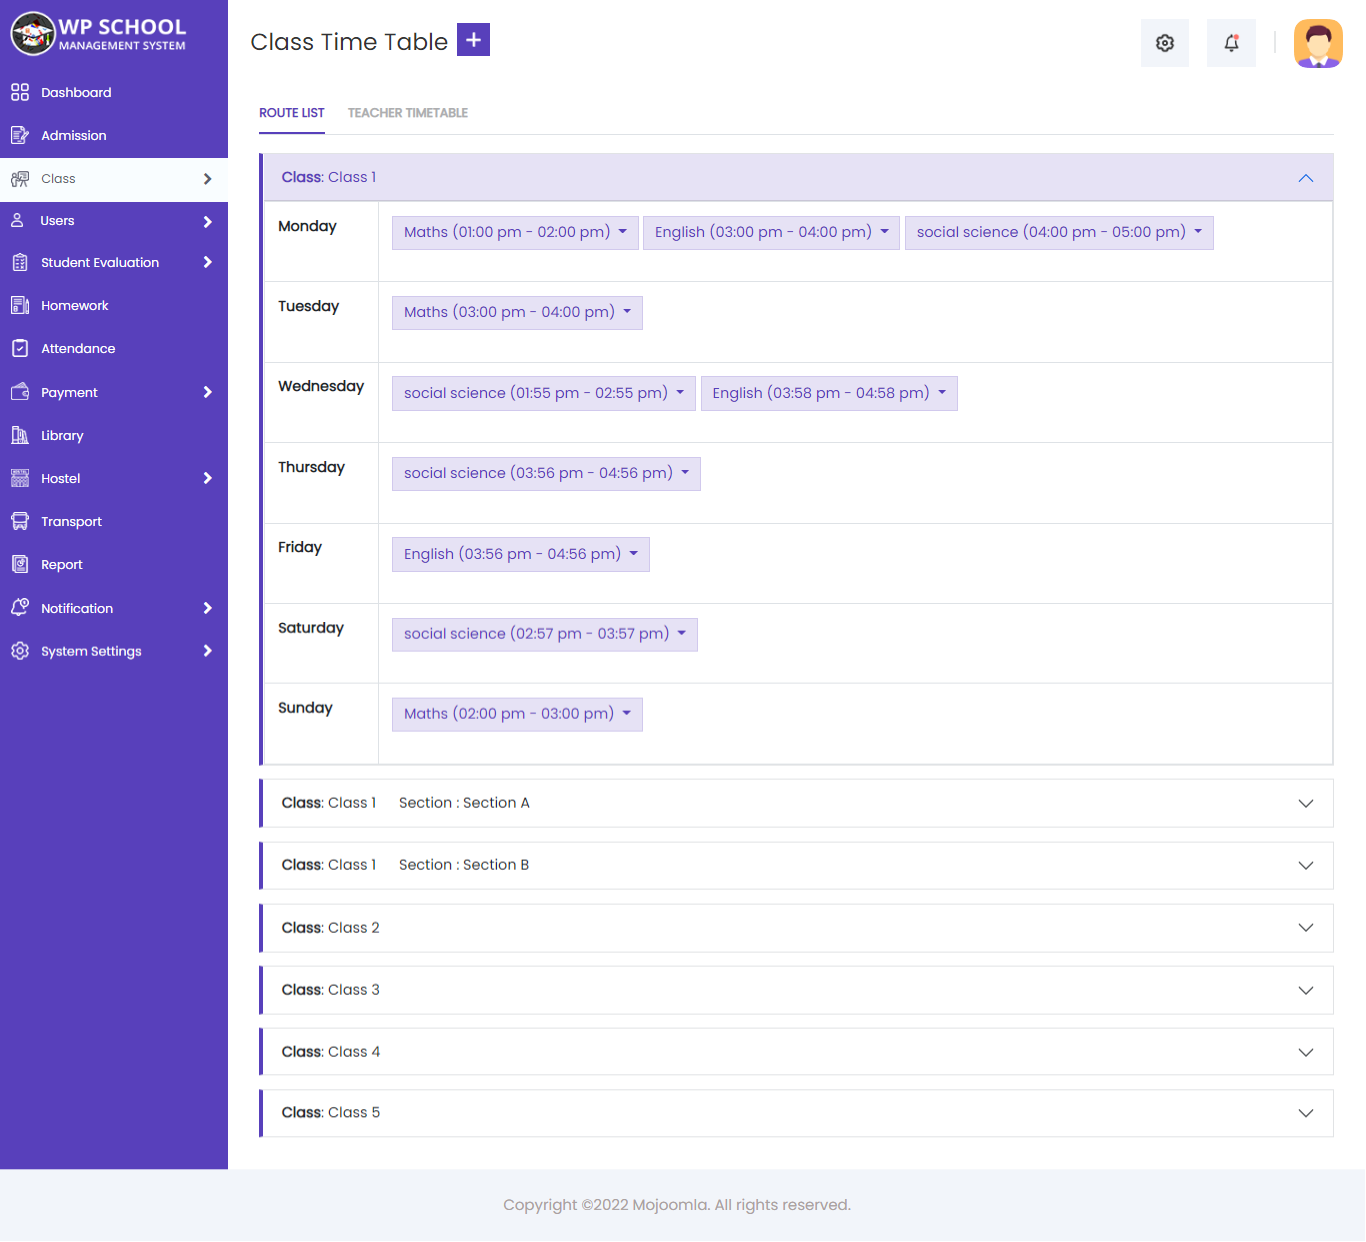
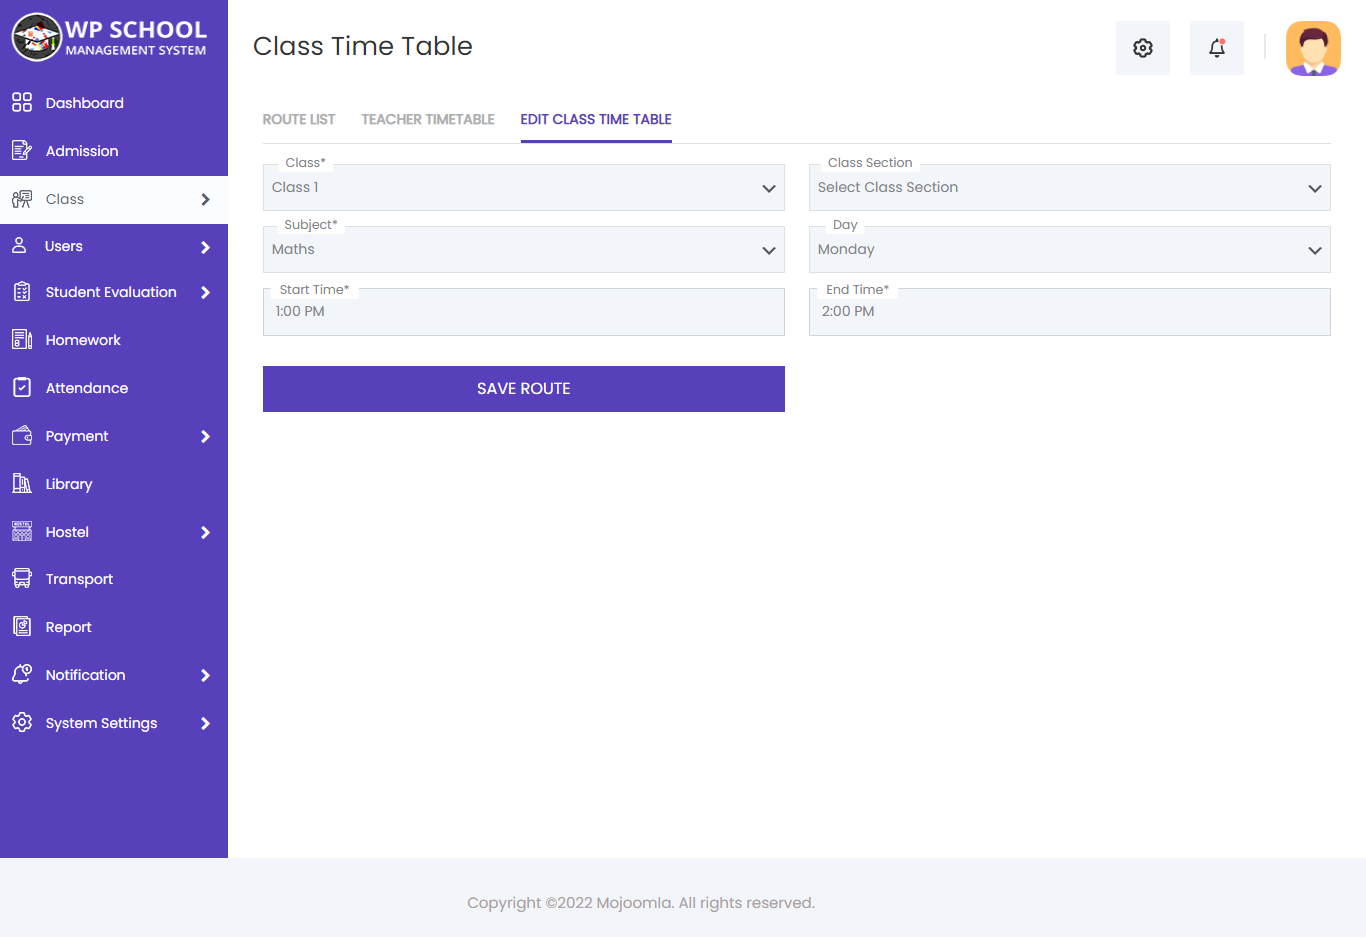
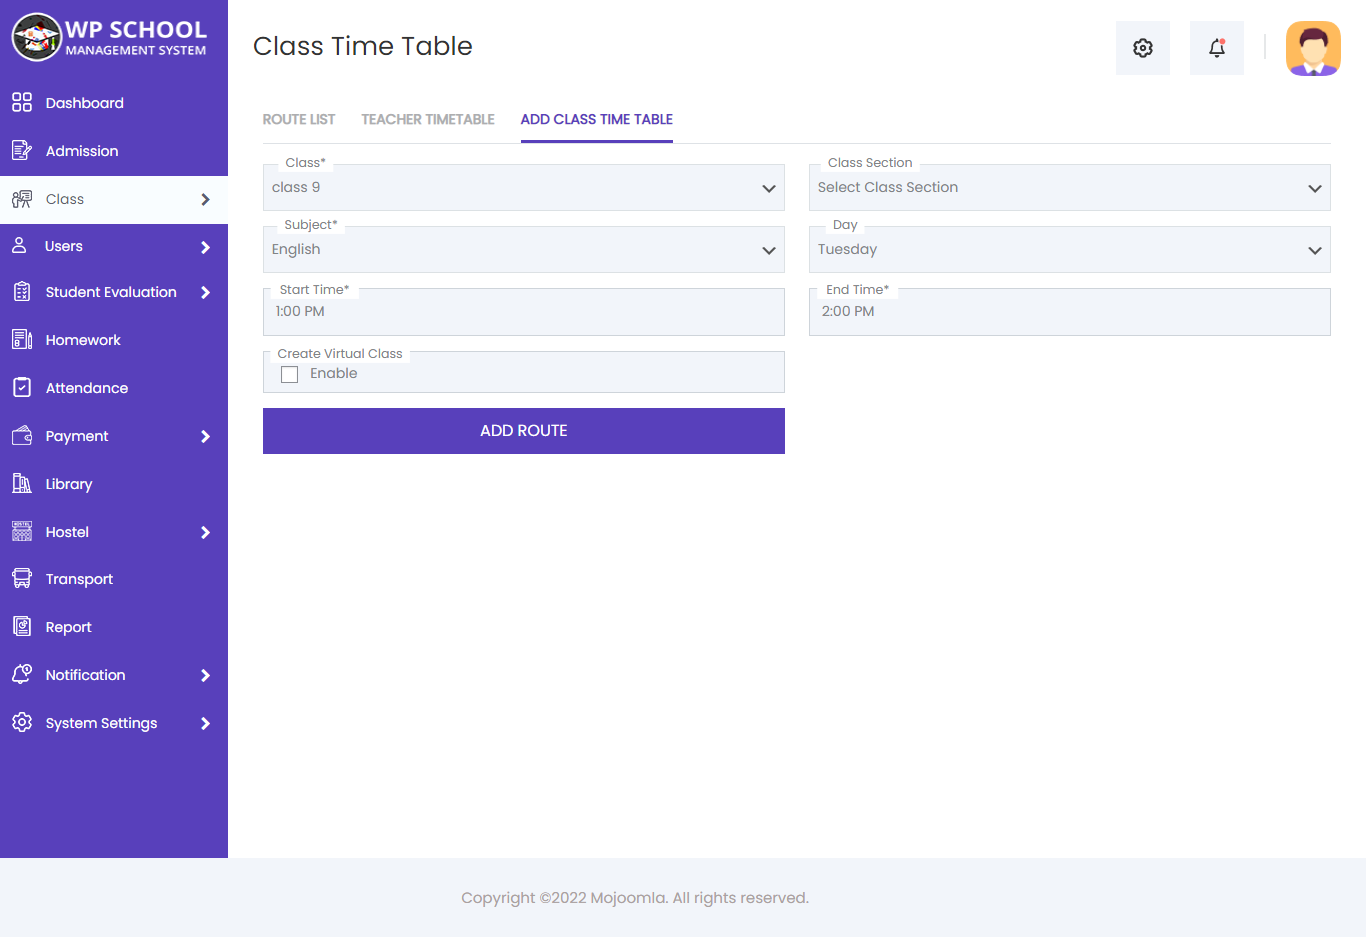
Add Class Timetable
Click Add Class Routine to schedule a new period. Select the class, section, subject, day of the week, and start/end time for the period.
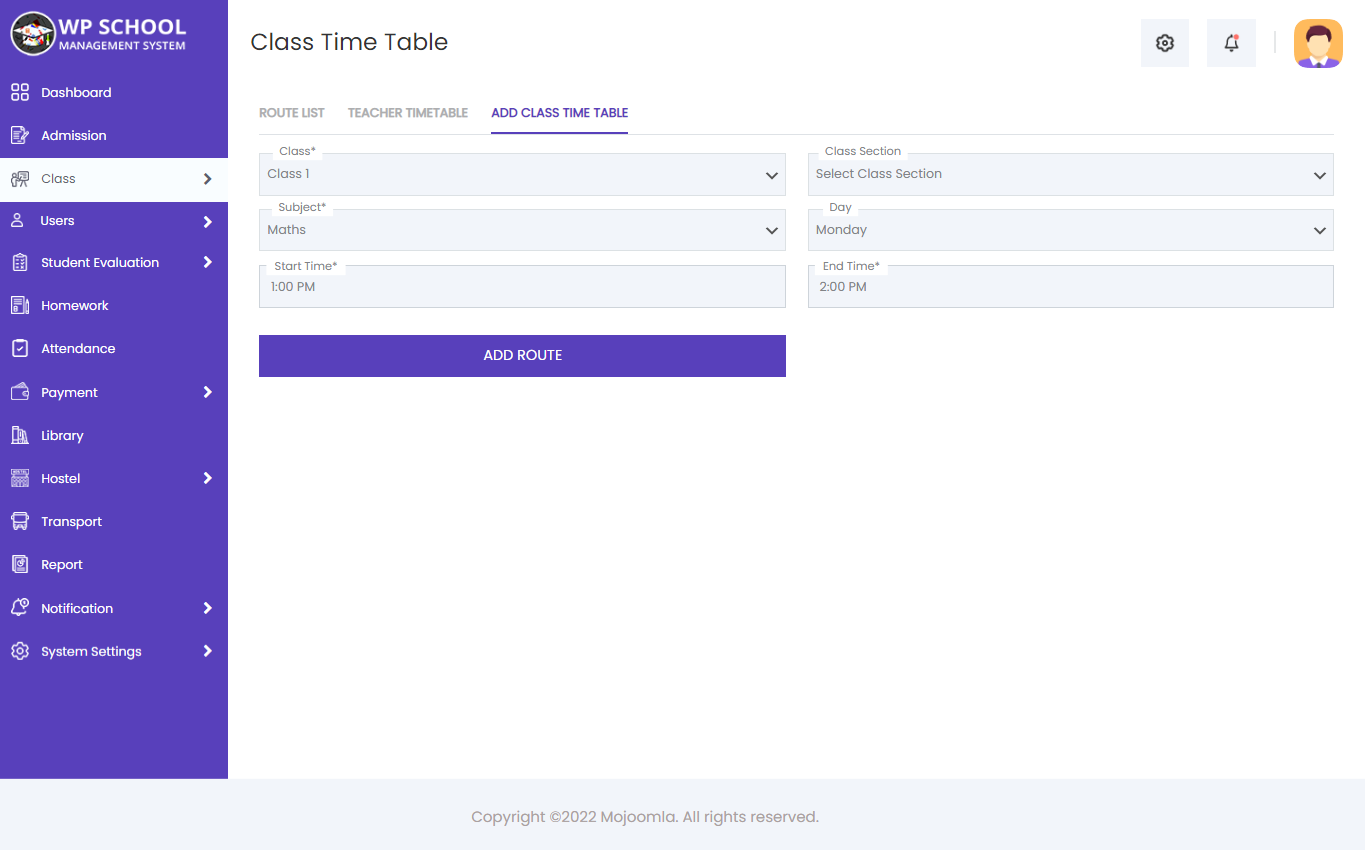
| Field | Description |
|---|---|
| Class / Section | Target class and section |
| Subject Name | Subject to schedule for this period |
| Day | Day of the week |
| Start Time | Period start time |
| End Time | Period end time |
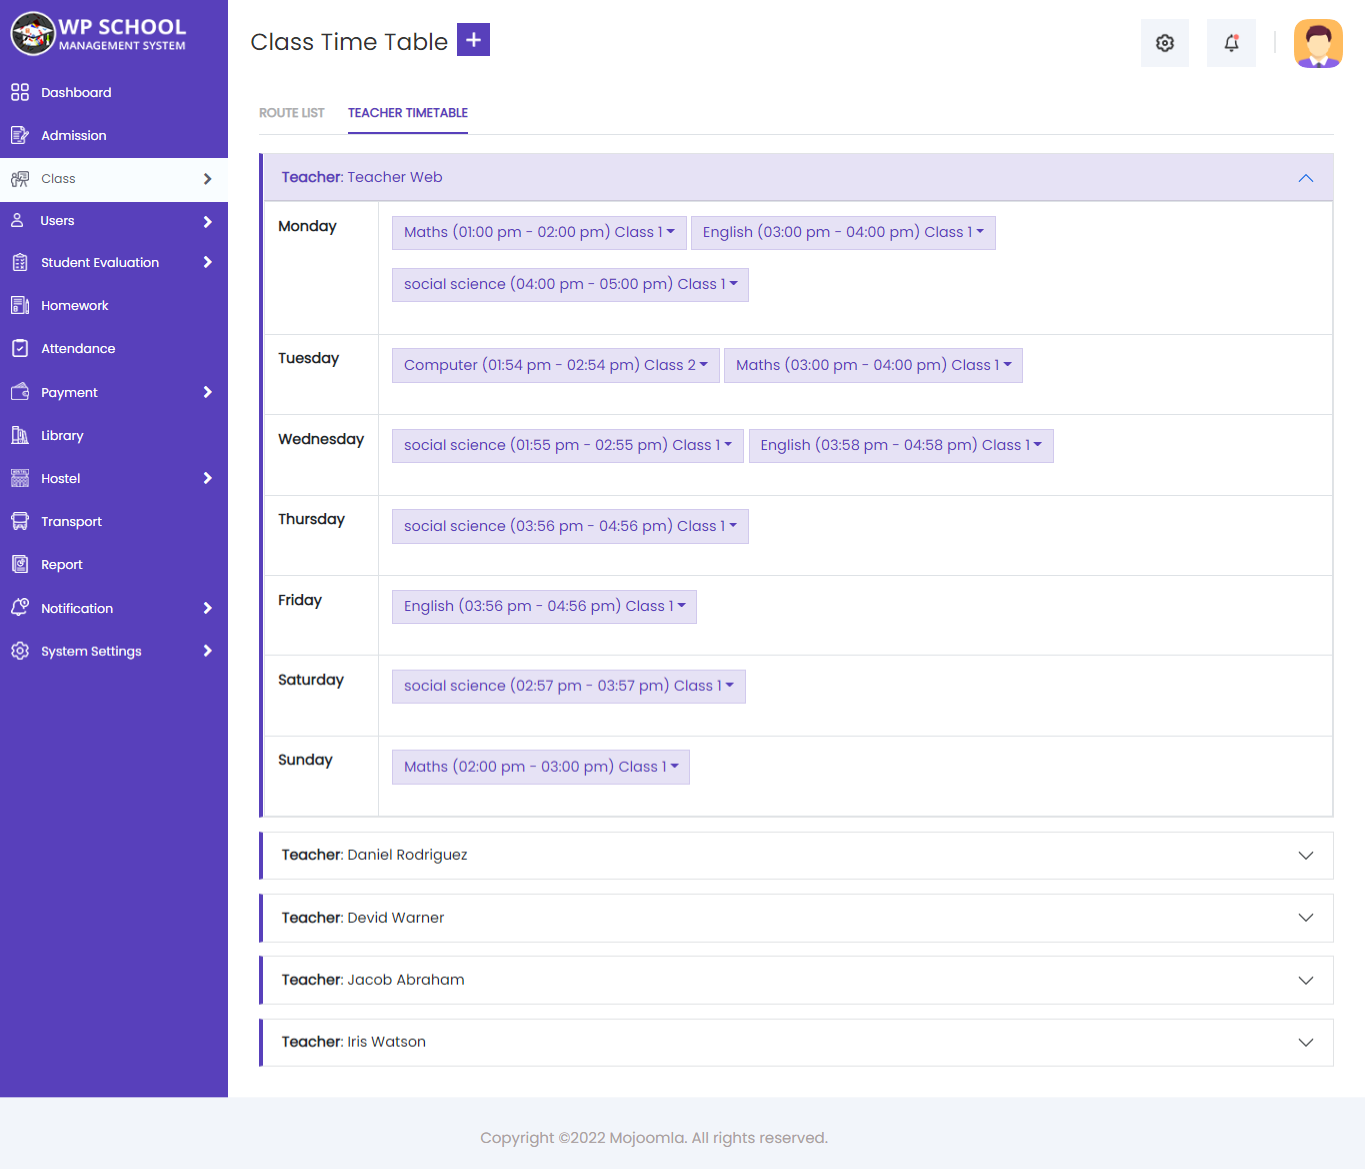
Teacher Timetable
Here you can see each teacher's timetable separately — all classes and periods assigned to a specific teacher across the week.
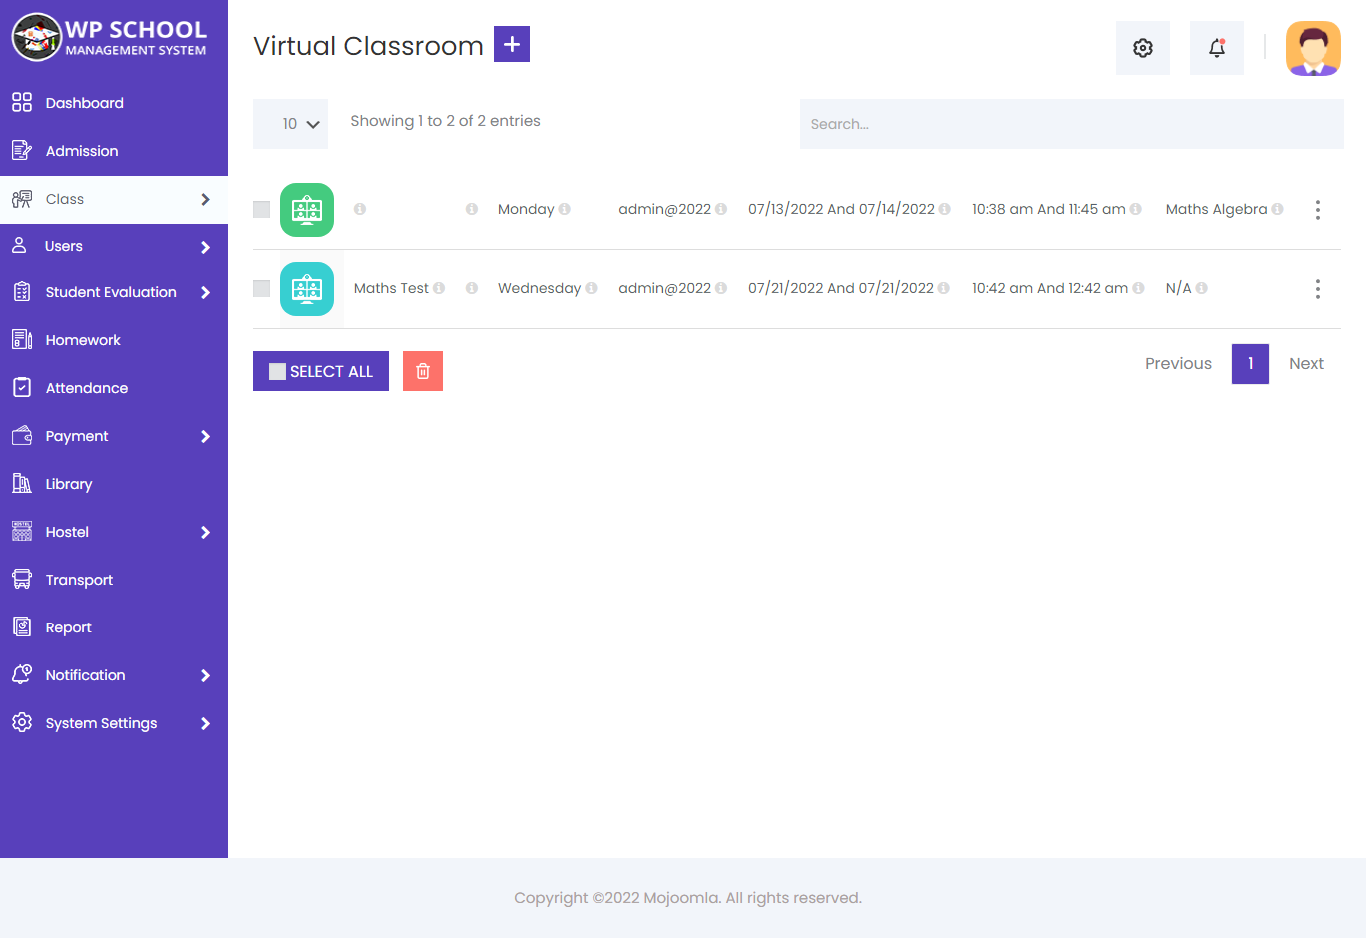
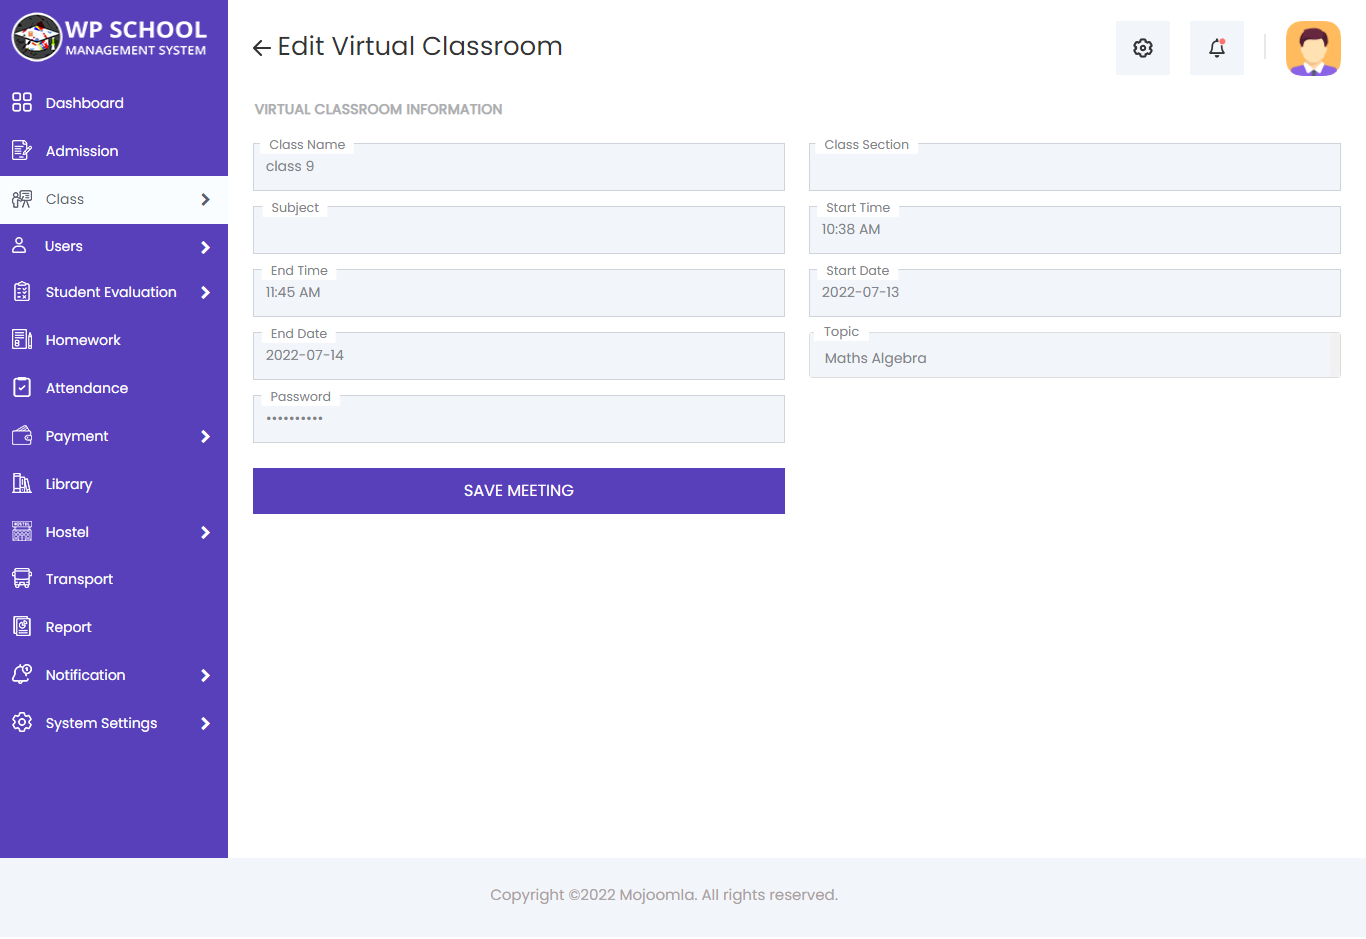
Create Virtual Class
Here you can create a virtual classroom session integrated with Zoom. Requires Zoom Client ID and Secret configured in General Settings.
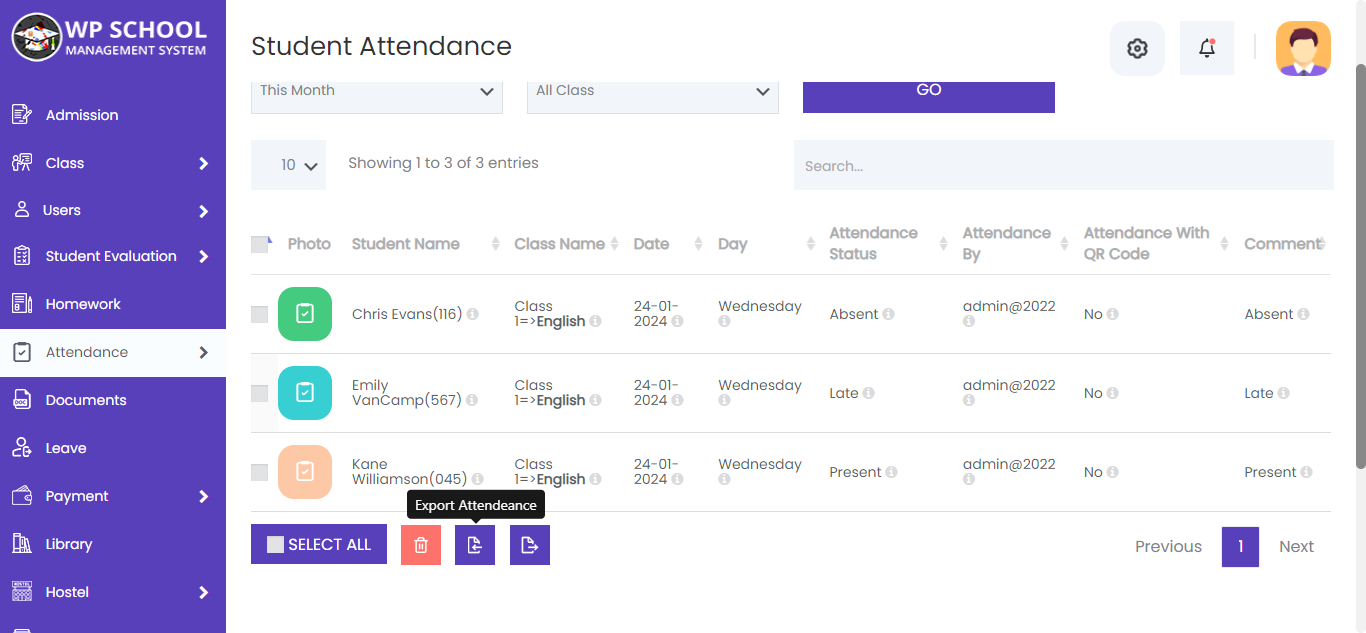
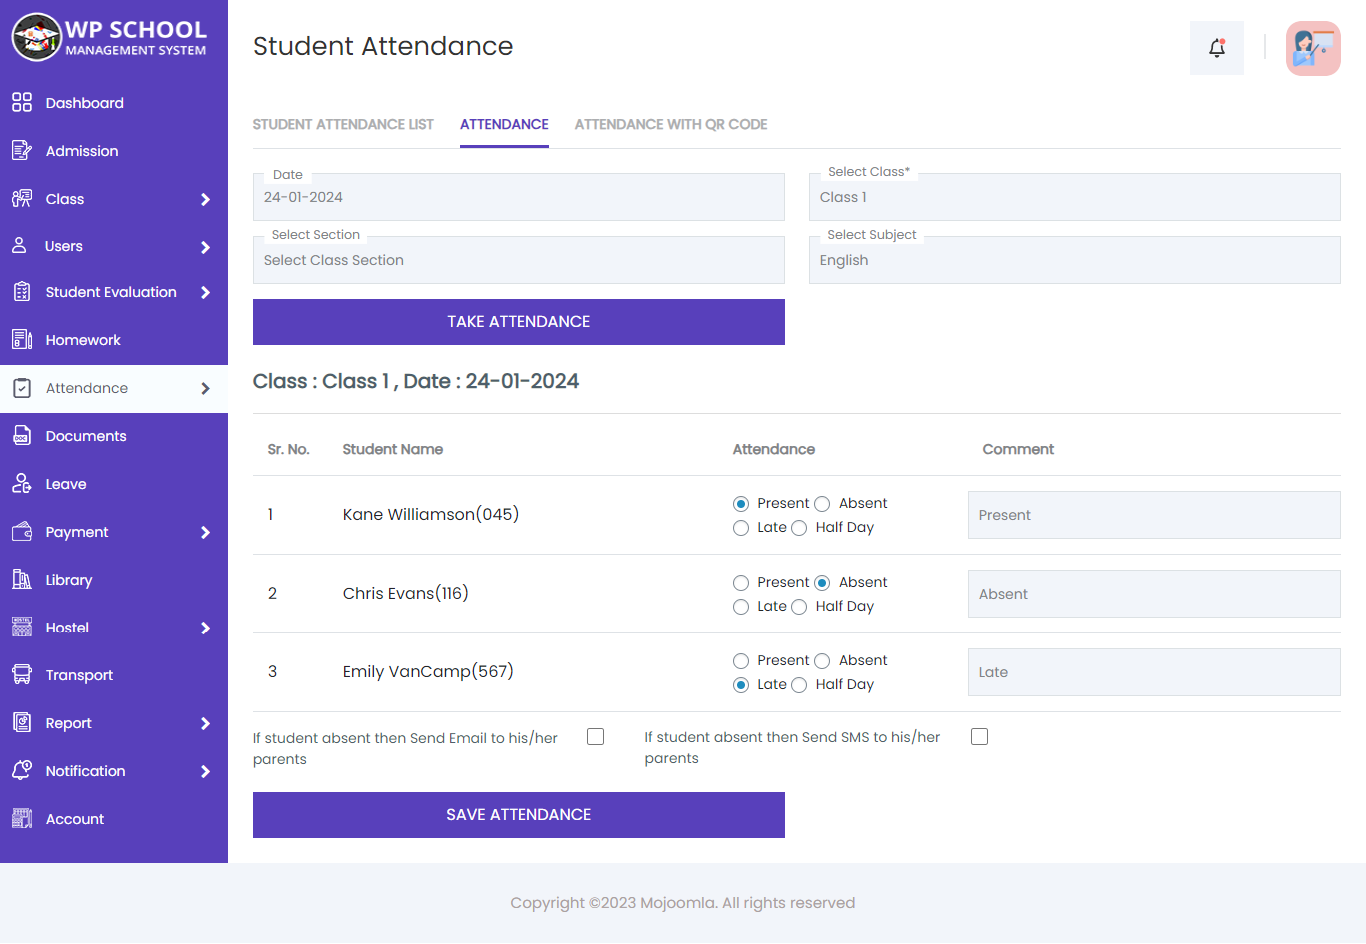
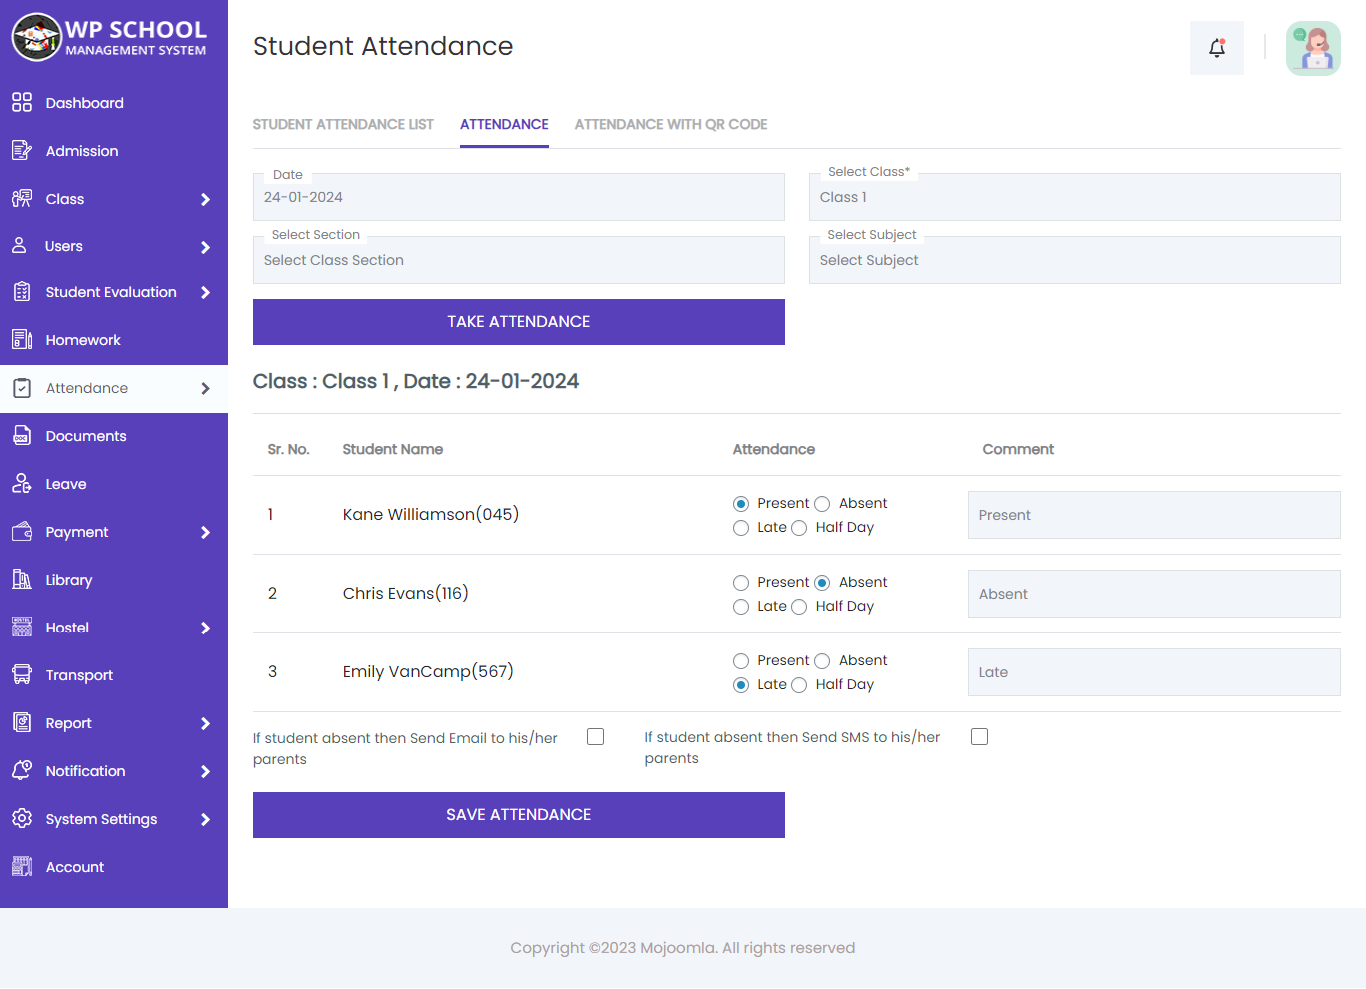
13) Attendance
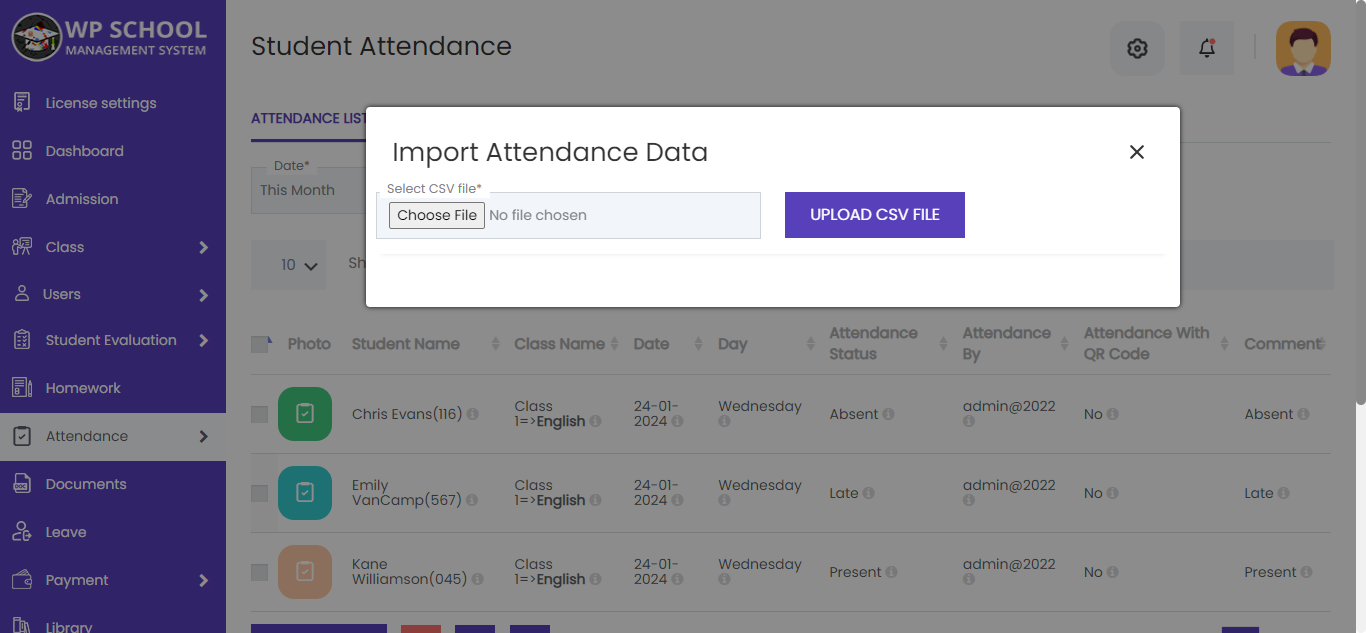
Manage daily attendance of students and teachers. You can also upload attendance via CSV or mark attendance using QR code scanning.
Student Attendance
Class-wise attendance for students. Select the date and class, then click Take/View Attendance to mark or review attendance. If a student is absent and you want to send an SMS to their parent, check the SMS checkbox.
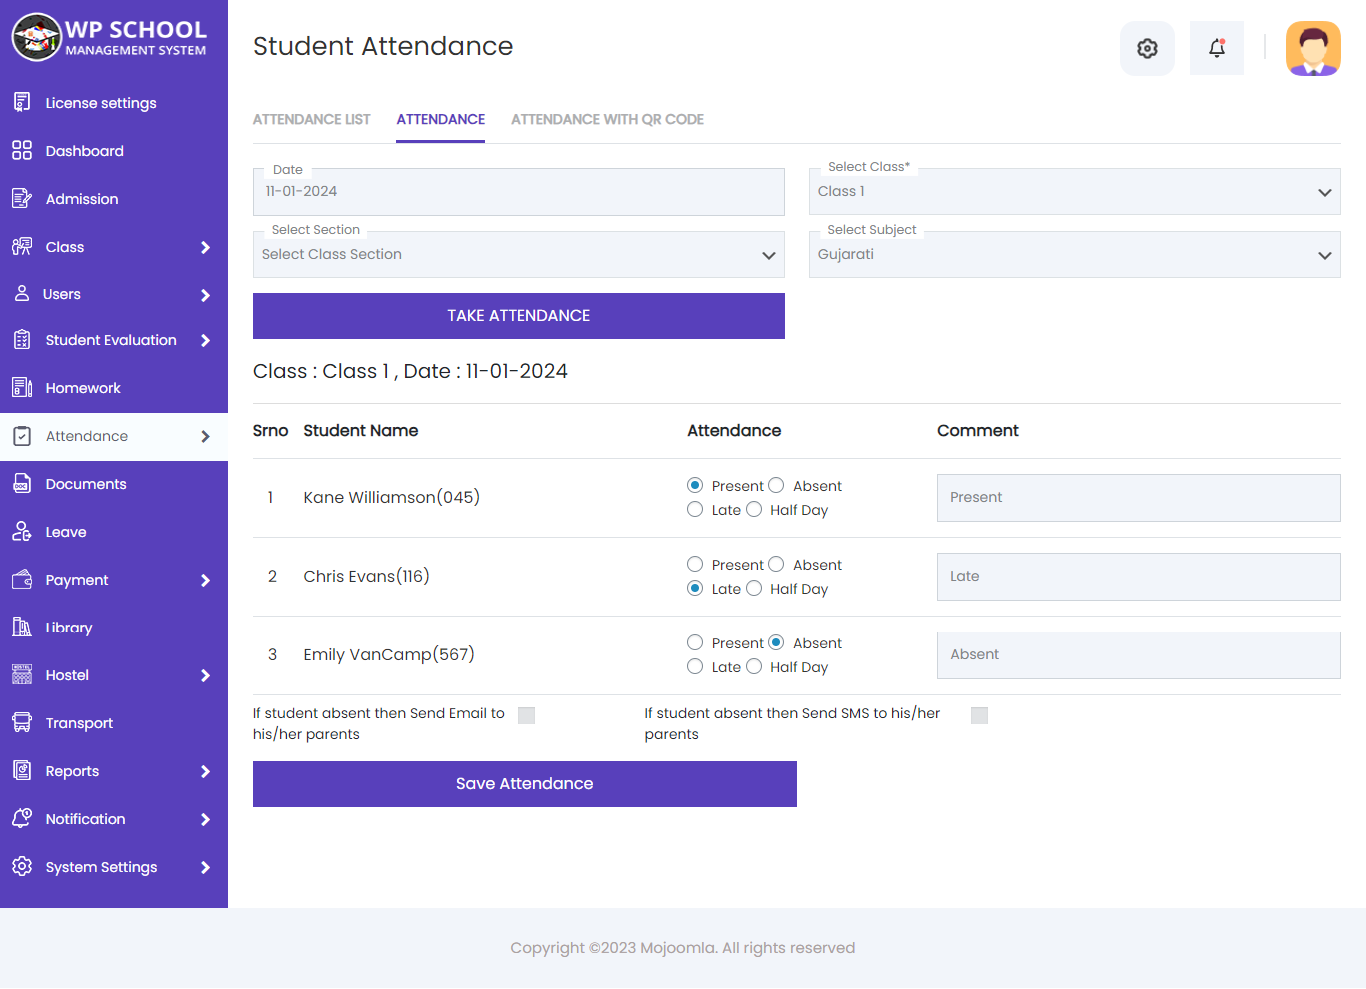
Select date and class, then click Take/View Attendance. Past dates are view-only. Current date is editable. Check the SMS checkbox to notify parents of absent students.
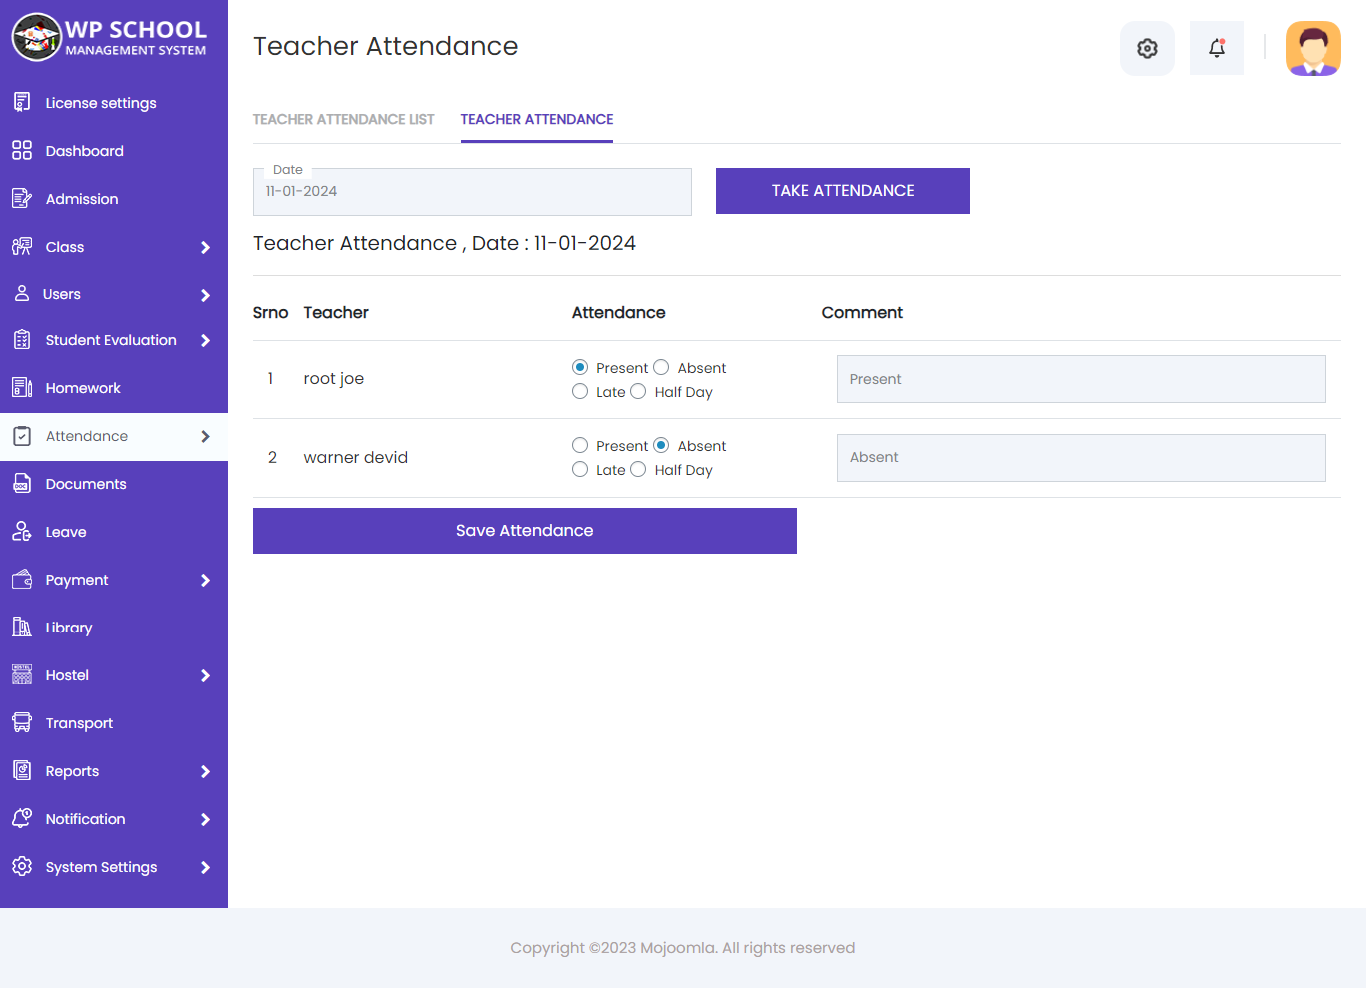
Teacher Attendance
Here you can also take teacher attendance. Select the date and mark each teacher as present, absent, or on leave.
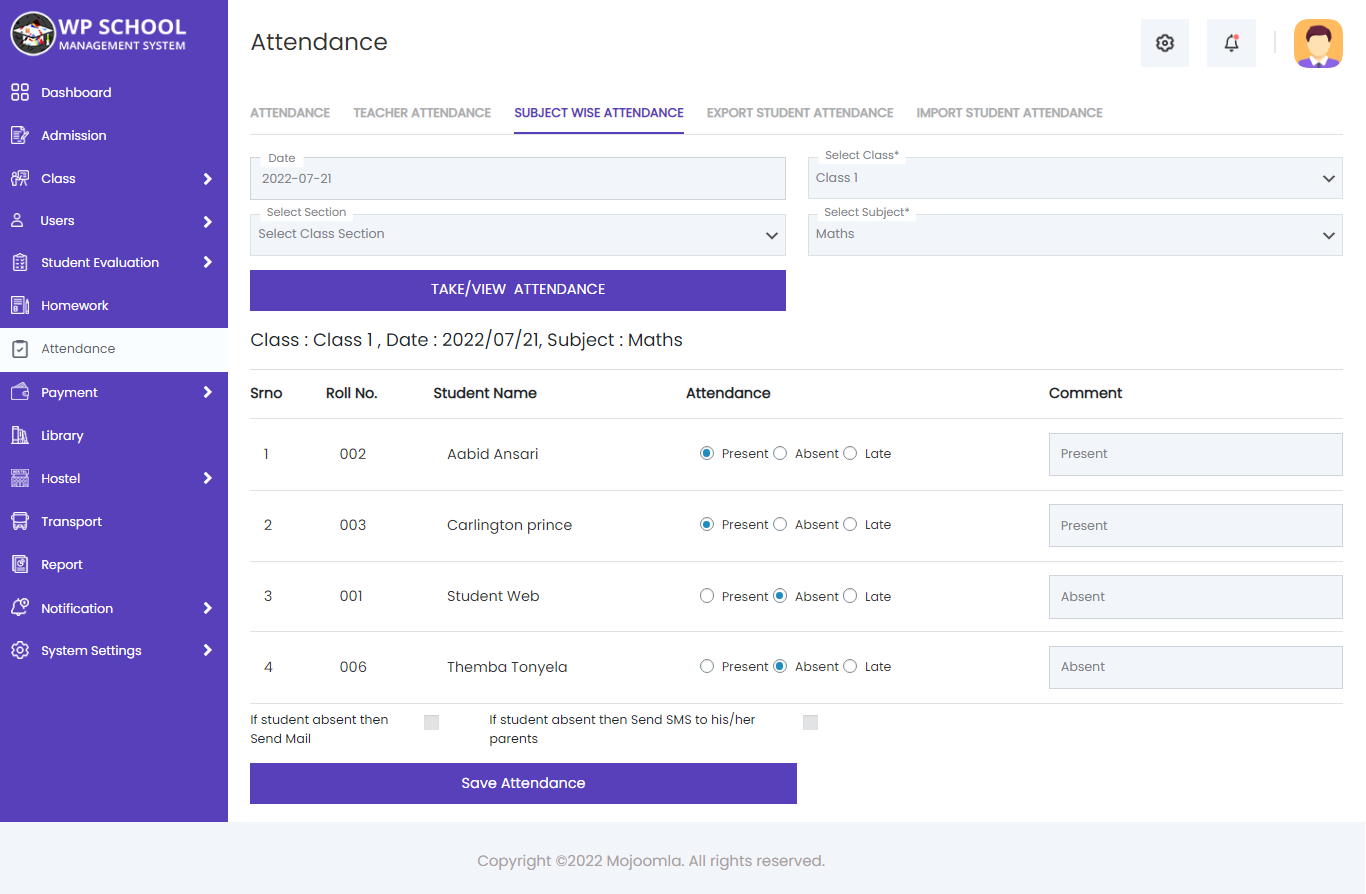
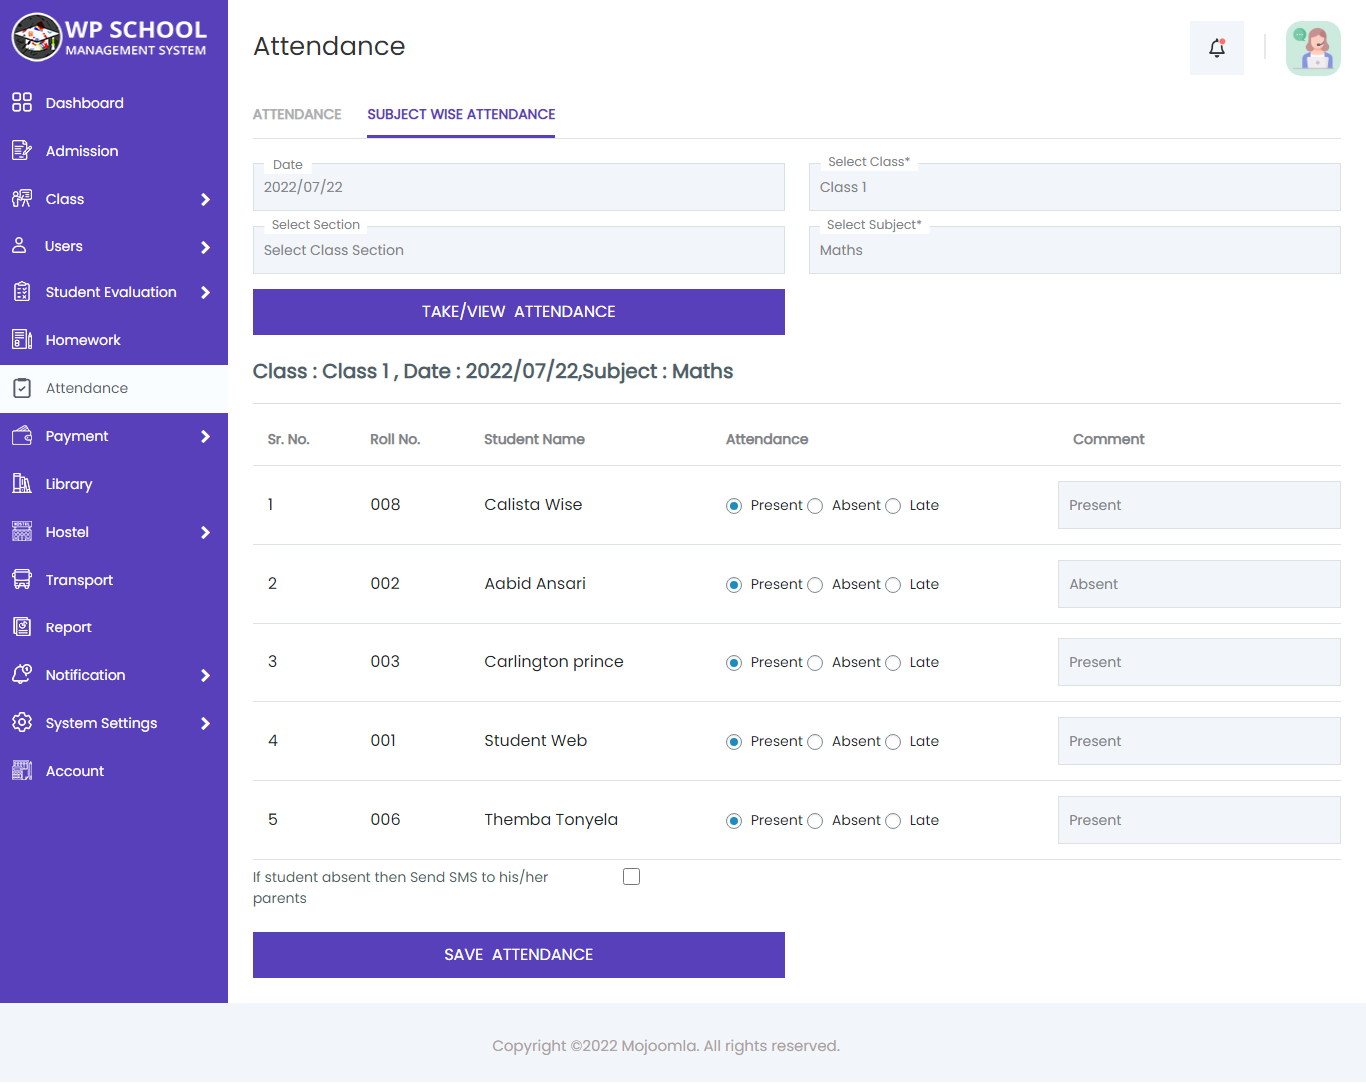
Subject-wise Attendance
Admin can view subject-wise attendance records. Select the class and subject to see detailed per-subject attendance.
QR Code Attendance
You can add attendance by scanning the student's QR code. Ideal for large classes and touchless check-in environments.
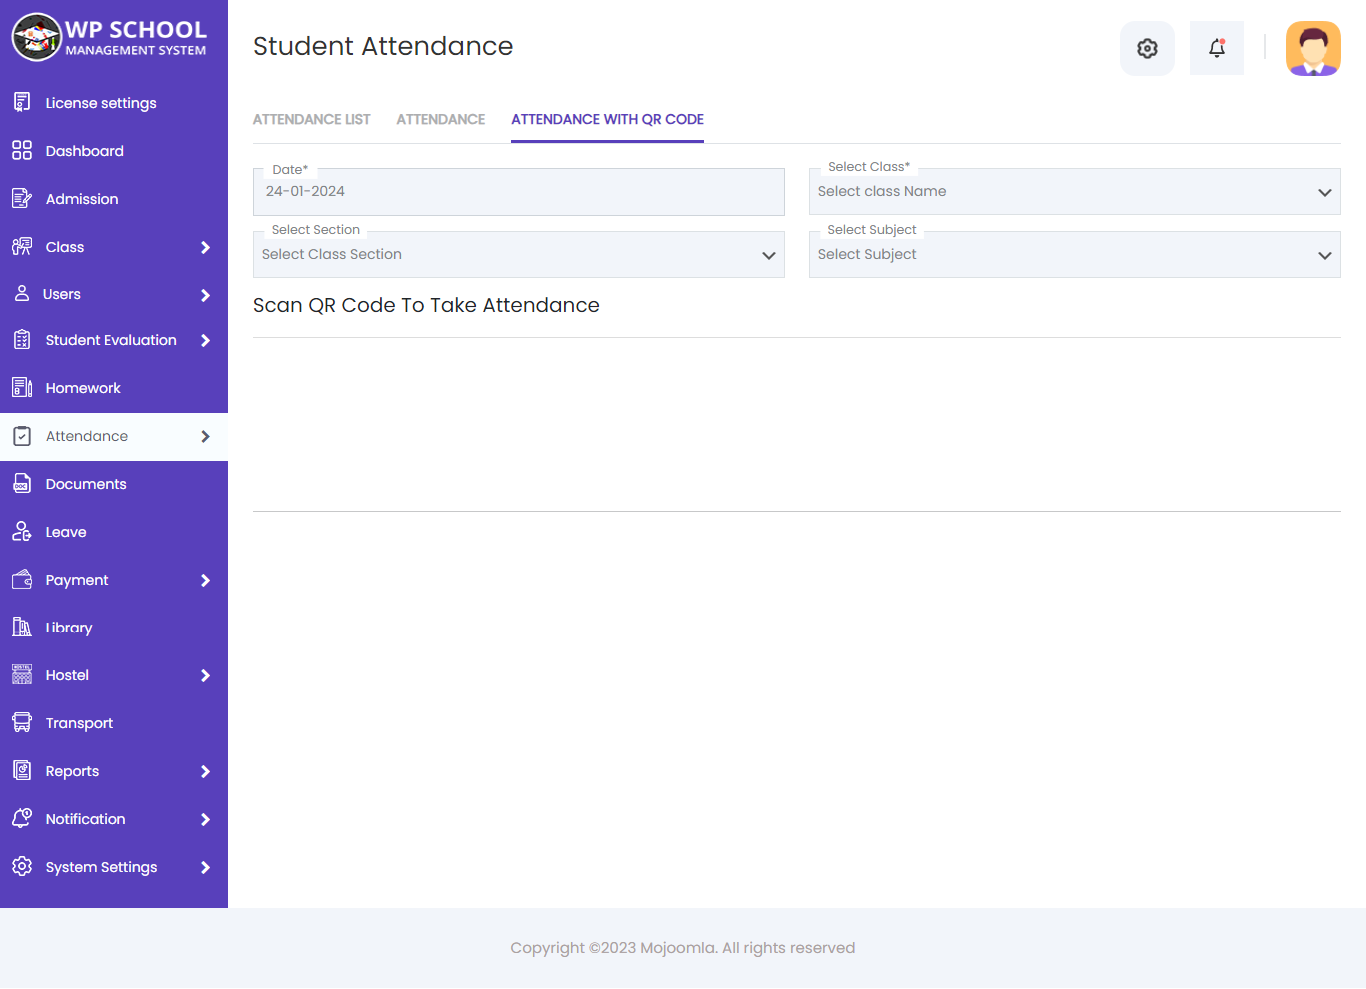
Mark attendance by scanning student QR codes — ideal for large classes or touchless check-in.
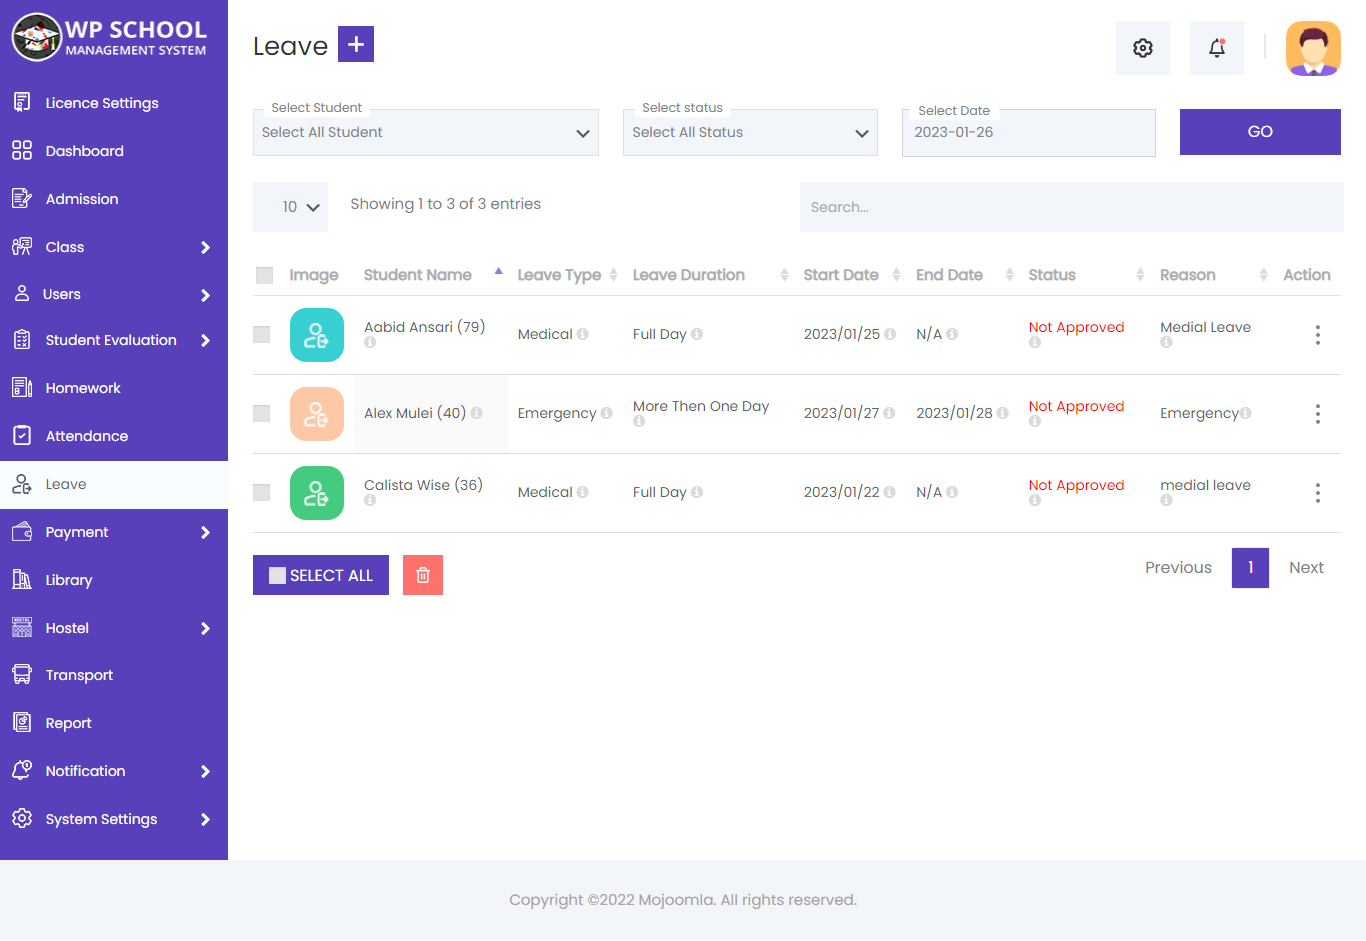
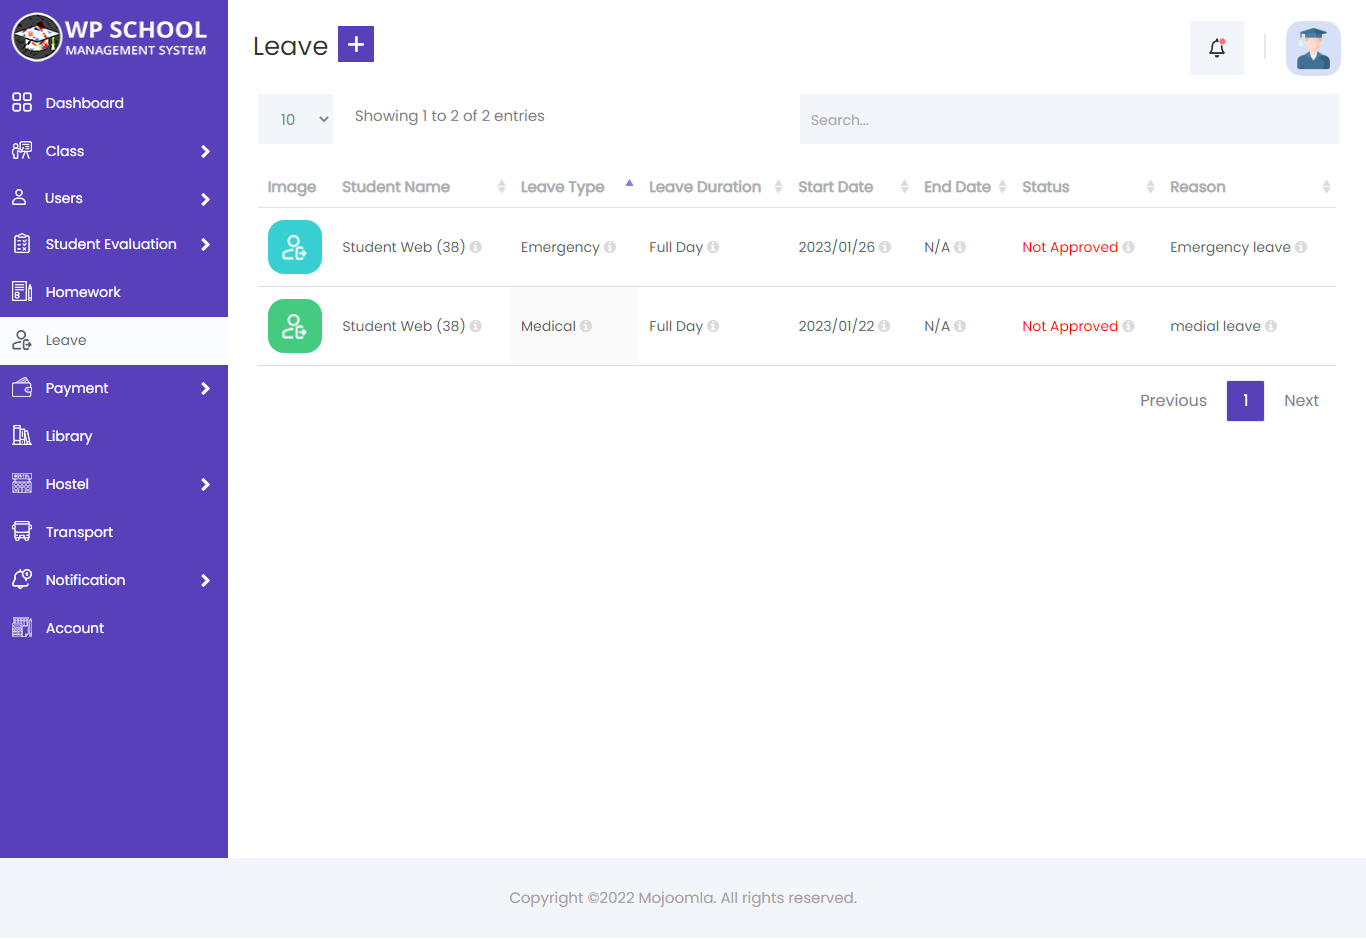
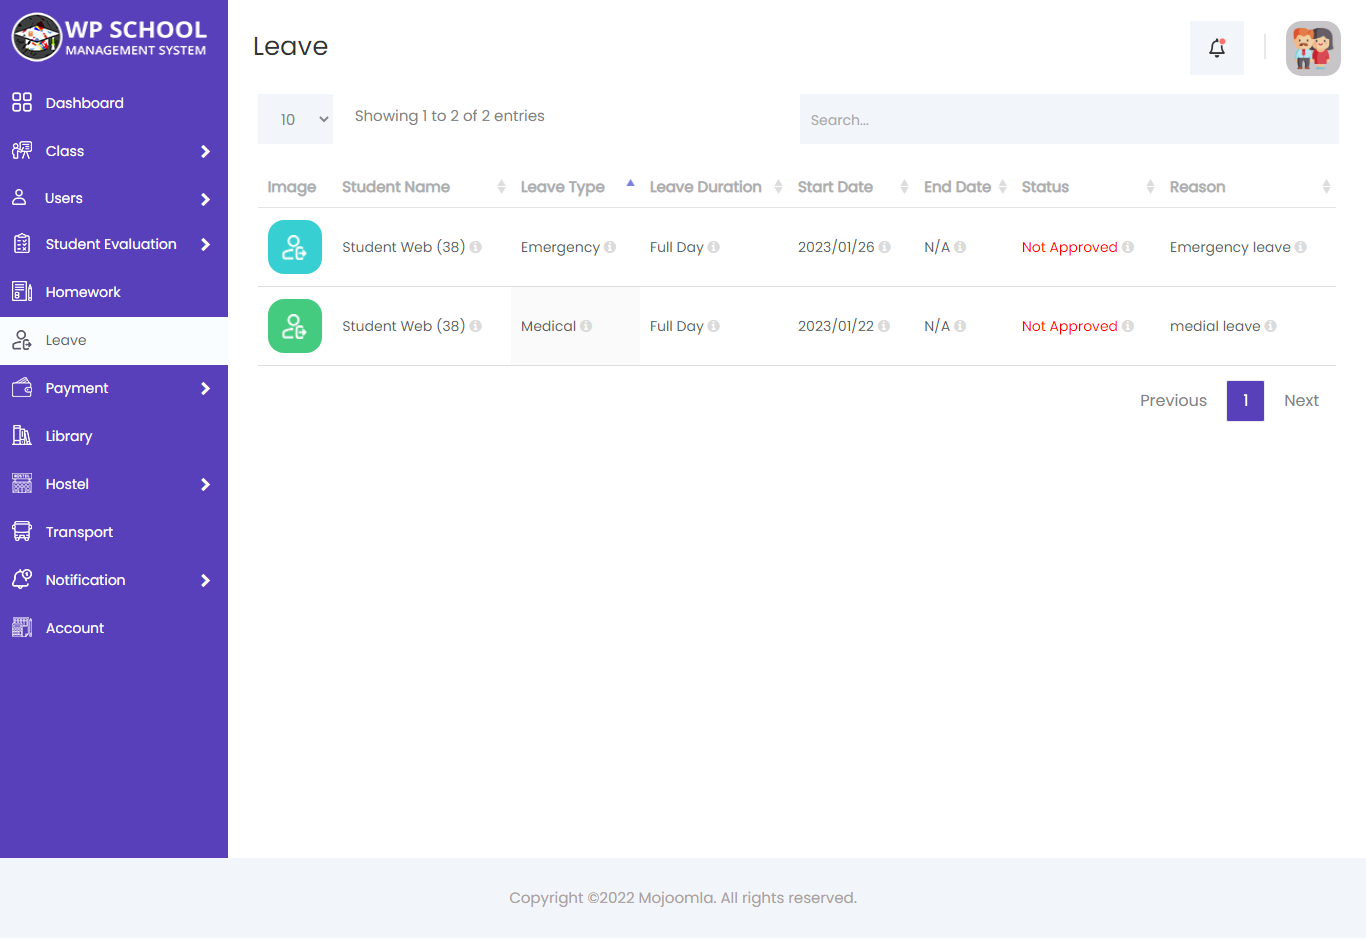
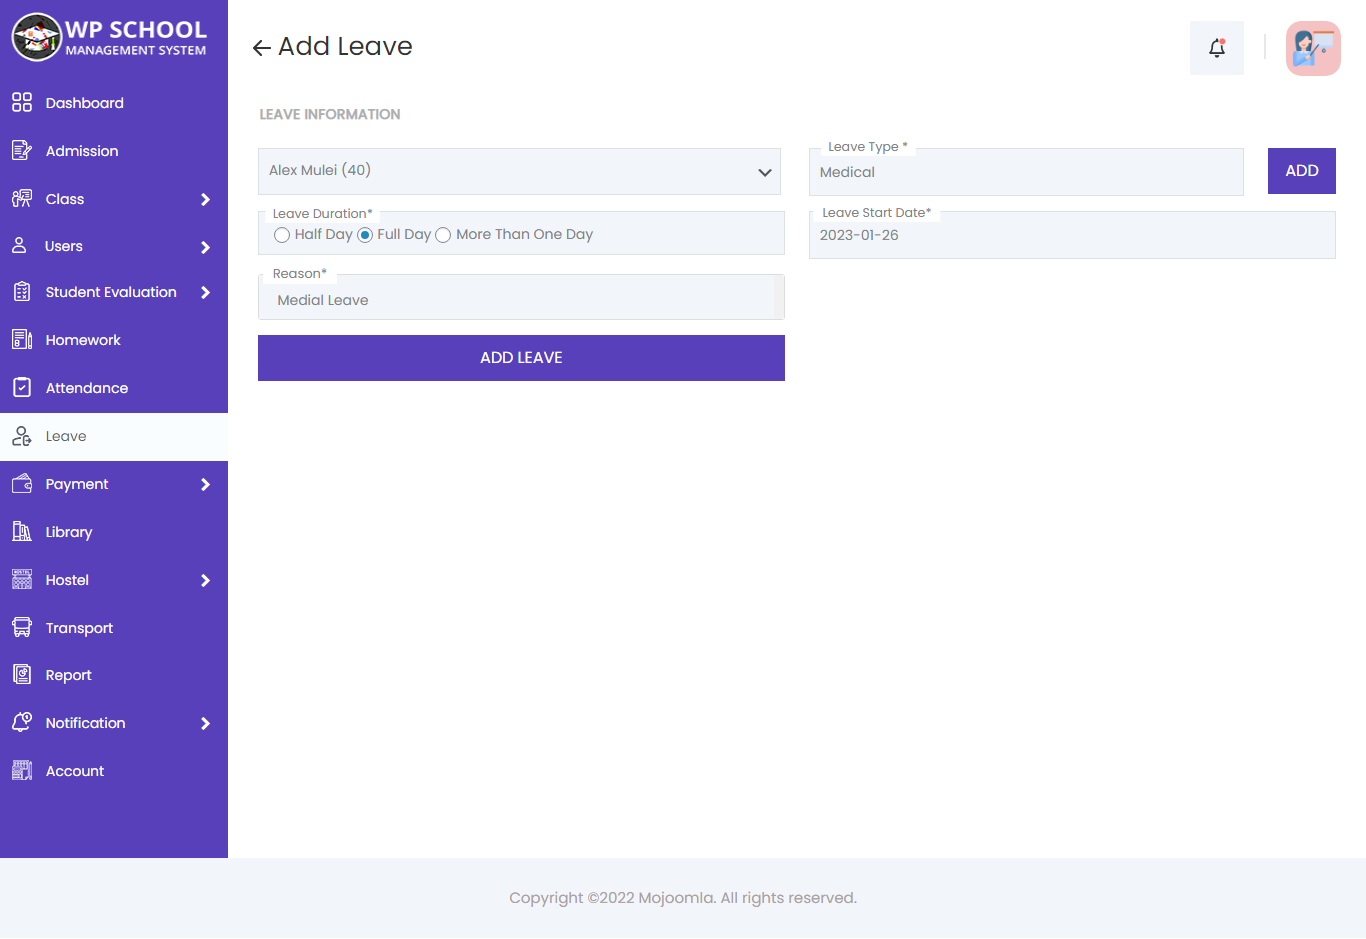
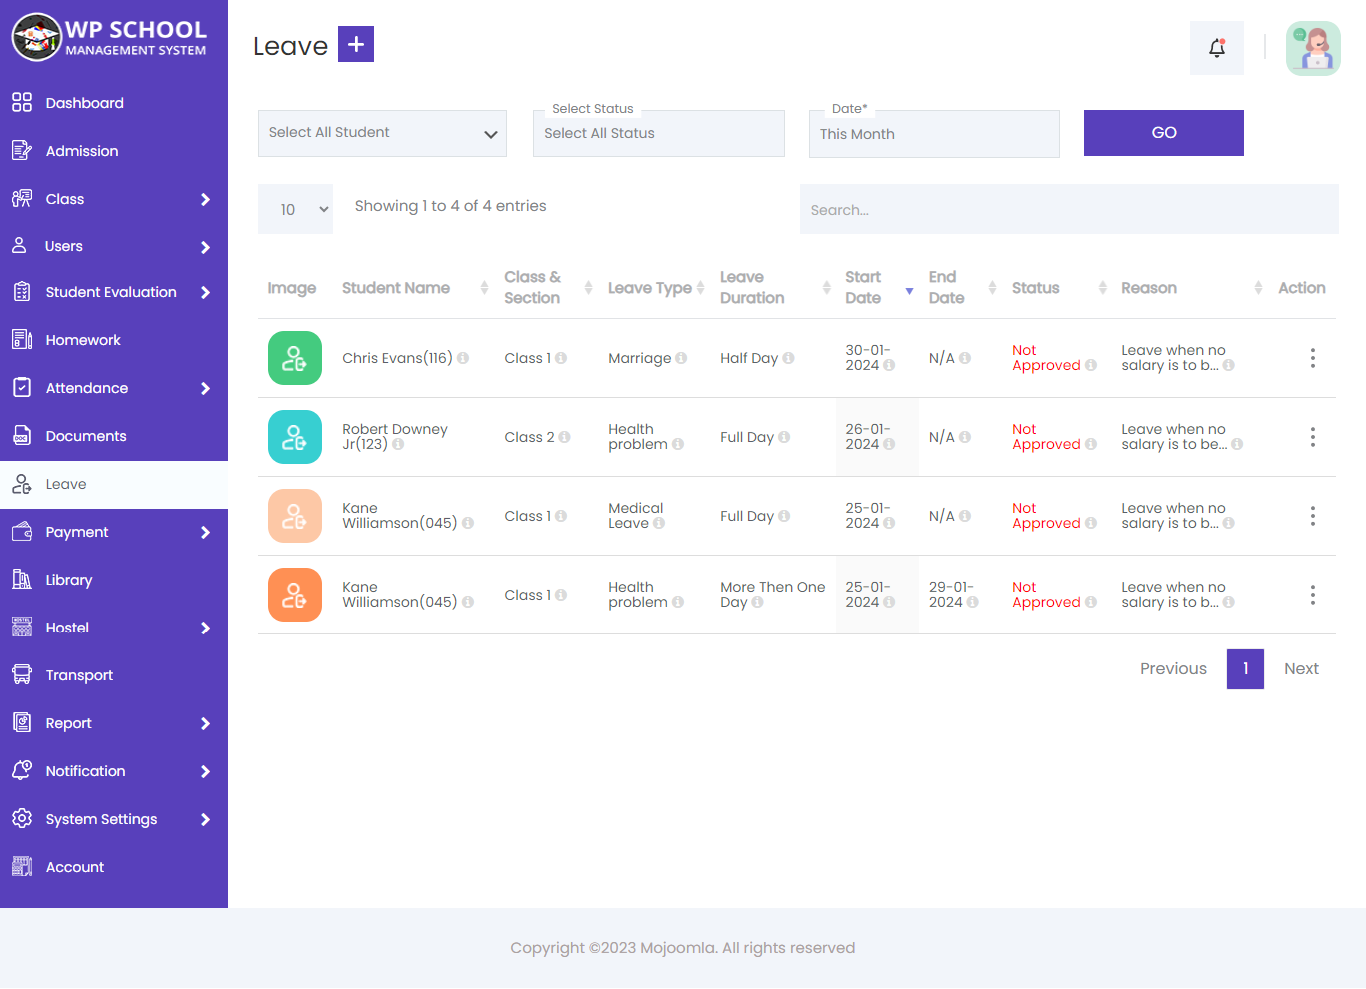
14) Leave
You can manage all student leave requests from this module. View pending, approved, and rejected leaves, and approve or reject them as required.
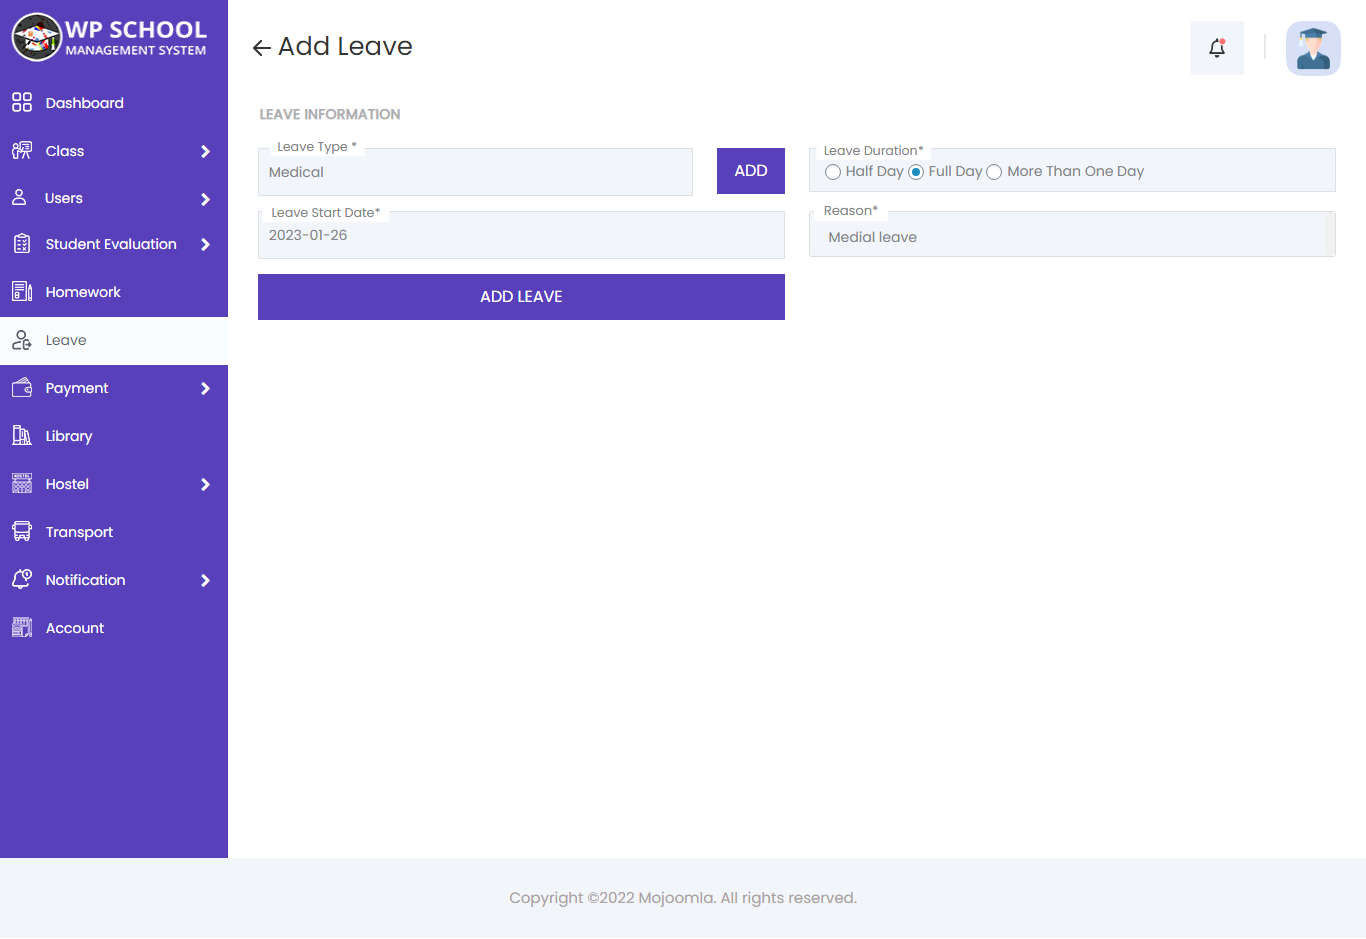
Add Leave
Click the Add Leave button to create a leave request for a student. Fill in all required fields and submit.
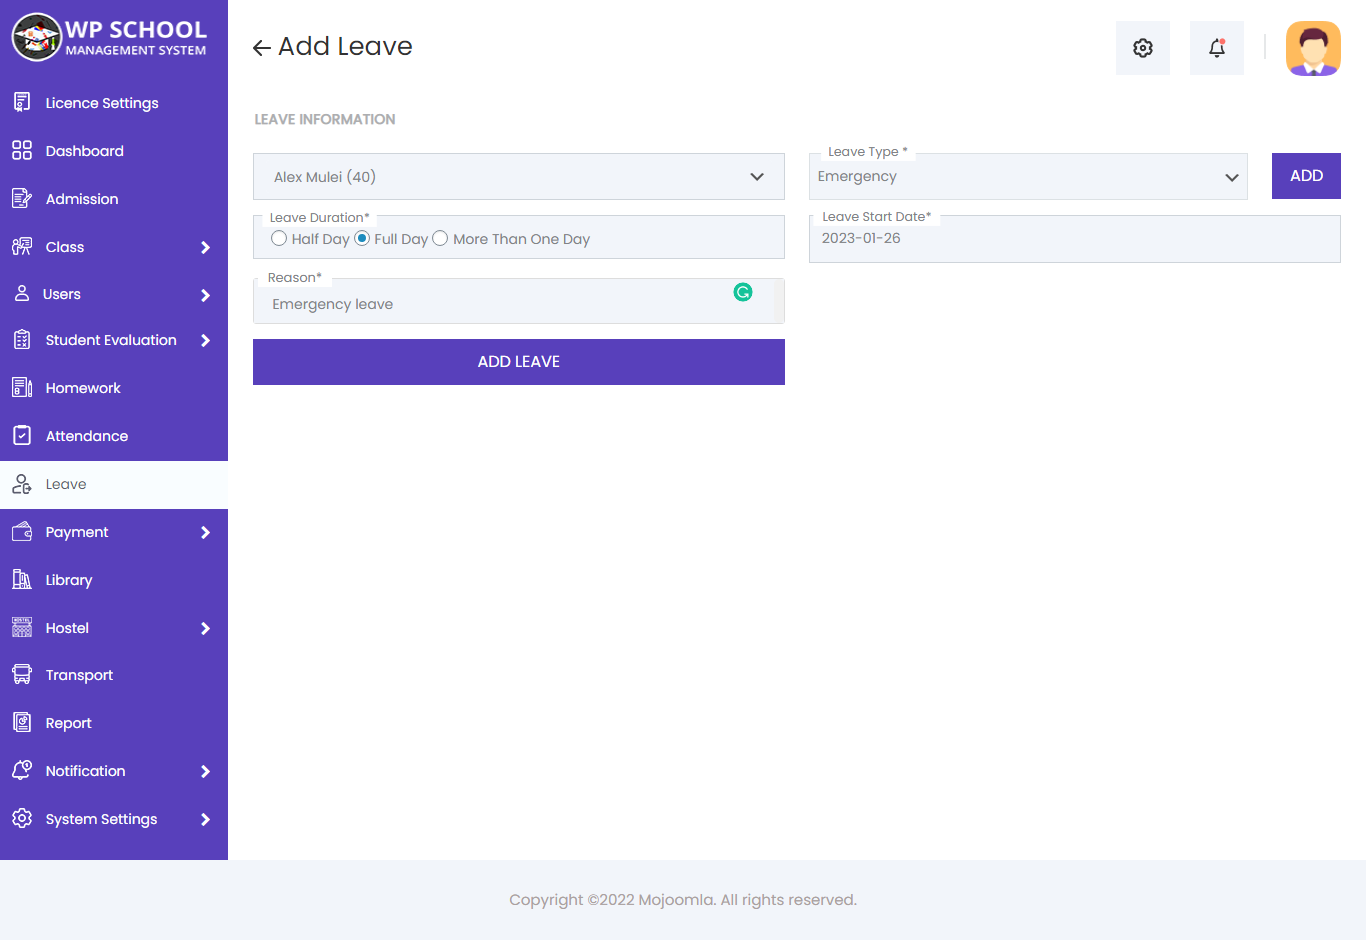
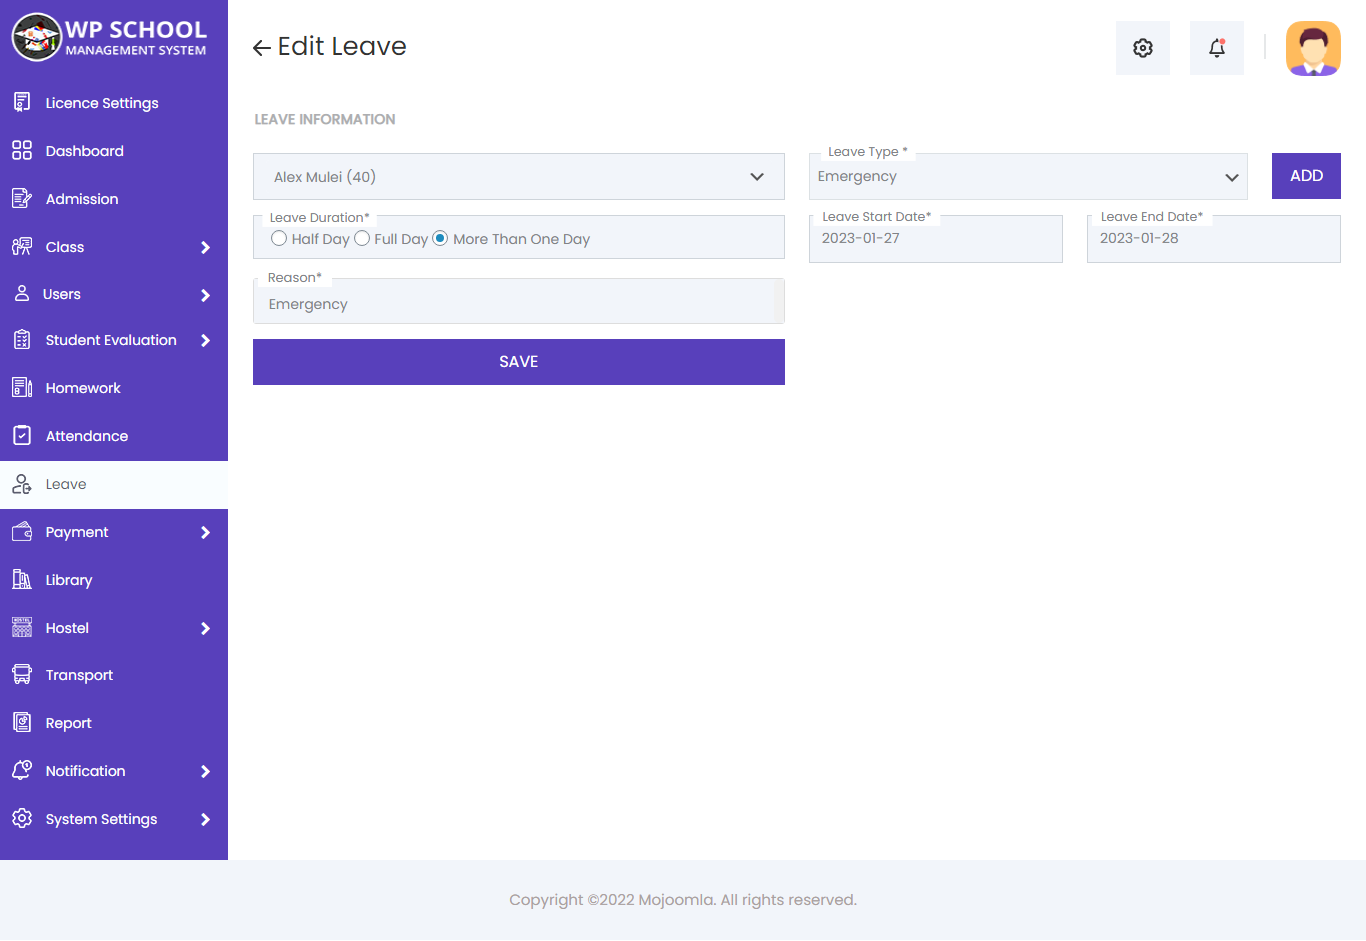
| Field | Description |
|---|---|
| Select Student | Student requesting leave |
| Leave Type | Sick / Personal / Casual etc. |
| Leave Duration | Half day or full day |
| Start / End Date | Leave period dates |
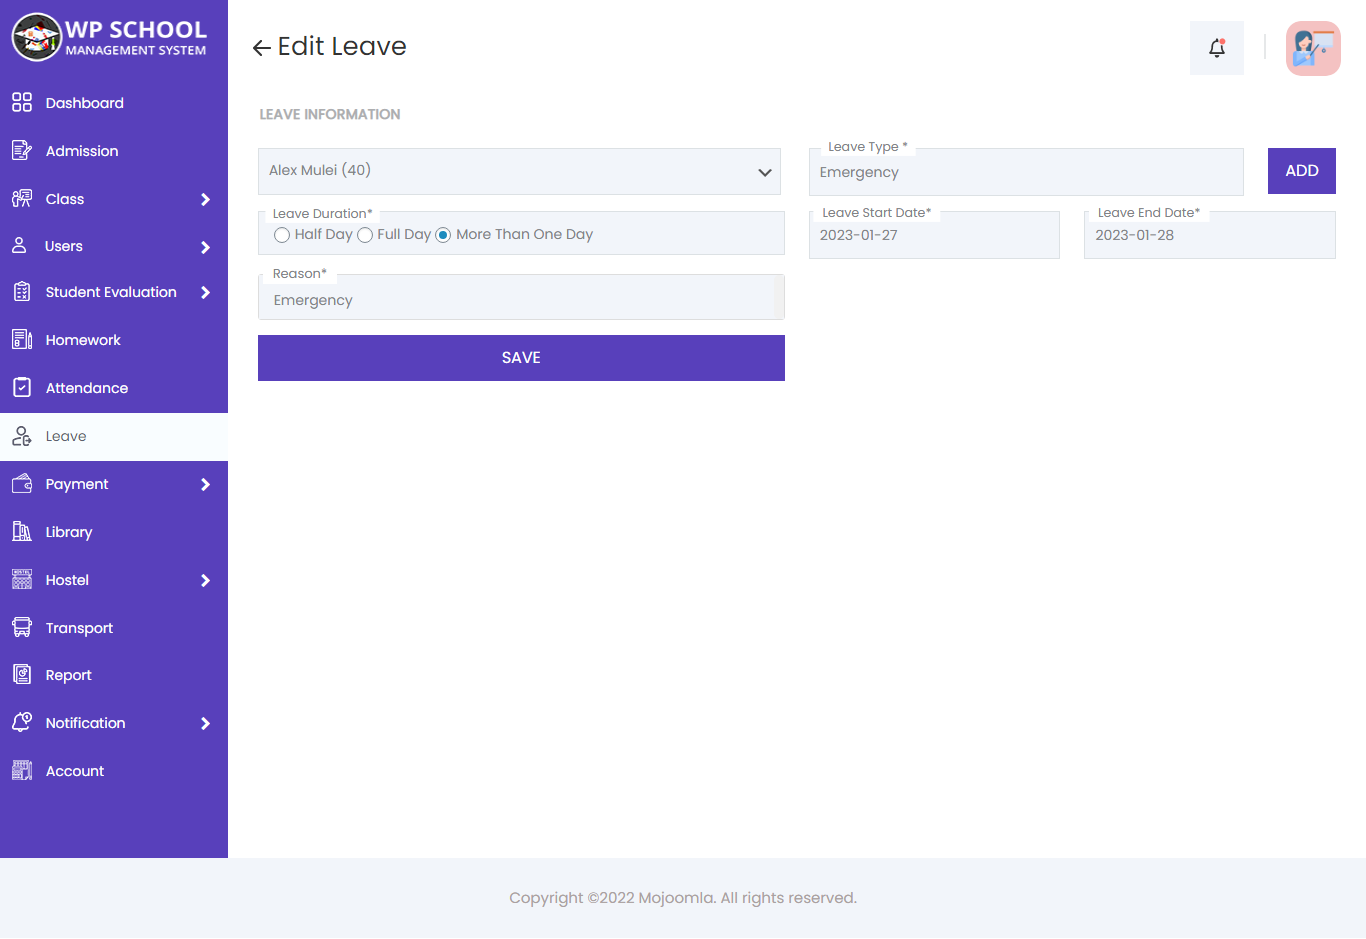
Edit Leave
Admin can edit the leave status — approve, reject, or modify the leave dates — by clicking the edit button next to any leave entry.
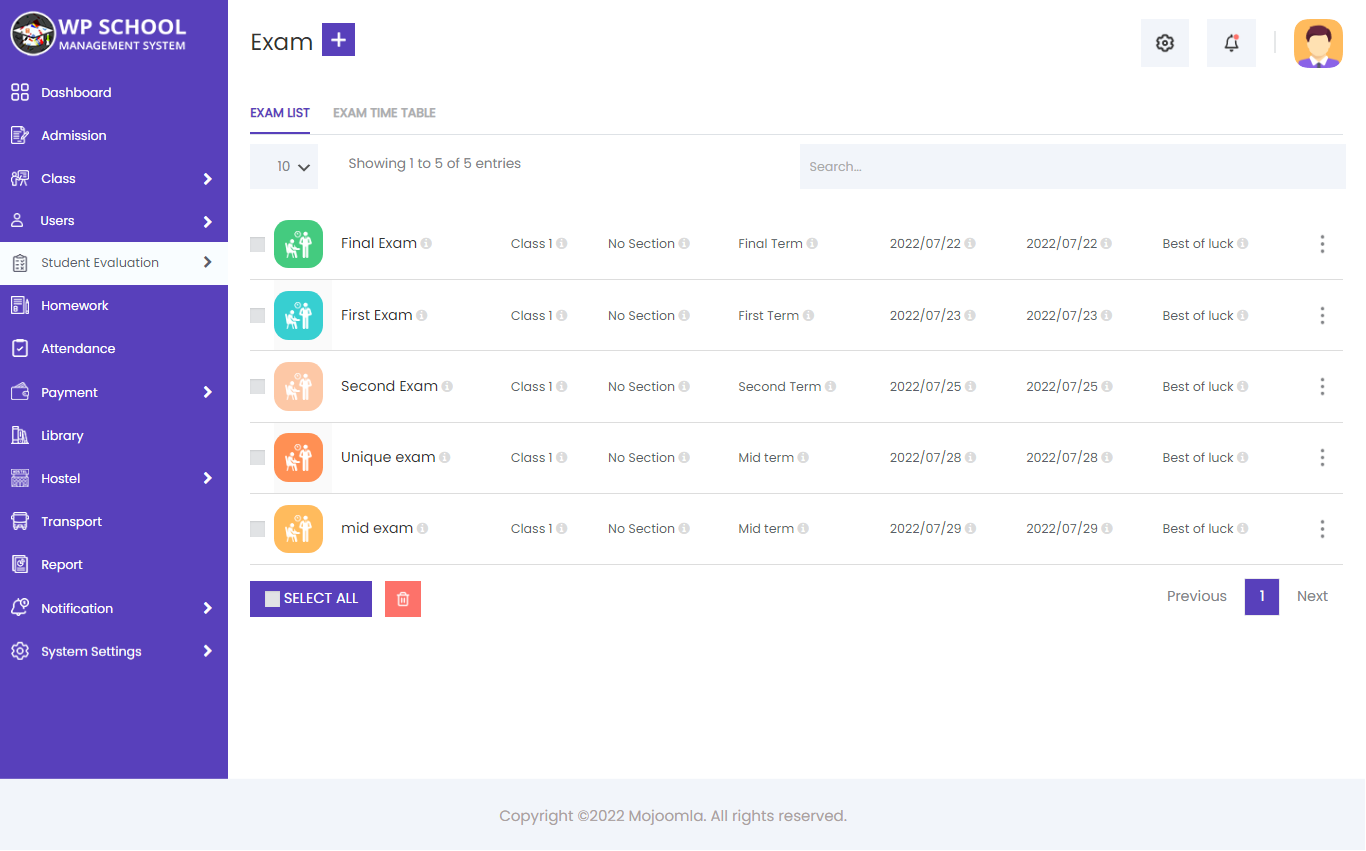
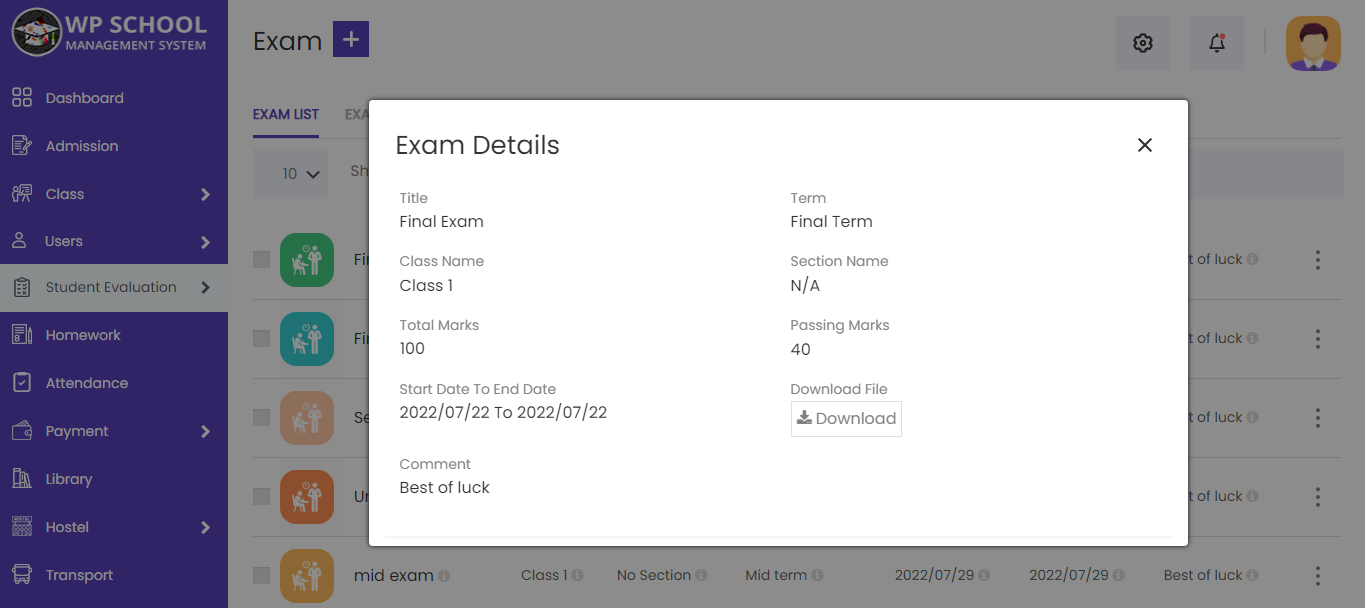
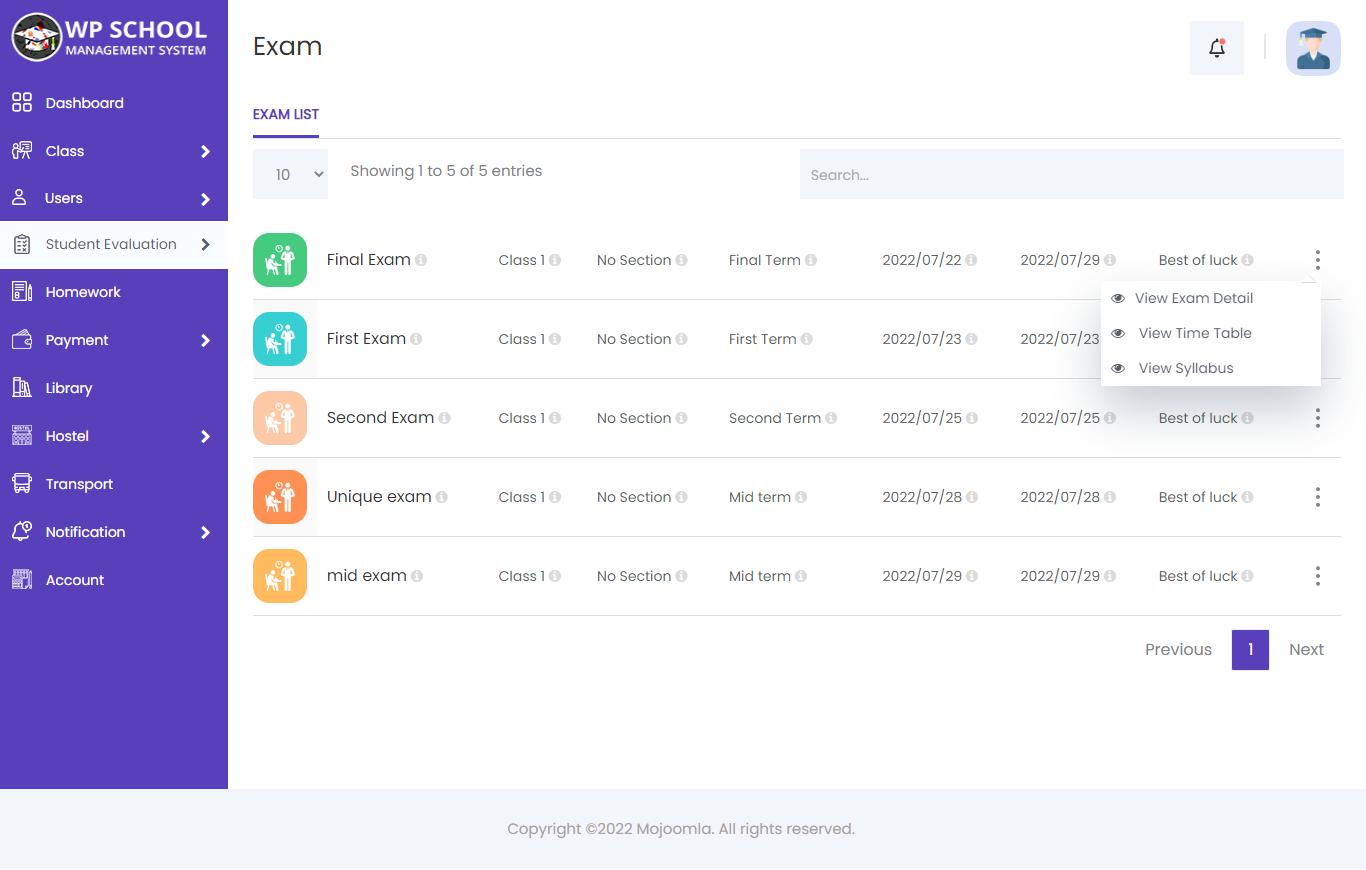
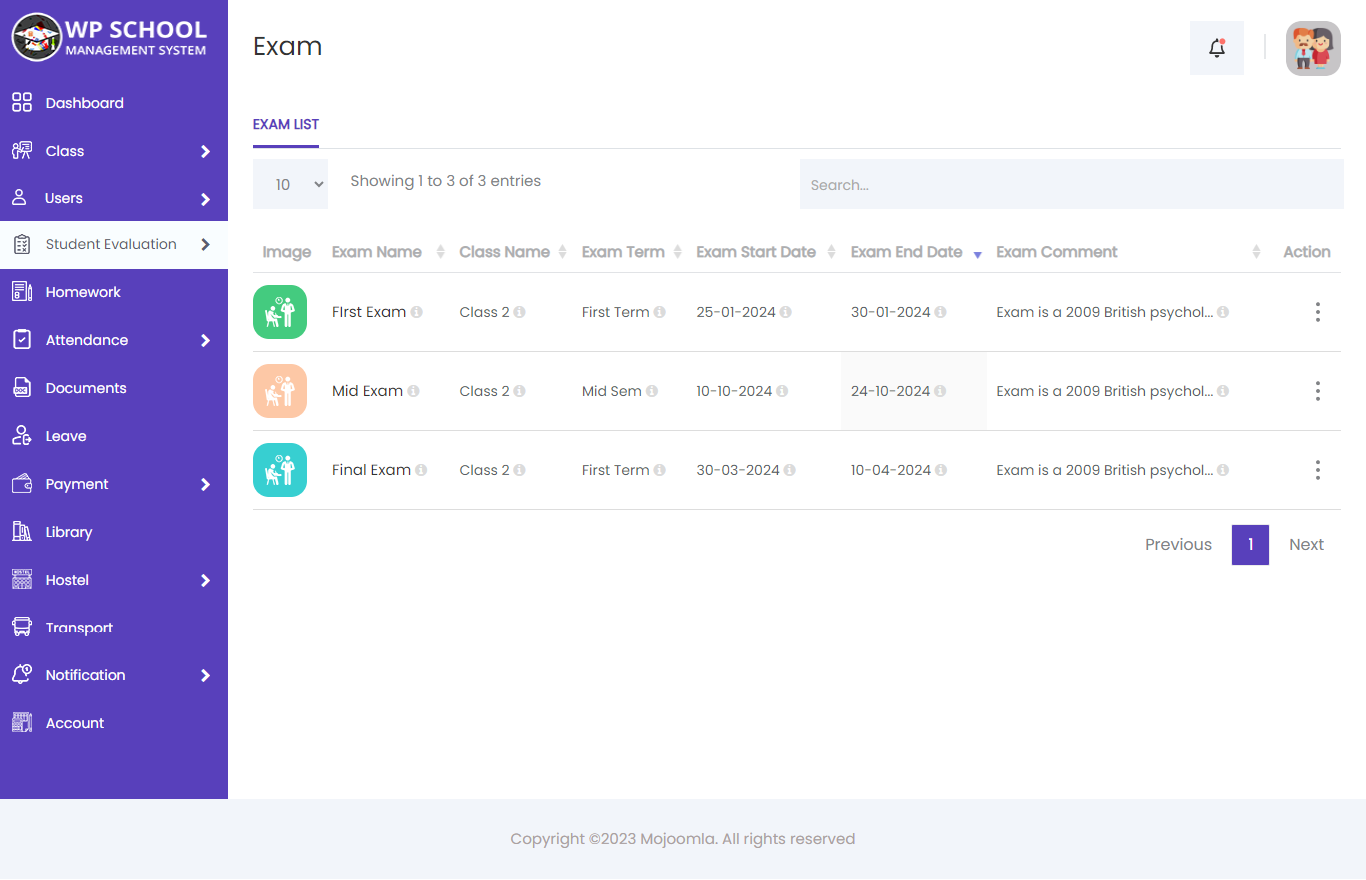
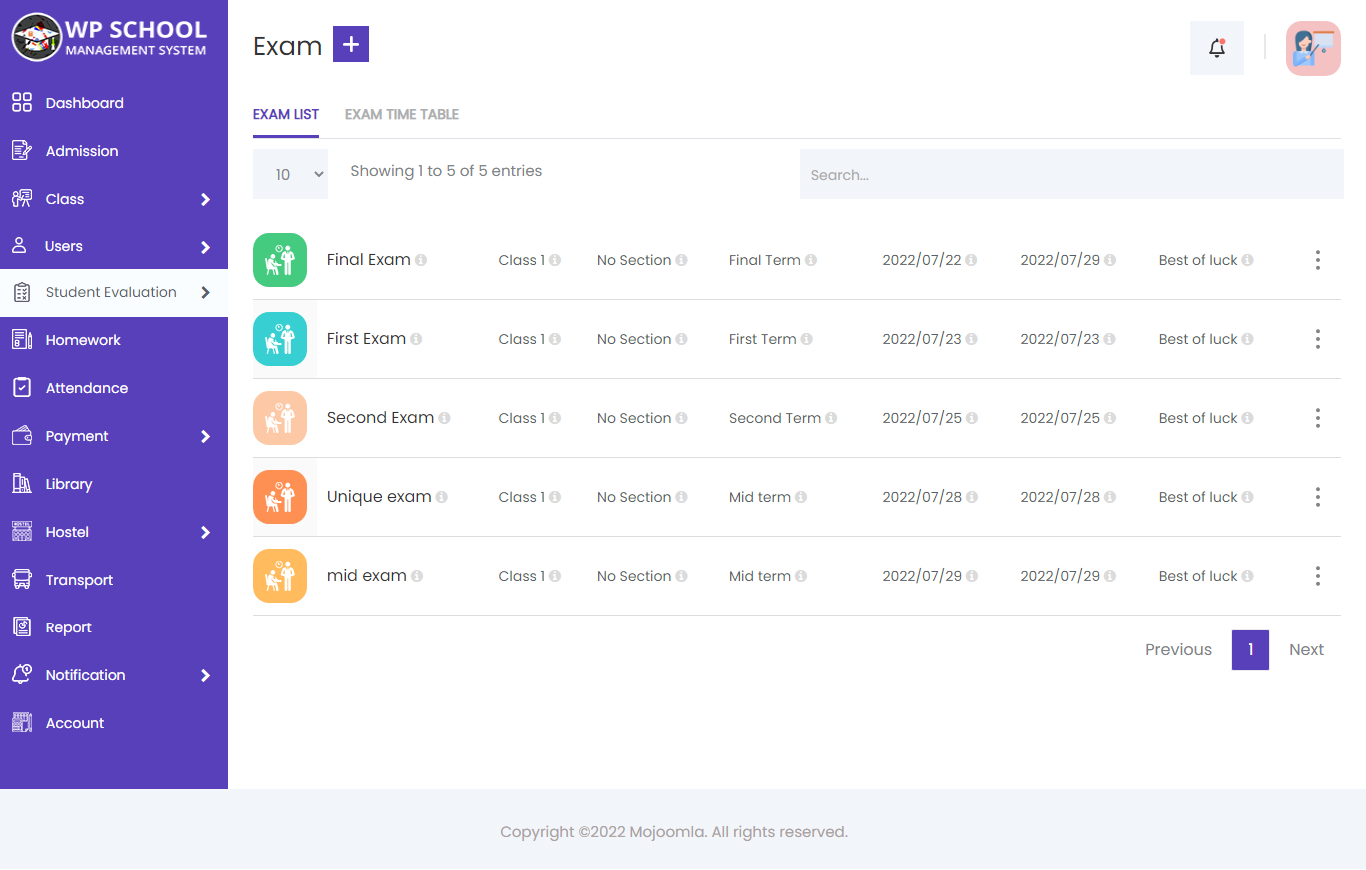
15) Exams
Display exam name, class name, exam term, starting and ending date, and exam-related comments. You can download and view exam-related syllabus from here.
Edit Exam
Click the Edit button on any exam to modify its details including name, term, dates, and syllabus.

View Exam
Click the View button to see full exam details, subjects, timetable, and related information.
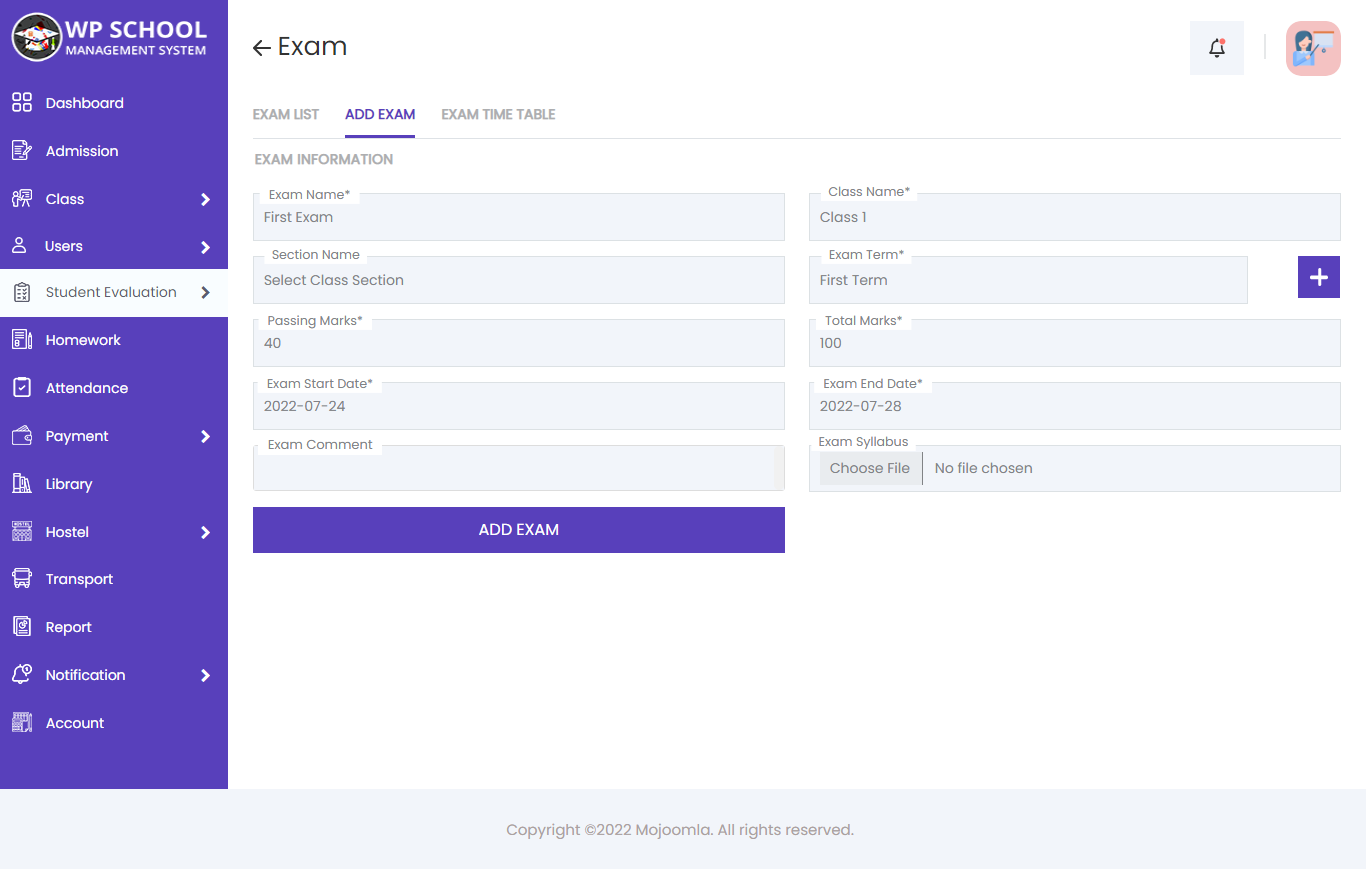
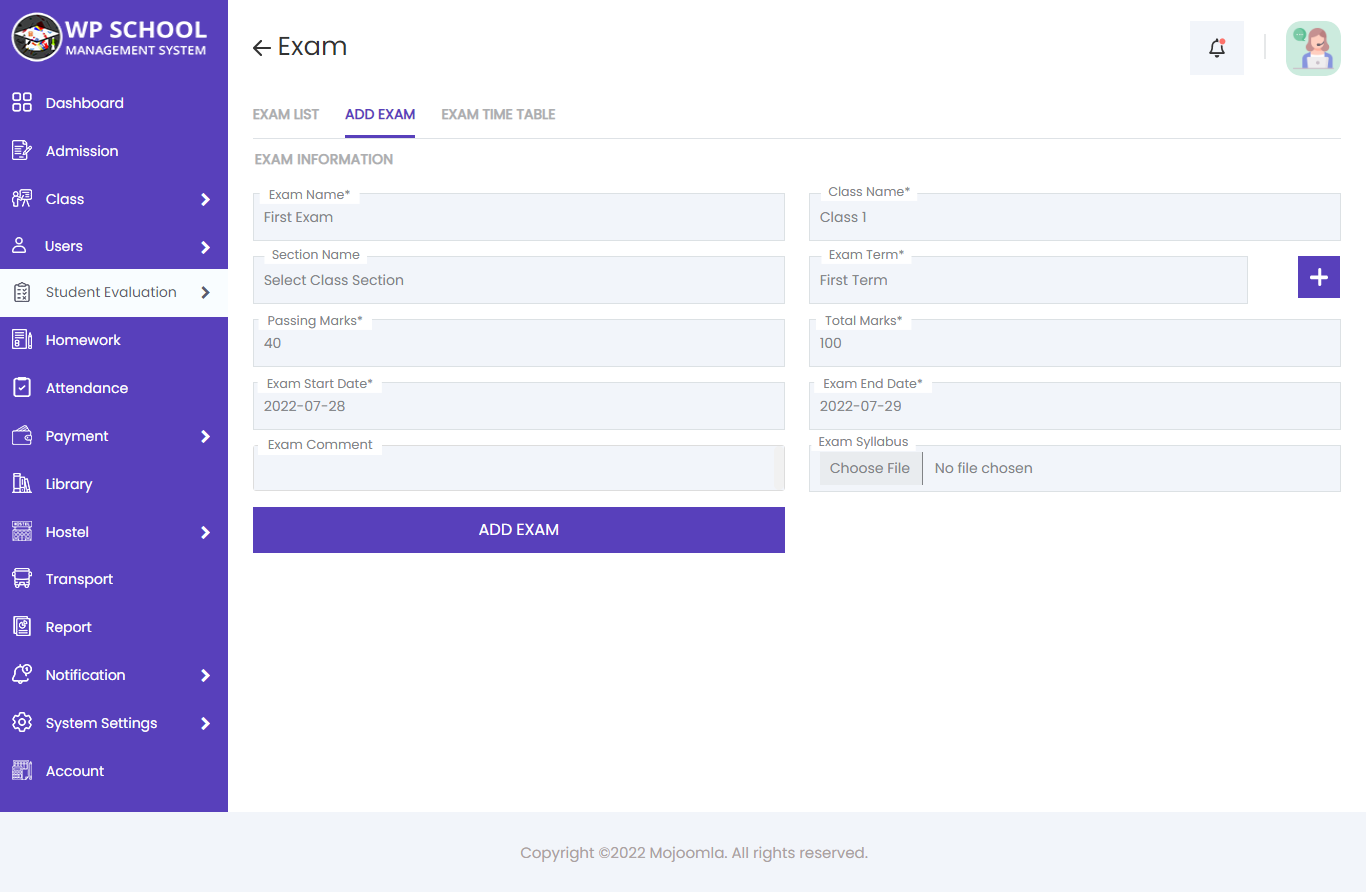
Add Exam
Click Add Exam to create a new exam. Select the class, enter exam name, term, date range, and optionally attach a syllabus. You can also enable contributory exams with partial marks.
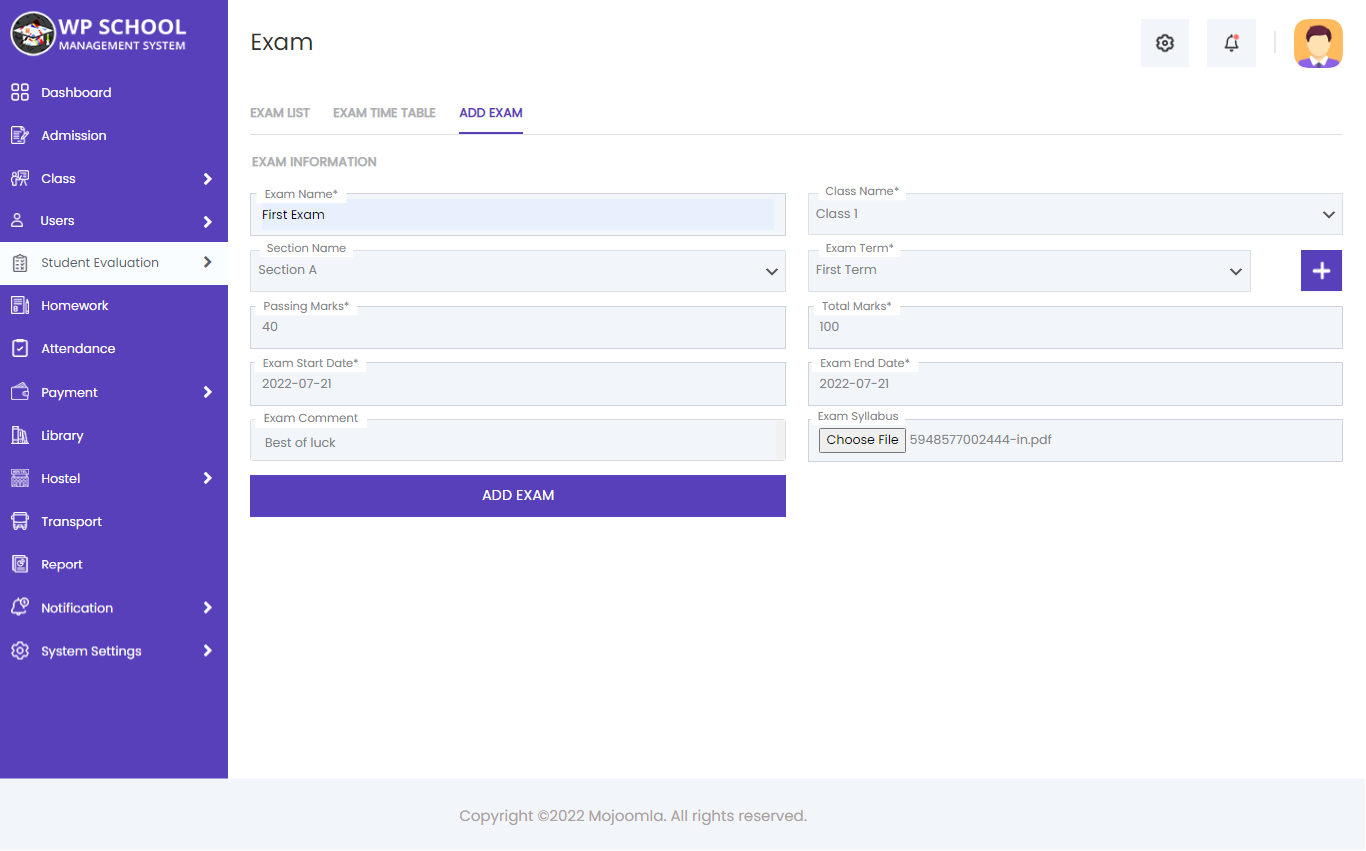
| Field | Description |
|---|---|
| Exam Name | e.g. Midterm 2025, Final Exam Term 2 |
| Class Name | Class this exam applies to |
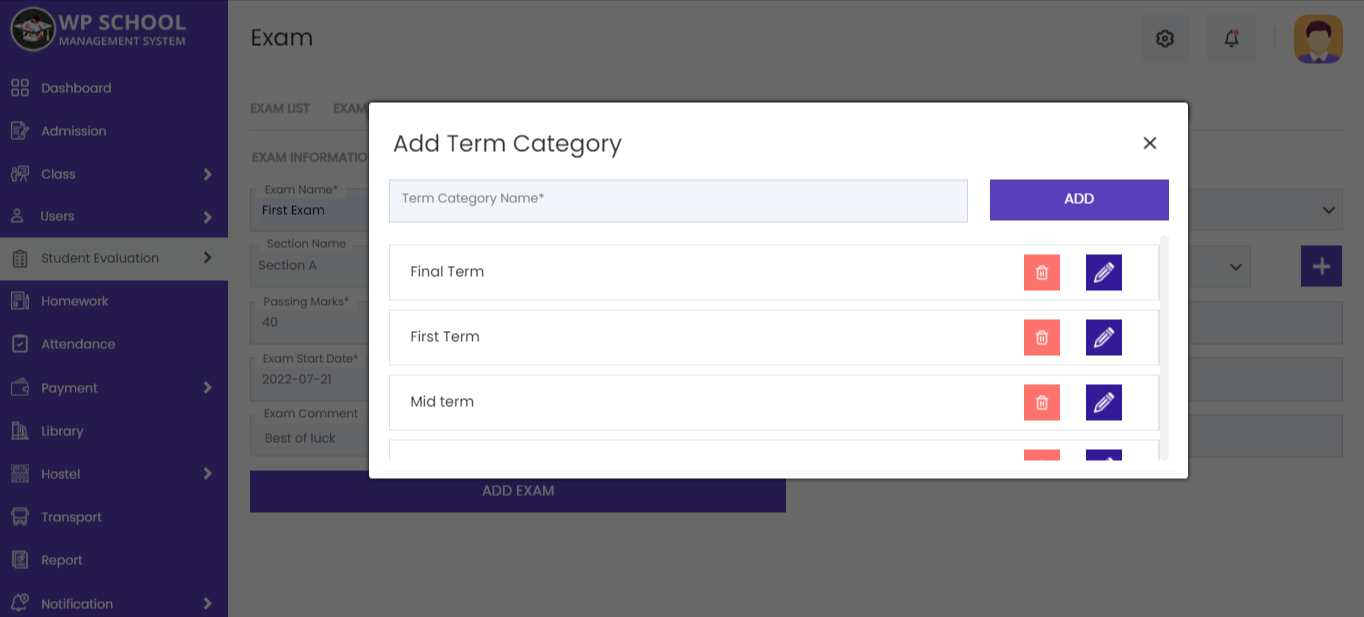
| Exam Term | Term 1, 2, or 3 |
| Start / End Date | Exam date range |
| Exam Syllabus | Covered syllabus description or upload |
| Contributions | Enable contributory exams with partial marks |

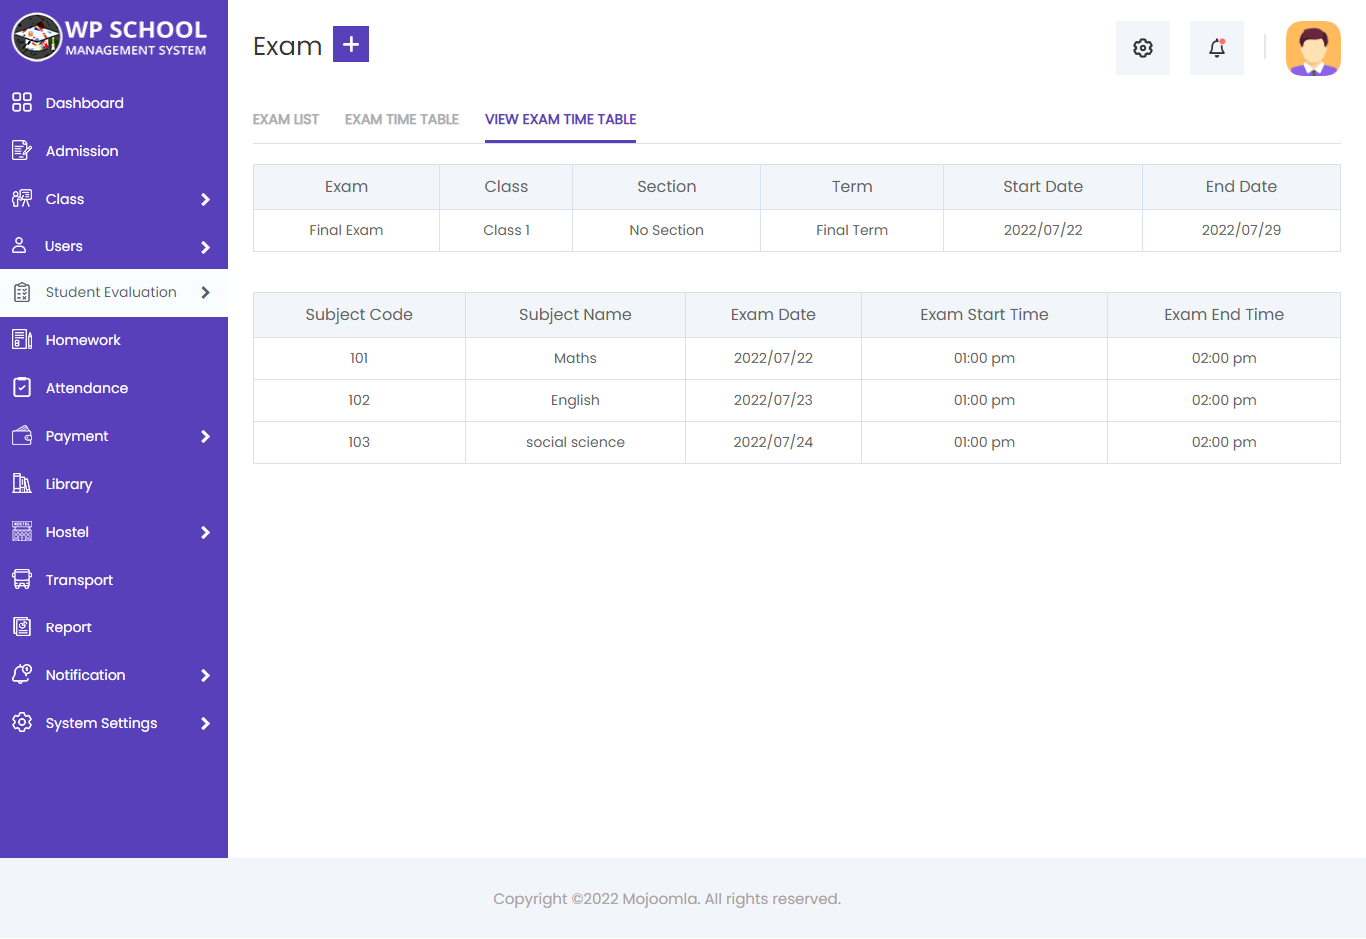
Exam Timetable
You can manage the exam timetable by clicking Manage Exam Time and generate a timetable for the exam. The timetable lists all subjects, dates, and timings.
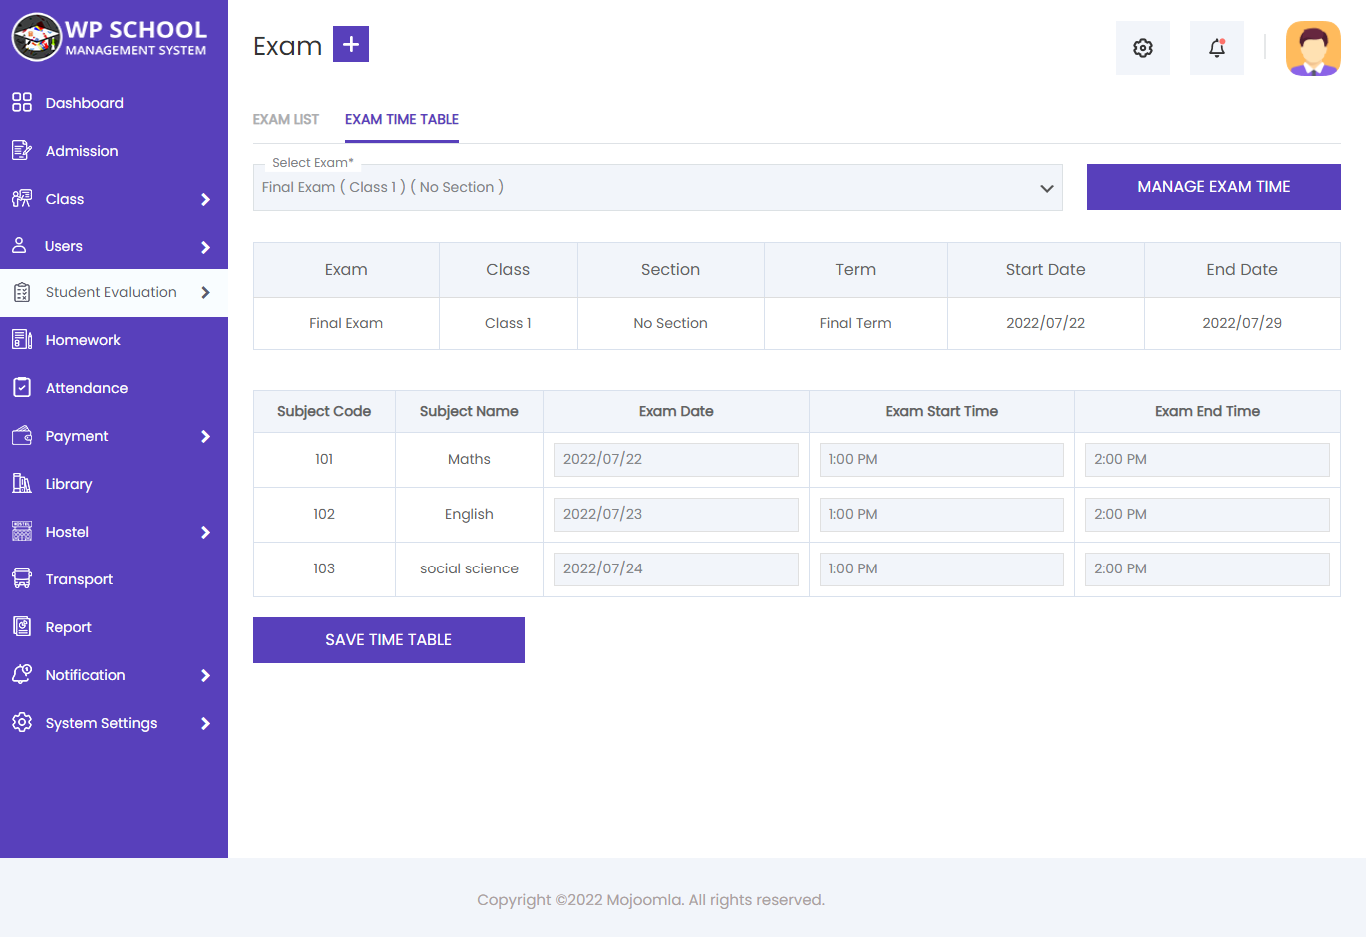
View Exam Timetable
You can see the exam timetable by clicking the View button in the Exam List. It shows all scheduled subjects with dates and time slots for each class.

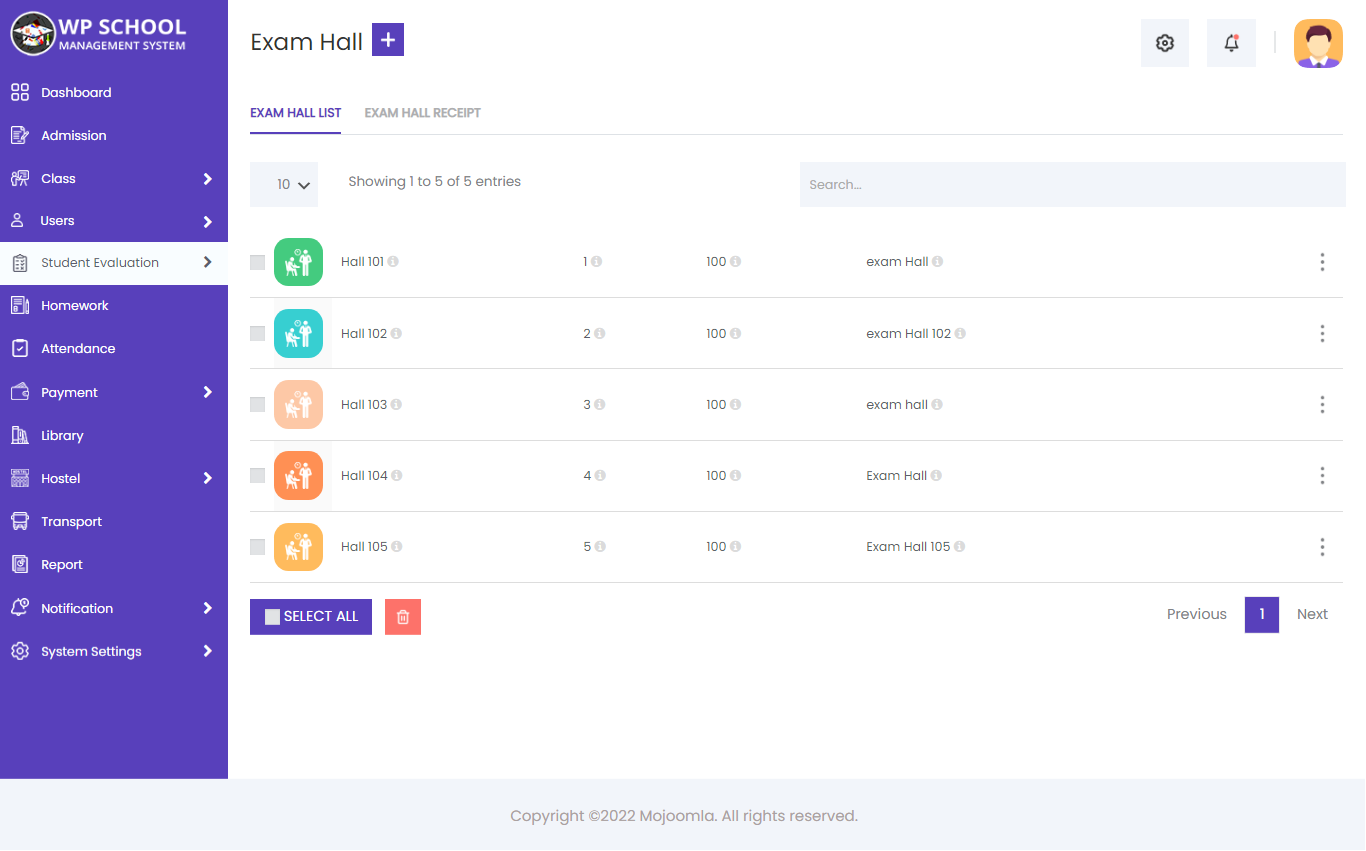
16) Exam Hall
Admin can add exam halls and generate exam hall receipts (admit cards) for each exam. The system assigns students to halls and generates printable admit cards that can be sent by email.
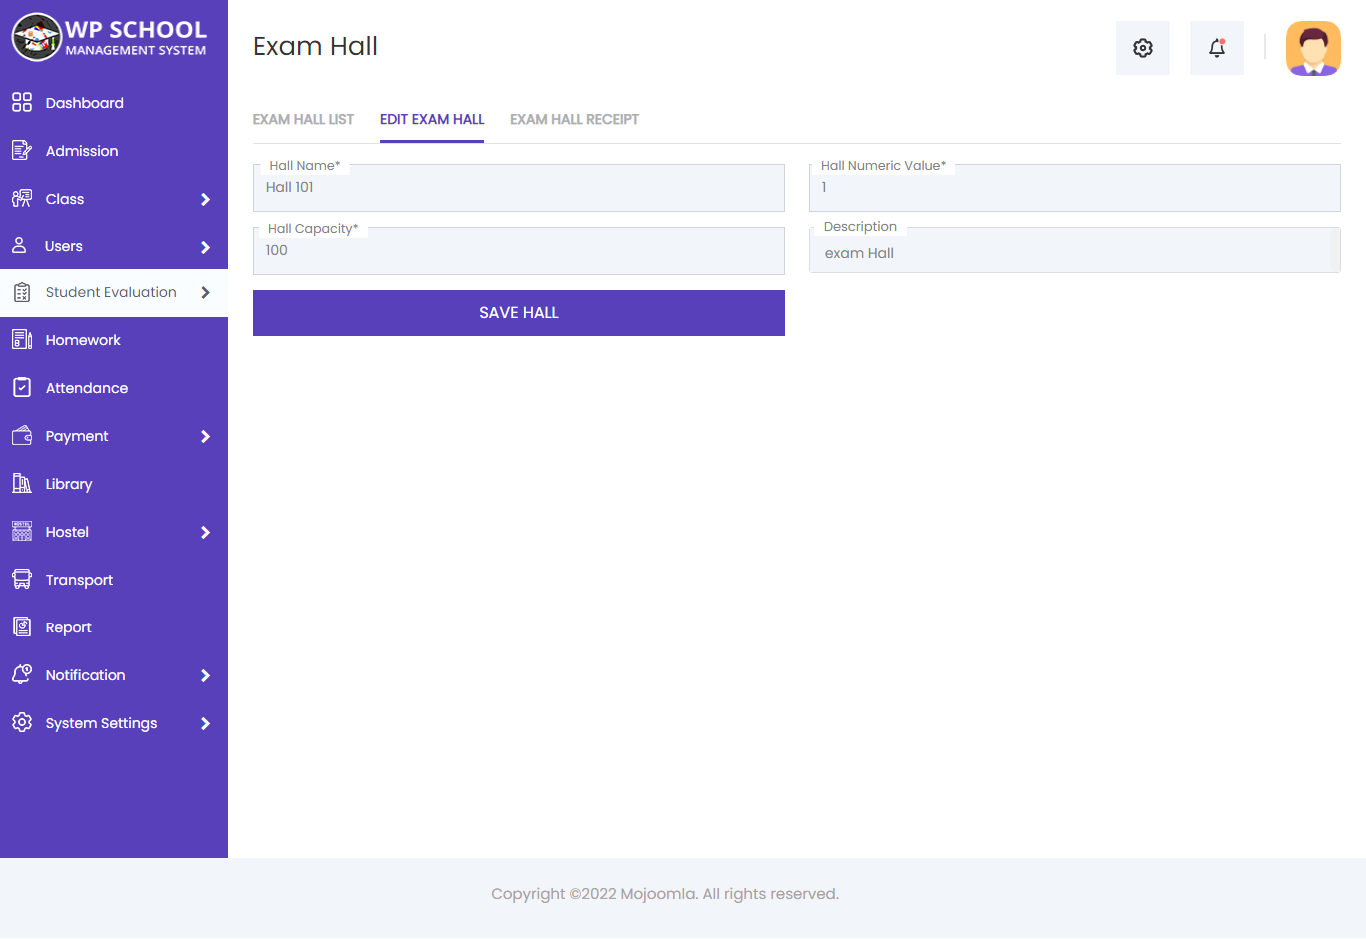
Edit Exam Hall
Click the Edit button on any hall to update its name, numeric value, or capacity.
View Exam Hall
Click the View button on any hall to see full details and the list of students assigned to that hall.

Add Exam Hall
Click Add Hall to create a new examination hall. Enter the hall name, numeric identifier, and seating capacity.
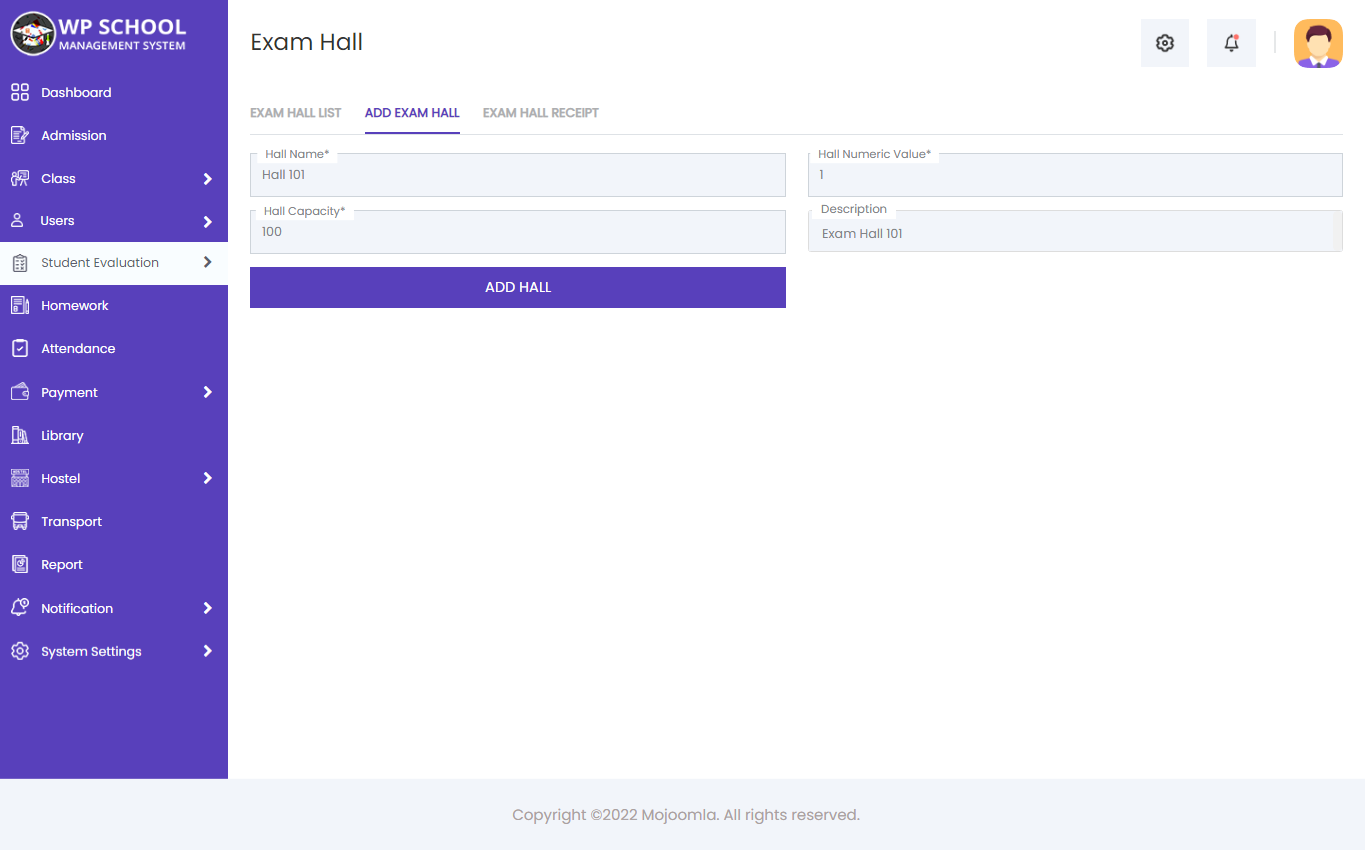
| Field | Description |
|---|---|
| Hall Name | Name of the examination hall |
| Hall Numeric Value | Numeric identifier |
| Capacity | Maximum number of students |
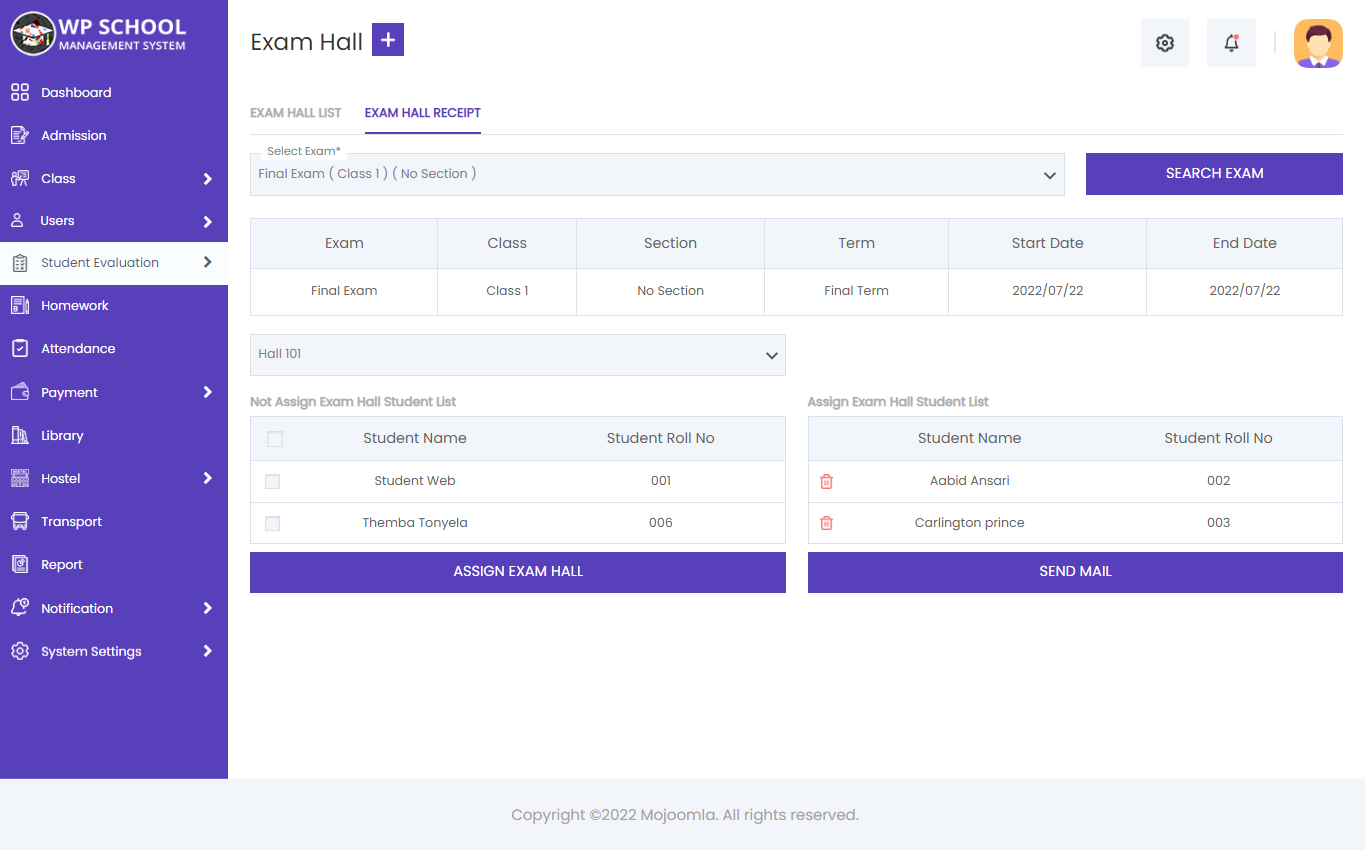
Generate Hall Receipt
Admin can generate student exam hall receipts by clicking Exam Hall Receipt, selecting the exam, checking which students to assign to the hall, and generating their admit cards. Exam hall receipt PDFs can also be sent by email using the Send Mail button.
17) Grade System
Display and manage the grade system. Define grade names (A+, A, B, etc.), their equivalent grade/credit points, and the mark range that maps to each grade. These grades are used in result generation and marksheets.
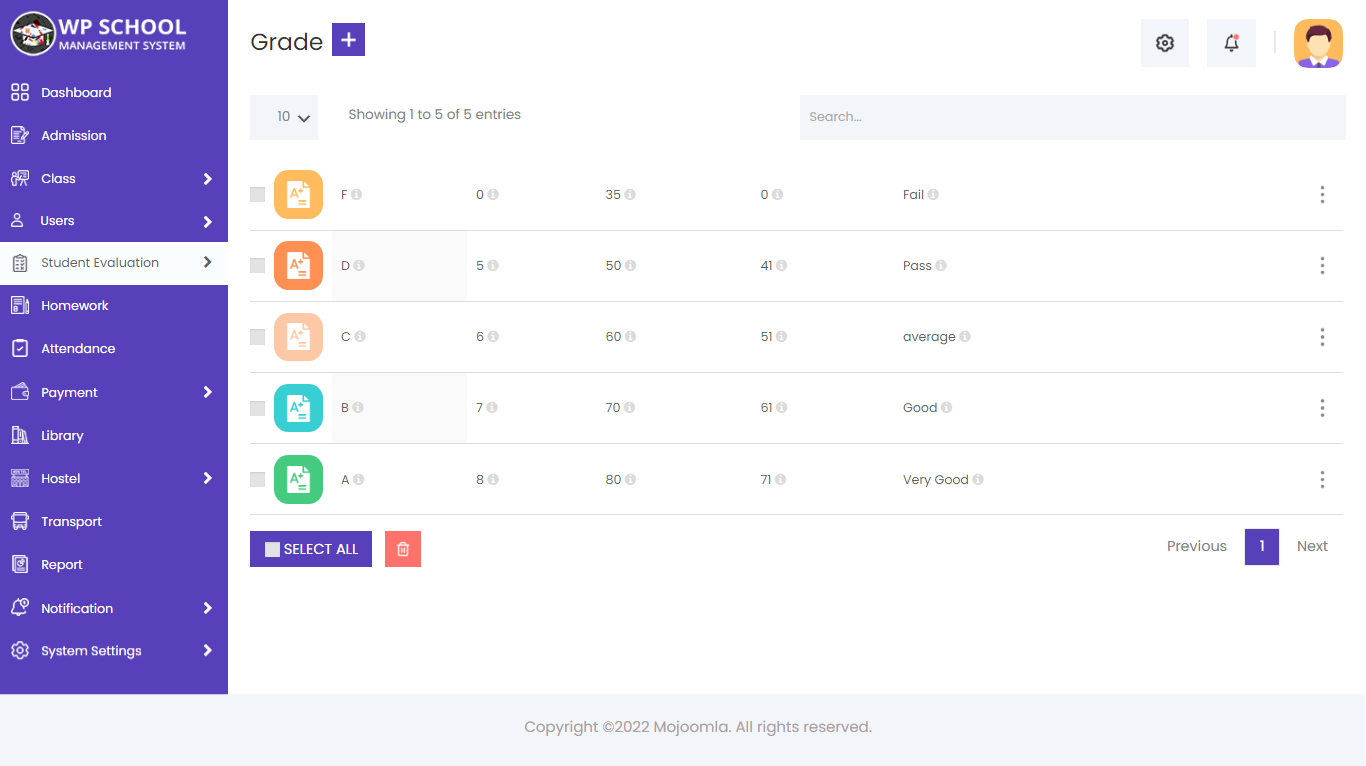
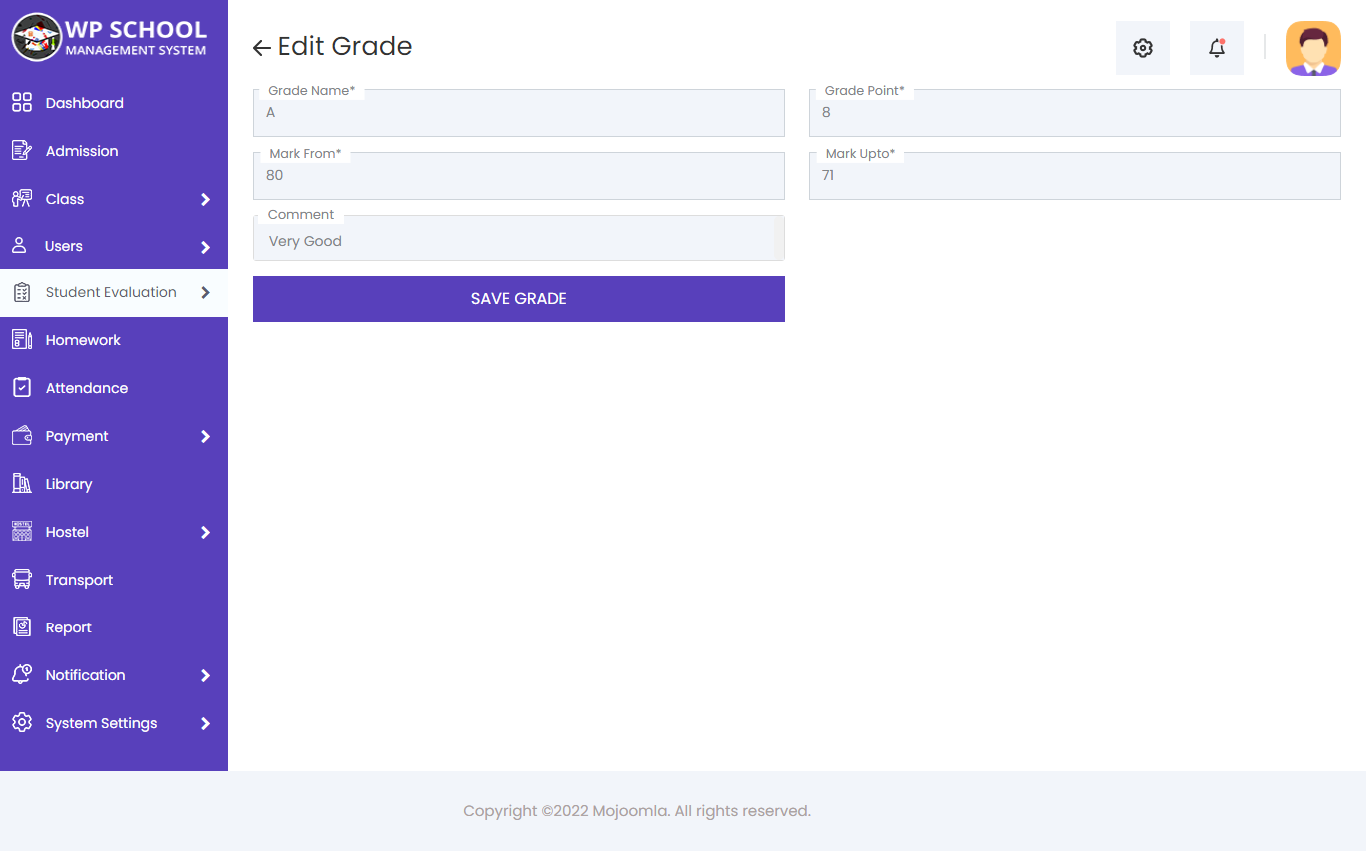
Add Grade
Click Add Grade to define a new grade boundary. Set the grade name, credit point value, and the minimum/maximum mark range for this grade.
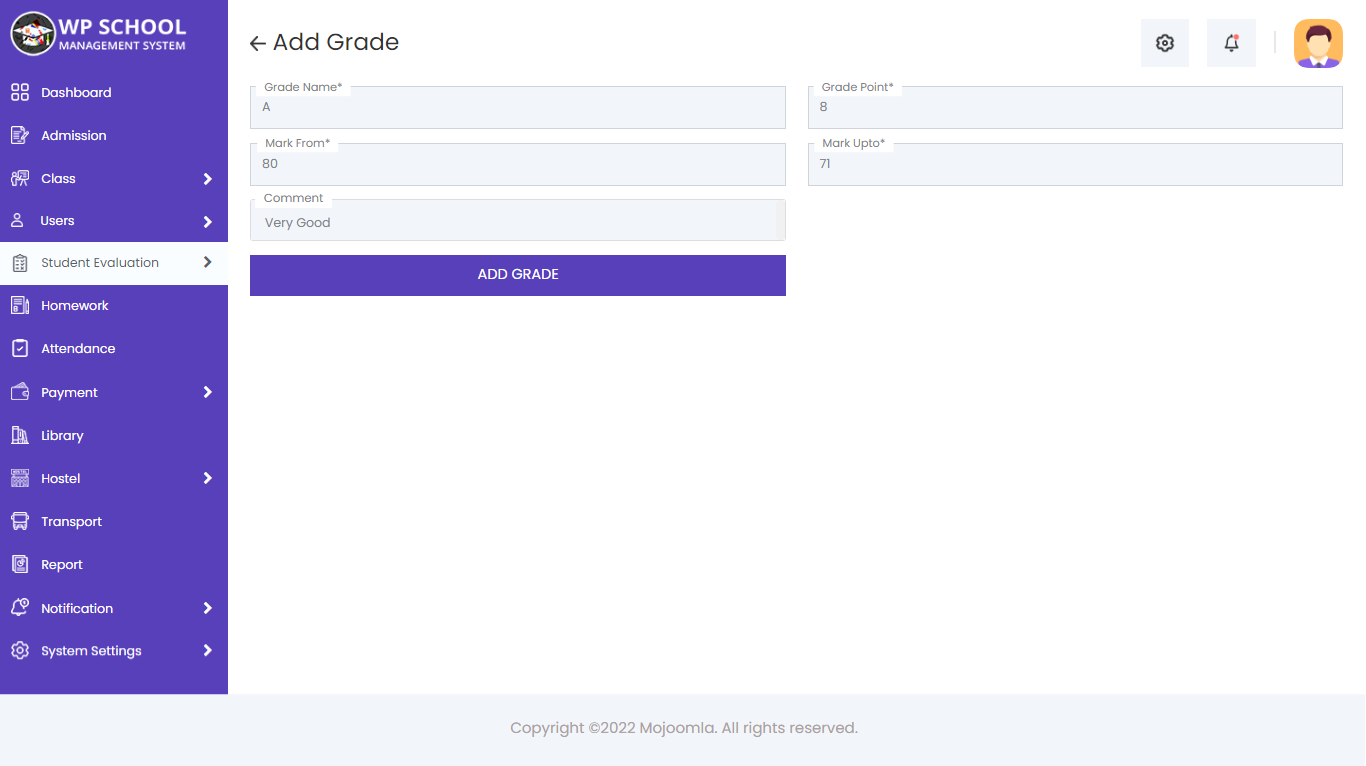
| Field | Description |
|---|---|
| Grade Name | A+, A, B+, B, C, D, F |
| Grade Point | Credit point value (4.0, 3.5, etc.) |
| Mark From / Up to | Mark range that maps to this grade |
Edit Grade
Click the Edit button on any grade to update its name, point value, or mark range.
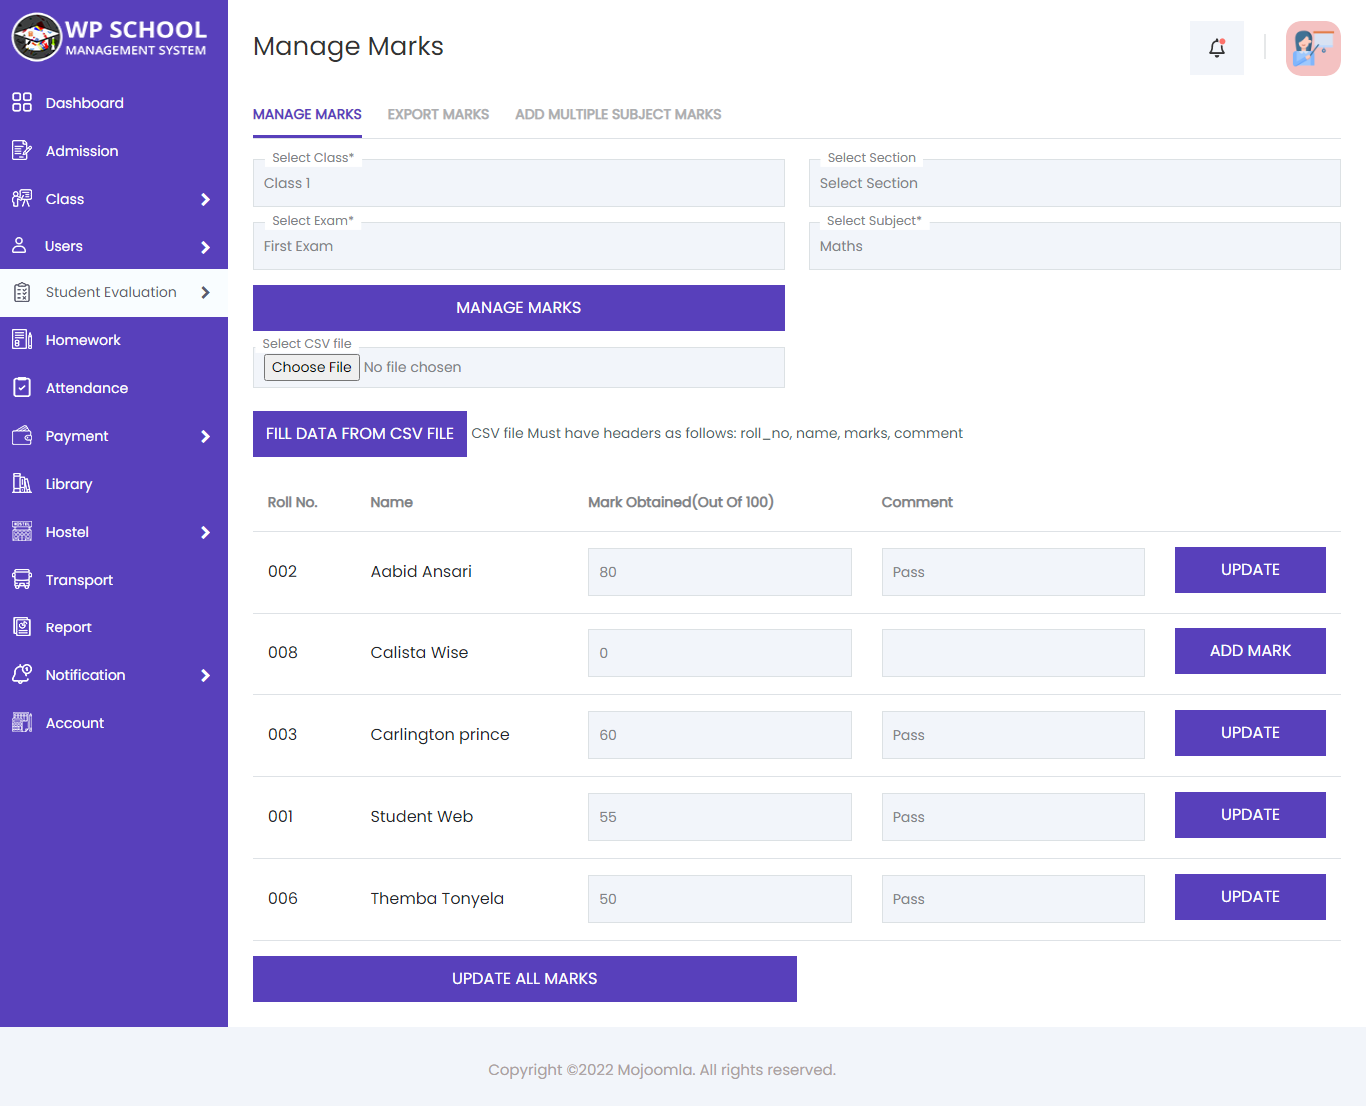
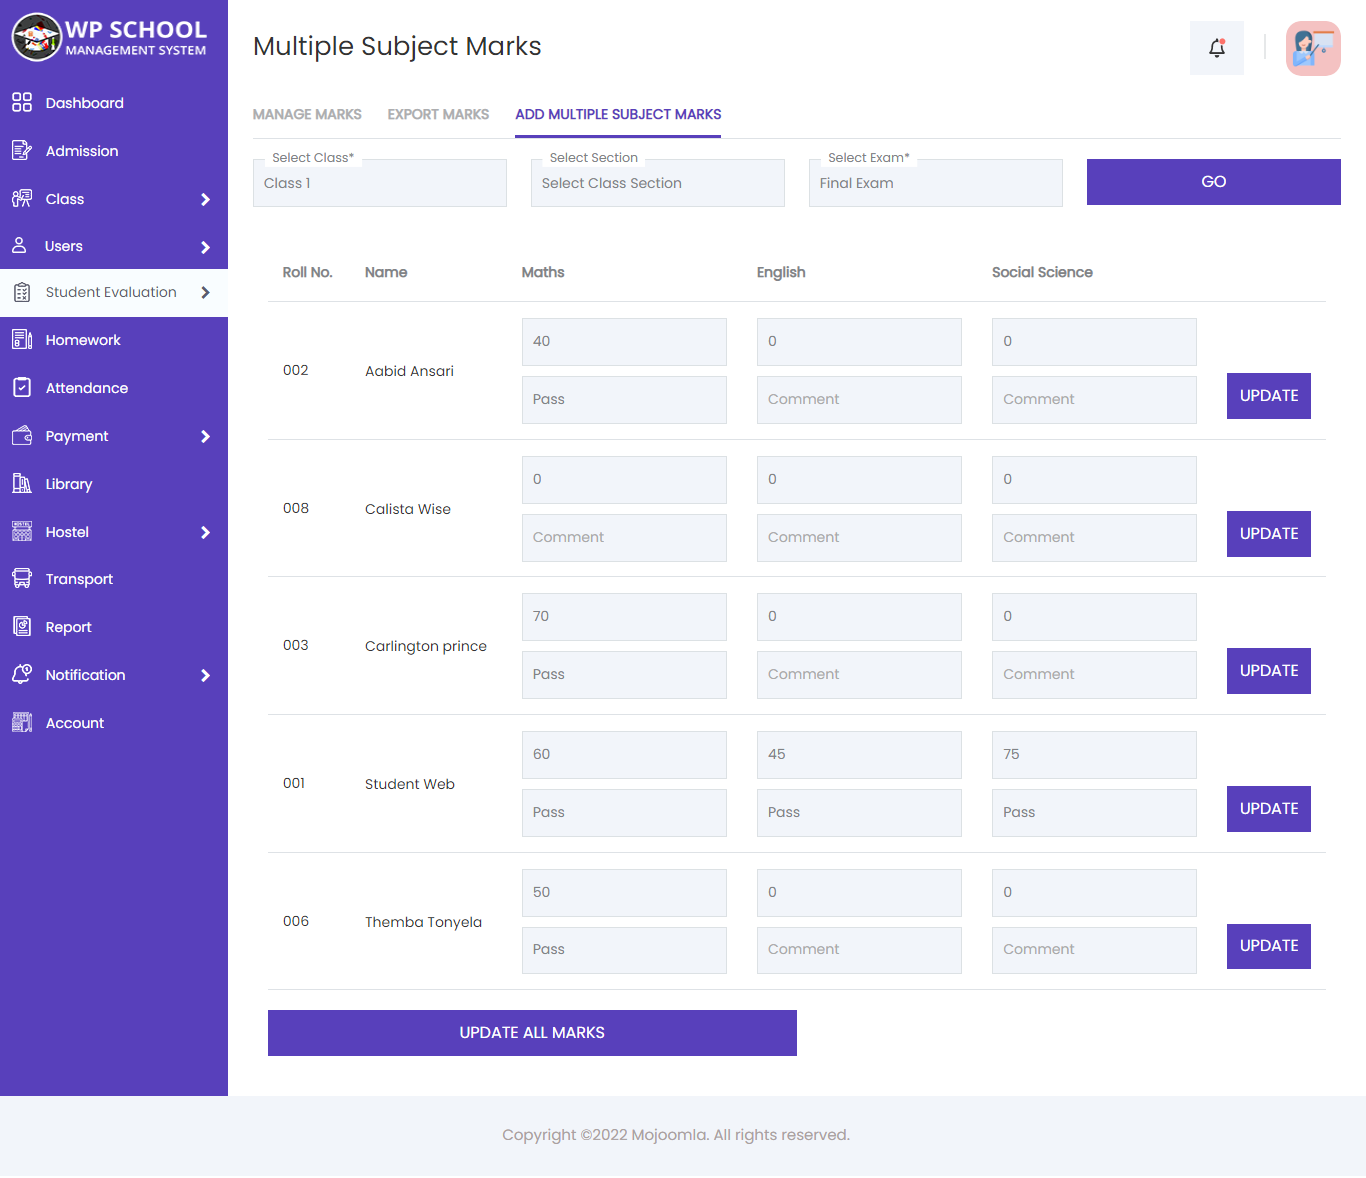
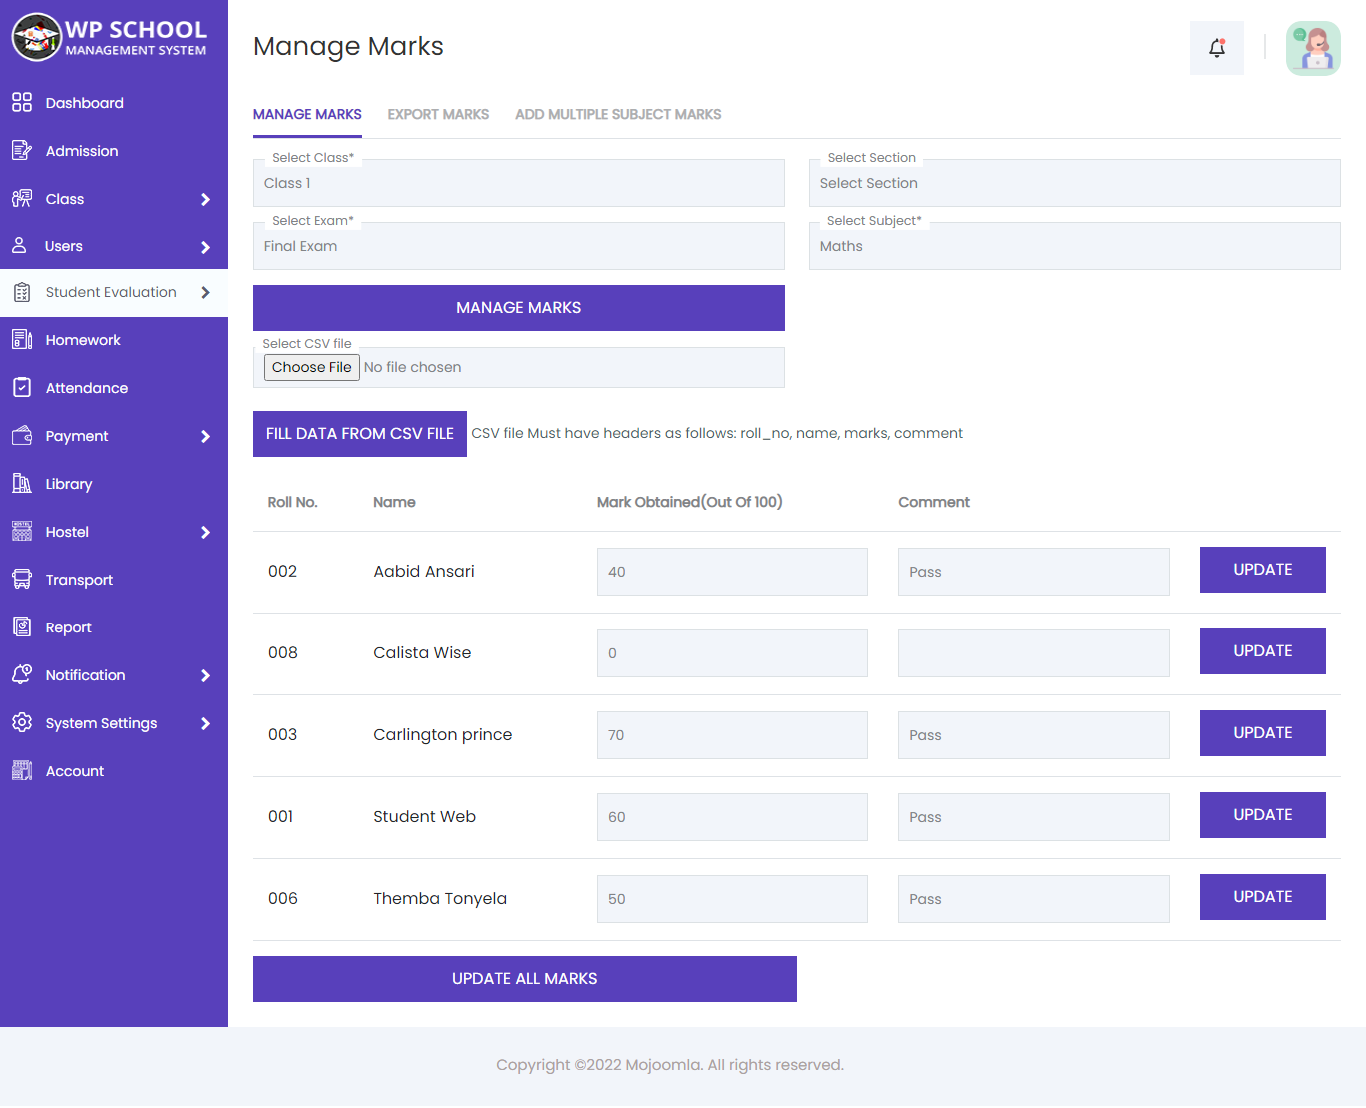
18) Manage Marks
Enter student marks from here. Select the exam name, class name, subject name and then press Manage Marks. Student marks are also added for the contributory exam. You can upload a CSV file to fill marks data or enter marks individually against each student.
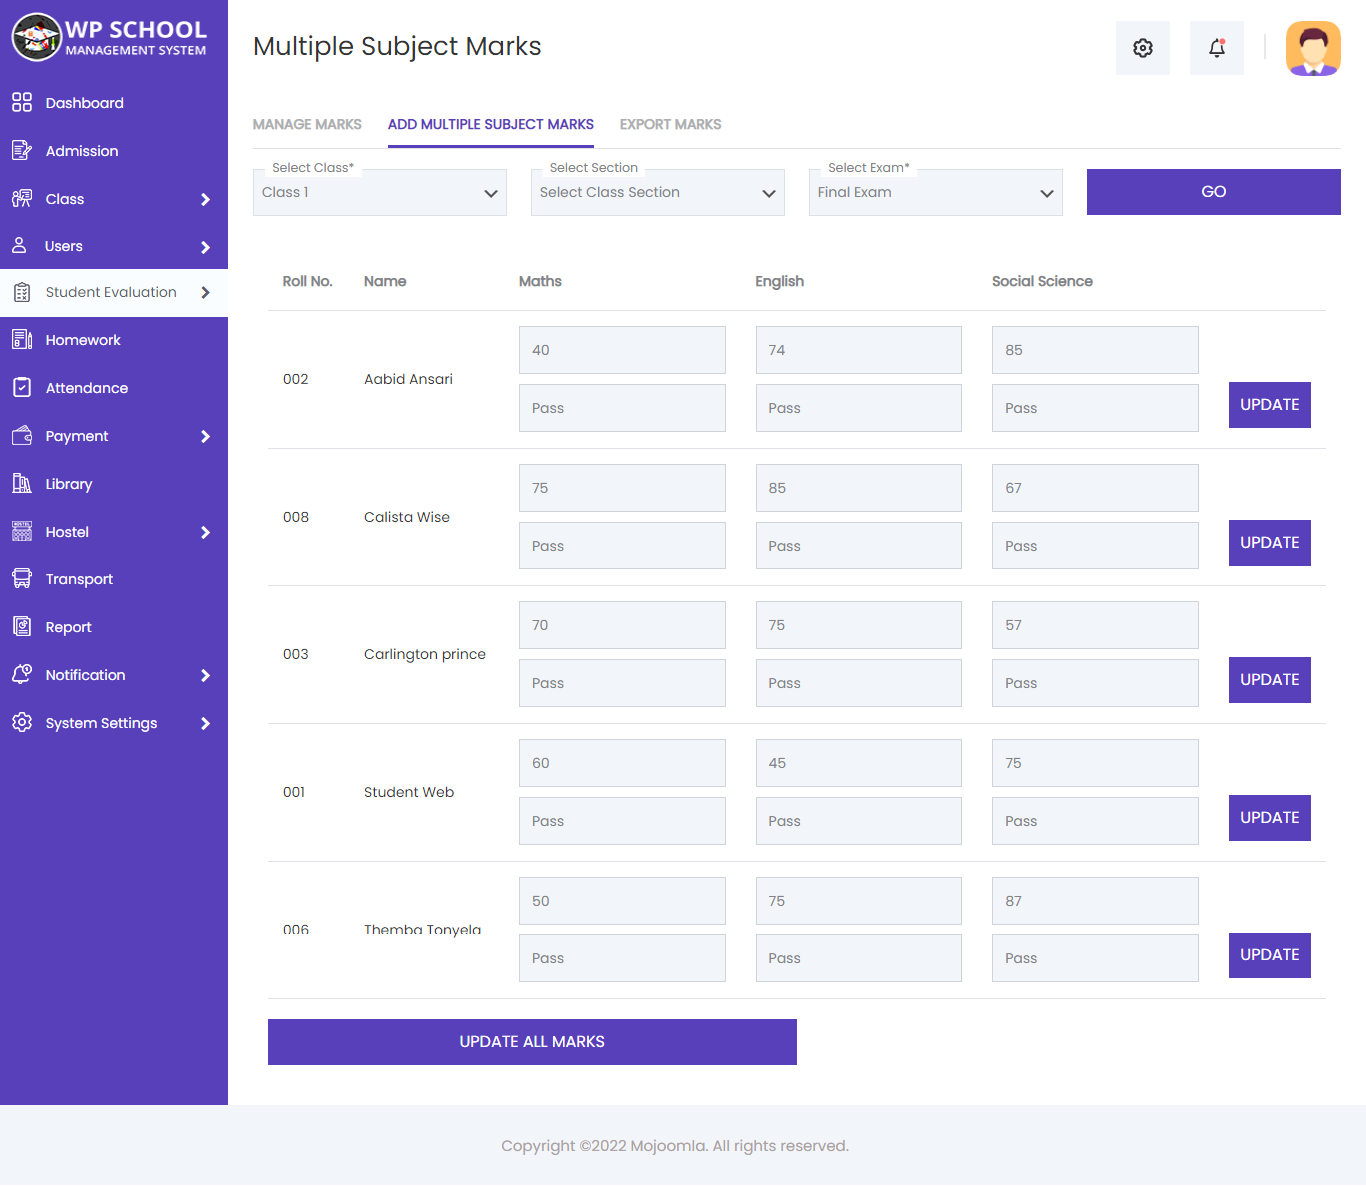
Update Student Marks
If you want to update marks, click Update All Marks after entering values against each student. Individual updates are also possible.
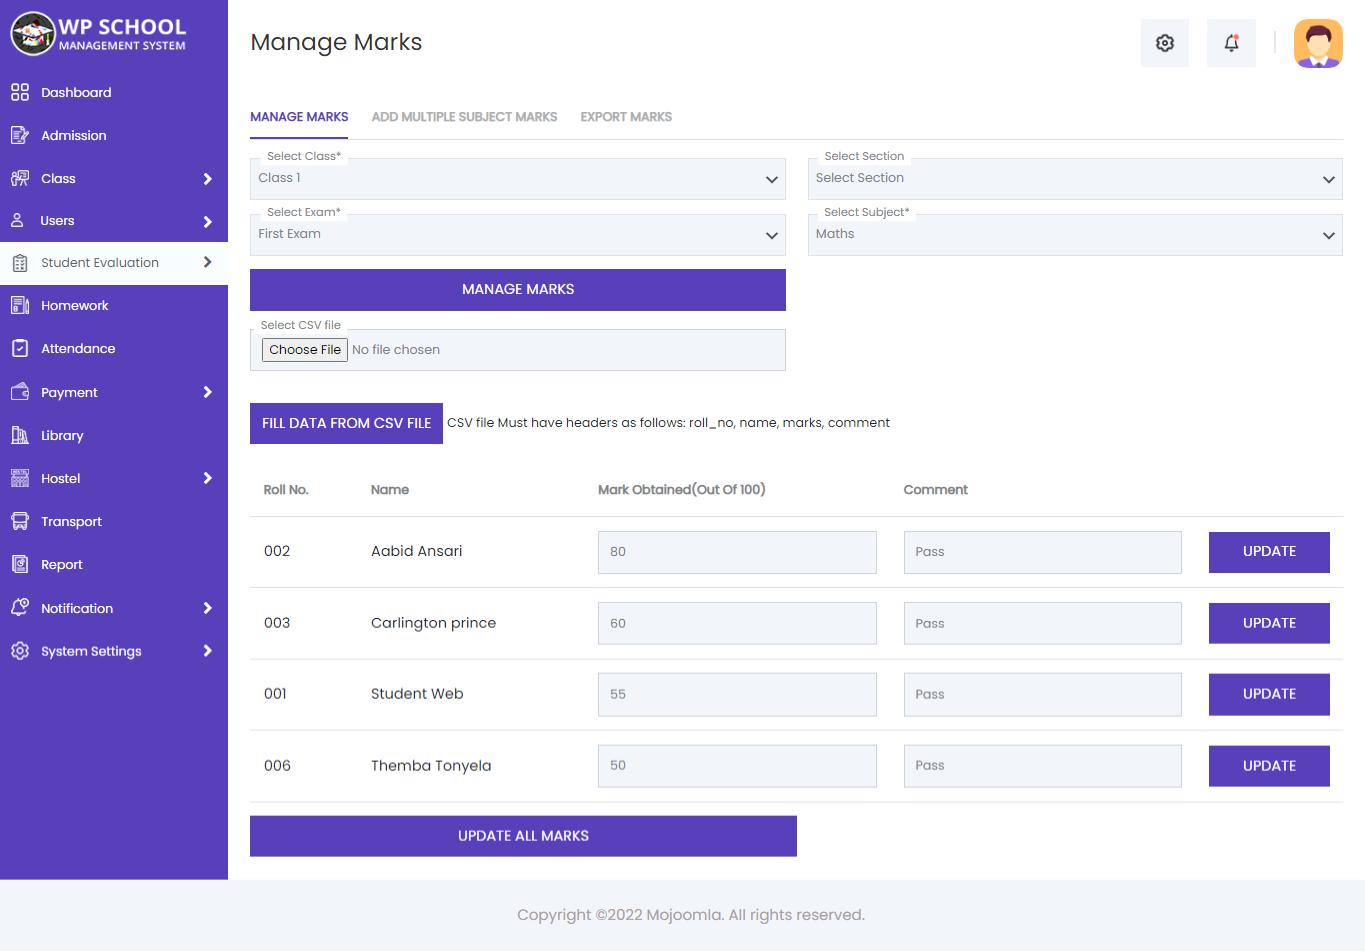
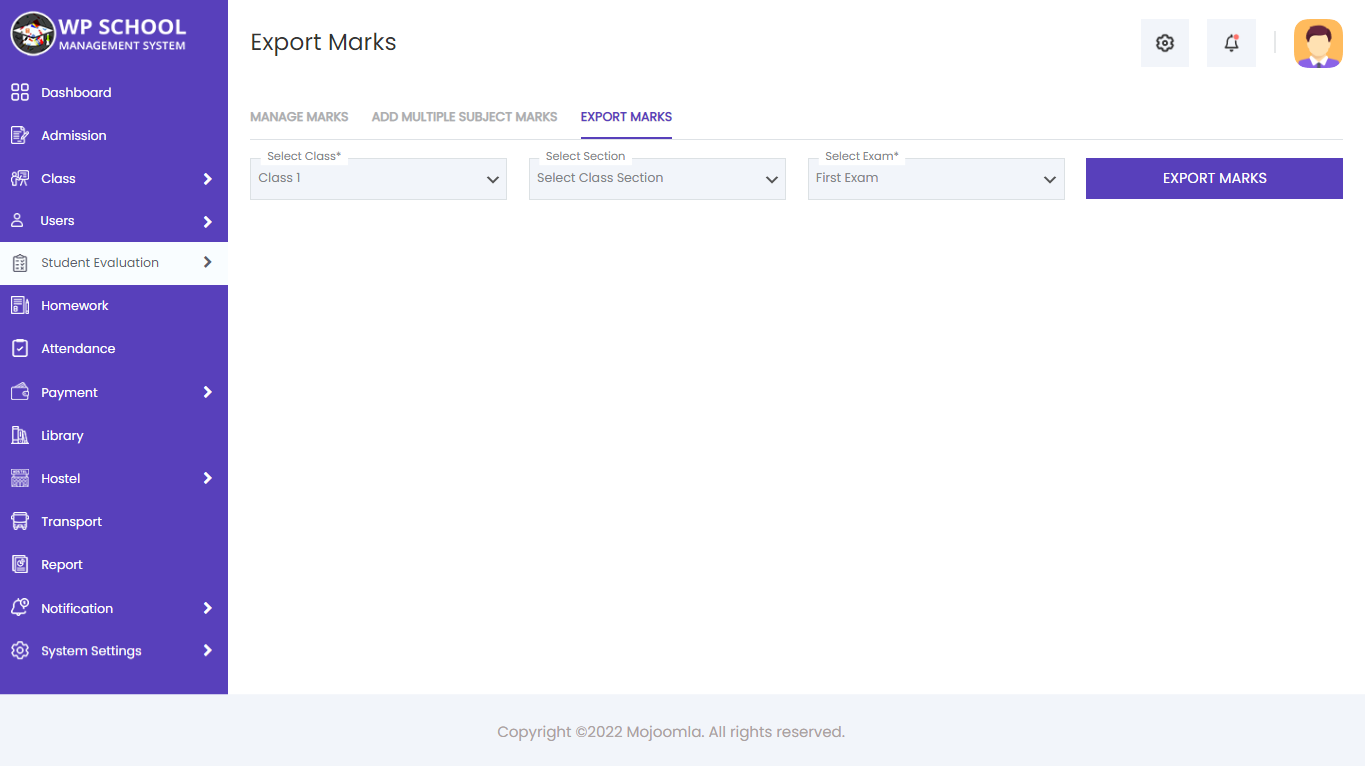
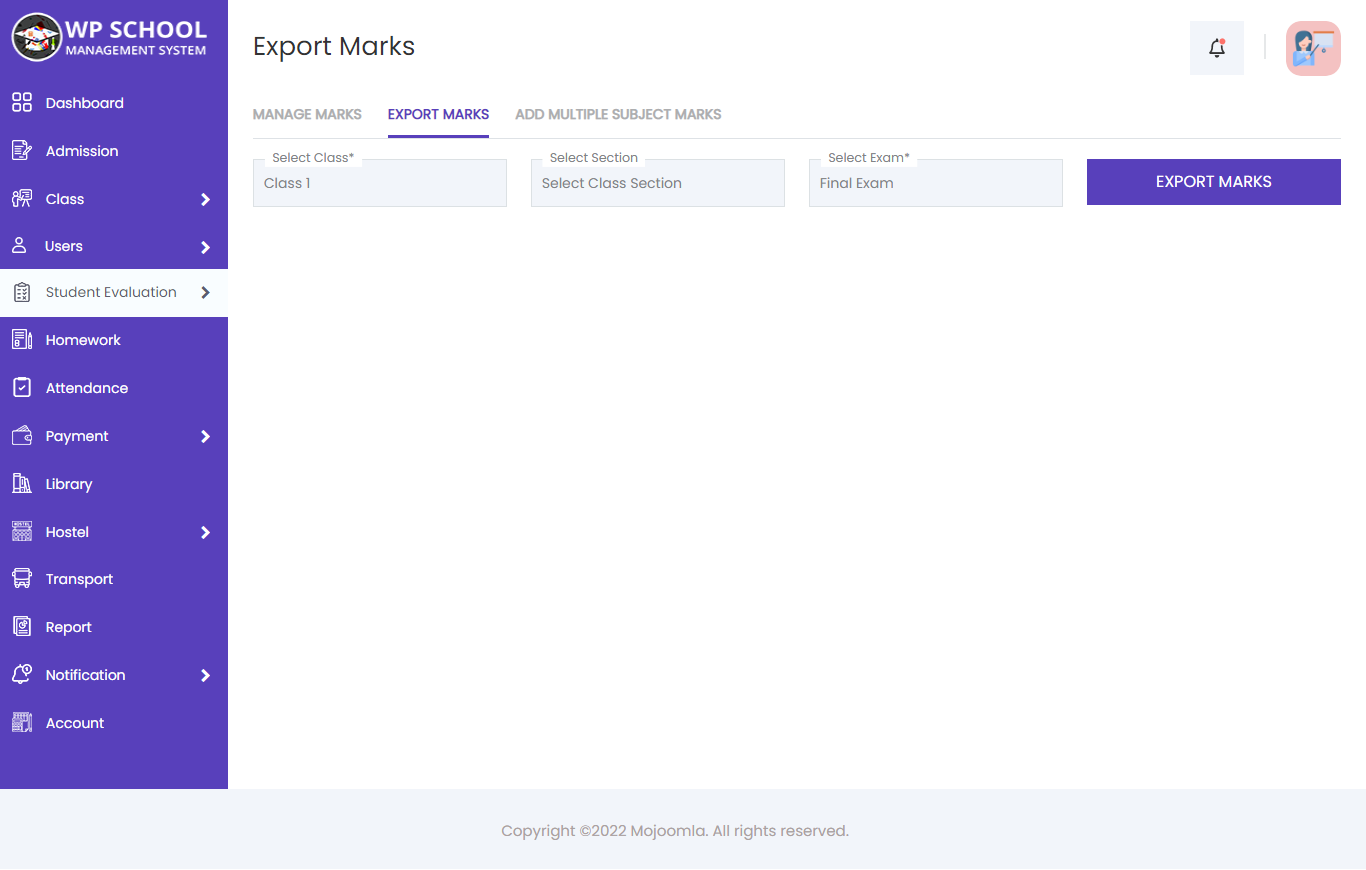
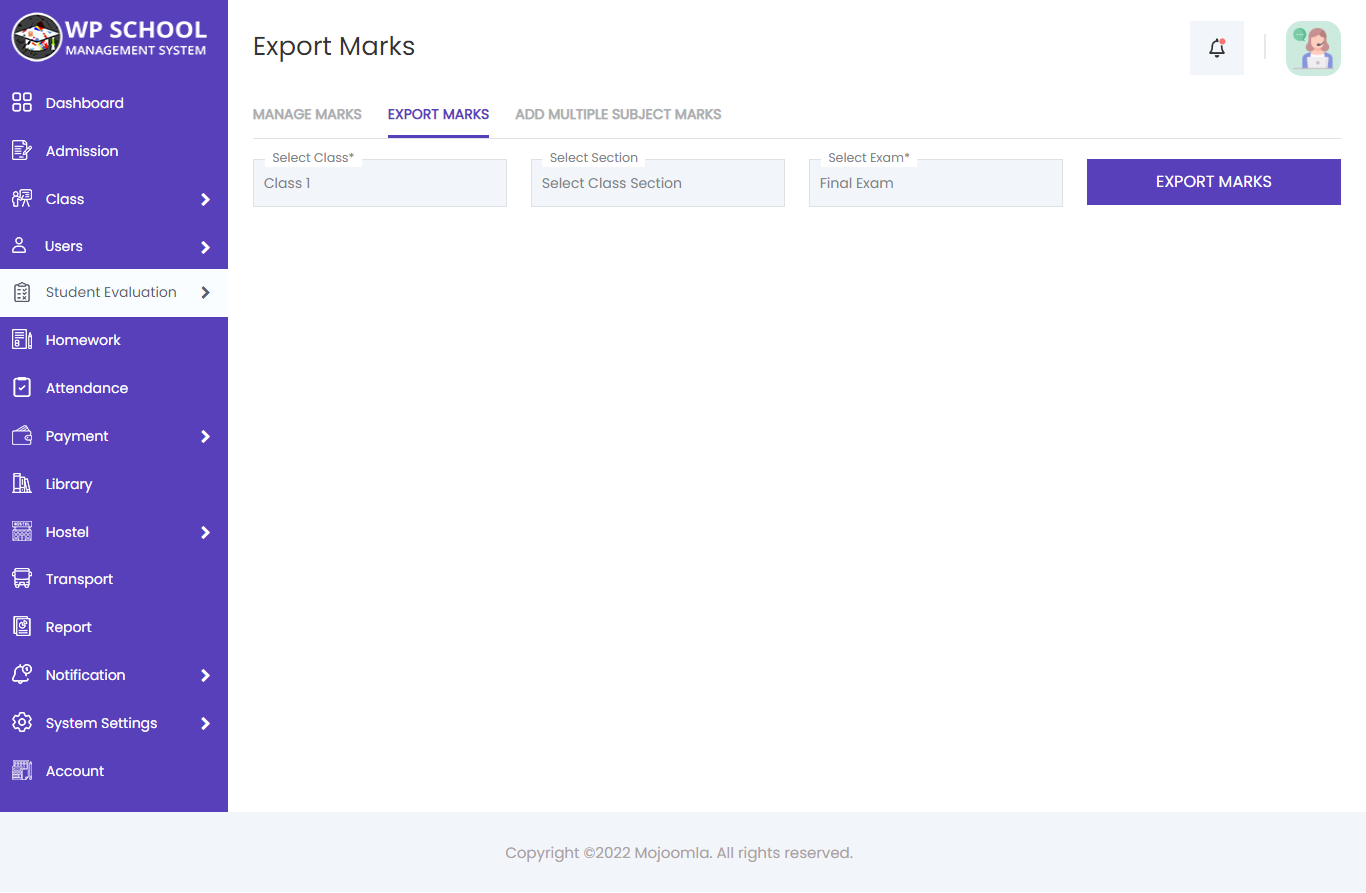
Export Marks
You can export the whole class marks result as a CSV file by clicking the export button from the marks management page.
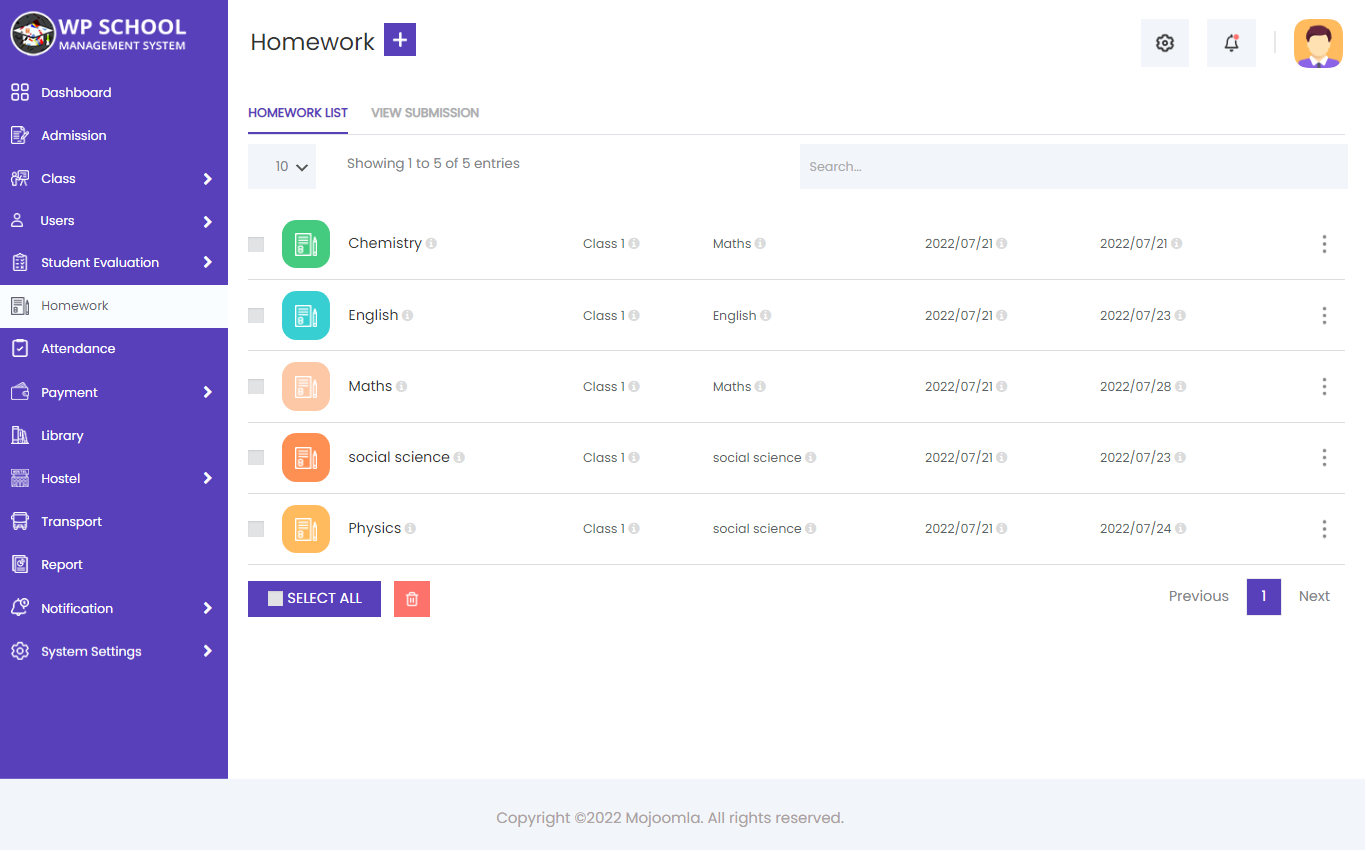
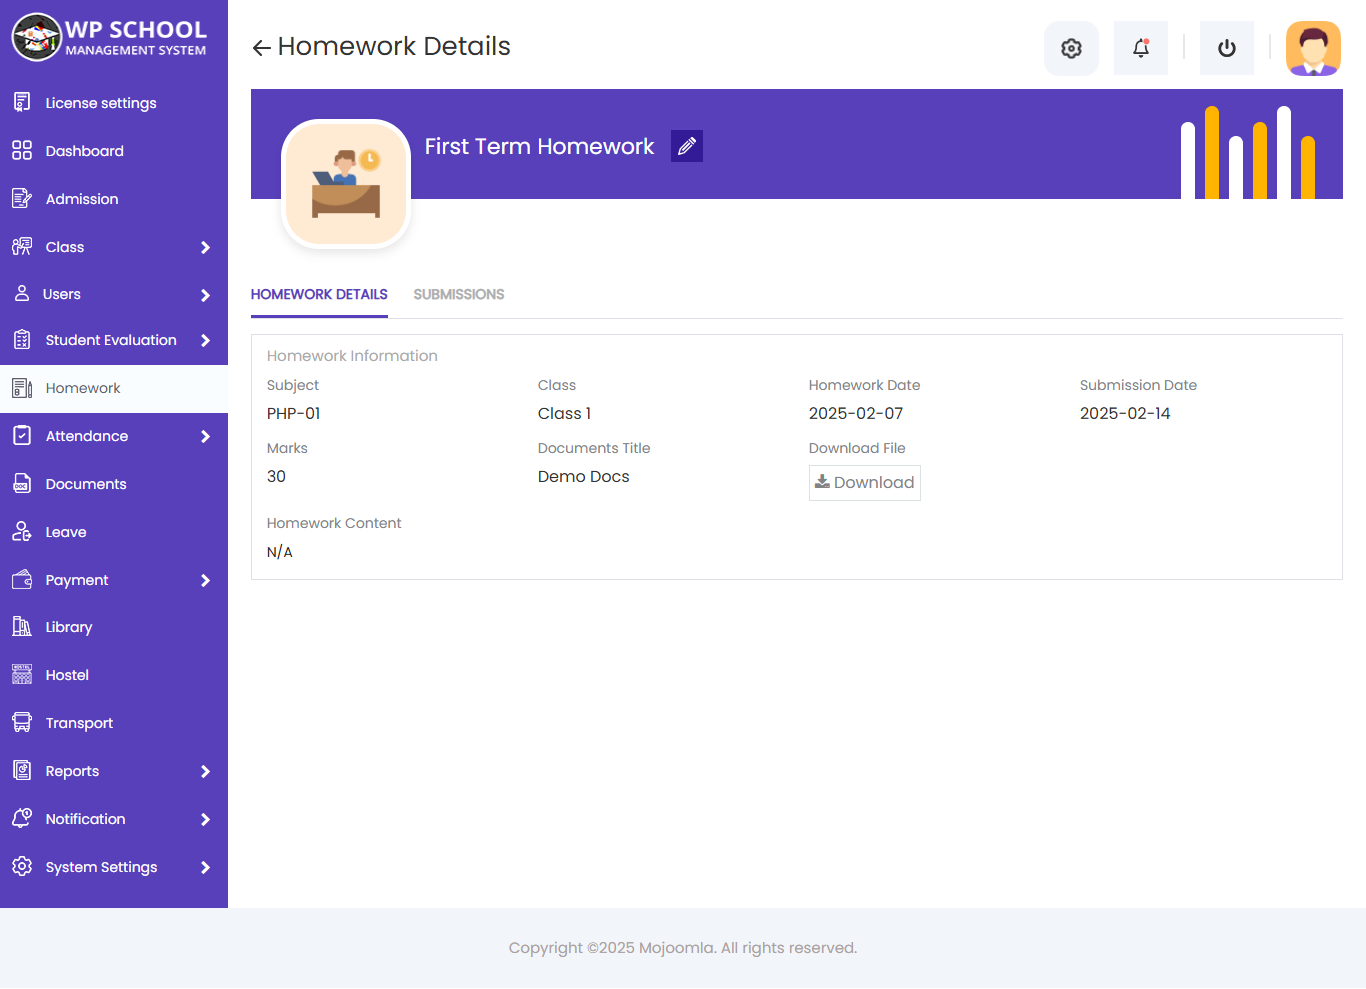
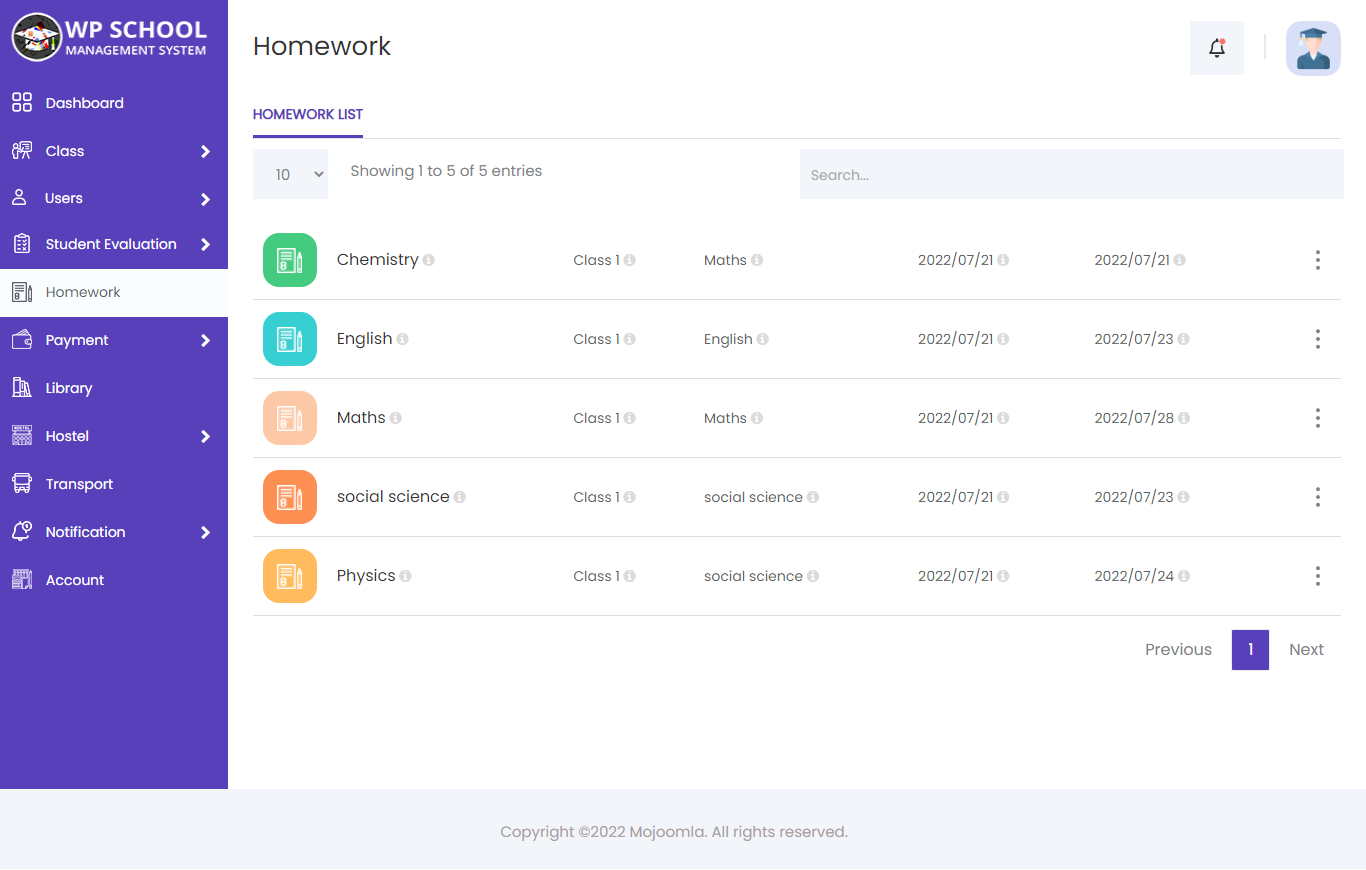
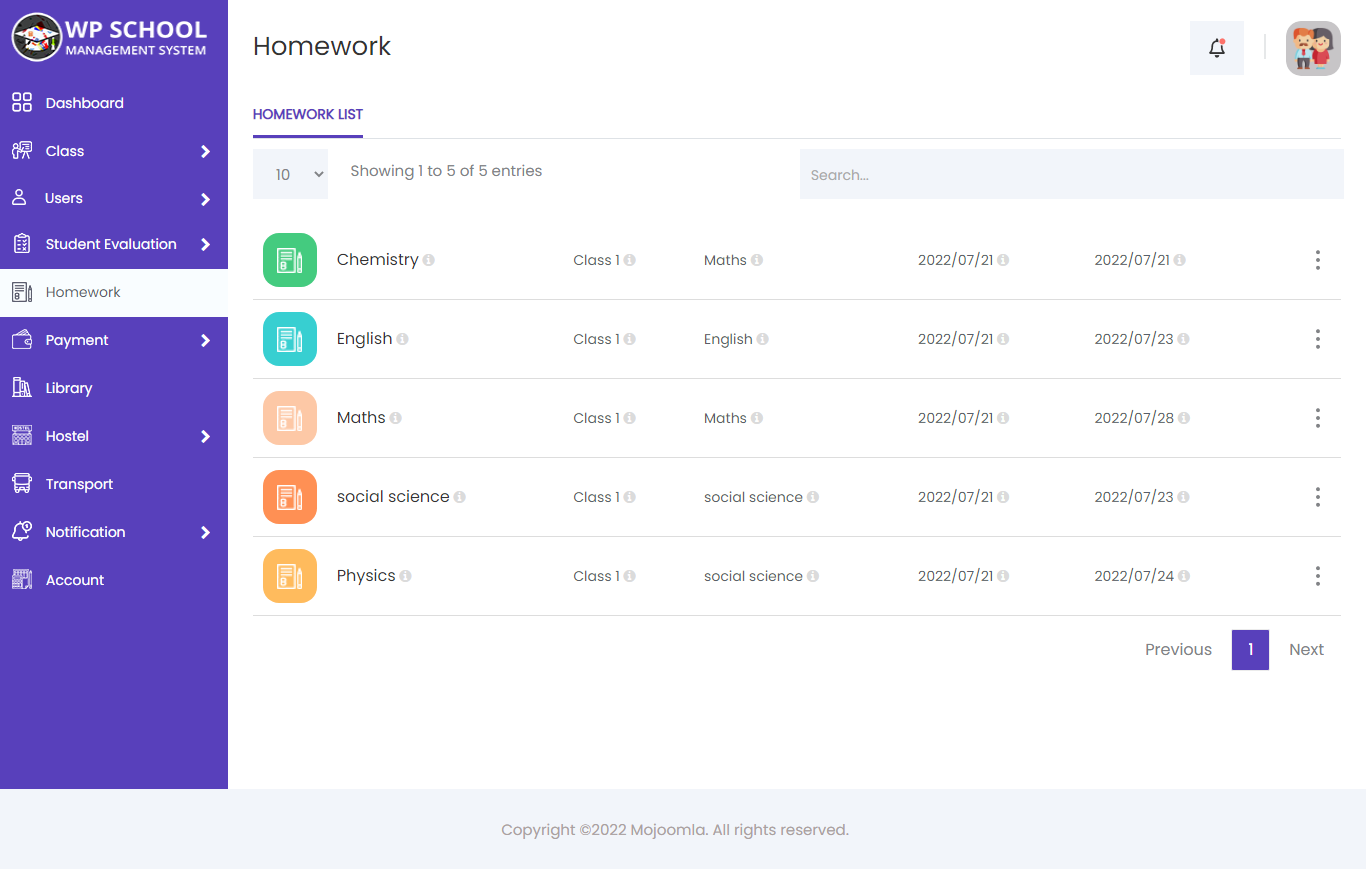
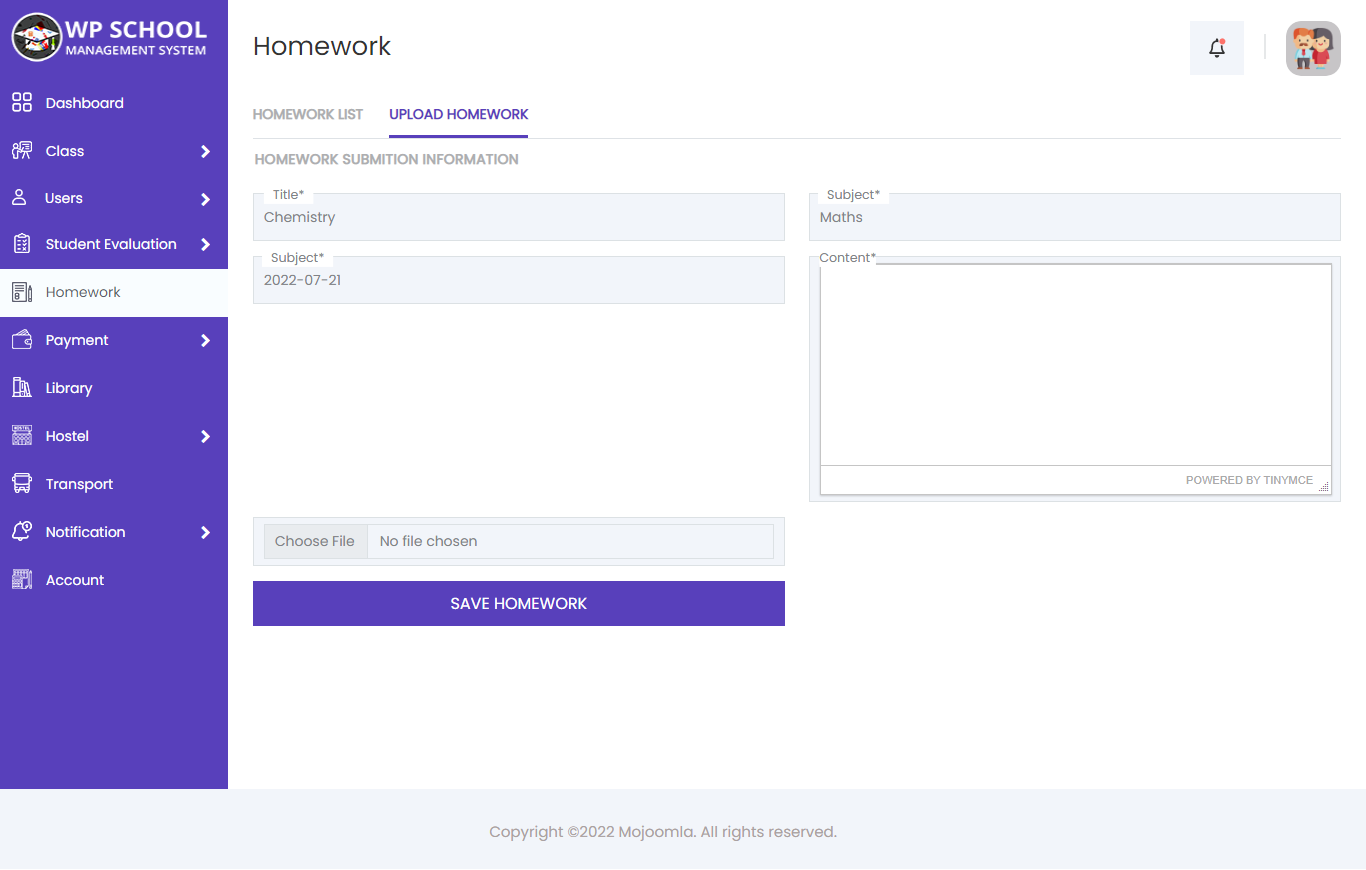
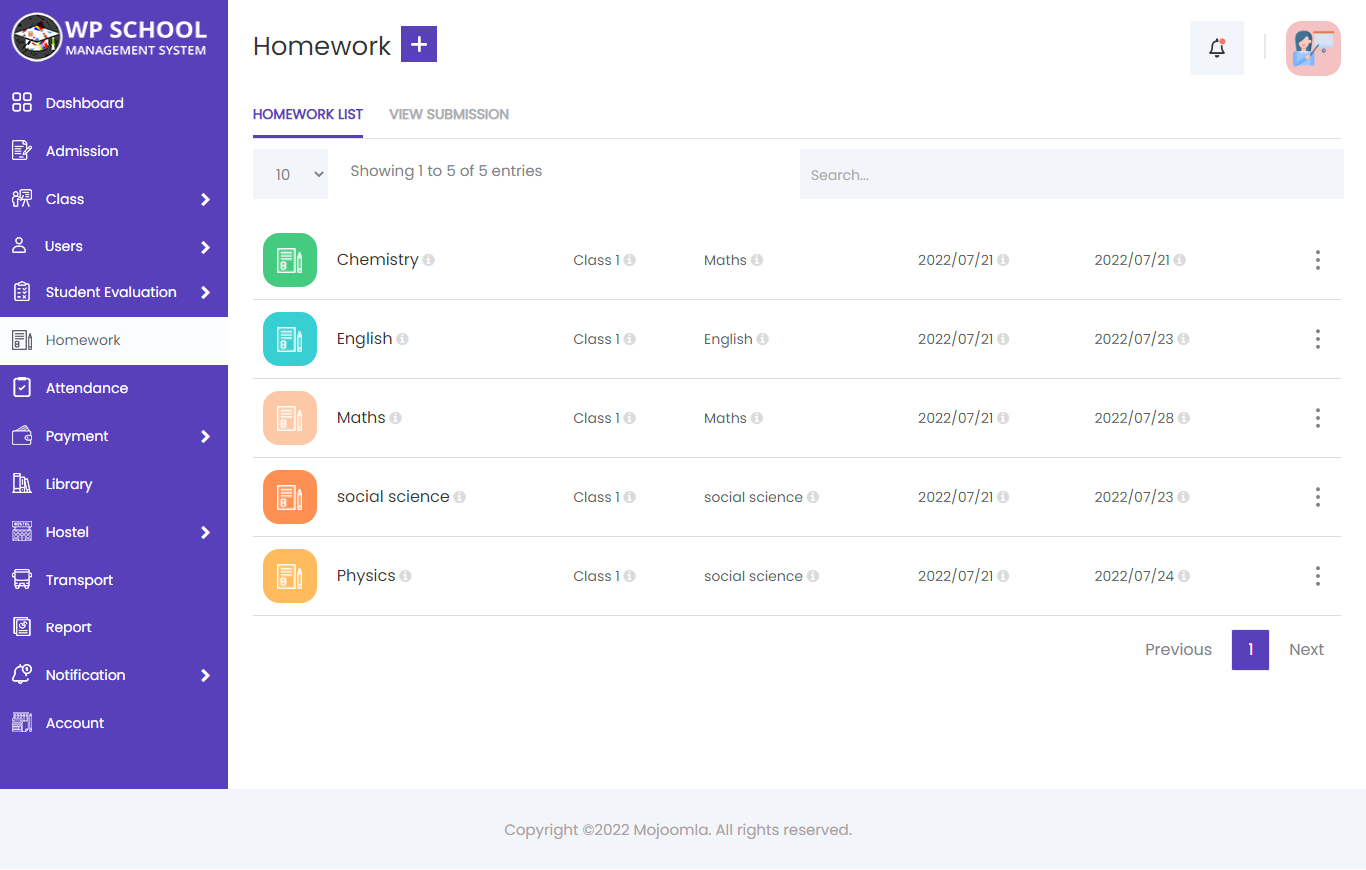
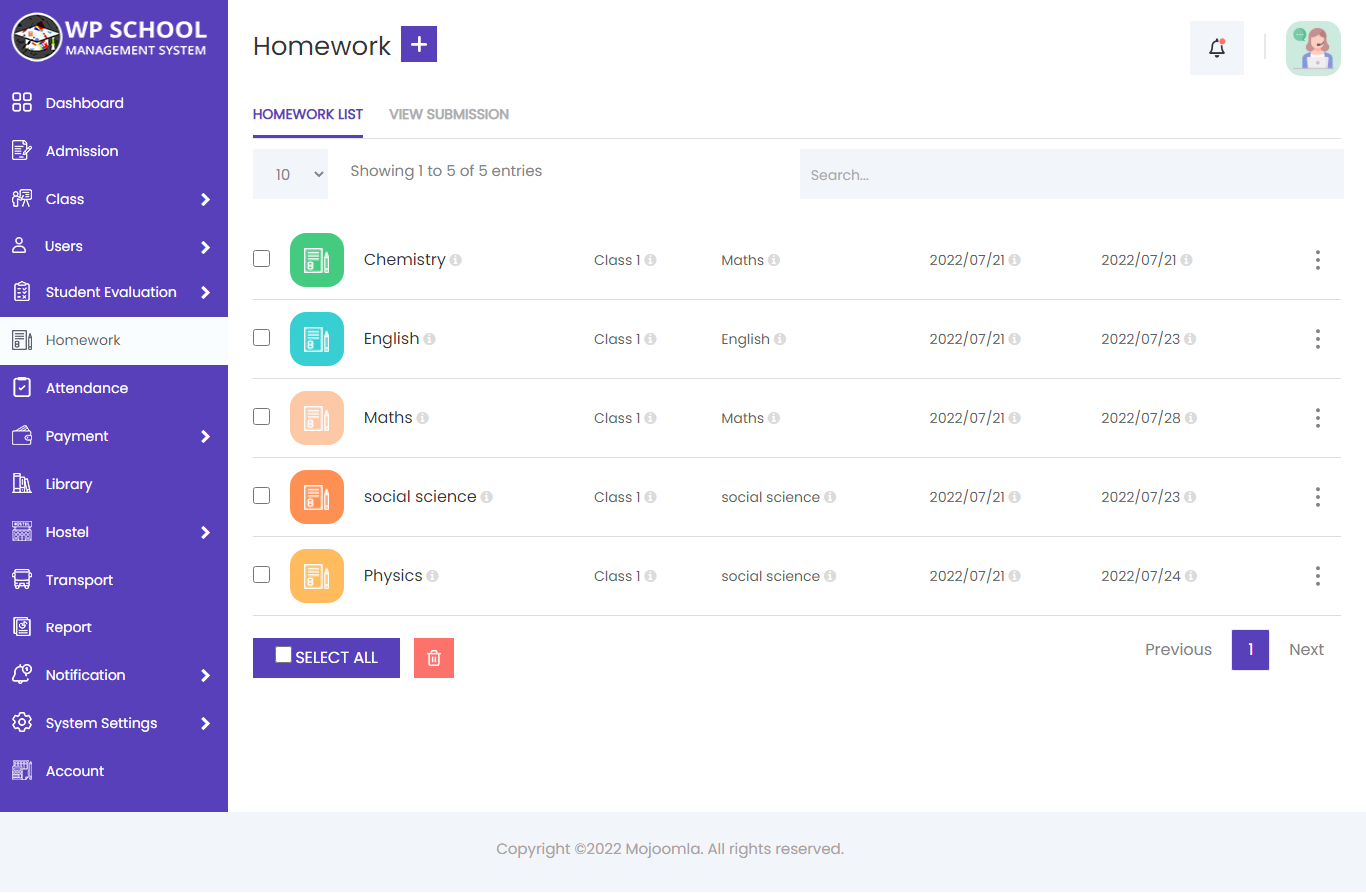
19) Homework
You can manage upcoming and closed homework assignments easily. View student submissions and evaluate them with marks once submitted.
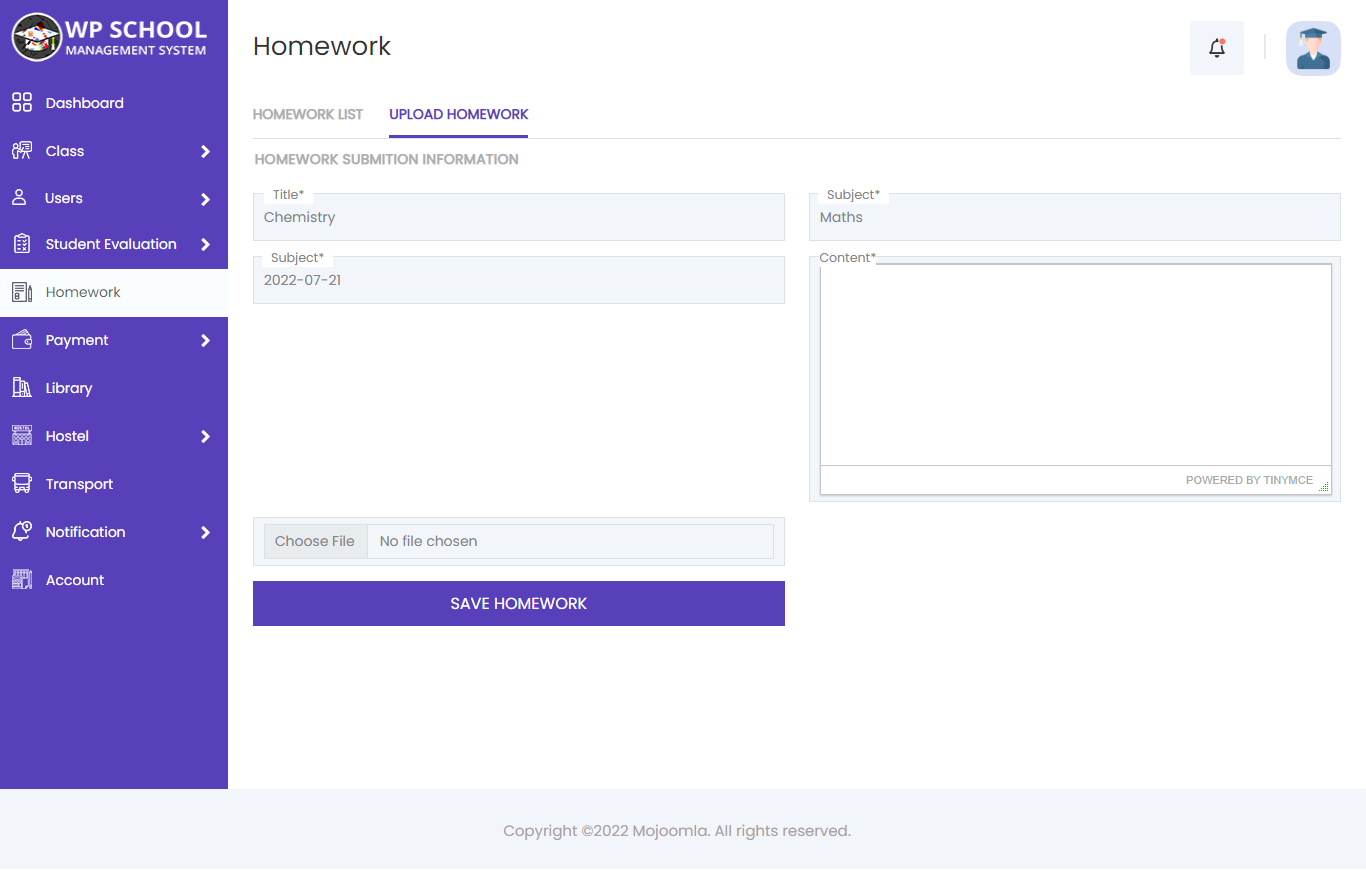
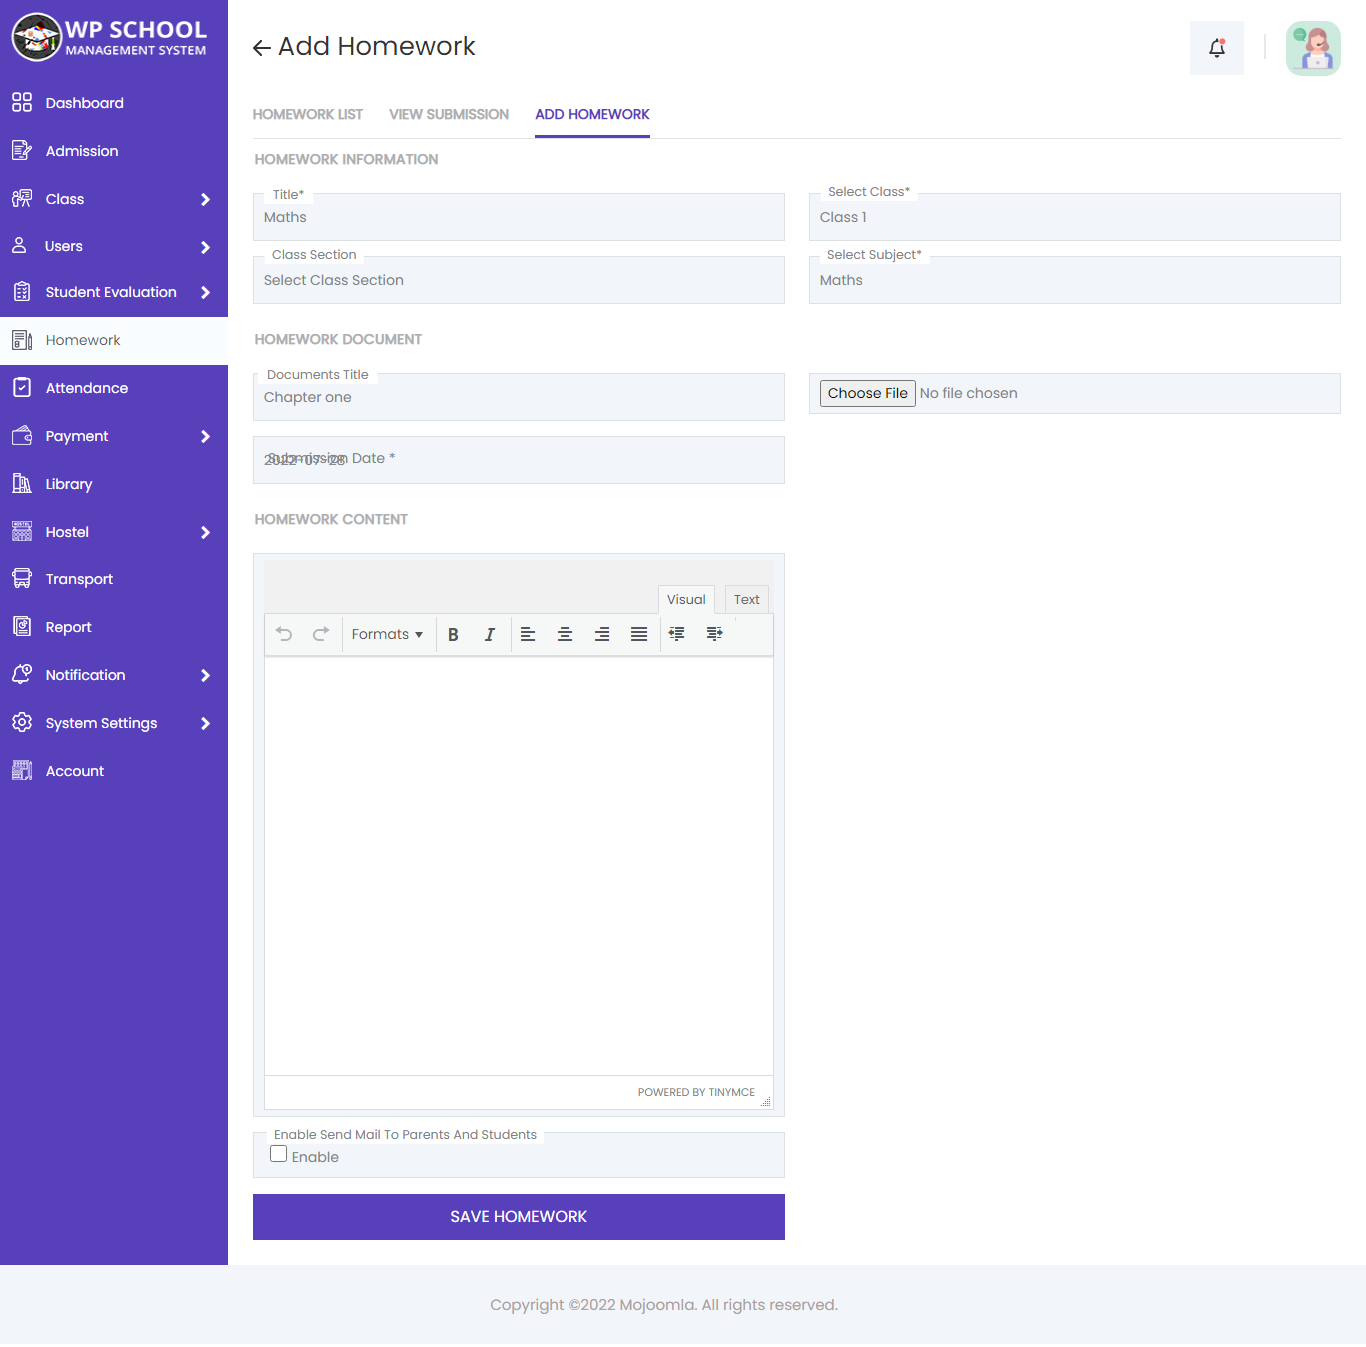
Add Homework
Click Add Homework to create a new assignment. Enter the title, select class and subject, write the content, set a submission deadline, optionally attach a document, and enter the maximum homework marks.
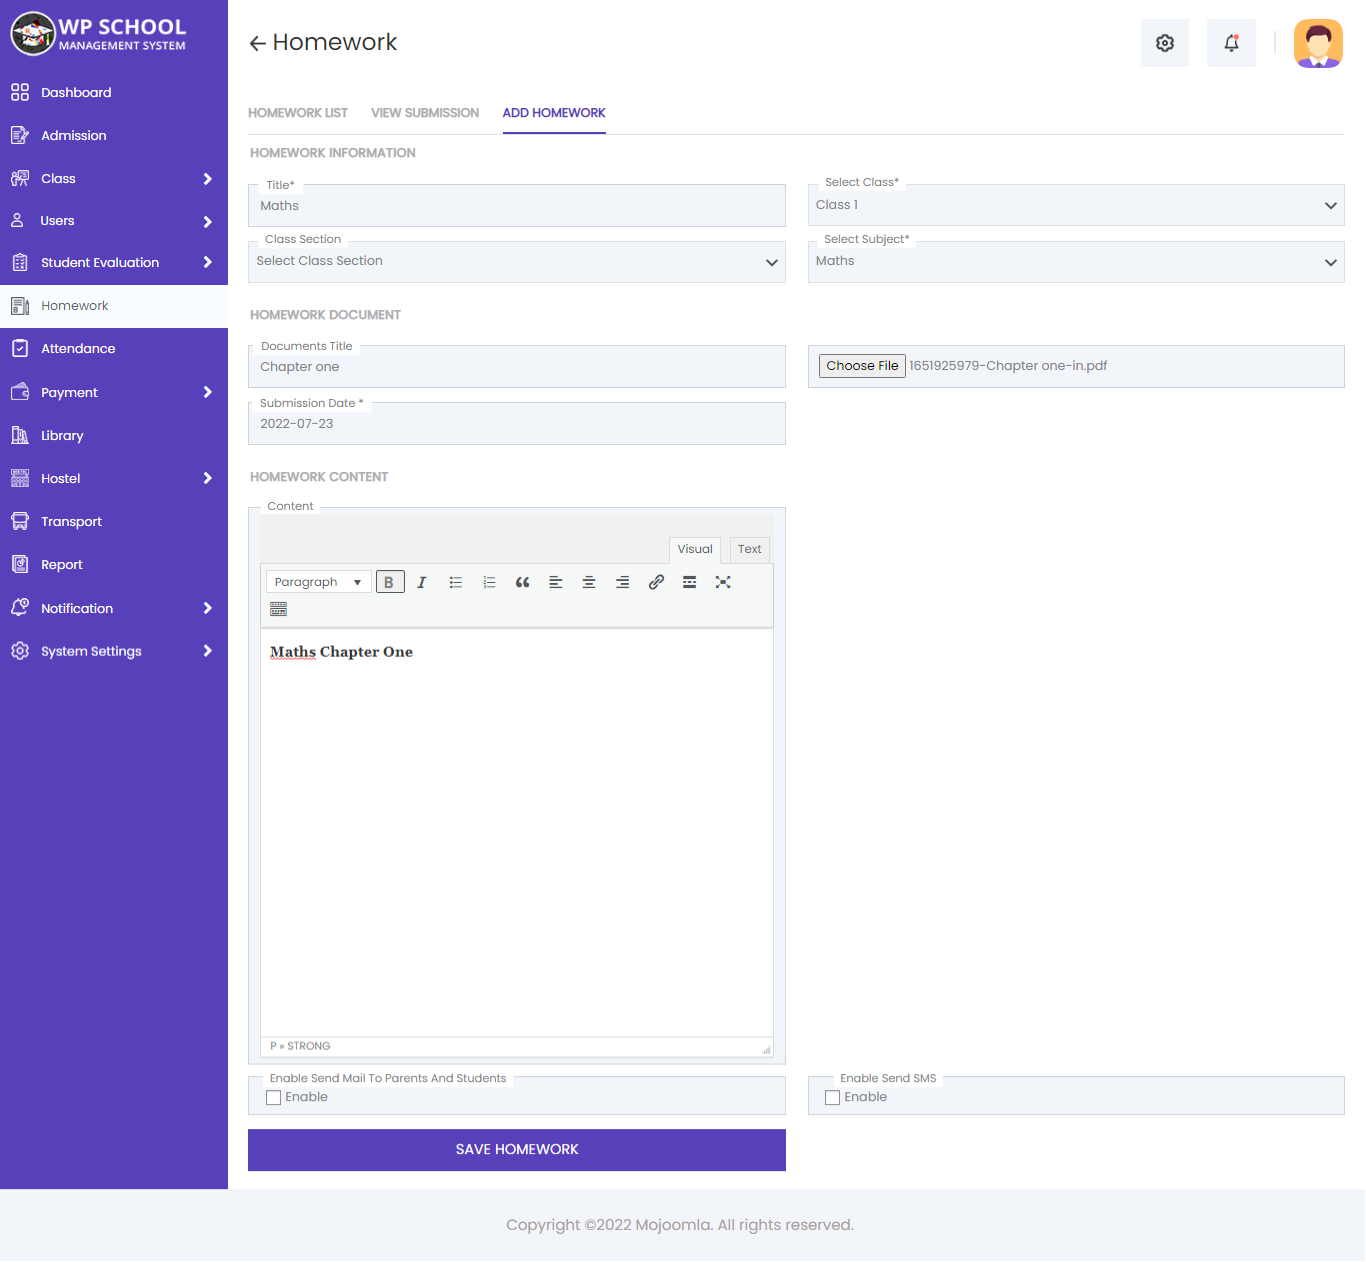
| Field | Description |
|---|---|
| Title | Assignment title |
| Class / Subject | Target class and subject |
| Content | Detailed description |
| Submission Date | Deadline for submission |
| Document File | Attach reference files |
| Homework Marks | Maximum marks awarded |
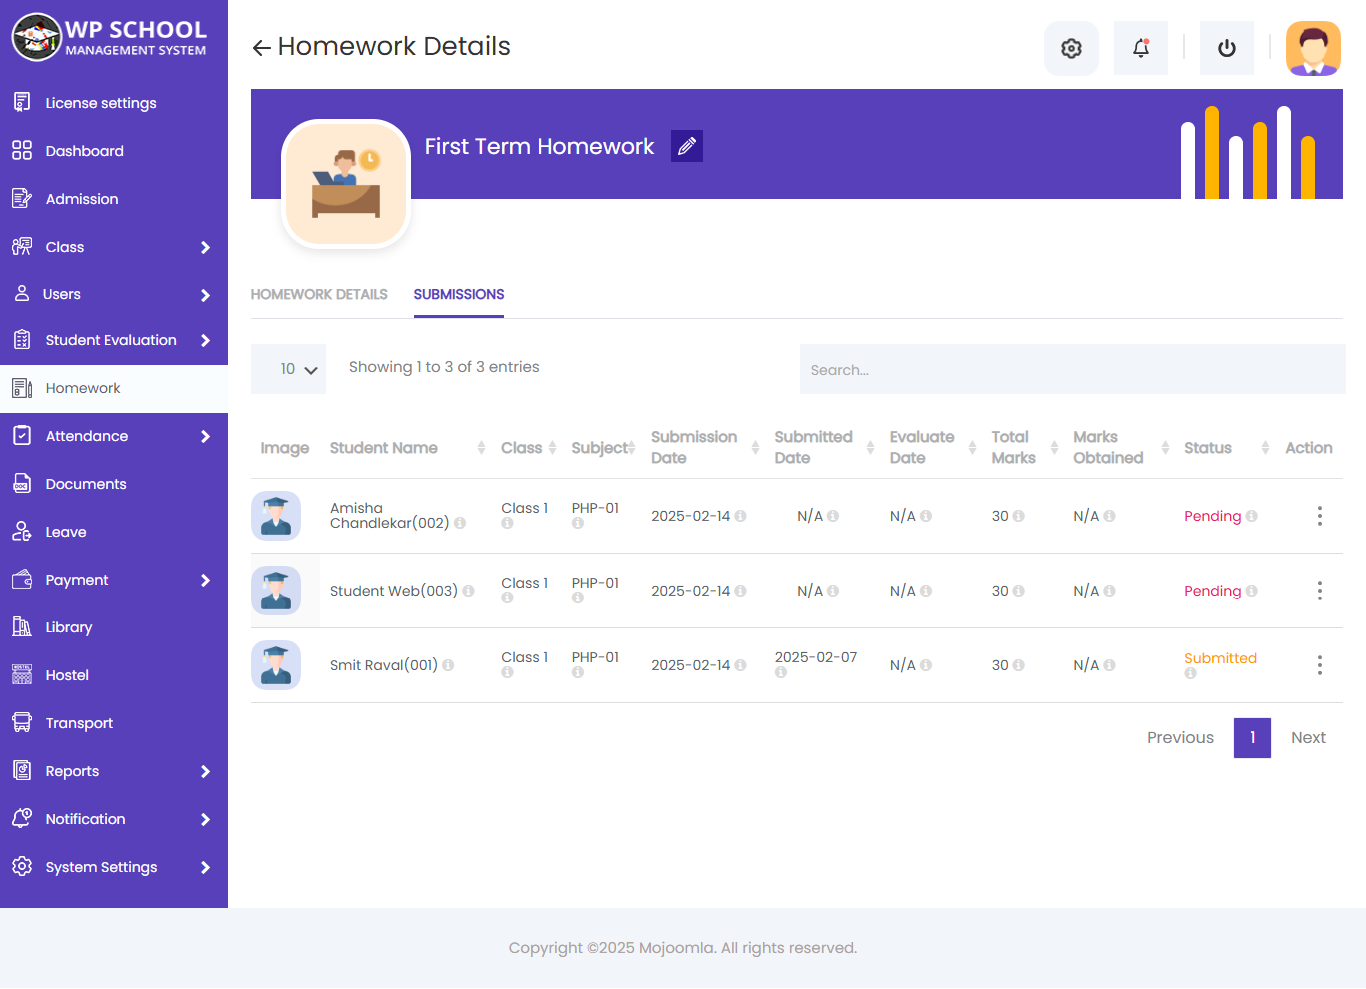
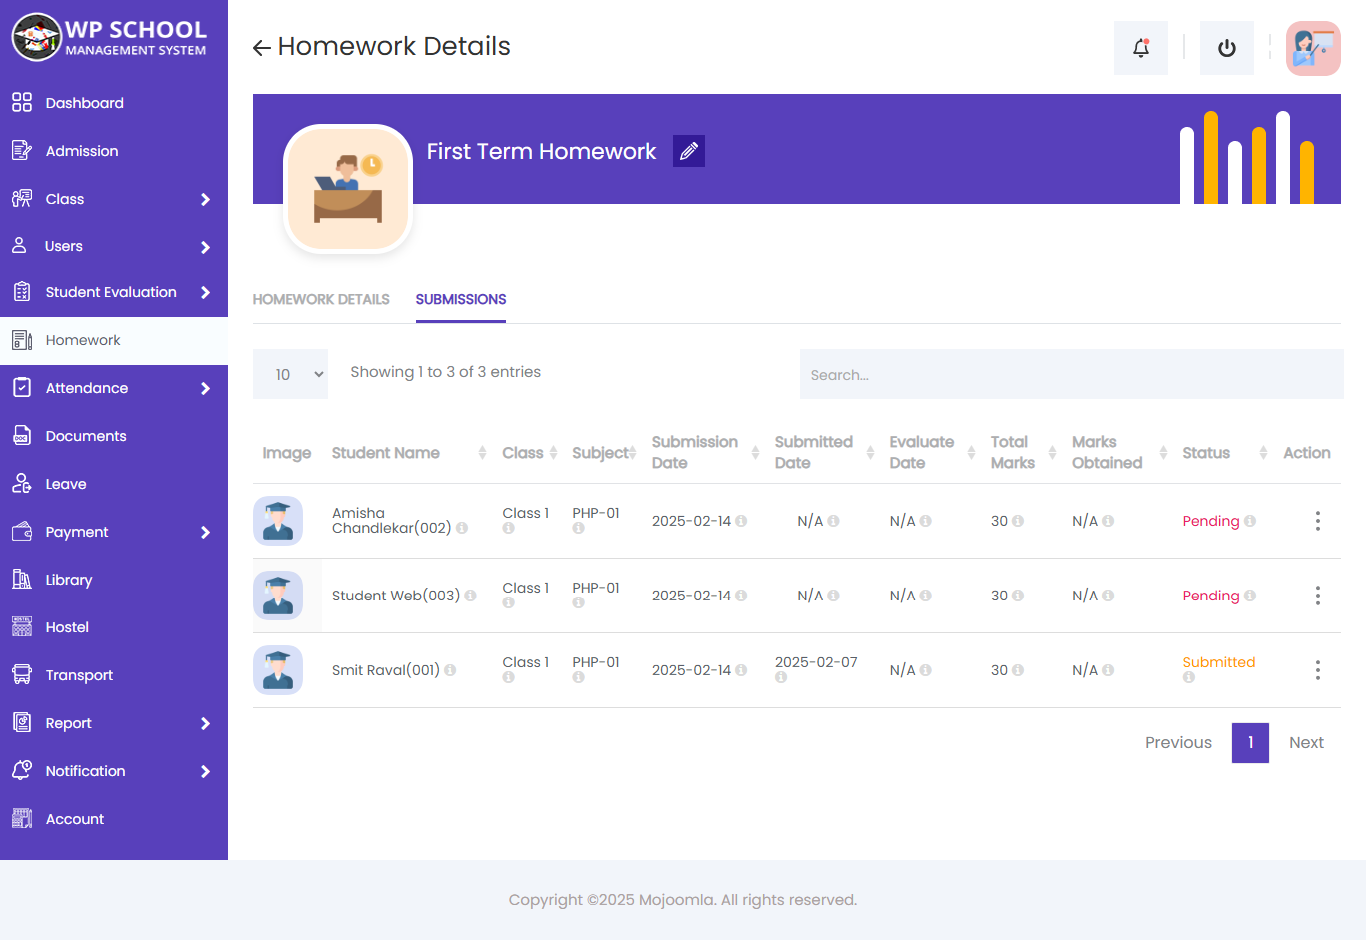
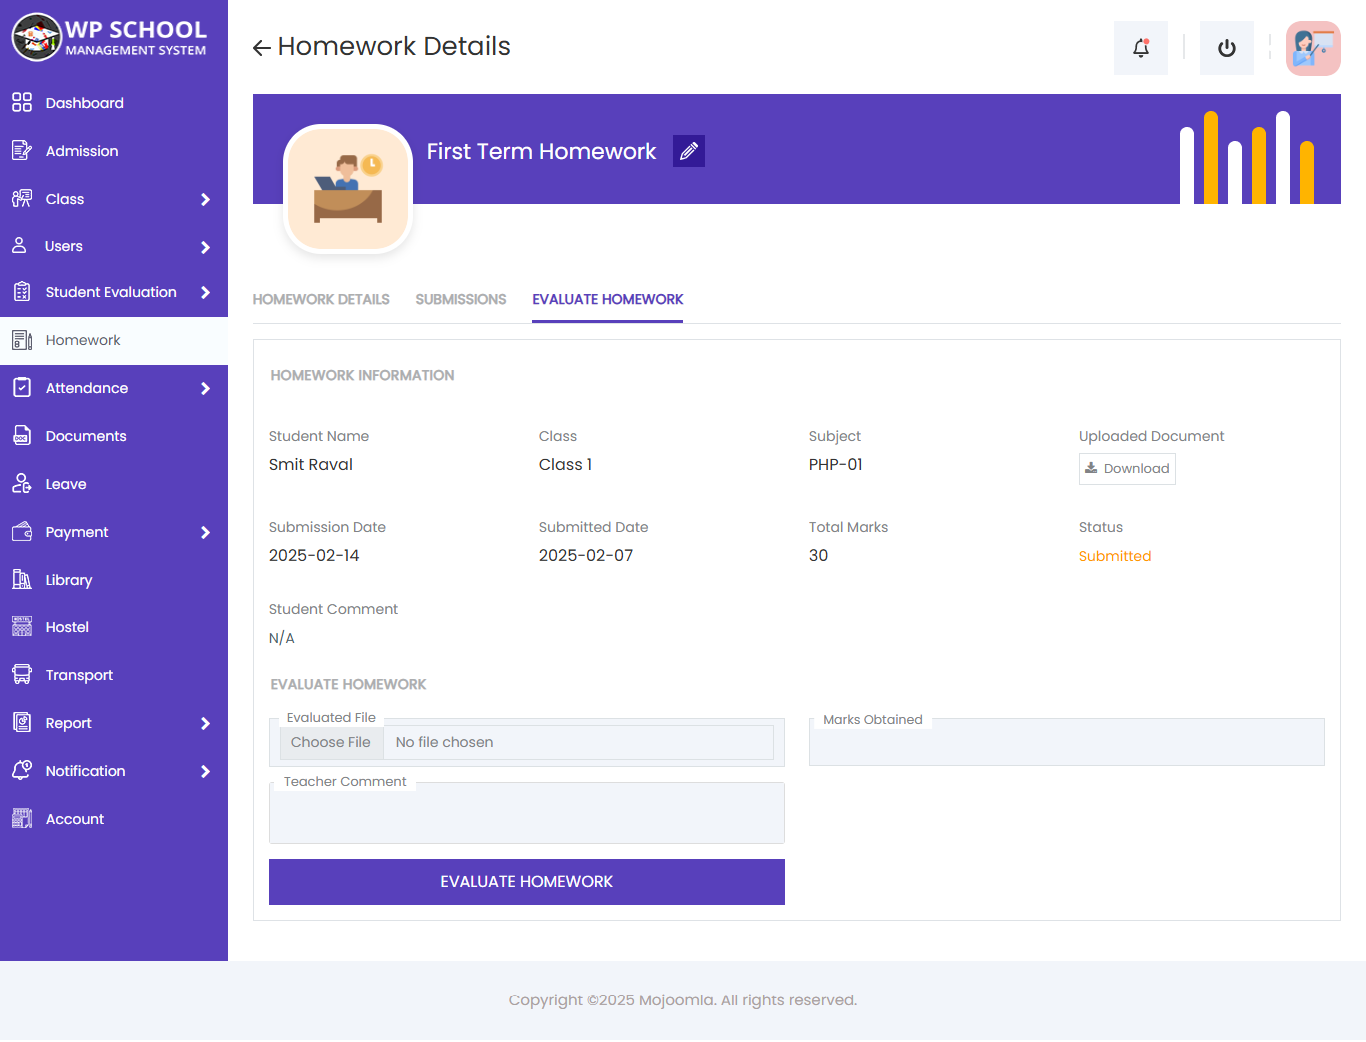
Homework Submissions & Evaluation
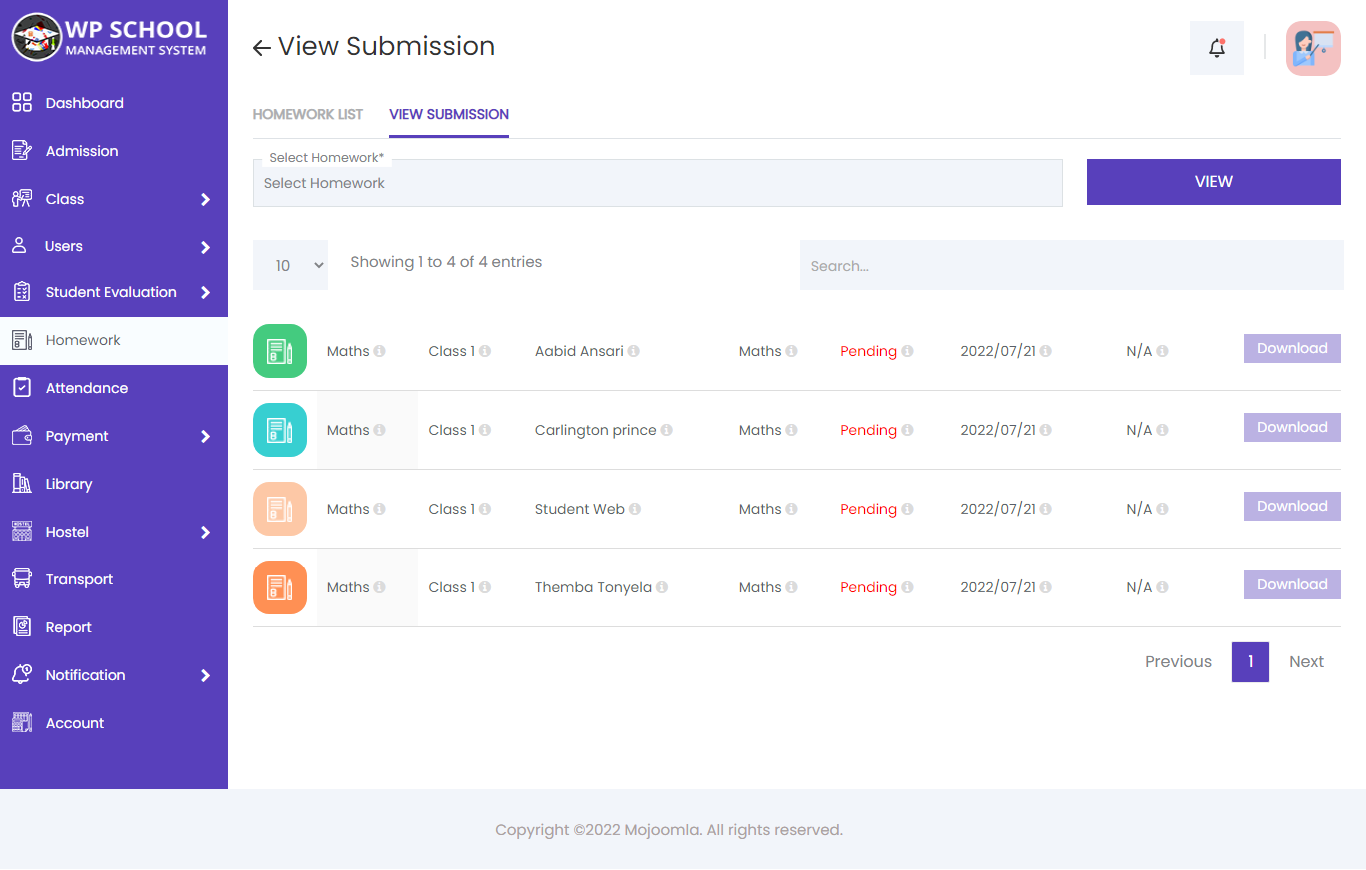
You can view homework details and see the list of all student submissions by clicking on the homework title.
View a list of all submitted homework files from students for this assignment.
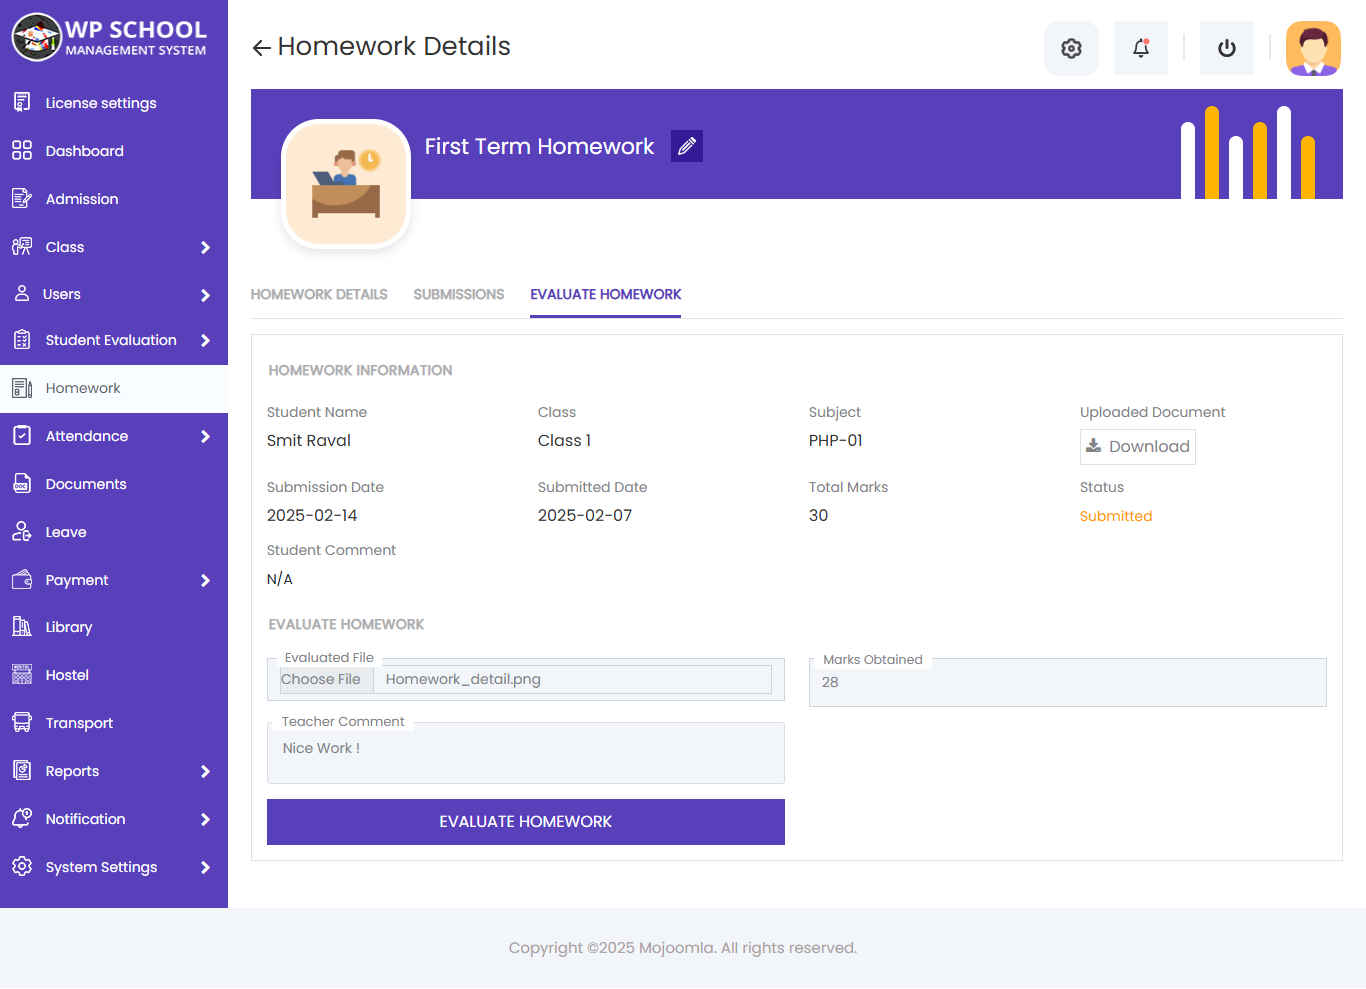
After student submission, you can evaluate submitted homework and assign marks to each student.
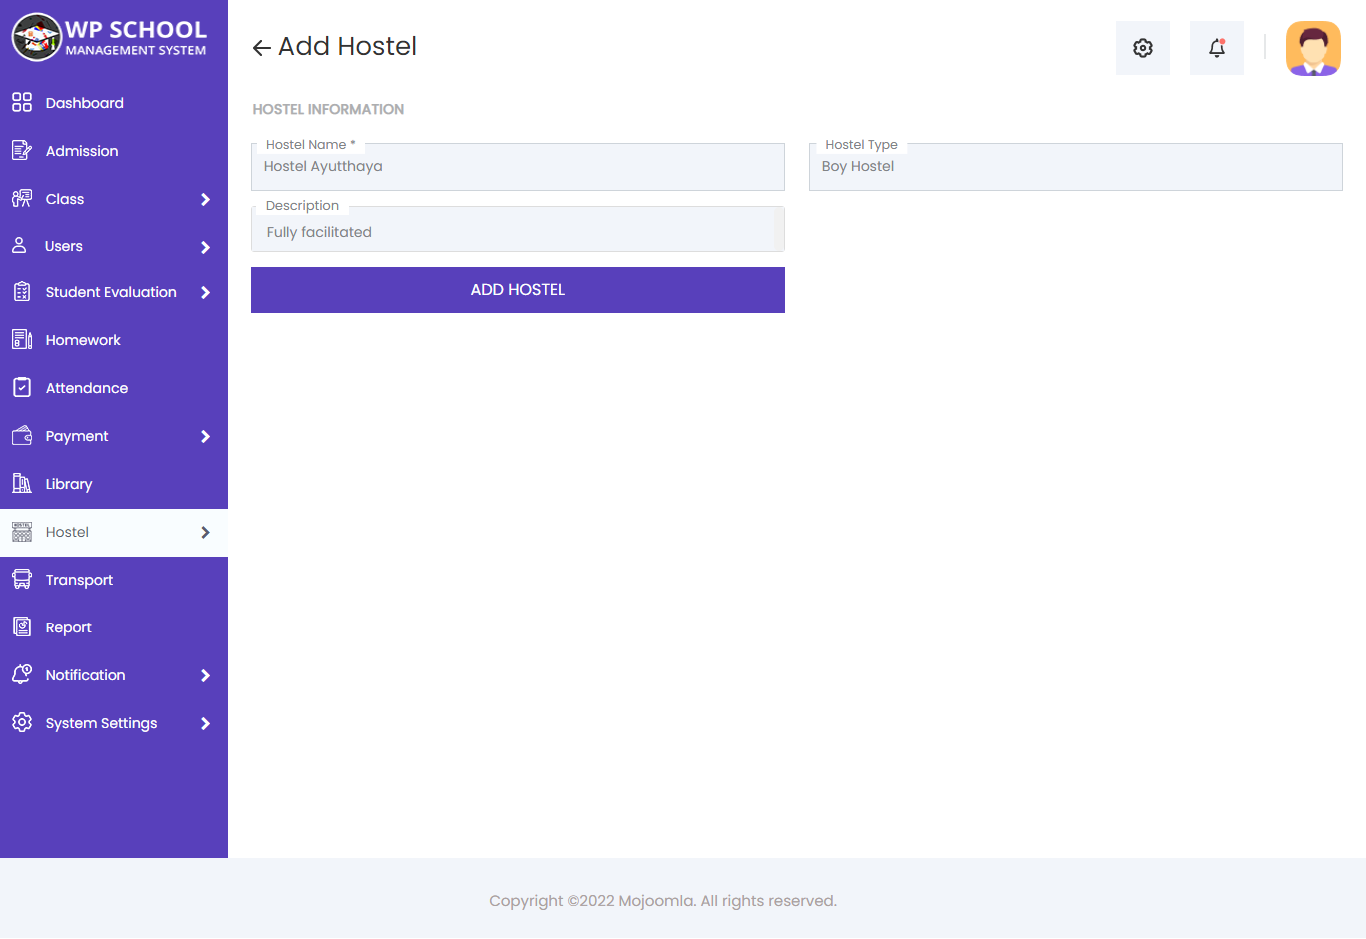
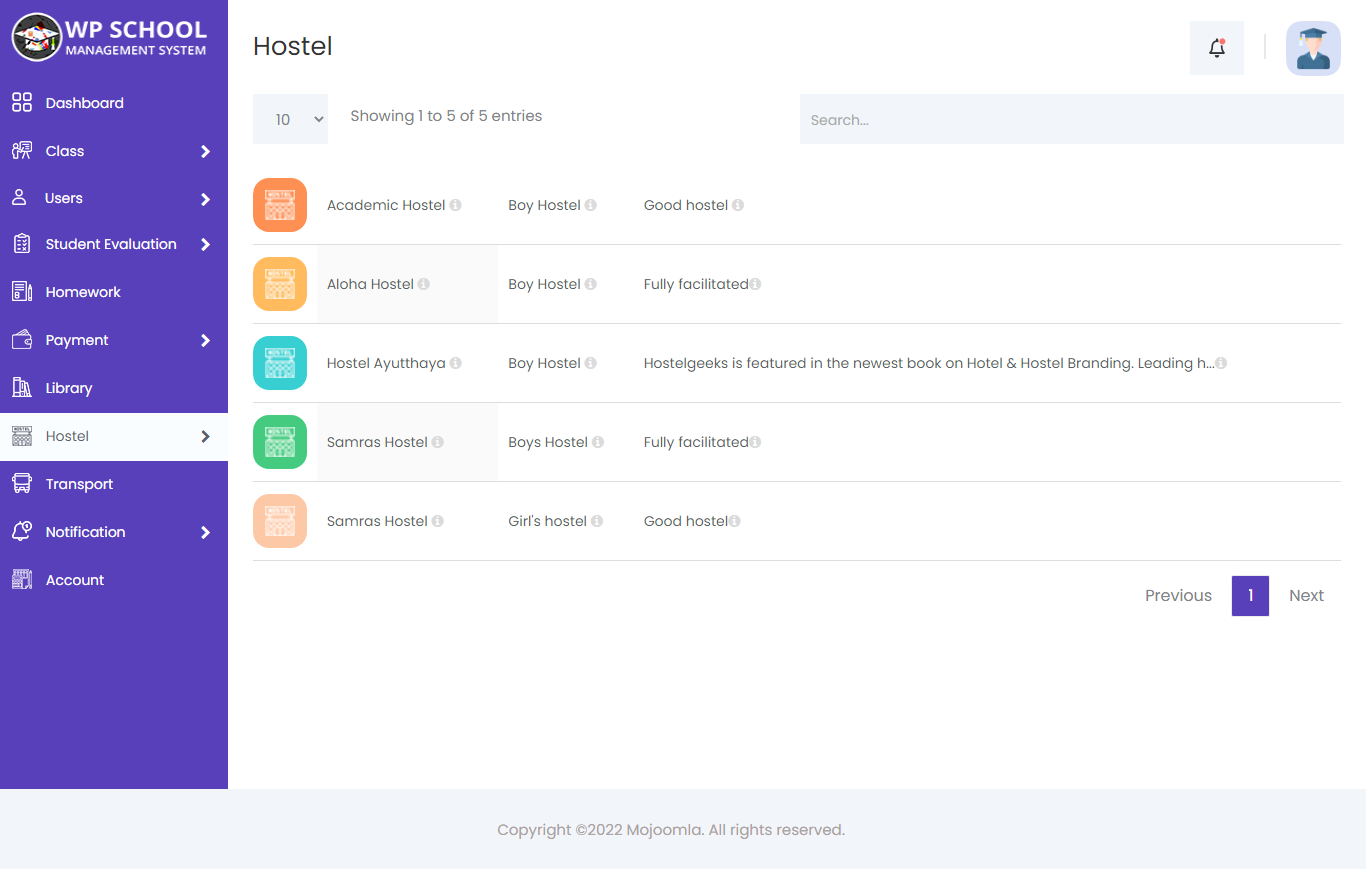
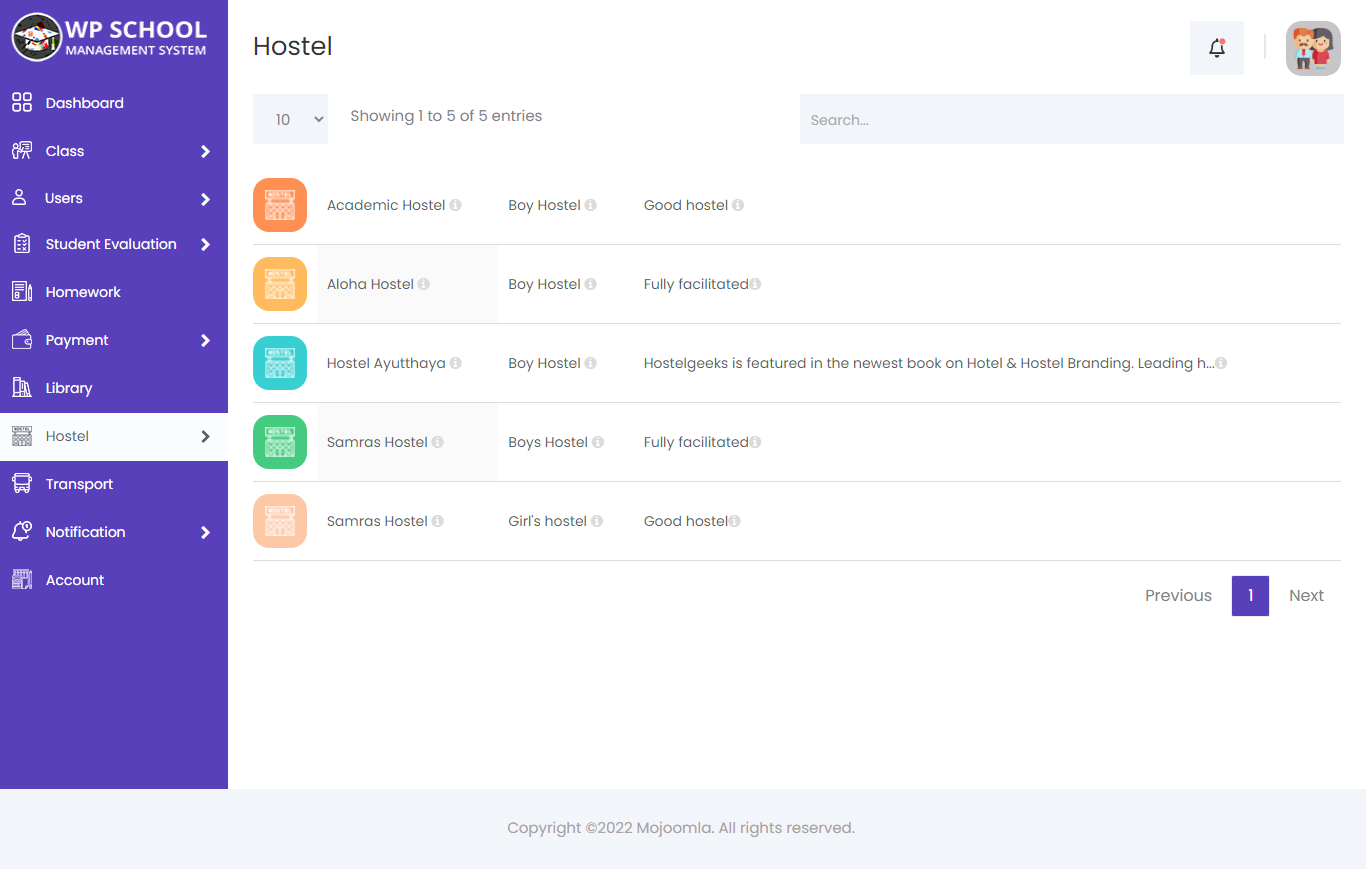
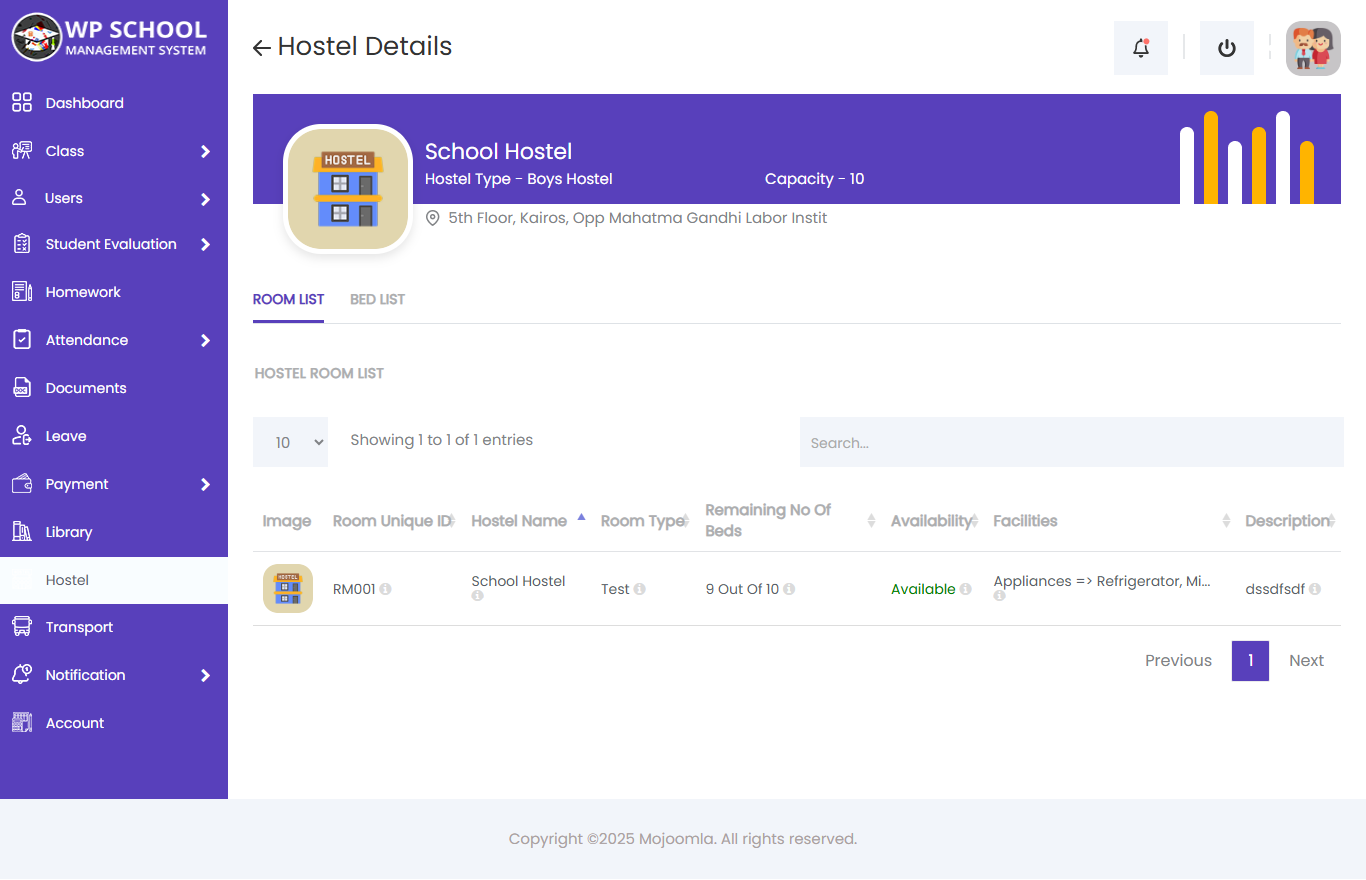
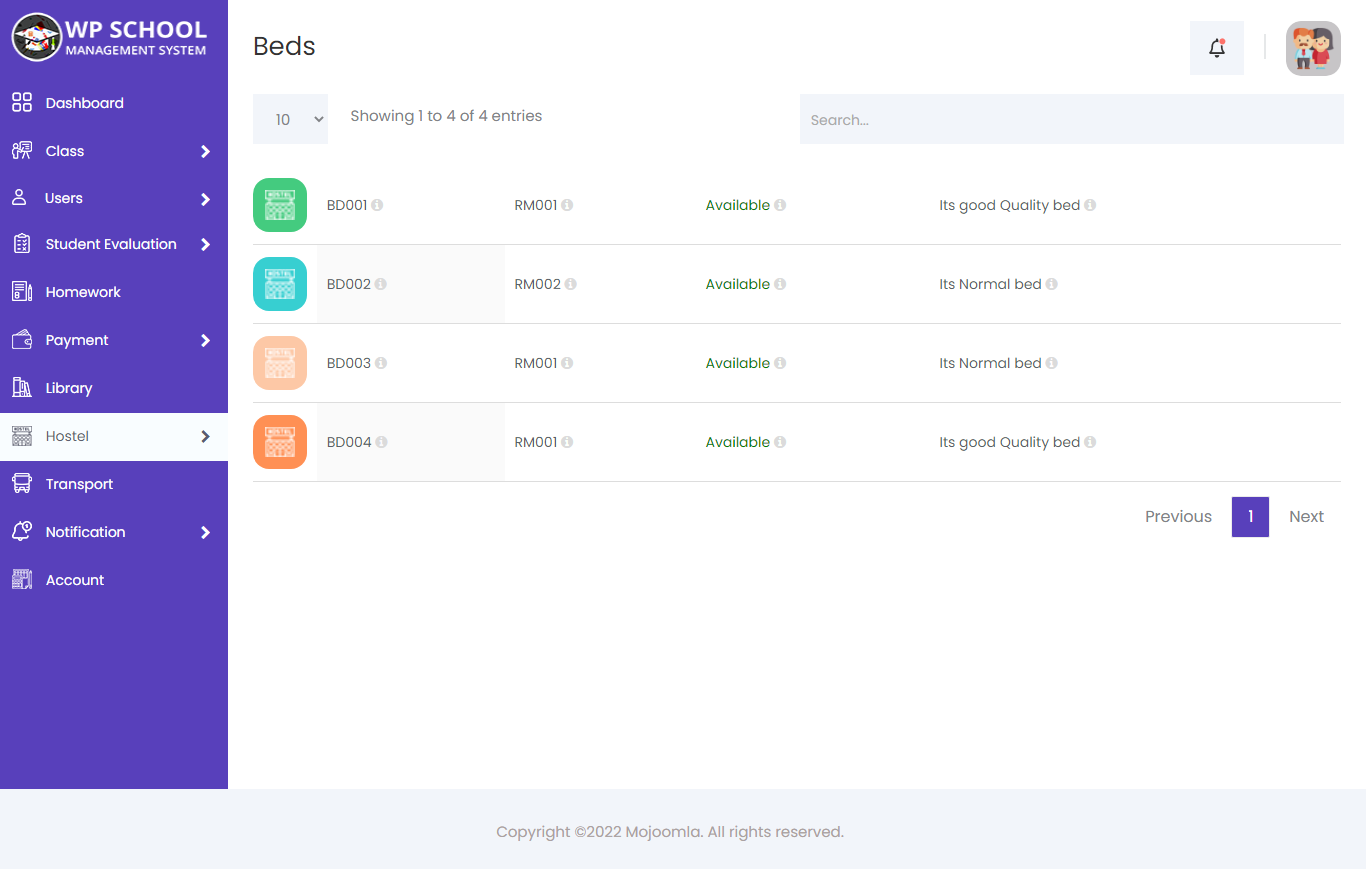
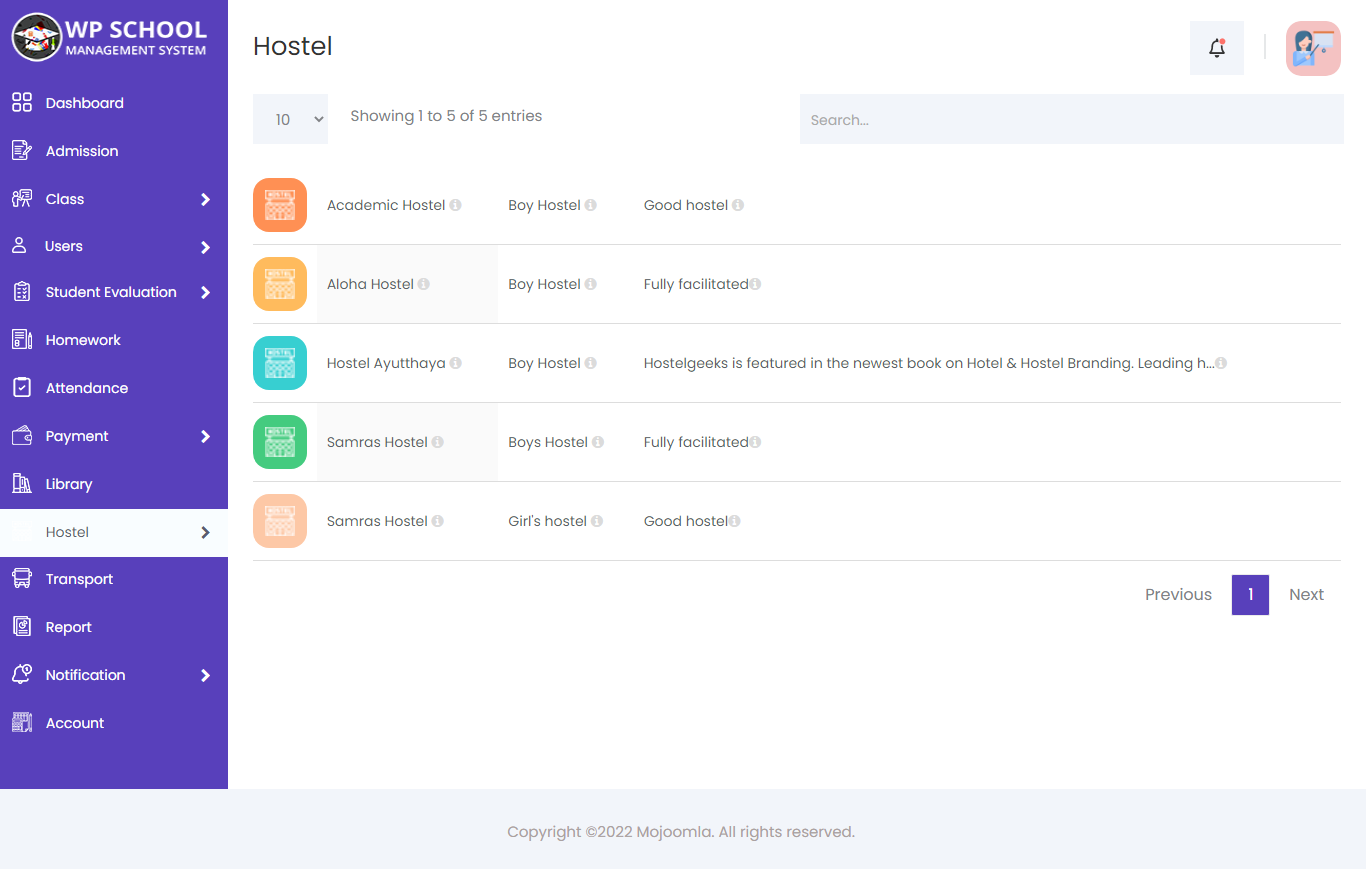
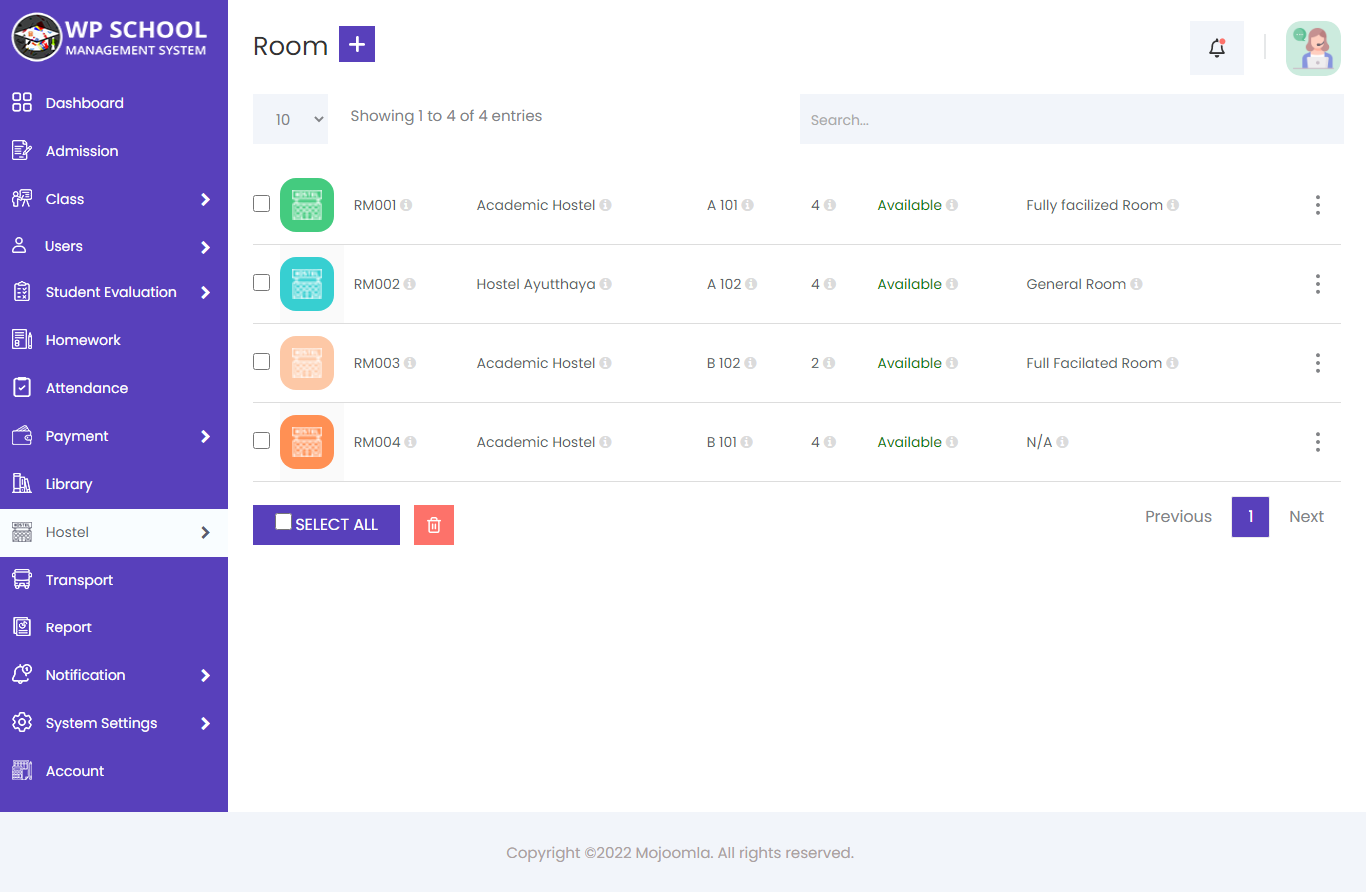
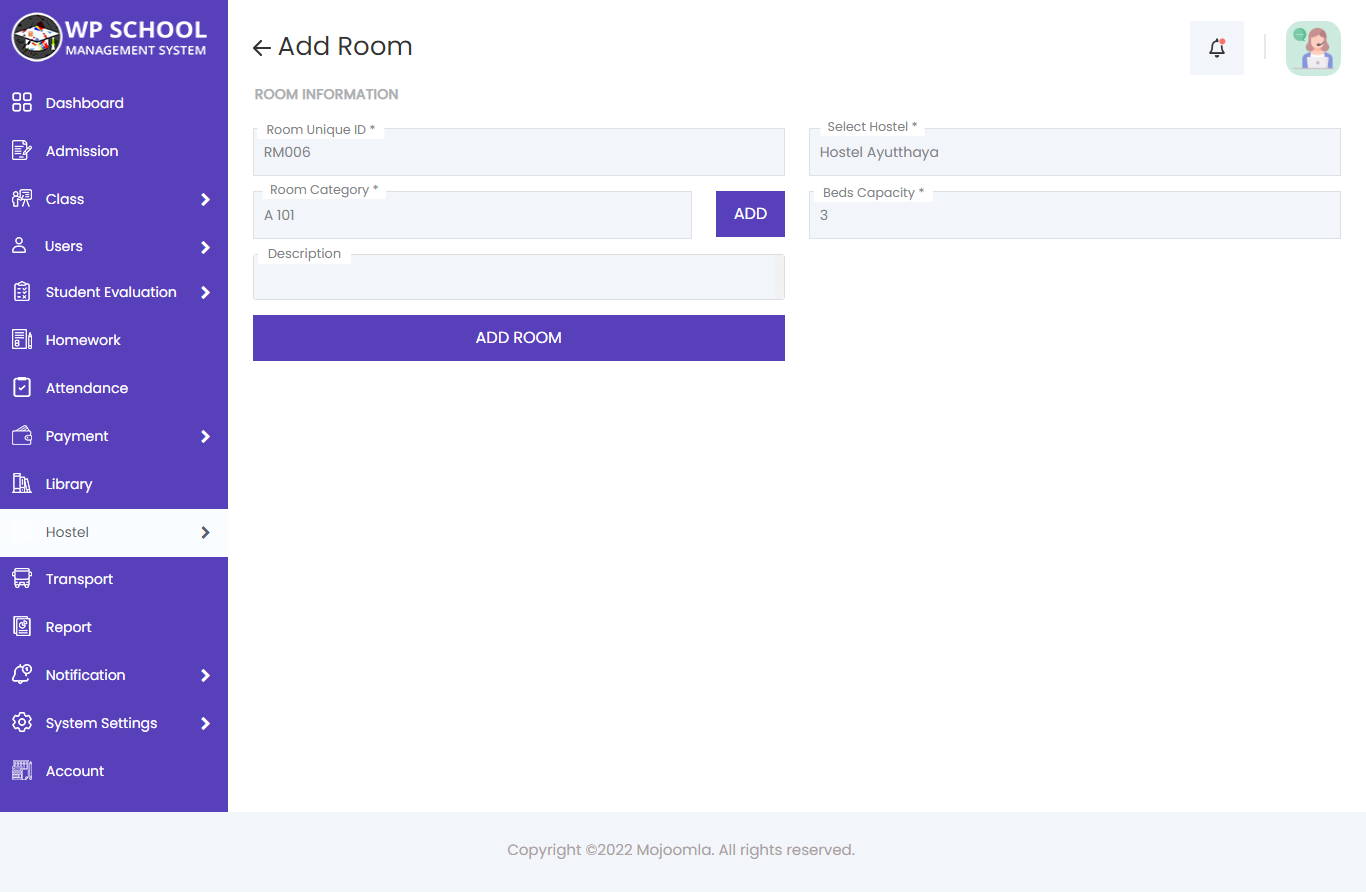
20) Hostel
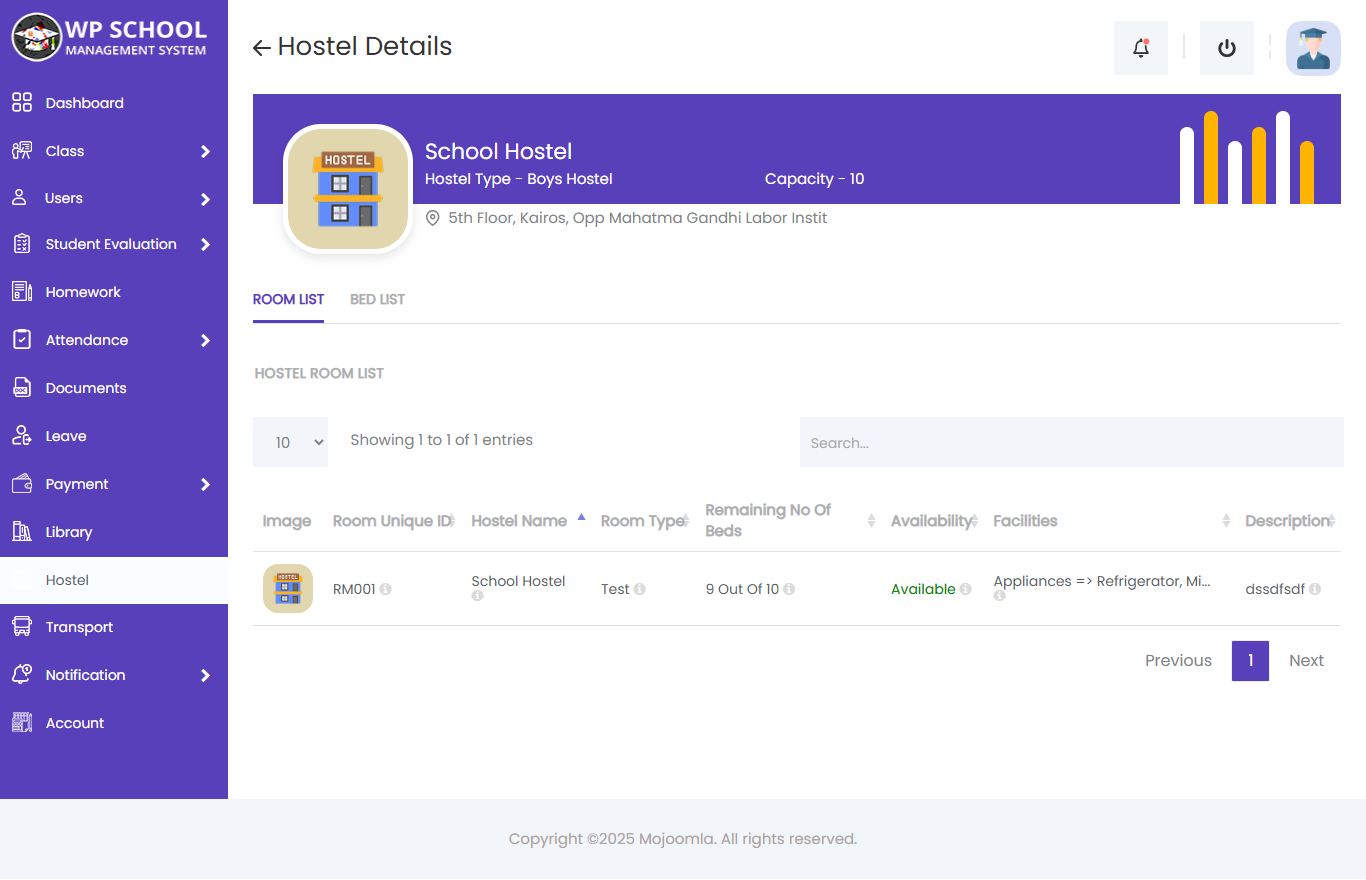
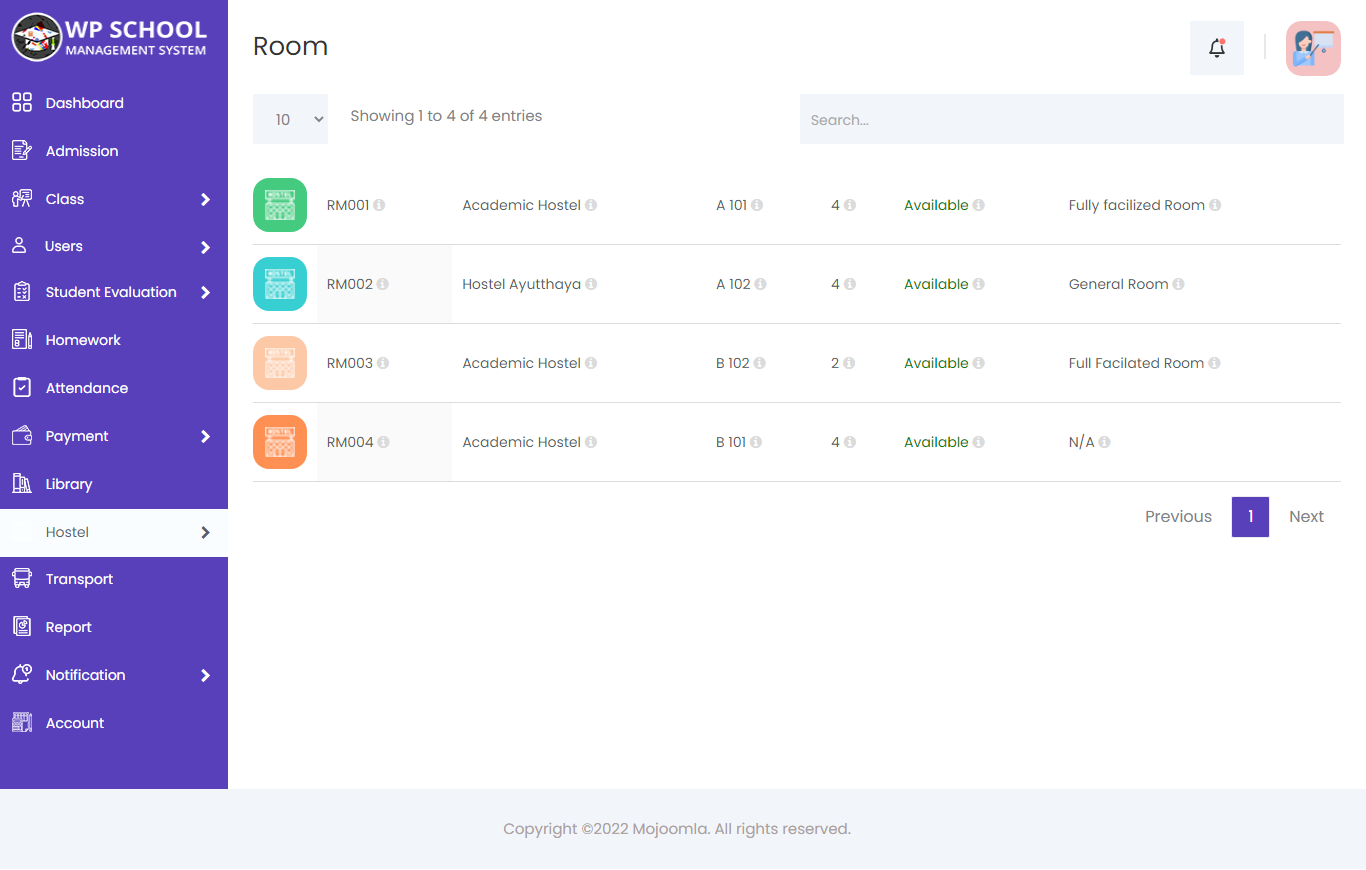
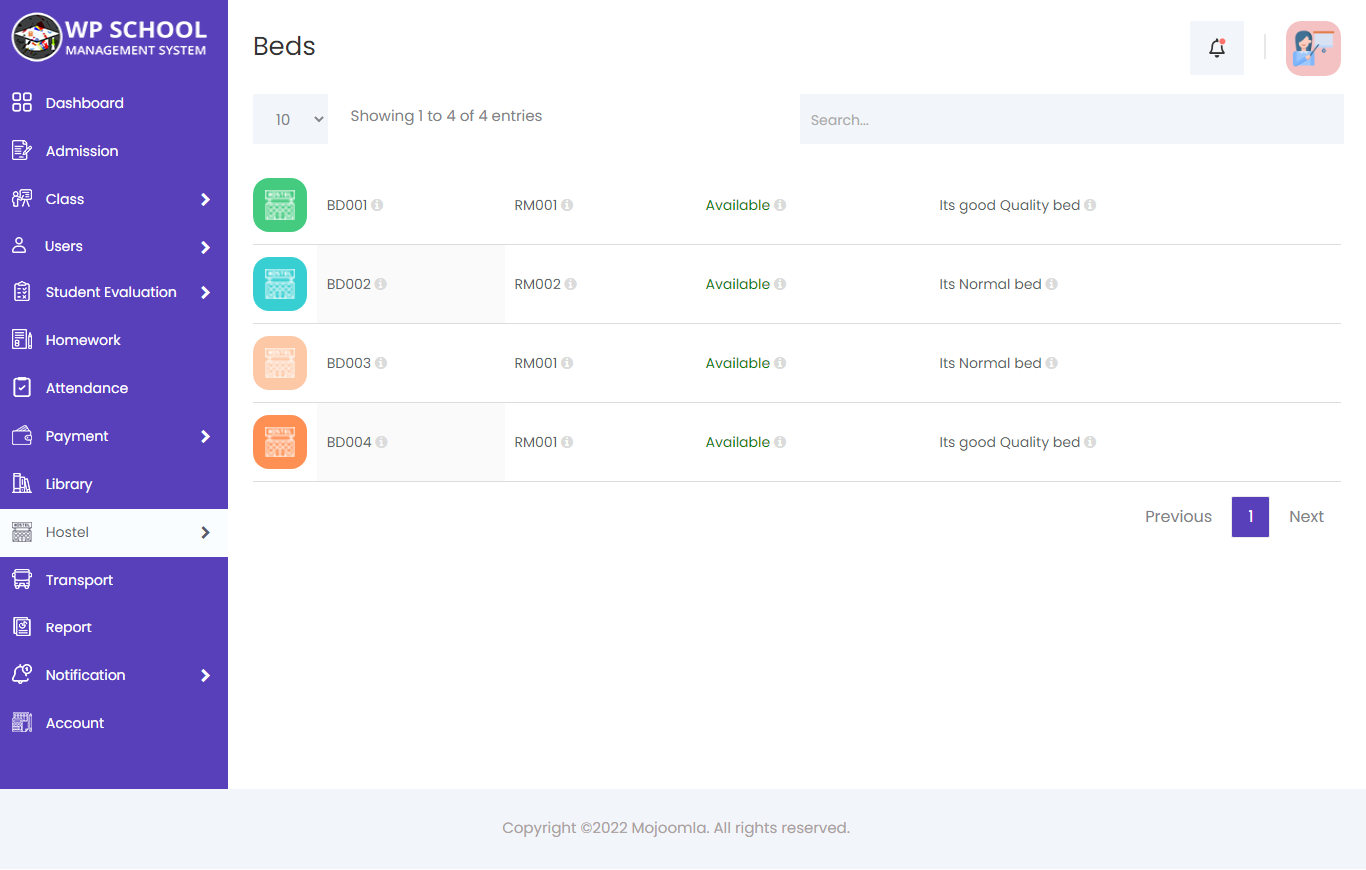
You can manage hostel facilities easily — add hostels, assign rooms and beds to students, and check room occupancy status at a glance.
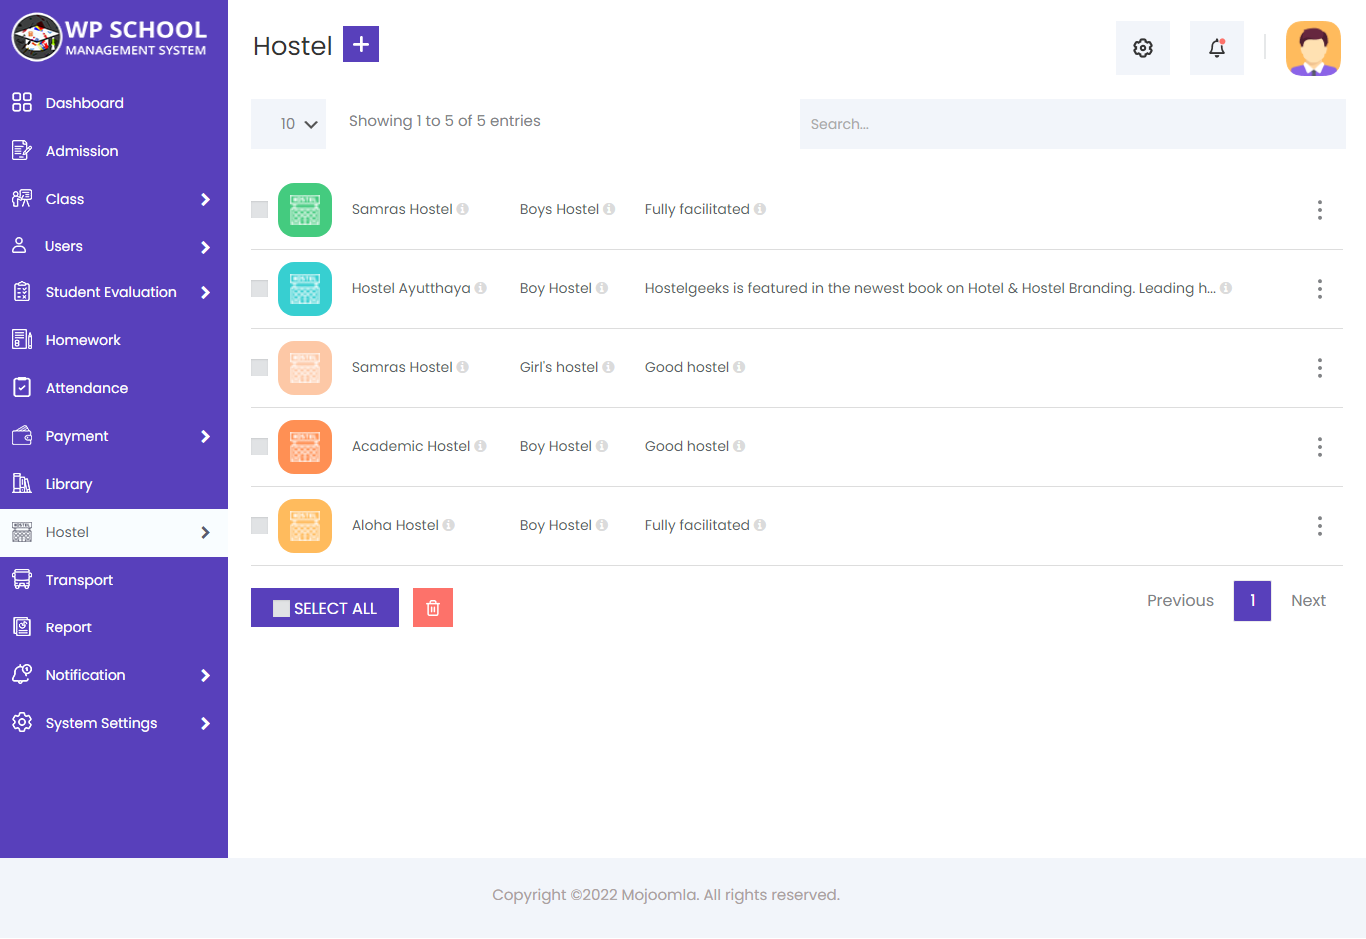
Add Hostel & Rooms
Click Add Hostel to create a new hostel entry. Enter the hostel name, type, address, and capacity. Then add rooms and beds within each hostel.
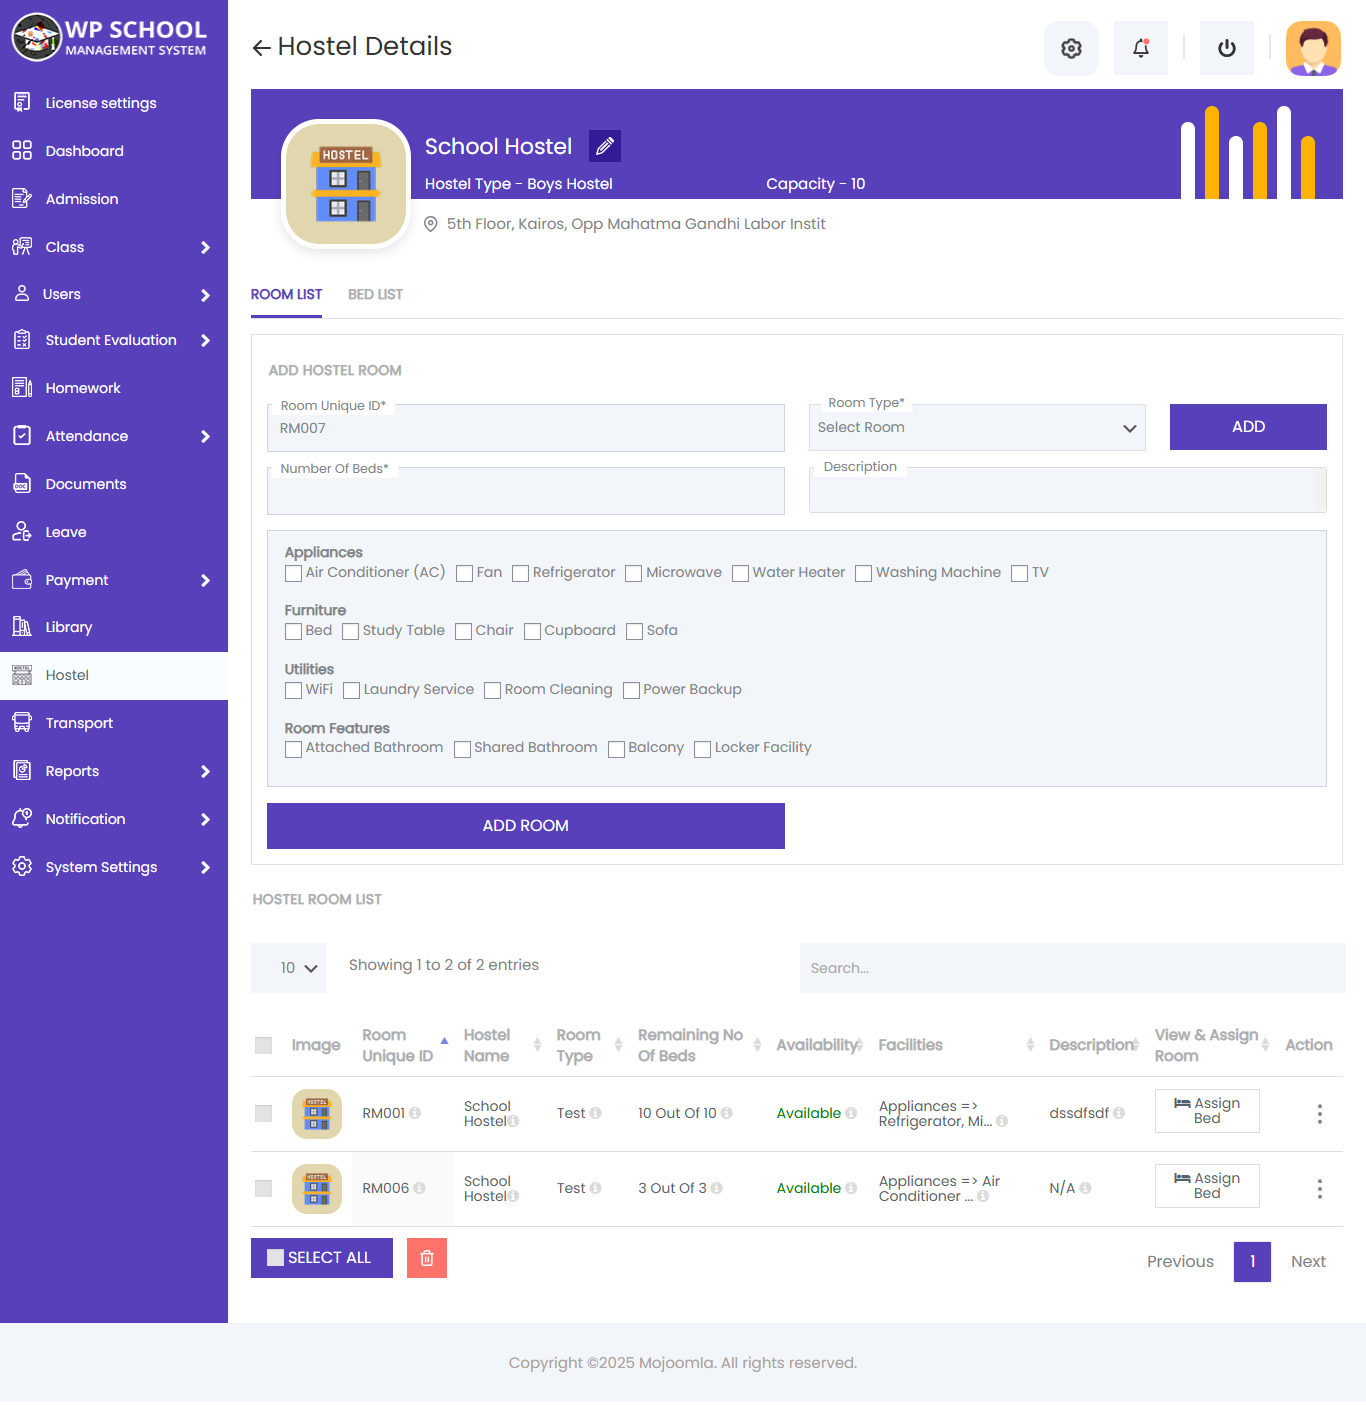
You can view hostel information, add and edit rooms, and see the full list of rooms for each hostel.
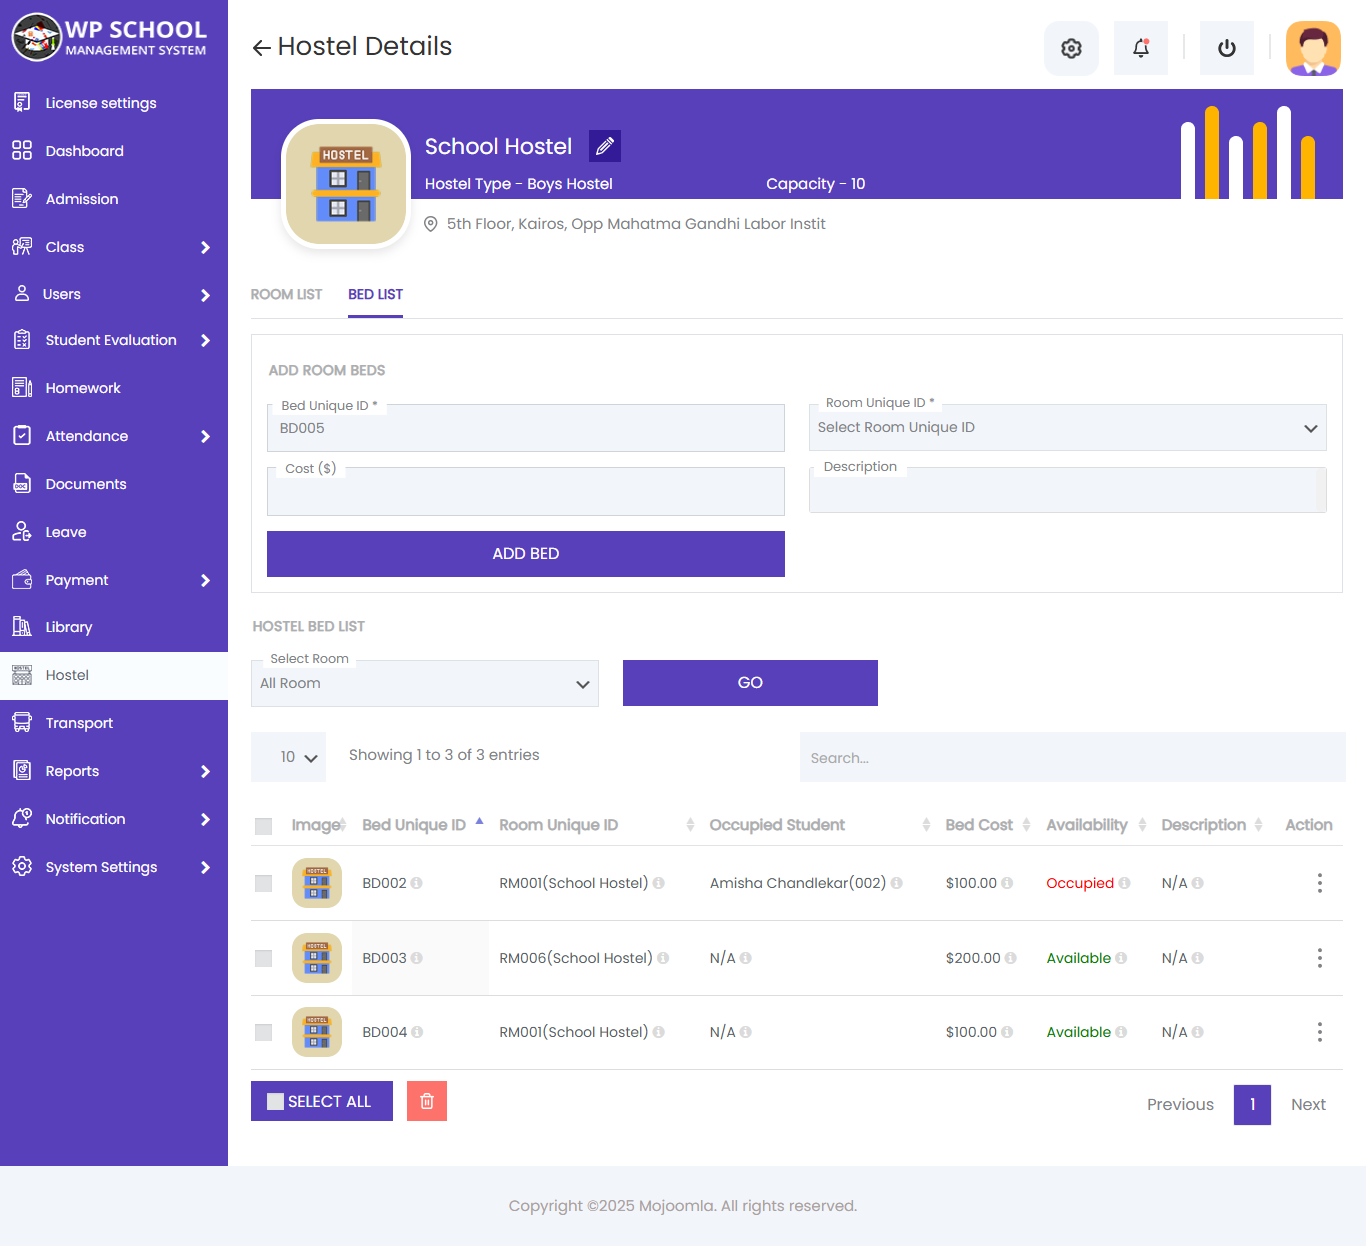
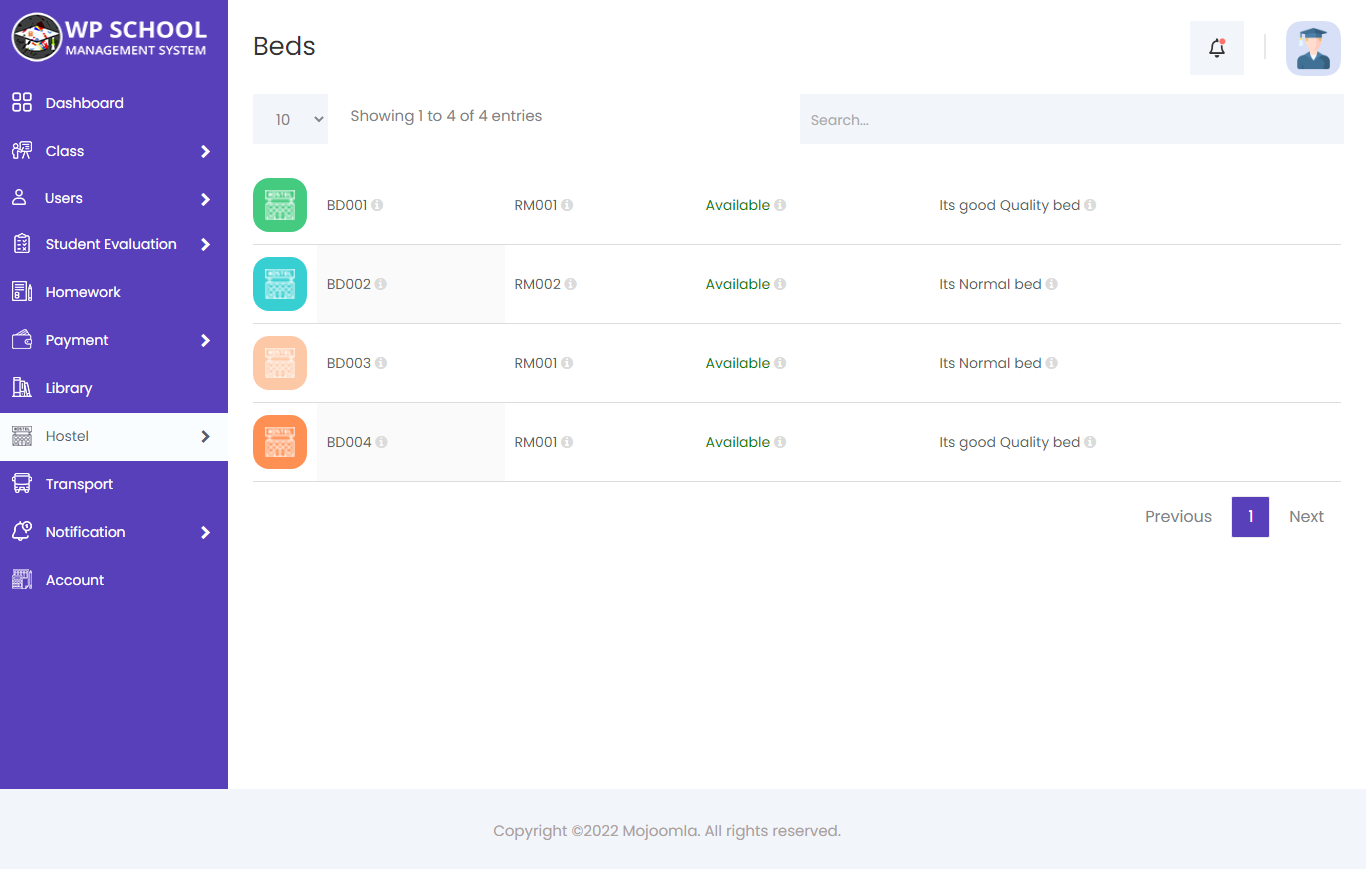
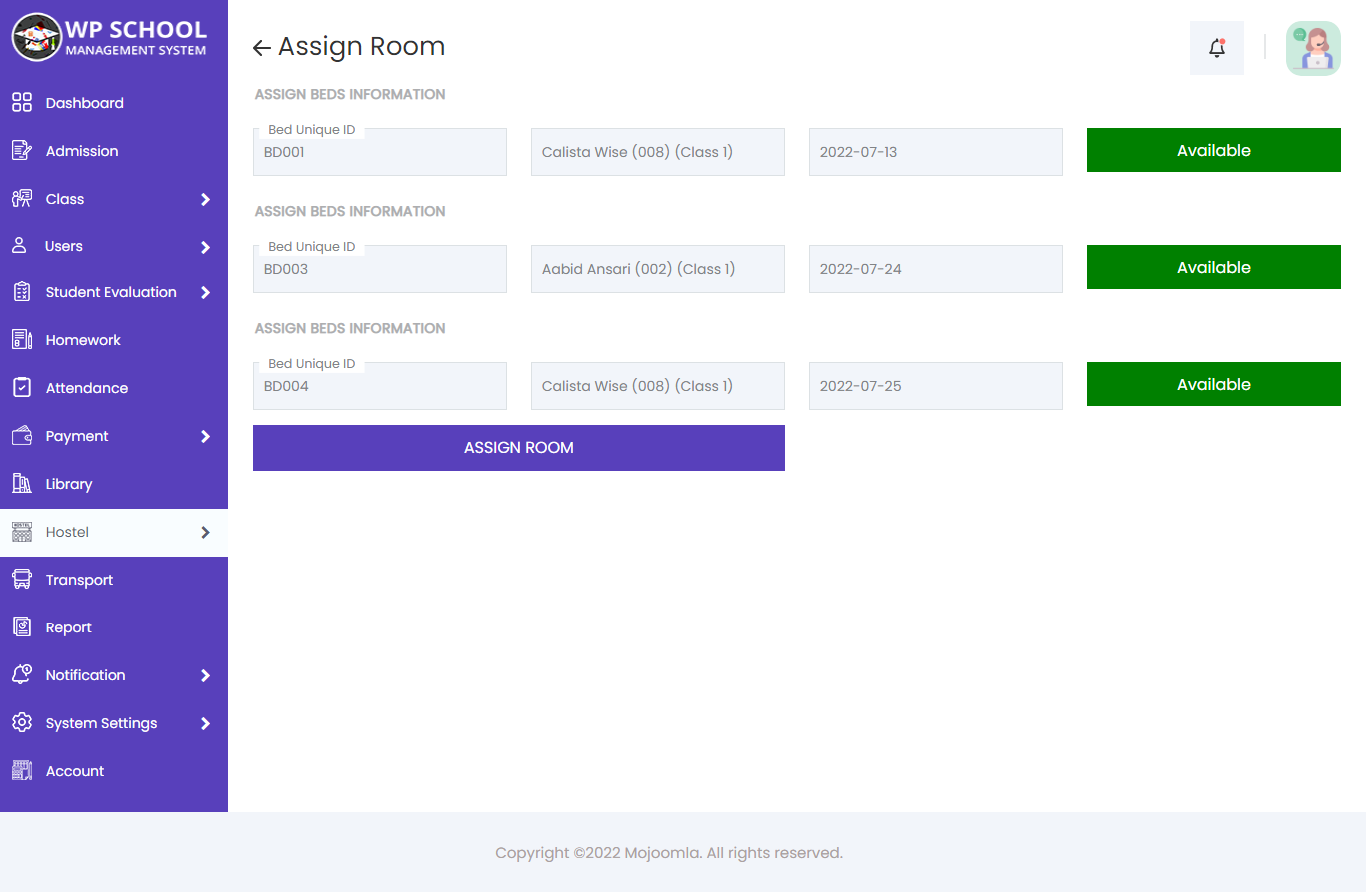
Here you can add and edit beds, as well as view a filtered list of beds by room.

Assign specific beds to students. The system tracks which beds are occupied and available in real time.
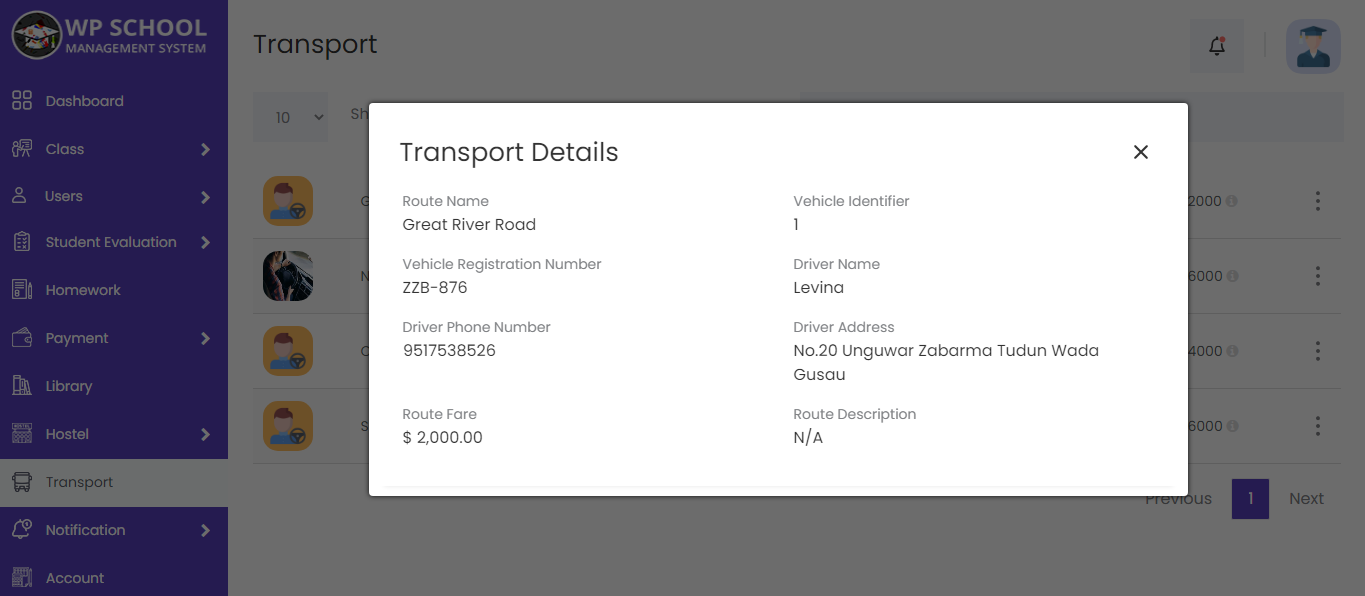
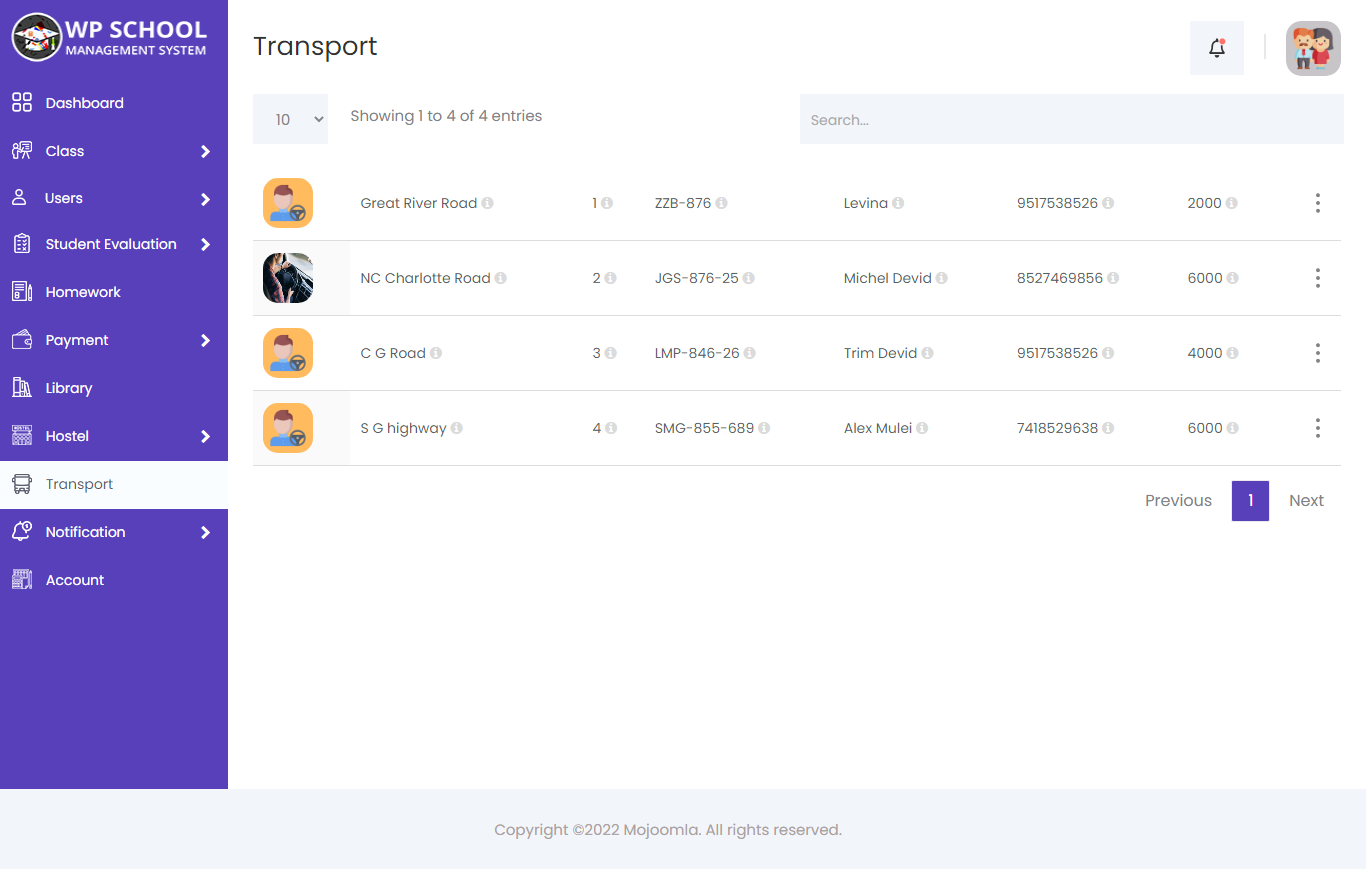
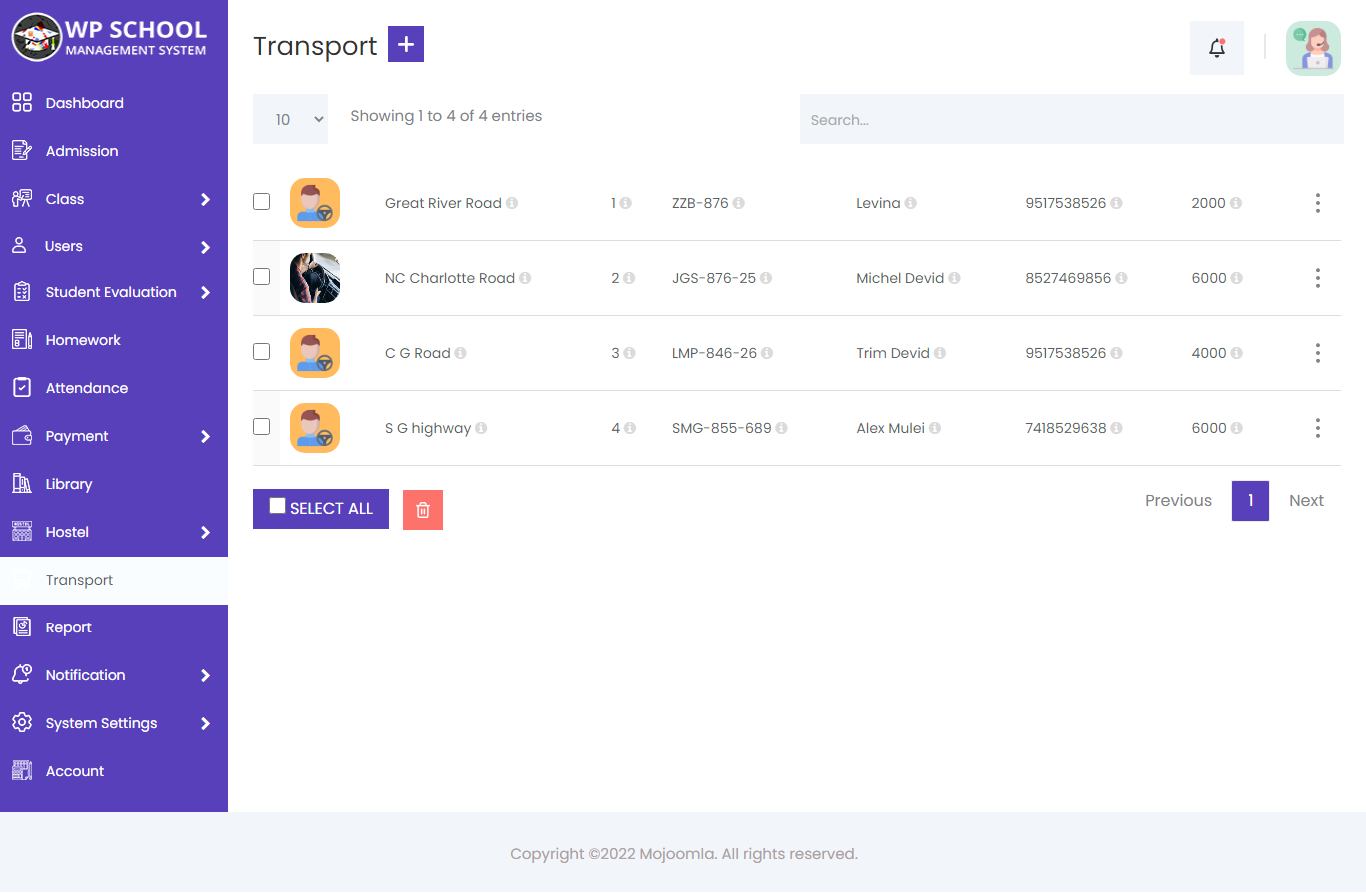
21) Transport
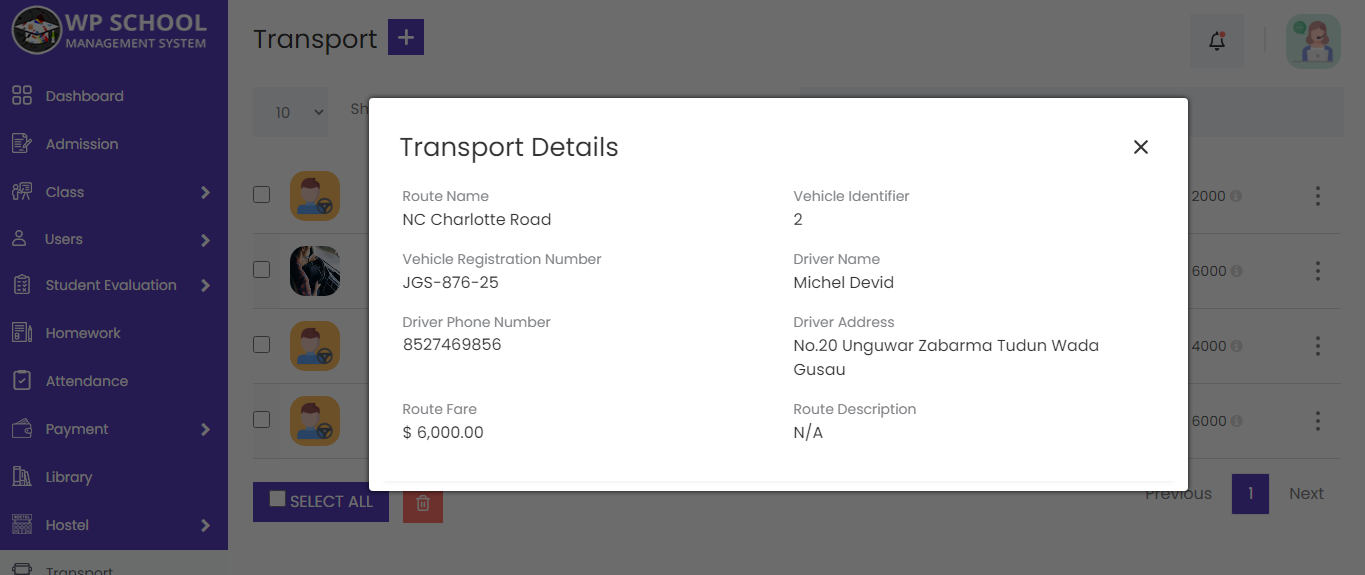
Here it displays means of transport for students — bus routes and driver details for each route. You can add, edit, and view all transport details. If you want to edit transport details, click the edit link from the transport list.
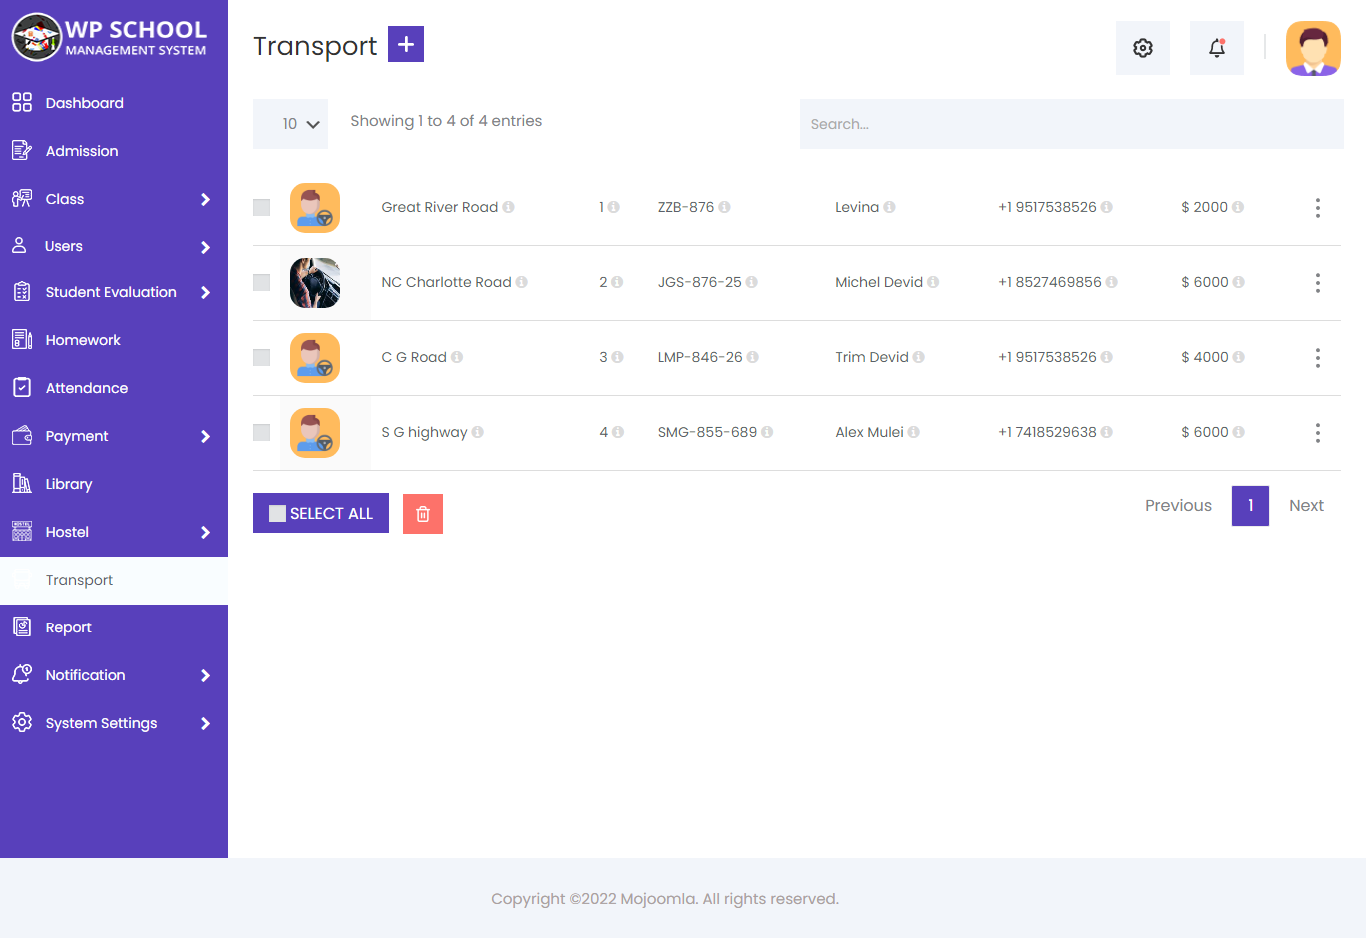
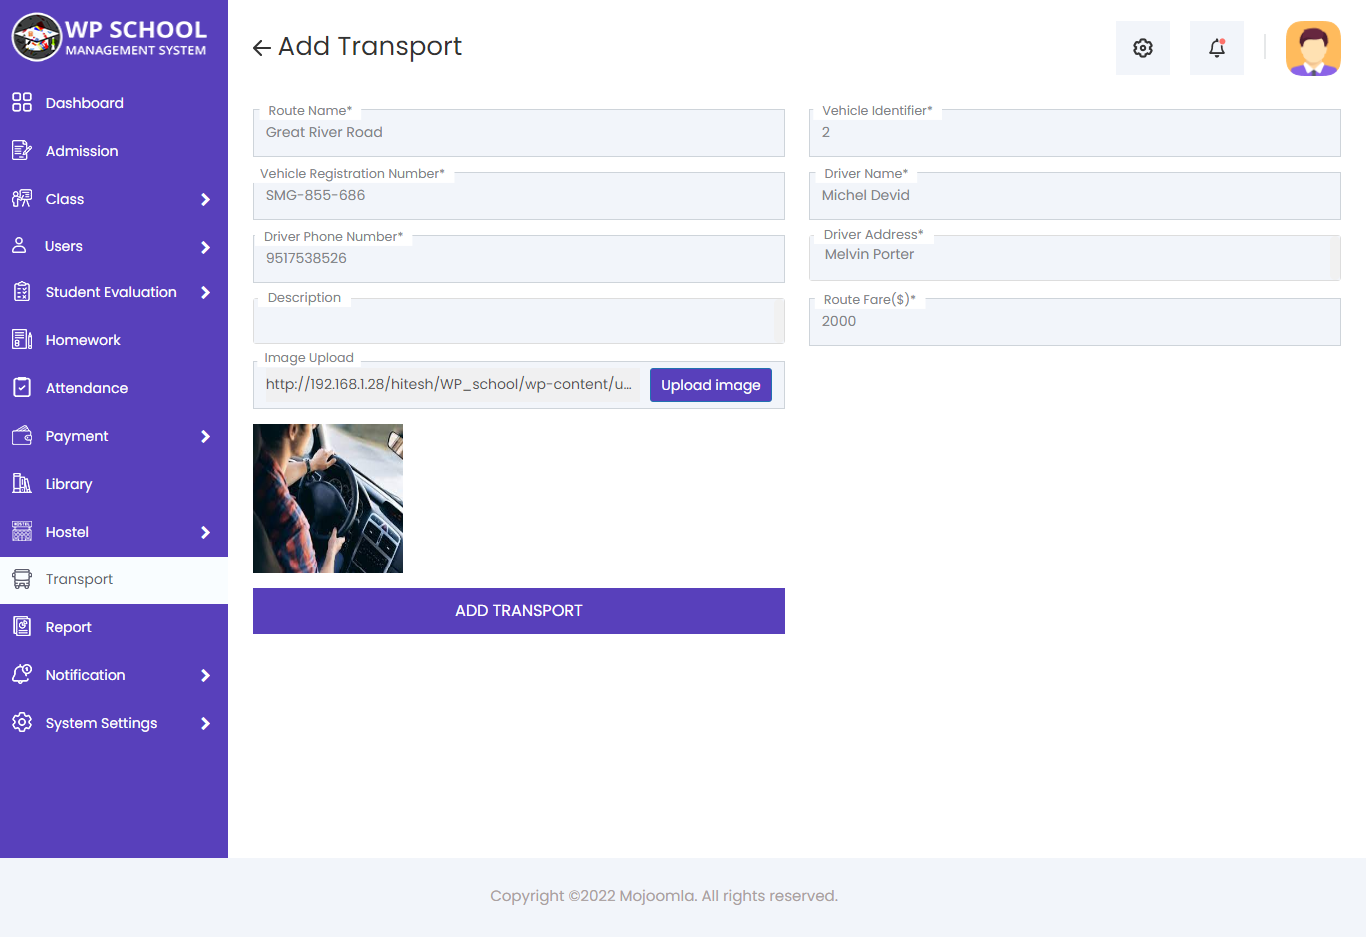
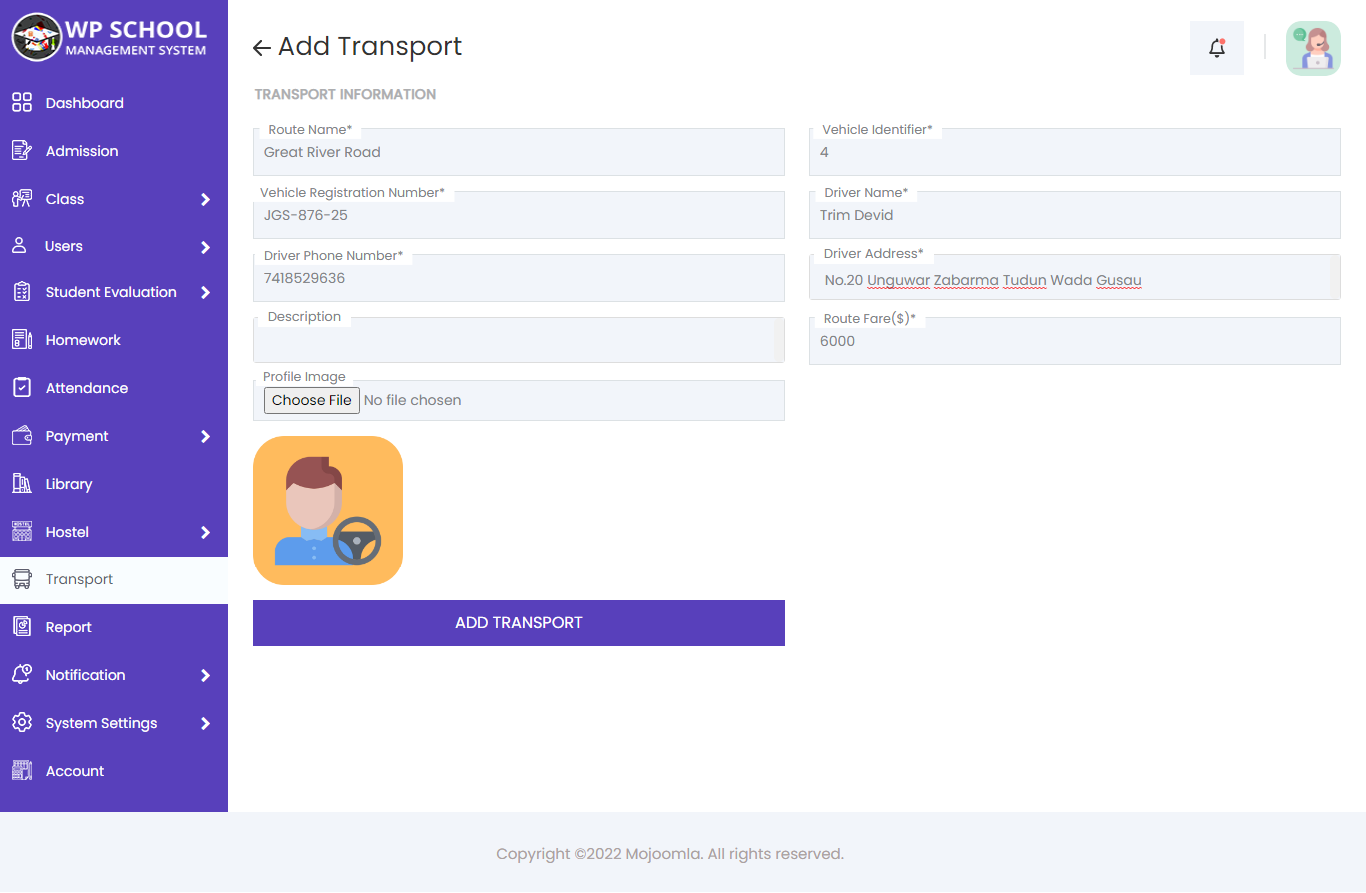
Add Transport
Click Add Transport to create a new transport route. Enter the route name, vehicle identifier, registration number, driver name, phone, and address.
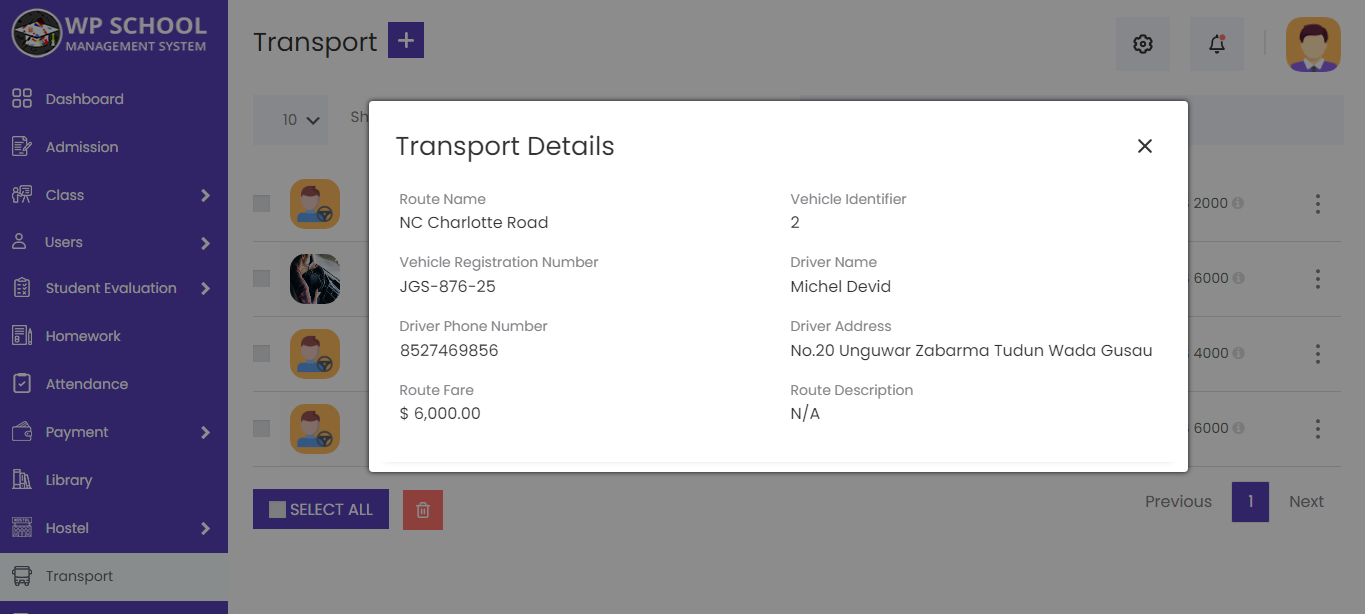
View Transport
Click the view button on any transport entry to see full route and driver details.

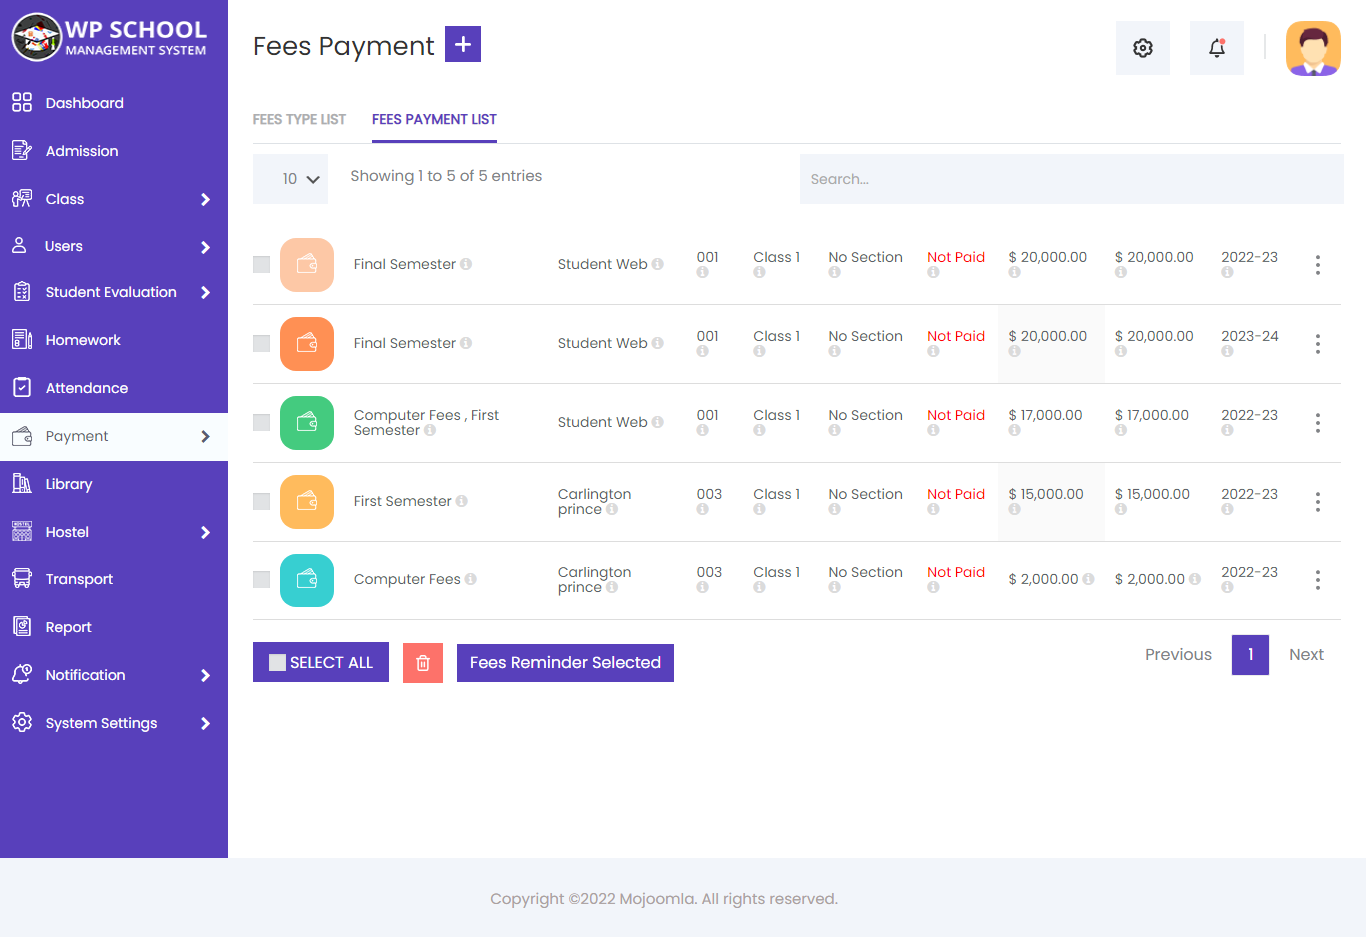
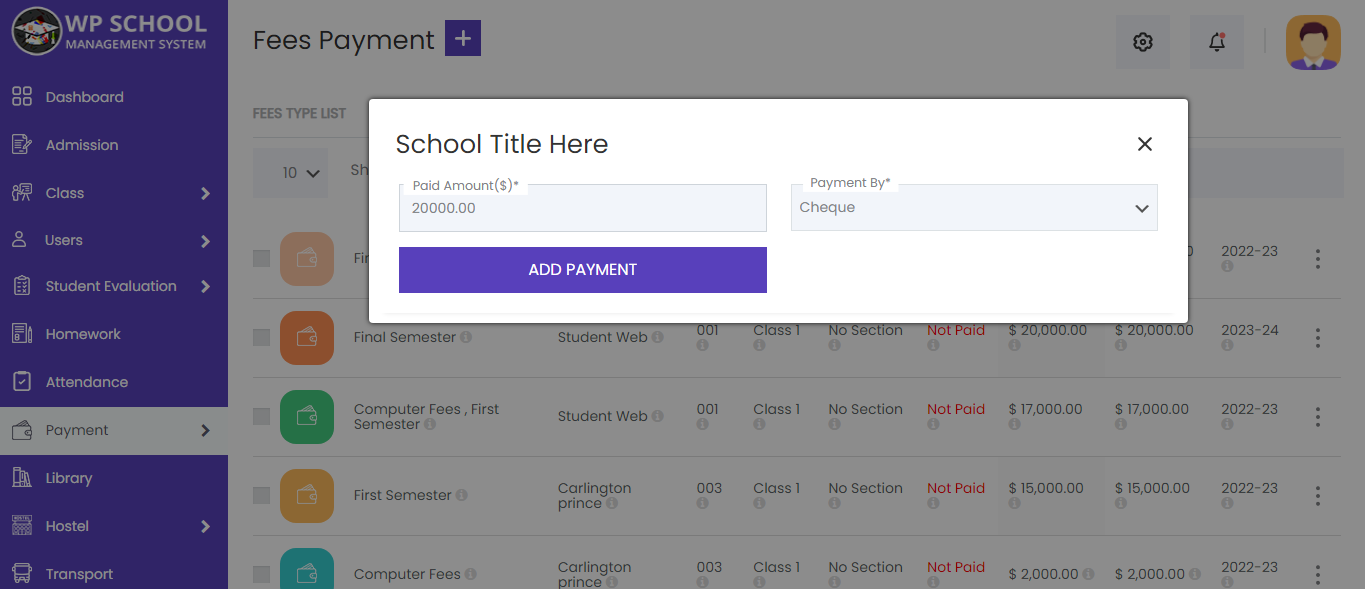
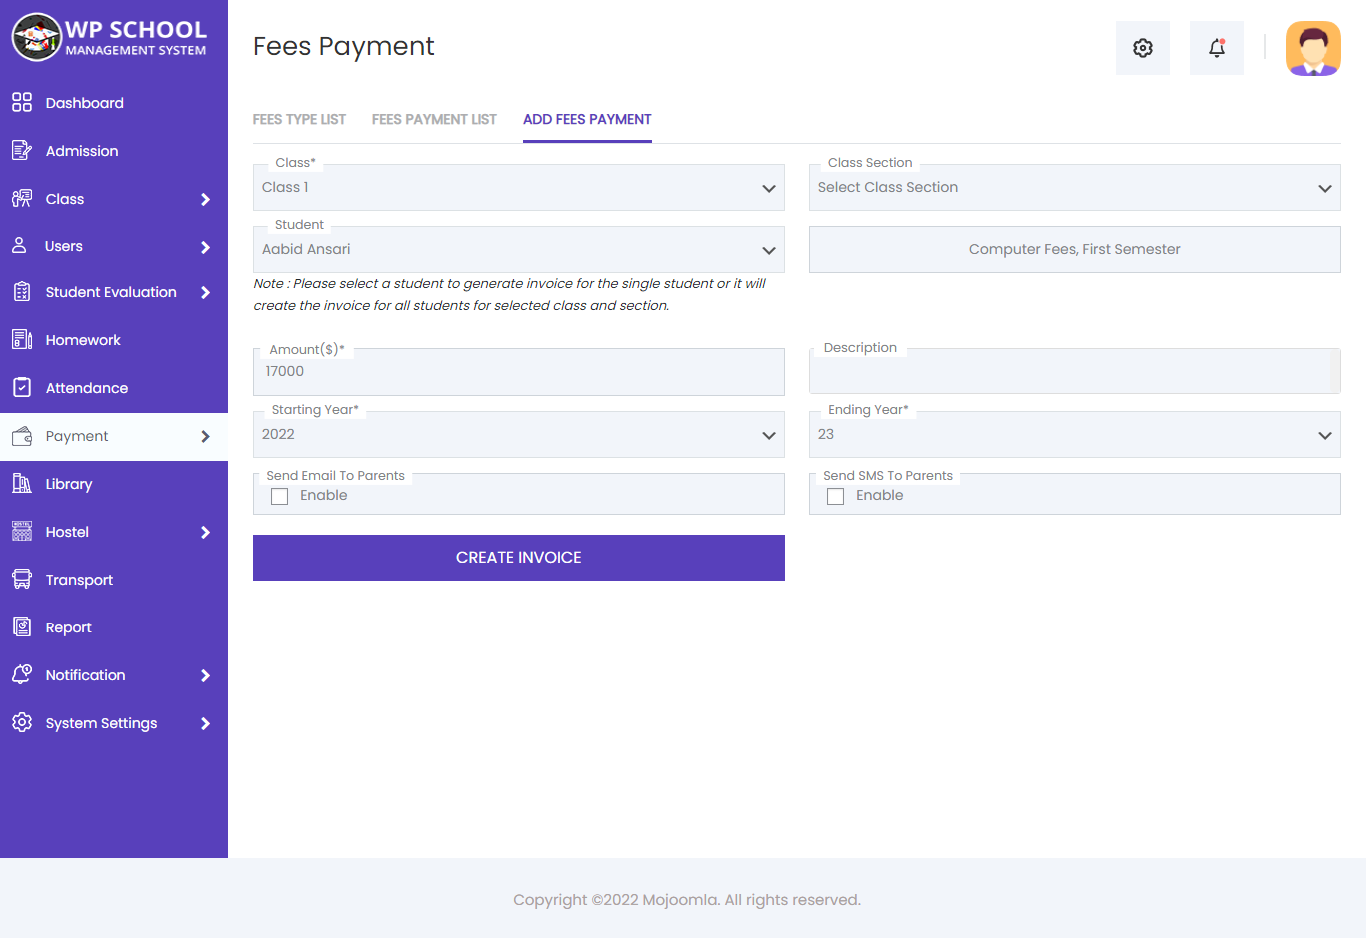
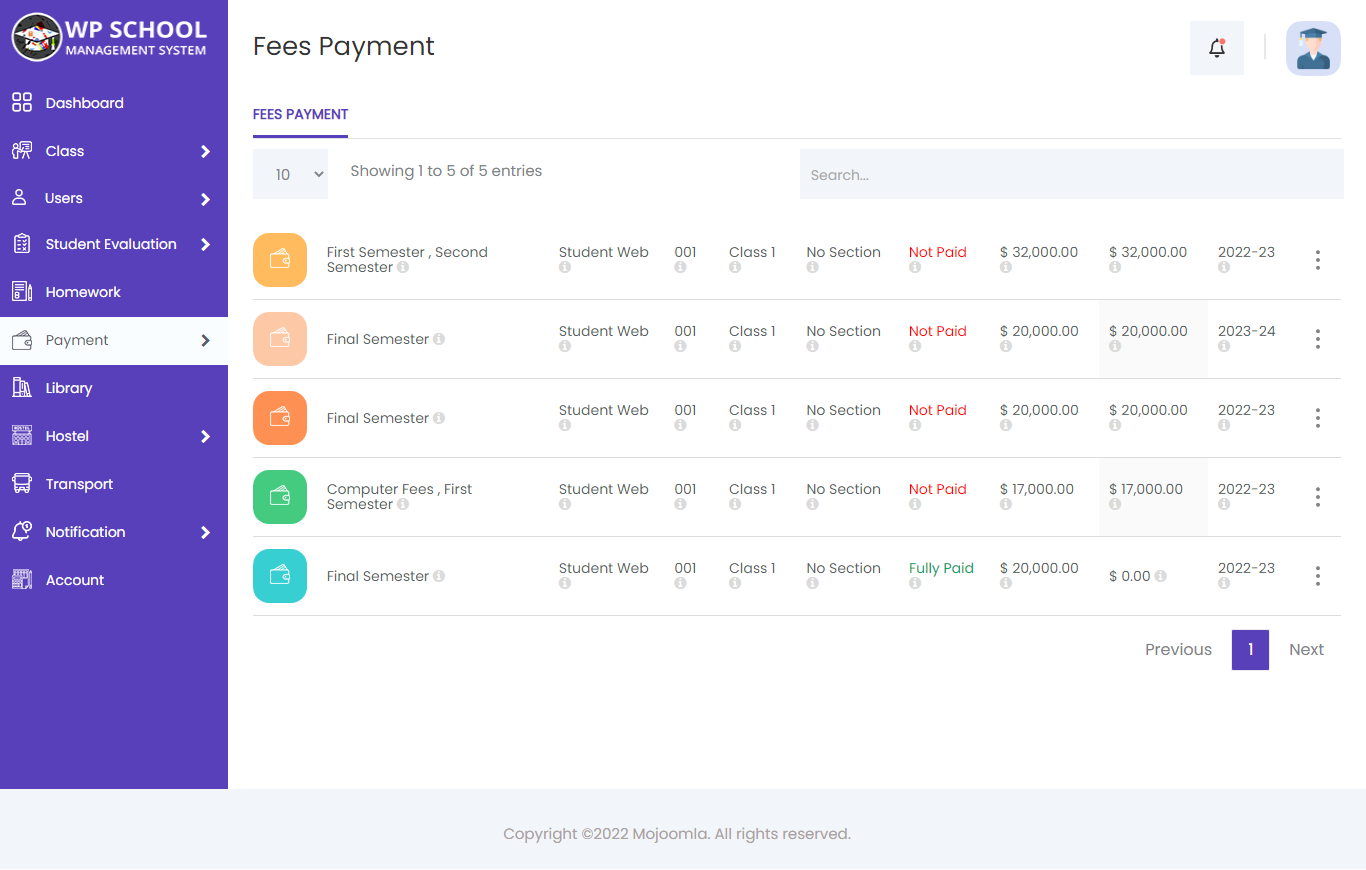
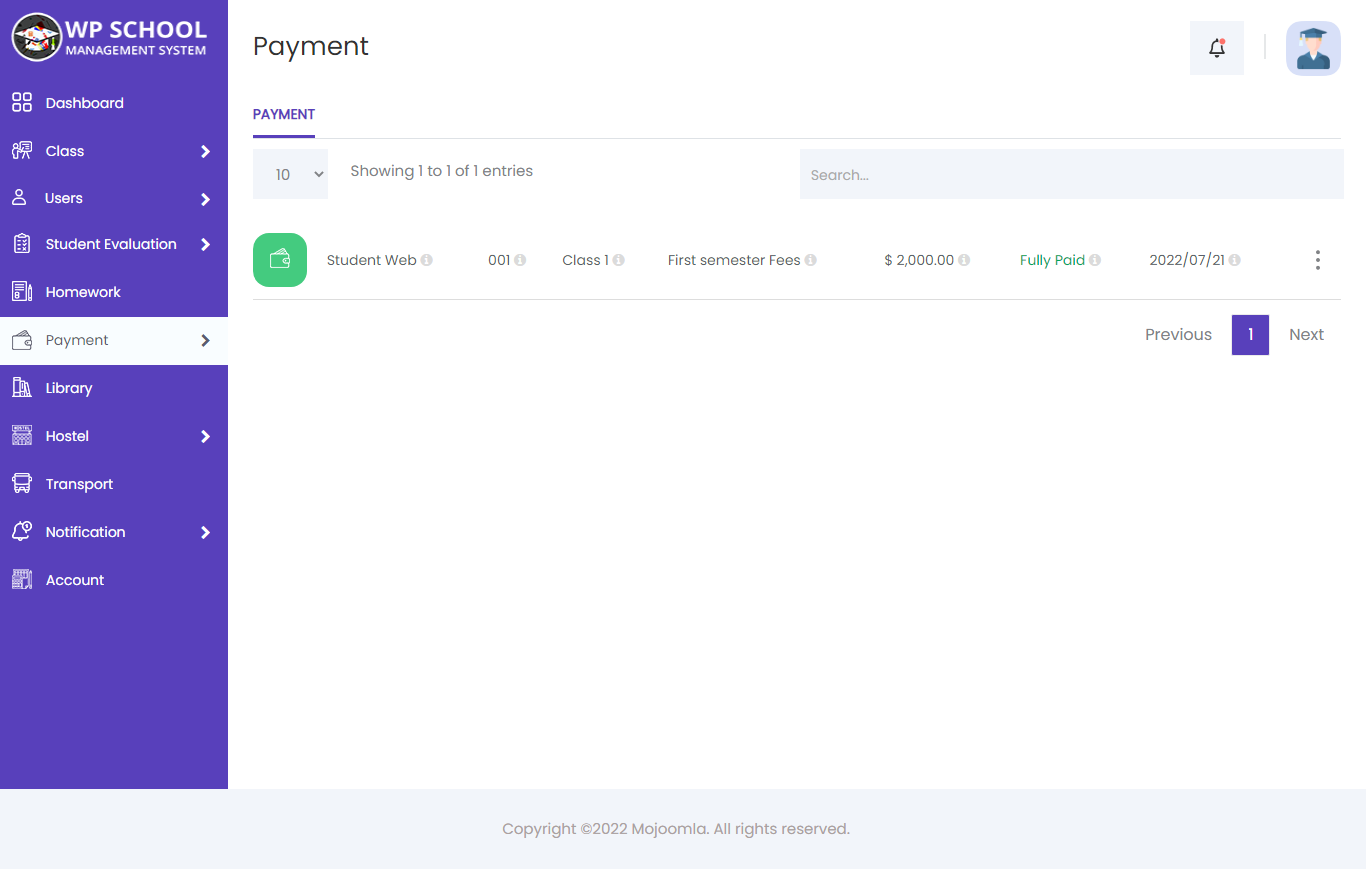
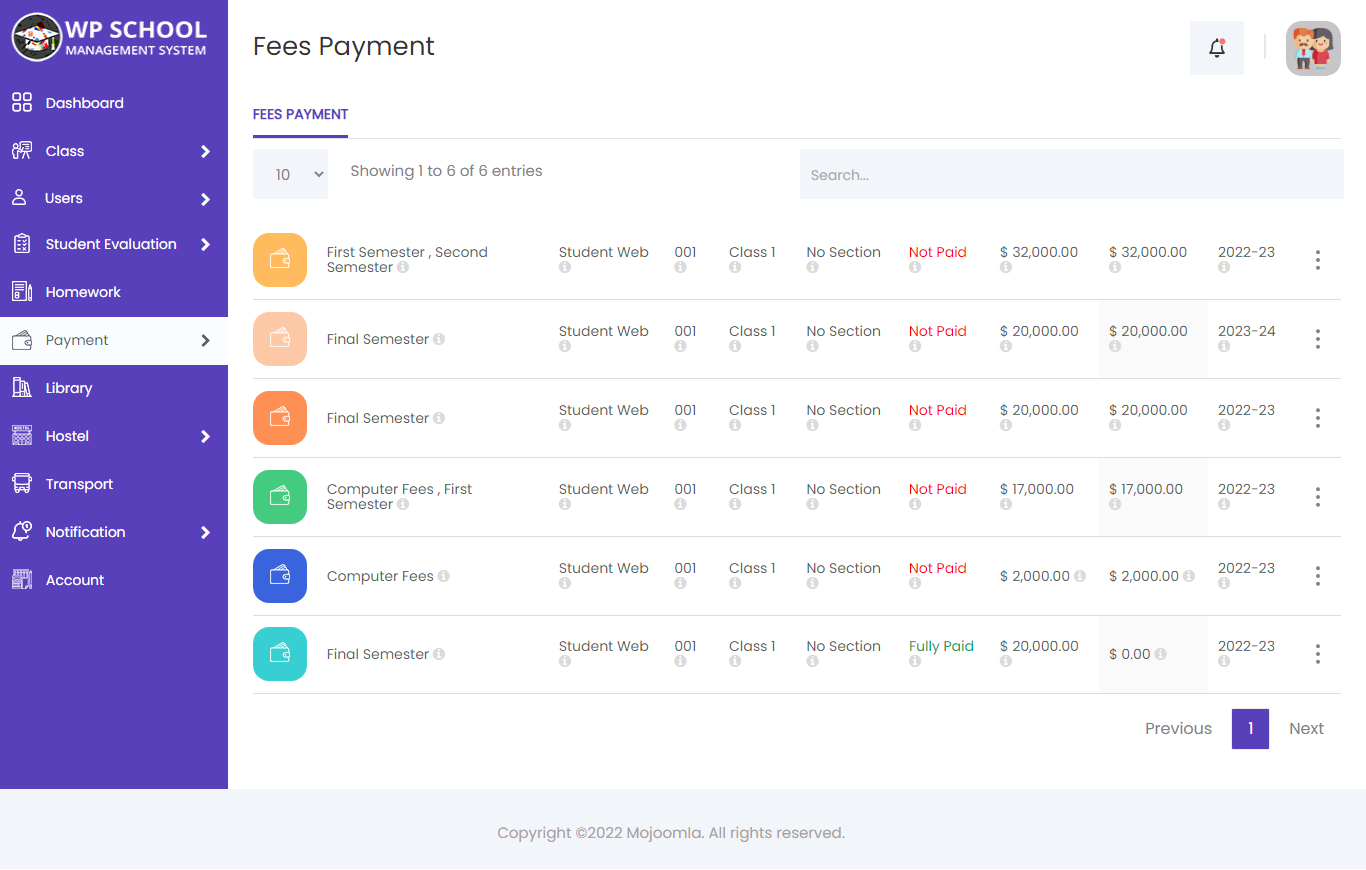
22) Fee Payment

Manage all student fee types, generate invoices, and track invoice history.
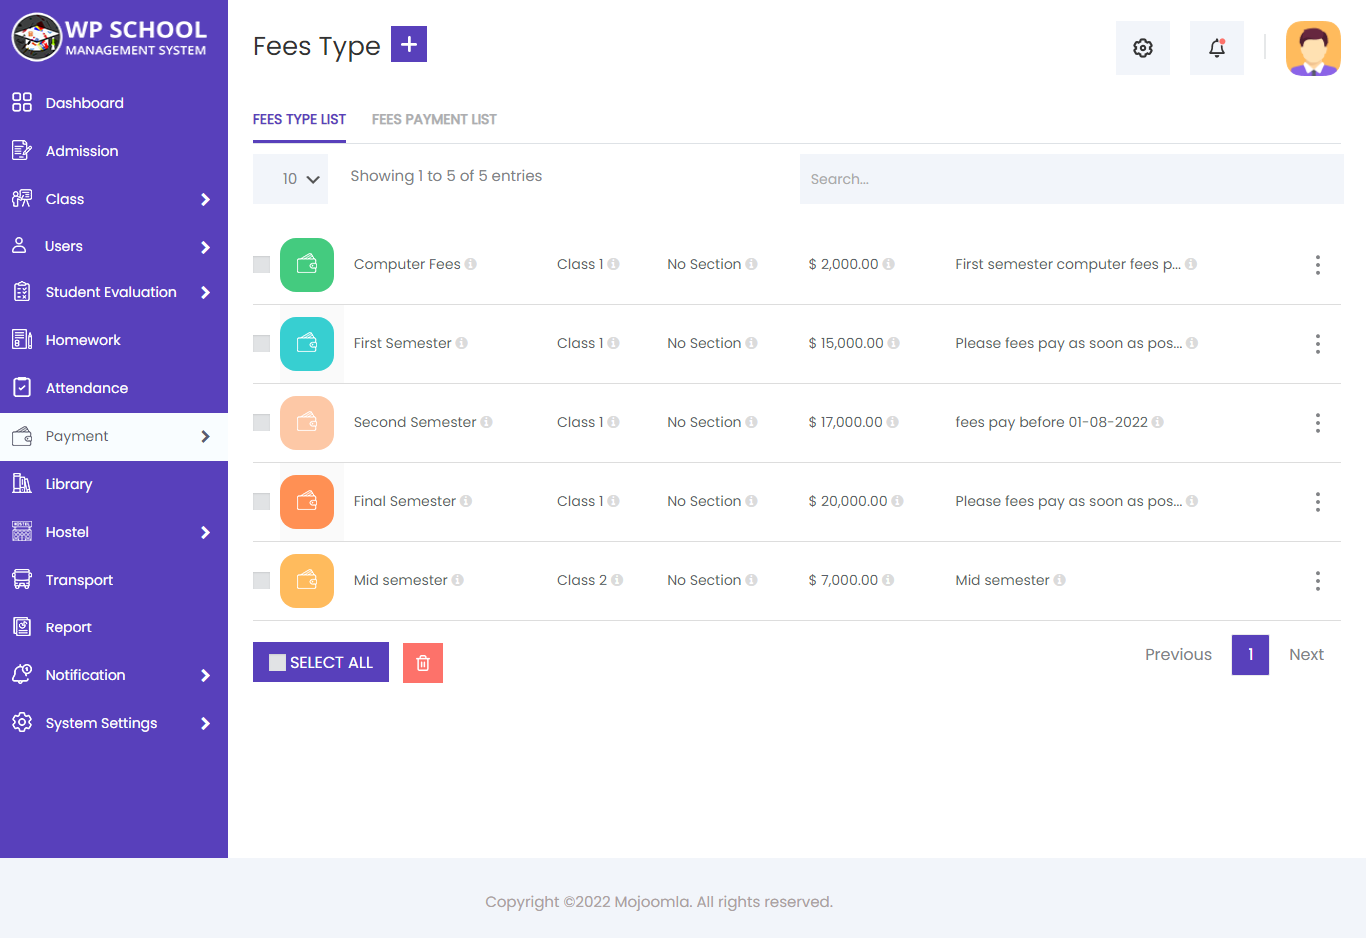
Add Fee Type
Create fee types such as Tuition, Transport, Hostel, etc. Each fee type is linked to a specific class with a fixed amount.
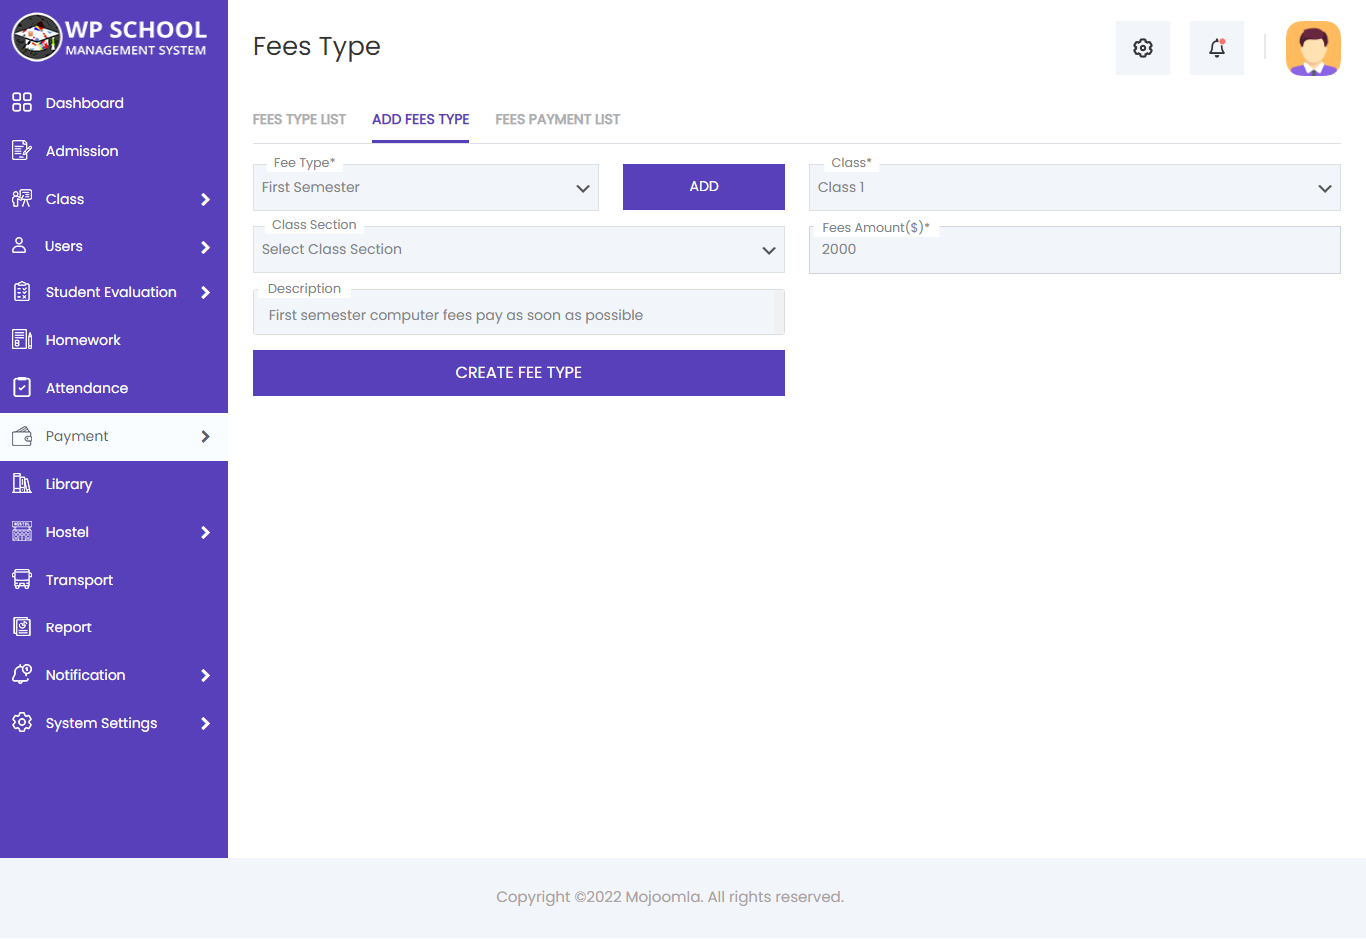
| Field | Description |
|---|---|
| Select Fee Type | Choose from list or add a new type |
| Select Class | Class this fee type applies to |
| Amount | Fee amount |
| Description | Description of the fee |
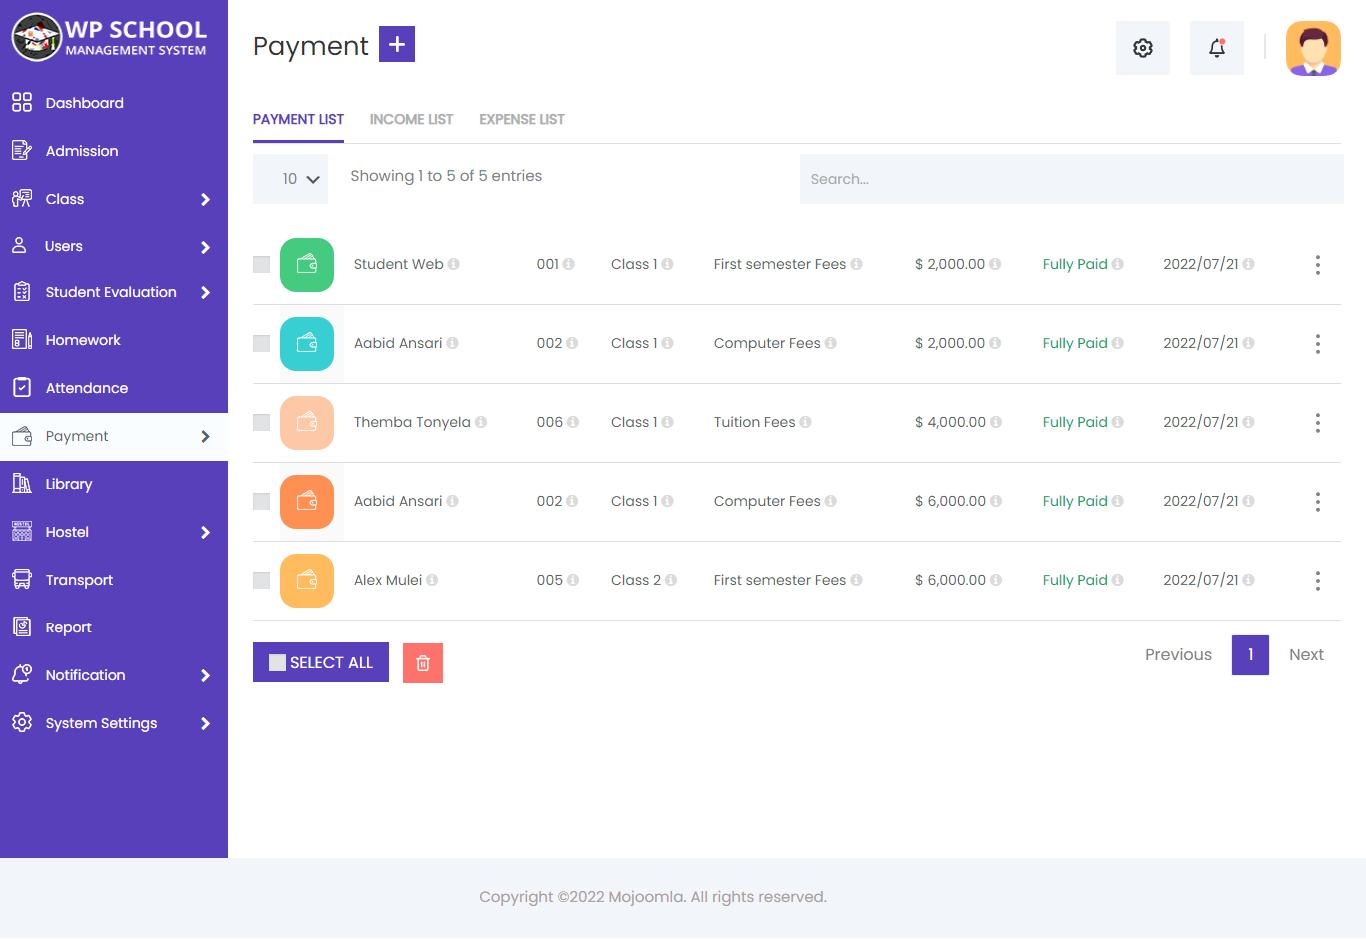
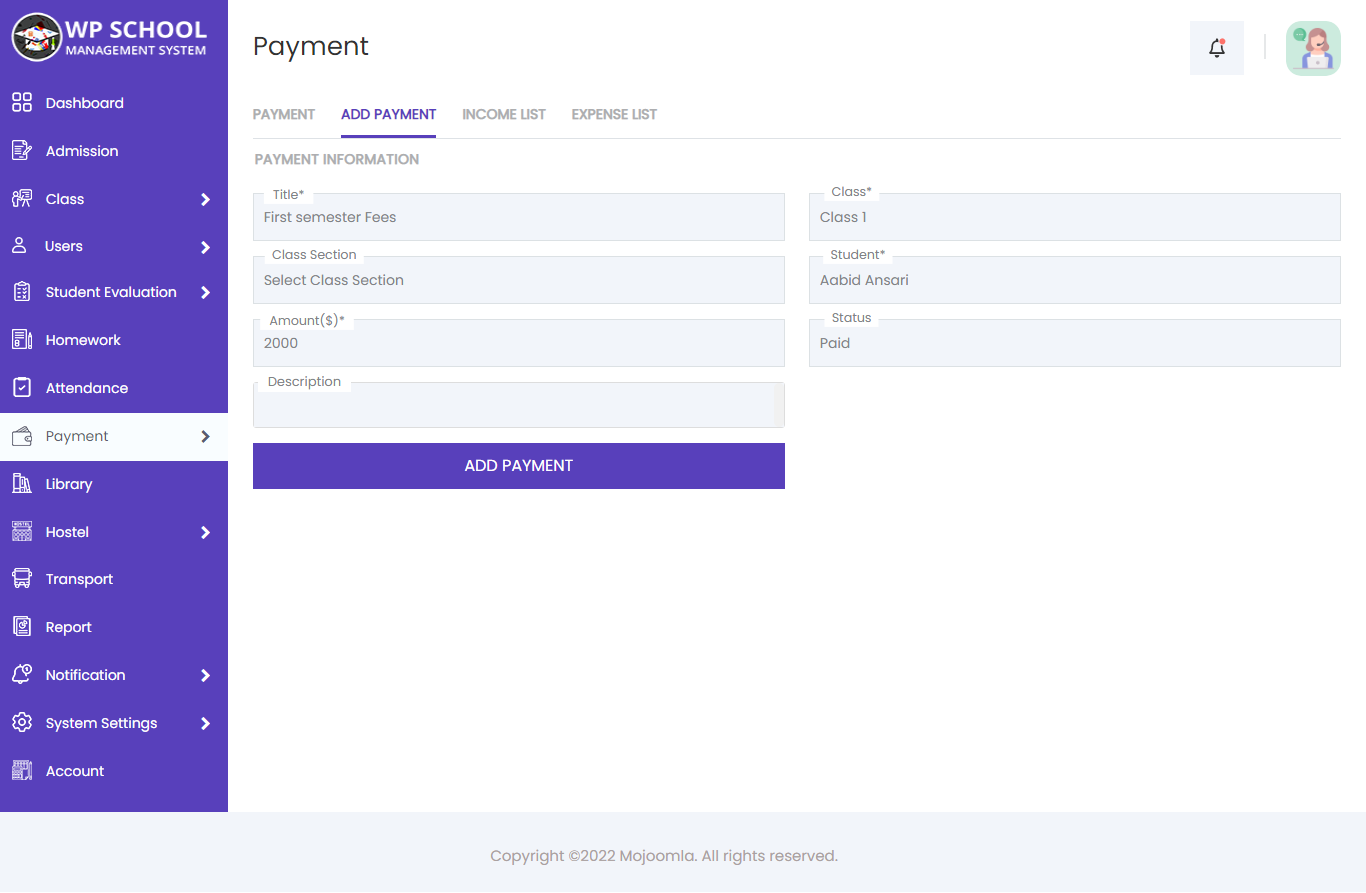
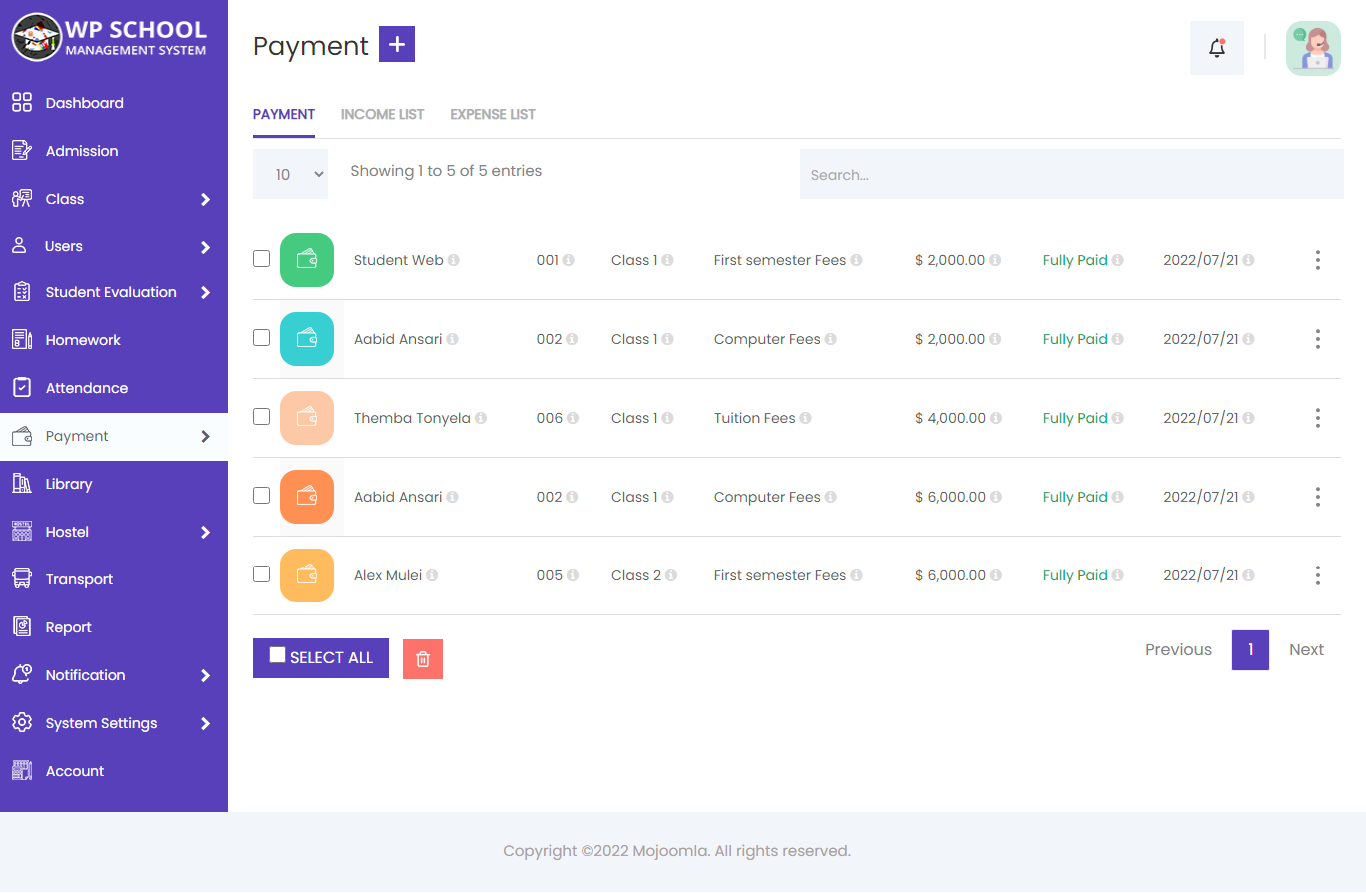
Fees List & Payment
View all student fee records — paid, unpaid, and partially paid. Click Pay to collect payment for any student.
Click the Pay Fees button to open the payment form for a selected student and record the payment.
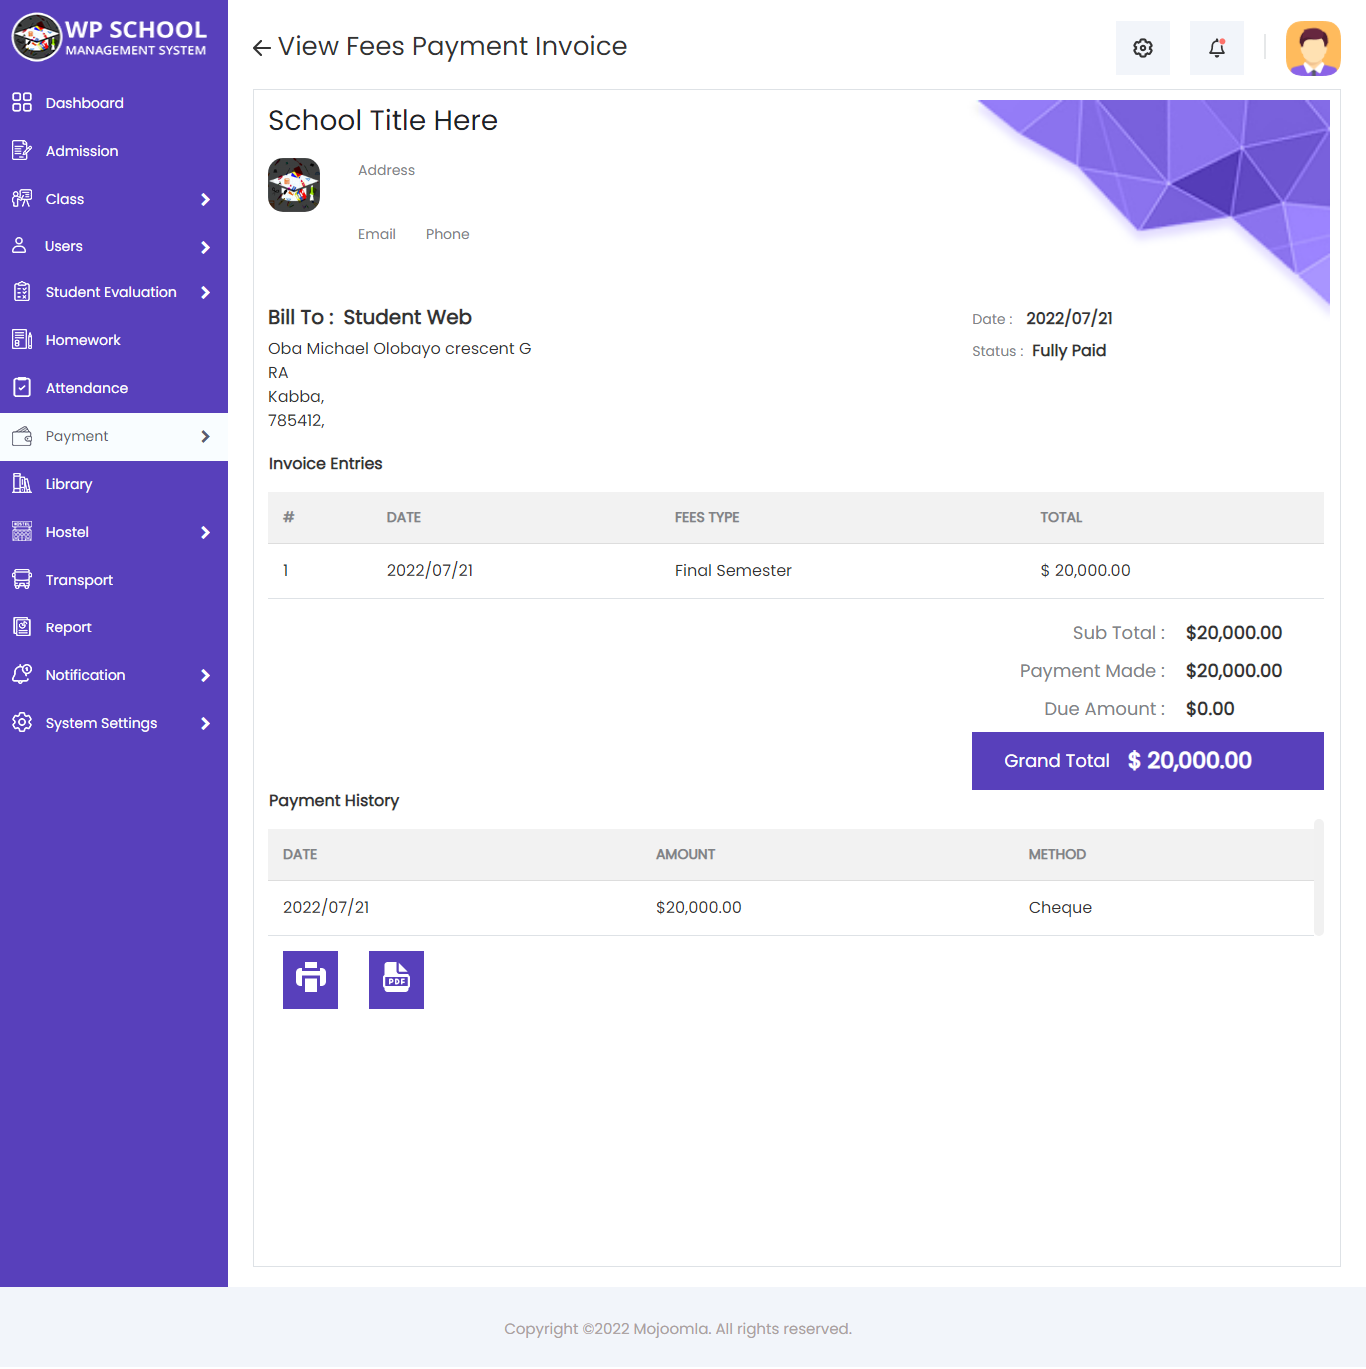
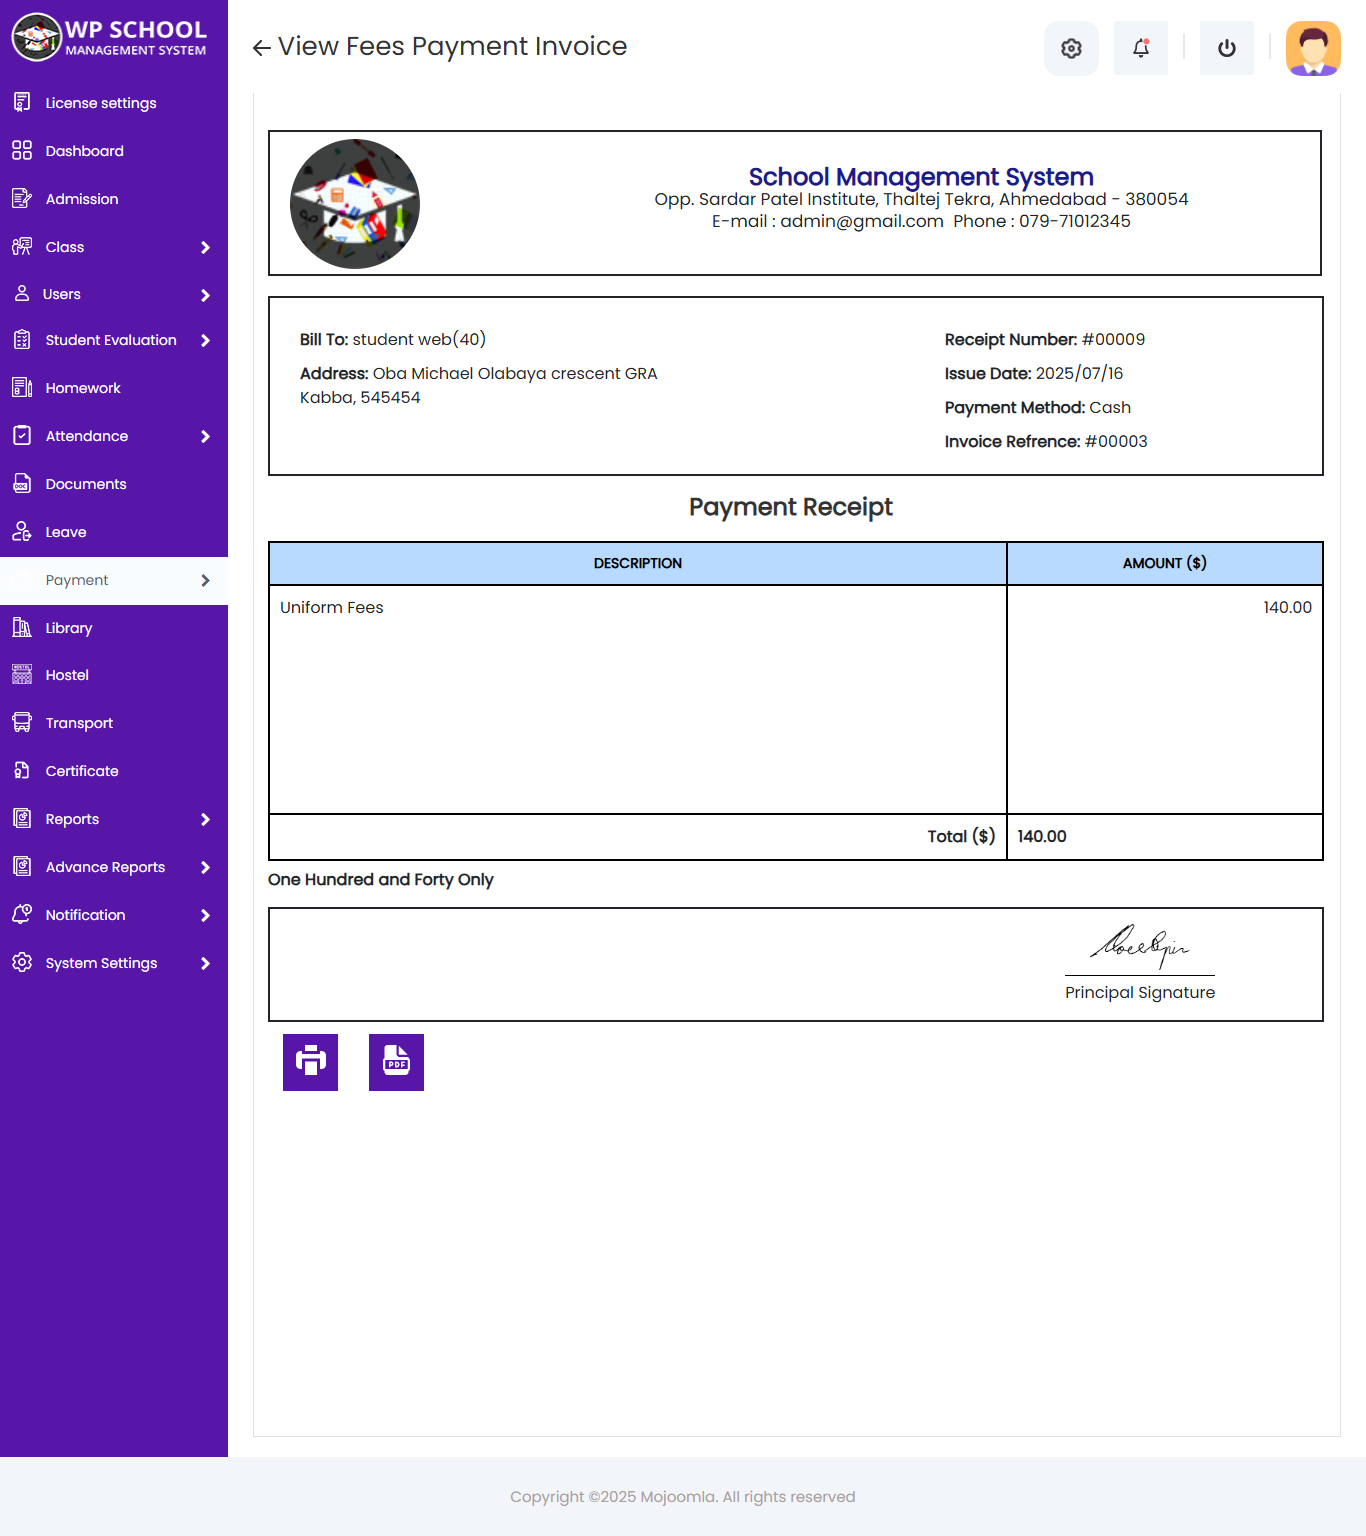
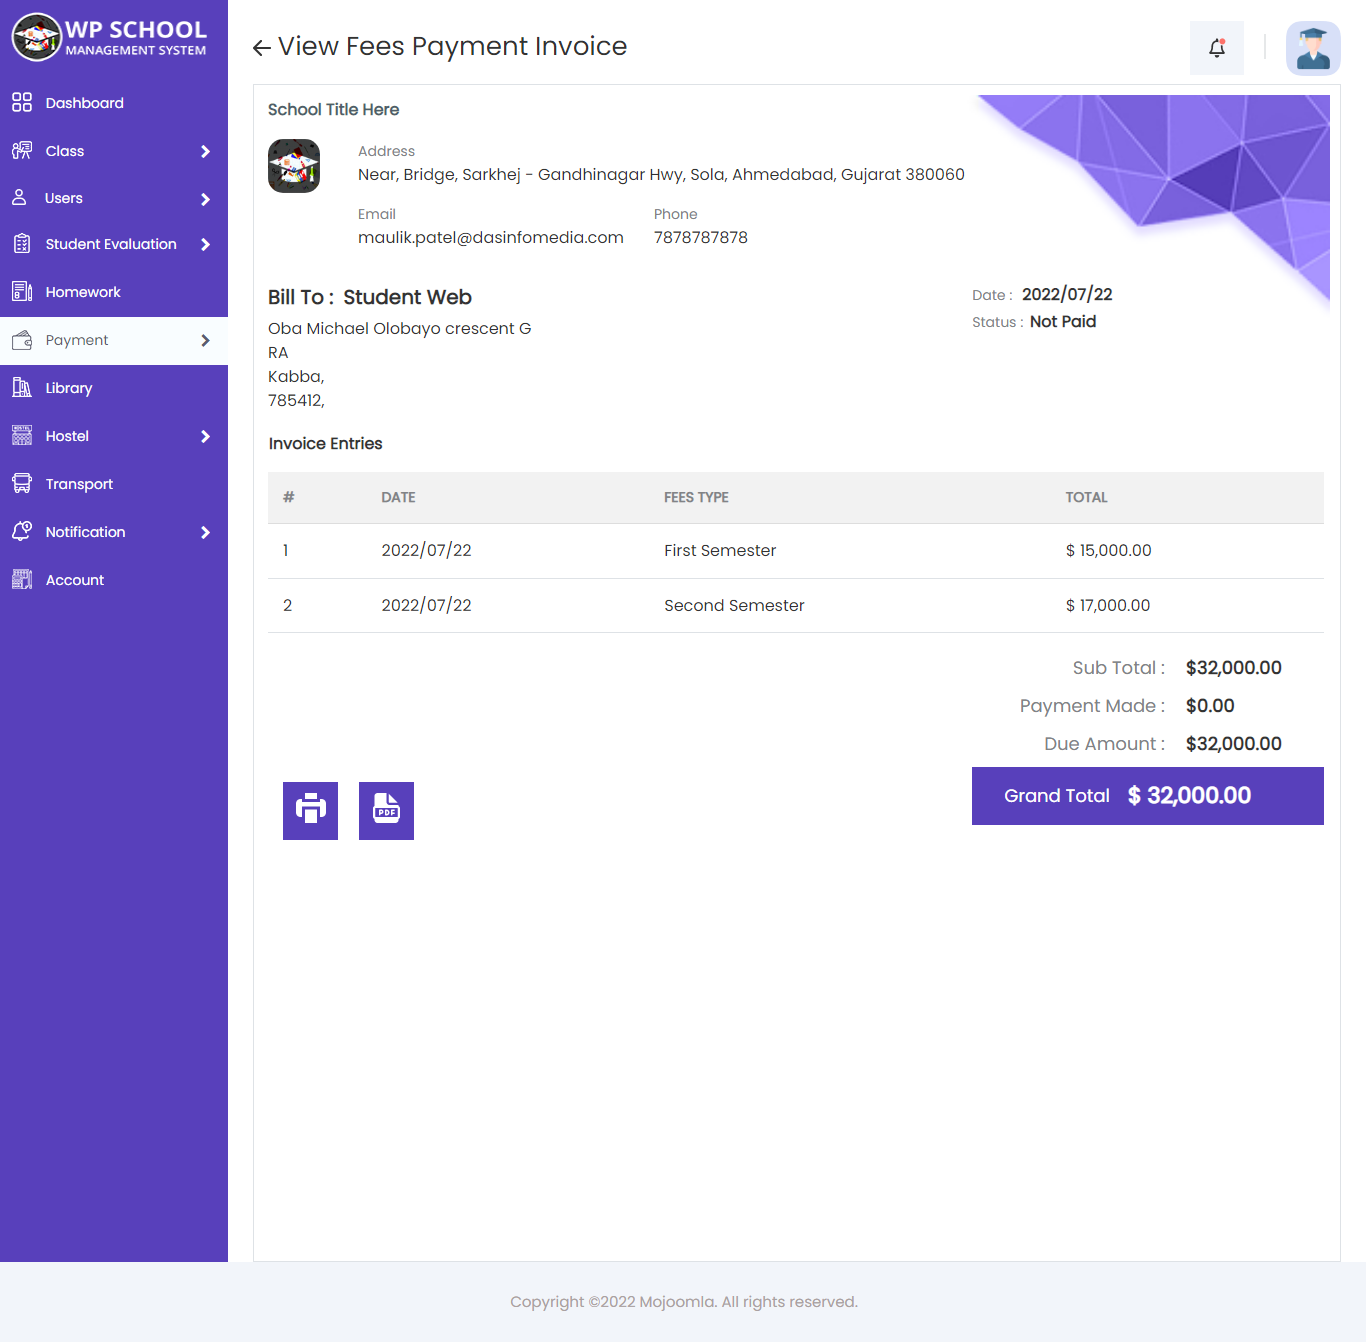
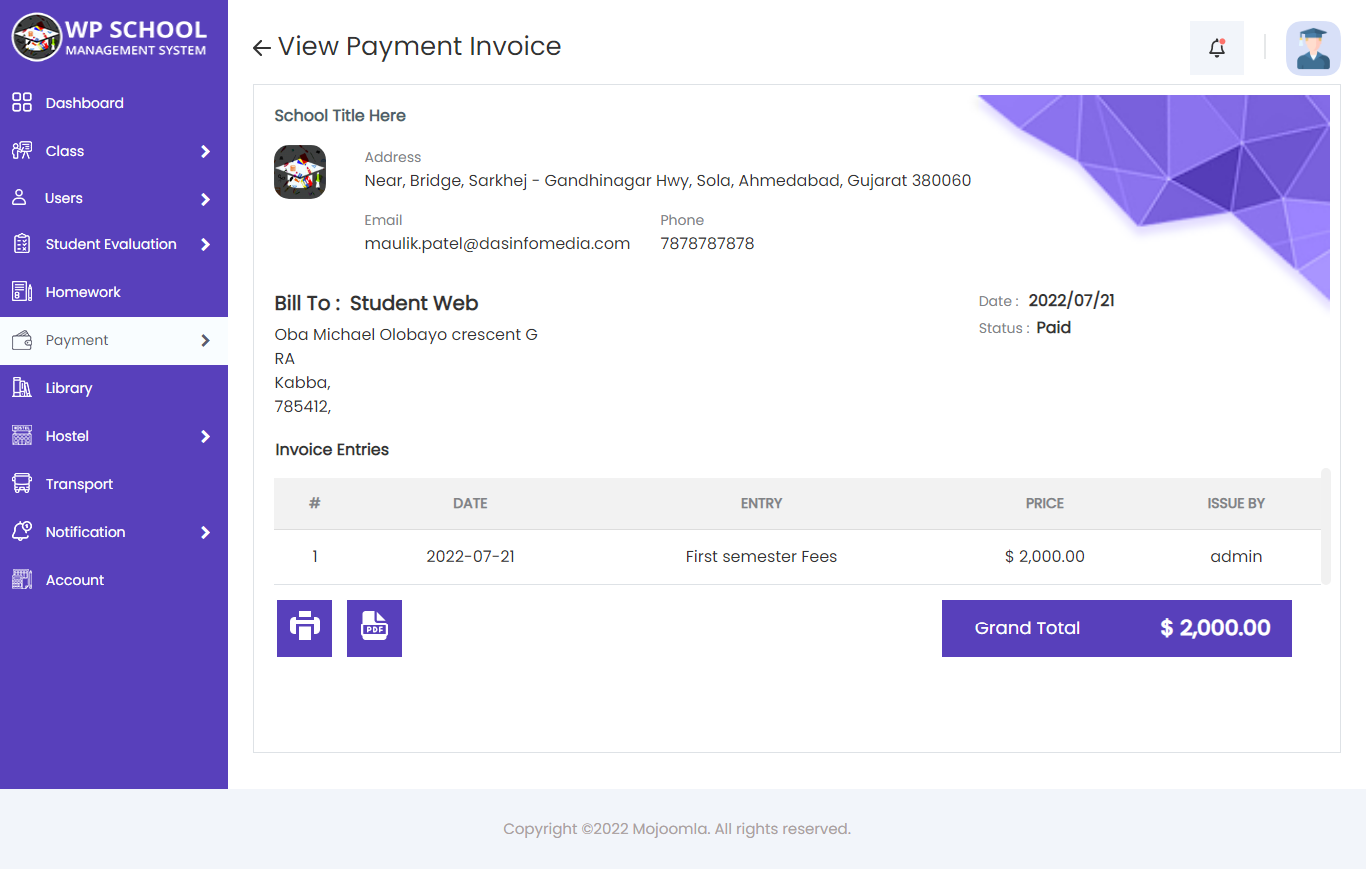
Click View Invoice to see the full fee invoice details for a student — amount, status, and payment date.
Generate & View Invoice
Admin can generate a new invoice for any student and send it by email. The invoice can be downloaded as a PDF.
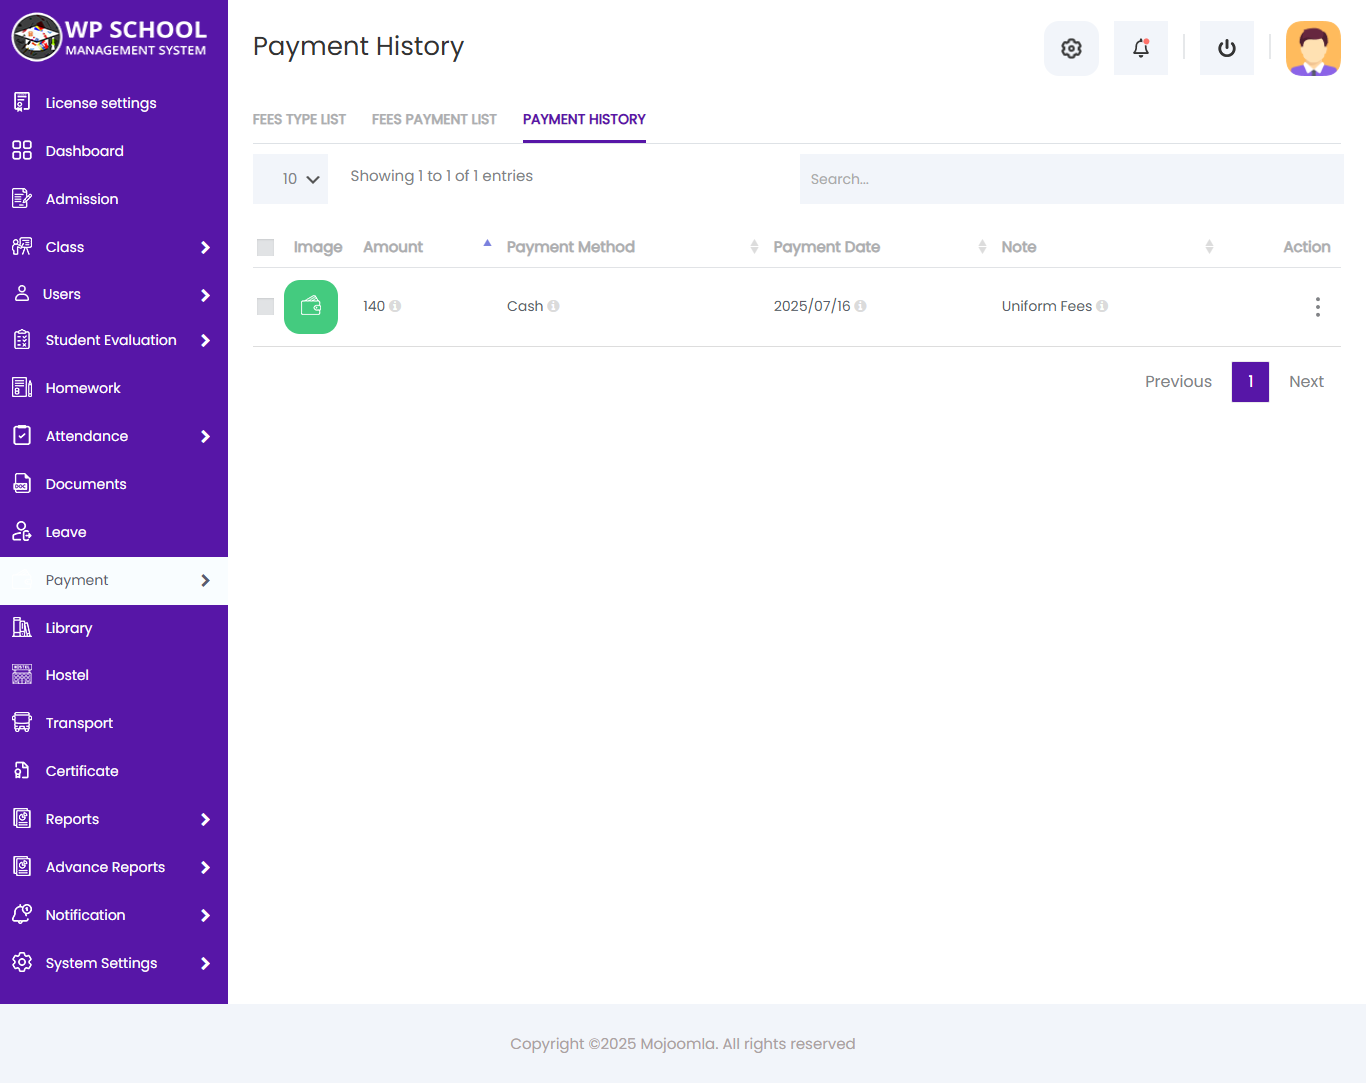
Payment History
After payment, admin can view the complete payment history for any student by clicking the Payment History button.
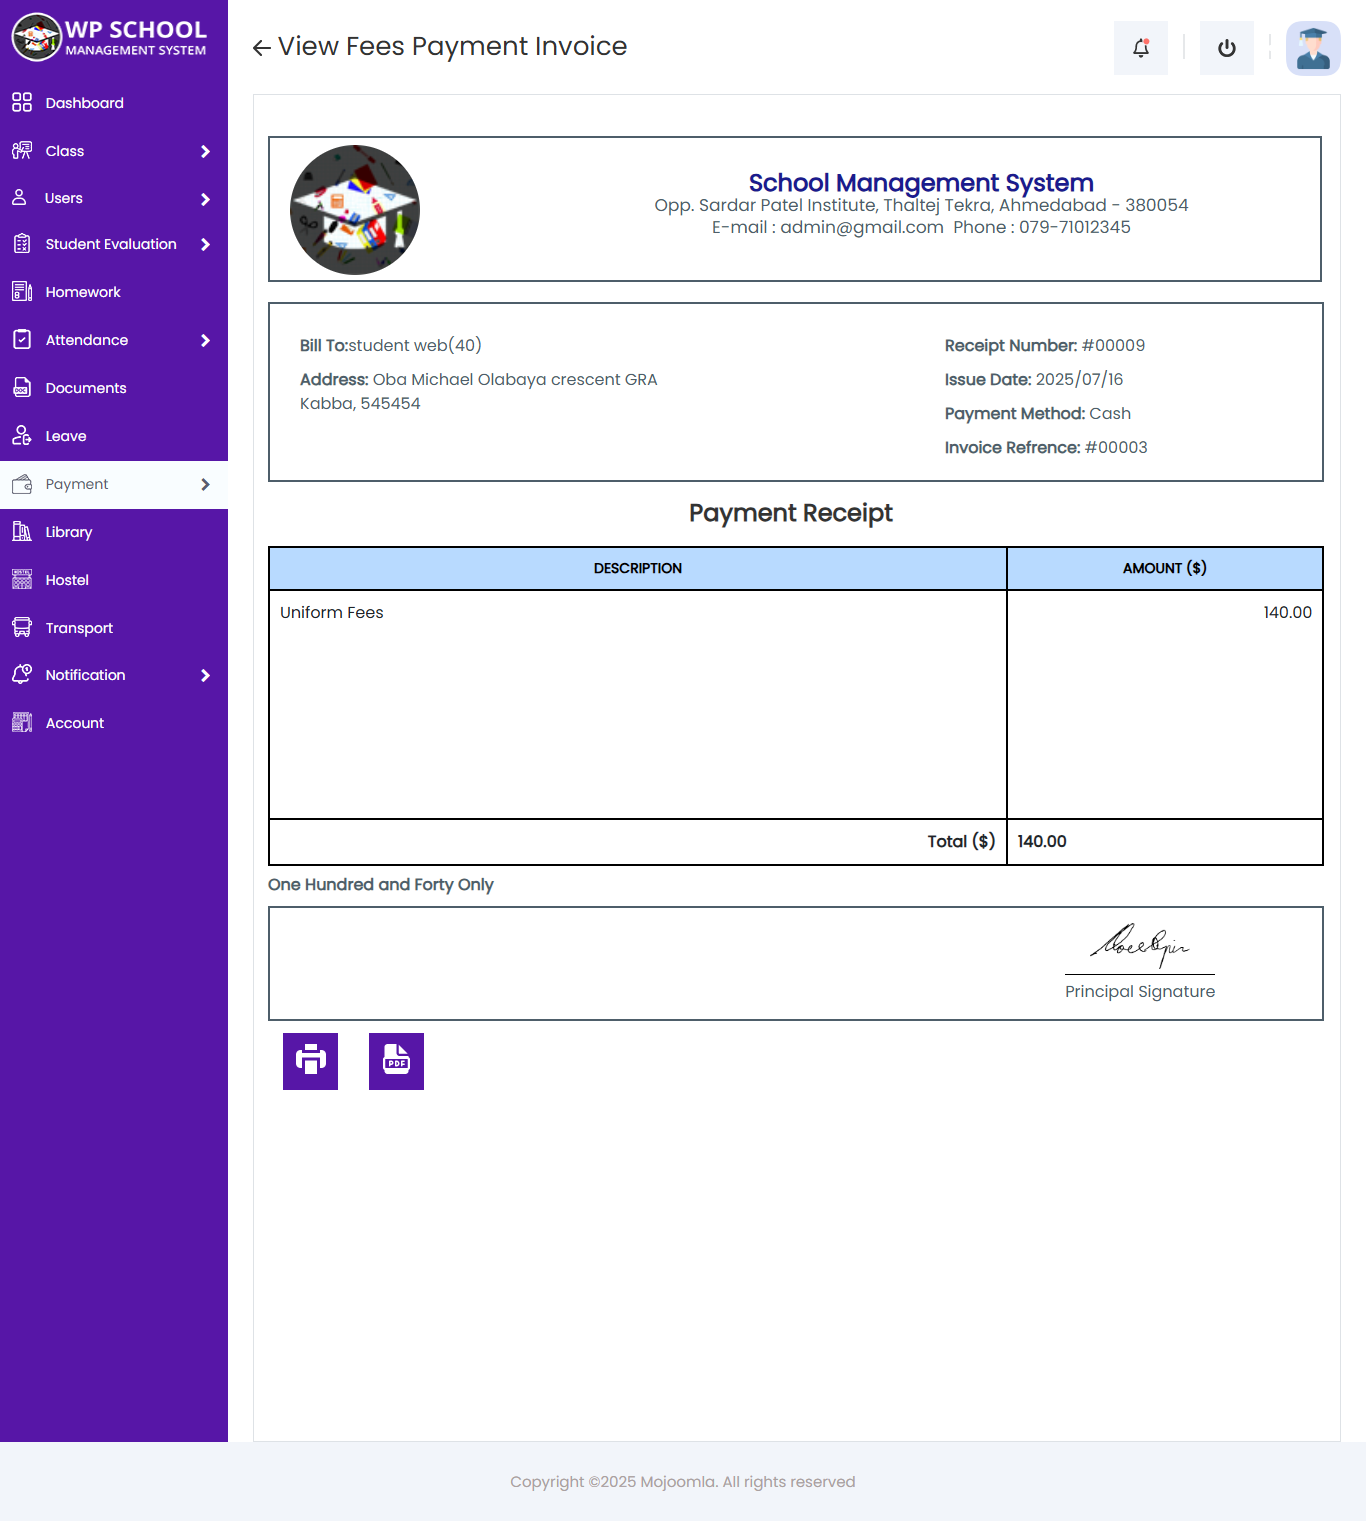
View Receipt
Admin can view and print or download a payment receipt as PDF by clicking the View Receipt button.
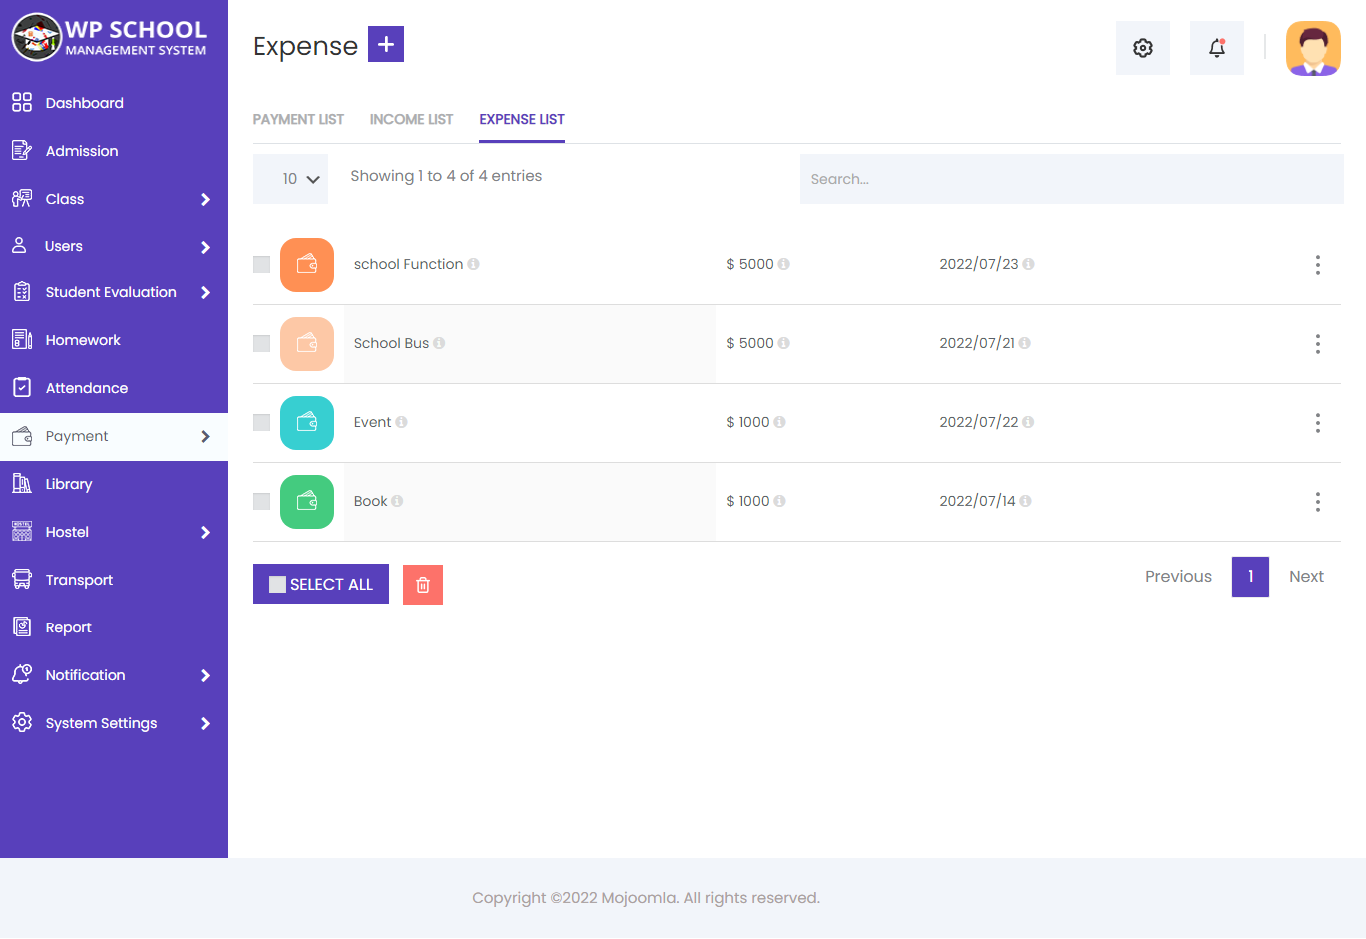
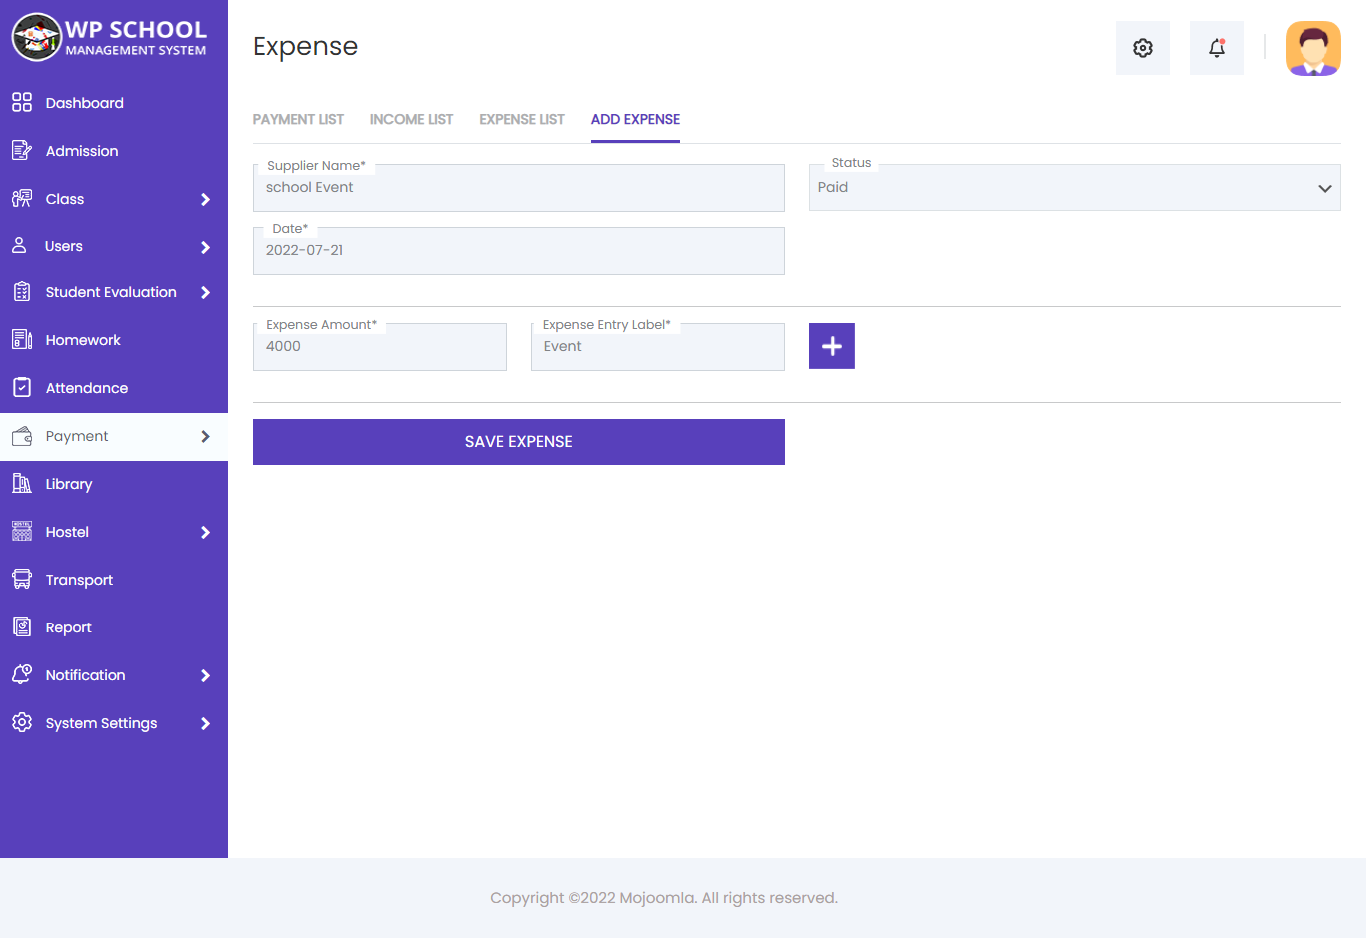
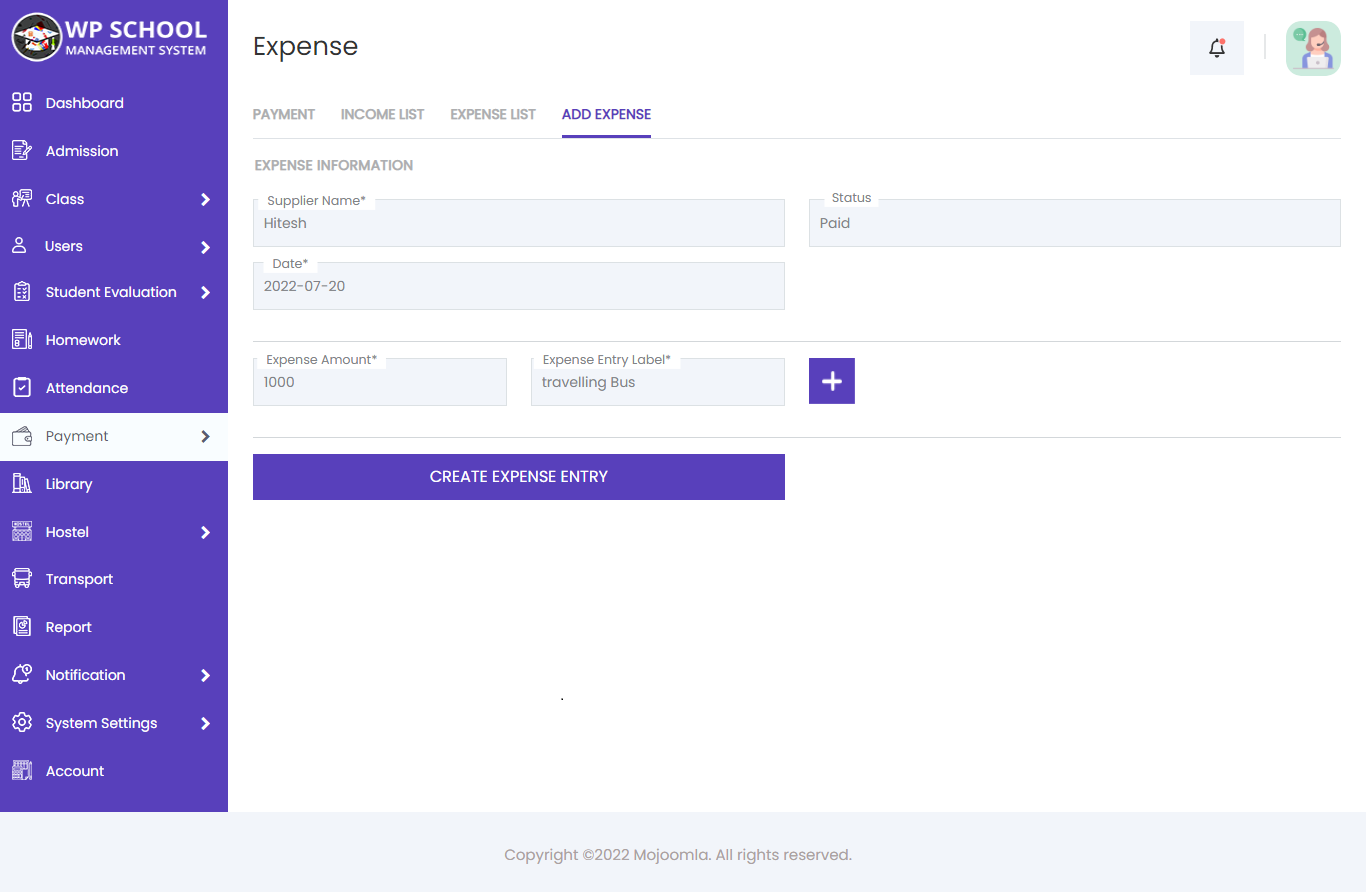
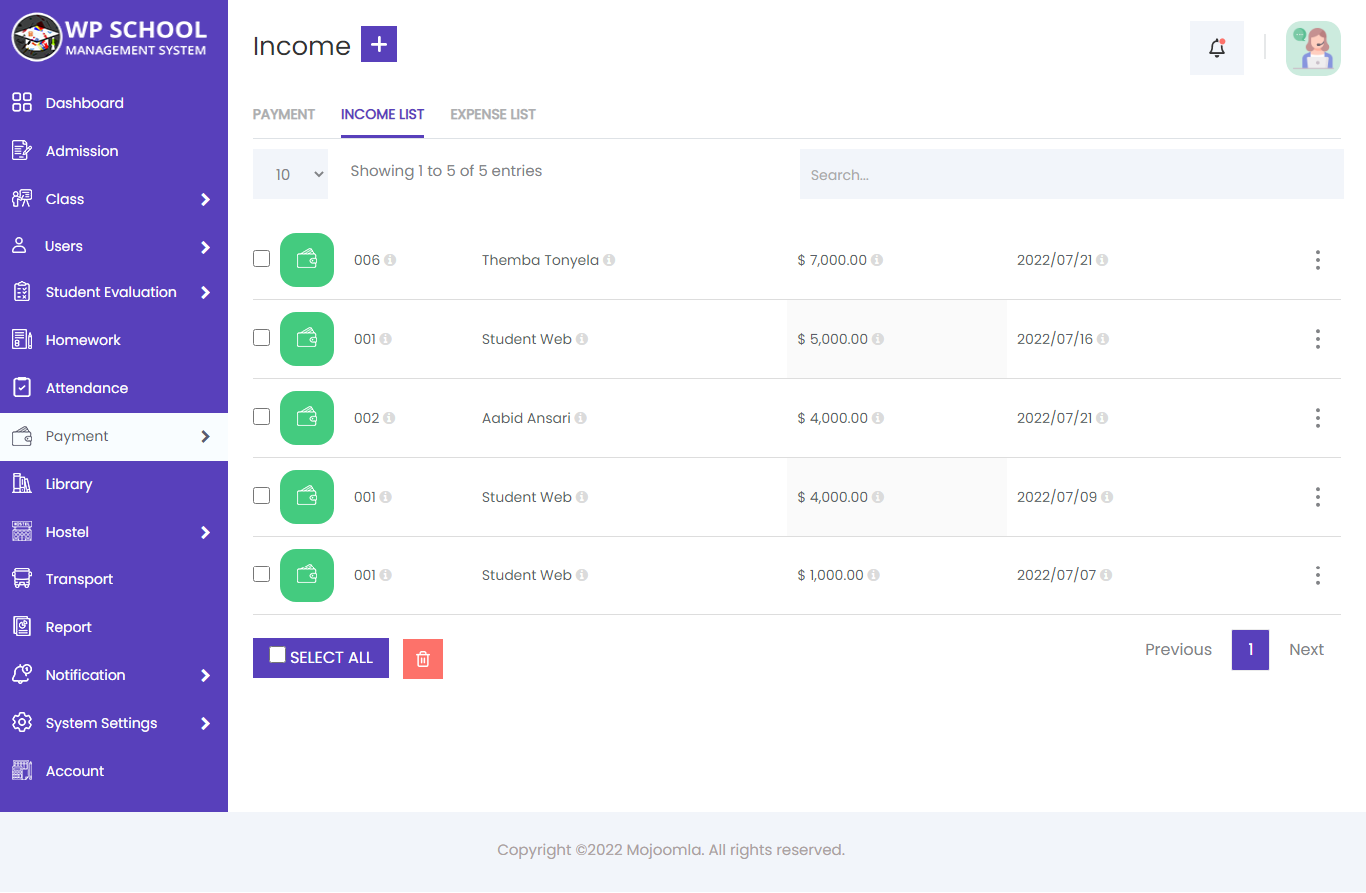
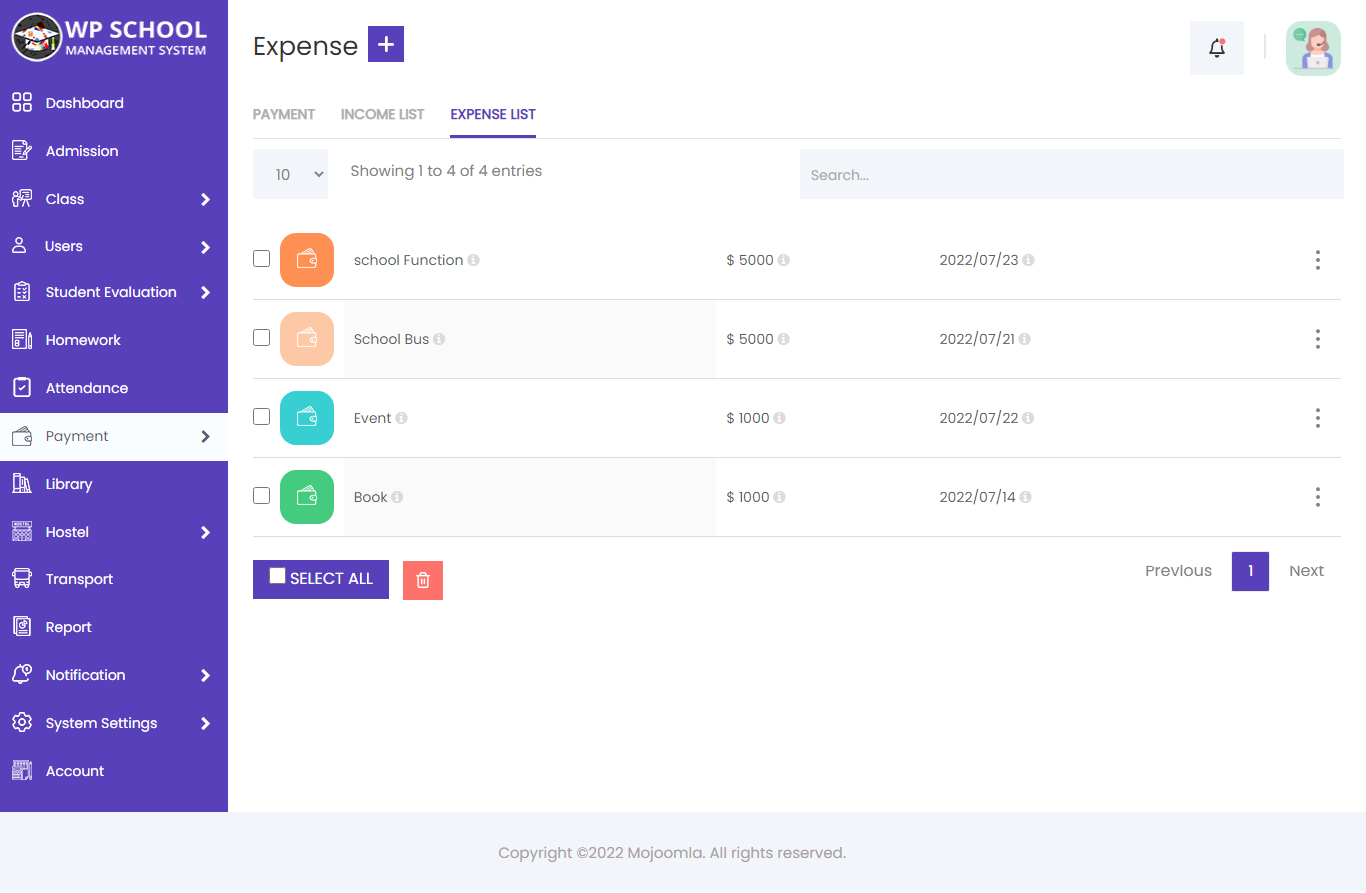
23) Payment (Income & Expenses)
Manage all school income and expense records. Track all financial transactions — view, add, and export income and expense entries in an organized list.
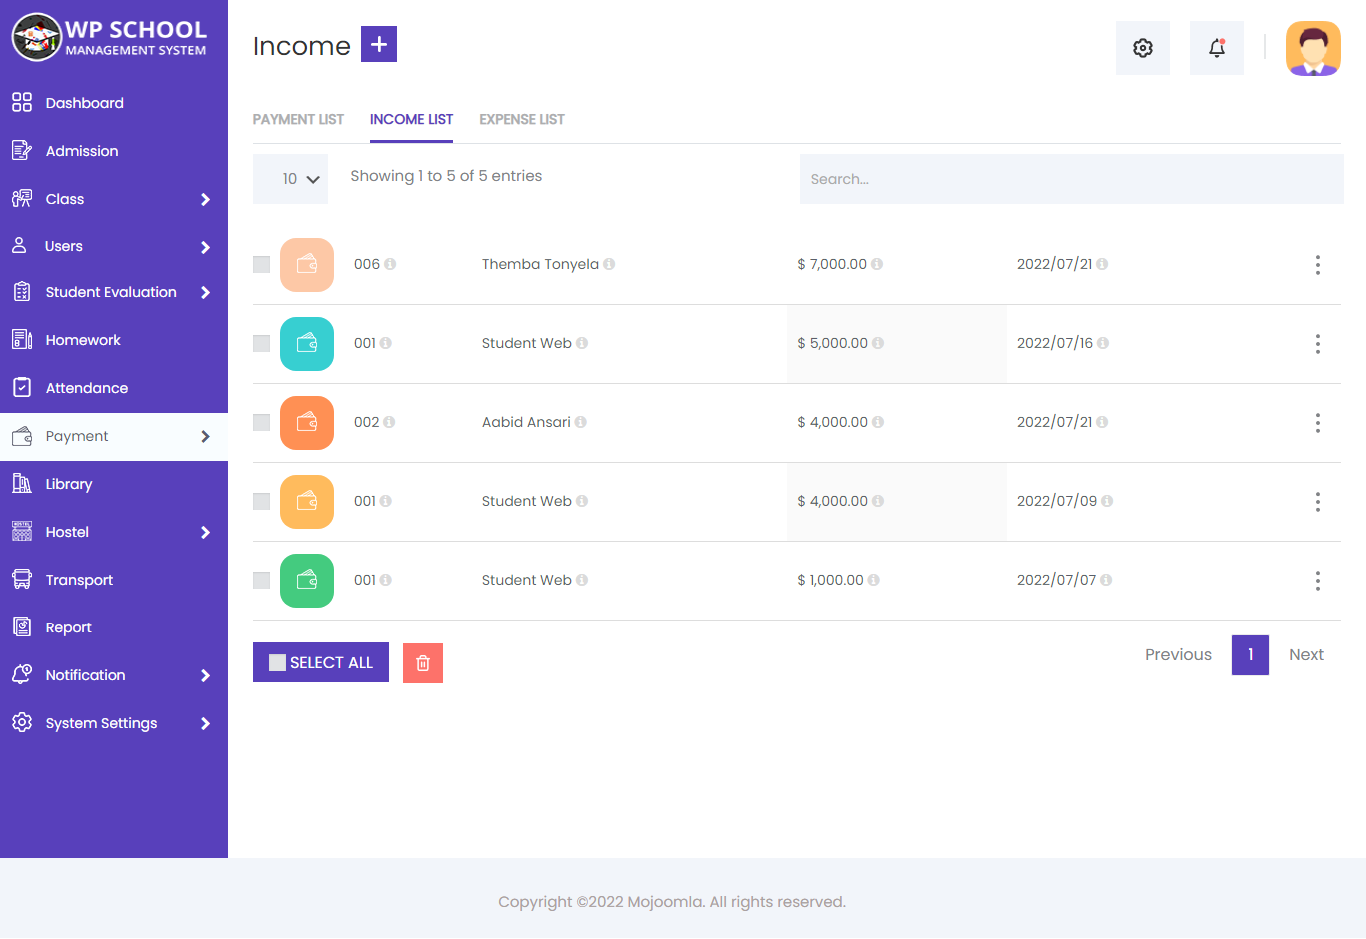
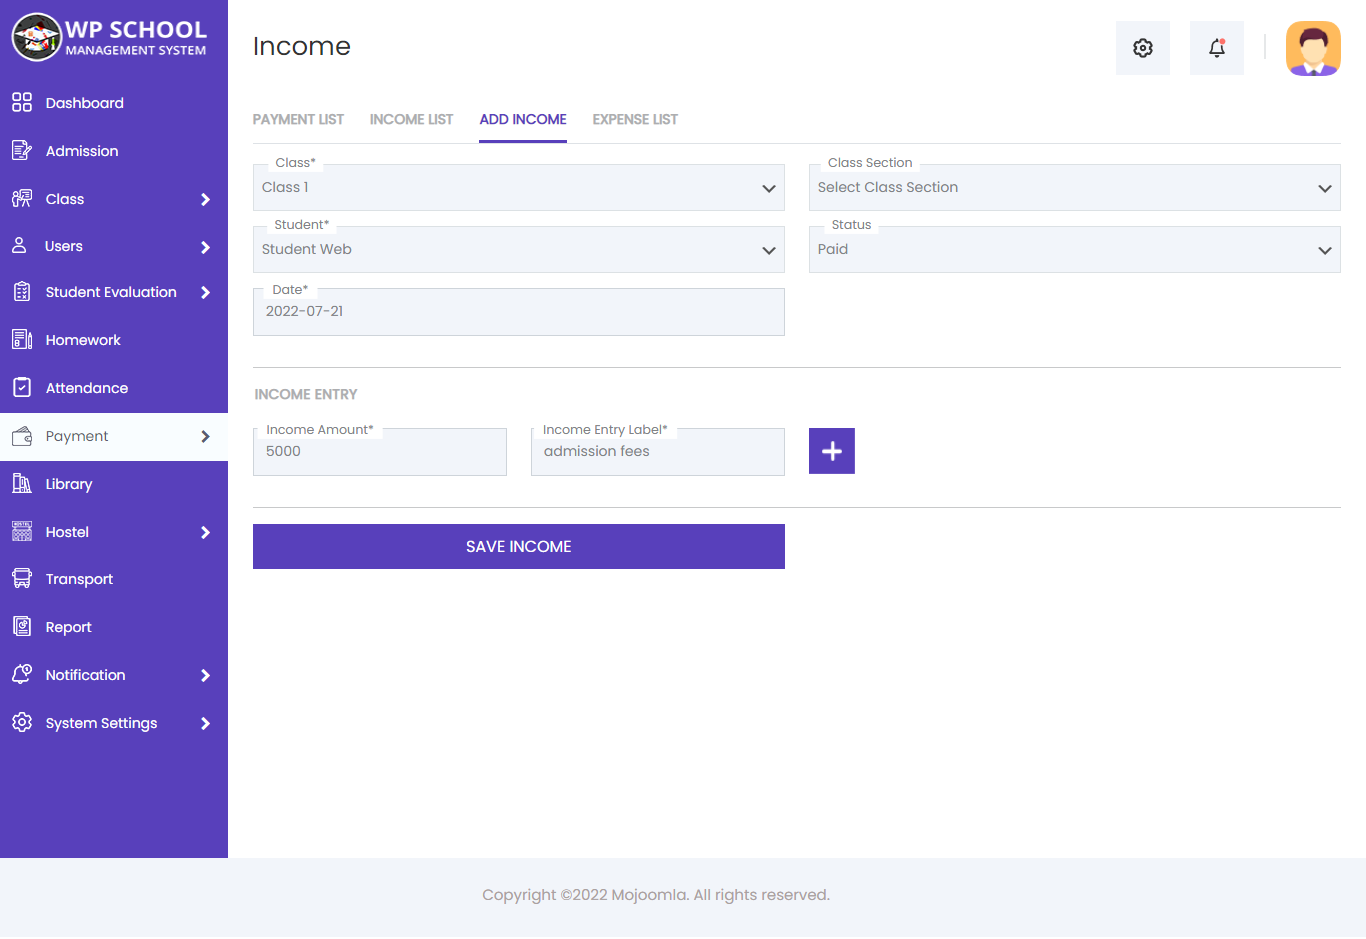
Income
View all income records and add new income entries with source, amount, and date details.
Expenses
View all expense records and add new expense entries with category, amount, and date details. Expenses can be exported to CSV for accounting.
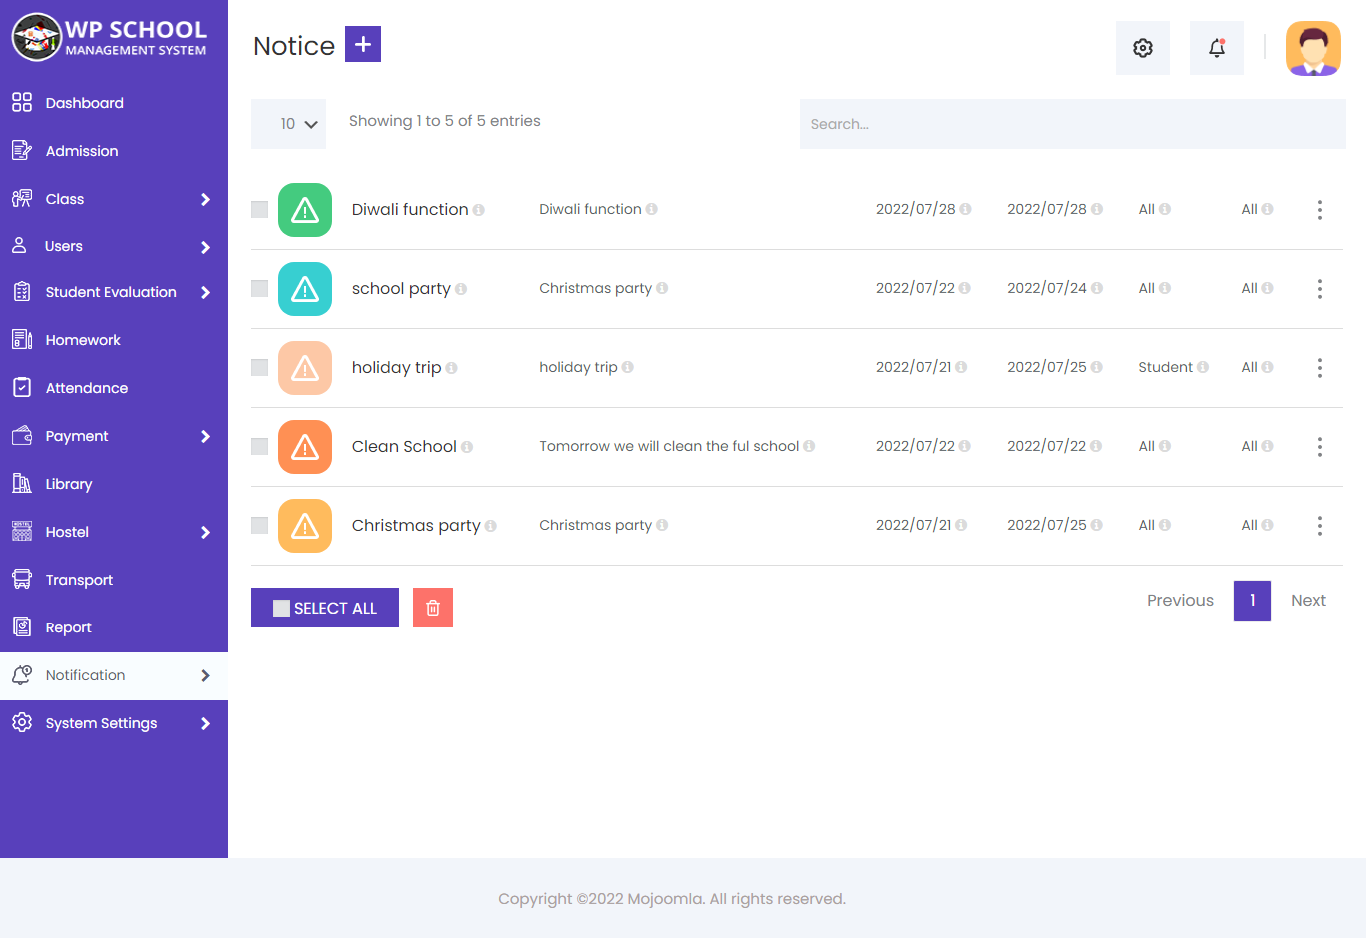
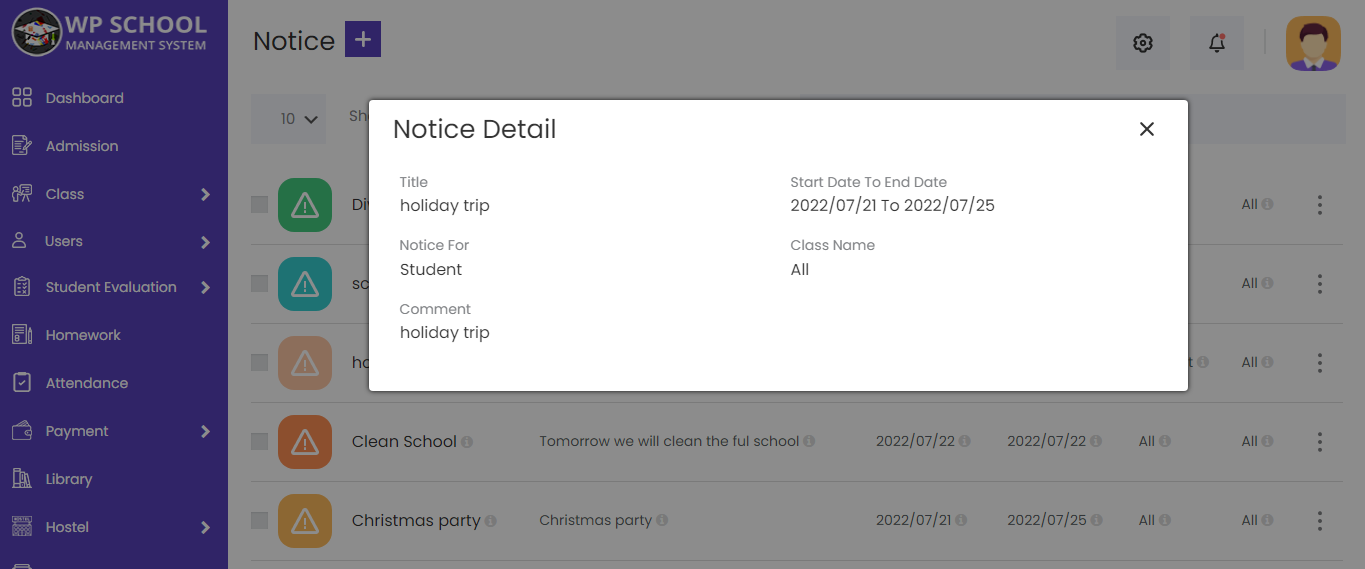
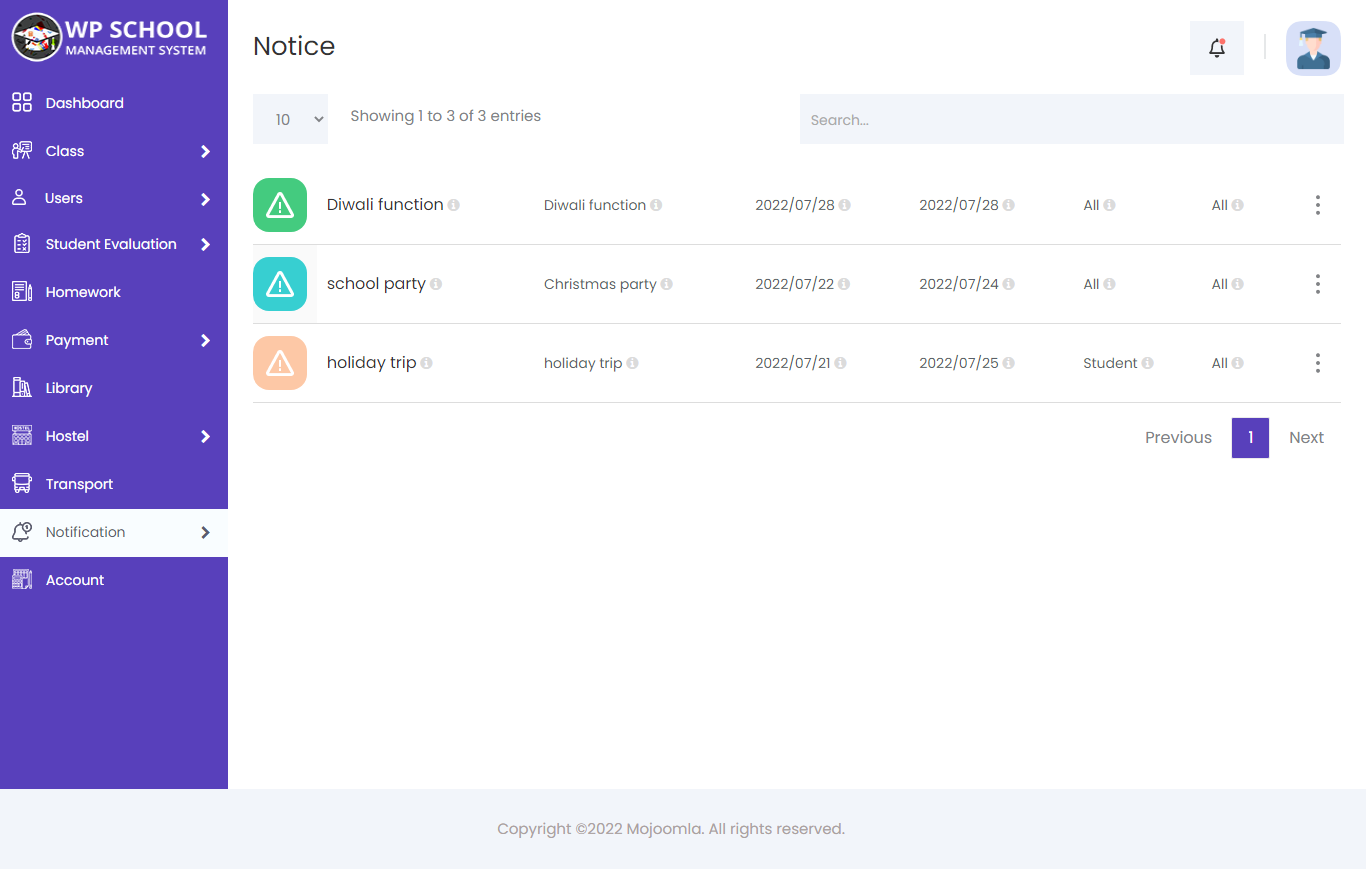
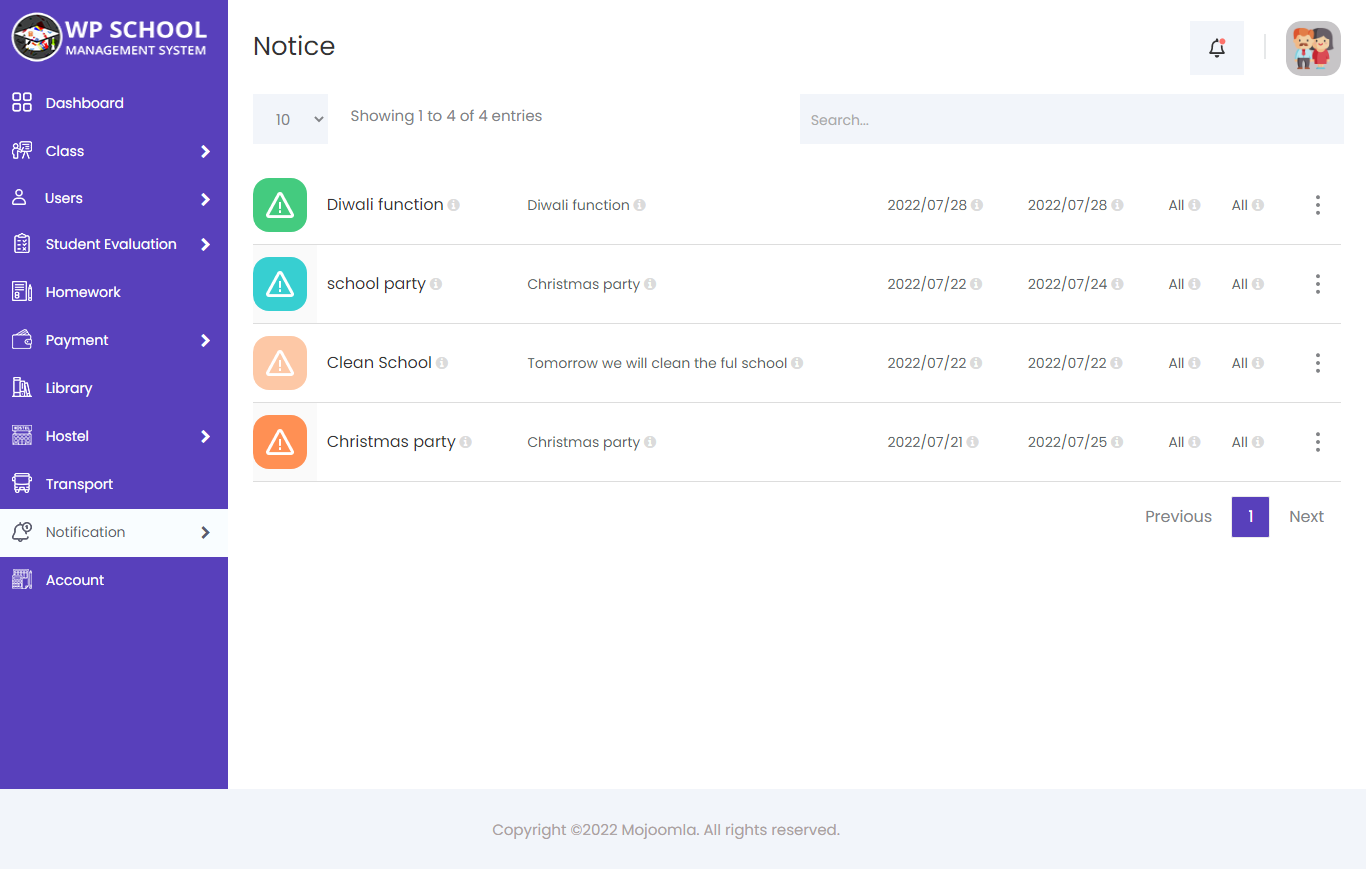
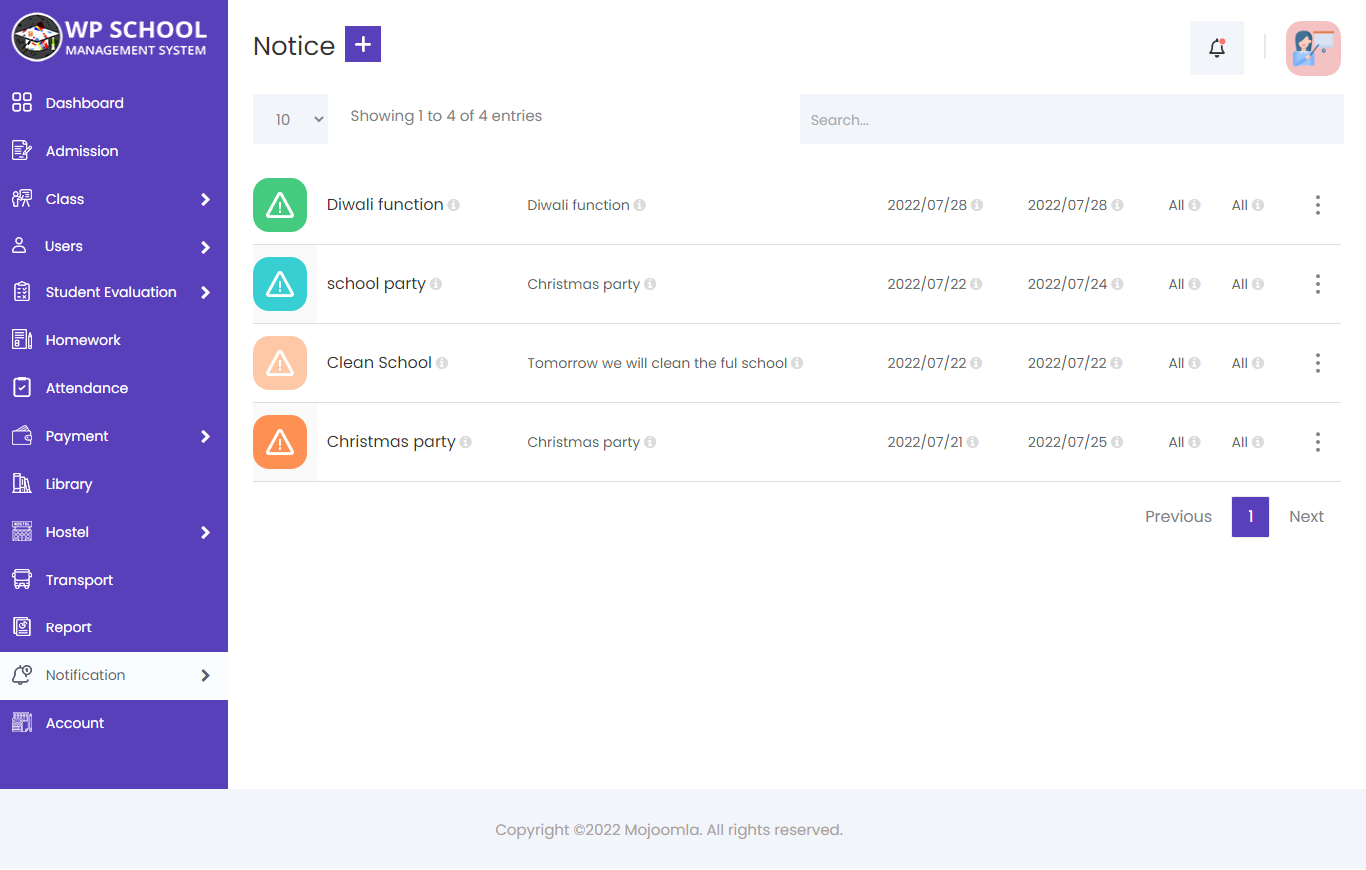
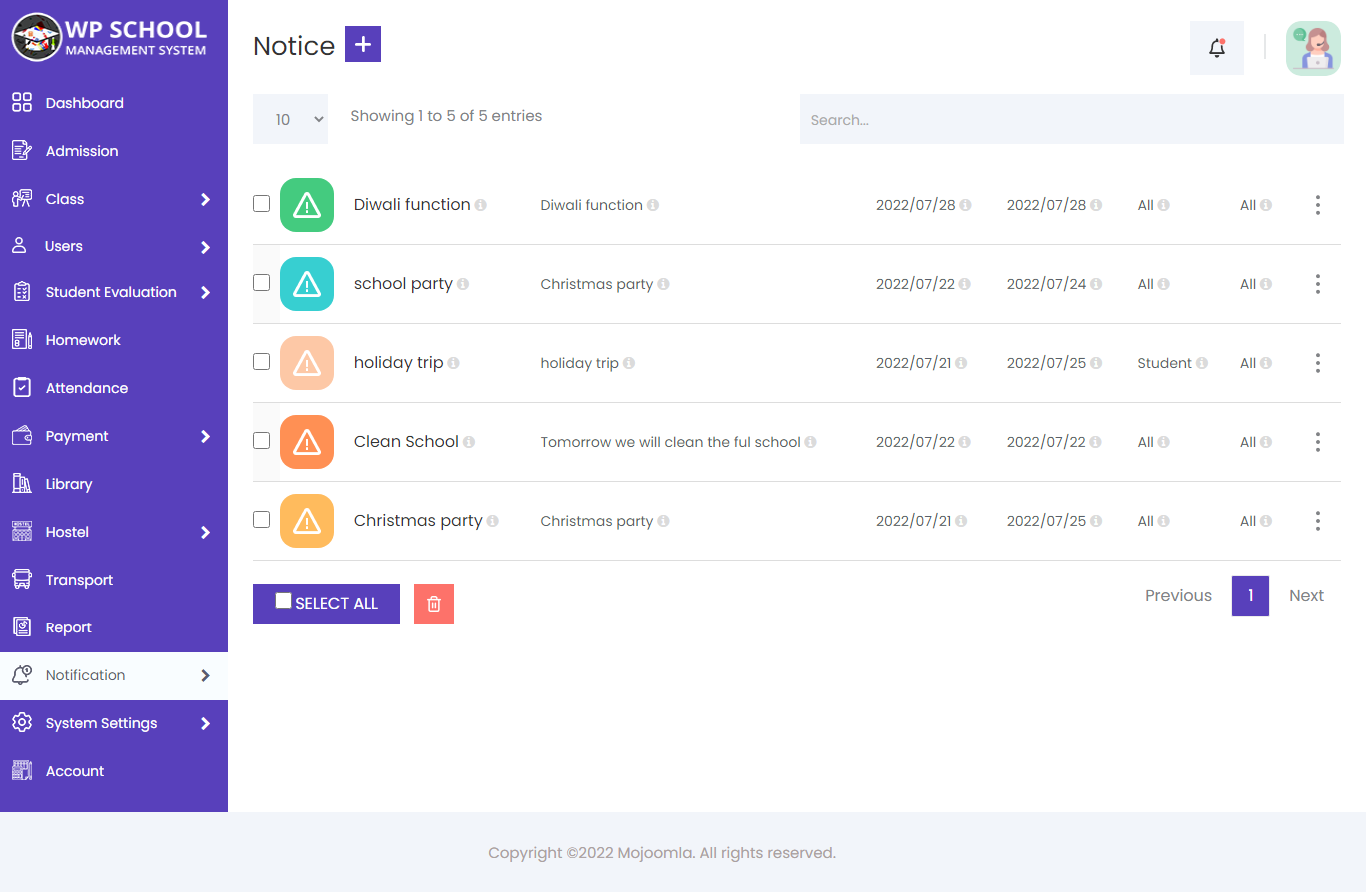
24) Notice Board
Here you can see and manage a list of events and notices for teachers, students, and all users. A date range is provided so this can also be used as an event calendar.
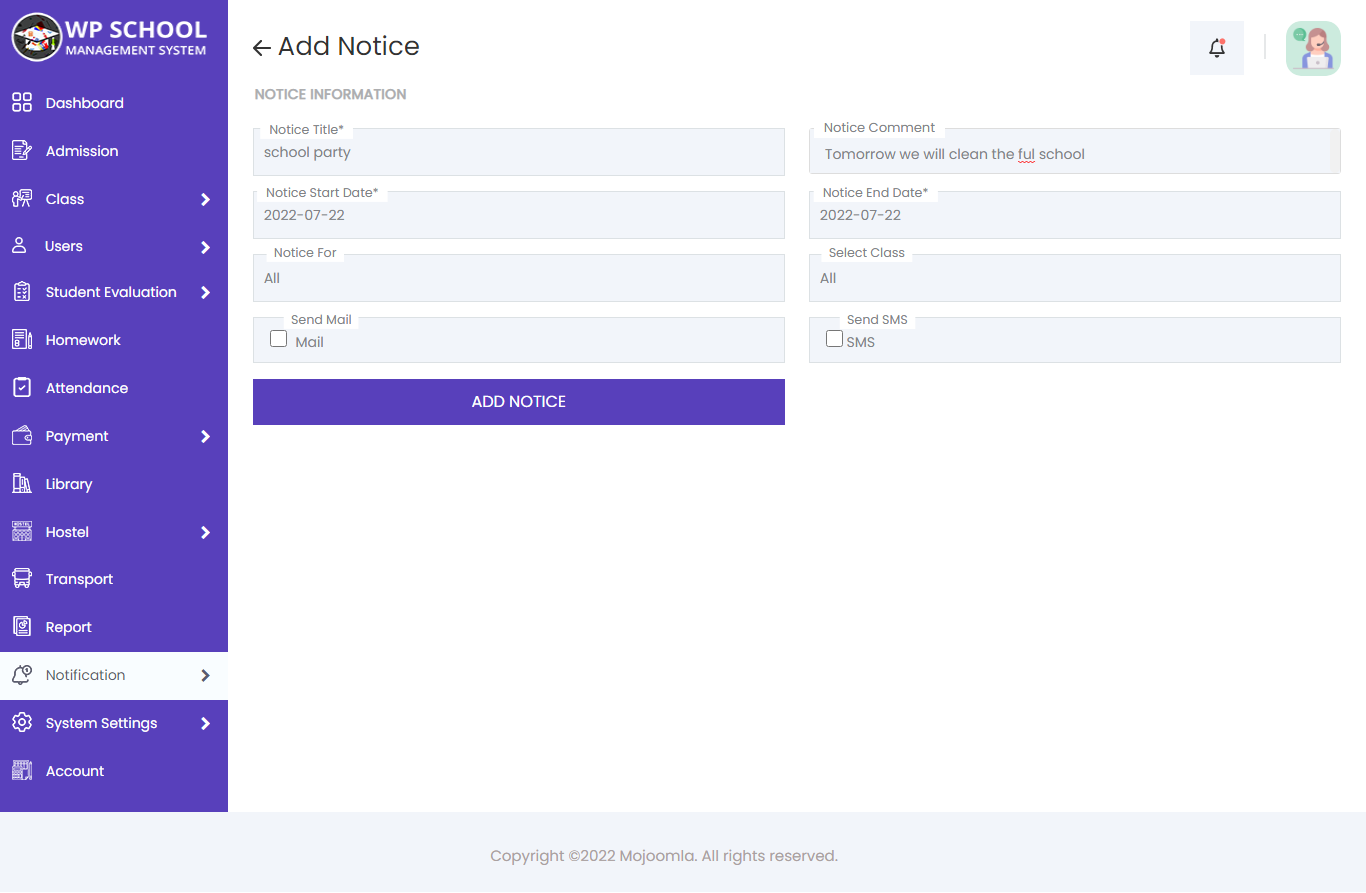
Add Notice
Click Add Notice to publish a new notice. Enter the title, active date range, select the intended audience, and optionally send an SMS notification to the selected group.
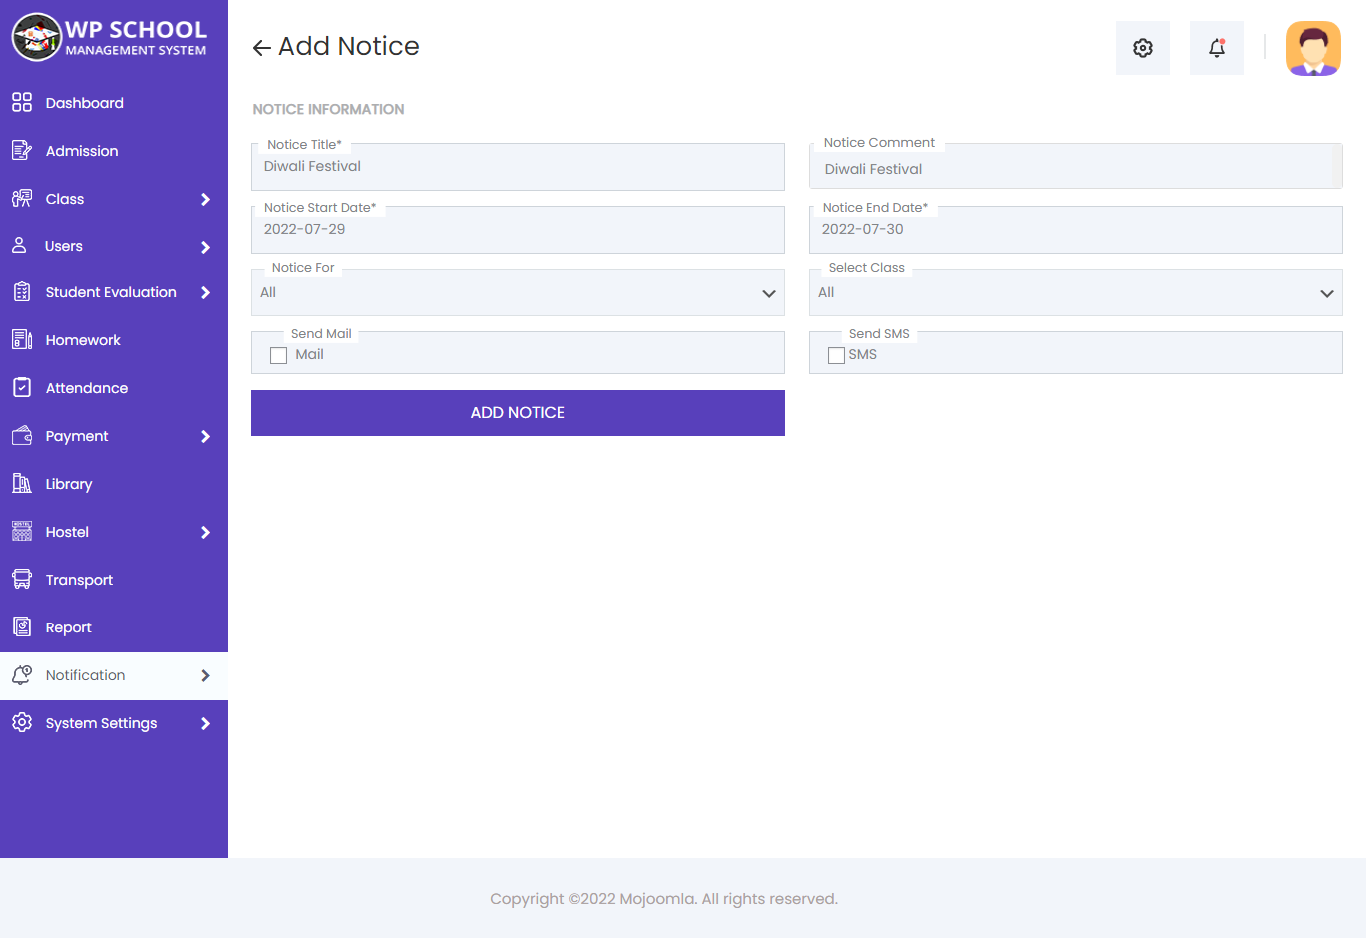
| Field | Description |
|---|---|
| Notice Title | Clear, descriptive title |
| Start / End Date | Active period of the notice |
| Notice For | All, Students, Teachers, or Parents |
| Message Sent | Check to also send an SMS notification |
| SMS Text | SMS message content |
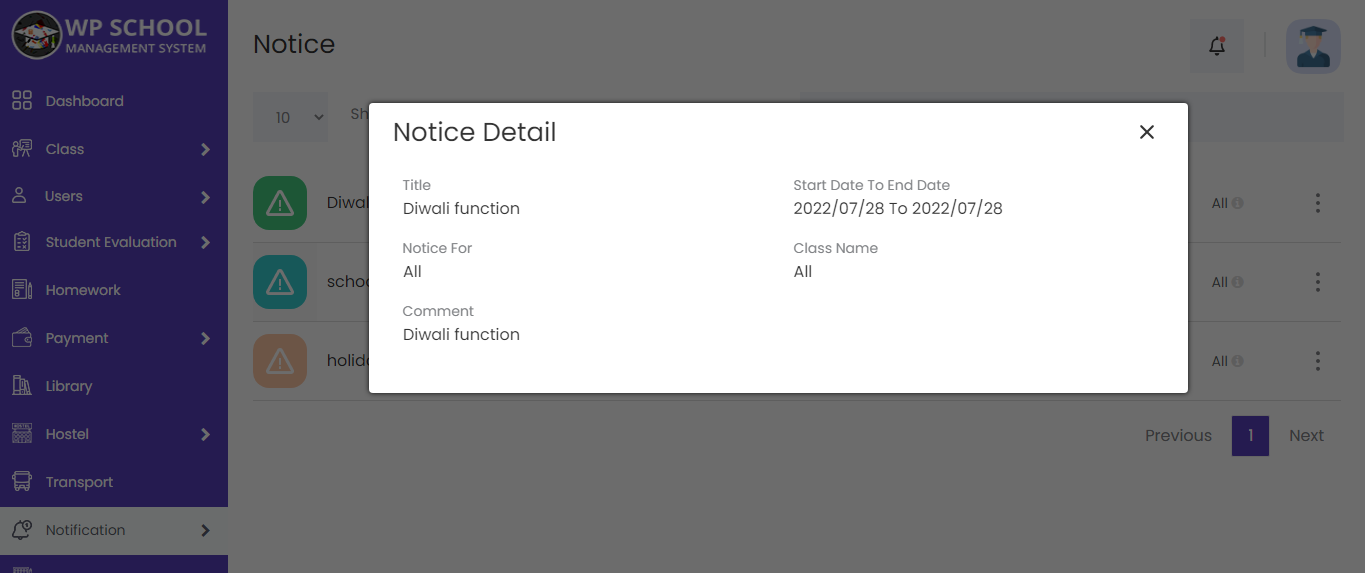
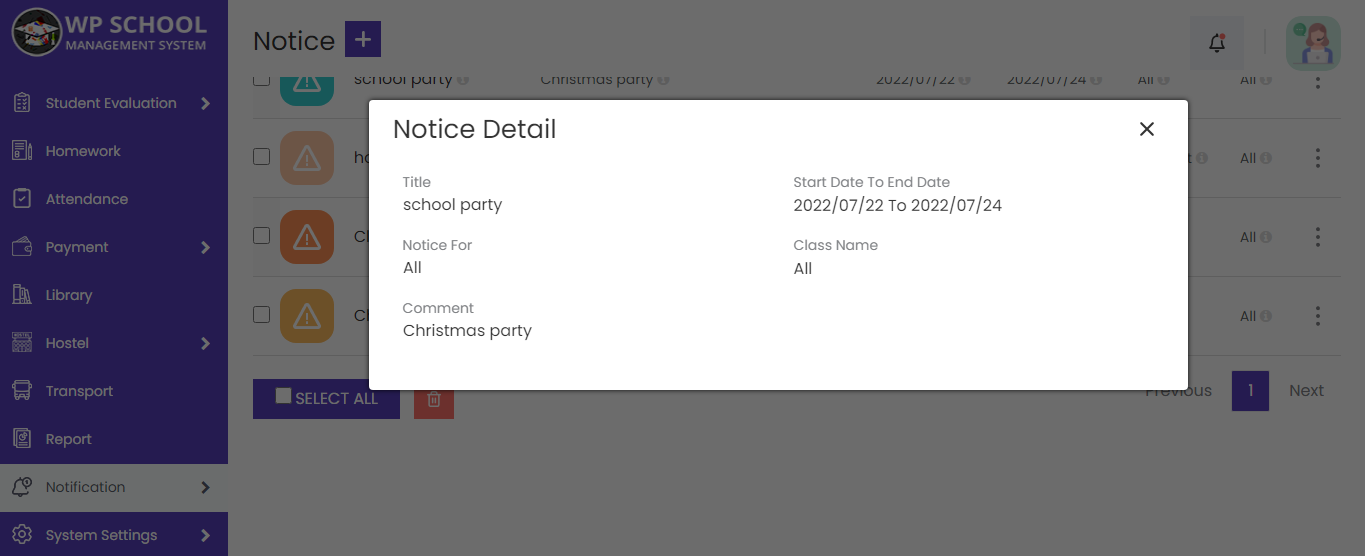
View Notice
Admin can view the full content of any notice by clicking the view button.
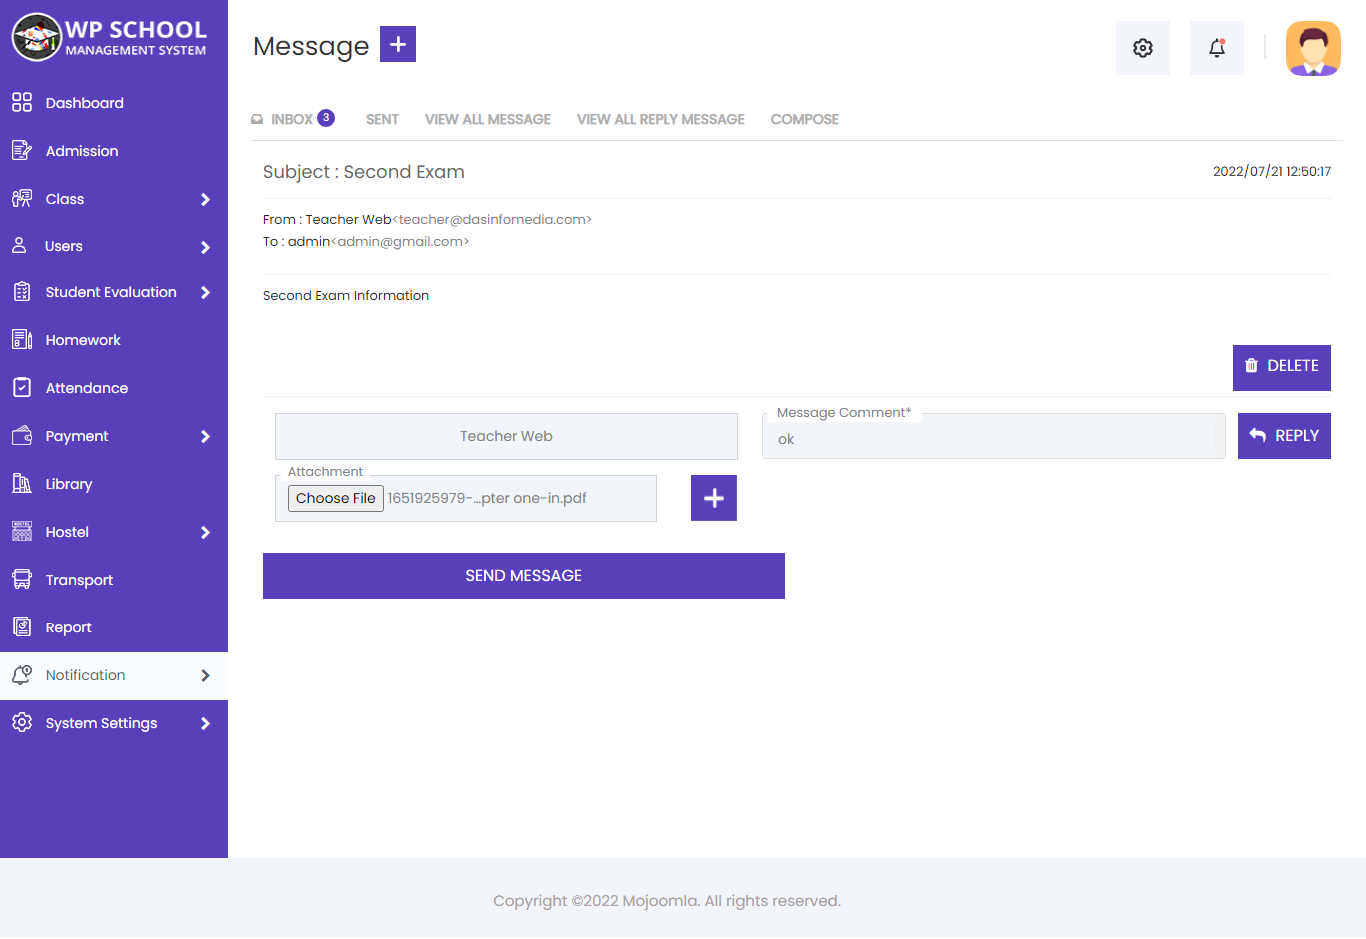
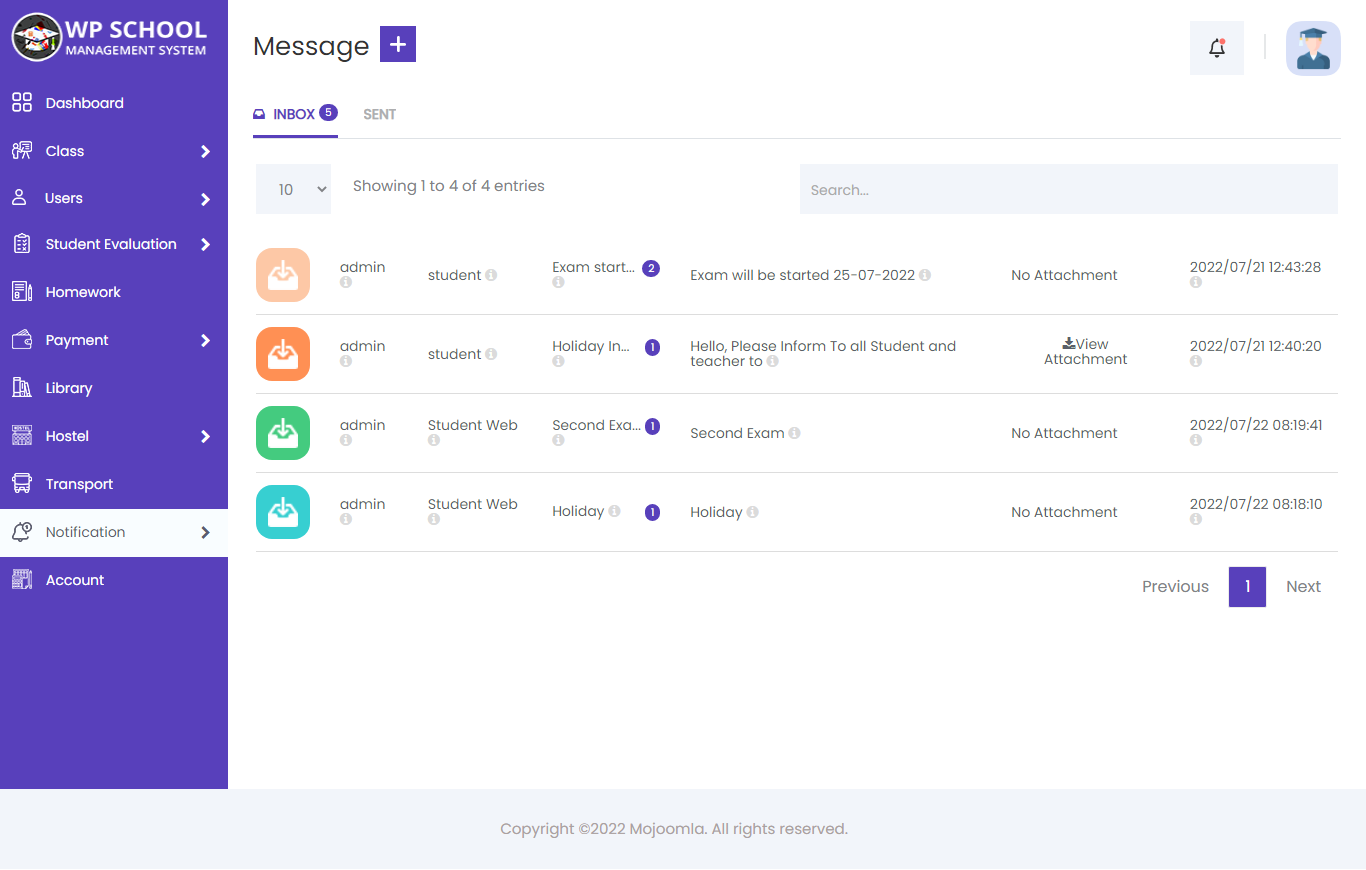
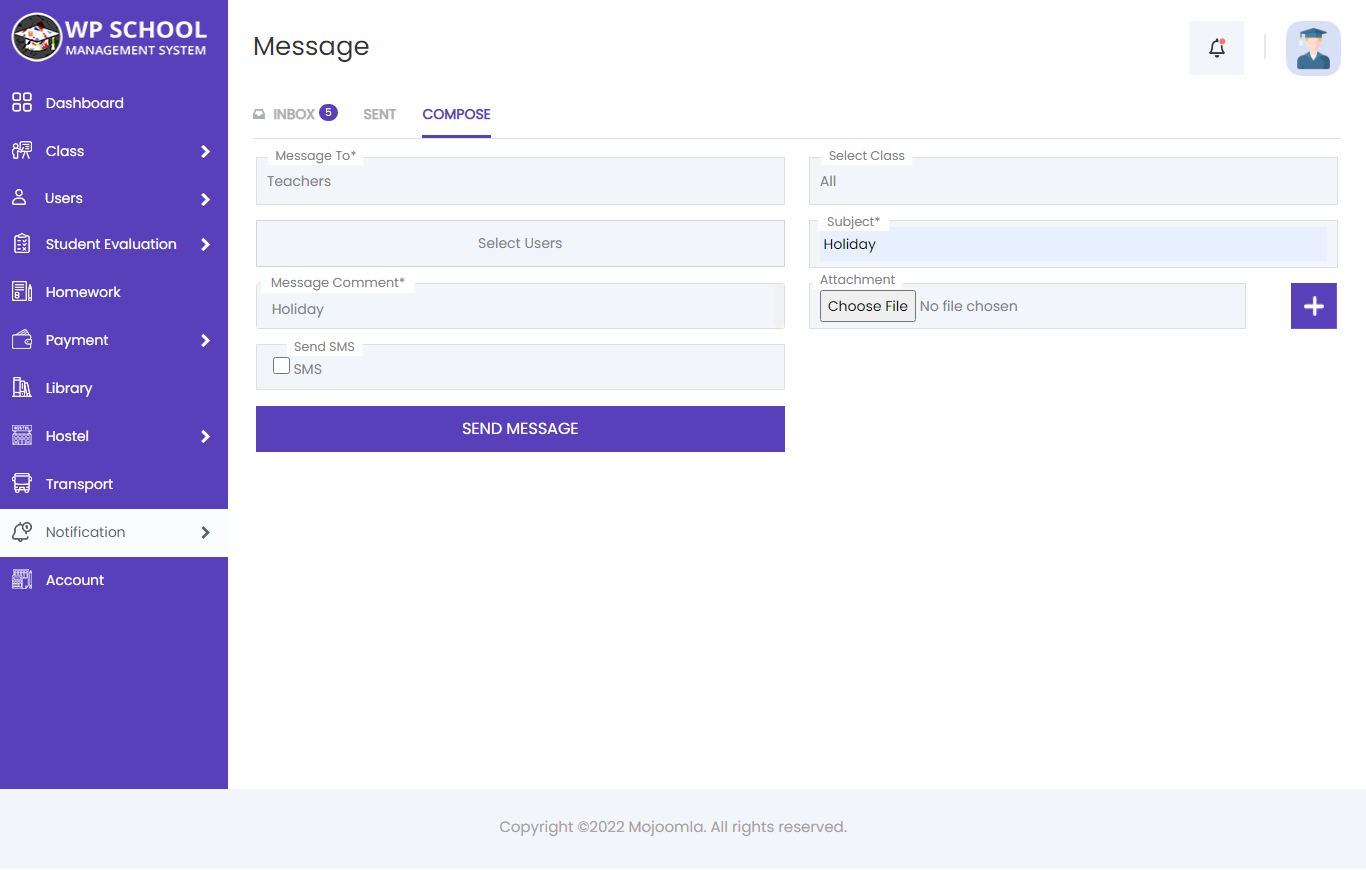
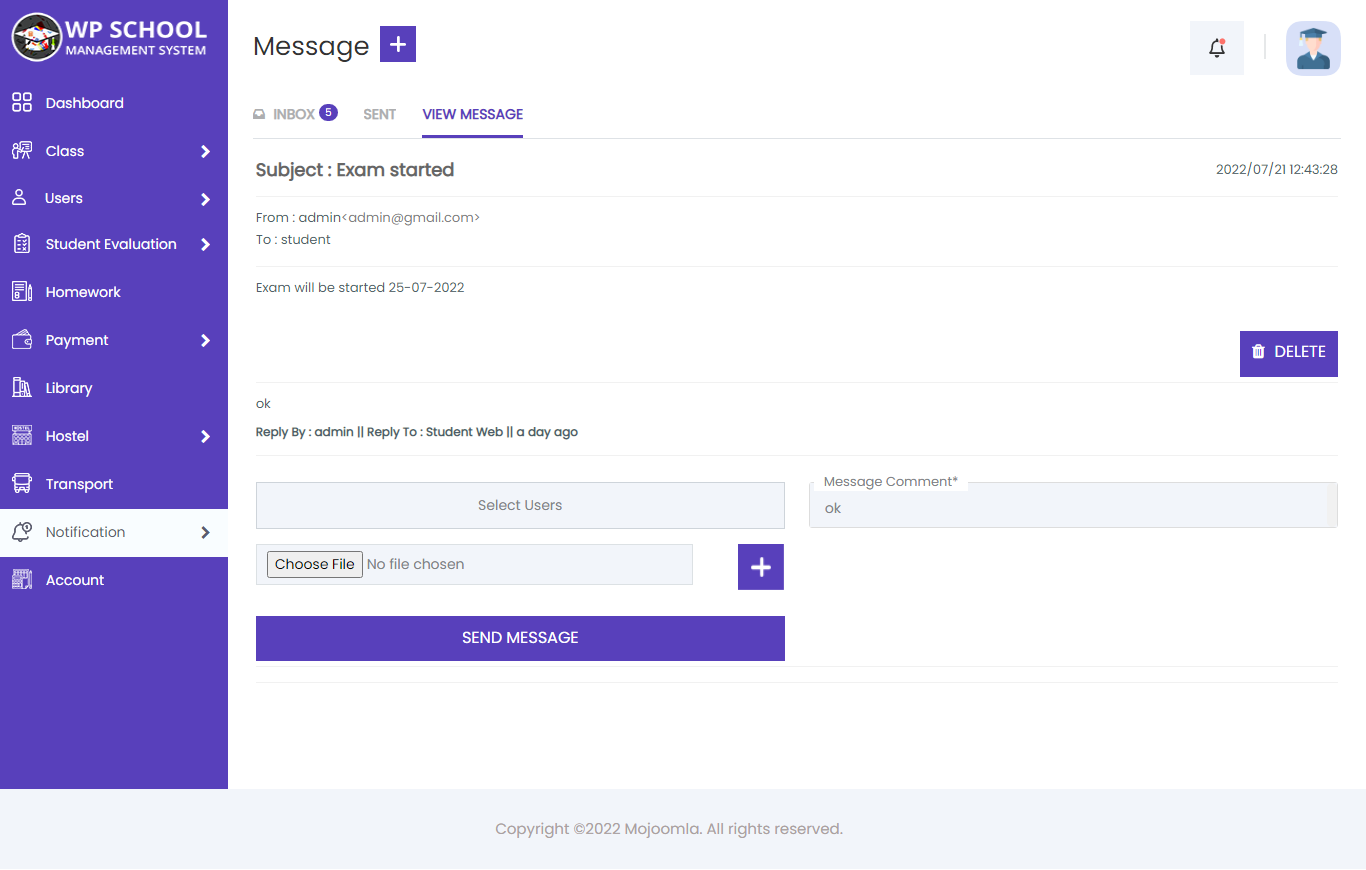
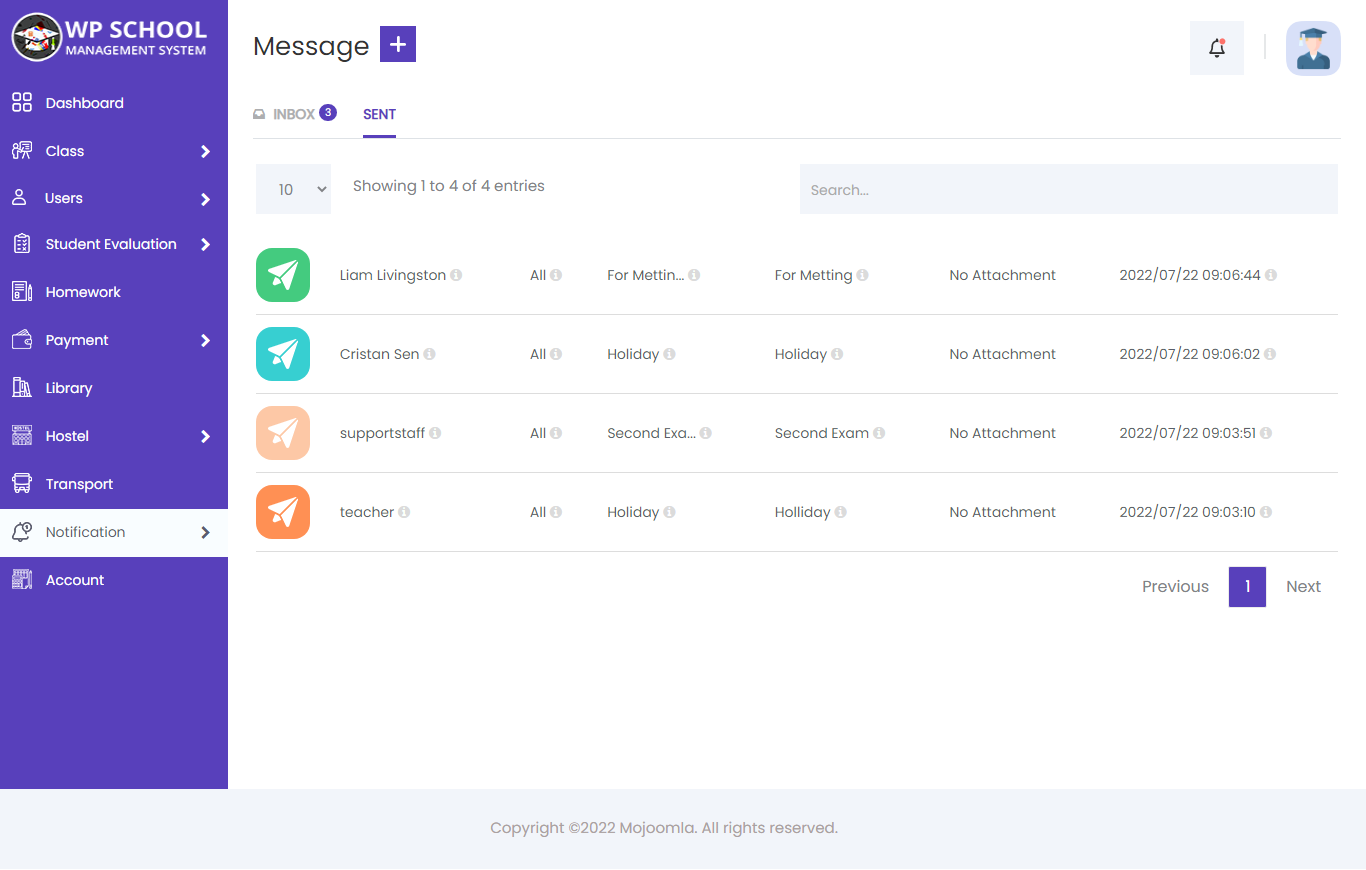
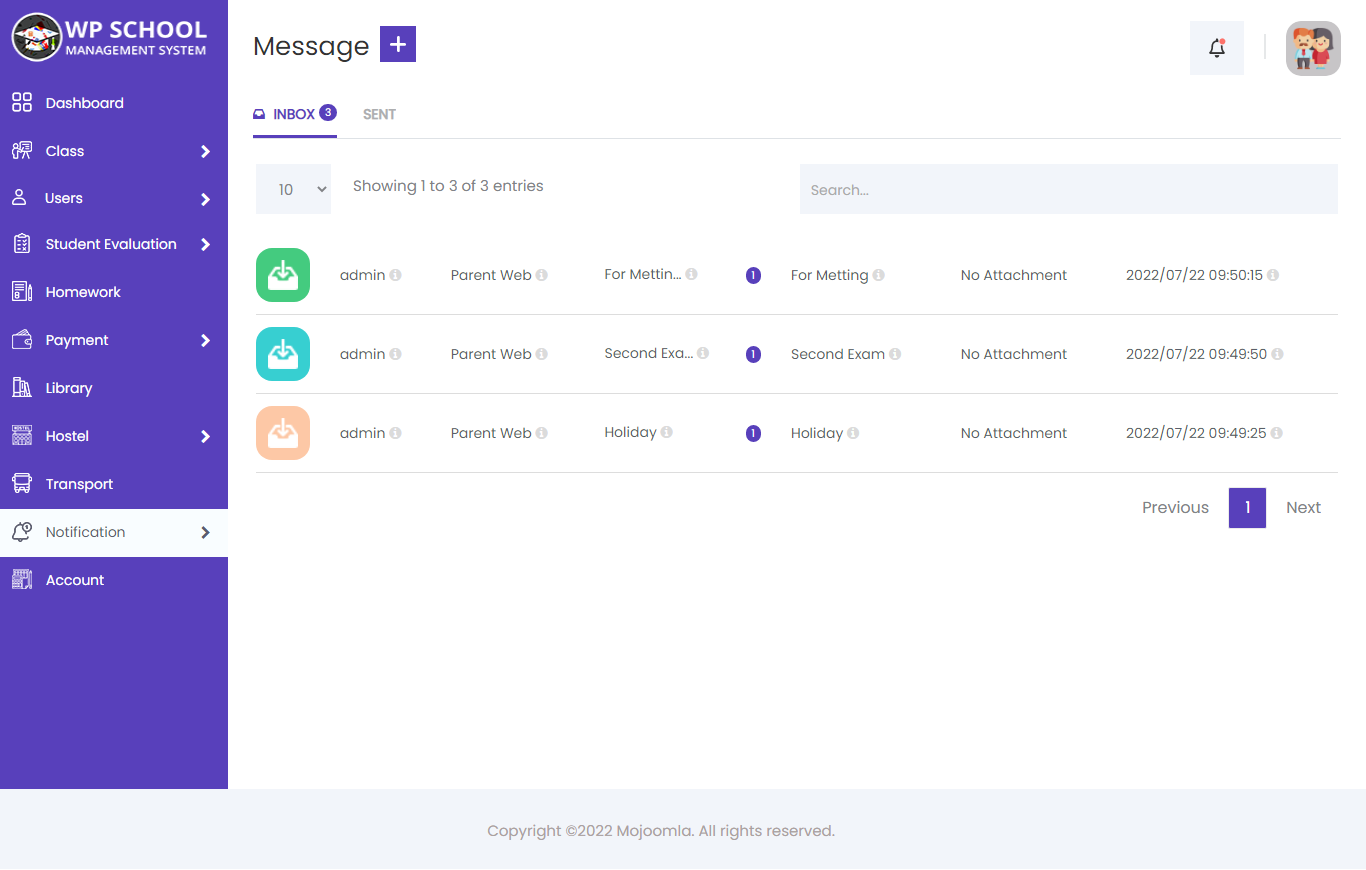
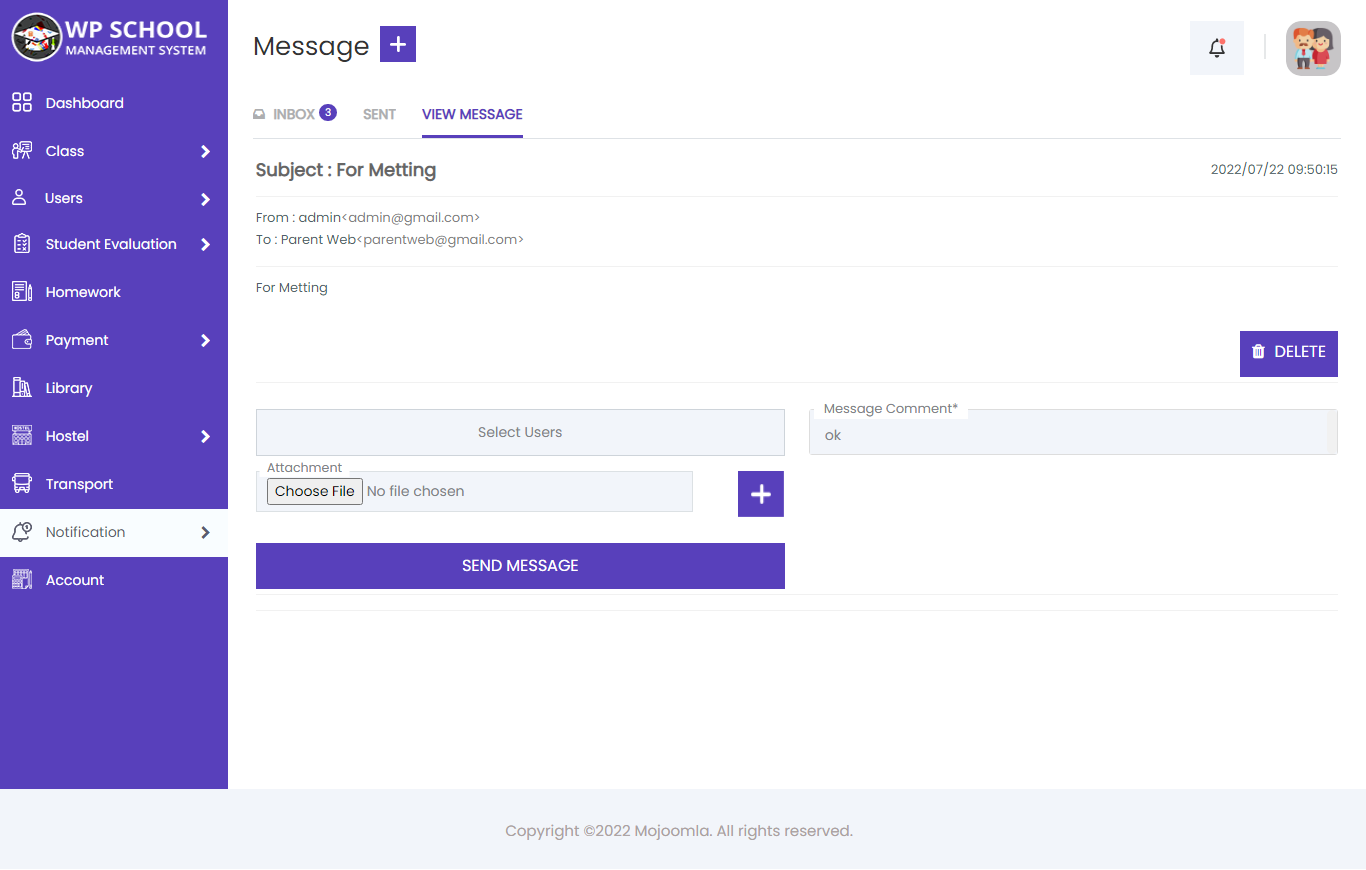
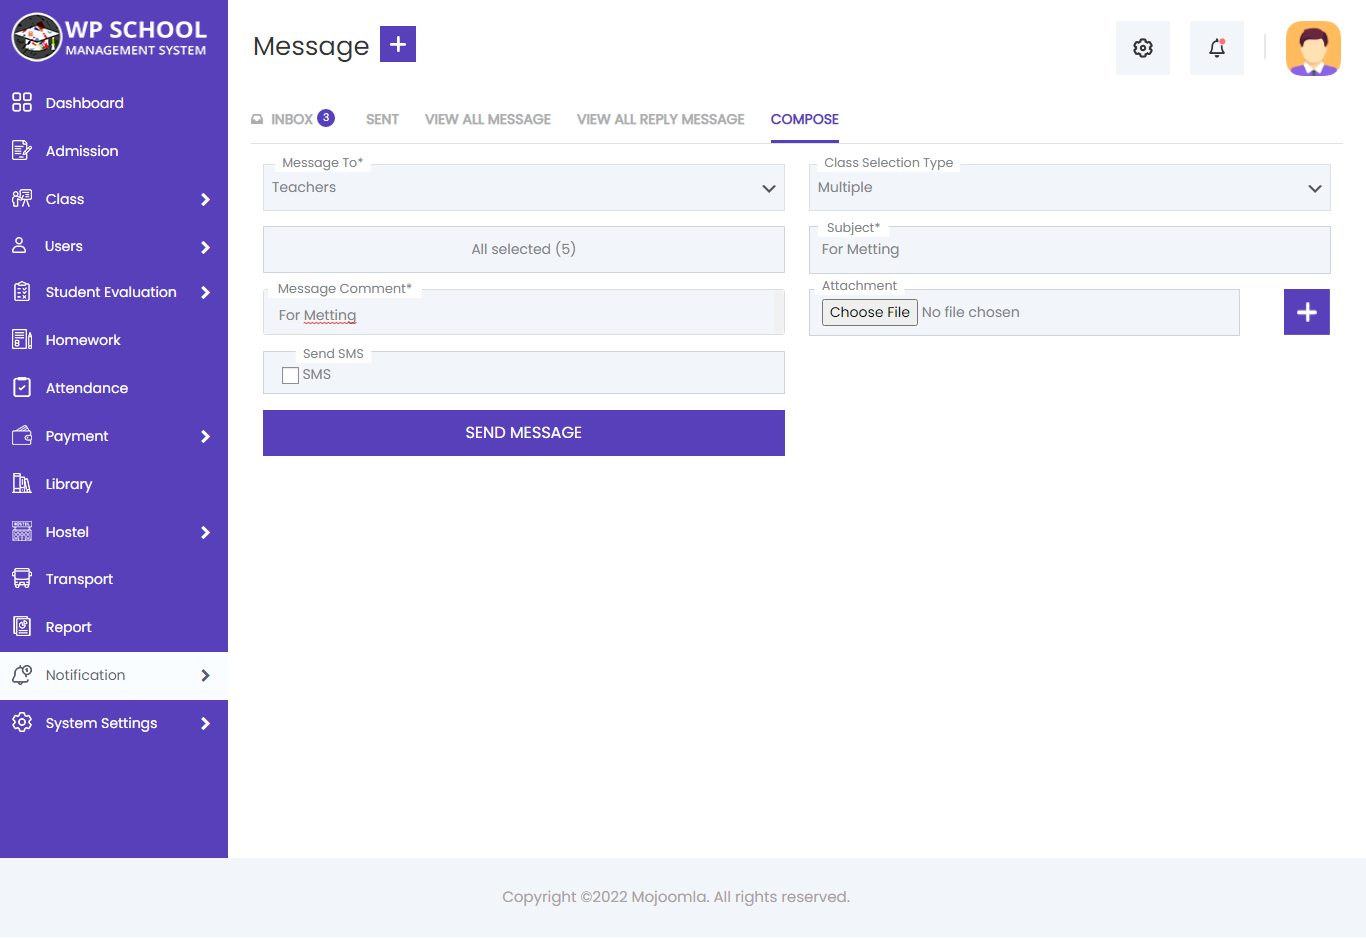
25) Messages
All received messages are stored and shown in Inbox. Admin can send messages to any group — students, teachers, or parents — and also reply to received messages.

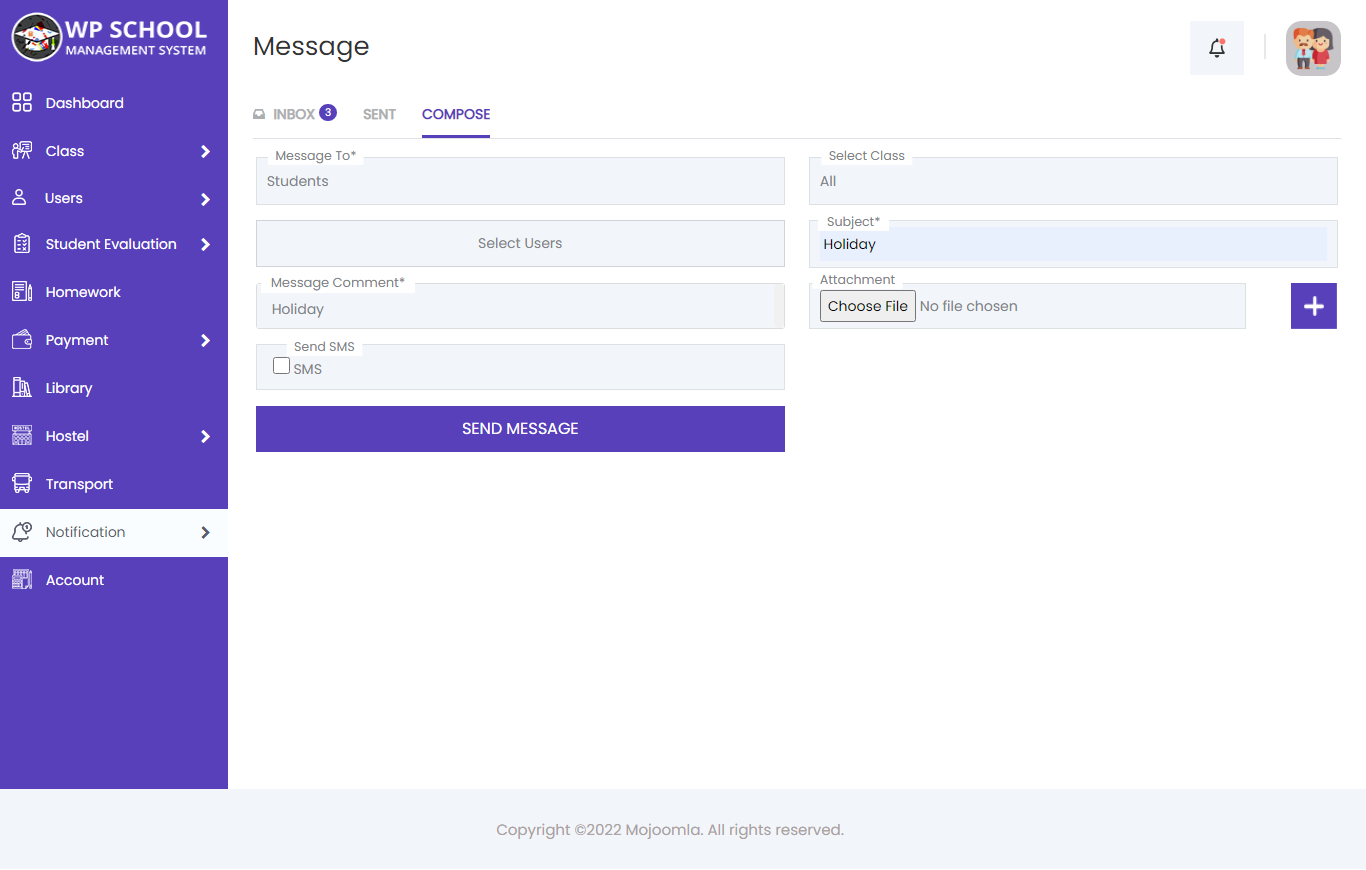
Compose Message
Here you can send a message to any user group. Select the recipient group, class, and specific users, then write the subject and message body. Optionally attach files or send as SMS.

| Field | Description |
|---|---|
| Message To | Select user group recipient |
| Class Selection Type | By class or individual user |
| Select Users | Specific recipients |
| Subject | Message subject line |
| Comment | Full message body |
| Attachment | Optional file attachment |
| Send SMS | Also send as SMS to all recipients |
Reply
Admin can reply to any received message directly from the inbox view.
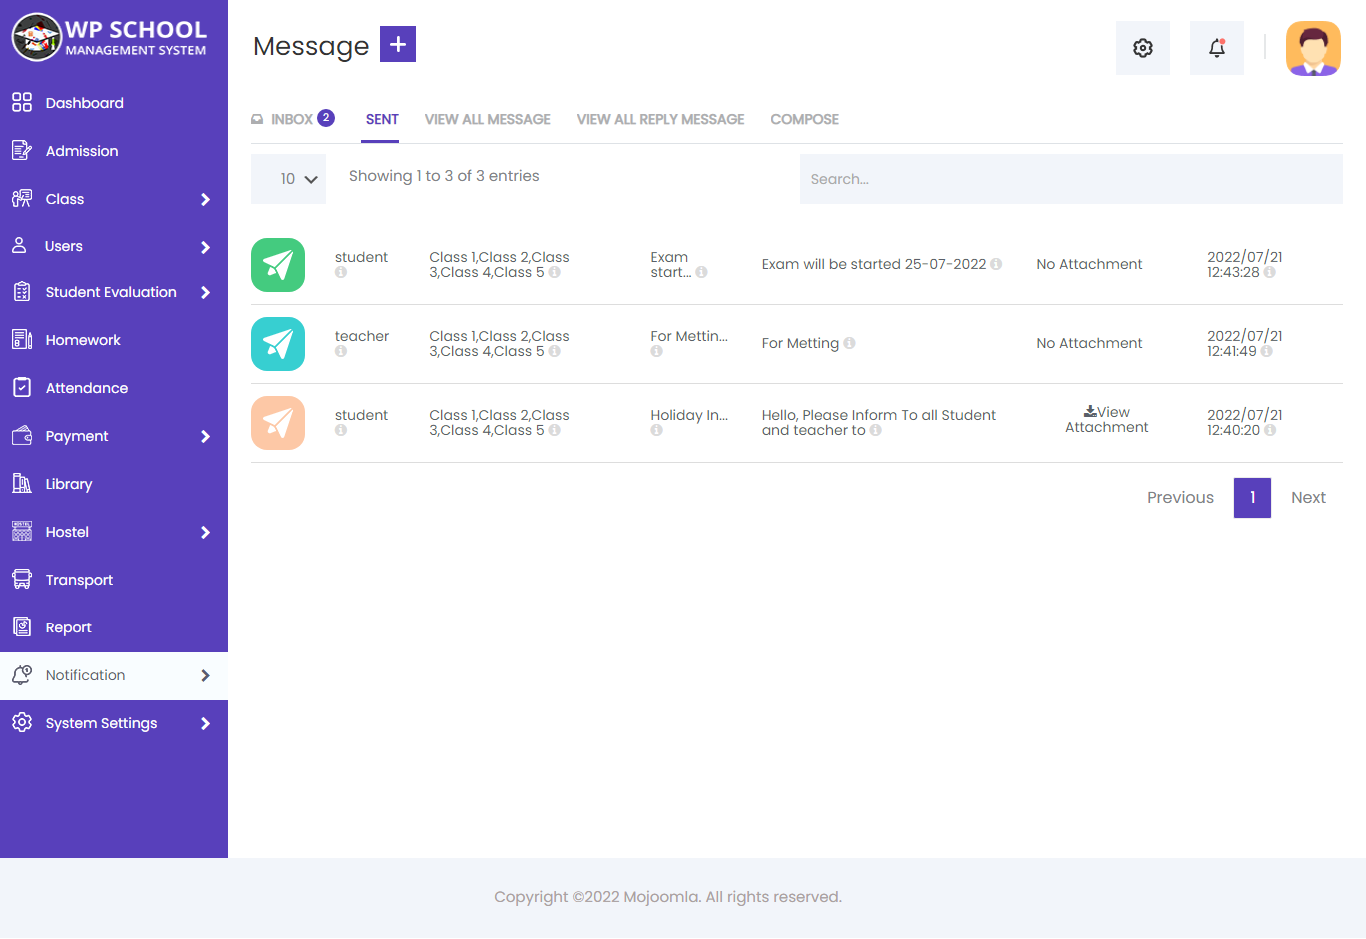
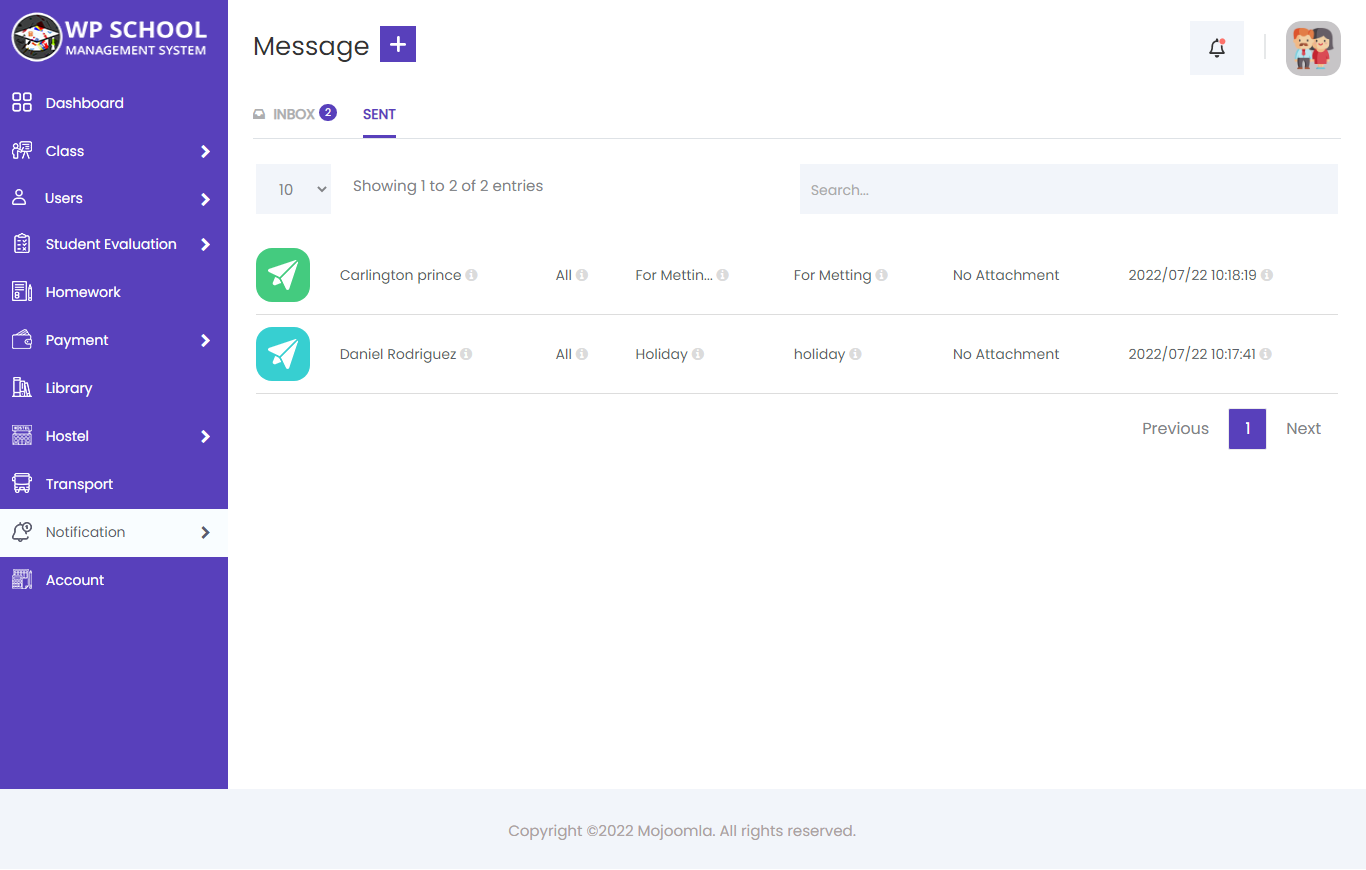
Sent Box
View all messages that have been sent by the admin, along with their recipients and timestamps.
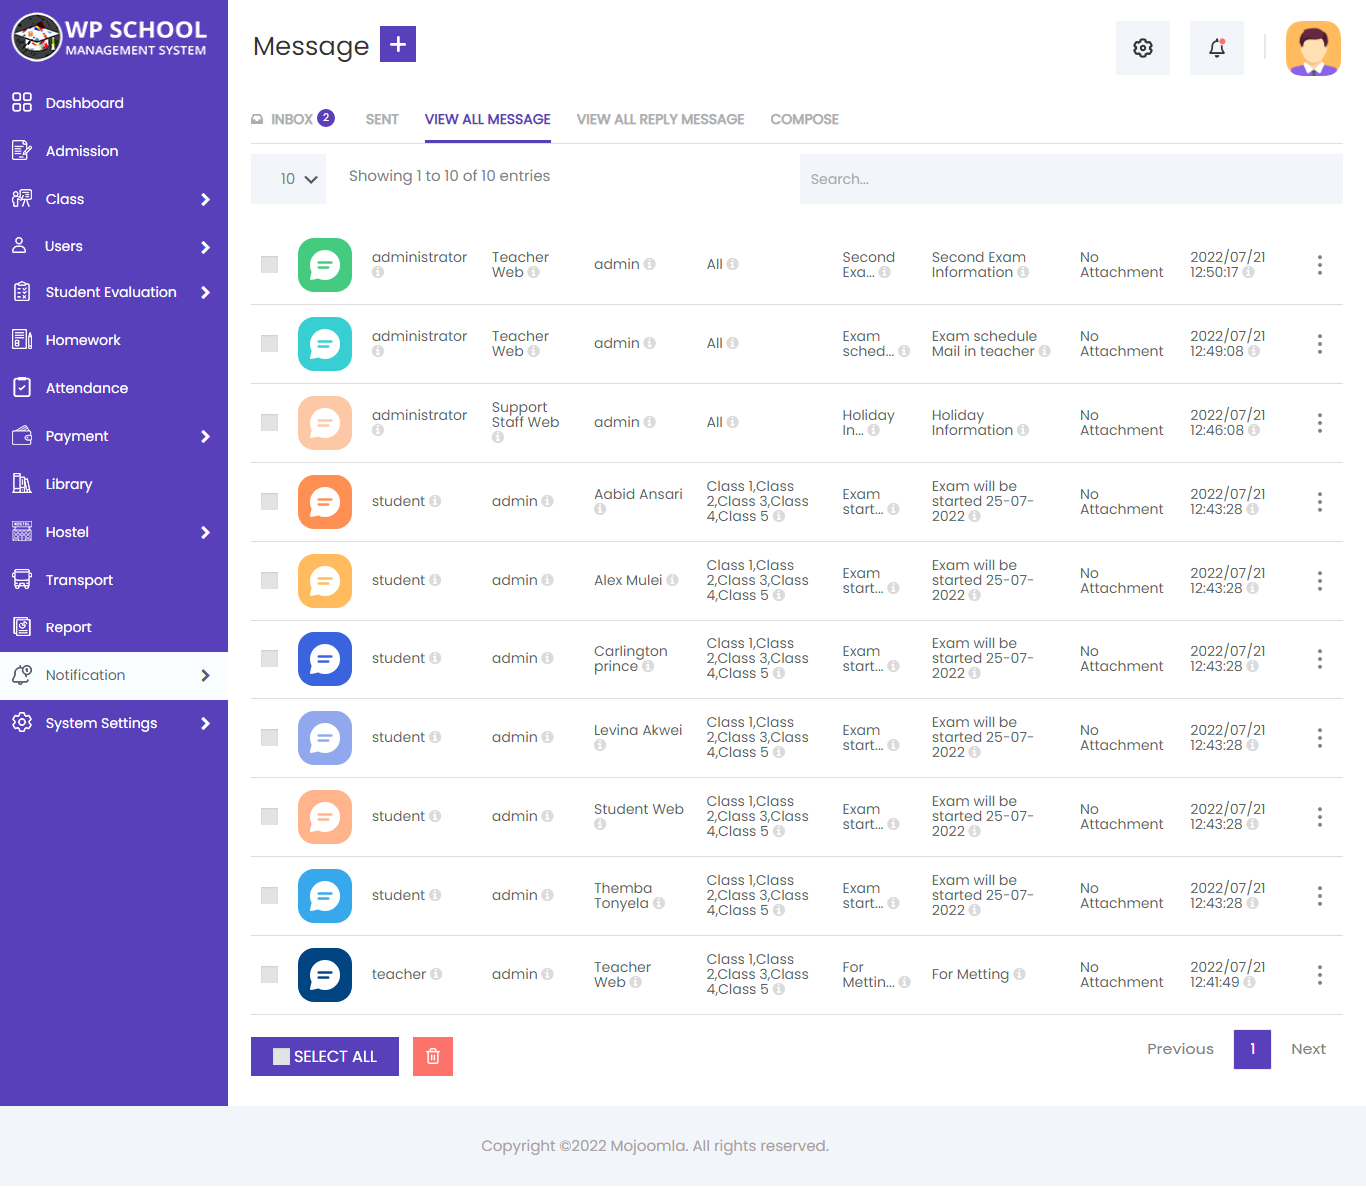
View All Messages
Here admin can view all messages in full and print them as needed.
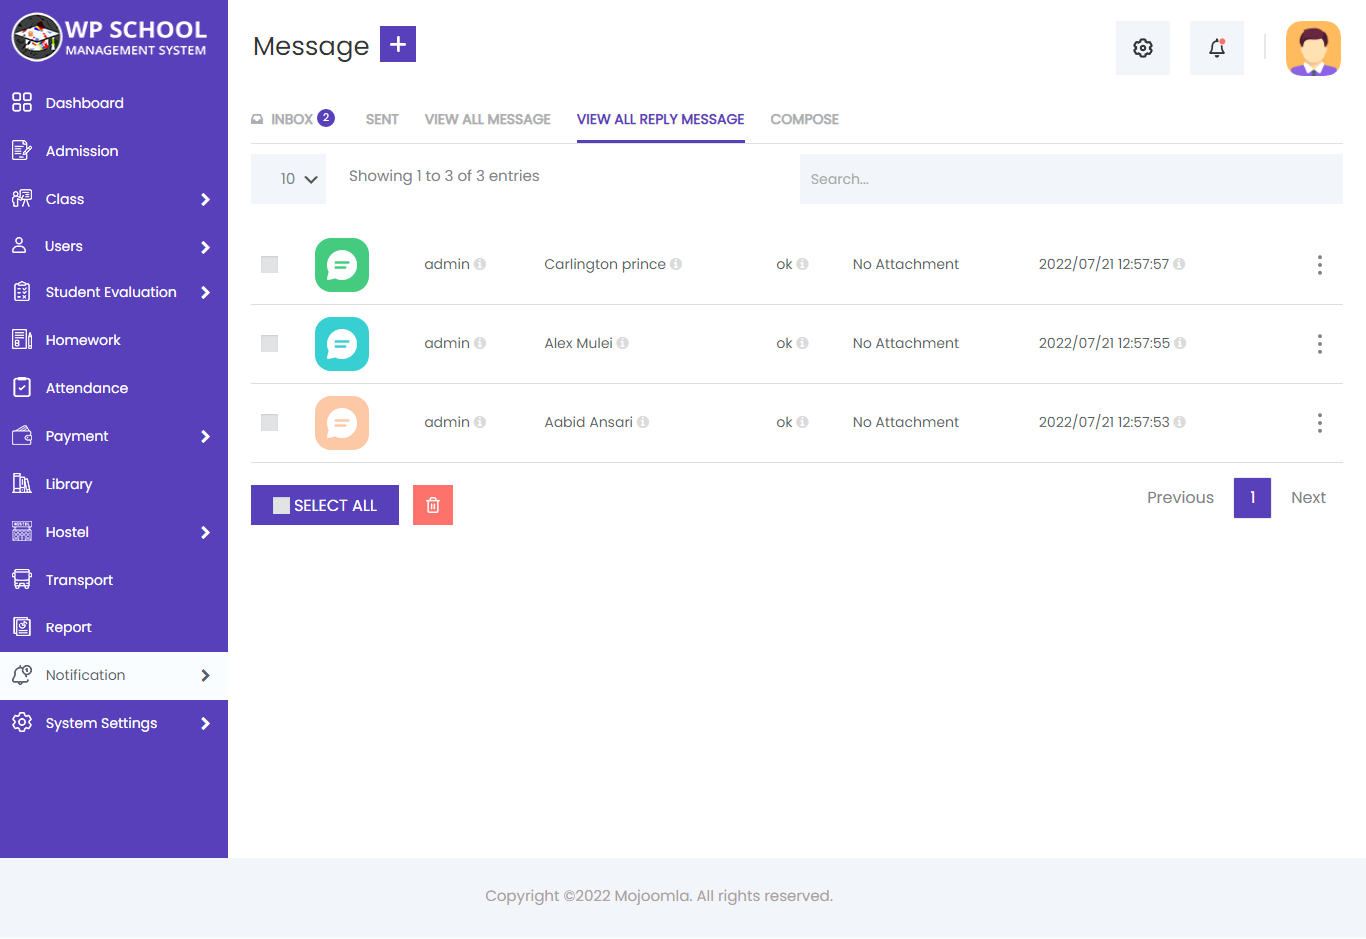
View All Reply
Here admin can view all replies and print messages.
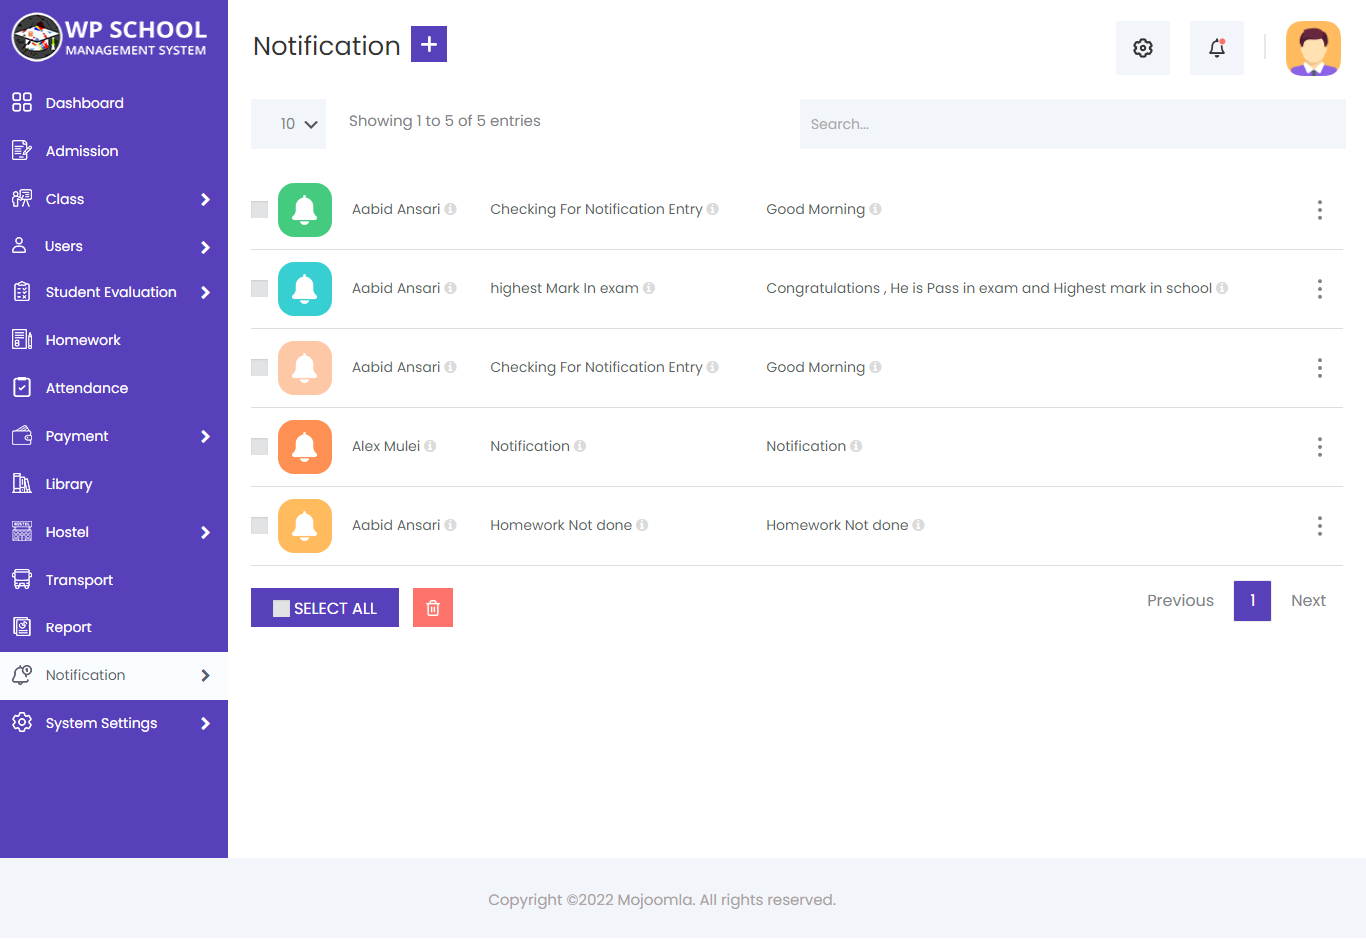
26) Notifications
Here you can see all push notifications that have been sent to students via the mobile app. Once your Firebase FCM Key is saved in General Settings, notifications are delivered directly to students' devices.
Notification List
View a complete list of all sent notifications including title, message, recipient, and sent date.
Add Notification
Click Add Notification to send a new push notification to a selected student's mobile app. Saving the notification sends it instantly.
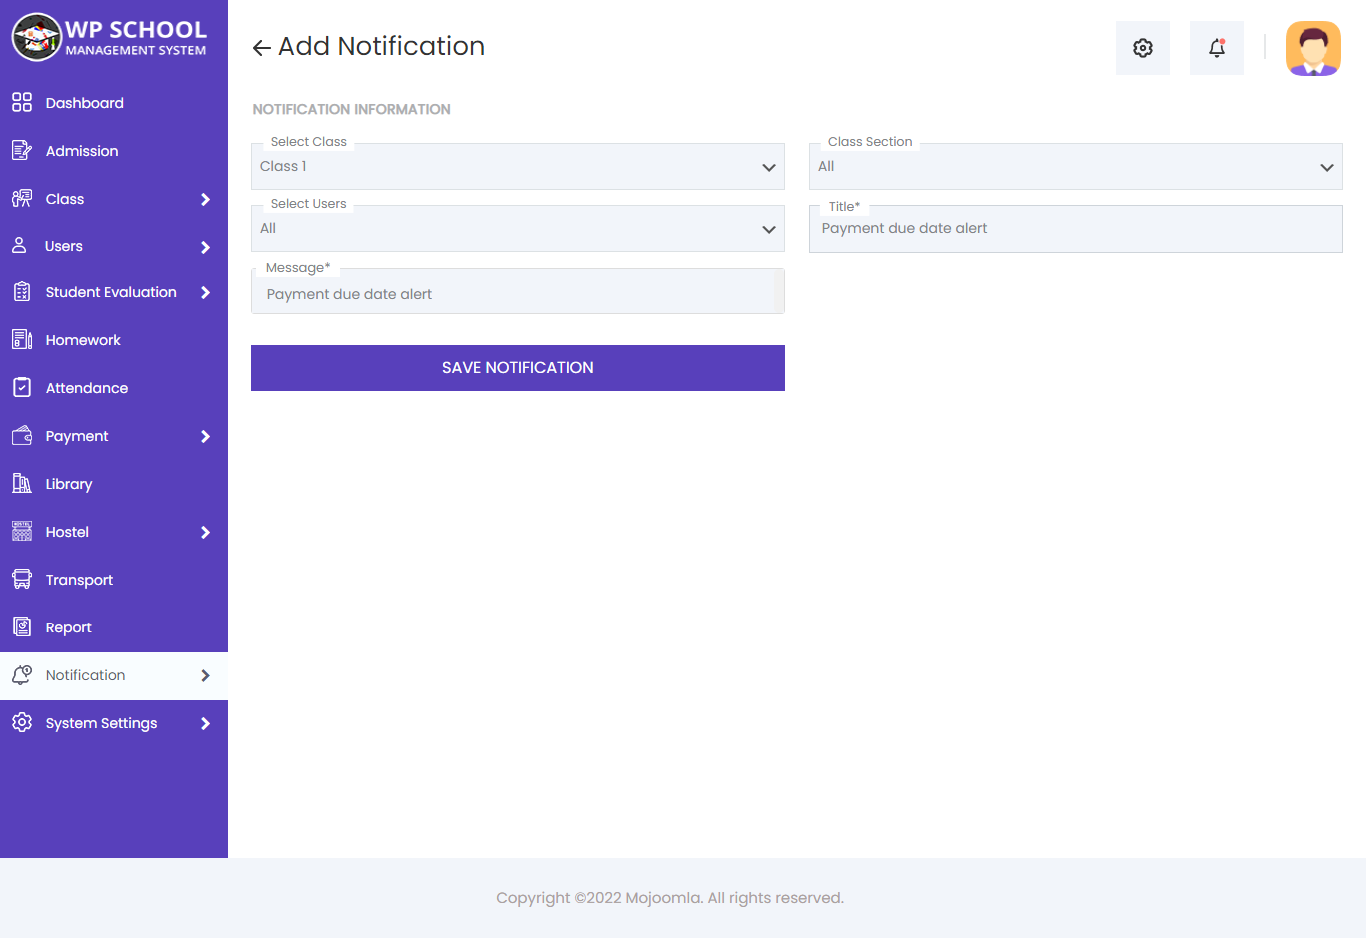
Saving a notification sends it to the selected student's mobile app. Save your FCM Key from General Settings to enable this.
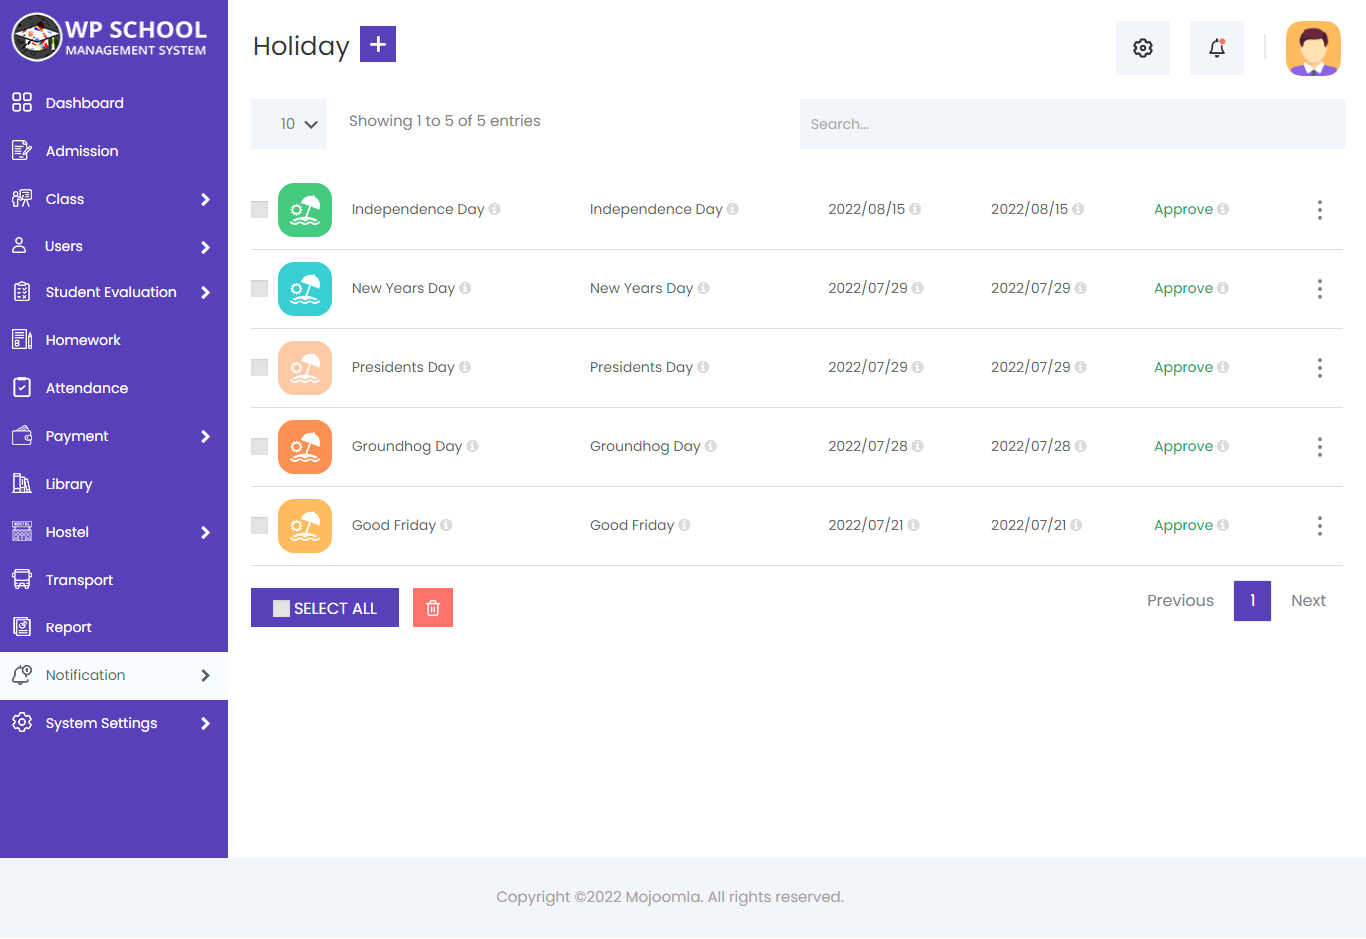
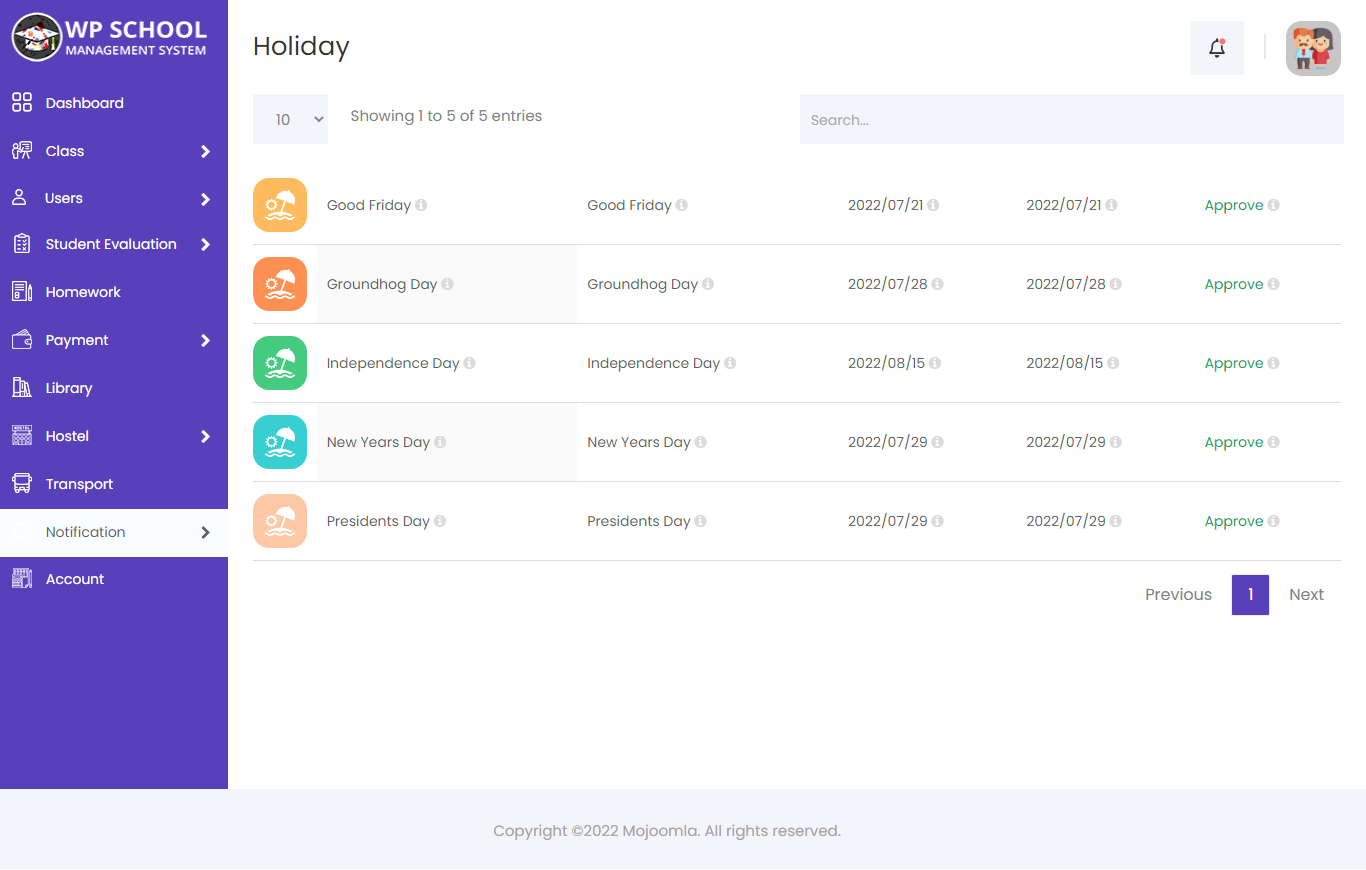
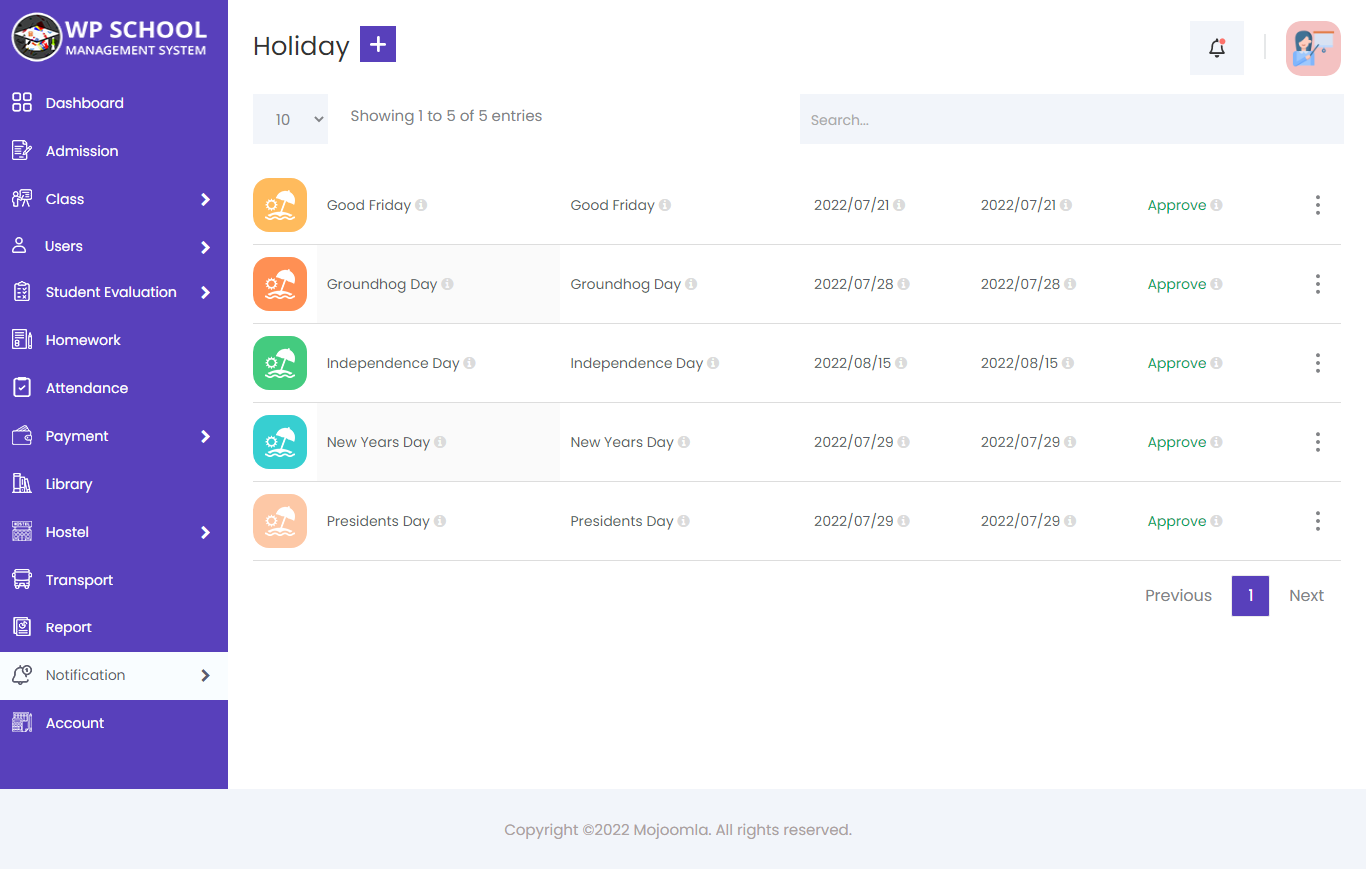
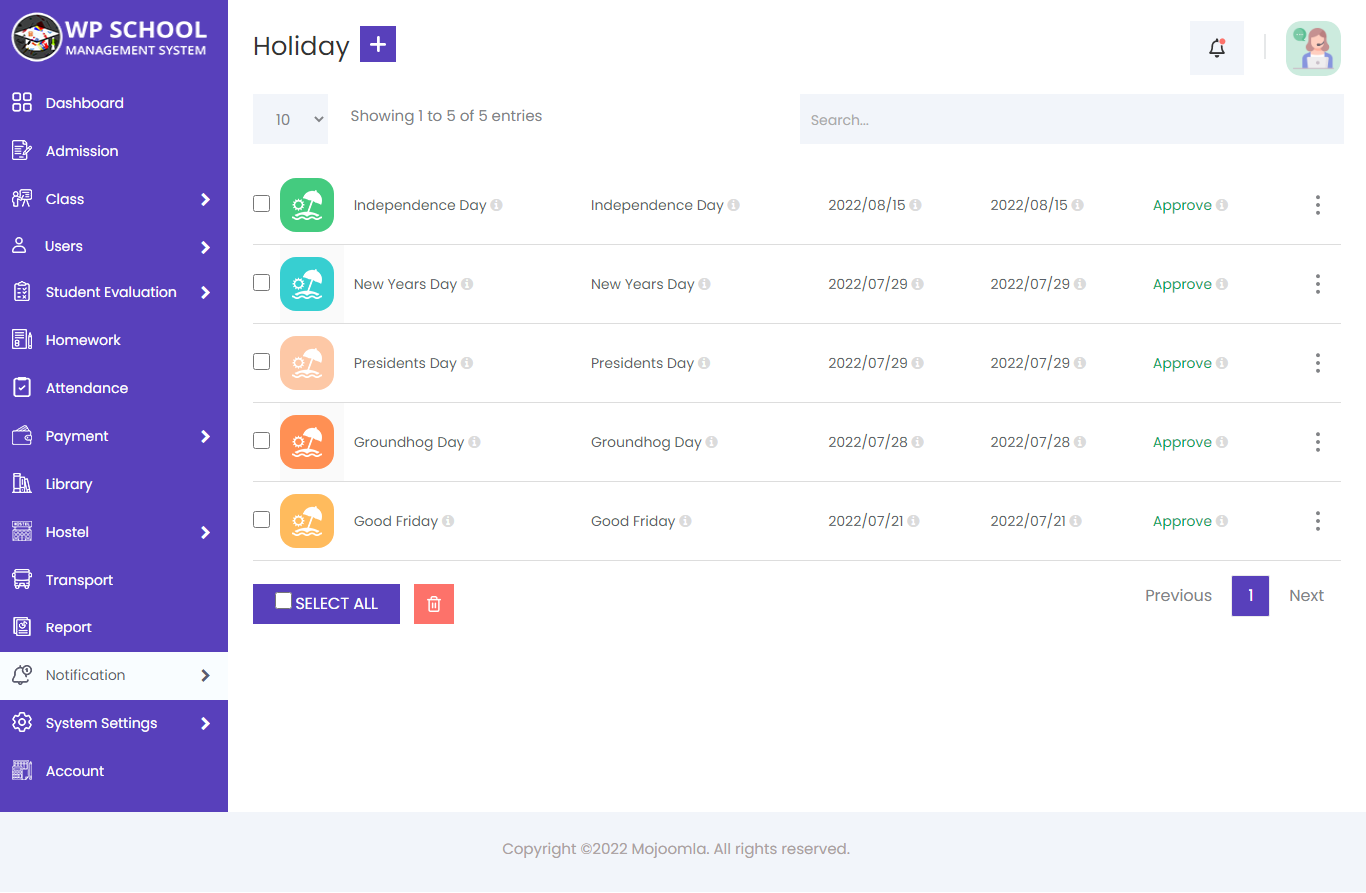
27) Holidays
Manage the school holiday calendar. Add holidays with names and dates — they are visible to students, parents, and teachers in their respective portals.
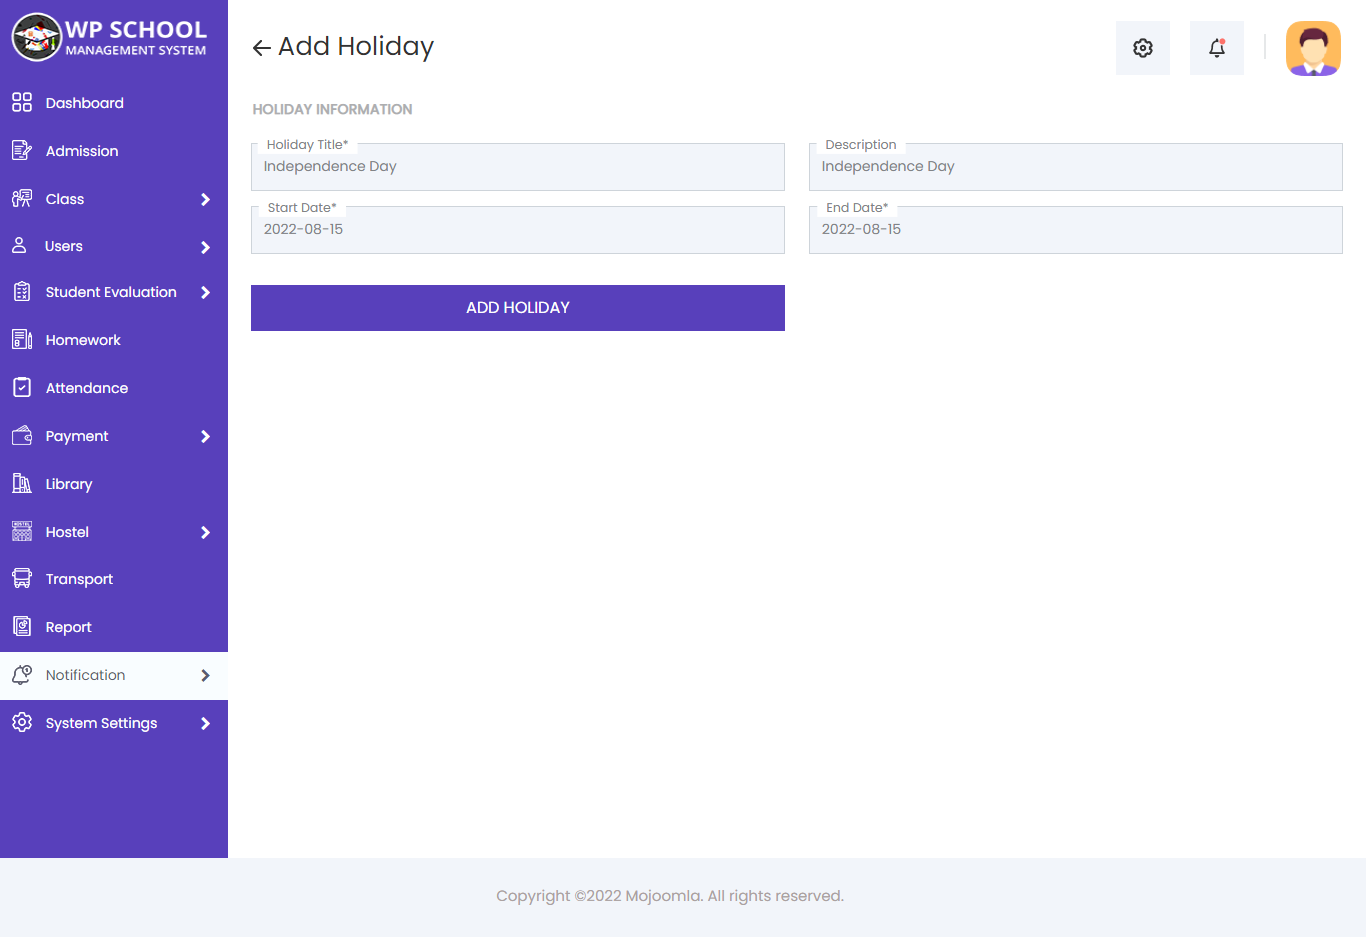
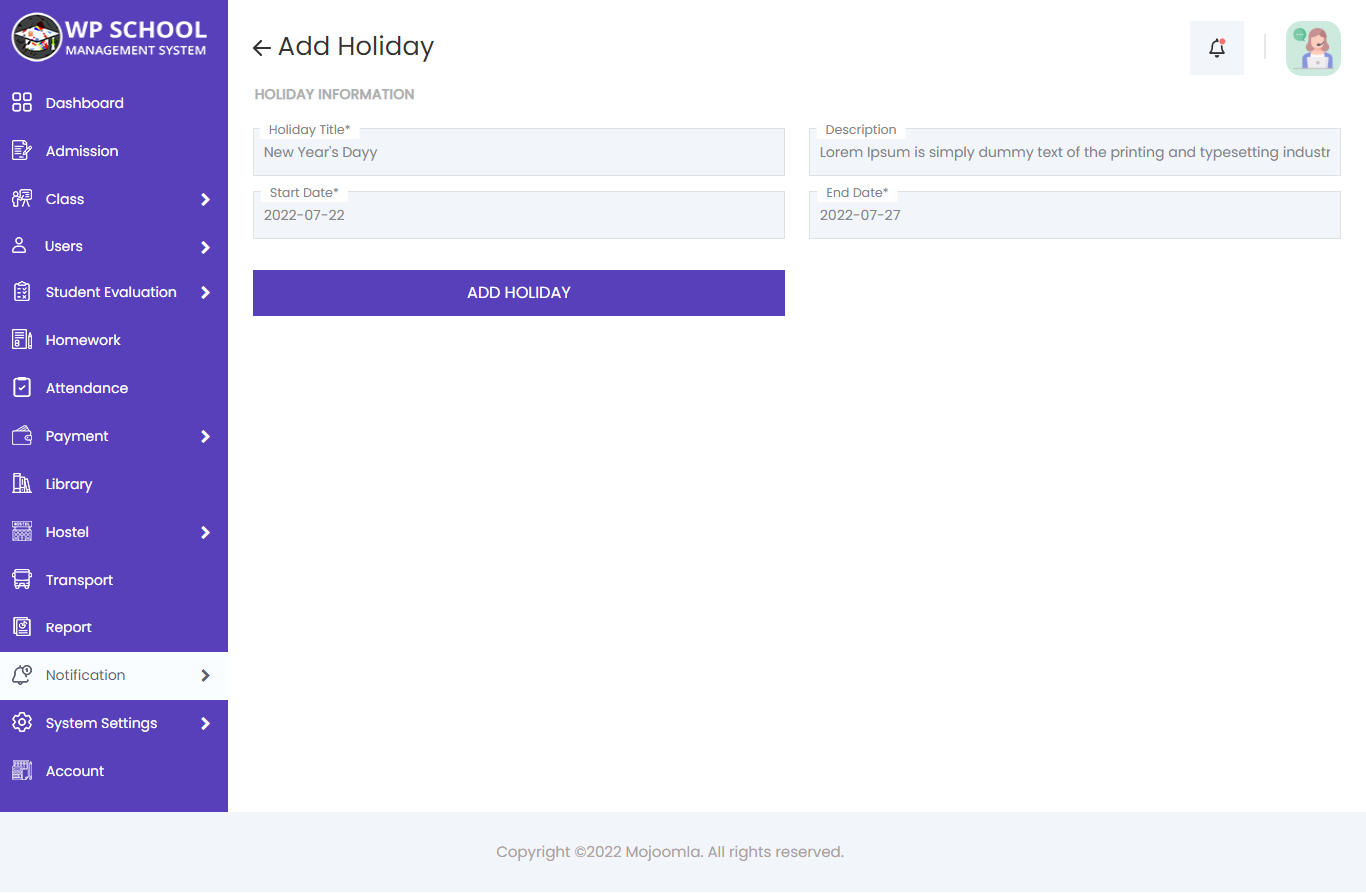
Add Holiday
Click Add Holiday to add a new holiday. Enter the holiday title and date. It will automatically appear in all user portals.
28) Migration
At the end of the academic year, migrate students from one class to the next. Students below the passing mark are not promoted.
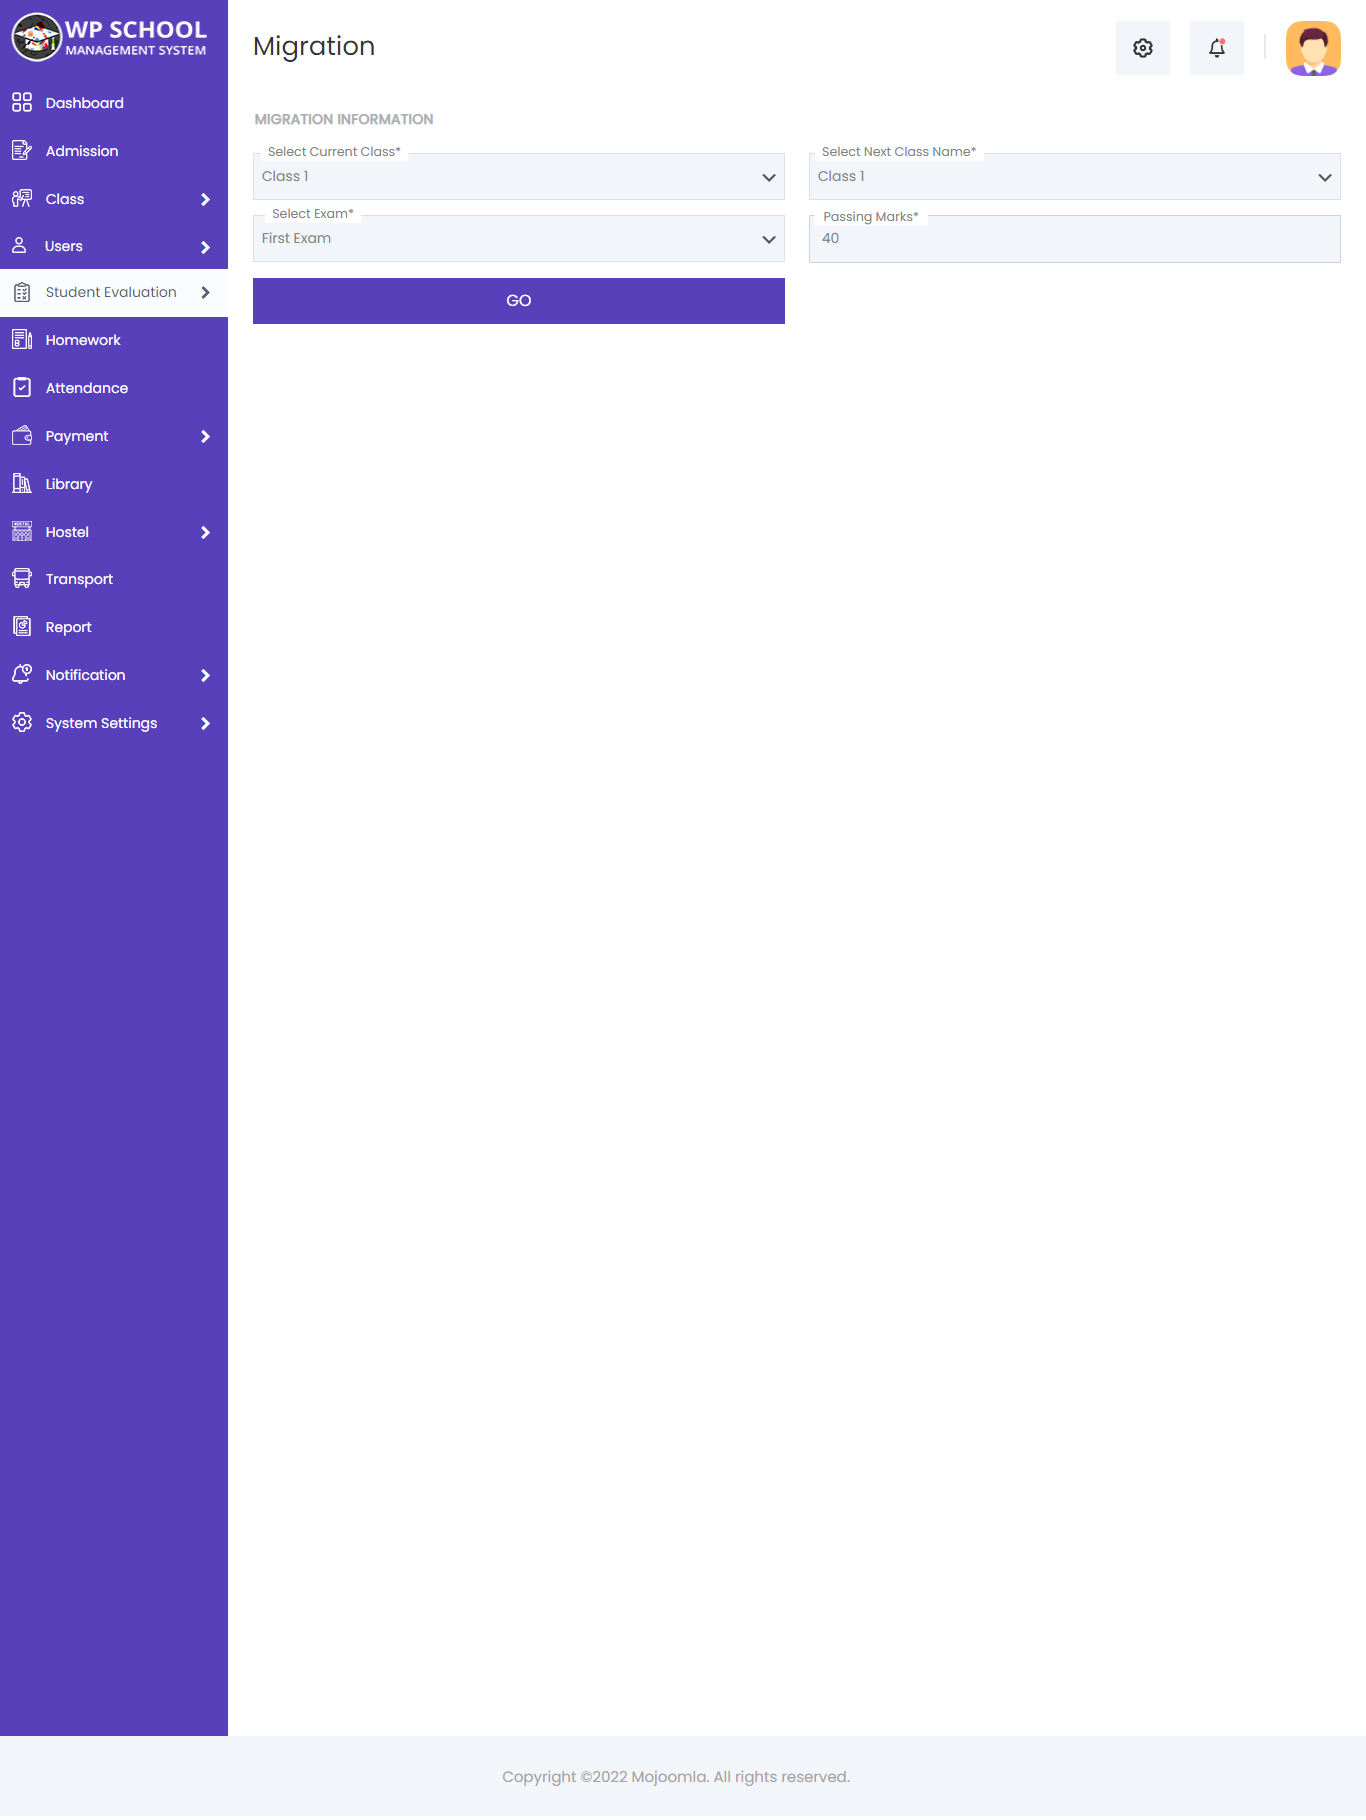
| Field | Description |
|---|---|
| Current Class | Class students are currently enrolled in |
| Next Class | Class students will be promoted to |
| Select Exam | Exam result to base promotion decision on |
| Passing Marks | Minimum marks required for promotion |
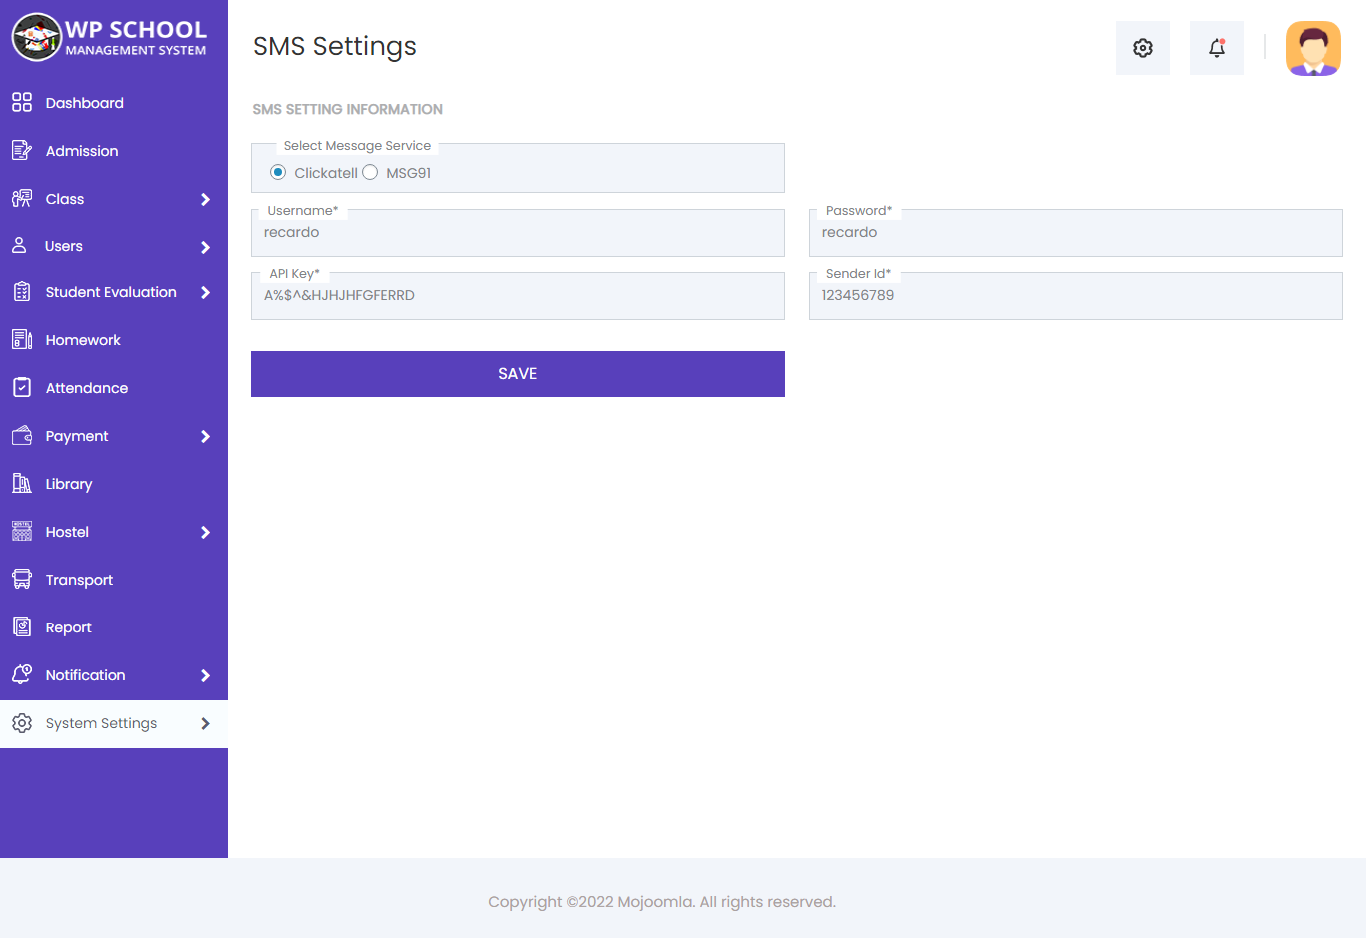
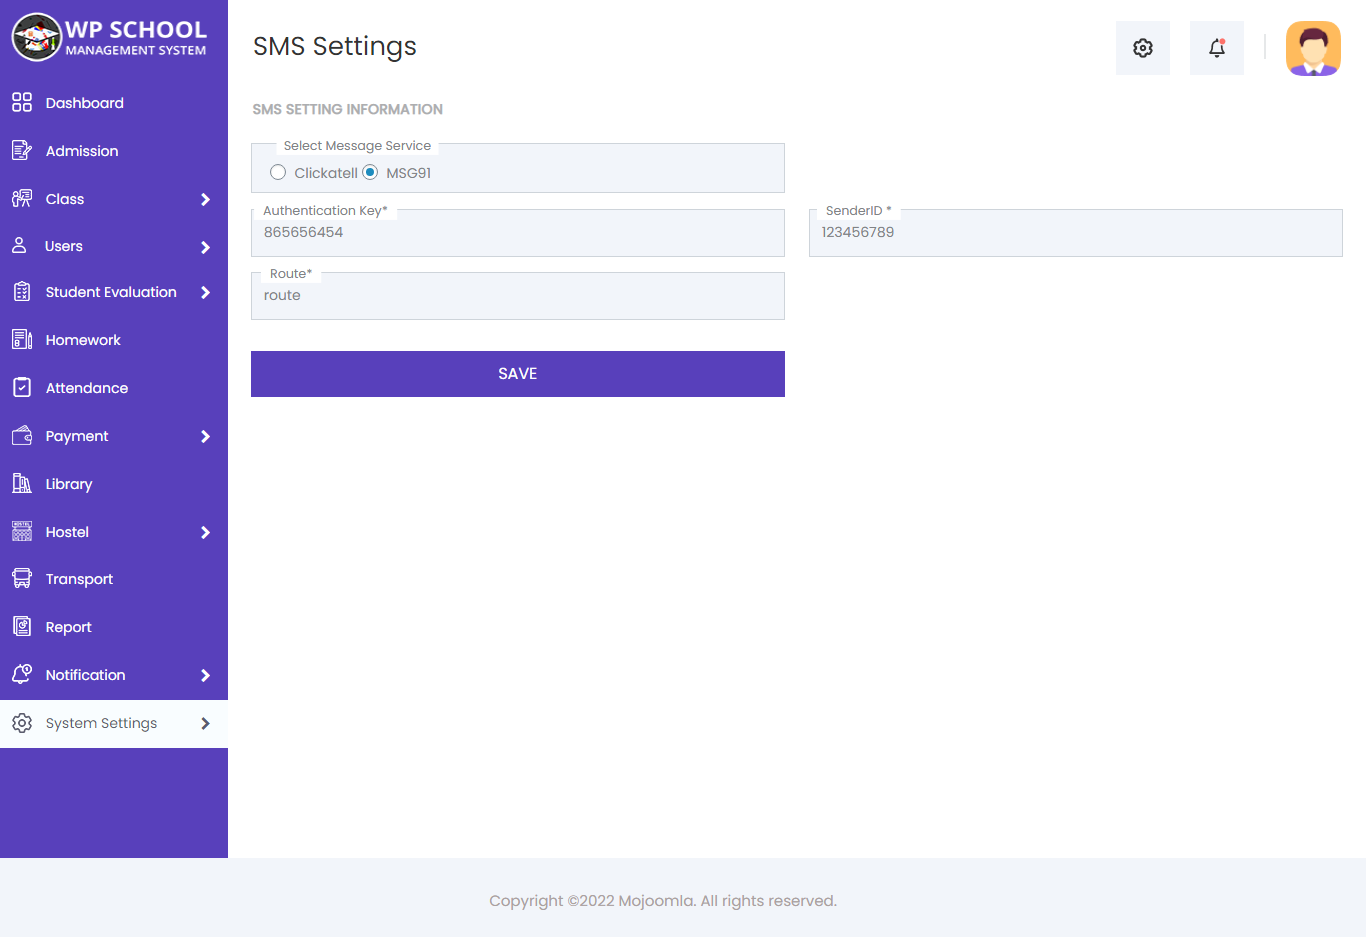
29) SMS Settings
Configure SMS gateway credentials to send automated SMS notifications to students and parents. Supported providers: Clickatell and MSG91.
Clickatell Configuration
Enter your Username, Password, and API Key from your Clickatell account to enable SMS via Clickatell.
MSG91 Configuration
Enter your Authentication Key, Sender ID, and Route for MSG91 integration to send SMS notifications.
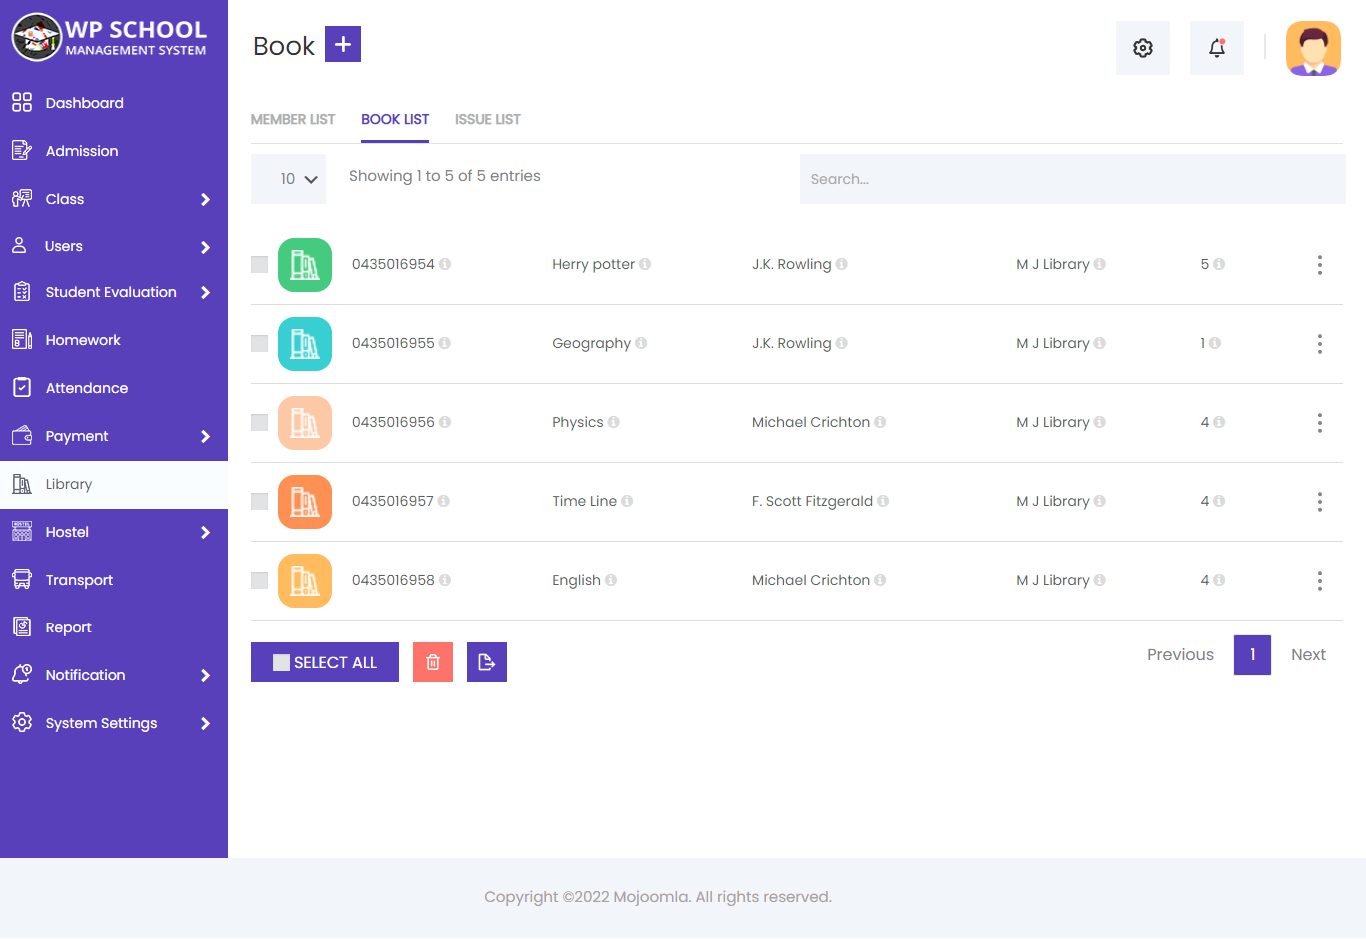
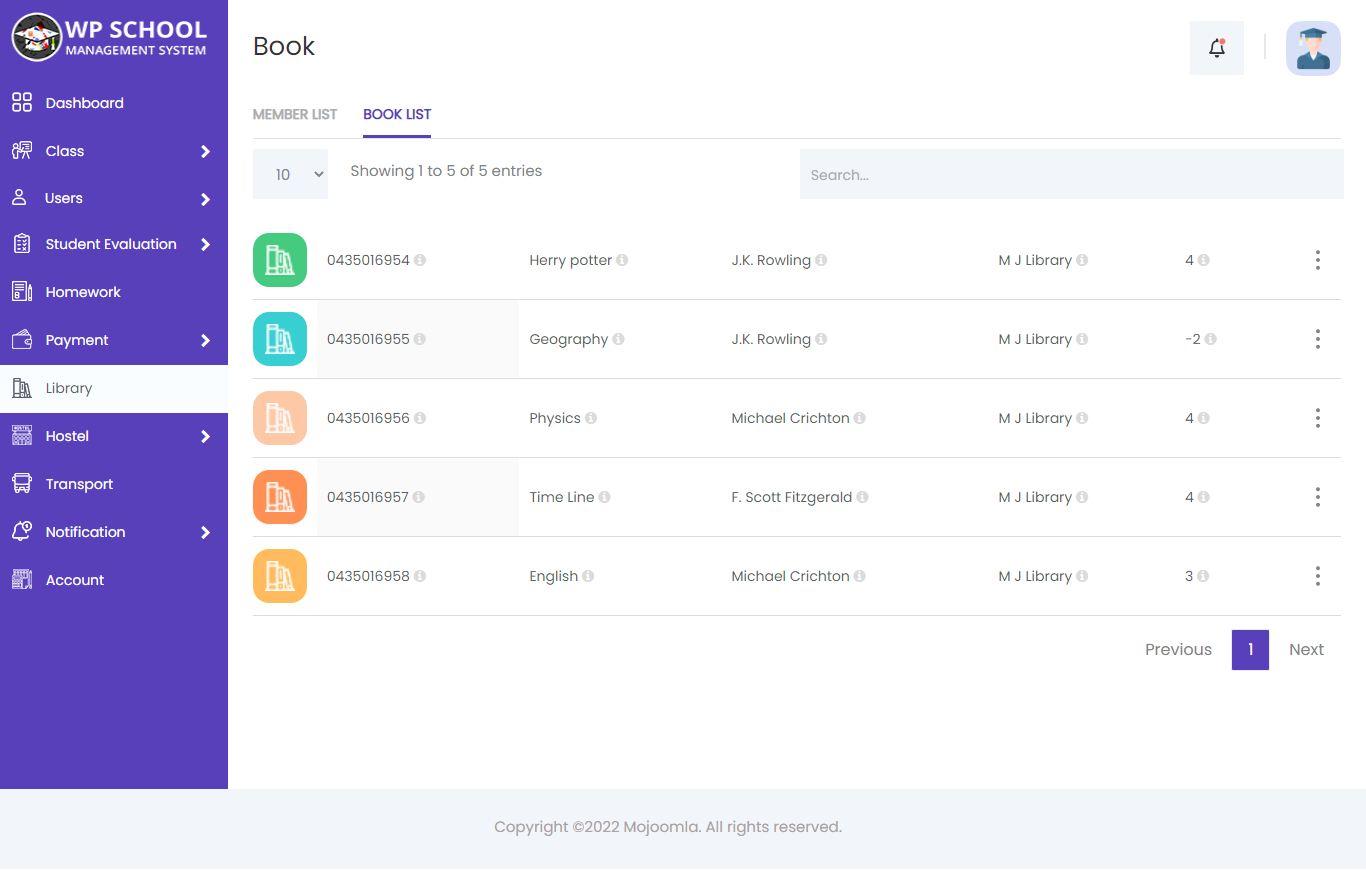
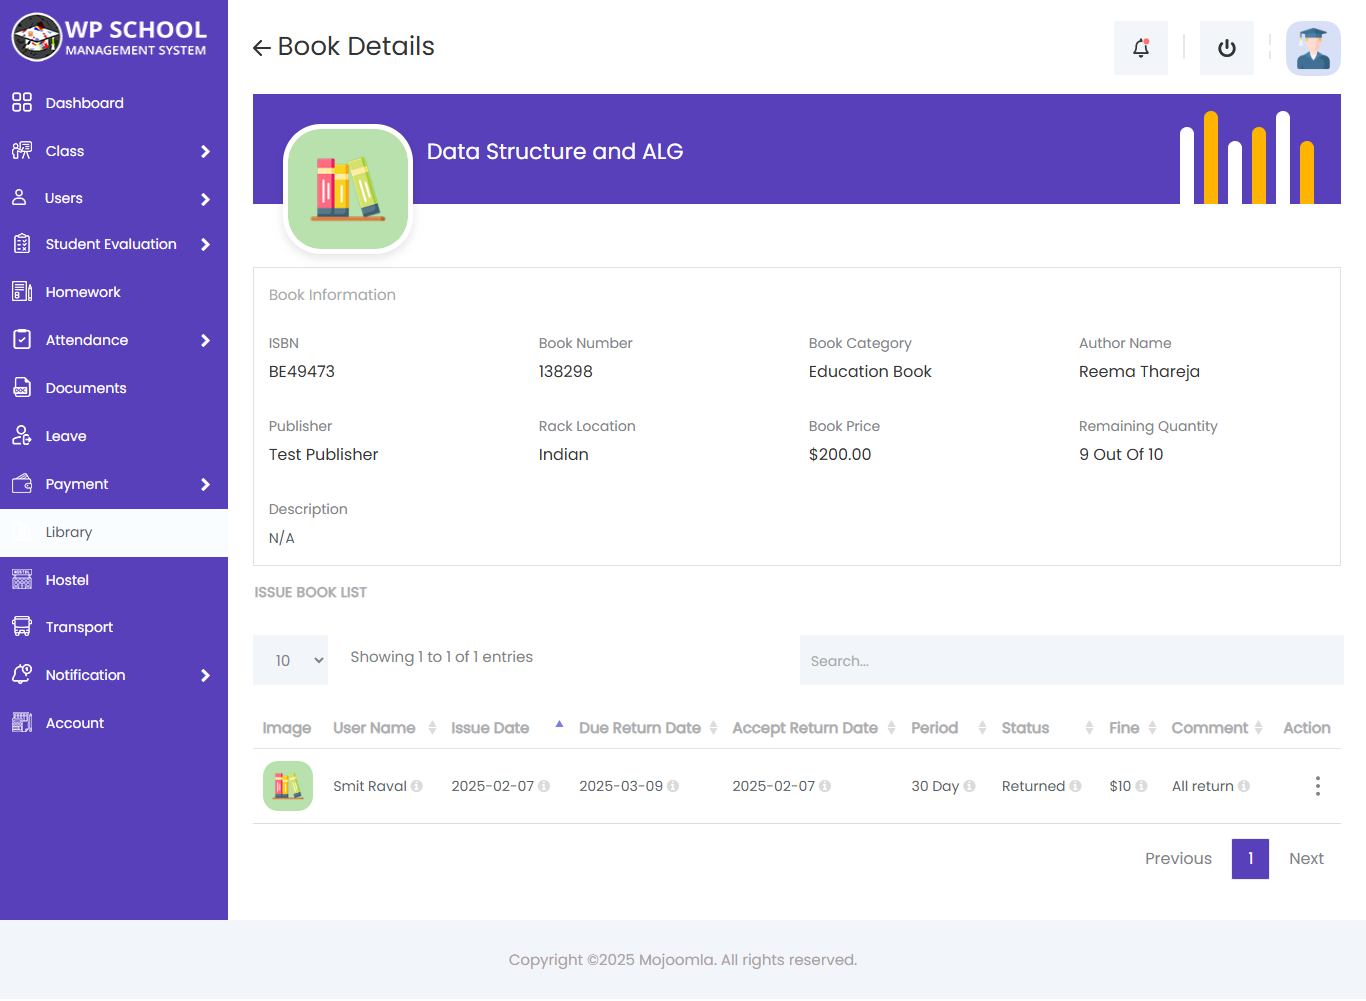
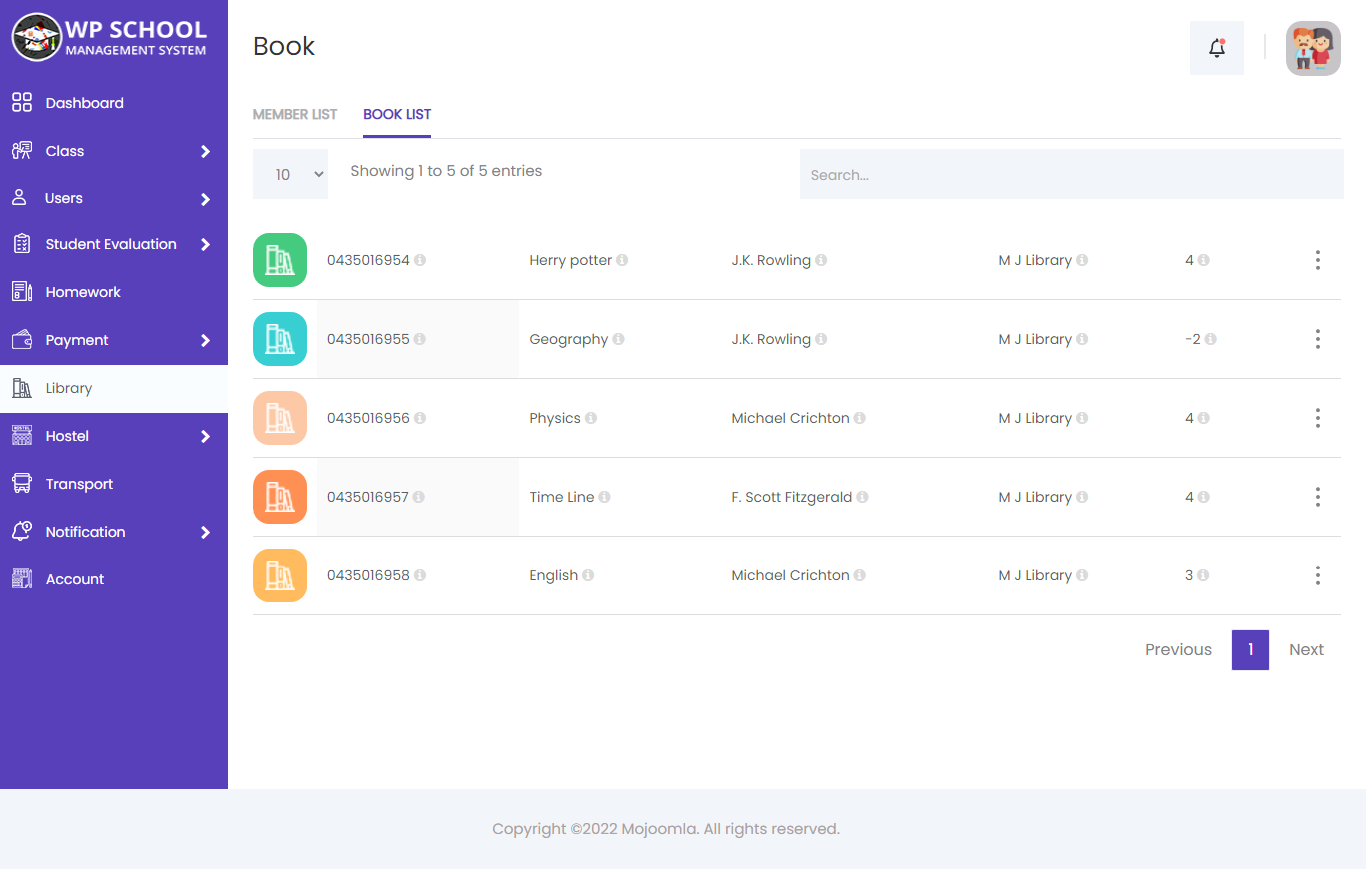
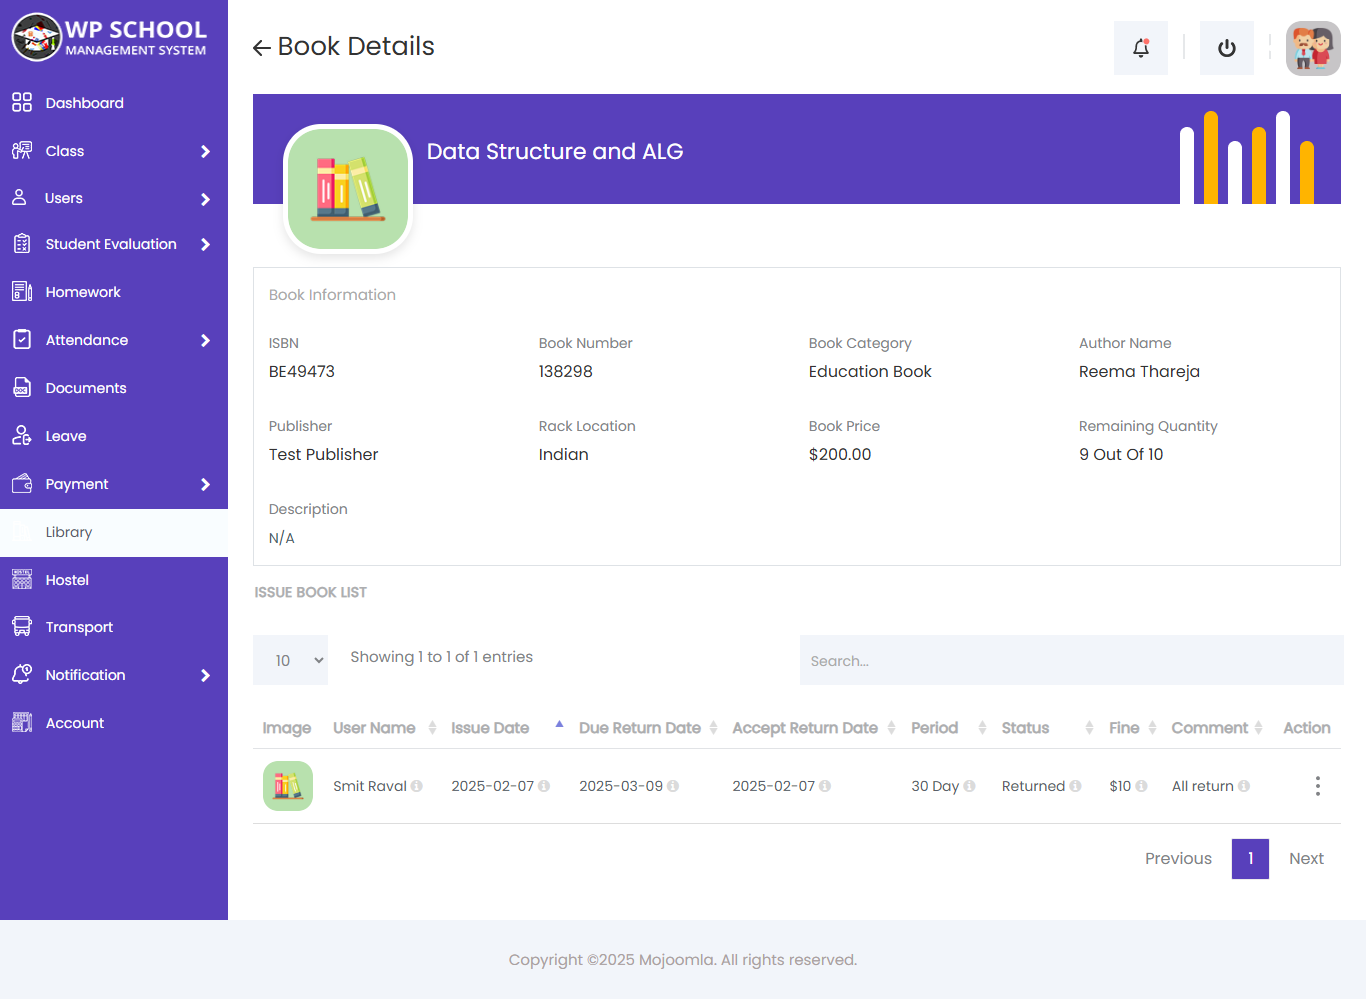
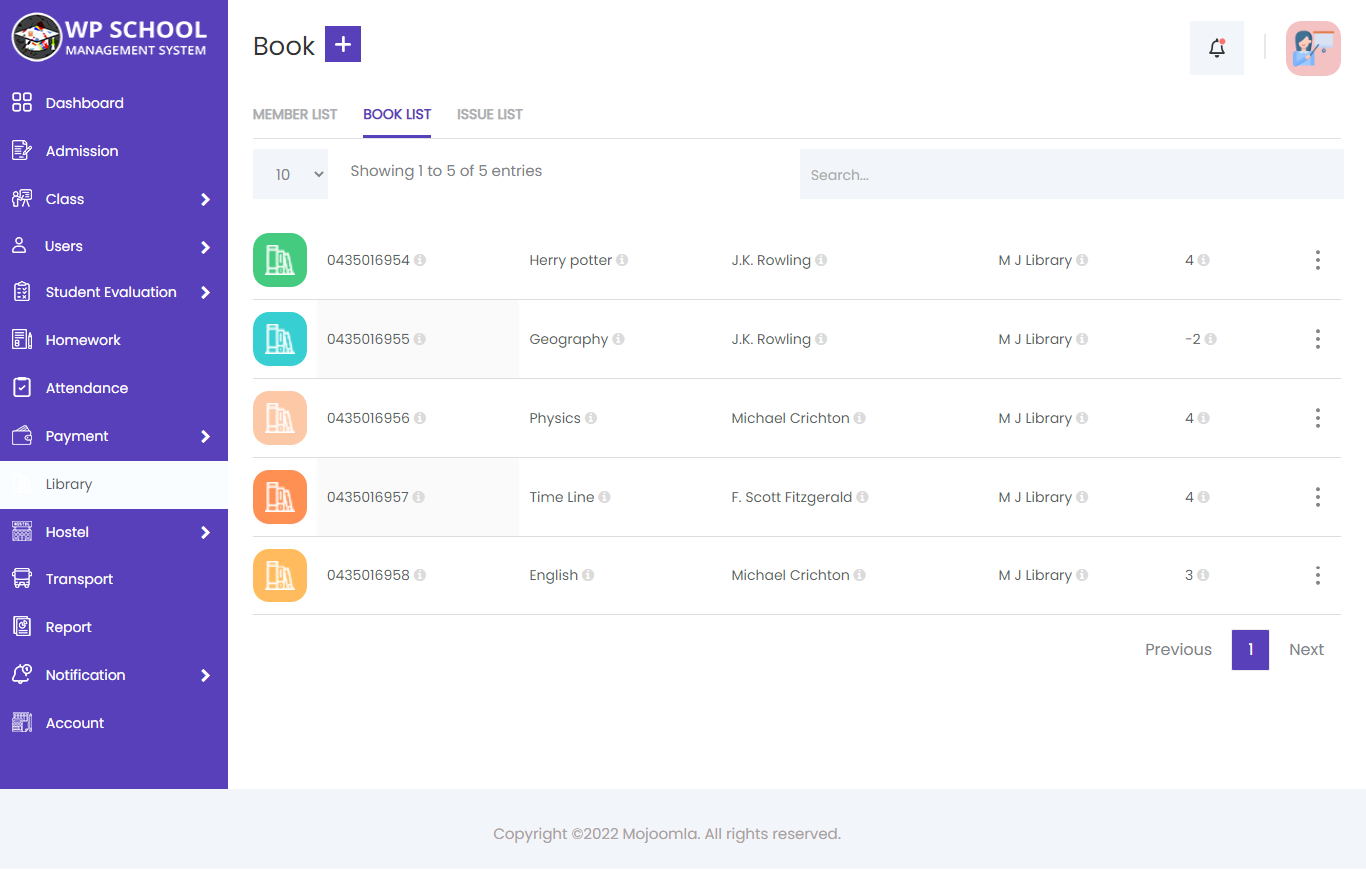
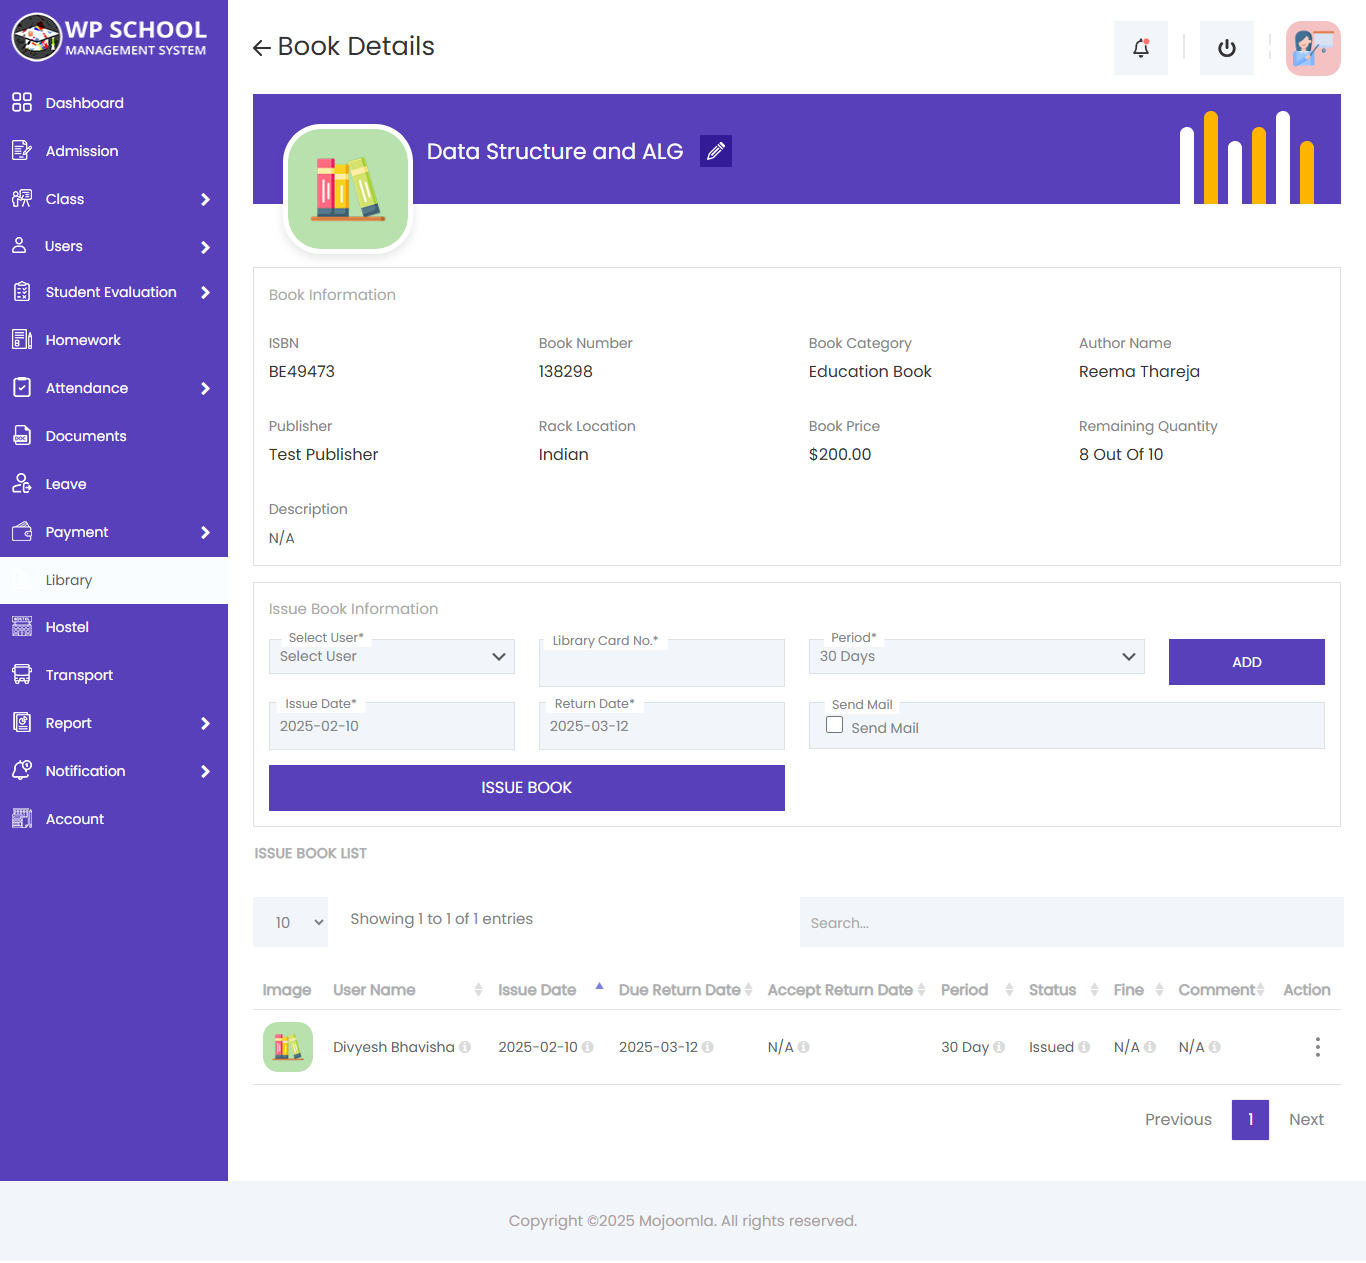
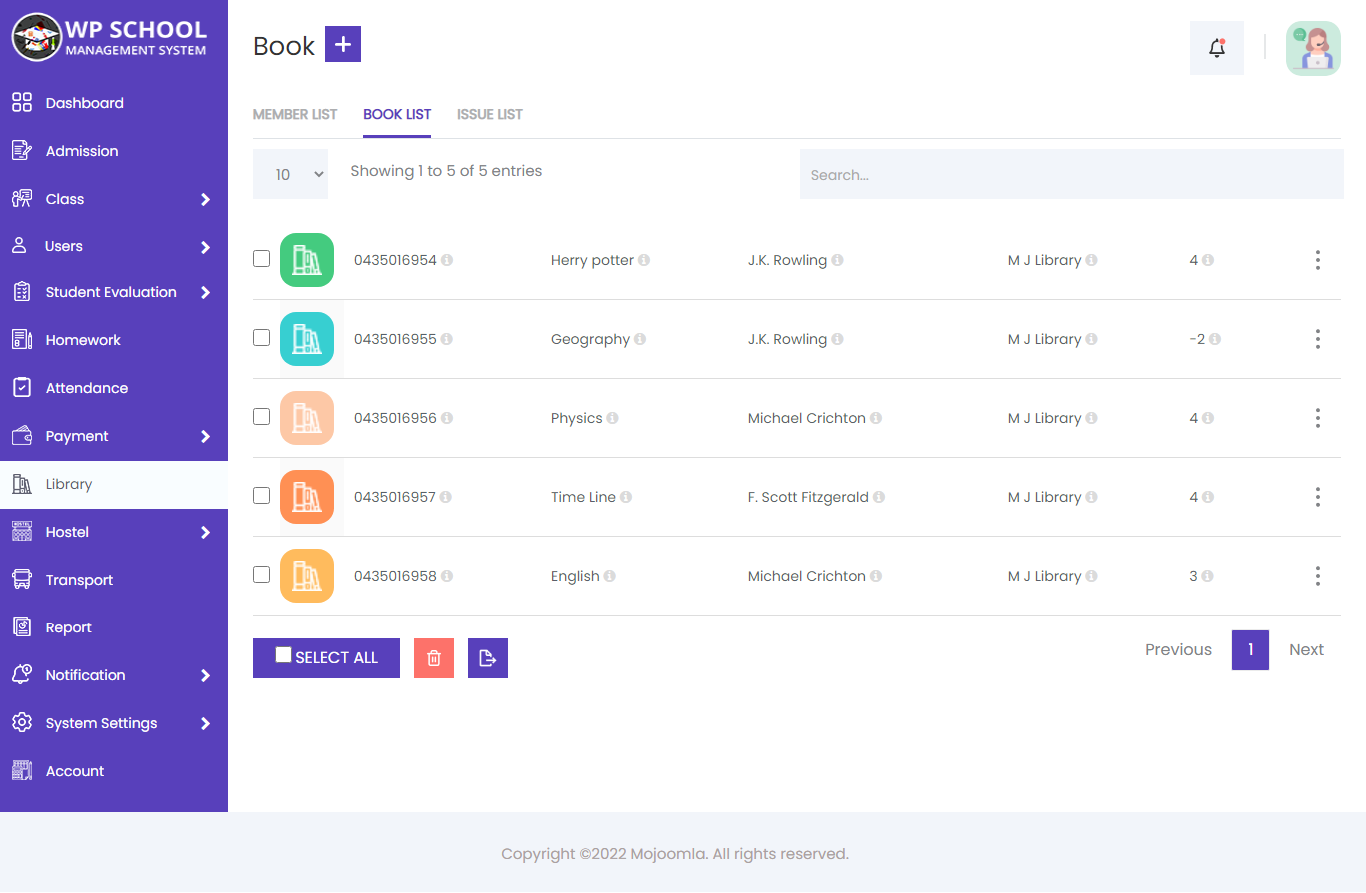
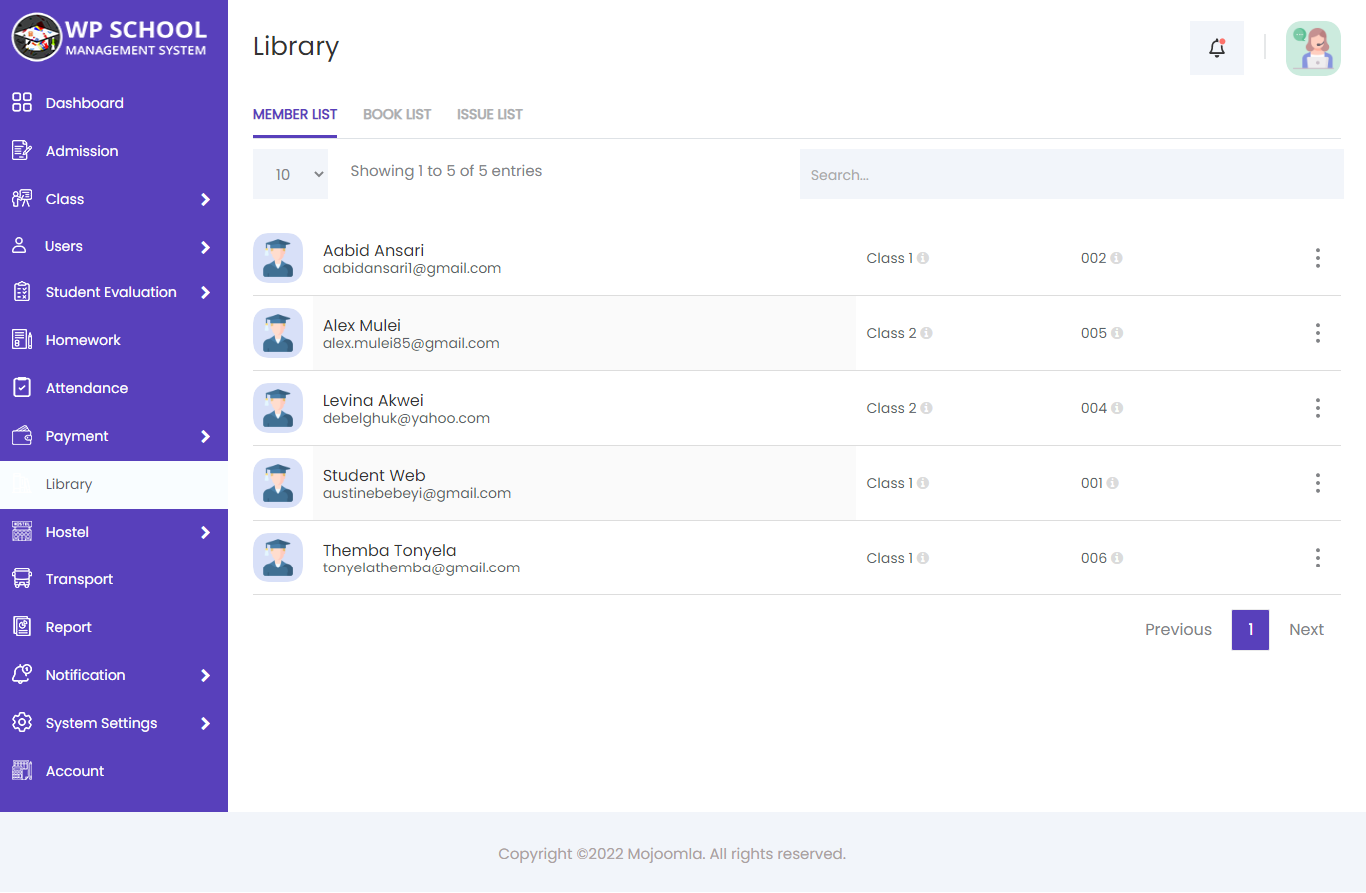
30) Library
Manage the school library — add books, track copies, issue books to students and teachers, and record returns. Students and parents can browse the catalogue from their portals.
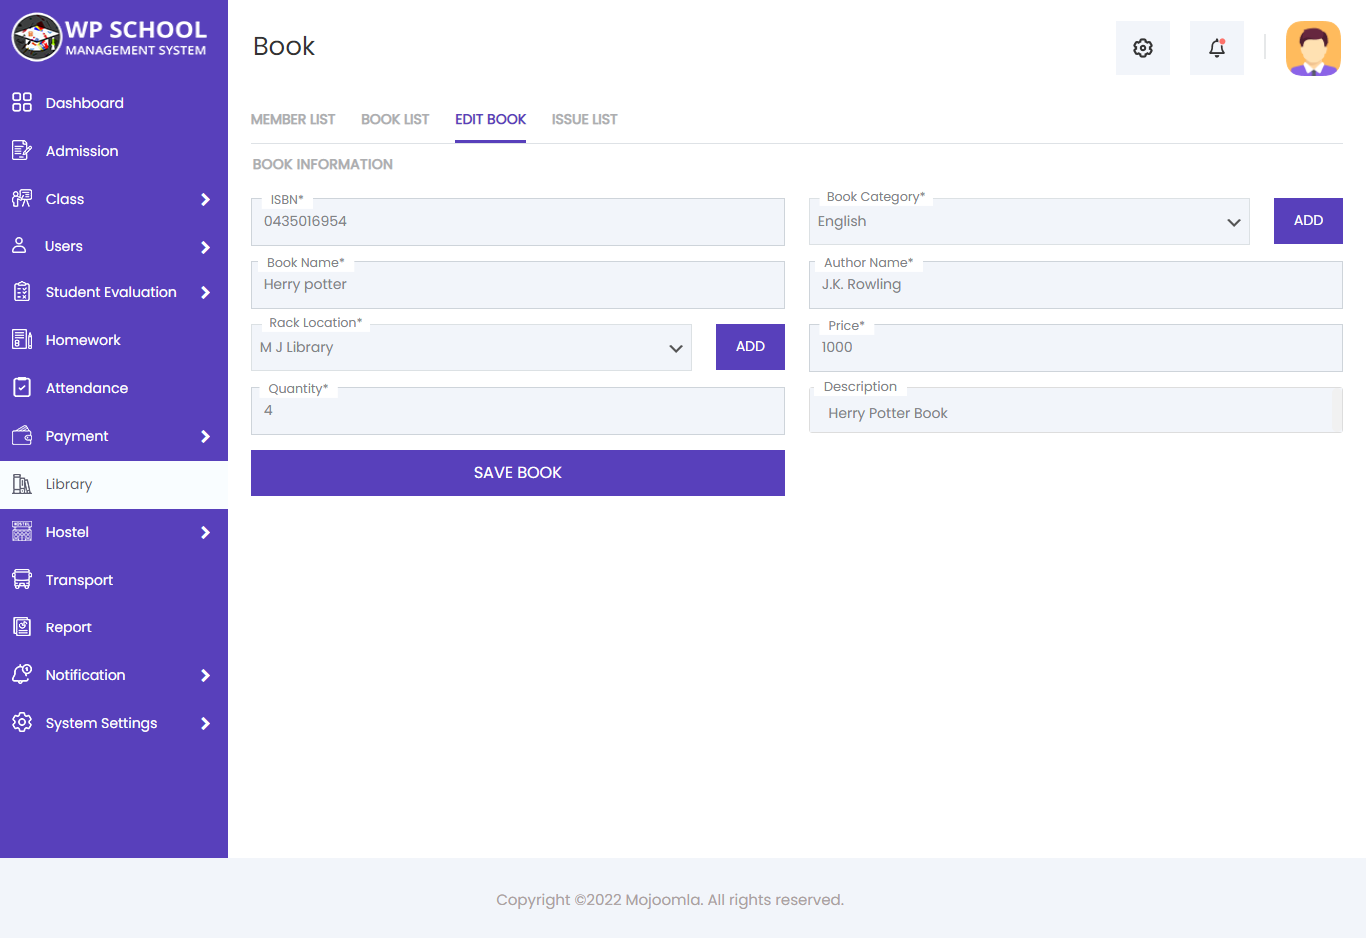
Edit Book
Click the Edit button on any book to update its information including ISBN, publisher, category, author, price, and quantity.
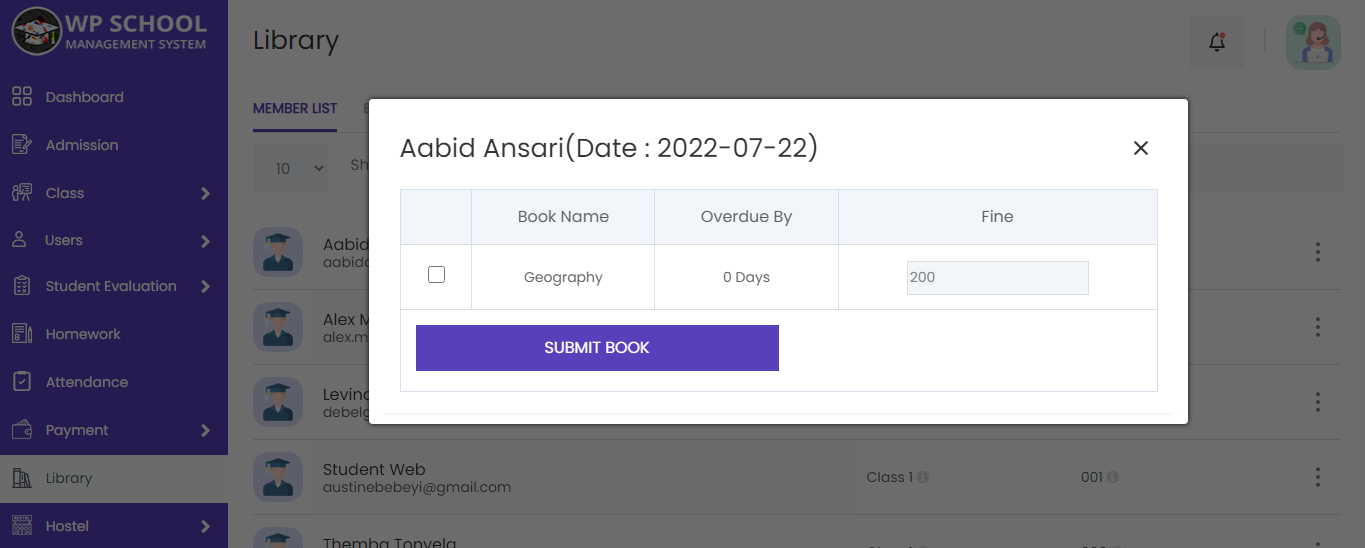
Accept Book Return
When a student returns a book, click Accept to mark it as returned and update the inventory.

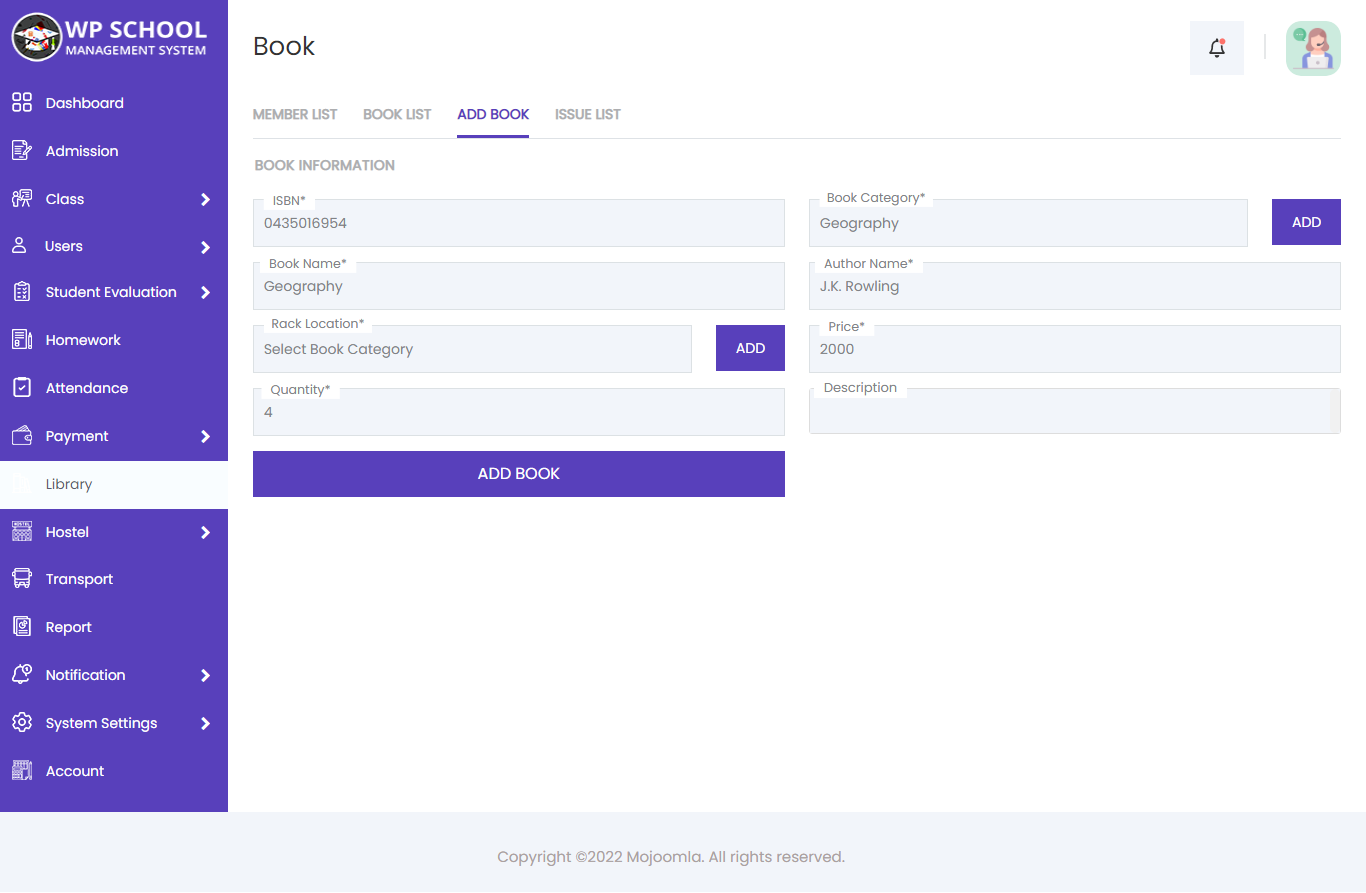
Add Book
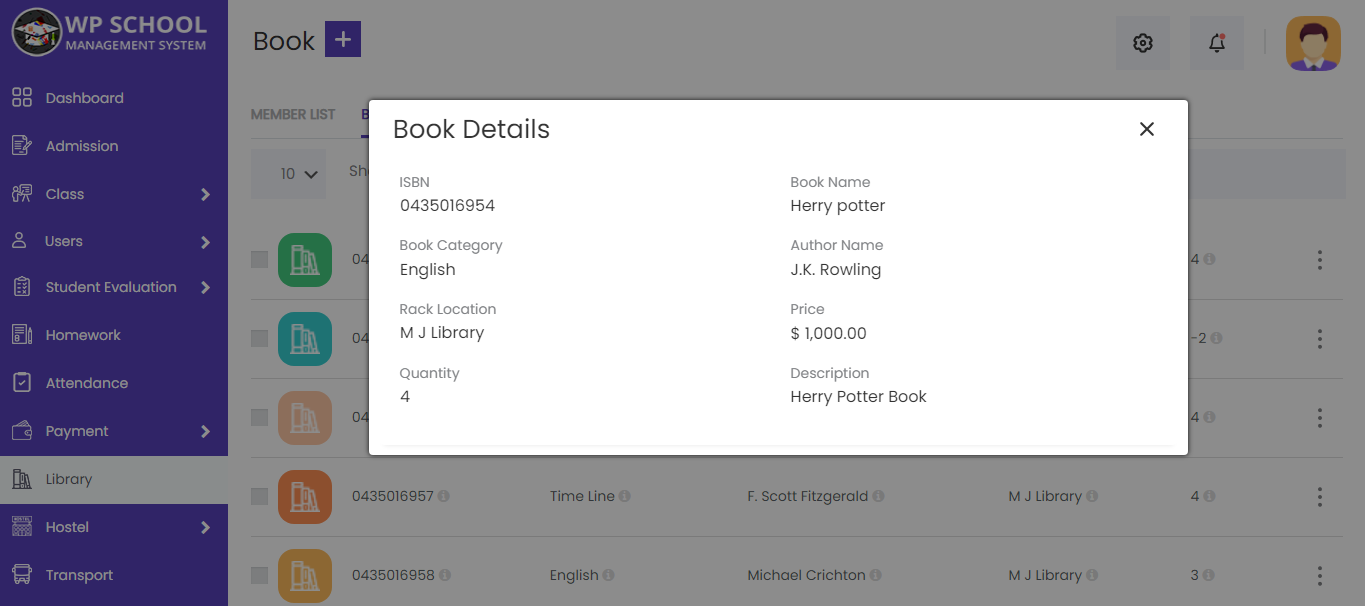
Click Add Book to add a new book to the library catalogue. Enter all details including ISBN, publisher, category, author, rack location, price, and quantity of available copies.

| Field | Description |
|---|---|
| ISBN | International Standard Book Number |
| Publisher Name | Book publisher |
| Book Category | Select or add a category |
| Book Name | Full title of the book |
| Author Name | Book author |
| Rack Location | Physical shelf location |
| Price | Book purchase price |
| Quantity | Number of copies available |
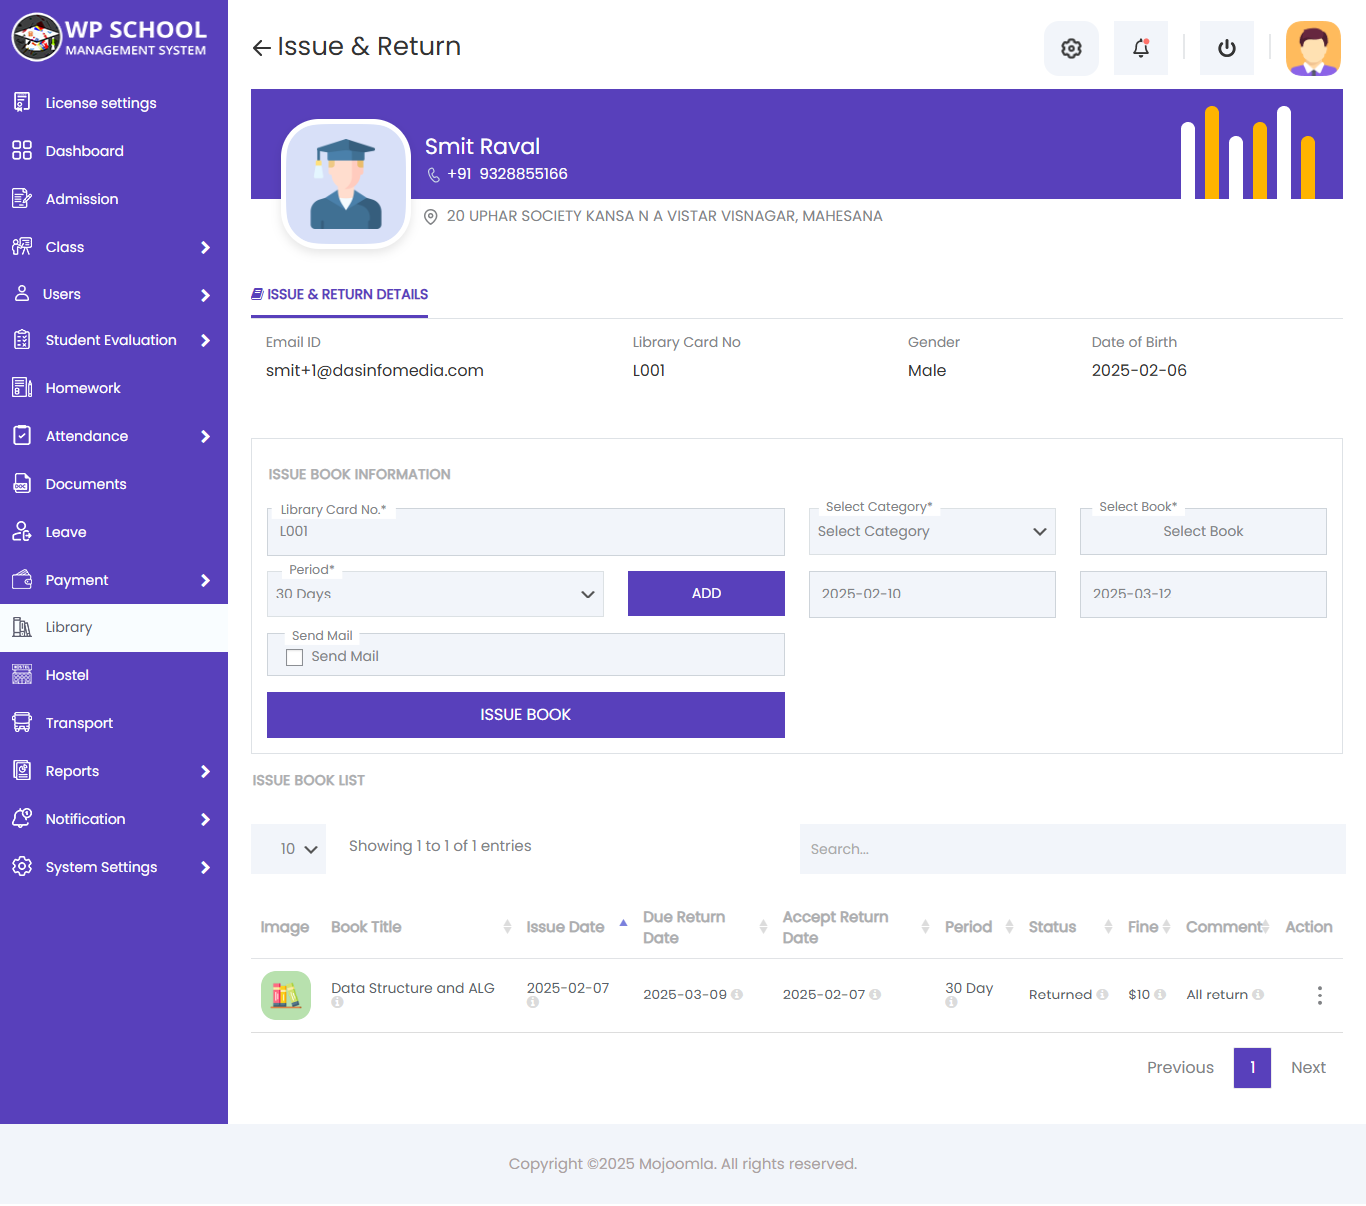
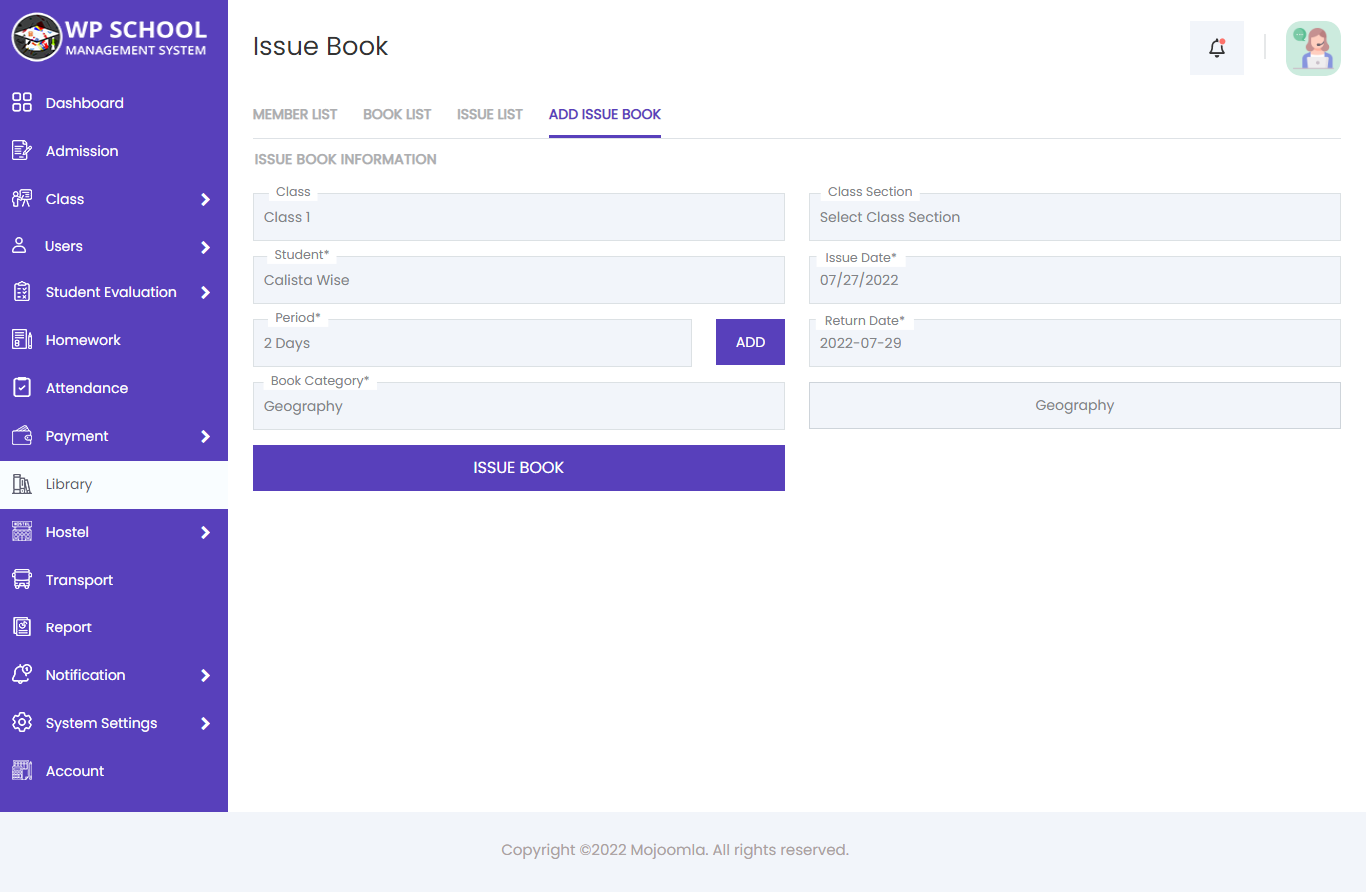
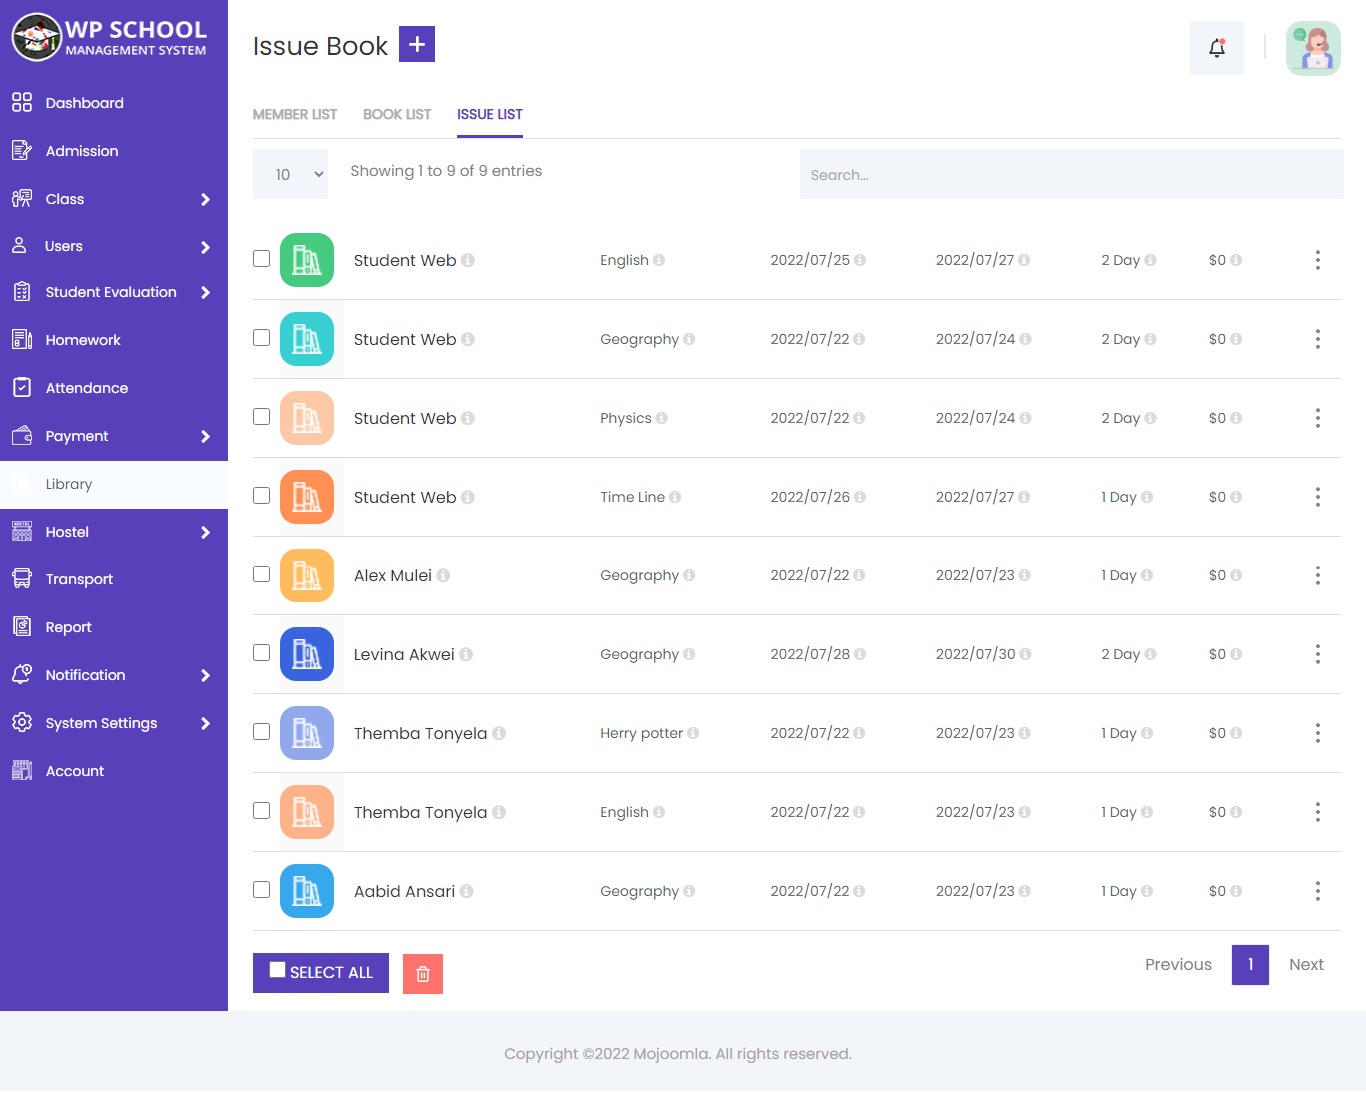
Issue & Return Books
View all currently issued books and their return status. Select a student or teacher, choose the book, and record the issue date and expected return date.
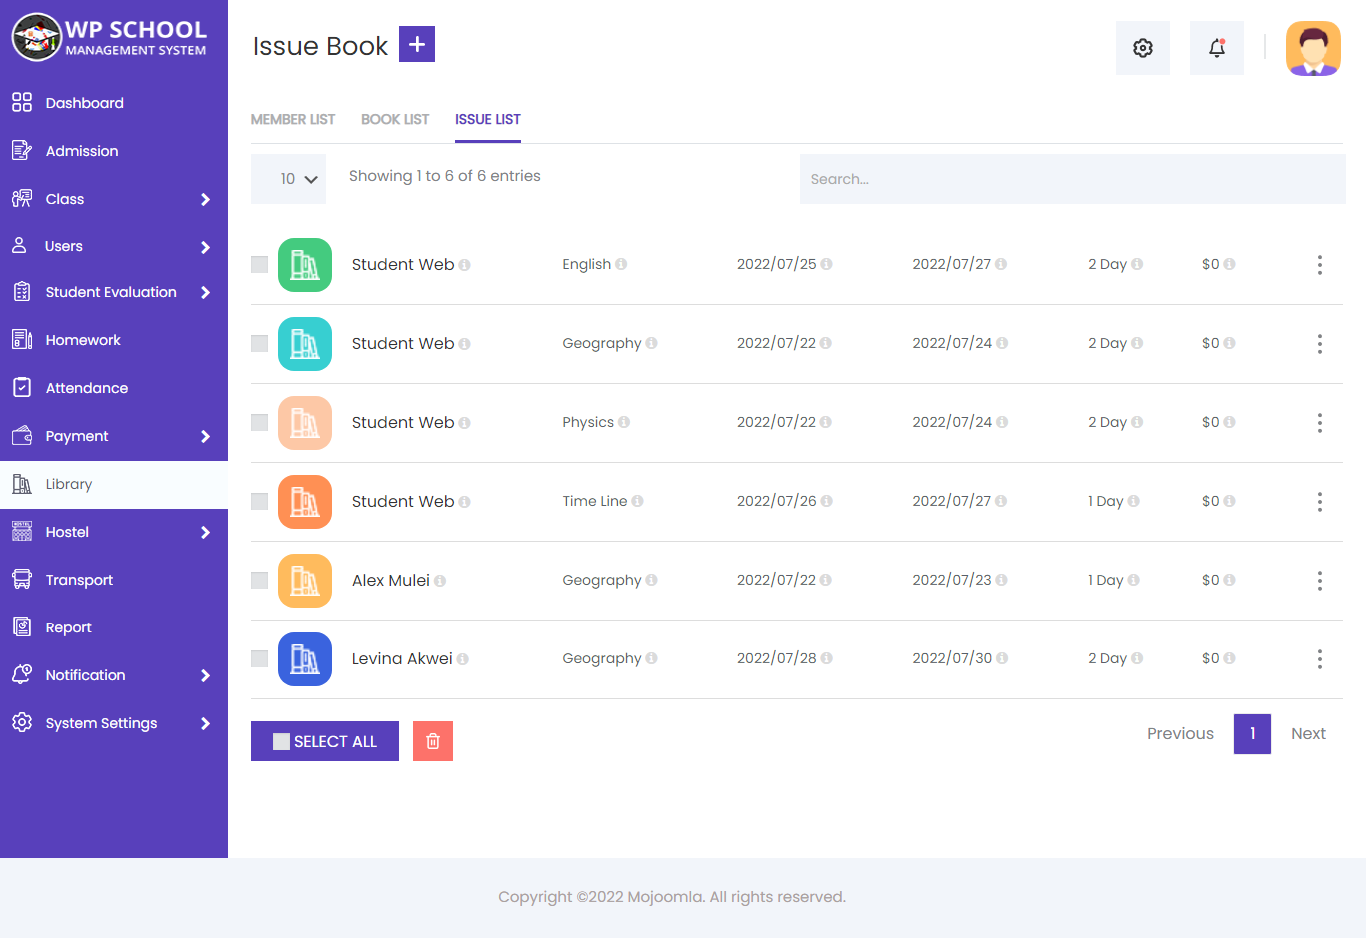
Click Issue and Return to manage book issue and return transactions for any student or staff member.
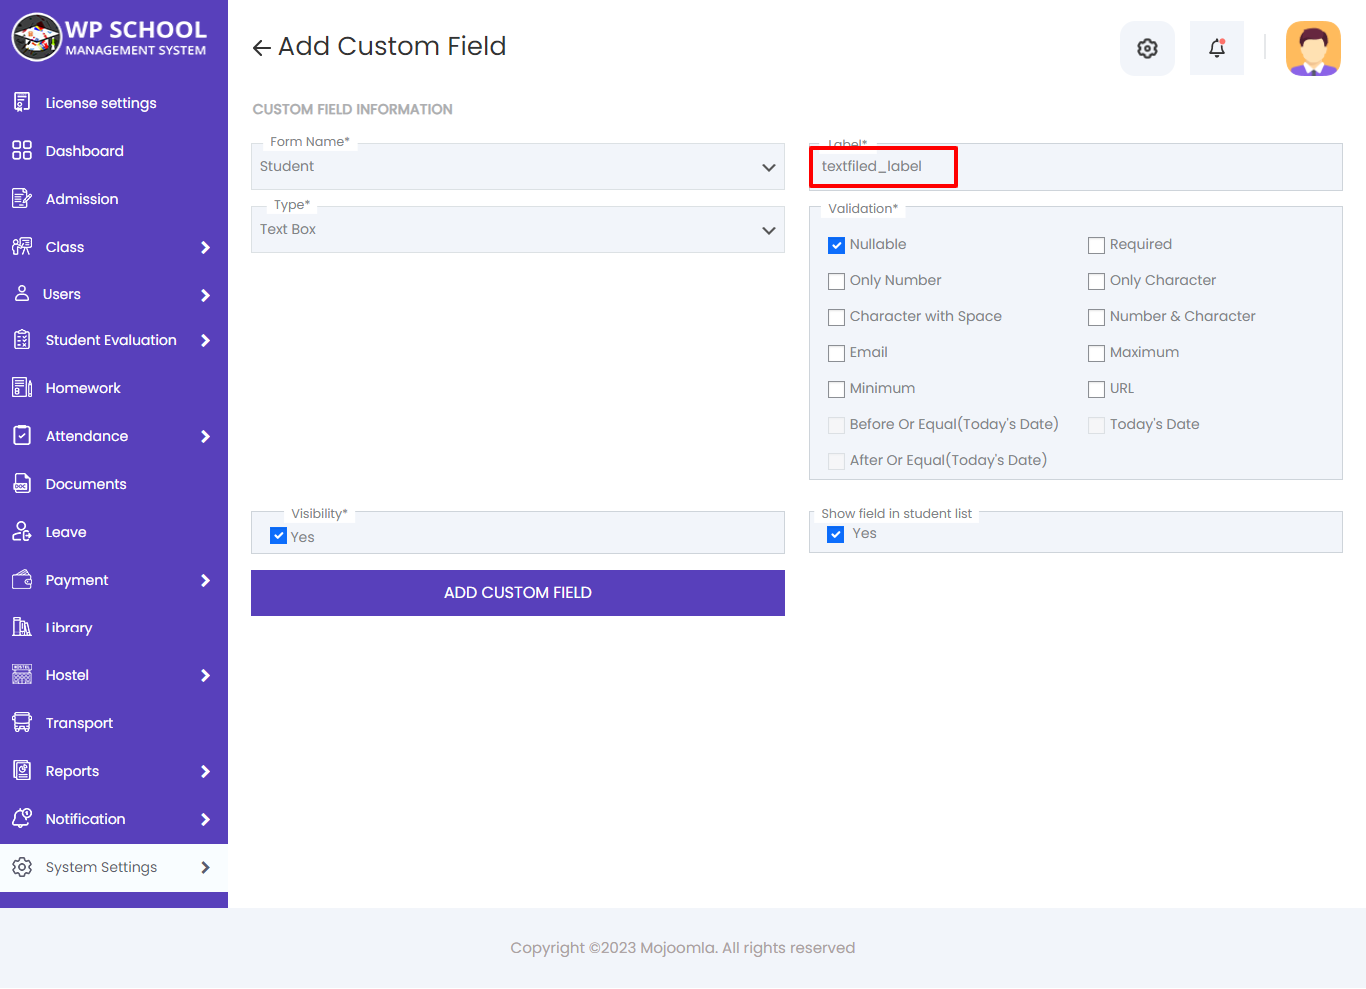
31) Custom Fields
Add custom fields to Student, Admission, Teacher, Support Staff, and Parent forms. Field types: TextBox, Label, Checkbox, Dropdown, Radio, File, Date.
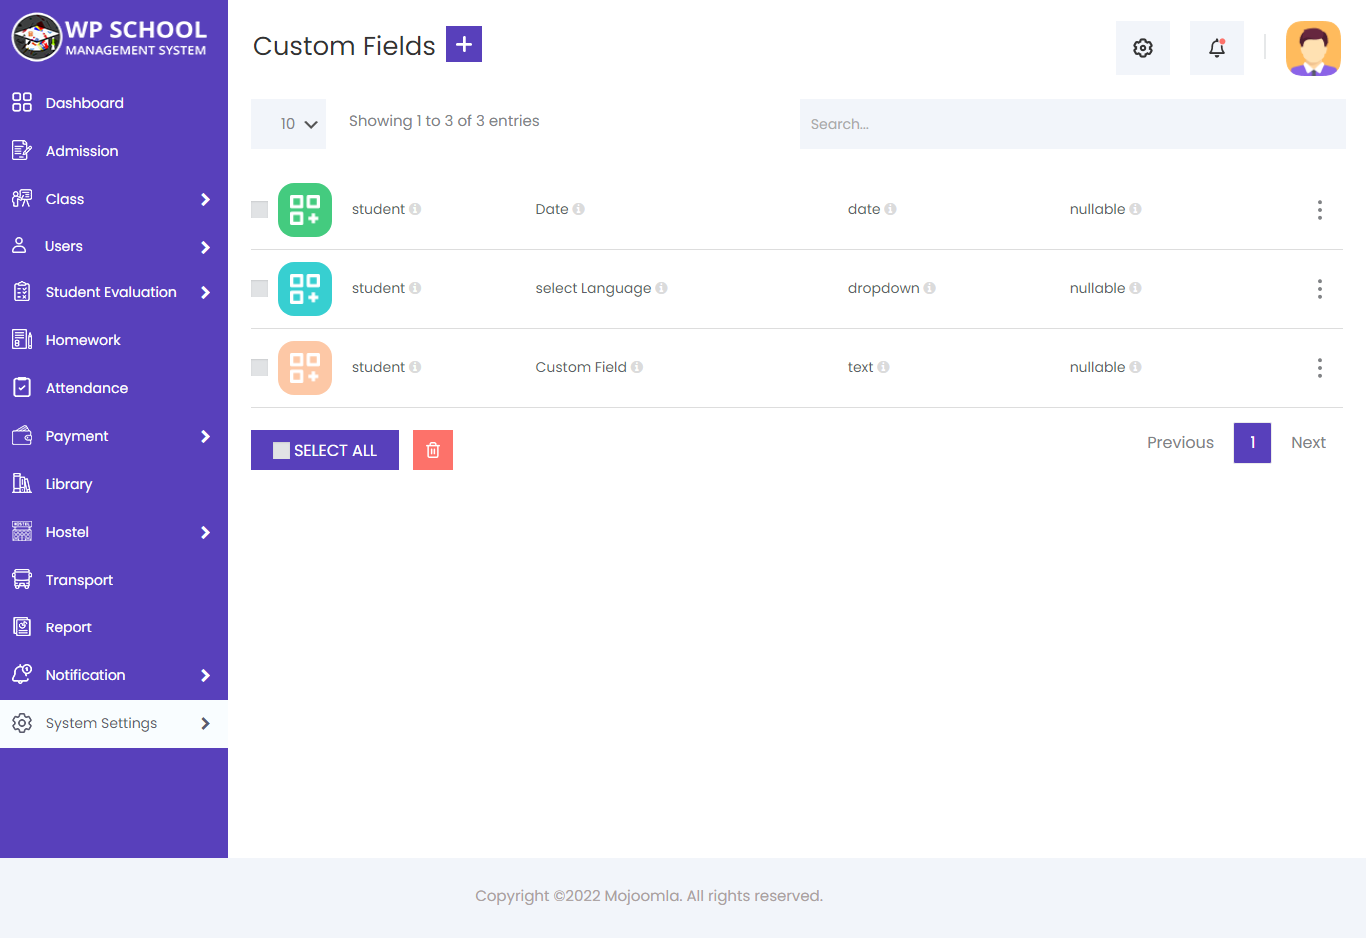
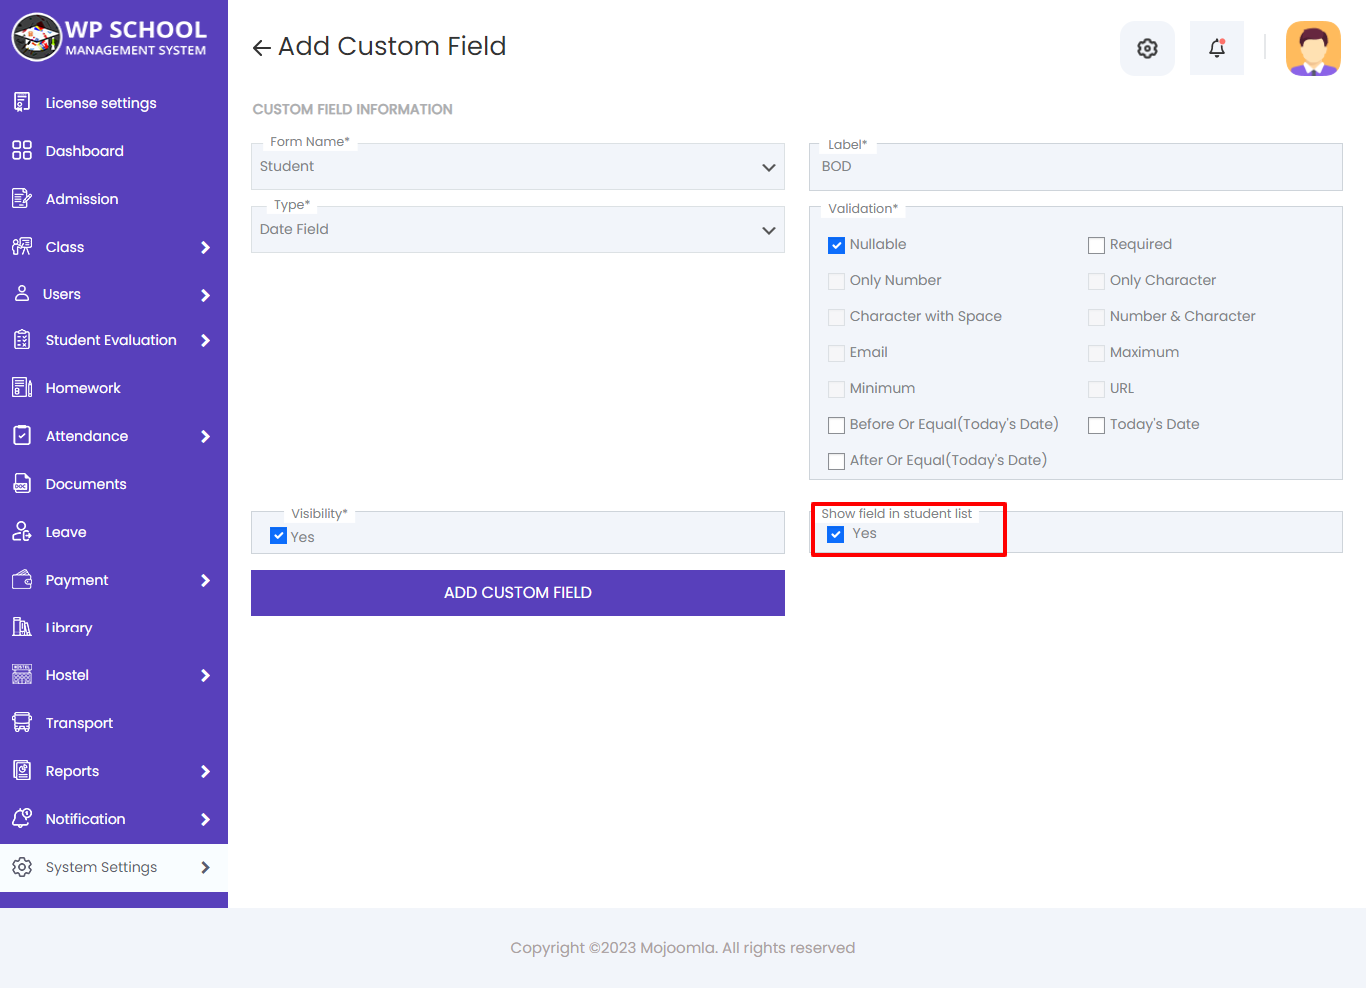
Custom Field in Student Form
Custom fields appear in the Student Add and Edit forms once created. Fields are shown according to their type (text, checkbox, dropdown, etc.).
Enable "show in student list" to display custom field values as columns in the student listing table.
32) Certificates
Design and issue academic certificates with dynamic student data placeholders. Generate, assign, and download certificates as PDF.
Certificate Templates
Design certificate templates using dynamic variables such as student name, admission number, and date of birth. Templates are reusable for any student.

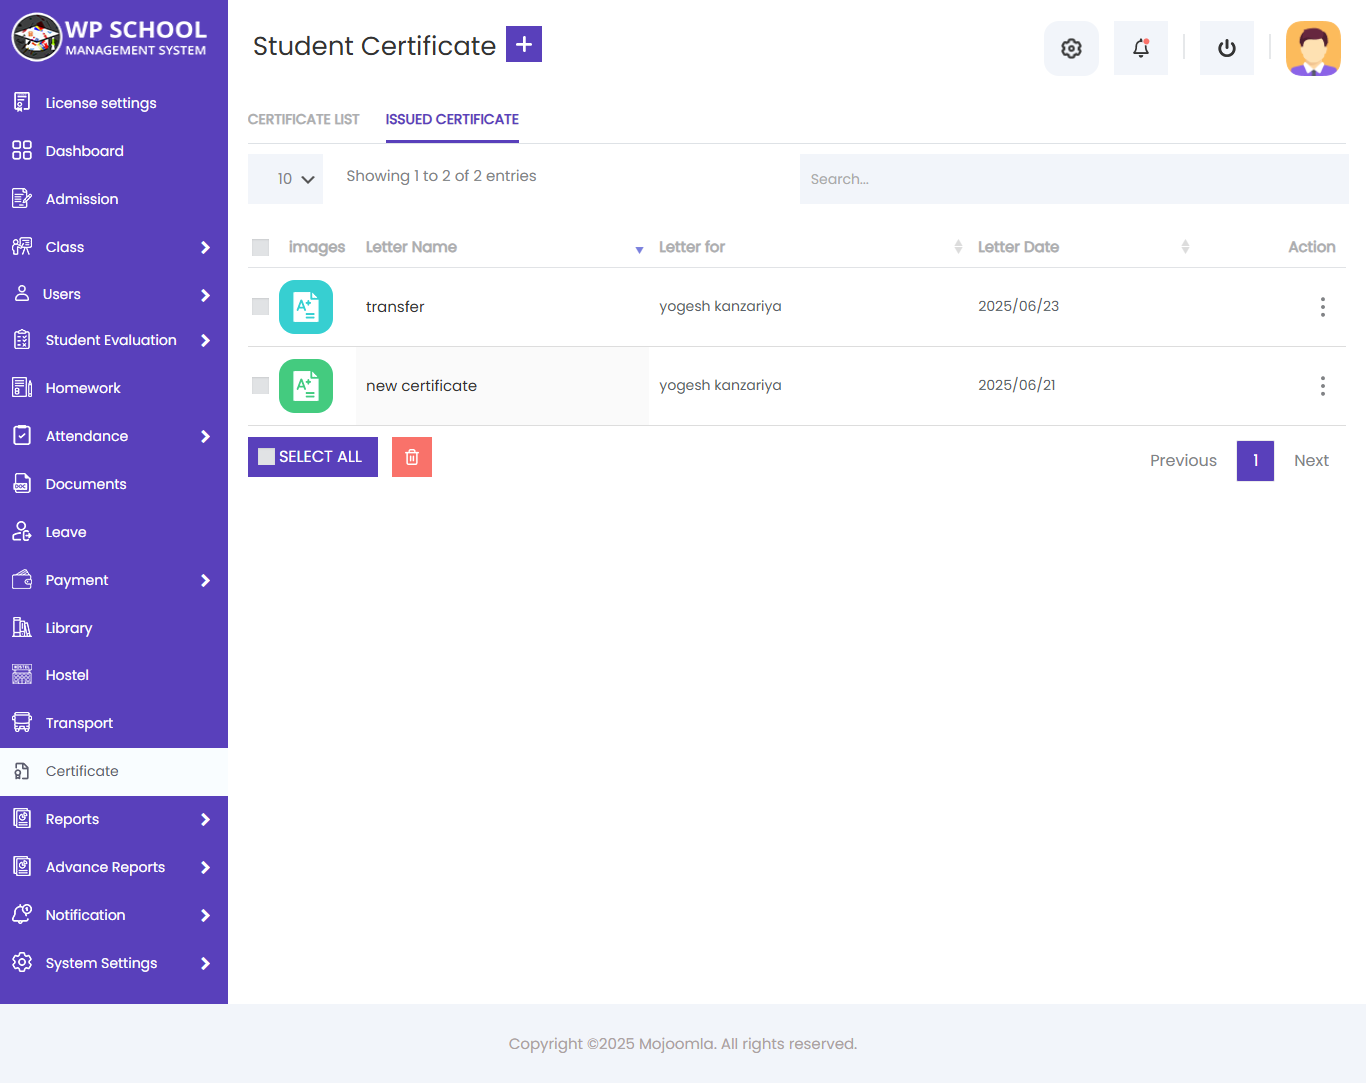
Issued Certificates
View a complete list of all certificates that have been assigned and issued to students.
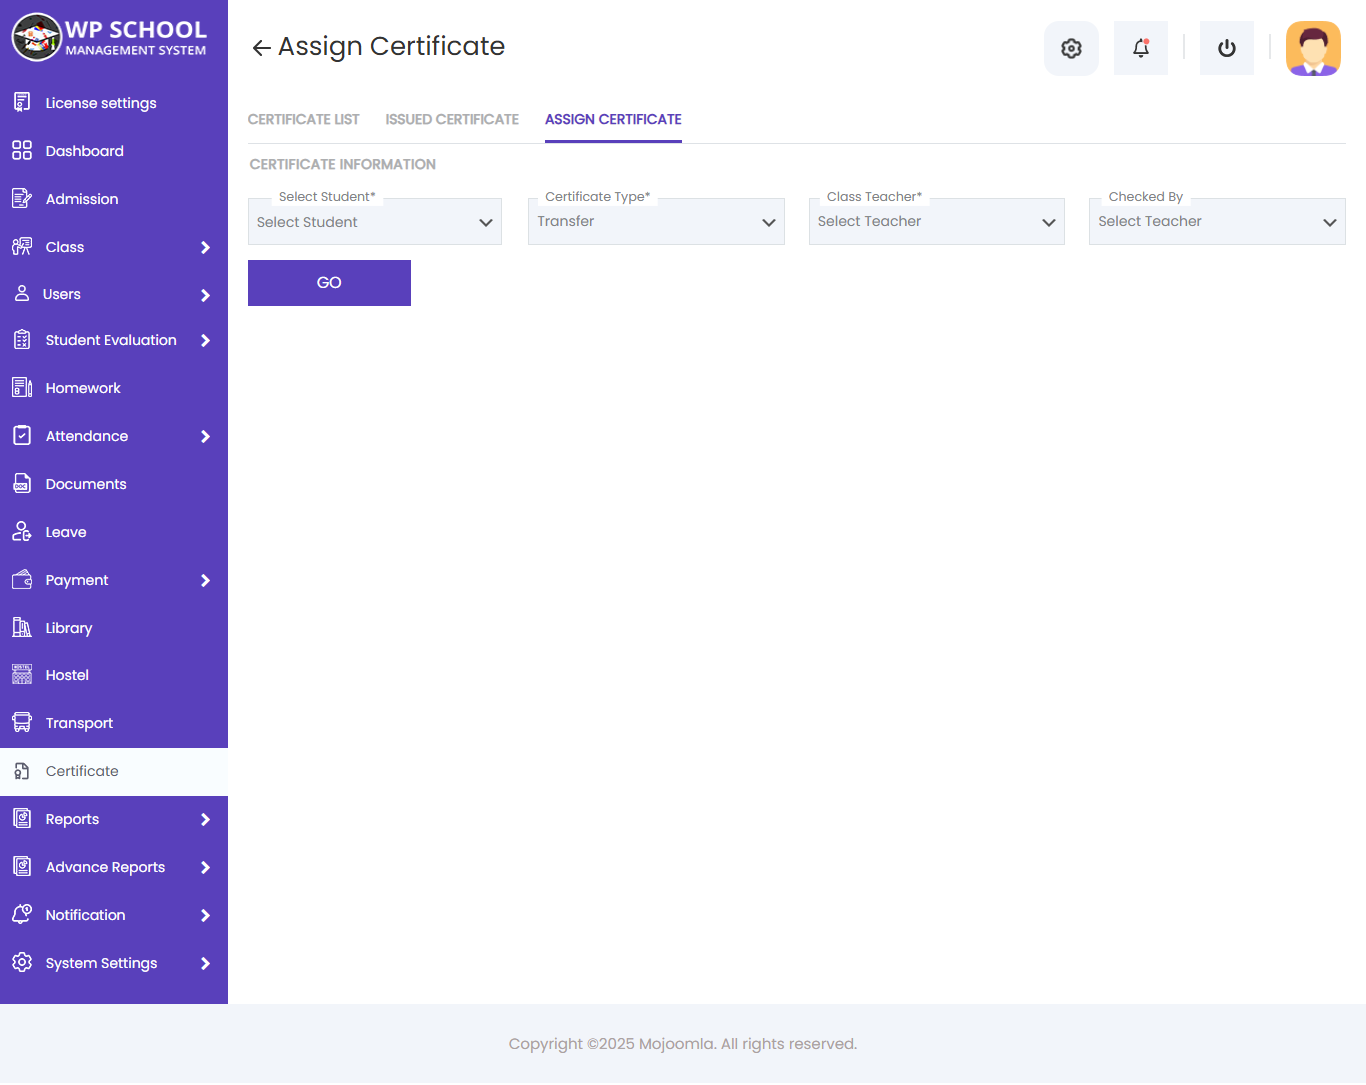
Assign Certificate
Select the student, certificate type, class teacher, and verifying teacher to assign a certificate to a student.
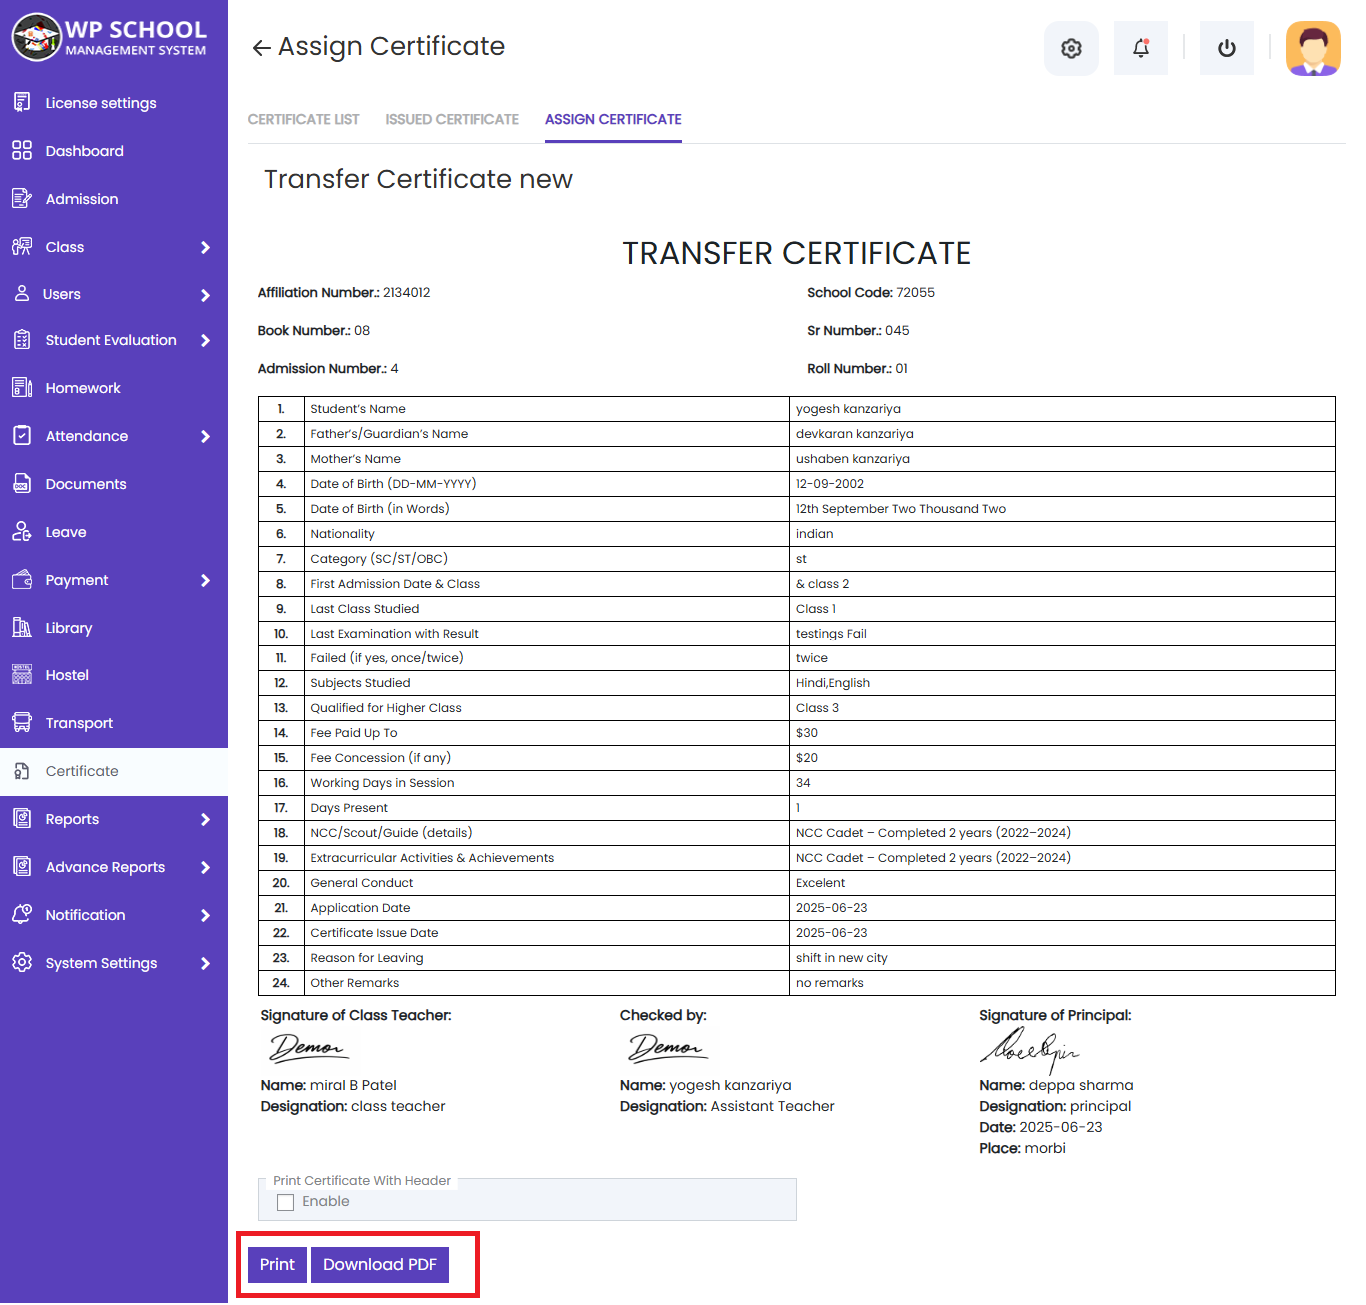
Print / Download Certificate
View the filled certificate complete with student data and signatures. Print directly or download as a PDF file.
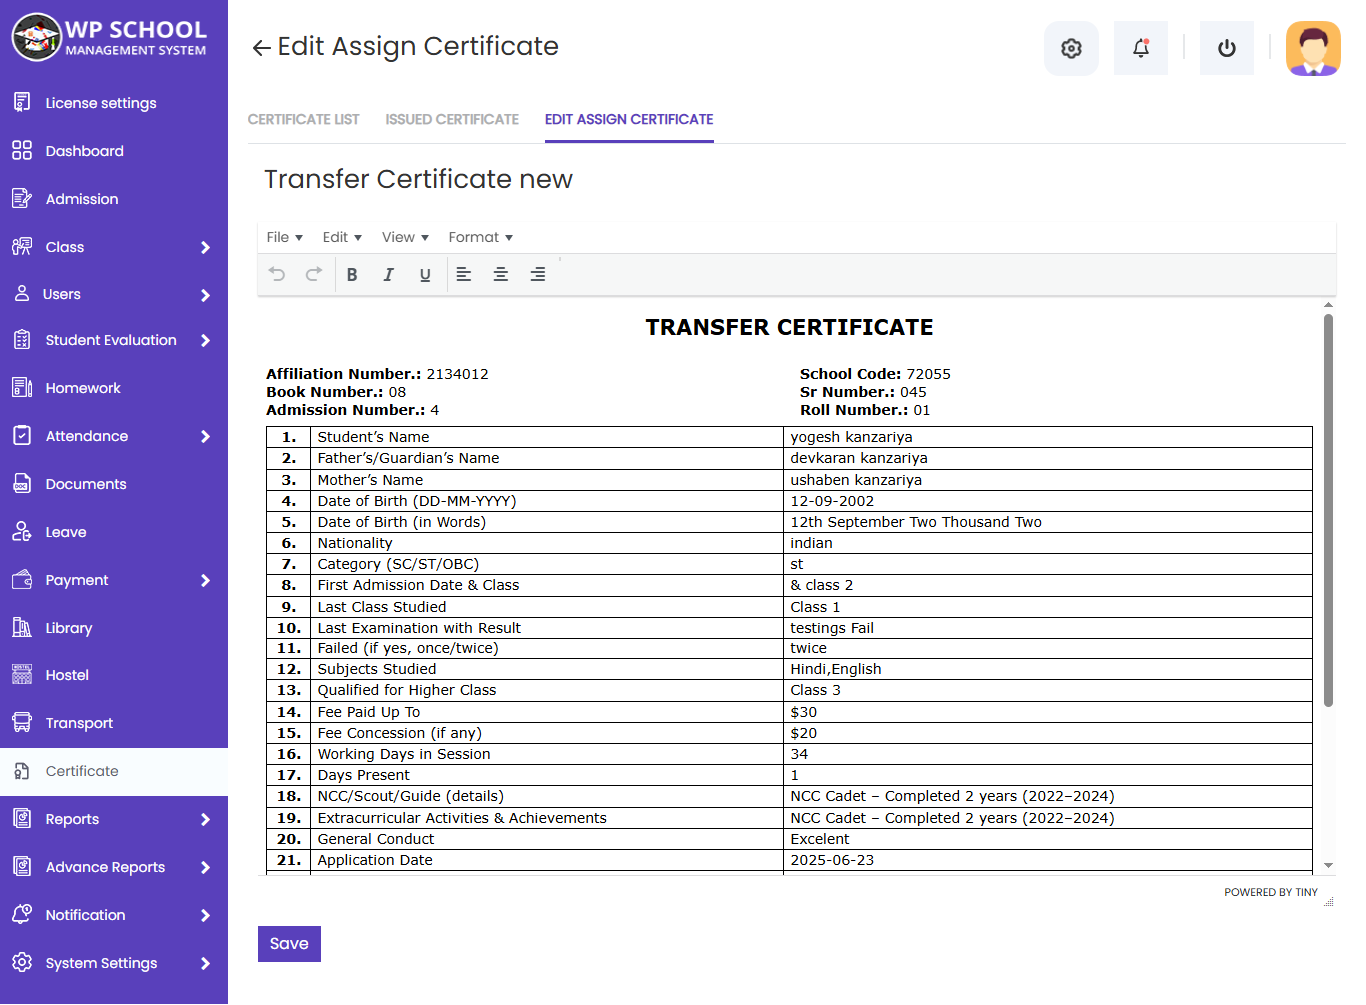
34.5.0) Edit Assigned Certificate
Modify an already-issued certificate — edit student details, academic records, and any other content in the rich text editor before saving updates.
Student View
Students access a personalized portal showing their academic data, fees, homework, hostel, library, and notices. All information is specific to the logged-in student.
1) Teacher List
Students can view the list of all teachers assigned to their class, along with their subject and contact details.
4) Subjects
Students can view all subjects assigned to their class, including subject code, teacher name, and syllabus details.
View Subject Details
Click on a subject to see full details including teacher information, syllabus, and study materials.
5) Class Routine
Students can view their weekly class timetable showing subject, teacher, start time, and end time for each period.
6) Exams
Students can view all upcoming and past exams for their class. They can see the exam timetable, download the syllabus, and check exam dates and terms.
9) Homework
Students can view upcoming and closed homework assignments. They can download attached files and submit their completed work through the portal.
Upload Homework Submission
Students can upload their completed homework files directly from the portal before the submission deadline.
10) Fee Payment
Students can view all their fee invoices and download receipts.
View Fee Invoice
Students can view and download their paid fee invoices in PDF format for record-keeping.
8) Hostel
Students assigned to a hostel can view their hostel details, room, and bed assignment from the student portal.
12) Transport
Students can view their assigned transport route, vehicle details, and driver information.

13) Notice
Students can view all notices published by the school admin that are directed at students or all users.
14) Messages
Students can view received messages in their inbox and compose new messages to teachers or other students in the same class (if enabled by admin).
Compose Message
Students can compose and send messages to teachers or classmates (if enabled by admin).
16) Library
Students can browse available books in the school library, view book details, and check issue/return status.
Book Details
Click on any book to view its full details — author, publisher, ISBN, available copies, and issue status.
15) Holidays
Students can view the school holiday calendar showing all announced holidays and their dates.

2) Student
Students can view their own class student list. With access rights, the full school student list can be made visible.
View Student
Click the View button to see personal information and contact details of a classmate.
3) Parent
Students can view their own parent/guardian information registered in the system.
View Parent
7) Leave
Students can view their own leave records and submit new leave requests directly from the portal.
Add Leave
Click Add Leave to submit a new leave request. Fill in the leave type, duration, and date range.
11) Payment
Students can view their payment records, download invoices, and view payment receipts from the payment section.
View Payment Invoice
Click View on any payment to see the full invoice with print and PDF download options.
View Payment History & Receipt
Students can view their full payment history and download individual payment receipts as PDF.

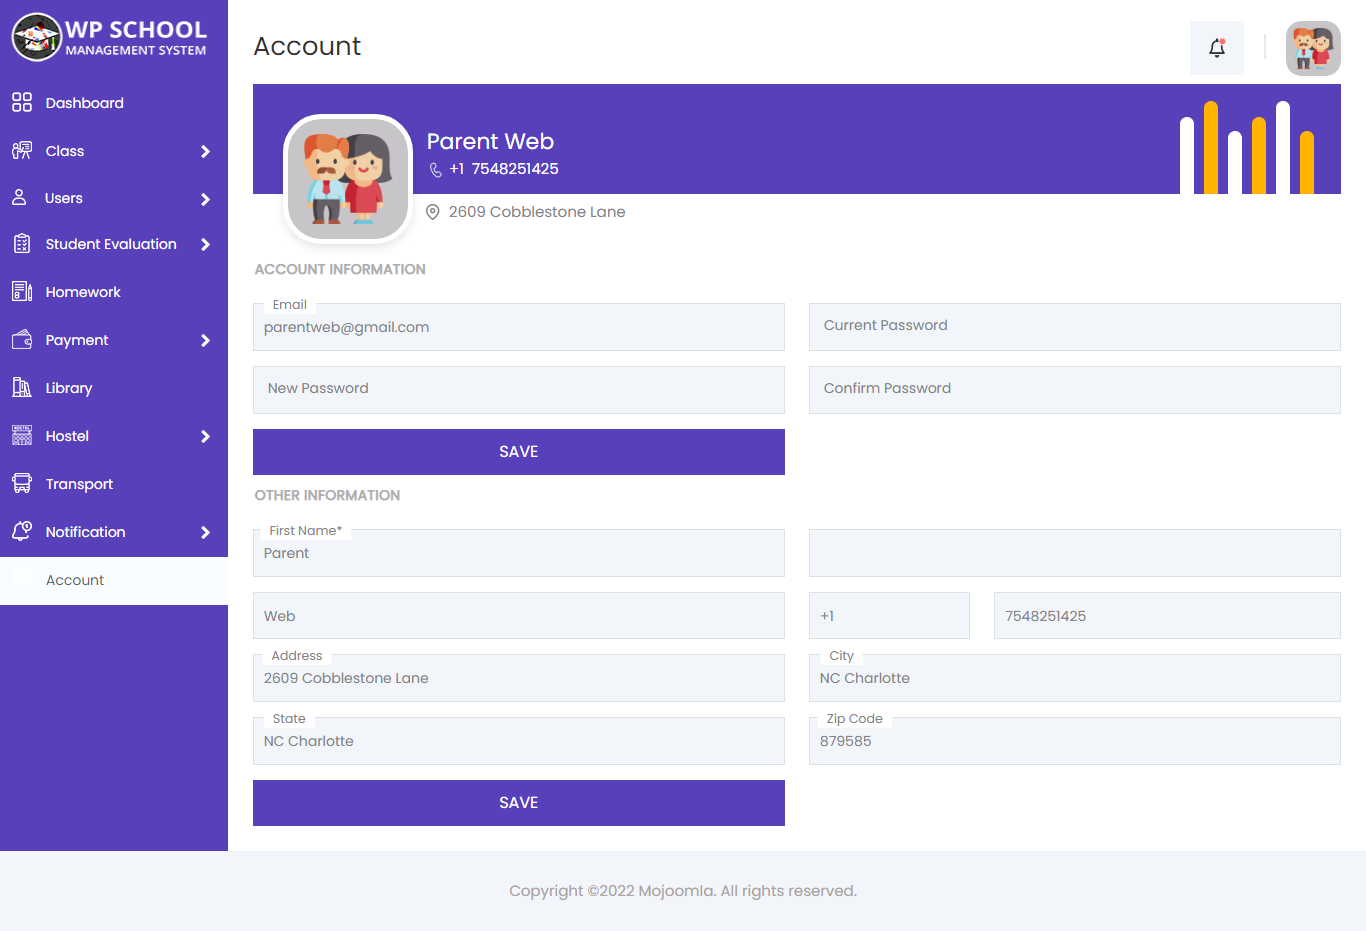
17) Account
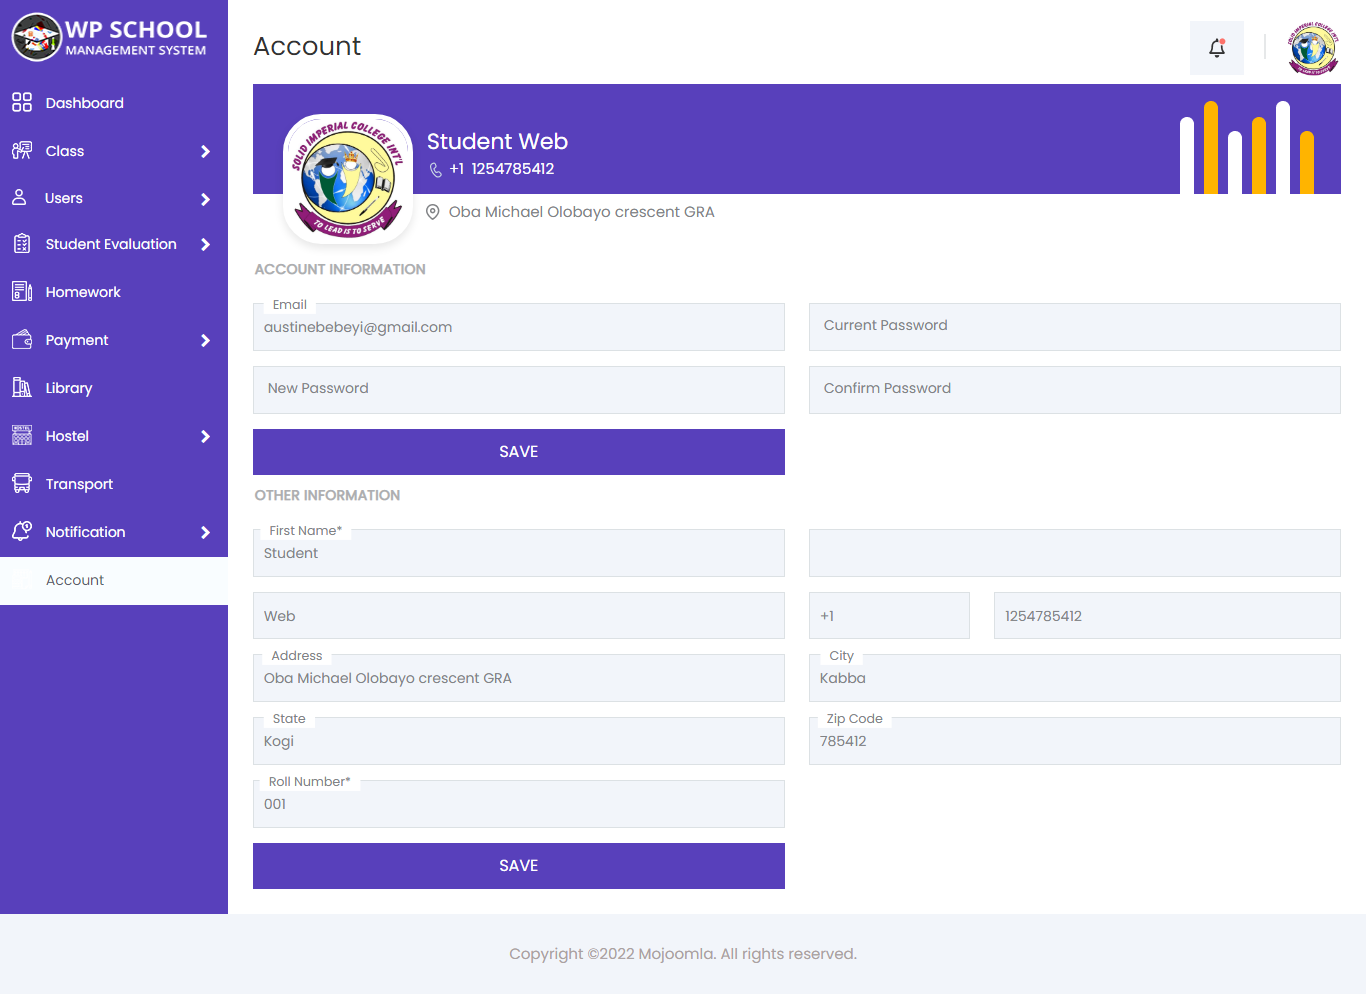
Students can view and edit their own profile information — name, contact details, address, and profile image — from the Account section.
18) Virtual Class
Students can join virtual classroom sessions created by their teachers — view the session list and join live or scheduled classes.

Parent View
Parents can monitor all their registered children from a single account — attendance, results, fees, homework, and notices all in one place.
1) Teacher List
Parents can view all teachers associated with their children's classes, along with subject and contact information.

2) Children
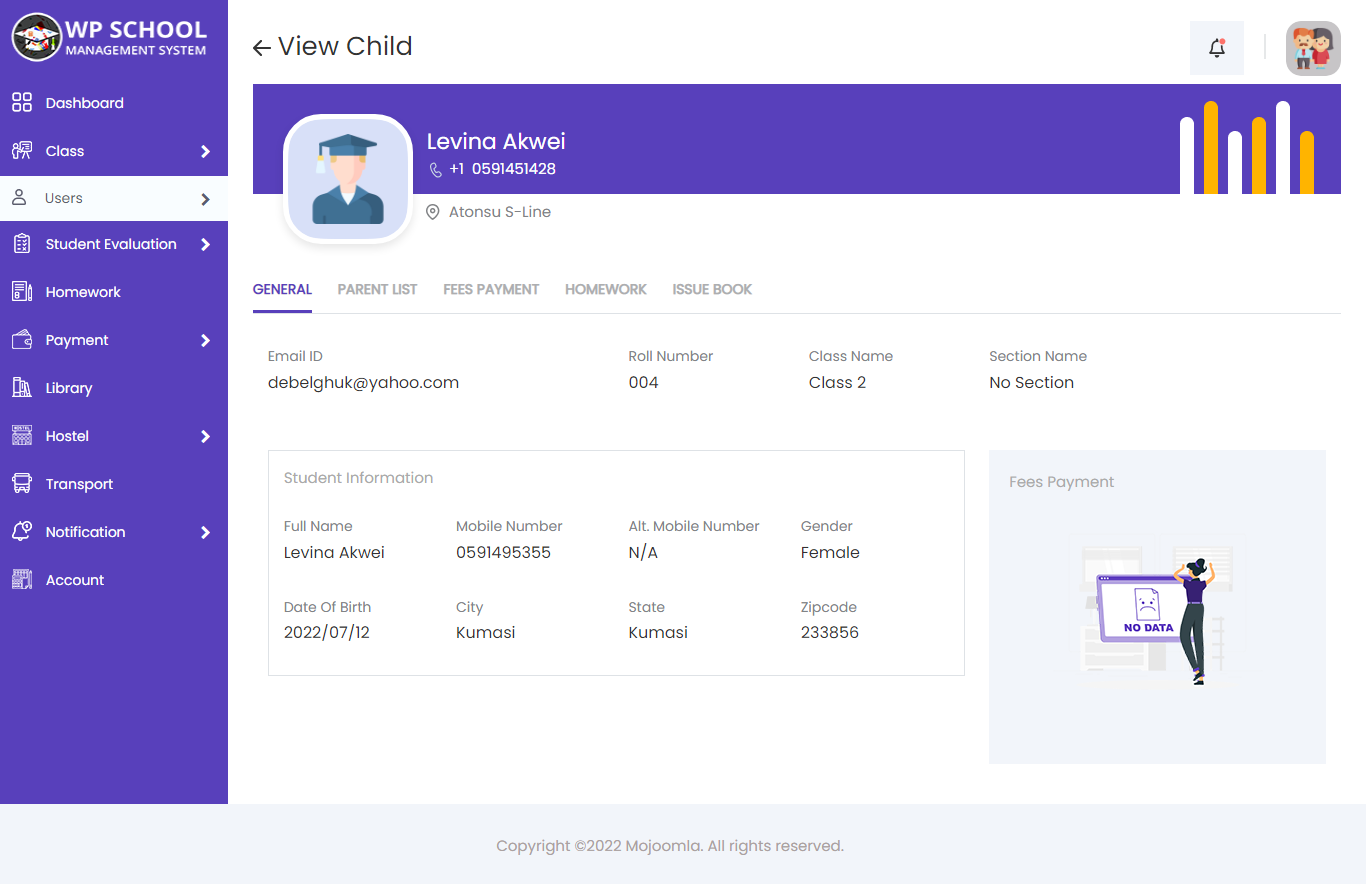
Parents can see all their registered children. Clicking on a child opens their full profile — personal information, attendance, and academic results.
View Child Profile
Click on a child's name to view their complete profile including personal details, class, and contact information.
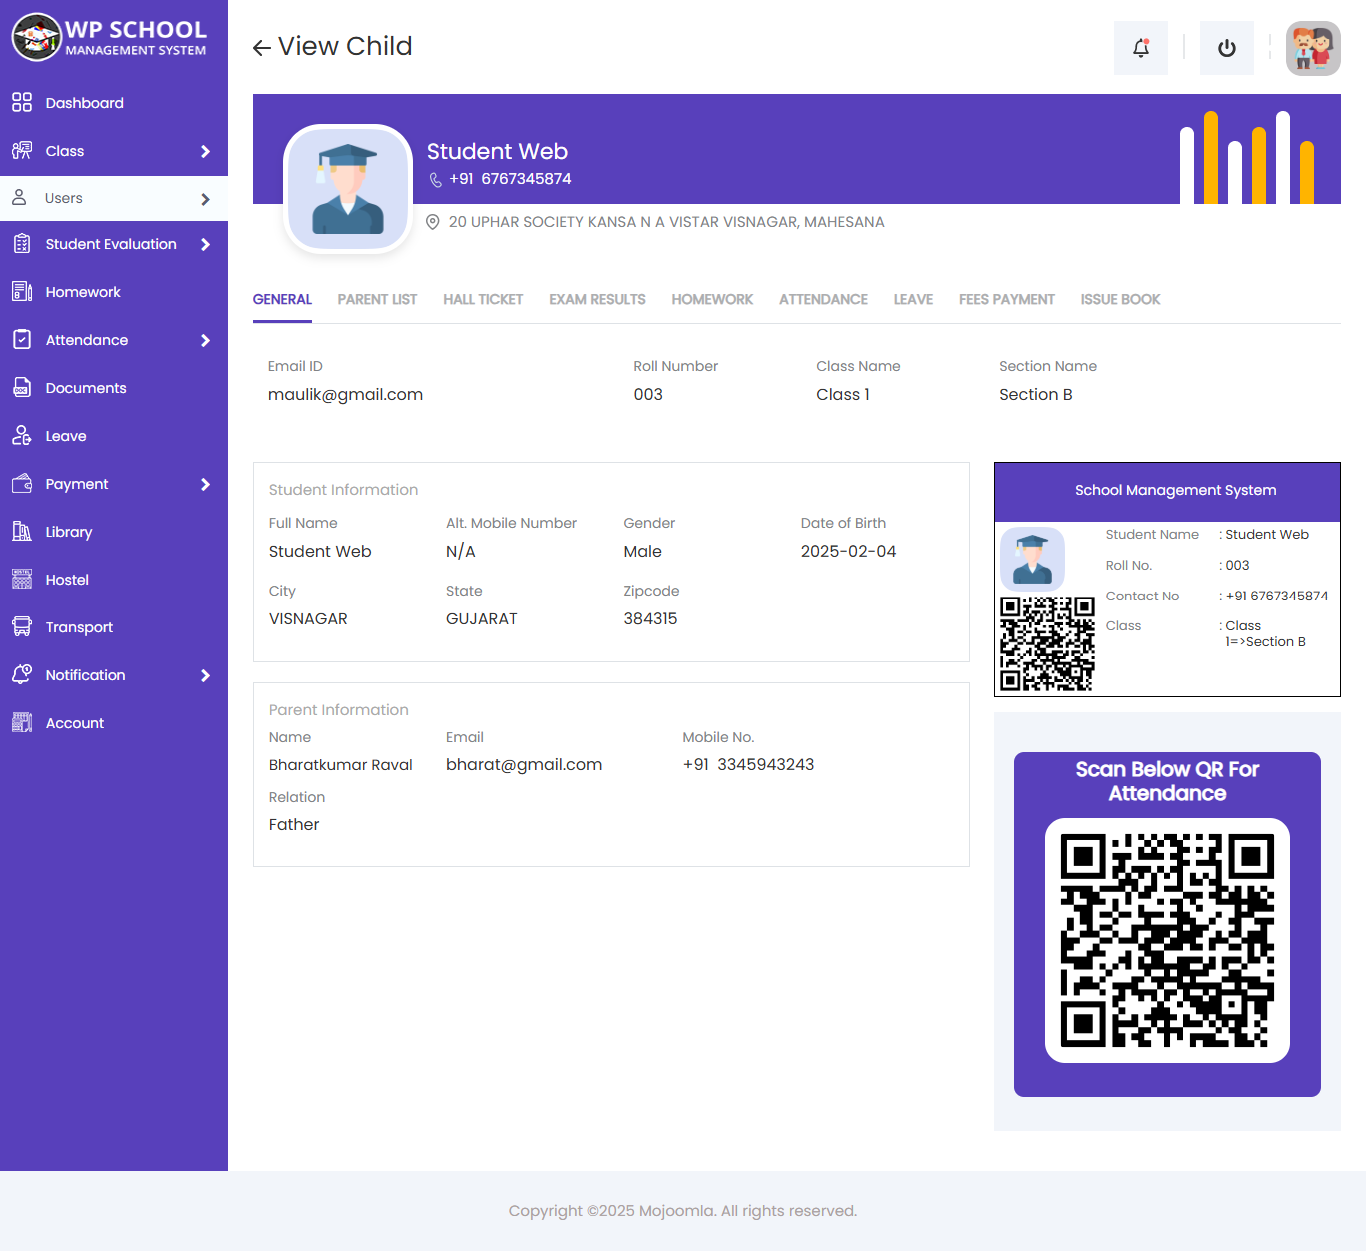
View Child Result
Parents can view exam results for each child, generate marksheets in PDF format, and print them directly.
5) Exams
Parents can view upcoming and past exams for their children's classes, including exam dates, timetables, and syllabus.
9) Fee Payment
Parents can view all fee invoices for their children and see the invoice status (paid/unpaid).
8) Homework
Parents can view homework assigned to their children, check submission deadlines, and monitor submission status.
Upload Homework on Behalf of Child
If enabled, parents can upload homework submissions on behalf of their children.
14) Library
Parents can browse the school library catalogue and view details of books available or issued to their children.
3) Subjects
Parents can view all subjects assigned to their child's class, including subject details and syllabus download.
4) Class Routine
Parents can view their child's weekly class timetable showing subjects, teachers, and timing for each period.

6) Leave
Parents can view all leave requests submitted for their child, along with status (approved, rejected, or pending).
7) Hostel
Parents can view hostel information, room details, and bed assignment for their child.
10) Transport
Parents can view transport routes and driver details for the vehicle assigned to their child.
11) Notice
Parents can view all school notices directed at parents or all users.
12) Message
Parents can receive and send messages to teachers and school administration. If enabled, parents can also message their child's classmates' parents.
Compose Message
Reply & Sent Box
15) Holiday
Parents can view the school holiday calendar to stay informed about upcoming school closures.
16) Account
Parents can view and edit their own profile details and see a list of their registered children from the Account section.
17) Virtual Class
Parents can view the virtual class sessions their children are enrolled in.
Teacher View
Teachers have access to their assigned classes — managing students, subjects, attendance, exams, marks, homework from a dedicated portal.

1) Students
Teacher can manage all information about their class students and also view results and attendance information of students and also download Exam receipt of the student.
View Student
Teacher can view a student by clicking the View button. This opens the view student page showing personal information, contact information, and parent information of the particular student.
View Result
Teacher can view the result of a particular student by clicking the View Result button. Results open in a popup where the teacher can generate a PDF Marksheet or print directly.

Exam Receipt
Teacher can view and download the exam hall receipt (admit card) for any student in their class.

3) Subjects
Teachers can view all subjects assigned to them and also add new subjects to their assigned classes.

Add Subject
Teachers can add new subjects by entering the subject code, subject name, and selecting the class. The teacher is automatically assigned to the subject.
6) Attendance
Teachers can take and manage daily attendance for their class. Select the date and class, then mark each student as present or absent. Past dates are view-only; the current date is editable.
Subject-wise Attendance
In University Flow, teachers can record attendance by subject. Select the date, class, and subject to take subject-specific attendance.

7) Exams
Teachers can view all exams for their assigned classes, add new exams, manage exam timetables, and view the complete exam schedule.
Add Exam
Teachers can add a new exam by entering the exam name, selecting the class, term, start and end dates, and uploading exam syllabus.
View Exam Timetable
Teachers can view the generated exam timetable showing all subjects, dates, and timings for the selected exam.
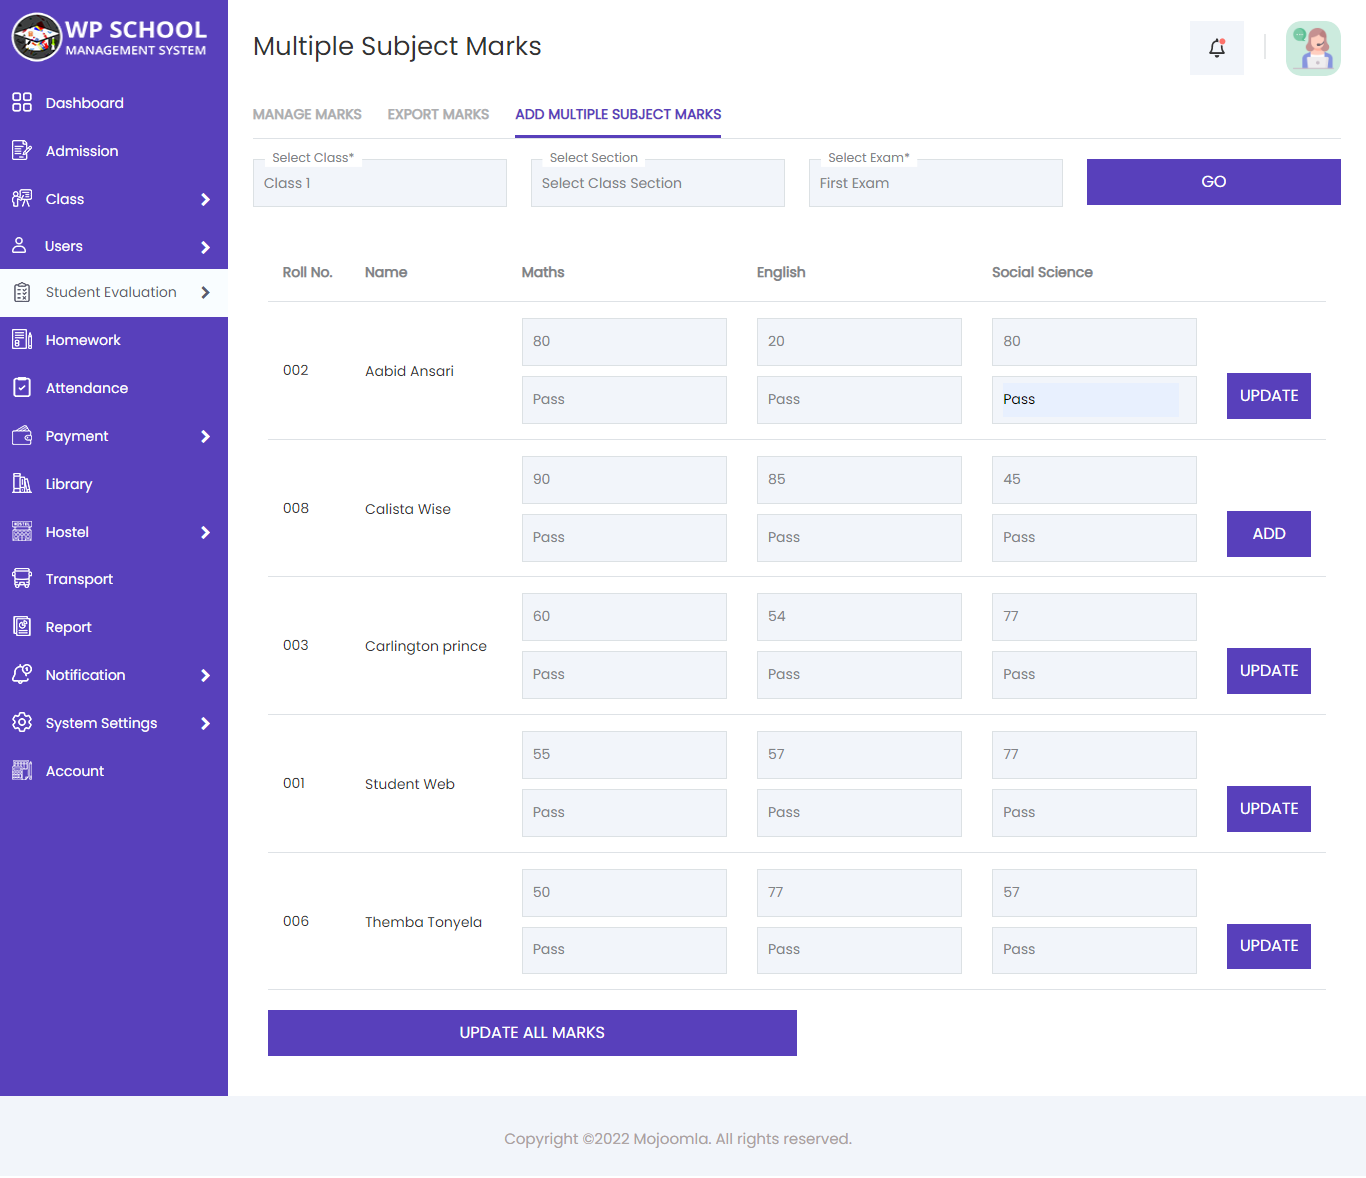
8) Manage Marks
Teachers can enter, update, and export student marks. Select the exam, class, and subject, then click Manage Marks to enter individual marks or upload via CSV.
Export Marks
Teachers can export the complete class marks result as a CSV file for offline record-keeping or sharing.
Add Multiple Subject Marks
Teachers can also add marks for multiple subjects simultaneously using the multi-subject marks feature.
9) Homework
Teachers can create, manage, and evaluate homework assignments for their classes. View upcoming and closed homework, and evaluate student submissions with marks.
Add Homework
Click Add Homework to create a new assignment. Enter the title, select class and subject, write the content, set a submission date, and optionally attach a document file and assign marks.

Homework Details & Submissions
Teachers can view the homework detail page showing a list of all student submissions for that assignment.

Evaluate Homework
After students submit their homework, teachers can evaluate each submission and assign marks from the evaluation screen.
2) Parent
Teachers can view the complete list of parents associated with students in their class.
4) Class
Teachers can view the list of classes they are assigned to, along with class details and student counts.
5) Class Routine
Teachers can view the class timetable for their assigned classes, showing subjects, periods, and schedules for each day.
10) Leave
Teachers can manage student leave requests for their class — view, approve, or reject leave applications.

Add Leave
Edit Leave
11) Hostel
Teachers can view hostel information, room lists, and bed assignment details for students in their class.
12) Notice
Teachers can view all school notices directed at teachers or all users.
13) Message
Teachers can send and receive messages to students, parents, and other teachers. All received messages appear in the Inbox.

Compose Message
Reply & Sent Box


14) Holiday
Teachers can view the school holiday calendar to plan lessons and activities around school closures.
15) Library
Teachers can browse the school library book catalogue, view book details, and check issue and return records.
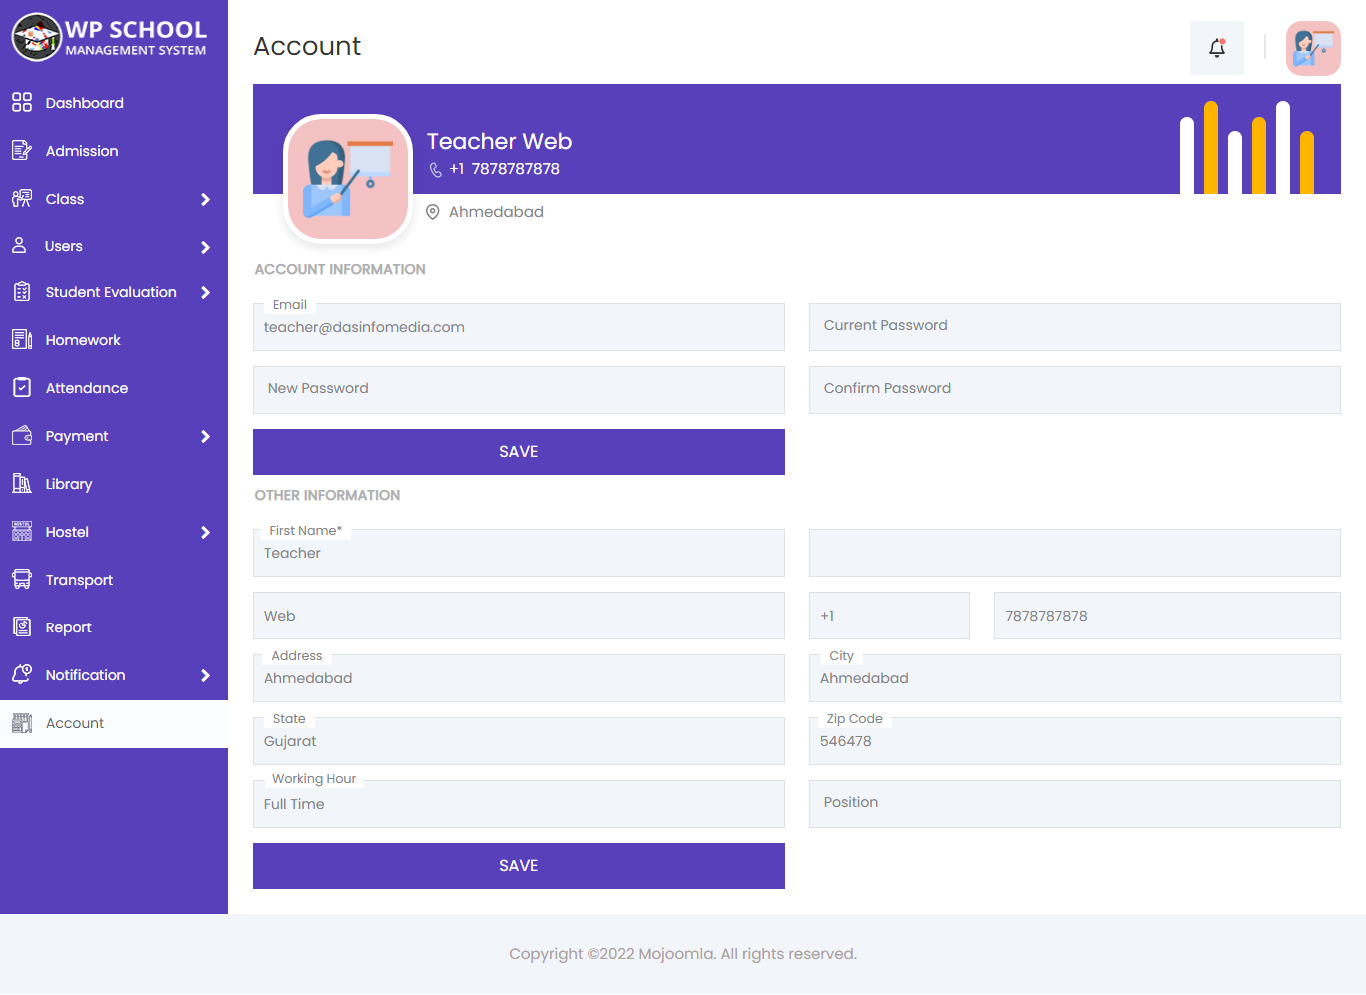
17) Account
Teachers can manage their own profile — update personal details, contact information, and change their password.
18) Virtual Class
Teachers can view and manage virtual classroom sessions — edit session details or create new virtual classes for students.
Support Staff View
Support Staff members have access to key school operations based on the access rights granted by the admin — including student management, exams, payments, and transport.
2) Students
Support Staff can view and manage student information based on their access rights, including viewing student profiles and downloading exam receipts.
View Student
Support Staff can view the complete profile of a student by clicking the View button — personal details, class, and parent information.

Exam Receipt
Support Staff can view and download exam hall receipts (admit cards) for students.

6) Exams
Support Staff can view the exam list and exam timetables for all classes, helping them coordinate exam logistics.

View Exam Timetable
Support Staff can view the exam timetable showing all subjects, dates, and time slots for each class's exam.

11) Payment

Support Staff can view payment records, income entries, and expense entries as per their access rights configured by the admin.
12) Transport
Support Staff can view and manage transport routes, vehicles, and driver details for the school transport system.
Add Transport
Support Staff can add new transport routes and assign drivers and vehicles to each route.
1) Teacher
Support Staff can view and manage the complete list of teachers, add new teacher profiles, and view individual teacher details.
View Teacher
3) Parent
Support Staff can manage parent records — add new parents, link children, and view parent profiles.
View Parent
4) Subject
Support Staff can view and add subjects — enter subject code, name, class, and assigned teacher.
5) Attendance
Support Staff can manage daily attendance for all classes — mark present/absent and notify parents of absent students via SMS.
7) Leave
Support Staff can manage student leave requests — add, edit, approve, or reject leave applications.
Add Leave
Edit Leave

8) Manage Marks
Support Staff can enter, update, and export student marks per class and subject. They can also add marks for multiple subjects simultaneously.

9) Homework
Support Staff can manage homework assignments — add new homework, view student submissions, and evaluate submitted work.
Add Homework
View Submissions

10) Hostel
Support Staff can manage hostel facilities — add hostels, rooms, and beds, and assign beds to students.


13) Notice
Support Staff can view and add notices for teachers, students, parents, or all users.
Add Notice
View Notice
14) Message
Support Staff can send and receive messages to all user groups — students, teachers, and parents.

Compose Message

Reply & Sent Box


15) Holiday
Support Staff can view and add school holidays to the holiday calendar.
Add Holiday
16) Library
Support Staff can manage the school library — add books, issue and return books, and track the member list.

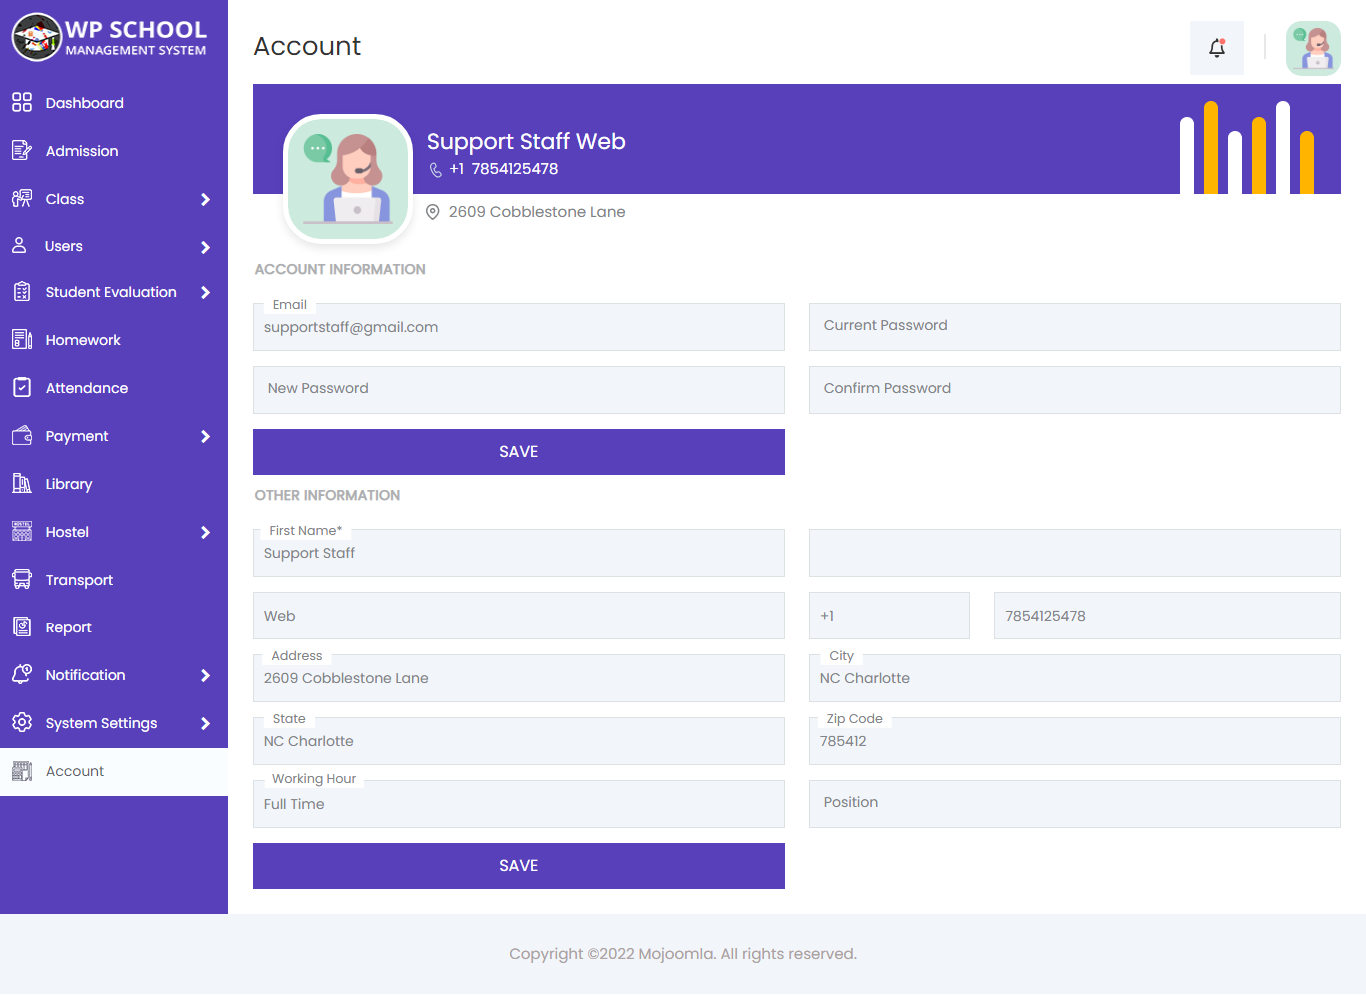
17) Account
Support Staff can view and edit their own profile — update personal details and change their account password.
Update Plugin
To update the plugin, follow the same steps as the initial installation. Upload the new ZIP file via the WordPress dashboard, then reactivate. All your data remains fully intact after updating.
- Deactivate the current version from Plugins → Installed Plugins in your WordPress dashboard.
- Delete the old plugin (your data is stored in the database and will not be lost).
- Go to Plugins → Add New → Upload Plugin and upload the new
mjschool.zipfile. - Click Install Now, then Activate the plugin.
- After activation, the system automatically applies any required database updates while keeping all existing data intact.
Always take a full database and files backup before performing a plugin update. Go to General Settings → Deactivate → Activate after uploading new files to ensure database table names and option names are correctly updated.
Import File
You can bulk-upload data for Students, Teachers, Support Staff, Parents, and Attendance via CSV files. A sample template file is provided inside the plugin package for each data type. Download the sample, fill in your data, and upload using the import popup in each section.
Upload Student CSV File
Go to the Student section and click the Import button. Download the sample CSV, fill in student data following the column format, then upload.
Import with Custom Field Values
To import custom field data: copy the exact Custom Field label name from the Custom Fields section and use it as a column header in your CSV. Detailed instructions are shown inside each import popup.
Always use the exact Custom Field label name as the CSV column header. Follow all instructions shown in the import popup before uploading.
Mobile App Settings
The School Management System includes a companion mobile app available for both iOS (via APNs) and Android (via Firebase FCM). Activate it by registering your Envato license key in the Mobile App Settings section.
License Verification
Go to General Settings → Mobile APP Settings → License Verification to activate Mobile APP access. Fill in all required fields. You can access the Mobile APP only after successfully registering your Envato License key. A single license key can be used for one domain only — the same key used for the plugin.
Icon Settings
Go to General Settings → Mobile APP Settings → Icon Settings to configure dynamic icons for the Mobile App.
Raise Request by Admin
If your license key requires re-verification or you need to raise a support request directly from the admin panel, use the Raise Request option in the Mobile App Settings.
Push Notifications
Save your FCM Key (Firebase Cloud Messaging) in General Settings to enable push notifications on Android devices. For iOS, configure your APNs certificate in the same section.
API URL
The plugin exposes REST API endpoints for mobile app integration. Base API URL pattern:
https://yourdomain.com/wp-json/schoolmanagement/v1/
All endpoints require authentication via license key and user credentials. See the mobile app docs for the full endpoint reference.
Security Concerns
WordPress Security Settings
1) .htaccess File
Add code in .htaccess
To enhance security and prevent unauthorized access to sensitive configuration files that may contain usernames and passwords, you should restrict access through the .htaccess file.
Add the following code to your .htaccess file:
<FilesMatch "(^\.|wp-config(-sample)*\.php)">
  Order Deny,Allow
  Deny from all
</FilesMatch>
<Files ~ "^\.ht">
  Order allow,deny
  Deny from all
</Files>
To secure your WordPress site, it's important to deny access to files that could expose sensitive information. Add the following code to your .htaccess file to restrict access to common configuration and backup files:
<FilesMatch "(liesmich.html|faq.html|readme.html|license.txt|faq.txt|credits.html|(.*)\.ttf|(.*)\.bak)">
  Order Deny,Allow
  Deny from all
</FilesMatch>
<FilesMatch "^.*(error_log|wp-config.php|robots.txt|php.ini|.[hH][tT][aApP].*)$">
  Order deny,allow
  Deny from all
</FilesMatch>
<Files .htaccess>
  Order allow,deny
  Deny from all
</Files>
<Files install.php>
  Order allow,deny
  Deny from all
</Files>
<Files fantastico_fileslist.txt>
  Order allow,deny
  Deny from all
</Files>
<Files fantversion.php>
  Order allow,deny
  Deny from all
</Files>
Blocking access to xmlrpc.php prevents attackers from abusing the XML-RPC endpoint to perform authentication brute‑force attacks, pingback amplification, or other remote RPC calls. Add the following to your .htaccess to deny web access to xmlrpc.php:
<Files xmlrpc.php>
  Order Deny,Allow
  Deny from all
</Files>
Use the code below to apply these settings and reduce the risk of information disclosure through directory listing:
<IfModule mod_rewrite.c>
  RewriteEngine On
  RewriteBase /
  RewriteRule .* - [E=HTTP_MOD_REWRITE:On]
  <FilesMatch "">
    <IfModule mod_headers.c>
      Header set Cache-Control "max-age=300, public"
      Header add Strict-Transport-Security "max-age=31415926;includeSubDomains;"
      Header set X-XSS-Protection "1; mode=block"
      Header always append X-Frame-Options DENY
      Header set X-Content-Type-Options nosniff
    </IfModule>
    <IfModule mod_headers.c>
      Header unset Server
      Header set Connection keep-alive
      Header always unset X-Powered-By
      Header unset X-Powered-By
      Header unset X-CF-Powered-By
      Header unset X-Mod-Pagespeed
      Header unset X-Pingback
    </IfModule>
  </FilesMatch>
</IfModule>
Using the code below you'll tighten HTTP responses to reduce useful information an attacker can harvest when banner‑grabbing.
<IfModule mod_headers.c>
  Header set Cache-Control "max-age=300, public"
  Header add Strict-Transport-Security "max-age=31415926;includeSubDomains;"
  Header set X-XSS-Protection "1; mode=block"
  Header always append X-Frame-Options DENY
  Header set X-Content-Type-Options nosniff
</IfModule>
To prevent unauthorized access to the error_log file, you can use the following .htaccess rule:
<FilesMatch error_log>
  Order Allow,Deny
  Deny from all
</FilesMatch>
The following .htaccess rule adds a Content Security Policy (CSP) header that prevents your site from being embedded on other domains:
<IfModule mod_headers.c>
  Header always set Content-Security-Policy "frame-ancestors 'self';"
</IfModule>
The following .htaccess code helps reduce CSRF risks by setting essential headers:
<IfModule mod_headers.c>
  Header set X-Content-Type-Options "nosniff"
  Header set X-Frame-Options "SAMEORIGIN"
  Header set Referrer-Policy "strict-origin-when-cross-origin"
</IfModule>
Use it to prevent direct language-switching via URL parameters which can be abused to expose templates or bypass language controls.
<IfModule mod_rewrite.c>
  RewriteEngine On
  RewriteCond %{QUERY_STRING} wp_lang= [NC]
  RewriteRule ^(.*)$ / [R=403,L]
</IfModule>
This .htaccess rule attempts to block common SQL-injection payloads found in query strings (quotes, comment markers, keywords like union, select, etc.) by returning a forbidden response when matched.
<IfModule mod_rewrite.c>
  RewriteEngine On
  RewriteCond %{QUERY_STRING} (\%27)|(\')|(\-\-)|(%23)|(#) [NC,OR]
  RewriteCond %{QUERY_STRING} (\*|union|select|insert|cast|set|declare|drop|update) [NC]
  RewriteRule ^(.*)$ - [F,L]
</IfModule>
Block attempts to force language selection via the wp_lang query parameter. Requests containing wp_lang= will be denied to reduce the risk of template information exposure or unwanted template rendering via URL manipulation.
<IfModule mod_rewrite.c>
  RewriteEngine On
  RewriteCond %{QUERY_STRING} wp_lang= [NC]
  RewriteRule ^(.*)$ / [R=403,L]
</IfModule>
To prevent SQL‑injection attempts targeting parameter:
<IfModule mod_rewrite.c>
  RewriteEngine On
  RewriteCond %{QUERY_STRING} (^|&)p= [NC]
  RewriteRule ^(.*)$ - [F,L]
</IfModule>
This rule applies a strict Content Security Policy (CSP) header to the sitemap.xml file, allowing only resources loaded from the same origin ('self'). It restricts scripts, styles, and images to improve security by blocking external content.
<Files "sitemap.xml">
  <IfModule mod_headers.c>
    Header set Content-Security-Policy "default-src 'self'; script-src 'self'; style-src 'self'; img-src 'self';"
  </IfModule>
</Files>
2) wp-config file
These settings enhance your WordPress site's security by removing server version info, preventing clickjacking, and securing cookies.
header_remove("X-Powered-By");
header('X-Frame-Options: SAMEORIGIN');
define('COOKIE_SECURE', true);
define('COOKIE_SAMESITE', 'None');
3) Add code in function.php file in theme
This helps stop simple attempts to inject malicious values into the post ID parameter.
add_action('init', function() {
  if (isset($_GET['p']) && !ctype_digit($_GET['p'])) {
    wp_die('Invalid parameter');
  }
});
The plugin works best on cPanel/WHM-enabled hosting. Usage/installation on Nginx or Plesk is not recommended — support will not be provided for those environments. Always back up your .htaccess file before making changes.
Frequently Asked Questions
The Plugin works best on cPanel/WHM-enabled hosting. Usage/installation on Nginx / Plesk is not recommended and we will not be able to provide support for the same.
Don't worry, You can create login form anywhere of your frontend page. You can add login form in two ways:
- By using shortcode
[smgt_login]anywhere at any page - Using
do_shortcode("[smgt_login]")at template page
You can also create registration page form anywhere on your frontend side. You can add registration form in two ways:
- By using shortcode
[smgt_student_registration]anywhere at any page - Using
do_shortcode("[smgt_student_registration]")at template page
You can also create Admission page form anywhere on your frontend side. You can add Admission form in two ways:
- By using shortcode
[smgt_student_admission]anywhere at any page - Using
do_shortcode("[smgt_student_admission]")at template page
If you want any paid customization as per your requirement in this plugin, you can contact us at sales@mojoomla.com.
Increase the WordPress memory limit to 256M. Add define('WP_MEMORY_LIMIT', '256M'); to wp-config.php — or update .htaccess with the PHP limits shown in the Installation section.
Simply Deactivate then Activate the plugin from the WordPress Plugins screen. Database tables and option names update automatically — no data is lost.
Go to General Settings → Student Approval and disable the option. When disabled, students must wait for admin approval before their first login.
Set up a server cron job running every 24 hours pointing to recurring_invoices.php in the plugin folder. Also ensure the Recurring Invoice option is enabled in General Settings.
Create new WordPress pages and add the shortcodes manually: [smgt_login] for Login, [smgt_student_registration] for Registration, [smgt_student_admission] for Admission. Then add the pages to your navigation menu.
Go to General Settings → Class Setting, change the organization type to University, check Enable Class Room, and save.
Yes — go to Students → Upload CSV. Download the sample CSV template, fill it in, and upload. For custom field data, use the exact custom field label as the CSV column header.
Enable Virtual Classroom in General Settings. Enter your Zoom Client ID and Client Secret. Copy the Redirect URL from settings and paste it into your Zoom app's redirect URI field. Save settings.